Category: Book Reviews

Review of books I have read or listen to!

Finding Dorie (Vanilla Polka Dot Cookies)

Finding Dorie (Vanilla Polka Dot Cookies)

Rock and rollers, Tom Cruise, that Bieber Kid, they all have their groupies.   I am a Dorie groupie.  Yep, not ashamed to admit it. Dorie is the bomb. Are you wondering-who?  Not that hilarious little blue fish in Finding Nemo? No.  “You mean Ellen DeGeneres who voices that cute little fish?”  Nope.  I am a fan of Dorie, Dorie Greenspan-cookbook author, dessert queen, cookie connoisseur and baker extraordinaire.

The Real Deal

I recently drove up to the City to see her at Omnivore Books, one of many tour stops (how does she do it?) for her newest book, Dories Cookies.  A hefty compendium of deliciousness that, yes, is all about the cookie.  Her recipe for Jammers, a buttery sable’ topped with jam and streusel alone makes it worth getting.  I don’t know Dorie on a personal level, but she is gracious, humorous and generous-one of the nicest souls you’ll meet.  This comes across when meeting her in person and in her writing.

Me and Dorie
Here I am with Dorie!

All this, and her cookbooks are REALLY, REALLY good.  The recipes are well written, easy to follow, and the results are YUMMY.  Before heading to the book signing I spent an agonizing few minutes trying to pick which book of hers I wanted her to sign (I literally have all of them).  I went with the first Dorie book I ever bought, Paris Sweets.  It contains her iconic recipe for Korova Cookies, aka World Peace Cookies and has the loveliest illustrations.

Mr. Greenspan

As I waited in line, I talked to Dorie’s husband Michael.  Wouldn’t you know it, he is just as nice! The list of recipes I have tried from Dorie’s books grows ever longer and this newest book will definitely add to it. Right about now is when I start looking in earnest for cookie recipes for the holidays. I opened the book and bam, Vanilla Polka Dot Cookies caught my eye.  The cookie starts with a buttery, vanilla laden dough made with egg whites.  The dough smelled so delicious, I had to stop myself  from dipping my finger in the bowl and popping a swirl of dough in my mouth.

The dough comes together quickly and can be used for this recipe immediately. Scoop, roll and dip.  Place the balls on a lined baking sheet press to flatten and bake.  How easy is that?

dsc05008

The dough does not spread so press the cookies to desired thickness.  I wanted a flatter thinner cookie, a smaller cookie, approximately 2.5 inches in diameter.  I used a tablespoon ice cream scoop to portion the dough.  The cookies took only 14 minutes to bake, well short of the suggested 20-22 minutes. My cookies were much smaller which accounts for the shorter baking time.  Watch the cookies carefully when baking, they brown very quickly.  All in all these fit the bill for a crispy, buttery festive cookie perfect for the holidays.  I brought them to Thanksgiving dinner and the kids gobbled (get it?) them up.

dsc05018

The recipe for these cookies can be found here along with her recipe for World Peace Cookies, courtesy of the Star Telegram.  If you are a Dorie fan like me, take a photo of any of Dorie’s cookies you make from her book, post it on Twitter or Instagram, and tag it with #Doriescookies and @Cookies4Kids. This will automatically trigger a 5 dollar donation to pediatric cancer research, woohoo!  Thanks and HAPPY HOLIDAYS.


Review: Martha Stewart’s Vegetables

Review: Martha Stewart’s Vegetables

Early adopter.  That’s how I would describe myself when it comes to Martha Stewart.  Years ago I invested in a copy of Entertaining the book that put her on the map.  In a tiny apartment, on a student’s budget, I dreamed of hosting a Hawaiian luau or an elegant holiday soiree’. Ok, never did the luau or soiree’ but I have used many of her recipes and tweaked her entertaining ideas.

But it has been quite awhile since I have picked up one of her books.  But Vegetables caught my eye.  We have made a concerted effort to eat more vegetables and less meat, this book was right up our alley.   First, this is not a vegetarian cookbook.  Though vegetables are definitely the star of this book there are quite a few recipes that contain meat or seafood.  Each and every recipe has a beautiful photo of the finish dish.  How cool is that?  The photos are up close, clean with simple backgrounds so focus stays on the food. The book is divided by type of vegetable such as bulbs, roots, tubers, greens and stems.  Each chapter starts with an introduction covering seasonality, buying, storing, prepping, flavor pairings and cooking.  Recipes are straight forward and uncomplicated.  Helpful hints are offered in sidebars.  As I flipped through the pages I bookmarked quite a few recipes to try.

Always looking for new ways to serve carrots I tried rainbow carrots and chard. The vegetables are steamed and drizzled with a citrus vinaigrette.  Colorful and appetizing perfect for a summer or fall meal.  Quick and easy.  I tackled the recipe for leek and parsnip soup next. Parsnips, I have to admit, is not a vegetable I cook very often, actually ever.  Loved it.  The parsnips give the soup a sweet earthy flavor, a nice twist to the classic potato leek soup.  I also managed to make the lone dessert recipe in the book.  Cornmeal shortcakes with corn ice cream and blueberry compote.  I substituted vanilla ice cream for the corn ice cream but if Santa brings me an ice cream maker with its own compressor (hint hint) I’ll definitely try the corn ice cream.  The shortcakes were buttery with a slight crunch from the cornmeal and the lemony blueberry compote a lovely accompaniment.

I received this book from Blogging for Books and I recommend it to anyone wanting to expand their “veggieverse”.   It’s filled with simple, delicious recipes with gorgeous photos and plenty of valuable information.  It’s a good thing.

corn-shortcakes

Here is a link to Cornmeal Shortcakes from Martha Stewart’s Living.  It is not exactly the same as the one in the cookbook. The difference being instead of 3 cups of all purpose flour the book’s recipe calls for 1 1/4 cups AP flour and 3/4 cup fine cornmeal.


Book Review: The Dim Sum Field Guide

Book Review: The Dim Sum Field Guide

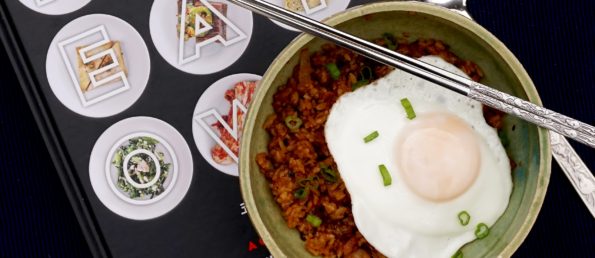
The Dim Sum Field Guide: Not For the Novice Dim Sum Eater

9781607749561_p0_v1_s192x300

I love dim sum so I jumped at the chance to review Carolyn Phillips’ “The Dim Sum Field Guide”.  My first impression of the book was, quite honestly, underwhelming.  “There aren’t any photographs,” I lamented to my hubby.  “Only line drawings of each tasty morsel and in black and white no less.  How is this going to help the dim sum newbie navigate the chaotic, intimidating hustle and bustle of a Chinese Tea House?  In this day and age a field guide should have photos of each entry, not line drawings.”  Disappointed, I put the book aside.
A few days later I picked up the book again this time spending a bit more time perusing it.  There is an introduction to and history of dim sum, dim sum etiquette and a funny, all too true, bit on fighting over the bill.  The book is divided by savory and sweet and then further divided by wrapped or not wrapped, method of cooking, and hot or cold.  Frankly, it was confusing, but then again, dim sum is comprised of hundreds of different dishes and virtually impossible to neatly categorize.
Each dish has two pages.  One is the line drawing and the other is best described as a taxonomy of each item with origins (history), nesting habits (how many in an order) and species (variations).  Also listed was a pronunciation guide in Mandarin and Cantonese with the name of each dish in Chinese characters.  The line drawings are very nice but one would be hard pressed to identify or differentiate many of the dishes from the drawings.  I did like the origins section which presented little factoids about each dim sum that I never even thought about.  Basic fillings are listed for each. Whether a dish contains pork, seafood or beef or if it is vegetarian or vegan is also noted.
This is my first review for Blogging for Books.  I am a bit bummed that it isn’t a glowing review where I finish with the tag line-You need to get this book NOW!.  However, it is a cute coffee table worthy book with interesting tidbits about dim sum.  Fortunately, I am not new to dim sum so I know what I am ordering, but I am going to sound pretty smart the next time I take my friends to a Chinese teahouse.
(Coconut Cookie Sticks) Cuckoo for Coconuts by Alice Medrich

(Coconut Cookie Sticks) Cuckoo for Coconuts by Alice Medrich

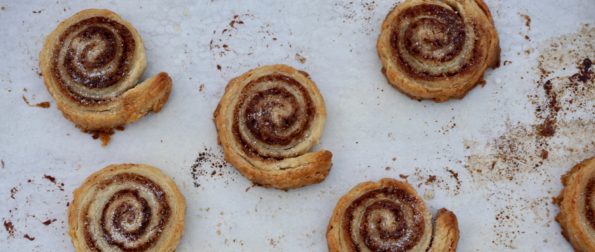
I snappd this photo at Black Sand Beach on the Big Island.  When I saw the sign on the tree, one of my favorite cookies just popped into my head, Alice Medrich’s Coconut Sticks.  Hmmm….I wonder why?  I love her coconut sticks.  A riff on biscotti, they often end up in a holiday cookie tin or in a cellophane bag with a cute ribbon as an appreciative thank you gift.

CoconutsNowadays I often find myself using coconut in my cooking & baking.  This is SO surprising since for as long as I can remember I have HATED coconut. As a kid the sight of coconut anything, cake, cookies candy elicited an automatic “Ewwww!” The feeling persisted well into adulthood.  Maybe it’s age, but I have grown to like coconut right along with brussels sprouts and naps.

With my changed coconut conviction. I have jumped off the deep end.  Curries without coconut milk, not happening. My Ranger cookies and World’s Best Cookies are made with shredded coconut, definitely bumping up the chewiness and flavor.  And of course, every batch of homemade granola has flaked coconut for that extra zing and crunch.

It’s like a new found secret weapon

I love making and nibbling on these Coconut Sticks. Thin, crispy and buttery with shreds of coconut dancing through, they are the perfect foil for a steaming cup of tea or that morning latte.  This recipe comes from Alice Medrich’s book Chewy, Crispy, Crunchy Melt-in-Your Mouth Cookies.  If you love cookies add this book to your collection.

Did I mention these crunchy wonders are EASY to make?  Well of course they are, you can make the dough by hand or in a food processor (ah, yes-thereby upping them to the STUPID EASY category).  Another wonderful slice and bake refrigerator cookie.  Press the dough into a loaf pan.  Chill.  Slice.  Bake.  Eat.  Donzo.  Easy Peasy.

What took me so long to become a coconut convert?  I don’t know.  Guess I will have to make up for lost time.

Life is good, dream coconuts.

Coconut Sticks Dough

Cuckoo for Coconuts (Alice Medrich's Coconut Sticks)

Buttery coconut cookie sticks.
Course cookies, desserts
Cuisine American
Keyword Coconut Cookie Sticks
Prep Time 20 minutes
Cook Time 15 minutes

Ingredients

  • 1 1/4 cups 5.625 ounces unbleached all-purpose flour
  • 2/3 cup 4.625 ounces sugar
  • 1 cup ~3 ounces shredded dried unsweetened coconut
  • Scant 1/2 teaspoon salt
  • 6 tablespoons cold unsalted butter
  • 1 teaspoon pure vanilla extract
  • 2 tablespoons cold water

Instructions

  • Prepare: A 5-x-9-inch loaf pan, lined on the bottom and sides with foil or plastic wrap
  • Put the flour, sugar, coconut, and salt in a large mixing bowl and whisk to blend.
  • Cut the butter into the flour mixture with a pastry blender or two knives until the butter is reduced to small pieces.
  • With the fingertips of both hands, lightly toss and rub the mixture together until the mixture resembles coarse meal.
  • Combine the vanilla and cold water in a small pitcher or cup.
  • Stir the flour and butter mixture with a fork while drizzling the water and vanilla into the bowl. Continue to toss and stir lightly with the fork or your fingers until all of the dry ingredients are slightly damp. The dough should remain crumbly and stick together only when pinched.
  • Food Processor method: Place flour, sugar, coconut and salt in food processor bowl. Pulse 2-3 times to combine.
  • Cut butter into 1/2 inch cubes and scatter on top of flour mixture. Pulse until mixture reveals coarse meal. Small lumps are okay.
  • Combine water and vanilla extract in small cup. Continue to pulse the flour mixture and drizzle water into processor bowl.
  • Pulse into mixture starts to clump. It should not come together completely but will still be crumbly. It will stay together if pinched.
  • If using a loaf pan, dump the mixture into the lined pan and spread it evenly. Press it very firmly, making a thin layer. Or dump the mixture onto a piece of foil on a baking sheet and distribute it evenly over an area about 4 by 9 or 10 inches. Press it firmly, squaring up the edges, to make an even compact layer about 1/2-3/4 inch thick. Fold the foil over the dough and wrap it tightly. Refrigerate for 2 hours or overnight.
  • Preheat the oven to 350°F. Position racks in the upper and lower thirds of the oven.
  • Unwrap the dough and transfer it to a cutting board. Use a long sharp knife to cut the dough crosswise into 1/4-inch (or thinner if possible) slices. Use the knife to transfer each slice to the lined or greased cookie sheets, placing the slices 1 inch apart. The slices will be fragile and require the support of the knife in transit; the results will be worth your careful effort.
  • Bake for 11 to 14 minutes (baking time will vary depending on thickness of cookie), until the cookies are golden with golden brown edges. Rotate the pans from top to bottom and from front to back halfway through the baking time to ensure even baking.
  • For lined pans, set the pans or just the liners on racks to cool; for unlined pans, use a metal spatula to transfer the cookies to racks. Cool the cookies completely before stacking or storing.
  • May be kept in an airtight container for several days.
Food, Food Can Bring Us Together (Turkey & Zucchini Burgers)i

Food, Food Can Bring Us Together (Turkey & Zucchini Burgers)i

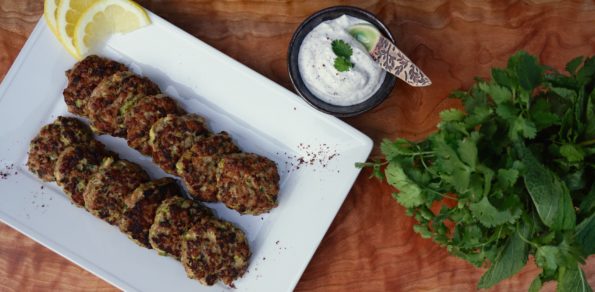
Wes planted 2 squash plants this season and I am totally dumbfounded by the number of squash you get from 2 plants…and apparently all at once.  Looking for recipes that will put a dent in the supply of zucchini that is monopolizing my vegetable crisper.

TurkeyZucchiniMeatballs

I remembered a recipe I had tried from cookbook author Ottolenghi, turkey and zucchini burgers with a yogurt sumac sauce.  If you have not checked out any of his cookbooks, please do.  This tasty recipe comes from his book Jerusalem.  It is filled with beautiful photos and stories about the food and the city. The recipes are filled with bold, bright flavors of which most were new to me.  The book is a collaboration between Yotam Ottolenghi and Sami Tamimi.  What I love is Yotam is Israeli and Sami is Palestinian. Both spent their childhoods in Jerusalem, growing up on opposite ends of the city.  Their mutual love of food brought them together in London.  Sharing food brings people together and hopefully helps to transcend our differences.

This dish is easy to prepare, healthy and tasty.  The burgers are made with ground turkey and grated zucchini.  The addition of mint, cilantro, scallions, cumin, cayenne and garlic makes it a party in your mouth.
A dipping sauce of yogurt and sour cream sauce is a cool and refreshing counterbalance to the meat patties.

DSC04441 (1)The sumac in the sauce, an herb that is both tart and fragrant further enhances the dish.  It can be found at Whole Foods, any Middle Eastern store or online.  Though you can increase the lemon in place of the sumac, try to find it.  It has a fragrant, fruity dimension that the lemon does not that I think really sets it apart.  We ate them with a bit of rice the first night and then stuffed in pita bread and topped with tomatoes and fresh grilled corn the following day for lunch.  Yums. Really versatile and almost better the next day as the flavors have had a chance to blend.

Try this recipe and check out the Ottolenghi cookbooks, breathtakingly beautiful and a joy to read.  If you are like me it will open doors to new flavors and foods.

Turkey and Zucchini Burgers with Sumac Sauce

Ingredients

Burgers

  • Approximately 1 pound or 500g ground turkey or chicken
  • 1 large zucchini coarsely grated (about 200g in total about 2 cups)
  • 3 green onions thinly sliced
  • 1 large egg
  • 2 tbsp chopped mint
  • 2 tbsp chopped coriander
  • 2 garlic cloves crushed
  • 1 tsp ground cumin
  • 1 tsp salt
  • ½ tsp course ground black pepper
  • ½ tsp cayenne
  • ~ 1/4 cup of vegetable oil for searing

Sour cream & sumac sauce:

  • 1/3 cup sour cream
  • 2/3 cup Greek yoghurt
  • 1 tsp grated lemon zest
  • 1 tbsp lemon juice
  • 1 small garlic clove crushed
  • tbsp olive oil
  • 1 tbsp sumac
  • ½ tsp salt
  • ¼ tsp black pepper

Instructions

Yogurt sauce

  • In a medium sized bowl, combine ingredients for sauce and mix thoroughly. Place in refrigerator to set and chill while making burgers.
  • The sauce will mellow with time, feel free to add a bit more sumac and lemon juice to taste.
  • Preheat oven to 425 degrees.

Burgers

  • Combine ingredients for burgers in bowl, mixing gently. The mixture is pretty wet. You can omit the egg or squeeze some of the liquid out of the zucchini to make forming patties a little easier.
  • Form patties in desired size. I used a 1/4 cup ice cream scoop which made smaller sized patties roughly 1.5 ounces in weight. This made about 15 appetizer sized patties.
  • Sear over medium high heat and place on parchment or silpat lined baking sheet.
  • Bake in oven for 6-8 minutes.
  • Serve with yogurt sauce.


All Things Reconsidered (Raspberry Diamants)

All Things Reconsidered (Raspberry Diamants)

Not all was amazing during our impromptu trip to New York for my cousin Mike’s surprise party in January (here is the good stuff though, from my The Big Apple post).  After visiting Ground Zero, we headed to Payard’s, a well known French bakery with an outpost on Houston Street.  All I can say is maybe it was an off day, but the pastries were disappointing at best.  We ordered a lemon tart, an oatmeal cookie and a Napoleon.  The Napoleon and cookie weren’t memorable at all, which is a good thing because the lemon tart was memorable because it was NOT good.  The crust (I love crust) was so tough we had to use our knife and fork to chisel through it.

Ugh, so Disappointing

I went up to the counter (ok, never said I wasn’t obnoxious) and asked “what one item in here would prove to me that Payard is worth his reputation.  To her credit she laughed and gave me a complimentary slice of the Payard Tart.  It was ok, definitely better than the lemon tart.

DSC04409

Anyway You Slice It

When we first arrived I spied his book Payard Cookies on display and my reaction was oh nooo, not another cookbook and its about cookies!  My cookbook addiction was about to rear it’s ugly head since I seldom pass up the opportunity to add to my collection.

After trying the desserts I walked out without a copy.

You might be asking where is this story going?  Well, having put Payard Cookies out of my mind I was perusing a favorite blog, Ipso-Fatto recently and to my surprise she had posted glowing reviews of a couple of cookies from Payard.  Well, maybe we did catch Payard on a bad day. I tried the Raspberry Diamants and you know, they’re pretty darn good and a breeze to make.

It is a slice and bake cookie which I love, so flippin’ easy.  You can make the dough in advance and leave it in the fridge.  You can bake as many or as few as you want and freeze the remaining dough for a rainy day.  These cookies are a riff on sables’, the French version of shortbread cookies.  Diamont, French for diamonds, refers to the sparkly edge on the cookies created by rolling the dough in coarse sugar before baking.  Description done, let’s go make some delicious cookies!

It’s Berry Good

Adding raspberry jam makes this cookie a little softer than a classic sable’.  Which gives the cookies a sweet tart flavor and flecks of red color.  Payard adds red food coloring to the dough to make the cookies pink but I didn’t.  Use jam with seeds, it adds a bit of crunch.  You can kick these cookies up a notch by making a sandwich cookie using raspberry jam for the filling or a raspberry buttercream.  Oh snap.

Uh-oh looks like I may be adding yet another cookbook to my collection.

All Things Reconsidered (Raspberry Diamants from Payard)

Prep Time 20 minutes
Total Time 45 minutes

Ingredients

Adapted from Payard Cookies

  • 14 tablespoons 200gms unsalted butter, room temperature
  • 2/3 cup 80 gms powdered sugar
  • 1 large egg yolk reserve egg white
  • 1/4 cup 60gms raspberry jam with seeds (I used TJ's)
  • 1-3 drops of liquid red food coloring optional
  • 1 3/4 cups 225gms all purpose flour
  • Pinch of salt
  • 1 cup 200gms granulated sugar or sanding sugar

Instructions

  • In a mixer fitted with the paddle attachment, beat softened butter with powdered sugar until fully combined. Add egg yolk, raspberry jam, and food coloring. Mix until well combined.
  • Add flour and salt and mix only until dough comes together. Careful to not overmix.
  • Place dough on piece of parchment paper and roll into a log about 1 1/2 inches in diameter. Freeze dough for approximately 2 hours, or until log is chilled all the way through. You can freeze dough for up until one month.
  • Preheat oven to 350 degrees. Line baking sheet with parchment.
  • Remove dough from fridge. Put granulated sugar in a large rimmed baking sheet.
  • Brush the reserved egg white on the outside of the cookie dough.
  • Roll in granulated sugar until completely coated. Return to fridge for 5 minutes to chill.
  • Remove from fridge and slice roll into 1/4 inch slices. Place on parchment lined sheet approximately 1 inch apart.
  • Bake for 8-10 minutes or until cookies just begin to turn color and the edges are golden brown.
  • Remove cookies from oven and transfer to a cooling rack. Cool completely and store in an airtight container for up to one week.
When Life Gives You Lemons…Make Lemon Bars!

When Life Gives You Lemons…Make Lemon Bars!

Who doesn’t love lemon bars?  But just to be sure, I do have two recipes for lemon bars to cover just about everyone.

For the longest time, my favorite Lemon Bar was from Michael Bauer’s column in the San Francisco Chronicle.  A classic lemon bar with a meltingly tender crust topped with a sweet lemon curd and dusted with powdered sugar.  These bars were the hidden gems in a summer picnic basket or the citrus foil to the chocolate cookies on the holiday cookie tray.

Along came Alice

….Medrich that is, the chocolate maven. She penned a wonderful little cookbook simply titled Cookies and Brownies (still available luckily).  Fifty recipes of classic cookies to cookies with a twist.  Hands down the best snickerdoodle, delicious butter cookies with pecans and cocoa nibs, and Steve’s brownies, fudgy and decadent.  For years I shied away from the bar cookies in her book.  The recipe started with melting the butter for the crust.  Whaaat?  Melted butter for a shortbread crust?  Just didn’t seem right.  I finally gave in and I am glad I did.  These lemon bars are a party in your mouth, the classic lemon bar amped up.  The crust is buttery and crispy crunchy not soft, the perfect foil for the filling which is sweet but tart enough to make your taste buds stand up and take notice.

The next time you make lemon bars, make the classic bars if you are feeding a swarm of little kids.  They’ll love them.  But if you are taking them to your friends, make Alice’s version, all grown up with attitude, just like us!

This recipe can be baked in a tart pan, once again upping the wow game on these bars. After pressing the dough into the pan, freeze for 15 minutes before baking.  If the crust puffs while baking, poke it back down with a fork.  To ensure it keeps its shape weigh the crust down with pie weights and remove about halfway through baking.  Remember to bake to a rich deep golden brown for a crispy, buttery crust.

Alice's Lemon Bars

A grown-up version of Lemon Bars from Alice Medrich. Tart lemon filling in a buttery, crisp base, absolutely delicious.
Course bar cookies, cookies, Dessert
Cuisine American
Keyword alice medrich, buttery, lemon, Lemon Bars, lemon curd, tart
Prep Time 30 minutes
Cook Time 1 hour

Ingredients

For crust:

  • 8 tbsp unsalted butter, melted 1 stick
  • 1/4 cup granulated sugar
  • 3/4 tsp vanilla extract
  • 1/4 tsp regular table salt or sea salt
  • 1 cup all-purpose flour

For topping:

  • 1 cup plus 2 tbsp granulated sugar
  • 3 tbsp all-purpose flour
  • 3 large eggs
  • 1 -1/2 tsp finely grated lime or lemon zest
  • 1/2 cup strained freshly squeezed lime or lemon juice
  • Powdered sugar for dusting

Instructions

  • Position a rack in lower third of oven and preheat oven to 350 degrees. Line bottom and sides of 8- by 8-inch baking pan with aluminum foil.

To make crust:

  • In a medium bowl, combine melted butter with sugar, vanilla and salt. Add flour and mix until just incorporated. Press dough evenly over bottom of pan. Freeze dough for 15-20 minutes until firm. Start filling while dough chills.
  • Bake 25 to 30 minutes, or until crust is fully baked, well-browned at the edges and golden brown in the center. If dough bubbles poke a few holes in it andpat it down.

To make topping:

  • While crust is baking, stir together sugar and flour in a large bowl until well-mixed. Whisk in eggs. Stir in lime or lemon zest and juice. When crust is ready, reduce heat to 300 degrees, slide rack with pan out and pour filling onto hot crust. Bake 20 to 25 minutes longer, or until topping no longer jiggles when pan is tapped.
  • Remove from oven to a wire rack to cool completely. Lift up foil liner and transfer bars to a cutting board. If surface is covered with a thin layer of moist foam (not unusual), blot surface gently with a paper towel to absorb excess moisture; repeat with a fresh piece of paper towel if necessary.
  • Using a long, sharp knife, cut bars into 16 or 24 daintier bars and sift powdered sugar over bars, if desired. Stored in an airtight container, bars can be refrigerated for up to 3 days.
  • I bake my lemon bars in a rectangular tart pan with removable bottom. It gives the bars a nice side crust and a nice finished look. The idea came from the blog Baking Obsession Check it out for instructions to bake in a rectangular pan.
The 3Jamigos Favorite Pasta Sauce #1

The 3Jamigos Favorite Pasta Sauce #1

What kid doesn’t like pasta?  My kid’s favorite spaghetti sauce is from Patricia Well’s Trattoria cookbook, a collection of well written, easy to follow Italian recipes, nothing too fancy just delicious, homestyle classic meals.  Meat sauces (Ragu’) generally require hours of cooking but this recipe calls for simmering for approximately 20 minutes.  It has lots of flavor and tastes fresh and light.  You start with a onions, carrots and celery which gives the sauce  sweetness which appeals to kids.  Over the years I have tweeked the recipe a little..like adding butter and basil to finish the sauce, yum.

DSC01963_2

So if you are looking for a meat sauce with kid appeal, look no further, this is it!

A little Dino to put you in the pasta mood:

The 3Jamigos Favorite Pasta Sauce #1

Course Main Course
Cuisine Italian
Keyword pasta, Ragu'
Prep Time 15 minutes
Cook Time 20 minutes
Total Time 35 minutes
Servings 1 .5 quarts

Ingredients

  • 1 small yellow onion chopped finely almost minced
  • 1 carrot peeled chopped finely almost minced
  • 1 stalk of celery chopped finely almost minced
  • 2 cloves garlic minced
  • 1/4 cup italian parsley chopped
  • 1 tsp salt
  • 1/2 -1 tsp chili flakes omit if using spicy Italian sausage
  • 8- 12 ounces of a mix of ground beef ground pork and ground veal or you can use 50/50 beef and italian sausage, spicy or mild
  • 1/4 cup vermouth or dry white wine
  • olive oil
  • 2 28 ounce cans of tomatoes San Marzano or domestic, Muir Glen

Instructions

  • I use a food processor to finely chop the vegetables. Heat olive oil in saucepan (min 4 quart size), add onion, carrot, celery, parsley & salt; saute 3-4 minutes until fragrant and soft, add garlic cook additional minute. Add ground meats, cook over medium low heat, until meat is no longer pink. Break up any chunks of meat with a spatula while cooking. Add vermouth and continue to cook for 3-4 minutes.
  • Puree tomatoes using food processor or a food mill. Do not over process, bits of tomatoes are fine, texture is good.
  • Add tomatoes to pan along with chili flakes. Simmer 20 minutes, until slightly thickened. If you like a thicker sauce, leave uncovered, if not, partially cover during simmer. Taste for seasoning.
  • Just before serving add 2 T butter and 1/4 cup julienned or chopped fresh basil.

Notes

Variations: Addition of 1/4 cup finely diced pancetta to ground meats, adds smokiness to dish.
Instead of butter, finish off sauce with 1/4 cup heavy cream.


Chili, Brownies & Friends

Chili, Brownies & Friends

At the risk of losing any credibility I might have earned with previous posts, yes, that is The Friends Cookbook in the photo.  I told you, I have a cookbook addiction, this proves it.  In my defense I did peruse the book before buying, first I noticed the cast of Friends did not write this cookbook, lol (not even Monica), it was actually written by a senior writer for Cooks Illustrated, the bastion of obsessive recipe testing.  Second, it was on sale…so what the heck, I took a chance and bought a copy.

IMG_8423

I kid you not, it has been my go to source for a variety of recipes, pancakes, brownies, coffeecake and yes, chili.  The recipes are fairly simple, delicious and KID FRIENDLY, a prerequisite for the last 20 years of my life.  Here are 2 favorites from the book, Flirting with Firemen Chili and the link to Absolutely Best Brownies,  Kid tested and approved.

Adapted from Cooking with Friends

Firehouse Chili

Kid friendly chili!
Prep Time 1 hour
Cook Time 2 hours
Servings 8 -10 servings

Ingredients

  • 3 T vegetable oil
  • 3 medium yellow onions chopped
  • 1 green bell pepper chopped
  • 3 medium cloves of garlic minced
  • 1.5 pounds ground beef I use a mix of beef and ground turkey or chicken 2:1
  • 2 cups canned crushed tomatoes I use a 15 oz can of fire roasted diced tomatoes
  • 1 15 ounce can of beef broth
  • 3 T chili powder
  • 1.5 t cumin
  • 1/2 t oregano
  • 1 t salt
  • 1 15 ounce can of kidney beans or pinto beans or black beans drained and rinsed

Instructions

  • Heat oil in large pot. Add the onions and saute over med heat until soft and transparent looking about 8 minutes. Add garlic and bell pepper and saute for additional 2-3 minutes. Stir in ground beef and cook until it loses pink color. Cook for about 4-5 minutes, breaking up the beef with a fork or spoon. Add tomatoes, broth, spices and salt. Bring to a boil, reduce heat and simmer for approximately 2 hours until chili thickens a little. Add beans. Ladle into bowls, garnish with shredded cheese and green onions.
  • I add corn (frozen is fine) 1-2 cups because what kid doesn't like corn and to spice it up I will add hot sauce like Cholula which is a little sweeter than Tabasco.