Tag: sweet rice flour

Mochi Banana Bread,The Cho-sen One

Mochi Banana Bread,The Cho-sen One

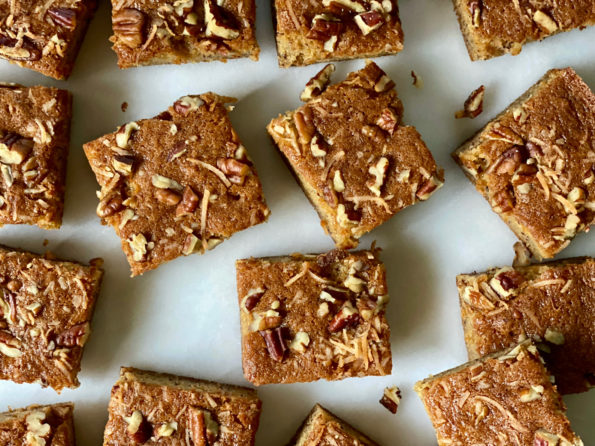
I think of myself as a pie person but lately, I have found myself baking cakes.  Not fancy multi-layer show-stopper cakes, simple one layer, easy to make, snacking cakes.  That grab-and-go type treat, unfussy, portable, the bar cookie of cakes.

Brooklynite pastry chef, Joy Cho, first caught my attention with her amazing Sour Cream Gem Cakes Made with sweet rice flour and AP flour, the cakes are tender, moist with a bit of springiness. The rice flour gives it that zing that sets them apart from traditional cakes.

The Joy of Snacking Cakes

Her Mochi Banana Bread and Sour Cream Chocolate Chip Snack Cake are a rift on her Gem Cakes.  Baked in an 8×8 pan and cut into squares, they’re the low maintenance but no less yummy cousins to Gem Cakes.

The combination of all-purpose flour and sweet rice flour once again makes them springy yet still tender and moist.  The butter and sour cream add flavor and richness.  The banana cake calls for just ONE banana.  Who doesn’t have one over-ripe banana sitting forlornly on the kitchen counter?  No more waiting for more bananas to ripen to make banana bread.   The toppings add more texture and flavor. Besides nuts and coconut, try chocolate chips or toffee bits.  Doesn’t that sound tasty?

So Berry Good

Strawberries are in season so I tweaked the Mochi Banana Bread to make Mochi Strawberry Pistachio Cake Bars.  Delicious, but I still like the banana version best.  Substitute the same volume of macerated strawberries for the banana.  Sprinkle the top with chopped pistachios.  To intensify the strawberry flavor, crush freeze-dried strawberries and add 1 tablespoon to the batter or sprinkle it on top of the finished cake.

Chip Off the Old Block

The Sour Cream Chocolate Chip Cake also has sweet rice flour and all-purpose flour giving it that trademark springy texture.   Studded with chocolate chips it definitely satisfies any chocolate cravings.  Find it here.

These cakes are in the one bowl realm of simplicity.  Combine dry ingredients in a small bowl, wet ingredients in a large bowl, add dry to wet, stir until just combined then STOP.  BadaBing-BadaBoom, done.  Pour batter into a prepared pan, sprinkle goodies on top, bake, cool, cut.  DONE.  Eatin’ cake in less than an hour.  Yep, easy-peasy.

One of these days when I am in Brooklyn I will try her desserts, on my NYC bucket list.  Until then, I hope she continues to share her creations and recipes.

Print Pin
5 from 1 vote

Mochi Banana Bread

Delicious snack cake made with AP flour and Sweet Rice Flour and one banana, the perfect little treat. The Mochi flour gives the cake a hint of springiness. Delicious.
Course Cake, Dessert
Cuisine Asian-American
Keyword banana cake, Dessert, joy cho, Mochi, mochi banana bread, sweet rice, sweet rice flour
Prep Time 15 minutes
Cook Time 30 minutes

Ingredients

Da Dry Stuff

  • 2/3 cup glutinous rice flour, like Mochiko (Koda Farms) 90 grams
  • 1/3 cup all-purpose flour 40 grams
  • 1/2 teaspoon baking powder
  • 1/2 teaspoon baking soda
  • 1/2 teaspoon kosher salt

Da Wet Stuff

  • 1 medium to large banana ripe (about 110 grams peeled)
  • 1/2 cup-scant granulated sugar 90 grams
  • 1/4 cup light brown sugar 55 grams
  • 1/2 cup unsalted butter, melted and cooled 113 grams or 1 stick
  • 1/4 cup full-fat sour cream, at room temperature 60 grams
  • 1 large egg at room temperature
  • 1/2 teaspoon vanilla extract

Da Toppings

  • Chopped toasted walnuts and/or toasted coconut for topping (optional)
  • Chocolate Sprinkles

Instructions

  • Heat the oven to 350°F. Lightly grease an 8x8-inch baking pan with nonstick cooking spray, line the pan with parchment paper, and grease the parchment.
  • In a medium bowl, whisk the rice flour, all-purpose flour, baking powder, baking soda, and salt together.
  • In a large bowl, mash the banana with a fork; some small chunks are fine. Add both sugars and whisk until combined.
  • Add the butter, sour cream, egg, and vanilla to the banana mixture and whisk until completely smooth.
  • Sift the dry ingredients over the wet ingredients, then whisk just until no flour lumps remain. Try not to overmix.
  • Pour the batter into the prepared pan and smooth the surface with a small offset spatula. Sprinkle top with chopped nuts and/or shredded coconut, or any topping you’d like. Toffee chips or chocolate chips come to mind, but that's just me 🙂
  • Bake for 25 to 27 minutes, rotating the pan halfway through, until a toothpick inserted in the center comes out clean.
  • Cool in the pan for 15 minutes, then transfer to a rack to cool completely before cutting into squares. This will keep for 2 to 3 days in an airtight container.

Notes

Use these to hold your parchment in place, everyone has metal clips lying around. Keeps parchment from getting in batter by clipping to top rim of baking pan.
Butter Mochi, Microwave Magic

Butter Mochi, Microwave Magic

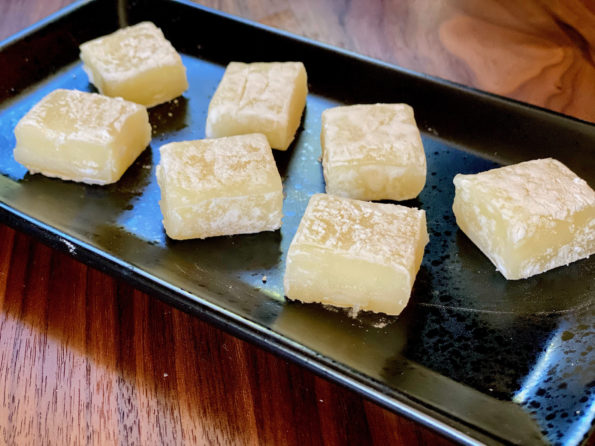
Yes, on the Mochi treat trail once again.  Aside from being delicious, Mochi is pretty darn easy to make thanks to Mochiko Sweet Rice Flour.  I have been playing around with recipes that find their roots in Hawaiian Butter Mochi.  Sweet Rice flour, butter, eggs, sugar, and different liquids (milk, coconut milk, fruit nectars….) combined and baked into delightful bars or muffins.   A bit cakey, a bit chewy yet forgiving, sweet but not cloyingly so, and maddingly addictive. The Butter Mochi Muffins is by far the most popular recipe on 3jamigos.  But…

There Is A New Kid In Town

A recipe for Butter Mochi on No Recipes had me running to my kitchen.  Whaddya know, these little gems are made in a microwave.  Unlike baked Hawaiian Butter Mochi treats, this one is texturally similar to classic mochi found in Japanese Manju Shops.  (Worth a visit! Shuei-Do in San Jose or Benkyodo in San Francisco).  The riff of adding butter, sugar, and milk is genius.  You end up with a soft, chewy, smooth, slightly sweet, buttery, insanely delicious treat.

Shortcuts: Momofuku, Microwave, and Mochiko

The microwave makes this a quick and easy treat.  I’ve been playing around with cooking in the microwave ever since I bought a set of Cook Anyday Microwave cookware.  Yes I know, I could have used the pyrex glass dish I have but…damn, that Dave Chang of Momofuku is really good at getting you to buy stuff, lol.  And really, you can never have too many bowls.  I listen to his podcast and its offshoot, Recipe Club.  and I find myself laughing A LOT.  A good thing during these crazy times.

Traditionally, Mochi starts with glutinous rice that is soaked, steamed, and laboriously POUNDED into a sticky mass that is used to form those cute little balls and squares you take for granted at the Manju Shop.  Luckily, we can start with Mochiko or Sweet Rice Flour-no soaking or pounding.  Just put everything in a bowl and stir.  How easy is that?  Along with the microwave, you will be cranking out batches of Butter Mochi in minutes.

Combine Mochiko flour and sugar in a large glass bowl (or microwavable bowl).   Add one-third of the milk, stir to make a smooth paste, gradually add the rest of the milk, and stir well for a lump-free batter. Place bowl in the microwave and nuke for two and a half minutes.  The mochi will look thicker and form some lumps.  Remove the bowl and add the butter.  Stir until the butter is fully incorporated and the mixture is smooth again.  The recipe calls for cultured butter which has a slight tang.  I used Trader Joe’s French Cultured Butter.  You could probably use European-style butter like Kerrygold Irish Butter.  I also used salted butter which I think enhances the flavor.

Put it back in the microwave for another three and a half minutes.  Carefully (it’s hot!) remove the bowl from the microwave and knead the dough with a wooden spoon or silicone spatula NOT your hands.  This helps create that translucent, elastic texture.

If it doesn’t get that translucent look or isn’t very elastic, try microwaving it another minute.  Transfer the Mochi into a small square pan lined with parchment.  The recipe calls for a five-by-five-inch pan.  Hmmm, not a size I have so I improvised.  Place pan (box in my case) in the fridge to chill.

The final step is cutting the Butter Mochi.  It will be really sticky.  To keep the pieces from sticking dust with potato starch or cornstarch.  Sorry folks, powdered sugar will not work as it will absorb moisture from the mochi and turn gummy.  Serve.  Mochi can be stored at room temperature for a day or in the fridge for longer.  Bring to room temp before serving.

And one mor-chi tip

I made a second batch using coconut milk.  For folks that are milk intolerant, this would work well. Win-win.  Reduce the first microwave time to 2 minutes.  It solidified a little quicker than the regular milk version which made stirring in the butter a little harder.  You do lose a bit of the pure butter flavor but the coconut milk is a nice complement.  Play around with the microwave times for your machine.  For the second microwave session, I’d go 3 minutes first and check before zapping it further.

Print Pin
5 from 3 votes

Butter Mochi

Butter Mochi made in the microwave! Soft, chewy, buttery, a hint of sweetness, this Japanese treat is easy to make and delicious!
Course Dessert
Cuisine Asian
Keyword brown butter, butter mochi, Dessert, mochiko, sweet rice flour
Prep Time 7 minutes
Cook Time 7 minutes

Ingredients

  • 100 grams mochiko
  • 90 grams granulated sugar a little less than 1/2 cup
  • 1 cup whole milk or coconut milk
  • 3 tablespoons Cultured Butter (45 grams) TJ's French Cultured Butter or Kerrygold Salted Irish Butter. I like the bit of salt.
  • Potato starch or cornstarch for dusting

Instructions

  • Line a 5-inch square pan with parchment paper. Use any small pan, 4x6 (lol, does anyone have a pan this size?)
  • Add the mochiko and sugar to a large microwave-safe bowl, and then add about 1/3 of the milk. Stir the mixture together until there are no lumps. Add the remaining milk and continue stirring until it is smooth.
  • Put the bowl, uncovered, in the microwave and set it to cook for 2:30. If you have a 600 watt microwave, use full power. Adjust accordingly.
  • Remove the bowl from the microwave and stir the mixture until it's mostly smooth.
  • Add the butter and stir until fully melted and incorporated.
  • Microwave uncovered for another 3:00-3:30. Get to know your microwave!
  • Carefully remove the bowl from the microwave. Use a silicone spatula to knead the mochi together. The mochi is very hot, do not get it on your hands as you stir. The mixture will get very sticky and turn a translucent yellowish-white color as you knead it. If this doesn't happen, microwave it for another minute or two.
  • Transfer it to the prepared parchment-lined pan and press the butter mochi into the corners and flatten off the top.
  • Chill the mochi in the refrigerator for a few hours to firm it up. Unmold the butter mochi and peel off the parchment paper. Use a sharp knife to cut it into approximately 1" squares and then dust each piece liberally with potato starch. Brush the excess starch off and serve.
Glazed Sour Cream Gem Cakes-Chodazzled

Glazed Sour Cream Gem Cakes-Chodazzled

Skipping across my feed lately have been a series of articles on chefs adapting to life during the pandemic.  As we know, the food industry has been hit particularly hard by COVID-19.  Restaurants, bakeries, caterers have worked hard to adapt to the harsh reality of the pandemic.  It hasn’t been easy and we have lost so many restaurants and businesses it’s depressing.  There are some bright spots though and Joy Cho is one of them.  Her Glazed Sour Cream Gem Cakes has taken Brooklyn by storm.

Laid off from her position at the Grammercy Tavern (she has CHOPS people) she created these wonderful little cakes in her Brooklyn home.  The cakes went viral and let’s just say ordering a box of these babies is like trying to score a table at the French Laundry pre-COVID, without the last name of Newsom (JUST KIDDING).

Lucky for those of us who don’t live in Brooklyn, Ms. Cho’s recipe for her ABSOLUTELY DELICIOUS Gem Cakes is available on Epicurious.  It immediately went viral, I stumbled upon it and yep, got busy in the kitchen.

A Gem of a Recipe

These are crazy good and pretty easy to make.  Here’s what makes these gems stand out.

All-purpose Flour and Sweet Rice Flour- The combination of the two flours is the best of both worlds.  Tender, cakey, moist, with a bit of springiness.  They have a nice balance of cakiness and chewiness.  Using just sweet rice flour would result in a denser, chewier texture, a classic mochi dessert without any sort of crumb.  All AP flour will give you a regular old cupcake and come on peeps, we are looking for something FRESH.

Butter, eggs and sour cream – The trifecta of fat that adds richness, flavor, moisture, and tenderness to the cake.

Be sure to keep a light hand which means don’t overmix the batter.  Your batter should be light and fluffy.  Finish incorporating the flour by folding the ingredients together by hand. You want to retain the air bubbles in the batter to keep the cakes light.  Overmixing develops the gluten in the AP flour which makes the cakes tough. The batter may look a little curdled at some points but keep gently folding and the batter will come together. Promise.

The original Gem Cakes are baked in a brownie bundt pan. I made them in a standard muffin tin which worked out well (don’t you think?).

Bake until the cakes are golden brown.  If you like your cakes a bit crispier on the outside bake a couple of minutes longer.

A Sparkling Finish

Genius Glaze – The glaze for the little cakes is a simple powdered sugar, a little bit of milk, and any flavor your heart desires.  The original recipe includes strawberry matcha and milk tea glazes.  Strawberry jam is used for the glaze, while the matcha and milk tea glazes start with powders.  Not having milk tea powder, I went with two jam flavors, strawberry and blackberry and a black sesame seed icing using black sesame powder I found at the Asian grocery store. You can make your own by grinding roasted black sesame seeds into a powder.

Dippity Do-Da-Dippity-Damn These are Delicious

While the cakes cool, make your glazes.  Speed is of the essence with the glaze as it sets pretty quickly.  Glaze your cakes by inverting the cupcakes and dipping them into the icing.  Rotate the cakes in a circular motion.  You will get drips down the side which adds to the appeal.  Set them on a wire rack and garnish each cake immediately after glazing before it hardens.

For the black sesame icing, I started with a tablespoon of black sesame powder, start with less, and add to taste.   My next batch will include a Citron-flavored glaze made with Citron Tea which is popular in Korea.  The array of freeze-dried fruits that can be crushed and used to flavor frostings and icings would also work well (just like Eric Kim’s Lofthouse Cookie frosting-so good).  You may need a smidge more milk to thin the glaze made with powders.  Use your imagination, the sky’s the limit. I’m thinking Mocha glaze with cocoa nibs to garnish.

Garnish adds that visual zing, nuts, poppy seeds, sesame seeds, citrus zest, so once again, be creative.  These cakes are scrumptious-make some now. Or if you are going to Brooklyn soon, please, be a GEM and bring me a box!

Print Pin
5 from 2 votes

Glazed Sour Cream Gem Cakes

Scrumptious mini cakes from the amazing Brooklyn pastry chef, Joy Cho.
Course Dessert
Cuisine Asian-American
Keyword joy cho, Sour Cream Gem Cakes, sweet rice flour
Prep Time 20 minutes
Cook Time 20 minutes

Ingredients

  • Nonstick vegetable oil spray such as PAM for baking (for pan)
  • 1/2 scant cup (60 g) all-purpose flour, plus more for pan
  • 1/3 heaping cup (60 g) glutinous sweet rice flour (such as Koda Farms Blue Star Mochiko)
  • 1/2 tsp baking powder
  • 1/2 tsp baking soda
  • 1/2 tsp kosher salt
  • 1/2 cup (1 stick) unsalted butter, room temperature
  • 2/3 scant cup (130 g) granulated sugar
  • 2 large eggs room temperature
  • 1 tsp. vanilla extract
  • 1/2 cup sour cream room temperature
  • 3 Tbsp whole milk, room temperature
  • Milk Tea Glaze, Matcha Glaze, or Strawberry Jam Glaze (for serving) or your choice
  • Flaky sea salt toasted unsweetened shredded coconut, lemon zest, or sesame seeds (for

Instructions

  • Place a rack in center of oven; preheat to 325°. Lightly coat 20 molds of 2 brownie Bundt pans or the cups of a standard 12-cup muffin pan or 2 standard 6-cup muffin pans with nonstick spray; lightly dust with flour, tapping out excess. Whisk rice flour, baking powder, baking soda, kosher salt, and all-purpose flour in a medium bowl to combine. Get yourself a scale, so much easier!
  • Beat butter in the bowl of a stand mixer fitted with the paddle attachment on medium speed just until smooth. Add granulated sugar and beat until pale and creamy, about 3 minutes. Scrape down sides of bowl with a rubber spatula. With motor running, add eggs one at a time, beating to incorporate and scraping down sides of bowl a&er each addition. Add vanilla and beat just to combine. (Mixture may look slightly curdled at this point, but don’t worry, it will come together in the end.)
  • Sift in half of dry ingredients and beat on low speed just until a few dry patches remain. Scrape down sides of bowl and add sour cream and milk; beat just until incorporated. Sift in remaining dry ingredients and beat until combined. Finish by hand to avoid overmixing.
  • Divide batter among prepared pans (about 2 Tbsp. per mold for Bundt pans or about 3 Tbsp. per cup for muffin pan). Bake, rotating pans halfway through, until a tester inserted into the center of a cake comes out clean, 14–16 minutes for Bundts, 17–20 minutes for muffins. Let cakes cool in pan 10 minutes, then gently loosen cakes with a small offset spatula and turn out onto wire racks; let cool completely.
  • Dip tops of cakes in glaze of choice; set back on racks, letting excess glaze drip down sides. Double-glaze cakes if you like.
  • Sprinkle cakes with toppings as desired (e.g., a pinch of flaked salt-like Maldon on Milk Tea Glaze, coconut or sesame seeds on Matcha Glaze, and lemon or orange zest on Strawberry Jam Glaze).
  • Do ahead: Like doughnuts, gem cakes are best enjoyed the day they are baked but can be made 2 days ahead. Store airtight at room temperature.
Print Pin
5 from 2 votes

Glaze for Gem Cakes

The perfect finish for Joy Cho's Glazed Sour Cream Gem Cakes
Course Dessert
Cuisine Asian-American
Keyword Icing for Glazed Sour Cream Gem Cakes
Prep Time 5 minutes

Ingredients

Base for Glaze

  • 1⅓ cups 160 g powdered sugar
  • 2 Tbsp. whole milk
  • 1/2 tsp vanilla
  • Kosher salt

Jam Glaze

  • 3 Tbsp. strawberry or OTHER FAVORITE JAM preferably seedless (push through a sieve before measuring if jam has large pieces of fruit)

Black Sesame Glaze

  • 1 tbsp Black Sesame Powder or grind roasted black sesame seeds to a powder.
  • 1 tsp milk If the glaze seems a little too thick

Freeze Dried Fruits

  • 15 gms freeze-dried fruit Start with about half-cup of freeze-dried fruit, crush and strain for seeds. Approximately 1 tbsp of fruit
  • 1 tsp milk If the glaze seems a little too thick

Instructions

  • While the cakes cool, whisk powdered sugar, milk, jam, or powder and a few pinches salt in a medium bowl until smooth. The consistency should be viscous but not overly thick; adjust with more powdered sugar or milk as needed.
Peanut Butter Mochi, that’s my Jam

Peanut Butter Mochi, that’s my Jam

My cookbook addiction continues unabated. One of my new favorites is A Common Table by Cynthia Chen McTernan.  It’s a beautiful cookbook filled with not only mouthwatering photographs of her food but wonderful stories about her family and friends. Her recipes are approachable and her writing inviting.  In contrast to the cookbooks of yesteryear, today’s cookbooks, like A Common Table, breathe life, warmth, and a personal connection into each recipe.  It makes me want to call my Mom, my kids, my aunties and uncles and say, “Hey, come on over we gonna cook, eat, and talk story”.

Have You Eaten Yet? (code for I ❤️ you)

This is not a cookbook that strives to teach one to cook, it’s more like a series of love letters, first and foremost to her family and friends, and then to all of us.  Her soulful, homey food reflects her southern upbringing, her Chinese heritage, her hubby’s Hawaiian-Korean-Irish roots, and their lives together. These are recipes I imagine are passed down from grandmother to mother and mother to daughter.  Each generation adding its own personal stamp.

Two Red Bowls is Cynthia’s blog, ground zero for her food and family tales.  She has managed to juggle a toddler, a newborn, a blog, and a book, no small feat.  Wow!

Onto her delicious food.  Needing a gluten-free dessert to bring to a potluck, I instantly thought of the peanut butter mochi in her book.  Mochi, made of glutinous rice flour, is chewy, dense, and all the craze right now.  Imagine a marshmallow but dense, chewy, and only slightly sweet. Mallows on roids.  To top it off, soooo easy to make.  Literally, one bowl plus a wooden spoon. The addition of peanut butter brings a familiar flavor and texture to the mochi, a great intro for the uninitiated.  Did I mention GLUTEN FREE?

The gold standard for rice flour and readily available is Koda Farms Blue Star Mochiko.  Ground into a fine powder, it blends quickly and is easy to work with. Throw the flour, sugar, eggs, and milk in a bowl.  Stir, don’t worry about overmixing (no gluten), pour, and bake.  The batter will resemble a thick, elastic pancake batter.

Plop the peanut butter evenly into the batter so that everyone gets a bite of peanut butter, and then it’s oven time.  Midway through baking, sprinkle crushed peanuts on top.  Next time I am thinking of using honey-roasted peanuts, to really accentuate the play on sweet and salty.  The batter will puff while baking, not to worry, it will flatten as the mochi is cooling.

Once it has cooled a bit, dig in, warm mochi is yummy.  I cut mine into squares and then further divided half of the squares into rectangular bars.  Just so delicious, the combo of chewy mochi, pockets of oozy soft peanut butter, and the crunchy peanut topping-the trifecta of yum.  It’s hard to resist and eat just one. It’s dense in texture and calories but so worth it!

I think you could make this milk-free by using coconut milk in place of milk. I have yet to try it.  Andrea Nguyen, Asian cookbook author extraordinaire created a riff by adding black sesame paste, Black Sesame Peanut Butter Mochi, which looks delish, I am so going to make her version soon.

Peanut Butter Mochi
Print Pin
5 from 2 votes

Peanut Butter Mochi

Gluten free and delicious.  Made with sweet rice flour a dense, chewy, a totally addicting treat! A quick and easy recipe!
Course Dessert, Snack
Cuisine Asian, Asian-American
Keyword Mochi, peanut butter, sweet rice flour
Prep Time 10 minutes
Cook Time 50 minutes
Total Time 1 hour
Servings 16 Servings

Ingredients

Filling

  • 6 Tbsp Peanut butter Natural, creamy or chunky
  • 2 Tbsp Powdered sugar

Cake

  • 1-1/2 Cups Sweet rice flour 225gm
  • 3/4 Cup Granulated sugar
  • 1/8 Tsp Salt
  • 1 Cup Whole milk
  • 1/2 Cup Vegetable oil
  • 2 Eggs
  • 1 Tsp Vanilla
  • 1/2 Cup Roasted peanuts Or substitute honey roasted peanuts
  • 1 Tbsp Brown sugar Optional, to be added to plain roasted peanuts,

Instructions

  • For the peanut butter filling, whisk together the peanut butter and confectioner’s sugar until smooth. Set aside.
  • Preheat the oven to 350F. Line an 8-inch square baking dish with parchment paper, letting the paper go up the sides so you can easily lift the cake out later on.
  • In a medium bowl, combine the sweet rice flour, sugar, milk, oil, eggs, and vanilla, whisk until smooth. Don’t worry about overworking the batter when making the cake, sweet rice flour is GLUTEN FREE.
  • Pour half the batter into the prepared baking dish. Used 2 small spoons or small teaspoon ice cream scoop to drop spoonfuls of the filling evenly across the batter, then pour the remaining batter over the filling. Bake, uncovered, for 20 minutes.
  • While the mochi is baking, place the peanuts in a food processor or blender and pulse until finely chopped. Remove the mochi cake from the oven, sprinkle of the crushed peanuts across the top. The cake maybe puffy so spread nuts as evenly as you can. The cake will fall as it cools.  
  • Return the cake to the oven and bake until the center bounces back when pressed, an additional 15 to 20 minutes. Let cool about 20 minutes before trying to lift the parchment paper to remove the cake from the pan. 
  • Enjoy warm or at room temperature. The mochi slices cleanly when cool, but is delish warm.
  • Store in an airtight container and keep at room temp if cool, or refrigerate. Microwave pieces on high with 15-second blasts to refresh.