Tag: classic cantonese dish

Scrambled Eggs and Beef over Rice (The Slippery Slope of Waat Dan Fan)

Scrambled Eggs and Beef over Rice (The Slippery Slope of Waat Dan Fan)

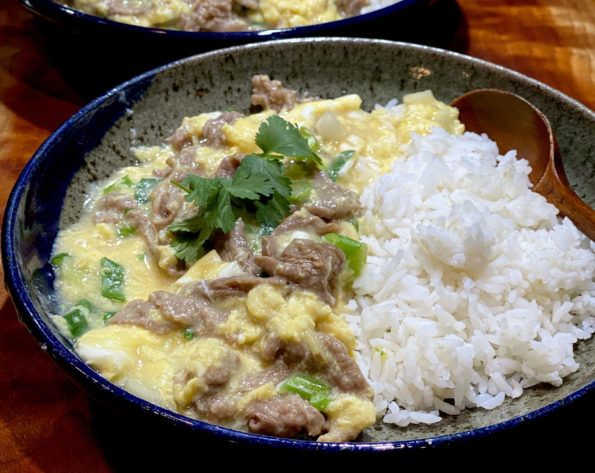
Waat Dan Fan (滑蛋飯) is one of my absolute all-time favorite down-home Cantonese dishes.  The literal translation is Slippery Egg Rice.  This version includes beef so it’s called Waat Dan Gnow Yuk Fan (滑蛋牛肉飯).  Although it comes together quickly, it can be a little tricky to get the texture of the eggs right.  Don’t let that put you off though, it is well worth it.  It may take a couple of tries, as it did with me, but the return is HUGE.  You will be rewarded with a homey, satisfying, tasty dish of stir-fried beef nestled in a pool of silky, scrambled-swirled eggs flavored with scallions and ginger.  Soooooo good!  真好吃!

Don’t Slip Up on the Mise on Place

  • Everyone thinks stir-frying is quick and easy, although the cooking portion is quick, it’s the prep that takes time. Everything has to be ready for the stir-frying to look effortless.  This dish is no egg-ception.
  • Slice and marinate your beef and put it in a bowl to the side.  Note, the oil in the marinade goes in last AFTER the beef has sat for 15-20 minutes and absorbed the marinade.
  • Crack your eggs into a bowl and whisk them with a pinch of salt.  Set it near the beef and close to the stove.
  • Slice your green onions and set them aside.
  • Have your 1/2 cup of stock to which you have added the sugar and salt along with the slurry of cornstarch and water ready.
  • Place the prepped ingredients next to the stove.

You’ll thank me

This is a classic Cantonese dish, the epitome of soul food.  I love serving it in a bowl with a spoon. Looking for a vegetarian rift? Try Tomato & Egg RiceEnjoy!

Print
5 from 1 vote

Hong Kong Style Slippery Eggs and Beef on Rice

Classic Cantonese dish that comes together in minutes, Slippery Egg and Stir Fried Beef Over Rice
Course homestyle, Main Course, soul food
Cuisine Asian
Keyword Cantonese cooking, egg, plate rice, Slippery beef
Prep Time 15 minutes
Cook Time 10 minutes
Servings 2 servings

Ingredients

  • 4 ounces Flank steak, flat iron or sirloin, thinly sliced
  • 2 large eggs can use extra large or jumbo
  • 1/2 cup water or chicken stock (low sodium)
  • 2 tbsp sliced green onions
  • 1/4 tsp salt
  • 1/4 tsp sugar
  • peanut oil
  • 1 tsp cornstarch + 3 tbsp water MIx in a small bowl and set aside

Mainade for Beef

  • 1 tbsp soy sauce
  • 1/2 tbsp oyster sauce
  • 1-2 slices fresh ginger, julienned
  • 1 tbsp sugar
  • dash of white pepper
  • 1 tbsp Shaoxing wine
  • 1 tsp cornstarch
  • 1 tbsp peanut or vegetable oil
  • 3 tbsp water

Serve over hot rice or rice noodles

  • 2-3 cups of steamed white rice

Instructions

  • Slice the beef to 0.2 mm thick, add the marinade ingredients except for the oil, marinade for 20 minutes. As the beef sits it will absorb alot of the water. Add oil after the beef has sat. Set aside.
  • In a small bowl, beat eggs with a pinch of salt. Set aside.
  • Heat oil in a pan over medium-high heat, add beef, stir-fry until it is no longer pink. Remove the beef and set aside. If beef has a lot of liquid, pour it into a strainer placed over a bowl to drain.
  • Pour the broth or water into the pan used to stir-fry the beef, add salt and sugar, and bring it to a boil.
  • Add the cornstarch water mix, and bring to a boil again. The mixture will thicken to a thin sauce consistency. Lower the heat to medium-low.
  • Pour the eggs into the sauce in a stream moving around the pan. Let it set a bit and then stir gently to allow eggs to continue to cook and set a bit more. It will still be very loose and the stock slurry will still be visible.
  • Add the beef and sliced scallions and cook for 30 seconds to one minute, stirring gently to blend the sauce and eggs. The mixture will be saucy.
  • Spoon cooked hot rice into shallow bowls large enough to hold 1-2 cups of rice. Pour the beef and egg mixture over the rice. Garnish with additional sliced scallions and cilantro. Serve immediately.
Cheung Fun, The Rice Stuff (Chinese Rice Noodles)

Cheung Fun, The Rice Stuff (Chinese Rice Noodles)

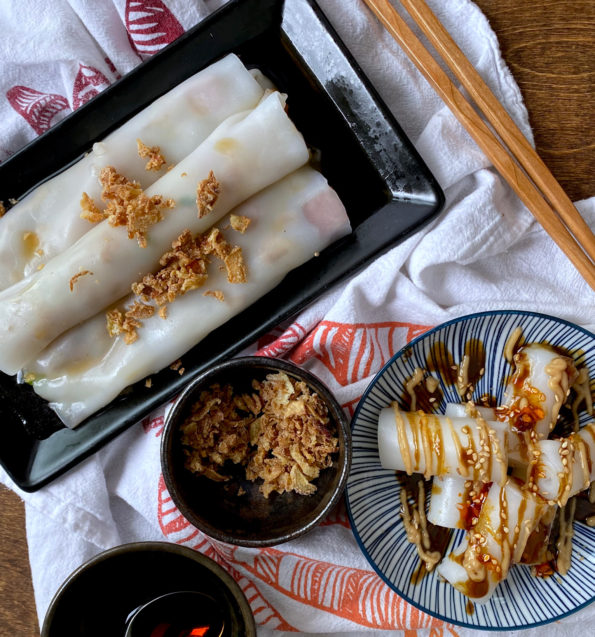
One of our favorite lunch outings is going for Dim Sum or Yum Cha.  Dim Sum refers to the dazzling array of bite-size dumplings and morsels while Yum Cha means to drink tea.  Yum Cha is a uniquely Chinese experience.  In the good old days (pre-COVID), after being seated (after an interminable wait), a procession of carts appear and snake their way around the tables.  Each cart holds steamer baskets of dumplings, plates of fried dumplings and egg tarts, chicken feet, black bean spareribs, noodles, and greens.

Let the games begin.

Start by waving your hand to get their attention and then point to the dishes you want.  A running tab is kept, stamped for each dish placed on the table.  Which, if you have hearty eaters, can run as much as going out for sushi!

Hyatt Regency Hong Kong

In the sweepstakes of little dishes that end up on our table when we go for Dim Sum, Cheung Fun or Rice Noodle Roll is an automatic ticket punch.  The noodles have a soft, silky, smooth, texture and are neutral in flavor.  This lends itself well to a variety of fillings like shrimp, bbq pork, or minced beef, and sauces. Filled noodle rolls are topped with a sweet, salty soy sauce while rice rolls without fillings are topped with sesame or Hoisin-based sauce (my favorite).  These are known as Chee Cheung Fun (猪肠粉). (Funny story, the literal translation is Pig Intestine Noodle owing to their resemblance to said pork anatomy).

How the pros make it! Joe’s Steam Rice Roll in NY City  Swear, I am eating here one day.

Never in a zillion years would I have thought of making Cheung Fun at home UNTIL I came across a recipe to make the noodles in the microwave.  I was sold.

Game ON

The first hurdle is the ingredients.  The rice noodle batter is a combination of:

  • Rice flour-plain rice flour NOT glutinous or sweet rice flour! Bob’s Red Mill at Whole Foods or Asian stores will have rice flour
  • Tapioca starch– also known as tapioca flour (I know, confusing!), derived from the starchy pulp of the cassava root. Used as a thickening agent like cornstarch.
  • Potato starch– is made from just the starch grains of potato and is NOT the same as potato flour which is cooked whole potatoes, that are dried and ground into flour. Potato starch is used as a thickener like cornstarch.  It is used in gluten-free flour blends to provide texture and structure (straight from Bob’s Red Mill site, lol). Bob’s Red Mill sells potato starch as does most Asian markets.
  • No wheat products…gluten-free, ta-da!

This is How We Roll

Having Some “FUN”

Combine the flour and starches in a mixing bowl, add liquid, stir…dunzo.  How easy is that?

The batter has a thin consistency and the starch and water will separate as it sits.  Stir or whisk the batter well before pouring it into the cooking dish.  I used two microwavable dishes to make the noods.  A rectangular 9×6 glass pyrex dish and the shallow round Cook Anyday Microwave-ware bowl. The rectangular dish is the perfect shape to make rolls but doesn’t have a vented lid.  You can use the plastic lid but keep it ajar when cooking to allow moisture to escape.

Lightly oil the bottom and 1/4 inch up the sides of your dish to prevent sticking.  Brush the dish as needed, you may need to each time you make a roll.  Pour about 1/3 cup of batter into the 9×6 dish ( a little less for the round bowl) to create a thin layer on the bottom.  The round bowl needed only a generous 1/4 cup to cover the bottom of the bowl.

Microwave Magic

Place vented lid on top and microwave at full strength for 2 min and 10 seconds.  My microwave is small and rated at 700 watts, you will need to find your microwave wattage and adjust accordingly either reducing the power or shortening the cooking time on a more powerful microwave.  If your microwave has a turntable, use it.  I found the noodles cooked more evenly when using the turntable.  The noodle is done when it looks translucent and has some bubbles.  Cracks in the cooked noodle are caused by either overcooking or using too much batter.  Remove from the microwave and place in a cold water bath to cool.  It will only need a couple of minutes but makes it much easier to roll.

Using a spatula or dough scraper, start on one edge and lift and roll the sheet to make a roll.  For filled rolls, scatter filling on one side of noodle, lift noodle, and roll to cover the filling.  The noodle is pretty forgiving so just push, roll.  Don’t worry, the rolling hides a lot of imperfections. A bench scraper is the perfect size for the rectangular Pyrex dish, score another point for the Pyrex pan.

The Bling, Fillings and Toppings

Rice noodles are neutral in flavor so it is the perfect foil for lots of different fillings and sauces.  Favorite fillings include barbecue pork, shrimp, or a medley of fried egg, Chinese pickles, green onions, cilantro, and bbq pork. Use your imagination, leftover roast duck, roast pork, or go vegetarian, sauteed mushrooms, caramelized onions, corn, the possibilities are unlimited.  I have added SPAM in a pinch!  Top rolls with a sweet soy sauce, don’t skip it, you could add some chili oil, that’s copasetic.  For a little crunch, I top the rolls with fried shallots or onions, totally optional.

Ji Cheung Fun is my favorite rice noodle roll.  Roll the noodle into a cylinder since Ji Cheung Fun does not have a filling.  Top with sauces, Peanut Sauce, and Hoisin Sauce, a play on sweet and salty flavors.  Sprinkle peanuts or sesame seeds on top to add a nice crunch.  I also hit it with Chili Crunch Oil…BAM, straight to Yumsville.

Comfort Finale

I rolled my last noodles intending to make a plate of Ji Cheung Fun but I really wasn’t in the mood for it.  Instead, I had soup noodles on the brain, so I cut each roll into 1/2 inch wide noodles, placed them in a bowl, and turned my attention to the soup.  Luckily, I had heirloom tomatoes from the market, a little bit of beef, and a couple of eggs in the fridge.  A warm bowl of Tomato Egg Drop Soup with Rice Noodles was ready in minutes and hit the spot.

Print Pin
5 from 2 votes

Cheng Fun

A favorite dim sum dish, steamed rice noodles filled with bbq pork, shrimp or minced beef, served with sweet soy sauce. Made easy in the microwave!
Course Appetizer, dim sum, Side Dish
Cuisine Asian
Keyword Cantonese cooking, Cheung fun, dim sum, ji cheung fun, microwave, rice noodles
Prep Time 45 minutes
Cook Time 3 minutes

Ingredients

Batter

  • 1 cup rice flour 140g
  • 1/2 cup potato starch 90g
  • 1/2 cup tapioca starch/flour 70g
  • 1 tablespoon sugar
  • 1/2 teaspoon salt
  • 1 tablespoon canola or vegetable oil plus more for brushing
  • 2 cups room temperature water 470ml
  • 2 cups just boiled water 470ml

Adds-ins

  • 3 tablespoons thinly sliced scallions
  • 3 tablespoons chopped cilantro

Toppings

  • red pepper flakes
  • toasted sesame seeds
  • chili oil

Sweetened Cheung Fun Soy Sauce

  • 2-2.5 Tbsp light soy sauce adjust to taste
  • 1/4 cup water
  • tsp sugar
  • ¼ tsp chicken powder
  • ¼ tsp sesame oil

Hoisin Sauce

  • 0.5 T regular soy sauce or dark soy reduce agave to 1/2 t if using dark soy
  • 1.5 T Hoisin Sauce
  • 0.5 T Sesame oil
  • 1-2 T water
  • 1 t Agave syrup or sugar

Peanut Sauce

  • 1 tbsp peanut butter 1 generous tablespoon
  • 2 T water
  • 1/2 t agave or sugar
  • 1/2 t sesame oil or chili sesame oil

Cheong Fun Sauce Simplified (variation of Sweetened Cheung Fun Soy Sauce)

  • 1/2 cup hot water
  • 2 tablespoons sugar
  • 3 tablespoons soy sauce
  • 1/2 teaspoon sesame oil.

Instructions

Batter

  • Whisk together all the flours, sugar, and salt in a mixing bowl. Add 1 tablespoon of oil and 2 cups of room temperature water to the batter and stir to combine. Some of the flour will clump up. Don’t worry–keep stirring and the flour will loosen eventually.
  • Gradually add the boiled water to the batter. Pour the water in a steady stream with one hand and stir the batter with the other hand. Place a towel underneath the bowl to steady it while you pour and stir.
  • Set the batter aside. The flour will settle to the bottom in just a few minutes. Make sure to stir the batter before each time you are ready to pour a sheet of cheung fun.

MIcrowave directions:

  • 1 9x6 or 8x8 glass pyrex dish
  • Rectangular Pyrex ~9x6 glass container, 8x8 glass container or Large shallow Cook Anyday Bowl
  • Brush bottom and 1/4 inch up sides of glass container or pan with vegetable oil.  Stir batter and pour approximately 1/3 cup of batter into Pyrex pan.  Loosely cover with lid.  Place in microwave and set time for 2 minutes and 10 seconds, full power.  (For reference microwave I have is ~700 watts, the low end of power for a microwave)
  • Set up a pan with cold water large enough to fit Pyrex container you are using to microwave.
  • When cooking is complete, remove from microwave and immediately place in pan of cold water.  Allow pan to sit for a couple of minutes to cool.  The rice noodle sheet should look transparent with a couple of bubbles.  If there are opaque spots where it still looks white, microwave for additional 15-20 seconds.
  • Remove container from water bath.  Using a bench scraper, run it around the edge of the noodle to loosen.  Starting from the edge (short or long) nearest to you, use a bench scraper or spatula, lift and roll the rice noodle away from you. Keep lifting and rolling. Divide the rice noodle roll in to the length desired. For Ji Cheung Fun the pieces are approximately 2 to 2.5 inches in length.
  • For filled Cheung Fun: Pour batter into dish, scatter a line of filling at about 1/3 line of batter in the pan , from the edge you will begin to roll. See video.

Fillings

  • Go crazy, rice noodles are very neutral and will compliment almost anything you pair with it.
  • Have approximately 1/2 pound of filling for this recipe. But if you come up short, make non-filled noods, cut them up for nice big bowl soup.

Shrimp

  • Use medium sized shrimp, peel and deveined. Toss the cleaned shrimp with 2 tablespoons water, 1/2 teaspoon sugar and 1/8 teaspoon baking soda. After the shrimp have been coated, cover and refrigerate for 2 hours. After 2 hours, rinse the shrimp under a gentle stream of cold running water for 5 minutes to wash away the sugar and baking soda and pat thoroughly dry with a paper towel. This step is sort of optional. The texture is greatly improved but your prep time is increased. But, if you want snappy shrimp-just do it. This is from Woks of Life, boss site.
  • Marinate the shrimp with 1/4 teaspoon sesame oil, a pinch of salt, 1/2 teaspoon cornstarch, and 1/4 teaspoon ground white pepper. Cover and return to the refrigerator while you prepare the rest of the ingredients.
  • Pre-cook your shrimp so they will be ready when you make your noods. Lay the shrimp out in a single layer in a microwaveble dish, the shallow Anyday Bowl works, cover and microwave on full power for 4 - 5 minutes until the shrimp are opague, pink and cooked through. AS always, adjust time for your microwave. These numbers are for my 700 watt Spacesaver, adjust accordingly.

Other stuff

  • BBQ Pork- Dice or julienne. You can mix in green onions if you like.
  • Dried Shrimp, found in Asian grocery stores, soak to soften before using.
  • Shiitake mushrooms Use dried or fresh. Rehydrate dried and dice. Fresh shiitakes should be seasoned sitr fried.
  • Egg-Straight from wathching the Joe's Rice Roll Video. Scramble an egg and use with the batter. Add 1 -2 tablespoons of egg after pouring batter into pan. Nice effect and great with bbq pork and green onions!