Tag: bacon

Tryin’ to Squash A Cold! (Instant Pot Butternut Squash Soup)

Tryin’ to Squash A Cold! (Instant Pot Butternut Squash Soup)

How does that old adage go? Feed a cold, starve a fever?  The thought crossed my mind as I was miserably lying in bed, achy, congested, and generally feeling like crap.  Thank goodness for laptops and search engines…I found a Scientific America article that addressed this very proverb and whaddya know, going all Mythbuster, Scientific America, not only debunked it, but concluded it really should be “Feed a cold, FEED a fever”.  Yeah baby, I love science.

What is the perfect antidote when it is cold, when you are sick, when you crave comfort, but you are too tired to fuss?  SOUP.  Am I right?  Yep, bowl therapy to the rescue.  It didn’t take long to find a soup that fit the bill.  From the blog Creative Bites, Pressure Cooker Creamy Butternut Squash Soup.  Lucky for me I had bought a butternut squash at the market and had all of the ingredients handy.  “Kold karma” pointed me to this quick (thanks to my Instant Pot) and easy, delicious soup.

Here’s the HARD part.  The PREP.  Yeah, no getting around peeling that butternut squash and dicing ALL THOSE vegetables.  Well,  I suppose you could buy pre-cut squash, diced onions and minced garlic, but that’s your call. It’s part of cooking therapy for me.

Butternut Squash soup Prep

NOW, the EASY part.  Prep was 90% of the game.  You’re now sitting pretty on 3rd base ready to score, just a mere minutes from homebowl. Get it?  I love the apples and red bell pepper, they add a nice sweetness.   Saute the veggies in your Instant Pot.  It’s important when you add the stock, really stir the bottom of pot to release all those bits of saute goodness.   The pot is very sensitive to bits stuck on the bottom and will turn off as a safety precaution if the bottom isn’t clean.  Add the stock, seal the pot, and then set the timer for 5 MINUTES.  Yep, five minutes and quick release at the end.  With the time it takes to come to pressure, you’re still only looking at 15 minutes of cooking time.  Not bad.

I used an immersion blender in the pot to puree the soup.  There are a lot of comments online about how it doesn’t work as well as a blender.  BUTTERNUTS.  Not creamy enough?  Throw the immersion stick back in and blend some more.  I’m willing to sacrifice a bit of creaminess (though I don’t think I am) to do this, as oppose to pouring HOT soup, in batches, into my blender.  I’m saving my blender for smoothies and Margaritas.

Butternut Squash Soup in Mugs

Go ahead and play around with this soup recipe. It’s very forgiving.  Got thyme?  Substitute for sage.  Got time?  Skip the Instant Pot, roast the vegetables instead.  See the prepped veggies above? Throw it all in a roasting pan, give it a good swig of olive oil, toss, salt and pepper and roast at 425 for about an hour).  The vegetables caramelize in the oven and add a sweetness to the soup that’s “souper” yummy.  Creative bites calls for goat cheese or cream cheese.  I like cream cheese because it adds a whole lot of mouth feel and just a slight tanginess.  You could probably use sour cream, creme fraiche or even just a touch of heavy whipping cream instead.  This would lighten the soup but you might lose that creaminess.

FINISH WITH TOPPING MADNESS.  Once your soup is done, garnish with ANYTHING your little heart desires.  Toasted nuts or pepitas, bacon, sliced apples, or more BACON, croutons.  Did I mention bacon?  I was sent a mix of nuts as a soup topping by my Food52 Holiday Gift Swap buddy- it was perfect.

Creamy Butternut Squash Soup Instant Pot

Course Soup
Cuisine American
Keyword butternut squash
Prep Time 15 minutes
Cook Time 15 minutes
Total Time 30 minutes

Ingredients

  • 1 Tbsp. olive oil
  • 1 large yellow onion diced
  • 1 red bell pepper chopped
  • 2 tsp. diced garlic
  • 1 tsp. fresh ground ginger
  • 2 lb. butternut squash peeled and cubed 1 medium squash
  • 1 medium apple peeled cored and chopped
  • 1 tsp. sage Substitute thyme or curry powder
  • 1/8 tsp. chili powder
  • 1/4 tsp. sea salt
  • 3 c. chicken stock I used additional cup to thin down the soup a bit
  • 3 oz. cream cheese Sub goat cheese
  • 1/3 c. Parmesan cheese
  • Salted Pepitas for garnish Or anything you like, like BACON BITS, spicy nuts, chives, sliced apple, sautéed wild mushrooms...
  • 1 Tbsp Brown sugar, optional To add roasted squash’s sweetness

Instructions

  • Turn on the Saute function on Instant Pot. Add the olive oil, onions and bell pepper. Saute on high for 4 minutes. Add the garlic and ginger and cook for 1 minute. Add the cubed squash, apple, sage, chili powder, sea salt and chicken stock.
  • Place the lid on your Instant Pot and move the knob to seal. Cook on high pressure for 5 minutes and do a quick release of the pressure.
  • Using an immersion blender in the Instant Pot, puree the mixture. Add the cream cheese and Parmesan, stir to melt and continue to puree until very smooth.
  • Garnish and serve.
“Bacon Up” Some Savory Scones

“Bacon Up” Some Savory Scones

It is not surprising that I love scones.  Scones are the British version of biscuits and as you all know, I am obsessed with biscuits.  I will go in search of two things on my travels, BISCUITS and PIE. Yep, I have been known to detour far and wide for either.  I may not go out of my way for a scone (who am I kidding, yes I will), but if I happen on a bakery and they have scones, that’s what will be sitting next to my cup of joe.  At home, my favorite scone recipe is from Dorie Greenspan.  Tender, crumbly, buttery, a touch of sweetness-downright delicious.  Make it with currants for a classic cream scone, or change it up and add orange zest and dried cranberries or my personal favorite, lemon and wild blueberries.

But this post takes a walk on the savory side.  Recommended by my friend Mary, baker extraordinaire-Bacon, Cheddar, Chive Scones from King Arthur Flour are seriously addicting.  That first bite fills your mouth with buttery crumbs, chunks of golden cheese, flecks of green chives, and then…wait for it..sweet, salty, crispy, bits of BACON.  Hello?  Are you smacking your lips right now?  You should be.

bacon cheddar chive scone

These are quick and easy to make and you can freeze the unbaked scones, take them out in the morning, throw them in the oven and voila, 30 minutes later, you are enjoying freshly baked warm scones.

After cutting the butter into the flour mixture, add your flavor bombs.

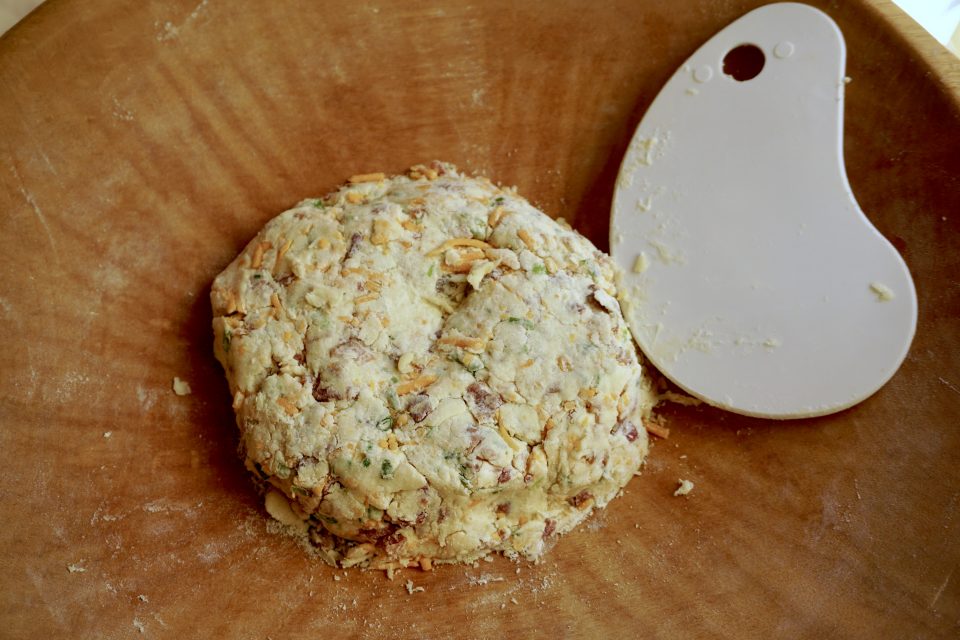
Add cream and fold, smoosh the dough together and form a disc approximately 1 inch thick, cut into wedges.  Do not overmix, but the dough should come together when pinched.  Add cream in tablespoon increments if necessary.

Confession.  The first time I made these was on a whim.  I opened the door to my fridge, hmmm, no chives, scallions will have to do.  What? No heavy cream, you’re kidding… well, I do have half & half, why not?  The trifecta of substitutions, I had a medley of cheese, Monterey Jack, Cheddar, and Mozzarella no cheddar.

Last minute bakers cannot be choosy.

The scones turned out fine. Light, great bacon flavor, definitely a keeper and I saved all those calories using half-half. Not bad!

The next time I was prepared-heavy cream, pastry flour, chives, sharp cheddar cheese…you betcha’.  This scone was a bit denser and moister, I could taste the sharp cheddar and overall the scone seemed richer.

Both scones were delicious.  So I leave it to you.  For a richer scone use heavy cream, for a lighter scone use half & half but definitely use sharp cheddar cheese for flavor.  I might even add some chopped jalapeno next time to spice it up a bit.  Woohoo!

**Alert** If you are a purist do not read the next paragraph.  The recipe calls for approximately a cup of chopped bacon.  That’s a lot of bacon.  You COULD oven-bake or pan-fry (all that splatter, ugh) the half pound of bacon and crumble it into bits, OR you could go to Costco and buy ready to use REAL bacon bits.  We are not talking imitation Bacobits but real bacon.  Snap, So EASY.


Bacon-Cheddar-Chive Scones

Course Breakfast, Snack
Cuisine American, British
Keyword scone
Prep Time 20 minutes
Cook Time 25 minutes
Total Time 55 minutes
Servings 8

Ingredients

  • 2 cups King Arthur Unbleached All-Purpose Flour or Pastry Flour Blend either works fine
  • 1/2 teaspoon salt
  • 1 tablespoon baking powder
  • 2 teaspoons sugar
  • 4 tablespoons cold butter
  • 1 cup very coarsely grated or diced cheddar cheese grated works well
  • 1/3 cup snipped fresh chives or finely diced scallion tops the green part
  • 1/2 pound bacon cooked, cooled, and crumbled (about 1 cup)* see text above
  • 3/4 cup + 2 tablespoons heavy cream or whipping cream or enough to make the dough cohesive

Instructions

  • Preheat the oven to 425°F with a rack in the middle to upper third. Lightly grease a baking sheet, or line it with parchment.
  • Whisk together the flour, salt, baking powder, and sugar. Work the butter into the flour until the mixture is unevenly crumbly, with some of the butter remaining in larger pieces.
  • Mix in the cheese, chives, and bacon until evenly distributed.
  • Add 3/4 cup of the cream, stirring to combine. Try squeezing the dough together; if it's crumbly and won't hang together, or if there are crumbs remaining in the bottom of the bowl, add cream until the dough comes together. Transfer the shaggy dough to a well-floured work surface.
  • Pat the dough into a smooth 7" disk about 3/4" thick. Transfer the disk to the prepared baking sheet. Use a knife or bench knife to cut the disk into 8 wedges, spreading the wedges apart a bit on the pan.
  • Brush the scones with a bit of cream; this will help their crust brown.
  • Bake the scones in the middle or upper third of the oven for 22 to 24 minutes, until they're golden brown. Remove them from the oven, and cool right on the pan.If they brown too quickly, cover loosely with foil.   Serve warm, or at room temperature.
  • Refrigerate any leftover scones, well wrapped, for several days; reheat before serving. Freeze for longer storage.

Notes

Want to make scones now, freeze and bake later?
Make scones up to the point they're on the baking sheet, cut and ready to bake; don't brush them with cream. Freeze, then remove from the sheet, and wrap airtight in a plastic bag. When you're ready to bake, remove however many you want to bake from the freezer, place on a baking sheet, brush with cream, and bake in a preheated 425°F oven for 35 to 40 minutes, until golden brown.
Make mini-scones: Divide the dough in half, and roll each half into a 5" round. Cut each round into 8 wedges. Bake in a preheated 425°F oven till golden brown, 18 to 20 minutes; or for about 25 minutes if frozen.
Showstopper When You InstantPotter Some Cauliflower Soup

Showstopper When You InstantPotter Some Cauliflower Soup

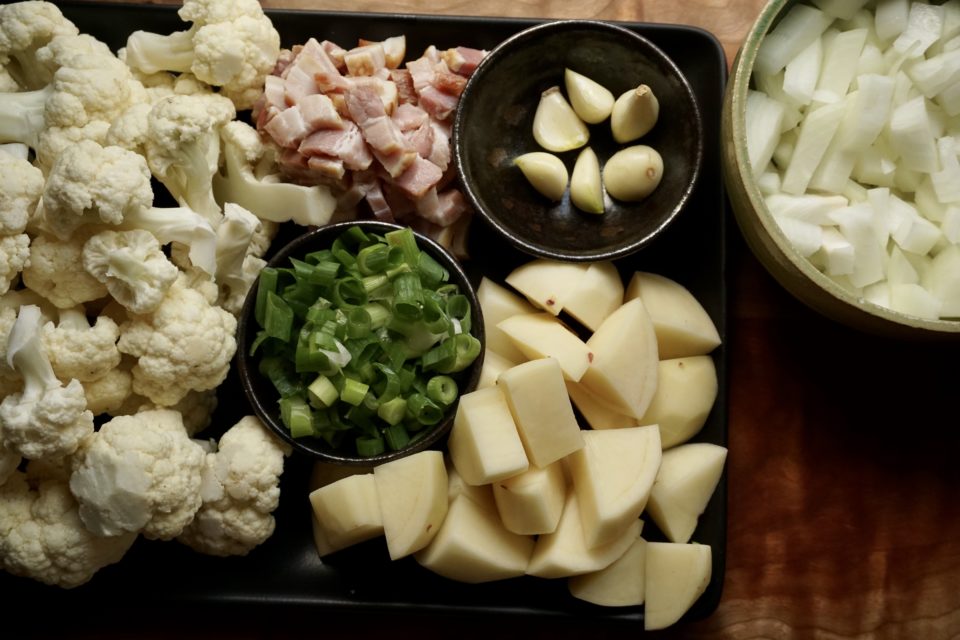
Sorry if the title made you groan. But as the weather turns cooler and the days grows shorter all I can think about is soup. My perfect fall meal is a bowl of hearty soup, a chunk of warm crusty bread spread with sweet butter, a bottle of Chianti and some nice fava beans…just KIDDING, no Chianti or fava beans.  I came across a recipe on Pressure Cooker Recipes for a cauliflower soup that #1-looked and sounded delicious and #2-can be made in a snap in an Instant Pot- WIN-WIN.

Pressure Cookr Recipes (not the most original title but spot on) is a great resource not just for recipes but for tips and info on how to use your pressure cooker.  There are quite a few soup recipes but this one stood out since I really like cauliflower. For the soup I used red potatoes but any waxy potato will do such as white rose or Yukon Gold. If cauliflower doesn’t float your boat, I think broccoli would work well also. To lighten the soup  you can use half and half or whole milk in place of heavy cream or decrease the amount of cream by half and add a bit more stock.  A nice green salad, a baguette and a bowl of this soup…yep, living the good life.


Cauliflower Soup

Ingredients

  • 1 head of cauliflower floret
  • 2 small red potatoes chunked
  • 4 cups 1 L of unsalted homemade chicken stock
  • 6 cloves of garlic minced
  • 6 slices of bacon chopped
  • 1 medium onion diced
  • 1 cup 250 ml of heavy cream
  • 2 bay leaves
  • 2 stalks of green onions chopped
  • Optional: 2 tablespoons 30 ml fish sauce
  • Optional: freshly grated Parmesan cheese for garnish

Instructions

  • Place chopped bacon in your Pressure Cooker and turn heat to medium (Instant Pot: press Sauté button). Stir occasionally and allow the bacon bits to crisp (~4 mins). Remove bacon bits from pressure cooker and place on paper towel to absorb the excess fat.
  • Sauté onions in bacon fat for roughly 1– 2 minutes until soften. Add in garlic and half of the green onions. Season with a pinch of kosher salt and pepper if you like. Sauté until fragrant.
  • Deglaze: Pour ~ ⅓ cup (100 ml) chicken stock. Scrub all the brown bits off the bottom of the pot with a wooden spoon. Keep the brown bits as they are very flavorful.
  • Pressure Cook the Cauliflower Potato Soup: Add 2 bay leaves, cauliflower, and 2 red potatoes in the pressure cooker. Pour the remaining chicken stock into pressure cooker.
  • Close the lid and cook at High Pressure for 3 minutes. Turn off the heat and use a 10 minutes Natural Release. Open the lid carefully.
  • Remove Bay Leaves. Blend cauliflower soup into desired consistency with an immersion hand blender. Add 1/2 -1 cup (250 ml) of heavy cream. Taste the soup and season with 2 tablespoons (30 ml) of fish sauce and kosher salt.
  • Serve: Garnish with green onions, crispy bacon bits, and freshly grated Parmesan cheese. Enjoy immediately. I think you will love it 🙂

Notes

  • Thinner Consistency: If you like a thinner soup consistency, add hot homemade unsalted chicken stock to adjust the thickness of the soup.
  • Smaller Cauliflower Florets: break the larger pieces into smaller florets, so it'll be easier to blend.
  • Crispy Bacon: It's important to place the bacon in the cold pot before turning on the heat (see tips section in the article).

Corn Porn (Sweet Corn Pesto with Pappardelle and Zucchini)

Corn Porn (Sweet Corn Pesto with Pappardelle and Zucchini)

Ha, bet that got your attention!  It was a bit sneaky and underhanded but I think you will thank me in the end.  Summer means fresh corn on the cob.  For as long as I can remember we have been cooking our corn in a pot of water.  A dash of sugar, a splash of milk or cream, bring the water to a boil, in goes the corn, a couple of minutes later-done.  It took my daughter to get us to try something new, to think outside the pot if you will.  GRILLED CORN.  Yes it takes longer, is a bit more work as you need to turn the corn every few minutes to develop a nice char, but WOW.  It is so worth it!  Grilling intensifies the flavor of the corn and the char or grill marks turn otherwise monotone cobs into something sexy and edgy. See, corn porn!

Grilled corn deserves more than just a sprinkle of salt and a pat of butter.  Don’t get me wrong I love buttered corn on the cob but its delicious with a squeeze of lime and spicy mayo, or a dash of chili powder and cumin topped with cotija cheese or hubby’s favorite, a smear of pesto and sprinkling of parmesan.  Can you say YUM?

DSC04223

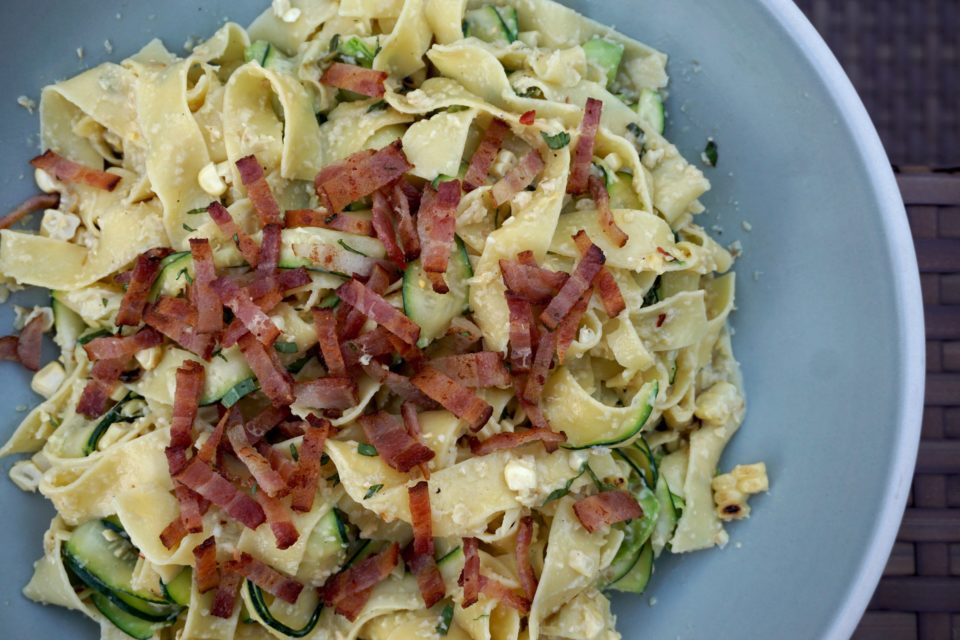
We also use grilled corn in this lovely pasta dish I found on the blog SpoonForkBacon, Sweet Corn Pesto with Pappardelle and Zucchini Noodles.  Easy and quick, the recipe calls for corn two ways, ground into a thick pesto with almonds (or use pine nuts) and parmesan cheese. Pieces of grilled corn are tossed in at the end.  We jazzed it up by adding some crispy bacon (I don’t think the bloggers of SpoonForkBacon will mind) and chili pepper flakes.  If you want to keep this meatless add sautéed mushrooms instead of bacon.  The pesto is quite thick so reserve the pasta cooking water to thin it down.  Adding zucchini strands not only lightens the dish considerably but adds a bit of color.

Corn Porn (Sweet Corn Pesto with Pappardelle)

A delicious twist on a summer pasta dish using corn as pesto!
Course dinner, lunch, One dish meals, pasta
Cuisine American
Keyword Candied bacon, Corn, pasta, Pesto
Prep Time 20 minutes
Cook Time 11 minutes

Ingredients

Sweet corn pesto:

  • 1 1/2 tablespoons unsalted butter
  • 1 tablespoon diced shallot
  • 1/2 teaspoon chili pepper flakes
  • 1 heaping cup fresh corn kernels
  • 2-3 garlic cloves thinly sliced
  • 2 tablespoons slivered almonds toasted
  • 2-3 tablespoons extra virgin olive oil
  • 3 tablespoons finely grated Parmesan
  • salt and pepper to taste
  • 2 zucchinis thinly sliced lengthwise (use a mandolin or a potato peeler for long, thin strips)
  • 8 ounces pappardelle pasta
  • 1/2 cup charred corn kernels off your grilled corn on the cob!
  • 4 strips of bacon cooked until crispy and crumbled
  • 1/4 cup julienned fresh basil leaves or cilantro

Instructions

For pesto:

  • Melt butter in a skillet over medium-high heat. Add shallots, corn, chili flakes and garlic and sauté for 2 to 3 minutes. Season with salt and pepper.
  • Remove from heat and transfer to a food processor. Allow mixture to cool, about 5 minutes. Add oil and almonds and pulse until mixture is evenly and finely ground. Remove to a small bowl.
  • Fold in Parmesan and adjust seasonings. Set aside.

For pasta:

  • Place zucchini strips onto a baking sheet (will probably need a couple) lined with a cooling rack. Lightly sprinkle each strip with kosher salt and set aside. Allow zucchini to “sweat” for about 15 minutes.
  • While zucchini ‘sweats’, cook pasta. Fill a large pot with water and bring to a boil. Add a handful of salt and pasta and boil for 5 to 7 minutes or until al dente, stirring occasionally.
  • Drain pasta (reserve cooking water) into a colander and add salted zucchini strips. Gently toss together.
  • Transfer pesto to a large mixing bowl (add a bit of the reserved pasta water, start with 1/4 cup) and top with pasta and zucchini noodles. Toss together until all the noodles are coated and evenly mixed together. Use additional pasta water if it seems dry.
  • Add corn and basil or cilantro and adjust seasonings.
  • Gently toss together, top with bacon and additional basil, serve immediately.
  • Pass additional parmesan.

Makes 3-4 servings


    Summer: Alfresco Meals & the Bacon Caper

    Summer: Alfresco Meals & the Bacon Caper

    I love alfresco dining and today was the perfect day to enjoy breakfast outside.  Banana blueberry pancakes made by my daughter, crispy bacon, a big bowl of fresh berries and mangoes (another reason to love summer), and yogurt with homemade granola. Perfect!  We set up outside in the garden, wait, forgot the coffee, back inside, grab the pot.  Back outside….WHAT? Sammy our dog, who has never, ever, ever eaten anything off the counter or table (a point of pride for us);  who will sit in a car surrounded by food including banana bread, egg rolls, fried chicken wings AND not touch any of it; HAS EATEN THE ENTIRE PLATE OF BACON, in a matter of seconds gobbled up 10 slices of bacon and licked the plate clean.  I’m still mad at him…..

    DSC01523

    Well, we still have pancakes.  I will share the easiest way to cook perfect bacon despite not having a photo of said bacon, just the dog who ate the bacon.

    Oven Cooked Bacon

    Ingredients

    • 1 pound of thick cut bacon
    • Variations:
    • 1/4 to 1/3 cup brown sugar
    • 2-3 T maple syrup
    • 1/4 tsp. cayenne
    • 1.4 tsp. black pepper

    Instructions

    • Preheat oven to 400 degrees. Line a rimmed baking sheet with foil and set wire rack on top. Lay bacon slices on rack. Do not overlap slices. Place in oven and bake 15-20 minutes until desired doneness. The bacon cooks perfectly, lays flat and best of all you don't have to stand at the stove watching it fry! Clean up is relatively easy, especially if you line your pan with foil.

    Variations:

    • For a sweet bacon, sprinkle bacon with brown sugar and bake as directed, spice it up by adding cayenne to brown sugar and sprinkling on bacon.
    • Brush with maple syrup , bake as directed.