Category: Rolled Cookies

Heartfelt Thumbprint Cookies

Heartfelt Thumbprint Cookies

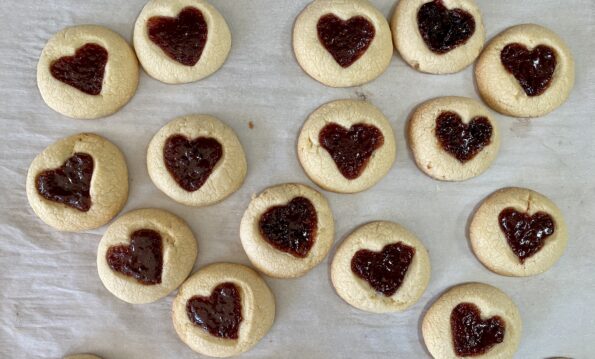
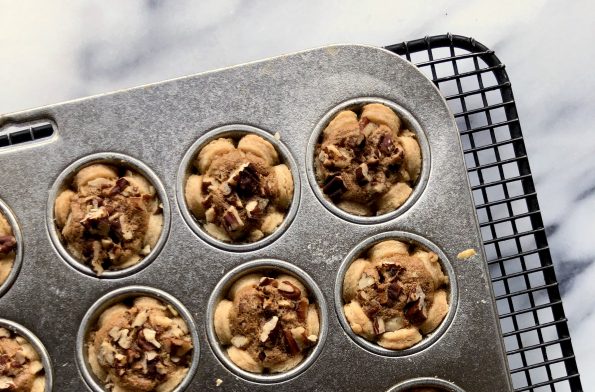
Just in time for Valentine’s Day…2024!

Thumbprint cookies with a heart-shaped center.  Do I hear a collective “Awwwww, how cute”? Yes!  I came across these delectable morsels on a fab blog I follow by Catherine Zhang, Desserts with a Hint of Asian Inspiration.  After watching her on Netflix’s Zumbo, an Australian Baking Contest/Show, I went hunting for her blog.  Cute as a button (I can say that I’m a MOM), she looks like a teenybopper but can razzle-dazzle us with her mad “baking skillz” on both her blog and her cookbook, “Mochi, Cakes and Bakes”. Her skills are beyond her years.  Her book is available at all my favorite places.

Thumbs Up Thumbprints

These thumbprints are buttery, tender, and delicious.  She adds powdered sugar which sweetens and tenderizes the cookie and cornstarch which further lowers the protein content of the flour and ensures a tender and slightly crumbly cookie.  I  added a touch of salt to bring out the flavor.  For a hint of citrus, try adding lemon or orange zest to the dough.  Cream the butter and powdered sugar until light and fluffy, add the egg yolk and vanilla (be generous), and finally, the flour and cornstarch.  Stir just until combined.  Don’t overmix.  Scrape the sides of the bowl after adding each ingredient.

Cookie Hacks

Kudos to the cookie baker, chef, or whomever who had that 💡 moment while scooping out cookie dough, THIS would be so much easier if I used an ice cream scoop.   My cookies will be round and all the same size!  For these thumbprints I used a #50 ice cream scoop (~0.68 ounce or 1.25 tablespoon) which made approximately 12-14 cookies about 2.5 inches in diameter.  Each scoop of dough weighed about 25-27 grams.

Catherine’s thumbprints call for making a cherry jam for the cookie centers.  I opted to use one of the many jams I have, a luscious strawberry jam from my favorite farmer’s market vendor, Live Earth Farm.  Depending on the consistency of your jam, you might have to heat and reduce the jam to thicken it.  This is what I did with their strawberry jam, worked like a charm.

To fill each cookie, use a squeeze bottle.  Put the jam in a squeeze bottle topped with a large bore cap.  I save the honey caps from Trader Joe’s, they work like a charm.

View these hacks on my IG reel under 3jamigos bakes.

Modern Old Inventions to Make it Simple

So, the tweak to this thumbprint cookie is using your thumb and pressing the center of your cookie dough TWICE, in the shape of a V to make the heart.  Two things, it’s a little cumbersome and she must have tiny thumbs, I had to use my pointer finger.

So there I was in my kitchen…

Enter Wes from the garage, his mancave, into the kitchen.

Wes: Whatcha doing?

Me: Making thumbprints with a heart in the middle, it’s a bit more work, but hey, it’s Valentine’s Day.

Wes:  Hmmm, I could make a heart shape stamp, would that make it easier?

Me: YES…back to the garage for you!

A few hours later…

Ooh, I LOVE my ❤️ shaped cookie stamp!  It does make it easier, but you can totally make these with your own little digits!  And, the cookies will be so cute.

Heart Thumbprints

Customizing thumbprint cookies for Valentine’s Day! Use strawberry or raspberry jam and 2 thumbprints in the shape of a V. A delicious, very cute cookie !
Course cookies, desserts
Cuisine cookies
Keyword cookies, strawberry jam, thumbprints, valentine, valentine's day
Prep Time 20 minutes
Cook Time 12 minutes

Ingredients

CHERRY JAM: But feel free to substitute your favorite red jam, like strawberry or raspberry!

  • 150 g Whole cherries approx. 1 cup
  • 50 g 1/4 cup Sugar
  • 1 tsp Lemon juice

COOKIE

    Creamed Mixture

    • 115 g Unsalted butter (1/2 cup) room temperature 68 degrees, shuld not be soft and melty
    • 60 g powdered sugar (1/2 cup)
    • 1 Egg yolk
    • 1/2 tsp Vanilla extract

    The Dry Stuff

    • 140 g All purpose flour (3/4 cup + 2 tbsp)
    • 15 g Cornstarch (2 tbsp)
    • 1/4 tsp salt
    • 1/2 Tsp lemon or orange zest, OPTIONAL finely grated

    Instructions

    • Preheat the oven to 350F

    CHERRY JAM

    • Finely chop cherries
    • Combine cherries, sugar and lemon juice in a small saucepan
    • Heat over medium heat for 8-10 minutes until thickened. Cool

    COOKIE

    • Combine flour and cornstarch in a bowl. Set aside.
    • Cream butter and powdered sugar until light and fluffy
    • Add egg yolk and vanilla extract, beat until well mixed.
    • Add flour mixture and stir until combined.
    • Use a #50 scoop to form 12-14 balls. If dough is sticky, chill for 10 minutes before scooping. Remove from fridge and roll into smooth balls. This is essential, a smooth surface, or you will have cracks in your finsihed cookie. Create a heart shape in the center of each ball using two thumbprints (I used my pointer finger) pressed in a V shape. Chill for 10-15 minutes.
    • Fill the thumbprint with cooled cherry jam or jam of your choice*
    • Bake for 10-12 minutes, or until lightly golden brown.

    Notes

    Weigh dough and divide by 12.  Use this as your guide.  Each dough ball will weigh approximately 25 grams.  Each baked cookie will be approximately 2 inches in diameter.
    *Use jam of choice.  I like raspberry or strawberry for Valentine's Day.  The jam should be fairly thick so it doesn't run too much.  If need be, heat jam and reduce to thicken it.
    The recipe can be doubled
    Alfajores (Bells Rang for this Cookie)

    Alfajores (Bells Rang for this Cookie)

    I found the cookie of my dreams at a family wedding a couple of years ago.  Strolling around the reception, waiting for the happy couple to arrive, I grabbed a glass of bubbly and gravitated towards the table of sweets,  a dazzling array of desserts.

    In the center of the table was an amazing assortment of cookies.  I chose the sugar cookie sheep, so cute I couldn’t resist. In fact, too cute to eat so I chose a second cookie, a petite round sandwich cookie covered with powdered sugar.  I popped one in my mouth.

    Wowza, Score One for the Round Cookie

    HELLOOOO…little cute as a button sandwich cookie. Where have you been all my life?  Tender, light, buttery, melt-in-your-mouth crumb with a rich-brown lovely caramel sandwiched in between. The rest of the wedding festivities were a blur as I fixated on the cookie, just kidding, it was a very nice celebration. I did eat as many cookies as I could, lol.  I stealthily circulated the room casually asking, friends and relatives about the cookies.  Ok, I’m lying…nothing stealth or casual about my inquisition.  I learned the cookies were made by the bride’s aunt who had lived in South America for a while.  The cookies were her version of Alfajores which originated in Spain and made its way to many Latin countries.  A tender shortbread-like cookie filled with caramelized milk and sugar mixture known as Dulce de Leche.  So good.

    Yep, made by the bride’s aunt!  I had an “in”.  I was wowed, they were so damn good and she made enough cookies for 300+ people.  This put me squarely in the Auntie Hall of Shame.

    It did take 5 years to finally get the recipe from her.  I badgered my niece occasionally to no avail (in her defense, she was pretty busy).  Finally, at her baby shower a couple of weeks ago, gracing the dessert table, a tray of cute sheep and Alfajores-ahhh, those lovely cookies, again.

    Lucky for me her aunt was there and I POLITELY (I accosted her) asked for the recipe.  She proceeded to rattle it off the top of her head ending with, “it’s the orange rind that really adds to the cookie, don’t forget it”.

    Thank you, Auntie

    This is actually a pretty simple cookie. Unlike many recipes for Alfajores, no egg in it. It’s flour, sugar in the form of powdered sugar, butter, salt, and a touch of orange rind.  The powdered sugar lowers the protein content creating a tender, melt-in-your-mouth cookie.

    The other component is the Dulce de Leche.  You could buy ready-made dulce de leche but what fun is that?  You could also make your own by cooking sweetened condensed milk, in the can, in a water bath.  This is simple but takes hours, and the remote chance of the can exploding loomed in my mind.  So I made my Dulce de Leche in the microwave.  Worked like a charm but it did have some stumbling blocks.

    What You Need

    A can of sweetened condensed milk (14 ounces) and a VERY LARGE microwavable bowl.  The milk will bubble and boil over if your bowl is too small, yep, exactly what happened to me.  Use a 2.5-quart bowl.  I recently bought microwave ware, Anyday Cookware, which I love, but the bowl was not quite big enough to avoid overflow.

    Liquid Gold

    The entire process takes 12-15 minutes.  In roughly 2 minute intervals you zap the mixture, remove stir and nuke again.  The mixture will bubble and then caramelize leaving you with liquid gold aka Dulce de Leche.  It will thicken as it cools down, but you do want a nice deep brown color and it shouldn’t be runny to avoid the “ooze factor” in a sandwich cookie. Use oven mitts, stir and let it cool.  You can spoon the filling onto the cookies or use a piping bag to fill the cookies. If you like butter & caramel flavor, you are going to love these cookies.

    There you have it, the cookie of my dreams.  Make a batch, I guarantee it will put a smile on your face.

    The finishing touch is optional but nice, roll the edge of the cookie in shredded coconut. Delicious.

    Alfajores

    A classic cookie found in many Latin American countries. A tender, buttery cookie with Dulce de Leche, caramelized sweetened milk filling.
    Course cookies, Dessert
    Cuisine Latin America, Spanish
    Keyword Alfajores, cookies, dulce de leche
    Prep Time 45 minutes
    Cook Time 30 minutes

    Ingredients

    Cookie

    • 1 cup unsalted butter softened 2 sticks
    • 6 tablespoons powdered sugar
    • 2-1/4 cups all-purpose flour
    • 1/2 t salt
    • Orange zest from 1/2 orange
    • 1 teaspoon vailla extract or paste optional
    • finely shredded coconut, unsweetened preferred but sweetened is ok too

    Dulce de Leche

    • 1-14 ounce can of sweetened condensed milk
    • Pinch of kosher salt or Fleur de Sel
    • 1/4-1/2 teaspoon cinnamon optional

    Instructions

    Cookie

    • Combine flour and salt in a small bowl and set aside. Zest orange.
    • Cream together butter and powdered sugar. Beat until smooth and creamy looking, should not get to the light and fluffy stage. Add orange zest, and vanilla if using, stir to incorporate.
    • Gradually add the flour mixture to the butter-sugar mixture, beat on low speed. Once the flour is incorporated, stop, do not overbeat. Remove dough from the bowl, shape into a ball and wrap with plastic wrap. Flatten the ball into a disc about 1 inch thick. Chill for at least an hour.
    • Roll dough out to 1/8 inch thickness. Using a cookie cutter, I use a 2 inch fluted cutter, cut out rounds of dough and place 1 inch apart on a parchment lined cookie sheet.
    • If dough seems soft at any time, re-chill.
    • Bake at 340 degrees for 12-15 minutes or until the edges just begin to color on the edges. They should be pale color. Remove and place on a rack to cool completely.
    • Once the dulce de leche is cold, fill a piping bag or use teaspoons to place dulce de leche on bottom side of half of the cookies. Use approximately 1 teaspoon of filling.
    • Top filled cookies with the remaining cookies and gently press to distribute filling. You want it to come to the very edge of the cookie. Roll edge of cookie in finely shredded coconut if you want. Dust both sides of cookies with powdered sugar.
    • Filled cookies can be kept for a couple of days at room temperature or in the fridge a little longer. The moisture in the dulce de leche will soften the cookies with time. If you want to make them ahead, don't fill them until you are ready to serve.

    Dulce de Leche (Adapted from Food.com)

    • Microwave directions:
    • You will need a 2-1/2 quart microwave bowl for this recipe. If you don’t have one that big, make half at a time. Trust me on this unless you like having caramel all over your microwave.
    • Pour sweetened condensed milk into bowl. If you have a vented lid, put it on. If not, cover bowl with plastic wrap and poke a couple of holes in it so the steam can escape.
    • The gold standard will be a 1000 watt microwave, adjust accordingly.*
    • Set microwave to 50% power and microwave milk for 2 minutes. If you are adding the salt and cinnamon, add it now.
    • Remove, (use oven mitts please!) Stir and put it back in the microwave. Then nuke at half power in two and a half minute intervals, stirring in between each time, for a total of ten minutes. As you cook the milk, it will boil, expel steam and gradually turn a nice rich brown. Keep in mind, you will need a pretty thick sauce for the cookies. You may need to nuke the milk for another 2-3 minutes. You want a deep rich brown. It will thicken a little as it cools.
    • *If you have a 1200 watt microwave, set it at 40%. I have a tiny 600 watt microwave so I set the power at 60%.
    • The Other Method:
    • Requires a lot more time. First, remove the paper label from the can and place it in a heavy duty pot on its side. Fill pot with enough water to cover the can by 2 inches. Bring the water to a boil and reduce heat so the water is at a simmer.
    • Make sure the water level stays 2 inches over the can at all times!!!!!! Or the can might explode!!!! Why I use the microwave method, lol. This method comes from Serious Eats.
    • Bring the water to a boil and then reduce the heat to a simmer. Simmer milk for 2-3 hours CHECKING WATER LEVEL EVERY 30 MINUTES. Add hot water as needed. 2 hours will give you a golden caramel while 3 hours will yield a deep, dark caramel.
    • Remove can from water. Allow the can to cool completely before opening, about 4 hours.
    Pineapple Pockets to the Rescue-Pining for a Cookie

    Pineapple Pockets to the Rescue-Pining for a Cookie

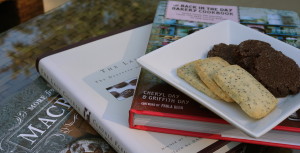
    There are a couple of baking books that are my go-tos for cookies, especially during the holidays, like Rose Levy Berenbaum’s Christmas Cookies, Alice Medrich’s Cookies and Brownies and Flo Bracker’s Sweet Miniatures.  I find myself reaching for Sweet Miniatures when I want an elegant, fancy cookie. Yes it will probably require a bit more effort than drop cookies, but it’s Christmas, when else are you going to pull out all the stops?

    Pineapple Cakes from Taiwan inspired me to make the Pineapple Pockets from Sweet Miniatures.  Taiwanese Pineapple Cakes are little bite-sized squares of pineapple jam cloaked in a sweet, buttery pastry crust.  I’m obsessed with these little cake-like cookies.  My introduction to these treats came years ago when a friend returning from a trip to Taipei brought back Te Chia Pineapple Cakes. It was love at first bite.  The sweetness from the pineapple offset by the buttery shortbread crust…needless to say, I was smitten.  I casually mention pineapple cakes to every friend that goes back to Taiwan while giving them my best wistful look.

    While these Pineapple Pockets are more complicated than your average drop cookie, the resemblance to Taiwanese Pineapple Cakes put these on my must-bake holiday cookie list. The process begins with  making a caramelized pineapple jam then a pastry dough. The dough is rolled and cut into circles, dotted with the jam, and then shaped into cones.  Labor-intensive, but in the end, you are rewarded with a meltingly tender cookie highlighted by the dollop of golden, caramelized pineapple preserves. They are absolutely delicious and well worth the effort.  But most importantly, they are delicious enough to satisfy my Pineapple Cake craving. Now I don’t have to wait for friends to take pity on me and bring them back from Taiwan!

    The jam is made first and set aside to cool. I added 1/2 tsp of vanilla to the jam and a pinch of salt to enhance the flavor.   Make the dough, chill it, then roll it into a circle. The dough should be about 1/8-3/16 inch thickness. Use a 2 inch round cutter for the circles.  Your best friend is your refrigerator.  If the dough gets soft or sticky during the process, put it back in the fridge to chill. This will make it easier to handle.

    Position the jam off-center.  Using a butter knife or thin blade spatula, flip the edge closest to you over the jam.  Angle your spatula on the opposite side and flip towards you, overlapping with the first.

    Ta-da, ready to bake!  Sprinkle powdered sugar on the finished cookies for a festive look.  In a pinch, you could use jarred preserves, make sure whatever you use is not too runny or thin.

    Pineapple Pockets

    Flo Bracker's delicious Pineapple Pockets. Caramelized Pineapple Jam encased in a buttery, tender pastry and shaped into a cone.
    Course cookies
    Cuisine American
    Keyword cookies, flo bracker, holiday cookies, Pineapple cakes, Pineapple Pockets
    Prep Time 1 hour
    Cook Time 14 minutes

    Ingredients

    Dough

    • 6 ounces unsalted butter, room temp 1-1/2 sticks
    • 1/4 cup granulated sugar 50gms
    • 1/2 cup unsifted powdered sugar 50gms
    • 2 egg yolks
    • 1 tsp vanilla
    • 1-2/3 cup unsifted all-purpose flour 235gms

    Pineapple Filling

    • 2 tbsp water
    • 1/3 cup granulated sugar 65gms
    • 8-ounce can crushed pineapple in natural juice
    • 1/2 tbsp unsalted butter

    Instructions

    • In bowl of mixer, cream butter at medium low speed until smooth, about 1 minute. Beat in sugars at medium speed until creamy. Add egg yolks, one at a time, then vanilla, beating until well combined and slightly fluffy. Scrape down the sides of bowl. Lower mixer speed, and gradually add flour and mix just until it is combined.
    • Gather dough into a disc and chill 15-30 minutes. Divide dough in half and on parchment or wax paper, roll each piece into a circle. approximately 11 inches in diameter and 1/8 inch thick. Transfer to a baking sheet, cover top with parchment and refrigerate until firm about 2 hours.

    Pineapple filling

    • In a medium saucepan, combine water and sugar over low heat. Swirl occasionally and wash down any sugar crystals that form on the side with a brush dipped in cold water to dissolve them. Increase heat to medium-high and cook without stirring until sugar thickens and turns amber in color about 8 minutes. Take it off the heat and add crushed pineapple and juice all at once. Careful as mixture will bubble up. Stir to combine and return the pan to stove and cook over med-high heat until mixture is golden and syrupy. Remove from stove and stir in butter. Place in bowl and set it aside to cool.

    Putting It All Together

    • Preheat oven to 325
    • Remove one piece of dough, peel off parchment. Put parchment back on dough and flip dough over and peel off bottom parchment.
    • Use a 2 inch round cookie cutter cut out circles and place on lined baking sheets. Place 1/2 teaspoon of cooled jam off-centered on circle. Fold over one edge of dough over jam, then overlap the opposite edge at an angle to form a cone. See pics.
    • Bake one sheet at a time, for 12-14 minutes until edges ar light golden.
    • Remove from oven and place on wire rack to cool for 5 minutes. Lift cookies off and place directly on cooling rack.
    • Sprinkle with powdered sugar. optional)
    • Store at room temp for up to 10 days.

    The 2020 Holiday Cookie Tin

    Jest Jammin’ (Christmas Cookies)

    Jest Jammin’ (Christmas Cookies)

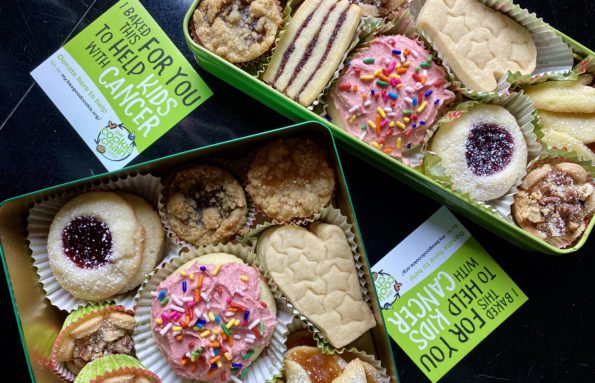
    I remarked to hubby the other day, “I ‘ve been pretty bad about baking holiday treats the last few years, huh”.  It was a rhetorical question as I pulled out more than a few jars of expired jams.  I love filled cookies-Thumbprints, Linzer bars, Raspberry Oaties so I have a penchant for stocking up on “stuff” like preserves, sprinkles, holiday cupcake liners…in preparation for the holiday season.

    Somehow I curtailed my cookie baking tradition a “few” years ago.  Homemade granola and Candied Spiced Pecans were so much easier.  I finally resurrected the cookie baking last year.  I eased my way back with an assortment of slice and bake cookies (check out my index for slice and bakes!) but this year, as I guiltily tossed several jars of raspberry preserves, I exclaimed…

    JAM IT, I’m baking filled cookies this year!

    So without further ado, here is the line-up for this year’s holiday cookie jam-stravaganza.

    Cranberry Cherry Ribbon Cookies– Sweet-tart cranberry cherry jam sandwiched between buttery shortbread.  I hope Nancy Baggett doesn’t mind, I construct these cookies differently than in her All American Cookie Book- this one is for you, Joe B. (Recipe link soon!)

    Raspberry Cheesecake Thumbprints– Good, but I’d make my Thumbprints instead if you like walnuts, or Emeril’s Thumbprints that have a hint of citrus. Yummers.

    Dorie’s Jammers filled with recently bought jams (strawberry, peach and cherry) from Sunblest Orchards. Dorie, my baking hero.

    Pineapple Pockets – Flo Bracker’s Sweet Miniatures.  Buttery, melt-in-your-mouth cookie with a little scoop of caramelized pineapple jam.  Mele Kalikimaka!

    Not jam-filled but a holiday imperative I make these

    Eric Kim’s Grocery Store CookieThese cookies make me happy!  I don’t even like the supermarket ones, but these?  Make them now, you’ll thank me.   A soft, tender cake-like vanilla cookie with hot pink raspberry frosting-SO DELICIOUS. Here is his video on making these little smiles. Recipe with my notes posted thru link.  Shhh, don’t tell NYT cooking.  I subscribe-it’s all good.

    Traditional Scottish Shortbread-because it’s my favorite and if I’m making cookies, I’m making these.  Looks are deceiving, they are scrumptious.

    Pecan Tartlets-not a jam but it is a filled cookie and oh so good. Hubby would disavow me if I didn’t make them.

    Yes, this is my holiday cookie run-down.  Any of these would make an awesome sweet treat to ring in the New Year, kick 2020 to the curb and usher in 2021.  But don’t just bake them during the holidays, make them for Ground Hog Day, Valentine’s Day, MY birthday, YOUR birthday, because it’s Tuesday. Anytime you want to make someone smile.  Jamie made Sally’s Baking Addiction Best Sugar Cookies for the delicious beauties below!

    Or For A Great Cause!

    Happy Holidays

    Peanut Butter Miso Cookies -Kool, Bake Me Some of that Funky Stuff

    Peanut Butter Miso Cookies -Kool, Bake Me Some of that Funky Stuff

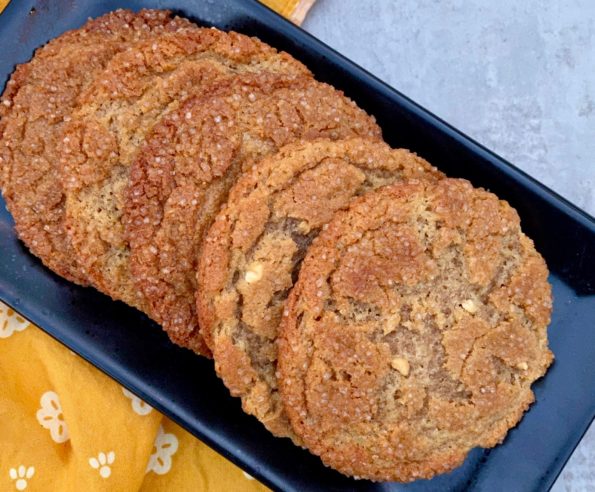
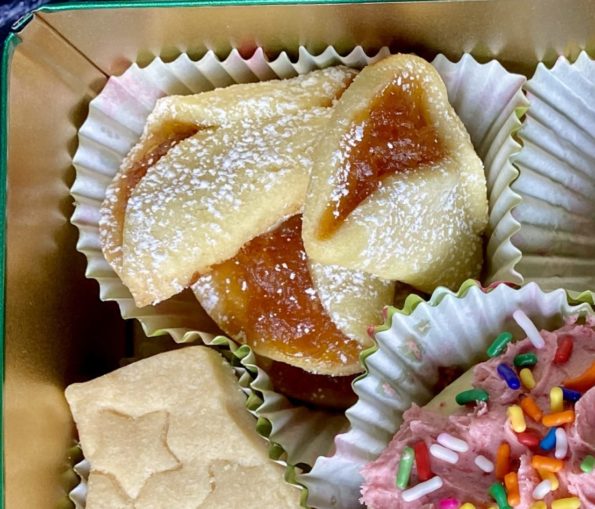
    Always on the lookout for cookies with a twist, I came across these cookies in New York Times Cooking.  There I was nonchalantly scrolling through my feed when it popped up on my screen PEANUT BUTTER MISO COOKIES.  Say what?  Miso?  In a cookie?  Like a lot of folks, I have had Miso Soup, but in a cookie? I was intrigued.

    This is essentially a  peanut butter cookie that sneaks in miso paste to add umami. It will have your cookie tasters guessing…what’s that yummy salty, edgy flavor? A cookie with a twist, something different but familiar.

    Miso Primer

    Before getting to the recipe, let’s talk about Miso.  Miso is made from soybean that has been fermented with Koji, (the fungus Aspergillus oryzae).  It is a cornerstone of Japanese cuisine.  It adds a salty, earthy flavor to soups, marinades, and salad dressings.  There is white miso or Shiro Miso, red miso or Aka Miso and mixed miso or Awase Miso (red and white).  White miso is mild and sweet while red miso is aged longer and develops a much saltier, earthy taste, and is darker in color.  Awase. Miso is a blend of both red and white miso.  Shiro Miso is the most popular, so if you had to pick just one, this is the way to go. Try Hikari White Organic Miso which can be found in most Japanese stores.  Miso Honey Ribs, and Japanese Cha Siu from No Recipes both use white miso and are really delicious.

    These cookies follow the standard cookie-making process.  Cream butter and sugar until light and fluffy.  Add white miso and peanut butter and cream mixture again, add egg and vanilla and stir in flour.  Pop the dough into the fridge to chill for about 15 minutes.  The dough will firm up and be easier to handle.  Use a 2 tablespoon ice cream scoop (#30-#36) to scoop out portions of dough, and hand shape to form a nice smooth ball.  Roll cookies in Demerara sugar or raw sugar which provides a nice crunch.  Place on a baking sheet.

    The KEY to this recipe, let the cookie dough rest.  Put it in the fridge for a minimum of 2 hours to allow the miso to mellow.  The longer you let it rest the mellower the miso gets.
    A great addition to these cookies would be white chocolate chips to compliment the miso or butterscotch chips.

    Pan Rapping

    A trick from Sarabeth’s baking book.  When the edges of the cookies are just beginning to set and the centers puff up, reach in the oven, lift the cookie sheet up, and rap or drop it on the rack.  This will cause the cookies to deflate and create those characteristic cracks.  Bake until the edges are set.  Yes, the precursor to pan banging cookies.

    The sweet, salty, earthy flavor of these cookies pairs well with a nice cup of tea.  The edge is crispy, the center is chewy and every bite has a nice crunch from the sugar.  It’s different, it’s delicious, and a great addition to any holiday box of treats.

    Peanut Butter Miso Cookies

    A sweet, salty, earthy, crispy-edged, cookie with a chewy center and a miso twist. Delicious!
    Course cookies
    Cuisine American, Asian-American
    Keyword Peanut Butter Miso Cookie
    Prep Time 20 minutes
    Cook Time 15 minutes

    Ingredients

    • 1 ¾ cups all-purpose flour 225 grams
    • ¾ teaspoon baking soda
    • ½ teaspoon baking powder
    • ½  cup unsalted butter (1 stick), at room temperature 115 grams
    • 1 cup light brown sugar 220 grams
    • ½ cup granulated sugar 100 grams
    • cup white miso paste 80 milliliters
    • ¼ chunky peanut butter 60 milliliters
    • 1 large egg
    • 1 ½ teaspoons vanilla extract
    • ½ cup 105 grams Demerara sugar, plus more as needed
    • 2/3 cup white chocolate chips or butterscotch chips optional

    Instructions

    • In a medium bowl, combine flour, baking soda and baking powder, and whisk until incorporated. Set aside.
    • In the bowl of an electric mixer fitted with the paddle attachment, mix butter, light brown sugar and granulated sugar at medium speed until light and fluffy, about 5 minutes.
    • Add miso and peanut butter to the mixing bowl, and continue to mix at medium speed, about 1 minute. Scrape down sides of the bowl to make sure all of the ingredients are evenly incorporated, and mix a bit more if needed. Add egg and vanilla extract, and mix until just combined.
    • Add 1/3 of the flour mixture to the mixing bowl, and mix on low speed until flour mixture is incorporated. Repeat with remaining flour mixture in two batches until all of it is incorporated.
    • Place 1/2 cup Demerara sugar into a small bowl. Scoop out a ball of dough (about 50 grams per cookie-use a 2 T ice cream scoop), and roll each portion between your hands until it is nice and round. (If the dough is too soft to roll, you can pop the mixing bowl in the refrigerator for 5 to 10 minutes to firm the dough up slightly.) Roll the piece of dough into the bowl of Demerara sugar and turn to coat. Transfer each ball to a parchment-lined baking sheet, arranging them about 3 inches apart. Repeat with all of the dough.
    • Refrigerate for 2 hours and up to overnight. (Even 15 minutes of refrigerator time will help the dough firm up, and the flavors meld. The longer the dough is refrigerated, the more mellow the flavors will be.)
    • When ready to bake, heat oven to 350 degrees. Bake cookies for about 15 minutes, until crisp at the edges and slightly puffed in the middle. They should still be a bit underdone in the center. Pull out the baking sheet and hit it against a counter. Place back into the oven to finish for about 3 to 4 minutes. When cookies are firm at the edges and slightly puffed in the center, pull them out and again hit the baking sheet against the counter. The cookies should appear flat and crinkly at the center.
    • Let the cookies cool on a baking sheet for a few minutes, then transfer to a cooling rack. Store fully cooled cookies in an airtight container; they should retain their chewy texture for a few days.
    Beta Testers (Lemon Poppy Seed Shortbread, Mexican Hot Chocolate Shortbread, Pistachio Shortbread Cookies)

    Beta Testers (Lemon Poppy Seed Shortbread, Mexican Hot Chocolate Shortbread, Pistachio Shortbread Cookies)

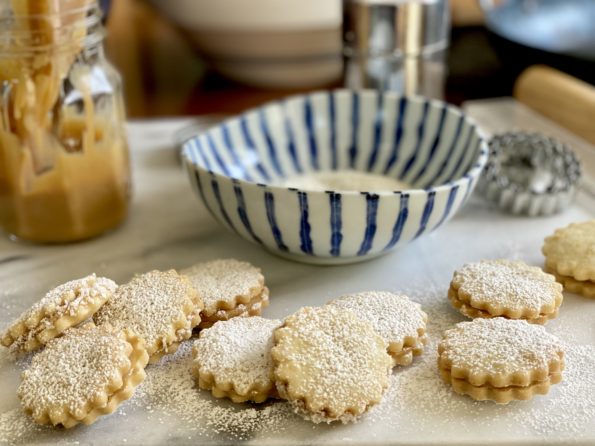
    With the reprint of Claudia Fleming’s “The Last Course”, I reached into the archives for a post on a trio of shortbread I “tested” on friends and family.  A delectable triple play of cookies that would be lovely in a holiday cookie tin or a festive platter for the annual swap.  Fleming’s Lemon Poppy Seed cookies are buttery, tender, lemony with a crunch from the poppy seeds while Back in the Day’s  Mexican Hot Chocolate Shortbread are rich, chocolatey, and spicy.  Bake em’ TODAY.  I love pistachios for their color and flavor, both shine in Macrina Bakery’s Pistachio Shortbread.

    Without further ado, a trio of tasty cookie bites from “back in the day” that you should bake today!

    Human nature always prevails and I am no exception.  Every New Year’s Day I make a couple of resolutions…lose weight, get more sleep, test more cookie recipes for next year’s holiday box, one out of three ain’t bad!  If I were a major leaguer with a 333 batting average I’d be batting clean up.

    DSC01290

    So from my collection of cookbooks, I pulled out Back in the Day Bakery Book and made the Mexican Hot Chocolate Shortbread,  Lemon Poppyseed Shortbread from Claudia Fleming’s The Last Course (re-issued!) and Pistachio Shortbread from More From Macrina Bakery.  I don’t like to rely on my taste buds only, so my trusty crew friends, nieces, & family were my “beta testers”.  Consensus was there was no consensus!  Although I might have to give the edge to the Mexican Hot Chocolate shortbread, me and Joe Biden..here to cast the final vote.

    A successful beta test since these three recipes would all make the cut for the holiday cookie basket.

    Mexican Hot Chocolate Shortbread

    These cookies taste like a mug of rich hot chocolate. The deep mocha-flavor is followed by a kick of cayenne pepper. Don't let the heat put you off; it only enhances the flavor.
    Prep Time 15 minutes
    Cook Time 10 minutes
    Author Back In the Day Bakery

    Ingredients

    Dry Ingredients #1

    • 1 3/4 cups unbleached all-purpose flour
    • 1/2 cup almond flour

    Creamed Mixture

    • 1/2 pound 2 sticks unsalted butter, at room temperature
    • 1/2 teaspoon pure vanilla extract
    • 1/2 teaspoon pure almond extract

    Dry Ingredients #2

    • 1 cup packed light brown sugar
    • 1/2 cup Dutch-processed cocoa powder
    • 1/2 teaspoon ground cinnamon
    • 1/4 teaspoon espresso powder or finely ground coffee
    • 1/2 teaspoon fine sea salt
    • 1/4 teaspoon cayenne pepper

    The Finishers

    • 1/2 cup mini semisweet chocolate chips
    • 1/4 cup granulated sugar for dusting

    Instructions

    • Line two cookie sheets with parchment.
    • Whisk the flours together in a medium bowl and set aside.
    • In the bowl of a stand mixer fitted with the paddle attachment (or in a large mixing bowl, using a handheld mixer), cream the butter, vanilla, and almond extract until the mixture is pale in color, 1 to 2 minutes. Turn the speed down to low, add the brown sugar, cocoa, cinnamon, espresso, salt, and cayenne pepper, and continue to mix until the mixture is smooth, 2 to 3 minutes. Add the flour mixture in thirds until just combined. With the mixer running, sprinkle in the chocolate chips, mixing until just combined.
    • Transfer the dough to another bowl and finish mixing by hand to make sure no bits of flour or butter are hiding on the bottom of the bowl and the dough is thoroughly mixed.
    • Use a small ice cream scoop to form the cookies, about 1 rounded tablespoon each, and place on the prepared cookie sheets, leaving 1 inch between the cookies to allow for spreading.
    • Flatten each cookie with a cookie stamp dusted with granulated sugar, or gently flatten each cookie with the palm of your hand and then dust the tops with sugar. They will have little cracks in the top. Refrigerate the cookies for at least 1 hour, or up to 5 hours. Position a rack in the lower third of the oven and preheat the oven to 350°F. Bake the cookies, one sheet at a time, for 8 to 10 minutes, rotating the pan halfway through the baking time for even doneness (see Tip). Cool the cookies completely on wire racks. Store the cookies in an airtight container for up to 3 days at room temperature.
    • Tip: It is really difficult to tell when dark chocolate cookies are done. Pull them out when they are firm to the touch on the edges and the sweet smell of chocolate has begun to fill your kitchen.

    Lemon-Poppy Seed Shortbread (Claudia Fleming, The Last Course)

    Ingredients

    • 1 cup 2 sticks unsalted butter, softened
    • 3/4 cup confectioners’ sugar
    • 1 1/2 teaspoons fresh lemon juice
    • 1 1/2 teaspoons grated lemon zest
    • 1/2 teaspoon vanilla extract
    • 2 cups all-purpose flour sifted
    • 1 1/2 tablespoons poppy seeds
    • 1/2 teaspoon salt

    Instructions

    • Using an electric mixer, beat the butter and sugar until creamy and smooth, about two minutes. Add the lemon juice, zest and vanilla and beat well.
    • In a bowl, combine the flour, poppy seeds, and salt. Add the dry ingredients to the butter mixture and mix until combined. Form the dough into a disk and, wrap in plastic wrap and chill for at least 3 hours and up to 3 days or freeze for up to 2 months.
    • Preheat oven to 300° F. Roll the dough between two sheets of wax paper to a 1/4-inch-thick rectangle. return dough to refrigerator for an additional 30 minutes. Cut the shortbread into shapes with a two-inch cookie cutter, or use a knife, and place 1 inch apart on parchment-lined baking sheets. Do not reroll scraps, if using cookie cutter. Prick shortbread with a fork and bake until pale golden all over, 23 to 25 minutes. Cool on a wire rack.

    PISTACHIO SHORTBREAD COOKIES

    Ingredients

    • 1 cup unbleached all-purpose flour plus more for the work surface
    • 1/4 cup granulated sugar
    • 1/2 teaspoon kosher salt
    • 1/2 cup shelled raw or roasted pistachios
    • 1/2 teaspoon vanilla extract
    • 1 stick 4 ounces unsalted butter, cold, cut into 1/4-inch pieces
    • 1 to 2 tablespoons granulated sugar sanding sugar, or raw sugar, for garnish

    Instructions

    • Pulse the flour, granulated sugar, salt, pistachios, and vanilla in the bowl of a food processor for 1 to 2 minutes, until the pistachios are finely ground. Scatter the butter pieces in the food processor and pulse several times to cut the butter into the flour. Stop pulsing when the ingredients just come together and cling to one another. (Watch carefully, as food processors work very fast and can easily overmix the dough. At first the mixture will have a coarse, crumbly texture, but then if you’re not careful it will quickly turn into a paste.)
    • Turn the dough onto a lightly floured work surface and shape it into a log about 2 inches in diameter and 10 inches long. (If the dough is too sticky, toss it in the fridge for 10 or so minutes to make it easier to work with. Dampening your hands ever so slightly with cold water also helps.) Place the log on a piece of plastic wrap or parchment paper. Tightly roll the wrap around the log and twist the ends to seal them securely. Refrigerate for at least 2 hours or up to 5 days. (This dough also freezes well for up to 3 weeks if wrapped tightly in plastic.)
    • Position 2 racks in the center of the oven and preheat to 325ºF (163ºC). Line 2 rimmed baking sheets with parchment paper and set aside.
    • Cut the chilled cookie dough into 1⁄2-inch-thick coins and place about 2 inches apart on the prepared baking sheets. Lightly brush the top of each shortbread cookie with water and sprinkle with sugar. Bake for 15 to 18 minutes, or until the cookies are lightly golden brown on both top and bottom. Let the cookies cool on the baking sheet for 5 minutes, then transfer to a wire rack to cool completely. Store the pistachio shortbread cookies in an airtight container at room temperature for up to 2 weeks.


    Pecan Tartlets-The Perfect Little Nutty Bite

    Pecan Tartlets-The Perfect Little Nutty Bite

    We were invited to Rosh Hashanah dinner the other night and I volunteered to bring dessert.  It’s usually a no brainer since our host LOVES Lemon Bars.  But then I remembered I had promised to post Mrs. S’s Pecan Tartlet recipe.  The Lemon Bars would have to wait for another occasion.

    Mrs. S, for all of you that have not read my Toffee Bars post (hint, hint), is my baking muse and mom of my BFF, Joy.  Every Christmas, since I met Joy in middle school, I have been the lucky recipient of a plate of Mrs. S’s holiday cookies.  They were delicious and beautiful.  She was meticulous and something of a control freak (I can SO relate) so she would shoo us out of the kitchen when she started her holiday baking.  Occasionally she would let us help with just the finishing touches, placing the pecan halves in her chocolate thumbprints or rolling her meltingly tender almond crescents in powdered sugar.  But mixing the cookie dough itself, nope, that was her domain.

    My Favorites

    Her Toffee Bars and Pecan Tartlets.  When I became interested in cooking and baking and not just eating, I asked for her cookie recipes and she was gracious enough to share them with me.  For Mrs. S making these cookies became second nature.  Details and how-to’s were committed to memory, not to paper.  Over the years I have figured out the little extra steps she took that elevated her cookies, especially her Pecan Tartlets, above the rest.  I’ve also added my tweaks to make the process easier and faster.

    How-Tos:

    The tart crust is butter and cream cheese-based and similar to a cookie dough.  It does not include any liquids so it won’t shrink much.  I make the dough in a food processor, much like tart dough.  The dry ingredients are placed in the food processor bowl and pulsed a couple of times to combine.  The original recipe includes up to half a cup of sugar in the dough, way too much.  I often don’t add any sugar but if you like a sweeter crust, add a MAX of 1/4 cup.  Note that the more sugar you add, the quicker you will need to roll out the dough as the sugar makes the dough stickier and tougher to work with.  Add the butter and cream cheese and pulse until the dough just starts to clump.  Do not overprocess.  Gather the dough and chill for approximately 2 hours. 

    You could scoop out dough, roll it into balls and press each into tiny muffin tins which is pretty easy, but then you wouldn’t get those cute scalloped edges.  Mrs. S’s method was to roll the dough out approximately 3/16 inch thick and cut it with a flower petal cookie cutter.  I know, lots of work but, look at how nice they look.  The genius of using the petal cutter is the shape makes it very easy to press the dough into the muffin tins.

    Next Step:

    Make the filling while the dough chills in the fridge.  Here’s the cheat.  Pour the filling into a squeeze bottle.  I replace the top with the lid from the honey I buy at TJ’s.  The spout is bigger which allows the filling to flow easily…a nice squirt into each muffin cup.  How EASY is that?  Ingenuity being the mother of invention, my cheapie wine opener works perfectly for pressing the dough evenly into the muffin tin.

    Fill the tarts to where the petals meet and sprinkle the pecans on top.  Walnuts or a mix of different nuts would be delicious too.  Follow the baking instructions.  When slightly cooled, dust the tarts with a nice layer of powdered sugar.

    Enjoy these little bites of bliss.  Don’t wait until the holidays to make them!

    MINIATURE PECAN TARTS

    Bite-sized pecan tarts, sweet, nutty and delicious!
    Course cookies, Dessert
    Cuisine American
    Keyword cookies, holiday baking, Mini Pecan Tarts, pecans
    Prep Time 45 minutes
    35 minutes

    Equipment

    • mini-muffin tin
    • 2 inch petal cookie cutter optional

    Ingredients

    Cream Cheese pastry

      Mix together:

      • 3 ounce cream cheese
      • 1 stick butter salted, or if using unsalted add 1/4 tsp salt
      • 1 cup all-purpose flour  preferably Gold Medal but any will work

      Filling

        Blend together:

        • 1 tablespoon softened butter
        • 1 cup firmly packed brown sugar light brown sugar
        • 1 egg large
        • 1 teaspoon vanilla
        • 1 cup chopped pecans substitute mixed nuts if you like, walnuts

        Instructions

        Dough

        • Original instructions: Combine well and refrigerate. Cut into small circles and press into mini-muffin tin.
        • My instructions: Mix the dough in a food processor. Place flour in fp bowl. Add butter and cream cheese to flour. Pulse mixture just until it begins to clump. Do not overprocess. Pour onto wax paper or plastic wrap and pat into a disc shape. Chill for at least 2 hours.
        • On a lightly floured surface, roll pastry out to 3/16-1/4 inch thickness. Cut into small circles. I use a petal cutter 2.5-inch or a plain round 2-inch cutter. Press circles into ungreased muffin tins. Chill muffin tins while making the filling.

        Filling

        • Blend filling ingredients well. Pour into a squeeze bottle. I use a plastic TJ honey container that has an opening about 1/8inch. This is a quick way to fill the muffin tins. You could use a spoon.
        • Fill prepared muffin tins about 3/4 full.  Allow filling to settle slightly.  Fill each muffin tin to the top with finely chopped pecans (about 1 cup)  Chill.
        • Bake in a preheated oven at 350 degrees for 15 minutes.  Reduce temperature to 250 degrees and bake 20 minutes longer. Allow tarts to cool and carefully remove from tins.
        • Sprinkle lightly with powdered sugar while still warm.  Allow to cool before removing from tins.

        Notes

        There aren't instructions for the prepared muffin tins.  I'm guessing at lightly greased.  I generally don't grease the tins and occasionally I lose a tartlet to sticking but for the most part a little pry with a thin bladed knife and the tarts come out of the pan.
        Tall Order for a Better Shortbread-Bien Cuit Bakery

        Tall Order for a Better Shortbread-Bien Cuit Bakery

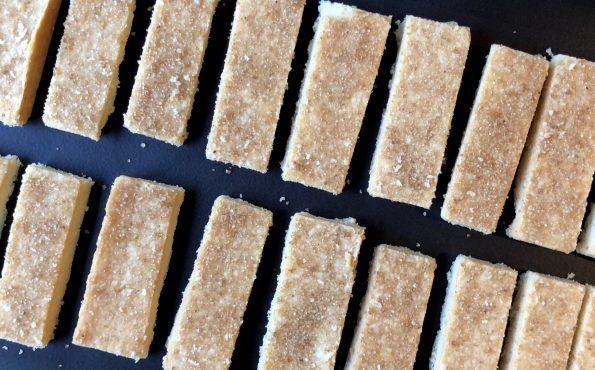
        I love shortbread and any excuse to bake a batch, I am all there.  So when Amanda Hesser posted an article on a favorite shortbread that graced their office meetings, all I could think was, do I have butter in the fridge?

        Duh, of course.

        The title of her article, The World’s Best Shortbread Is No Longer Sold-but We Got The Recipe.

        Whaat? World’s Best?  This was added incentive to make a batch.  After all, I think I already have the perfect Shortbread.  An essay entitled “My Father’s Shortbread” found long ago in Cuisine magazine was both a tribute to the author’s Scottish father and his recipe for shortbread.  It has been the cornerstone of my annual holiday cookie platter for more years than I can remember.  Bouchon’s Shortbread is similar in texture and flavor to my favorite and is my runner up.  Can Amanda’s best these? I’ll let you be the judge.

        Update 10/2023:  Yes, I love shortbread and two additional recipes I have tried that are very similar to this shortbread are Ted Lasso’s Biscuits with the Boss.  Both are delightful, Christina Tosi’s and Apple TV’s (the producer of Ted Lasso).

        Let’s get busy…

        shortbread dough 1

        The dough comes together easily.  The dry ingredients are blended briefly in a mixer and pieces of cold butter are added and mixed at low speed just until the dough comes together.  Do not overmix.

        Press the dough evenly into a PARCHMENT lined 9×13 baking pan. The parchment should hang over the sides. Cover the dough and refrigerate overnight.  The parchment will make it easier to remove the cookies after baking.

        The dough should be about 3/8 inch thick. Total baking time for my batch was 50 minutes, so start checking early and rotate pan at the halfway mark.  You want a nice golden brown.  Sprinkle the Demerara Sugar on the cookie as soon as the pan comes out of the oven.  It will adhere better.  At the 5 minute mark when I tried removing the shortbread from the pan, it cracked as the parchment gave way.  Next time I might try cutting the cookies in the pan, letting it cool and then removing them.  They’re a bit fragile so you may lose a couple while removing it from the pan.  Lucky you, you get to eat those pieces.

        I will admit, they’re pretty good.  The biggest difference is the use of powdered sugar instead of granulated sugar.  Powdered sugar has cornstarch and lowers the protein content of the dough.  This creates a less dense, softer cookie.  It has the prerequisite buttery flavor, but the texture is different.  The sprinkling of sugar (use Demerara or Turbinado) on the top gives these cookies a nice crunch. I love that crisp resistance you get when you bite into a classic shortbread cookie, the sugar gives that crunch. Next time I’ll try European butter to up my butter game.  After rereading Ms. Hesser’s article, with the low baking temperature, I probably could have left the cookies in for a bit longer.  This might have added some crispness and flakiness without the shortbread getting too dark.

        A steaming cup of coffee or tea and a few of these biscuits make for a lovely afternoon break.  Turning on Downton Abbey would make it perfect!  Update: 10/2023 If not Downton Abbey, Ted Lasso would be a great watch!

        Bien Cuit Shortbread

        Course cookies
        Cuisine American
        Keyword Shortbread
        Prep Time 15 minutes

        Ingredients

        • 302 grams unsalted butter
        • 93 grams confectioners' sugar
        • 3.5 grams kosher salt
        • 302 grams all-purpose flour
        • 1/8 cup regular or raw sugar for sprinkling

        Instructions

        • Line a 13x9-inch baking sheet or baking dish with parchment paper.
        • Cut the cold butter and reserve at room temperature to temper slightly.
        • Mix the confectioners’ sugar, salt, and flour in a mixer fitted with a paddle attachment. Mix for a few seconds to combine the dry ingredients.
        • Add the cubed butter and mix on low speed until a smooth dough is formed and butter is fully incorporated.
        • At first, the dough will look extremely flaky and dry; let it keep mixing and it will eventually come together into a dough.
        • Dump the dough into the baking sheet ordish and spread it evenly to the corners. Cover with plastic wrap and chill overnight.
        • The next day, heat the oven to 300°Dock the dough every inch or so with a fork. Bake until the shortbread is golden brown, 60-75 minutes.
        • Remove the pan from the oven and let cool for 5 minutes. Turn the shortbread out onto a cutting board, and slice into 4-inch x ¾-inch slices. Sprinkle with raw sugar and transfer to a baking rack to cool completely. Store in airtight containers.

        Notes

        From a commenter on the original recipe:  
        I went to King Arthur Flour's website. They have a list of ingredient conversion and I trust them, so here's what they say:
        302 grams butter = 1 1/3 cup (2 2/3 sticks)
        93 grams unsifted confectioner's sugar = .8 cups (a bit more than 3/4 cup + 1 tablespoon)
        3.5 grams diamond crystal salt = 1 tsp on my kitchen scale (Canning salt, which has a very similar texture to table salt, comes out to 1/2 tsp)
        302 grams flour = 2 1/2 cups (I'm betting this is sifted but I'm not sure)


        Ladies and Gentlemen, This is Cookie Number 5 (Nibby Buckwheat Butter Cookies)

        Ladies and Gentlemen, This is Cookie Number 5 (Nibby Buckwheat Butter Cookies)

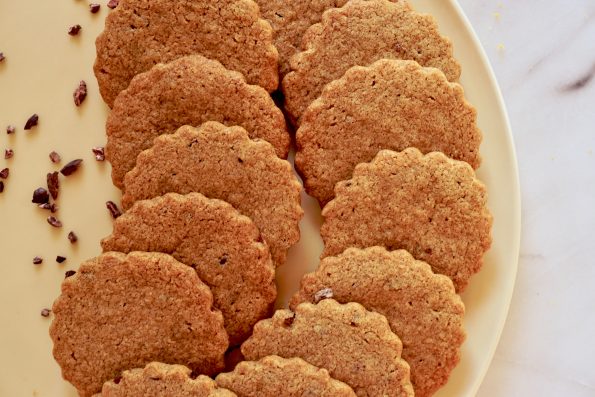
        One of my favorite baking goddesses (I have many) is Alice Medrich. Yes, that Alice, Chocolate Maven, Dessert Queen and creator of quite possibly the best damn lemon bars ever. Don’t get me started on her Snickerdoodles, so good.  Cookie number 5 is from her book, Pure Desserts, a shortbread cookie with a twist-Nibby Buckwheat Butter Cookies.

        If you have been following 3jamigos you know that I fall in the shortbread camp for favorite type of cookie. Buttery goodness in bite-size morsels with a hint of sweetness, sign me up.  Well lucky me, this cookie falls in that camp-buttery, slightly sweet, tender, nice sandy texture, and a cool, slightly bluish brown hue.  The cookies get kicked up a notch with the addition of cocoa nibs. This adds a subtle hint of chocolate at the finish. The color and slight earthiness from the buckwheat and the “is it chocolate or isn’t it?” from the nibs, cookie mindblower.

        So if you are looking for a shortbread that is a little bit different but still buttery delicious, put this one on your list.

        Bonus: Easy to make.

        Do not overbeat when creaming the butter and sugar which will incorporate too much air into the dough (I might have done this which accounts for the puffiness and soft edges).  The mixture should be smooth and creamy.  Add flour and beat until it comes together, don’t overmix.

        The dough can be shaped into a log, chilled and finished as slice and bake cookies.  The dough can be stored in the fridge or freezer so you have freshly baked cookies when family and friends drop by.  Everyone will think you are a badass baking queen.

        Or you can get fancy-schmancy and roll out the dough and cut out cookies for a more festive look.  Put the dough in a gallon sized Ziploc bag and roll to the edges.  This will give you a sheet of dough about 1/4 inch thick, perfect for cutout cookies.  I used a fluted metal cutter which may work better than a plastic one as you have to cut through the nibs. To add festive bling, sprinkle the cookies with sanding sugar and a touch of flake salt (like Maldon) before baking.  That takes these cookies to the “bend and snap” (Legally Blond-remember?) level of attention.

        Chill the dough after cutting out the cookies, the edges won’t spread as much. I was having oven issues so the edges ended up less defined. Still yummy though!

        Okay, not hooked yet? Still looking for a classic shortbread, try this oneamazing traditional Scottish Shortbread or Bouchon’s Shortbread.

        Nibby Buckwheat Butter Cookies

        Nibby Buckwheat Butter Cookie

        A delicious riff on shortbread, buckwheat flour and cocoa nibs take these cookies to a new level.
        Course cookies
        Cuisine American
        Keyword NIbby Buckwheat Butter Cookies
        Author Adapted from 101 Cookbooks (Alice Medrich)

        Ingredients

        • 1 1/4 cups 5.6 ounces all-purpose flour
        • 3/4 cup 3 ounces buckwheat flour
        • 1/2 pound 2 sticks unsalted butter, softened
        • 2/3 cup sugar
        • 1/4 teaspoon salt
        • 1/3 cup cacao nibs
        • 1 1/2 teaspoons pure vanilla extract

        Instructions

        • Whisk the all-purpose and buckwheat flours together in a medium bowl. Set aside. In a medium bowl, with the back of a large spoon or with an electric mixer, beat the butter with the sugar and salt for about 1 minute, until smooth and creamy but not fluffy. Mix in the nibs and vanilla. Add the flours and mix just until incorporated. Scrape the dough into a mass and, if necessary, knead it with your hands a few times, just until smooth.
        • Form the dough into a 12 by 2 inch log. Wrap and refrigerate for at least 2 hours, or, preferably overnight. Or place dough in a gallon ziploc and roll to the edges of the bag.  Dough will be about 1/4 inch thick.  Chill thoroughly before cutting out shapes.  These cookies do puff and expand a bit so also chill dough after cutting to ensure crisp edges. 
        • Position the racks in the center of the oven and preheat the oven to 350F degrees. Line the baking sheets with parchment paper.
        • Use a sharp knife to cut the cold dough log into 1/4-inch-thick slices. Place the cookies at least 1 1/2 inches apart on the baking sheets.* Or follow instructions for cut-out cookies.
        • Optional:  Sprinkle cookies with a bit of sanding sugar and an even tinier bit of flake salt like Maldon before baking.
        • Bake until the cookies are just beginning to color at the edges, 12 to 14 minutes, rotating the baking sheet from front to back halfway through the baking. 
        • Cool the cookies in the pans on a rack, or slide the parchment liners carefully onto the rack to free up the pans. Let cool completely.

        Notes

        The cookies are delicious fresh but even better the next day. They can be stored in an airtight container for at least one month. My batch made about 30 3-inch cookies. Recipe states approximately 48 2-1/2 inch cookies.