Tag: rice bowl

Jangjorim (Soy Braised Beef 장조림)

Jangjorim (Soy Braised Beef 장조림)

I have a total backlog of recipes I want to share with you and this one is top of the list.  I have made this as many times as I have made Eric Kim’s Quick Grape Tomato Banchan or Ottolenghi’s Charred Tomato and Cold Yogurt (so good) and that is saying a lot.

Do You Banchan?

Jangjorim or Soy Braised Beef can be served as banchan (those yummy little dishes that come with every Korean meal) or as a topping to a rice bowl or in a bento box.

I’m not a salad lover. Well, let me rephrase that, I’m not a salad maker…so much trouble.  But banchan? Worth the trouble, I’ll make a batch of each, keep them in the fridge and pull ’em out for lunch and/or dinner.  They go with everything, rice, noodles, or sammies.  Want a little funkiness in your grill cheese, add kimchi (김치).  Want crunch and spice in your noodles, add spicy cucumbers (오이무침).  Pickled or braised veggies go so well with rice, maybe that’s why I like them.

Koreanbapsang’s recipe for Jangjorim is my starting point.  First step, make the stock to cook the meat.  The stock includes onions, scallions, garlic and Korean radish (mu,무).  The radish gives the dish sweetness, I save the radish to serve with the Jangjorim.  It’s delicious.

Shank-alicious

Next, cut beef into cubes and simmer in the stock.  Use brisket, flank, chuck, or my favorite, shank.  Shank is both flavorful and economical, win-win.  For those not familiar with shank, it comes cut crosswise into pieces with the bone in the center.  Remove the meat from the bone and cut it into pieces. Throw the bones into the cooking broth for extra flavor.  I’ve also used pork shoulder or butt as a substitute with nods of approval from the fam.  After simmering, remove the meat and place it in another pot along with 2.5 cups of the original stock and add the seasonings.  Reserve the radish.  Cook meat on medium heat for approximately 20 minutes.  Then add shishito peppers, boiled, peeled eggs, kelp (optional), and the reserved radish. Cook for another 10 minutes or until meat is tender.

Shishito peppers can be a bit spicy, so if you have little kids or big kids that are spice averse, use bell peppers or Anaheim peppers, and cut into manageable bite-sized pieces.  Cook eggs as you would six-minute ramen eggs.  Chill eggs thoroughly before final braising to avoid overcooking the eggs.  Normally, the eggs are hard-boiled but jammy eggs are my jam.

Jangjorim can be served at room temperature to warm as banchan or over rice.  The meat can be shredded or sliced.  It’s so flavorful, a little bit goes a long way.

I love this dish and hope you will try it!

Jangjorim (Soy braised Beef)

Jangjorim or Soy braised Beef, adapted from Korean Bapsang, is a delicious Korean side dish that works well in a bento box too!
Course Meat, Side Dish
Cuisine Asian, Korean
Keyword Banchan, Korean, shishito peppers
Prep Time 10 minutes
Cook Time 1 hour

Ingredients

Da Stars

  • 1.5 pounds shank meat or beef brisket you can sub pork shoulder or butt
  • 10 to 12 Shishito peppers or other fresh green peppers Use less and cut into halves if using large peppers
  • 3 boiled eggs* peeled

Da Stock

  • 1/2 medium yellow onion
  • 2 stalks scallions white part only save green parts for garnish
  • 6 ounces Korean radish (about 1/4-1/3 of one radish) mu, cut into big chunks
  • 7 cloves garlic
  • 3 slices thin ginger about 1-inch round
  • 1/2 teaspoon whole black peppers or ground peppers to taste

Da Sauce

  • 5 tablespoons soy sauce
  • 2 tablespoons soup soy sauce guk ganjang, 국간장 (or use more regular soy sauce)
  • 3 tablespoons sugar
  • 3 tablespoons rice wine or mirin
  • 1 piece 3-inch square dried kelp substitute a bay leaf

Instructions

  • Cut the beef into 2-inch chunks. This recipe is very flexible. You use brisket or flank. I love beef beef shank which is very economical. It has great flavor and texture. You could even use pork shoulder or butt. Delicious!
  • In a medium pot, bring 8 cups of water and Da Stock ingredients to a boil. Cover and continue to boil for 5 minutes over medium-high heat.
  • Drop the meat into the pot. Bring it to a gentle boil, and remove the scum. Reduce the heat to medium. Boil, covered, for about 30 minutes.
  • Remove the meat. Strain the cooking liquid into a large bowl, and then add 2.5 cups of the liquid back to the pot. (You can save the remaining broth to make a soup or stew later.)
  • Add the meat and sauce ingredients to the pot. Bring it to a boil over high heat. Reduce the heat to medium, and boil, covered, until the meat is tender and the sauce is reduced to about ⅓, about 20 minutes. You can cook longer if the meat is still not tender enough.
  • Add the optional dried kelp, peppers and eggs and continue to boil for about 10 minutes. Discard the kelp, and transfer everything else to an airtight container for storage. Cool before storing in the fridge. Shred the meat and pour some sauce over to serve.
  • Optional: Serve the radish and onions with this dish! Normally, the meat is shredded, and served with shishito peppers and eggs.

Notes

Refrigerate in an airtight container. It will keep for a week. If you want to keep it longer, boil the meat and sauce again after a few days.
The meat will become hard in the fridge. You can soften it by leaving the shredded beef out at room temperature for 20 to 30 minutes, or microwave for about 20 seconds to soften.
Eggplant Unagi Don

Eggplant Unagi Don

From one of my favorite sites, Two Plaid Aprons, a vegetarian version of Unagi Don!  Eel grilled with a sweet and savory sauce or “tare” is called unagi.  Don is short for donburi, which refers to the bowl and rice that serves as the landing spot for toppings like unagi.  Rice bowls, in my humble opinion, scream comfort food and this riff is no exception. If you are looking for some protein try a fam fav like Oyako Donburi, a Chicken and Egg Donburi.

Grilled and sauced unagi yields a smoky, savory-sweet, melt-in-your-mouth bite of deliciousness.  Eggplant braised in the same fashion makes a great stand-in for the unagi.  According to the hubster, the resident carnivore in my house, this will satisfy any meat-eater.  The tare is made with soy sauce, Mirin (sweet sake), sake, and sugar; ingredients found in most Asian grocery stores.  I like substituting dashi soy for the soy sauce which is a blend of soy sauce and fish stock that gives the eggplant a hint of brininess.

Anyway You Slice It

Leave the skin on the eggplant if you like. The other thing you can do is score the eggplant crosswise to mimic the striations on unagi.  Fry the eggplant until nicely charred, lower the heat and pour in unagi sauce and green onions. Cover and let the eggplant braise for 5 minutes or until tender but not mushy.  As the eggplant braises, it picks up the flavor of the sauce and becomes tender and soft like…eel. YUMMO.

Take the eggplant out and place it over your rice.  Garnish with green onions and toasted sesame seeds.  Serve immediately.  OR, take it over the top with a runny, sunny-side-up egg.  Enjoy!

Eggplant Unagi Don

Eggplant Unagi Don, a delicious, easy prep, vegetarian version of Unagi Don
Course dinner, lunch, one bowl meal
Cuisine Asian, Asian-American, vegetarian
Keyword eggplant, mirin, Rice Bowl, soy sauce, vegetarian
Prep Time 5 minutes
Cook Time 15 minutes

Ingredients

Da Stars

  • 2 Japanese eggplant or Chinese eggplant washed, sliced in half lengthwise and crosswise if they are long.
  • 4 cups cooked white rice Feel free to use whatever grain you like, brown rice, farley, quinoa (not my choice but hey)

Da Sauce

  • 4 tbsp sake
  • 4 tbsp soy sauce regular or low sodium or Dashi Soy
  • 4 tbsp granulated sugar
  • 2 tbsp mirin
  • 2 stalks Green onion, sliced
  • 1/8 tsp dashi powder or granules optional use with low sodium soy sauce

Da Garnish

  • Toasted white sesame seed, sliced green onions

Instructions

Unagi sauce:

  • In a small bowl, mix together sake, soy sauce, sugar, mirin and dashi if using. If you use Soy Dashi, skip the powder. Set aside until needed.

Eggplant Prep

  • Cut off stem of the eggplant and peel the skin with a vegetable peeler, this is optional, if you like skin, save yourself a step. Cut the eggplant in half crosswise, then slice each half evenly lengthwise. Lightly score eggplant crosswise every 1/8-1/4 inch, don't cut thru! This makes it look more like unagi.

Cookin' It

  • In a 10-inch shallow pan over medium high heat, add a couple tablespoons of oil. Once the oil is hot, place eggplant flat side down and sear until golden brown, about 2 to 3 minutes. Flip eggplant and sear the other side for a minute or two until golden brown.
  • Stir the prepared unagi sauce and pour it into the pan. Reduce heat to medium/medium-low to keep the sauce at a simmer. Place a lid on the pan and cook eggplant slices for 5 minutes.
  • After 5 minutes, remove the lid and flip eggplant slices to their flat side. Add half of the sliced green onions to the sauce and continue simmering for 2 to 3 minutes, or until the eggplant slices are tender and the sauce is reduced to a thick glaze. Remove pan from heat.

To Serve:

  • Scoop a serving of hot rice into each bowl.
  • Place two slices of eggplant unagi flat side up on each bowl of rice. Garnish with the remaining green onion and sesame seeds. Bowl food is soul food!
Taiwanese Pork Belly Rice Bowl (Lu Rou Fan-卤肉饭)- In Hog Heaven!

Taiwanese Pork Belly Rice Bowl (Lu Rou Fan-卤肉饭)- In Hog Heaven!

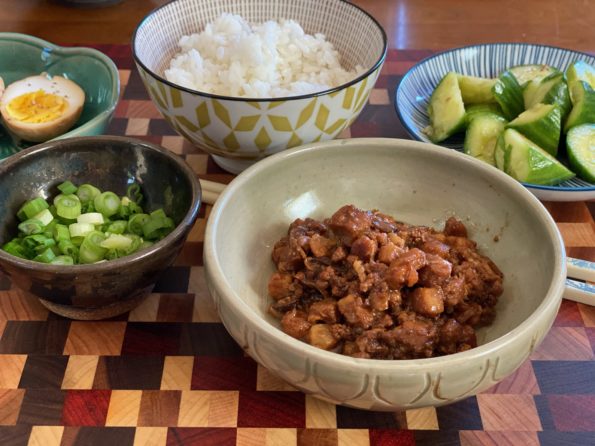
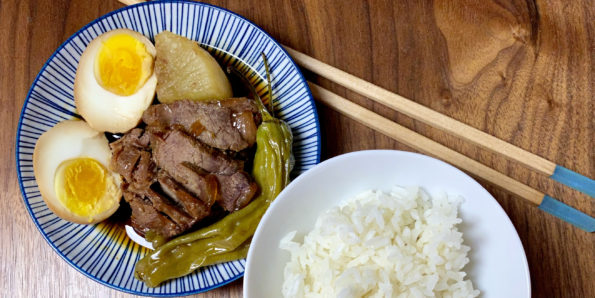
Continuing my virtual traveling by cooking, I’m imagining myself in Taipei right now.  I have not been back to Taiwan in ages and yet I find myself thinking about Taipei and my visit so long ago.  Growing up in San Francisco the majority of Chinese are from Hong Kong and the Guangdong (Canton) region.  I was fortunate enough in college to spend a summer in Taipei (yes, on the Taiwan Love Boat Trip).  I sampled  Shao Lung Bao, Oyster Egg Omelets, Popcorn Chicken, Beef Noodle Soup, and Red Bean Shaved Ice while wandering around the night markets.  Everything was so delicious, different from Cantonese food, and yet familiar at the same time.

Bowl Food is Soul Food

If you have followed 3jamigos, you know I have an obsession with bowl food and eating with a spoon.  The Taiwanese dish Lu Rou Fan 滷肉飯 falls squarely in this category.  In fact, this iconic dish was the basis for Taiwanese Turkey Rice, a favorite bowl I posted around Thanksgiving.  Shreds of turkey garnished each bowl of Lu Rou Fan.  People liked the turkey garnish so much, it got its own gig, Turkey Rice, the spin-off.

Back to Lu Rou Fan.  Season diced pork belly with star anise, cinnamon, and aromatics like garlic, shallots, and ginger,  are braised in a soy sauce and sugar mixture until it is melt-in-your-mouth tender.  Place a generous scoop of the braised pork, half of a hardboiled egg, and greens on top of a bowl of steamed rice.  Grab your spoon and dig in, bowl food is soul food.

After surveying different sites for Lu Rou Fan, my version is a mash-up of recipes I found.  The non-negotiables are pork, ginger, shallots, garlic, and a sauce flavored with star anise, soy sauce, sugar, and rice wine.  Start with pork belly cut into approximately 1/3 inch slices then diced.  Thick slab pork belly can be found in most Asian grocery stores.  I also add ground pork to the diced pork belly for a saucier texture, like a ragu’. Shiitake mushrooms are used to pump up the umami as does dried shrimp.  Shrimp is optional, if you decide to use it, soak and finely mince it before adding.  I have mentioned my lack of affinity for star anise, so I use only one clove and add a cinnamon stick instead.  If you like star anise feel free to use two.  Last but not least…

Pull Out the Instant Pot!

The pressure cooker reduces the effort and time to making Lu Rou Fan, a win-win.  Saute’ pork, add the aromatics and liquid, and 30 minutes later your Lu Rou Fan is ready for the finishing touches.  How easy is that? Make this dish a day in advance to allow the flavors to meld and to chill the Lu Rou.  Skim the solidified fat off before serving.

Finishing Touches

When the pressure cooker is done, release pressure and set the pot to saute bring the pork mixture to a boil, and reduce to desired consistency OR if the sauce is not thick enough, add a cornstarch water mixture to thicken. You want lots of sauce to drizzle on your rice so do not reduce too much.

The star of this dish is the succulent, saucy pork belly dancing on the main stage of rice but there are supporting actors.  Hard-boiled eggs often accompany Lu Rou Fan.  Boil, peel, and place eggs in the pork sauce after it has finished pressure cooking.  While the sauce thickens, the eggs will absorb the color and flavor of the pork.  The eggs will be hard-boiled, so for those who have come to love six-minute ramen eggs-this ain’t it.  Use soft-boiled instead of hard-boiled eggs to add to the sauce for a less-cooked egg.  Or cook six-minute eggs ramen style and use this in place of the hard-boiled eggs.  It’s your bowl of goodness, do what you want.  Serve with greens such as seasoned cucumbers, or steamed bok choy or broccoli.  Garnish with green onions and more fried shallots. YUMMY.

Taiwanese Pork Belly Rice (Lu Rou Fan)

Another Soul Food Bowl, made a little quicker in an Instant Pot. Braised pork belly seasoned with soy sauce, garlic, ginger, star anise and shallots. Delicious over rice or noodles. Comfort food.
Course Main Course, Meat
Cuisine Asian
Keyword Lu Rou Fan, Taiwanese Pork Belly Rice
Prep Time 20 minutes
Cook Time 45 minutes

Equipment

  • Instant Pot

Ingredients

  • 1 lb skin-on pork belly diced into 1/3 inch pieces
  • 1/4 lb ground pork
  • 1 tbsp vegetable oil or shallot oil
  • 3 slices ginger
  • 2 tbsps shaoxing wine
  • 2 tbsps dark soy sauce
  • 1 tbsp regular soy sauce
  • 1/4 cup fried shallots or onions
  • 1 shallot, finely diced
  • 4 cloves garlic chopped (1.5 tbsp)
  • 1 star anise
  • 2-3 dried shiitake mushrooms soaked until mushrooms are softened, remove from water andnreserve soaking liquid, dice mushrooms
  • 1 tbsp dried shrimps chopped OPTIONAL
  • 1 stick cinnamon or 1/2 tsp ground cinnamon
  • 2 tbsp rock sugar or brown sugar (30gms rock sugar_
  • 2/3 cup hot water or reserved liquid from mushrooms
  • Soy sauce /salt to taste
  • fried shallots and green onions garnish
  • 2 eggs hardboiled or cooked Ramen style

Instructions

  • Turn on the "sauté" function of the pressure cooker, press "adjust" once to switch to "more" for browning.
  • Once the oil is hot, add pork belly and give it a stir so that it's not sticking to the bottom. Saute' just until pork belly starts to brown, add ground pork. Let pork cook until it loses its pinkness and the liquid evaporates.
  • Add ginger, shallot, garlic, saute briefly before adding soy sauces, Shaoxing wine, cinnamon, star anise, rock sugar, shiitake mushrooms, and fried shallots. Mix it well and add reserved mushroom liquid or hot water. Cover with the lid.
  • Turn on the "manual" function, set the timer to 25 minutes. Allow 10 minutes before release of pressure and opening. Skim off the fatty oil from the top.
  • If the sauce seems too thin, turn on the "sauté" function, and "adjust" to "more" to thicken and darken the pork belly. Saute to desired sauce thickness and color. Season with light soy sauce or salt to taste. Alternatively, taste sauce after opening the pot. If it has enough flavor but is thin, mix 1 tbsp cornstarch with 2 tbsp water. Add to mixture and bring to a boil to thicken sauce.
  • Ladle the braised pork over rice with some sauce. Top with an egg* and greens of choice. Garnish with green onions and more fried shallots.

Egg

  • Generally, eggs are hardboiled, peeled and added during cooking..which makes a very hard-boiled egg. I like ramen eggs or runny eggs
  • Boil eggs to just past soft boiled stage. See post for link to ramen eggs. Have eggs peeled and ready to go when pork is finished cooking. Add to pork and allow to sit in sauce until you are ready to serve. Cut eggs in half and place 1/2 in each bowl of rice.

Notes

Use skin-on pork belly as the skin becomes tender, juicy and flavorful after absorbing all the flavors from spices and soy sauce. 
Use leaner ground pork (e.g. pork shoulder) as a substitute if the pork belly is too fatty. But really, you don’t need a ton on your rice.  Reduce the cooking time accordingly.  
Oyako Donburi Hmmm, Maybe the Chicken and the Egg Came Together?

Oyako Donburi Hmmm, Maybe the Chicken and the Egg Came Together?

I am soooo excited! We are adding a new category to 3Jamigos!  The kids have flown the coop and are making their own way, Jeff in the City close by (yippee), Jorge in Korea teaching (so far away) and Jams currently working and freezing her tush off in Minneapolis (half of so far away).  Luckily we have FaceTime, phones, texting and when that just won’t do, flights.  Just an airplane ride away.

A California-Texas kinda gal, winter in Minneapolis is a new experience for Jamie.  Down jackets, scarves and gloves are now a part of her wardrobe vernacular, as is staying indoors. The winter weather has her looking for activities inside to keep her busy.  For Christmas, we gave her knitting needles, yarn and starter lessons from Wes on how to knit.  Big hit, knitting up a storm haha.

Jamie has always loved to bake and cook.  She’s a natural, and with this weather, she has been doing alot more cooking and baking.

A recent call went like this:

Mui (her nickname):  Mom, can you send me your Oyako Donburi recipe?  Is it easy to make?

Me: Sure.  Yep, it’s pretty easy.  One pan, a couple of eggs, chicken, and onions.

Mui: That sounds good, I love rice bowls and I can bring the leftovers to work.

LIGHTBULB MOMENT:  Hey, why don’t we both make Oyako Donburi and then post about it?  You have done spots before on 3Jamigos. We’ll alternate picking recipes to make and blog about!

THUS a new 3jamigos category was born, M&M which stands for Mom and Mui.  Mui means little sister.  We have been calling Jamie Mui since Day One.

Oyako Donburi is the perfect dish to launch M&M.  Chicken, sliced shiitake mushrooms, onions are cooked in a savory-sweet sauce of soy sauce, sake, dashi.  Lightly beaten eggs are then poured on top of the chicken and sauce and simmered until just cooked through, then the chicken and egg mixture is placed on top of hot rice.  Watch your kids, hubby, neighbors, everybody gobble it up.  So delicious, classic Japanese soul food.

So without further adieu, our inaugural M&M post by Jamie on making Oyako Donburi in cold & snowy Minneapolis.

HELLOOOO WORLD/readers of 3jamigos.com. It’s ME. J A M I E. Ya know, that crazy girl who moved to Minneapolis to live in -30 DEGREE WEATHER. Nope, that wasn’t a typo. It really was NEGATIVE 30 on my drive into work last week.  GLOBAL WARMING IS REAL PEOPLE. (I know that doesn’t really make sense, but global warming is causing polar vortexes normally over THE NORTH POLE to break apart and dip down to lower parts of the globe).  It’s so cold that you can’t stand outside with exposed skin for more than 5 minutes without getting frostbite. FROSTBITE. Schools were closed. The roads were empty. But I still had to go to work. Once I got over that, it really wasn’t bad. They are GREAT about paving and salting the roads, so it was actually a breeze getting to and from work.

BUT enough about me. Let’s talk about the fact that my mom and I decided to start a mother-daughter blog where we cook the same dish separately and talk about it, AND THE FIRST DISH WE PICKED JUST HAPPENED TO TRANSLATE TO “Parent (chicken) and child (egg).” Damn, we are GOOD, people. You couldn’t even make this stuff up. I mean, I guess you could. It would make a great lifetime/hallmark movie. Ok. Enough interruptions. Let’s get down to the food.

Okayo Donburi. The ultimate comfort food.  It’s a mix of chicken and eggs (parent and child) with a sweet/salty/chickeny sauce and sautéed onions.  Pour it over some rice, and all the stresses of your day melt away. The best part? It is SO easy to make.

Chop up some onions, slice some mushrooms, toss it into the pan with some chicken broth, mirin, soy sauce, and sugar, and top it off with some eggs and chicken.  E A S Y and so foolproof even my mom could make it and she suuuuckkss at cooking (if you couldn’t tell). I like to add in extra mushrooms and chicken. Sometimes extra onions. Pretty much extra everything. It is that good.  Mom used to make it all the time when I was little, and it was one of my favorite dishes then too.  So far, I’ve made it 3 times since winter started. That’s how good it is.

So now, for lack of a better conclusion, stop reading this post and go make it. Go!

Oyako Donburi

Course Main Course
Cuisine Asian
Keyword Oyako Donburi
Prep Time 15 minutes
Cook Time 15 minutes
Total Time 30 minutes
Servings 4 servings

Ingredients

  • 3-4 boneless, skinless chicken thighs cut into bite-sized pieces
  • 4-5 eggs lightly beaten
  • 1/2 yellow onion thinly sliced, red onion can be used
  • 1 green onion sliced on the diagonal
  • 2-3 dried shiitake mushrooms soaked to soften, sliced
  • 1 tablespoon vegetable oil

Sauce Mixture

  • 1 cup dashi (fish based stock) can substitute low sodium chicken broth
  • 5 T soy sauce
  • 2 1/2 T sugar can cut to 2 T
  • 21/2 T mirin substitute sake to decrease sweetness
  • cilantro garnish if desired

Instructions

  • In a small bowl, lightly beat eggs and set aside.
    Oyako Prep
  • Heat saute' pan, add vegetable oil then onions and mushrooms, fry for 1-2 minutes until onions are soft. Add sauce mixture, heat through. 
  • Add chicken and lower flame to medium-low. Cook for 3-4 minutes, turning the chicken over. Cook until chicken loses pinkness
  • Add eggs evenly over top of chicken. Cover and cook over low heat until eggs are just cooked should not be dry. 
  • Garnish with green onions or cilantro and nori strips
  • Divide into portions and serve over rice.  If desired, individual portions can be made.  Quarter ingredients and use a small omelet pan to make.