Tag: butter mochi

Cinnamon Toast Crunch Butter Mochi-Cereal Killa

Cinnamon Toast Crunch Butter Mochi-Cereal Killa

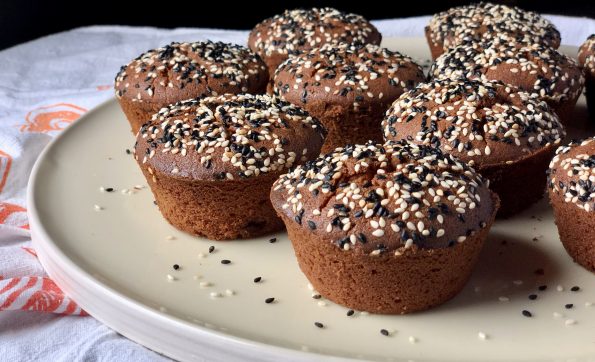
I am always on the lookout for mochi recipes.  Aside from being downright delicious, it is nice to have gluten-free options in your arsenal.  The blog, Little Fat Boy caught my attention with a recipe for Cinnamon Toast Crunch Butter Mochi.  Holy moly, dessert with not just one but TWO of my favorite foods, mochi and cereal, I am all in.

Bad, Bad Mom

I’m going to admit, I was one of those crazy militant moms about snacks and cereals.  The only cereals that graced our table included Special K, Honey Bunches of Oats, and Rice Krispies.  BORING.  The grams of sugar had to be in single digits for any box to make the cut.  Hostess was not part of our family’s vernacular.   To this day, I’m not sure if my kids have had a Hostess Twinkie.

Eventually, I came clean to my kids, and the flood gates opened.  They rolled their eyes with righteous indignation as I rattled off my favorite childhood snacks and cereals-Captain Crunch, Lucky Charms, HoHos, Milk Duds, BigHunks…lol.  Hey, I was a latch-key kid…unlike them…so lucky to have a mom to constantly police, I mean, watch over them!

Welcome to Adulthood

The perks of growing up, my days of being their sugar police are long over.  In fact, during their college days, care packages with Dad’s Good Cookies, Brownies, Chocolate Chip Cookies, and candies were sent on a regular basis.  We made up for years of deprivation.

All Things Mochi

Ground Zero for mochi recipes is Butter Mochi Muffin, adapted from Snixy Kitchen (a gorgeous blog featuring gluten-free recipes), and still the most popular recipe posted on 3Jamigos.  Variations followed, Mango Mochi Muffins, Chocolate Mochi Donuts and Brownies, and Misugaru Mochi Muffins…in fact mochi has its own category on 3Jamigos.  This is the latest in my mochi mania recipes, Cinnamon Toast Crunch Butter Mochi. Remember the cereal milk at the bottom of your bowl you savored when you were a kid?  Yep, use it to make your mochi.

Soak the cereal for a minimum of an hour in one and a quarter cups of milk, stirring occasionally.  The recipe calls for 1 cup of milk and half a can (200ml) of coconut milk.  The cereal will absorb some of the milk, after soaking, if there is less than 1 cup of milk, add extra coconut milk to bring it to 1 cup.

For the first batch, I followed Little Fat Boy, made them in a pan, and cut them into squares.  For the second batch, I made muffins because everyone deserves their own sweet treat.

To further crisp the Cinnamon Toast Crunch topping, I used Christina Tosi’s method to make cereal crunch.  Toast crushed cereal bathed in butter in the oven.

Delicious, sweet, with cinnamon and caramel undertones and the characteristic gooey, springy texture of mochi, this is a keeper.  Add this to your bucket list.

Cinnamon Toast Crunch Butter Mochi

Butter Mochi flavored with Cinnamon Toast Crunch. Another delicious, gluten-free treat!
Course Cake, Dessert, Muffins
Cuisine Asian, Asian-American, Hawaiian
Keyword butter mochi, cereal, Cinnamon Toast Crunch, coconut milk
Prep Time 2 hours
Cook Time 1 hour
Servings 12 servings

Ingredients

Wet Stuff

  • 2 large eggs
  • 1.25 cups milk, I like whole but lowfat, skim and alternative milks will work to soak Cinnamon Toast Crunch
  • 1/2 can of coconut milk 200ml I prefer full fat coconut milk
  • 1/4 cup unsalted butter melted
  • 1 Tbsp maple syrup or Golden Syrup
  • 1 teaspoon vanilla extract

The Dry Stuff

  • 1/2 box Mochiko sweet rice flour (glutinous rice flour) 254 g
  • 1 cup brown sugar preferably dark brown
  • 1/4 teaspoon kosher salt
  • 1 tsp baking powder
  • 1-1.25 cups Cinnamon Toast Crunch Cereal to soak in milk

Topping

  • 1 cup Cinnamon Toast Crunch Cereal for topping
  • 2 tbsp unsalted butter, melted
  • unsalted butter to grease pans

Instructions

  • Soak 1.25-1.5 cups of milk with Cinnamon Toast Crunch for at least an hour or overnight. Strain milk into a measuring cup. You should have 1 cup. If it is less than this, use extra coconut milk to make up the difference,
  • Preheat an oven to 350° F. Generously butter an 8x8 baking pan. For muffins, butter a 12-cup muffin tin.
  • In a separate mixing bowl, mix together rice flour, brown sugar, baking powder, and salt. Set aside.
  • Mix wet ingredients in large bowl, 2 large eggs, 1 cup milk (soaked in Cinnamon Toast Crunch), coconut milk, maple syrup, and vanilla extract. Blend until smooth.
  • Slowly pour dry ingredients into a bowl of wet ingredients, whisking as you pour until it becomes a smooth batter. Mix in melted butter into the batter until incorporated, then pour batter into the buttered pan. If making muffins, pour batter into each muffin tin approximately 7/8 full. Should fill 12 cups. Tap pans on the counter to release air bubbles.

Topping

  • Crush the extra Cinnamon Toast Crunch in a small bowl and add melted butter. Stir to coat cereal with butter. Pour onto a small baking sheet and bake at 275 degrees for 20 minutes or until toasty and fragrant. Remove and cool.
  • Sprinkle toasted cereal on batter just before baking. You can forego the toasting of the cereal but you lose some of the crispiness.

Da Finish

  • Cake pan mochi: Bake for approximately 60 minutes until golden brown and set. Stick a toothpick or bamboo skewer in, it should go in smoothly and come out without any sticky stuff. If you like your mochi a little more set bake a bit longer. The less time you bake the gooey-ier your mochi will be.
    For muffins bake approximately 40-45 minutes.
  • Once cool, sprinkle powdered sugar on mochi before serving. Slice cake into squares like brownies and serve.
  • Will keep a couple of days at room temp. Do not refrigerate. Mochi is freezable.
Butter Mochi, Microwave Magic

Butter Mochi, Microwave Magic

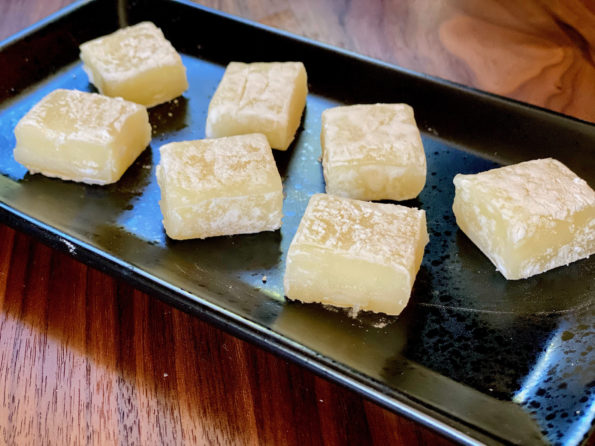
Yes, on the Mochi treat trail once again.  Aside from being delicious, Mochi is pretty darn easy to make thanks to Mochiko Sweet Rice Flour.  I have been playing around with recipes that find their roots in Hawaiian Butter Mochi.  Sweet Rice flour, butter, eggs, sugar, and different liquids (milk, coconut milk, fruit nectars….) combined and baked into delightful bars or muffins.   A bit cakey, a bit chewy yet forgiving, sweet but not cloyingly so, and maddingly addictive. The Butter Mochi Muffins is by far the most popular recipe on 3jamigos.  But…

There Is A New Kid In Town

A recipe for Butter Mochi on No Recipes had me running to my kitchen.  Whaddya know, these little gems are made in a microwave.  Unlike baked Hawaiian Butter Mochi treats, this one is texturally similar to classic mochi found in Japanese Manju Shops.  (Worth a visit! Shuei-Do in San Jose or Benkyodo in San Francisco).  The riff of adding butter, sugar, and milk is genius.  You end up with a soft, chewy, smooth, slightly sweet, buttery, insanely delicious treat.

Shortcuts: Momofuku, Microwave, and Mochiko

The microwave makes this a quick and easy treat.  I’ve been playing around with cooking in the microwave ever since I bought a set of Cook Anyday Microwave cookware.  Yes I know, I could have used the pyrex glass dish I have but…damn, that Dave Chang of Momofuku is really good at getting you to buy stuff, lol.  And really, you can never have too many bowls.  I listen to his podcast and its offshoot, Recipe Club.  and I find myself laughing A LOT.  A good thing during these crazy times.

Traditionally, Mochi starts with glutinous rice that is soaked, steamed, and laboriously POUNDED into a sticky mass that is used to form those cute little balls and squares you take for granted at the Manju Shop.  Luckily, we can start with Mochiko or Sweet Rice Flour-no soaking or pounding.  Just put everything in a bowl and stir.  How easy is that?  Along with the microwave, you will be cranking out batches of Butter Mochi in minutes.

Combine Mochiko flour and sugar in a large glass bowl (or microwavable bowl).   Add one-third of the milk, stir to make a smooth paste, gradually add the rest of the milk, and stir well for a lump-free batter. Place bowl in the microwave and nuke for two and a half minutes.  The mochi will look thicker and form some lumps.  Remove the bowl and add the butter.  Stir until the butter is fully incorporated and the mixture is smooth again.  The recipe calls for cultured butter which has a slight tang.  I used Trader Joe’s French Cultured Butter.  You could probably use European-style butter like Kerrygold Irish Butter.  I also used salted butter which I think enhances the flavor.

Put it back in the microwave for another three and a half minutes.  Carefully (it’s hot!) remove the bowl from the microwave and knead the dough with a wooden spoon or silicone spatula NOT your hands.  This helps create that translucent, elastic texture.

If it doesn’t get that translucent look or isn’t very elastic, try microwaving it another minute.  Transfer the Mochi into a small square pan lined with parchment.  The recipe calls for a five-by-five-inch pan.  Hmmm, not a size I have so I improvised.  Place pan (box in my case) in the fridge to chill.

The final step is cutting the Butter Mochi.  It will be really sticky.  To keep the pieces from sticking dust with potato starch or cornstarch.  Sorry folks, powdered sugar will not work as it will absorb moisture from the mochi and turn gummy.  Serve.  Mochi can be stored at room temperature for a day or in the fridge for longer.  Bring to room temp before serving.

And one mor-chi tip

I made a second batch using coconut milk.  For folks that are milk intolerant, this would work well. Win-win.  Reduce the first microwave time to 2 minutes.  It solidified a little quicker than the regular milk version which made stirring in the butter a little harder.  You do lose a bit of the pure butter flavor but the coconut milk is a nice complement.  Play around with the microwave times for your machine.  For the second microwave session, I’d go 3 minutes first and check before zapping it further.

Print Pin
5 from 3 votes

Butter Mochi

Butter Mochi made in the microwave! Soft, chewy, buttery, a hint of sweetness, this Japanese treat is easy to make and delicious!
Course Dessert
Cuisine Asian
Keyword brown butter, butter mochi, Dessert, mochiko, sweet rice flour
Prep Time 7 minutes
Cook Time 7 minutes

Ingredients

  • 100 grams mochiko
  • 90 grams granulated sugar a little less than 1/2 cup
  • 1 cup whole milk or coconut milk
  • 3 tablespoons Cultured Butter (45 grams) TJ's French Cultured Butter or Kerrygold Salted Irish Butter. I like the bit of salt.
  • Potato starch or cornstarch for dusting

Instructions

  • Line a 5-inch square pan with parchment paper. Use any small pan, 4x6 (lol, does anyone have a pan this size?)
  • Add the mochiko and sugar to a large microwave-safe bowl, and then add about 1/3 of the milk. Stir the mixture together until there are no lumps. Add the remaining milk and continue stirring until it is smooth.
  • Put the bowl, uncovered, in the microwave and set it to cook for 2:30. If you have a 600 watt microwave, use full power. Adjust accordingly.
  • Remove the bowl from the microwave and stir the mixture until it's mostly smooth.
  • Add the butter and stir until fully melted and incorporated.
  • Microwave uncovered for another 3:00-3:30. Get to know your microwave!
  • Carefully remove the bowl from the microwave. Use a silicone spatula to knead the mochi together. The mochi is very hot, do not get it on your hands as you stir. The mixture will get very sticky and turn a translucent yellowish-white color as you knead it. If this doesn't happen, microwave it for another minute or two.
  • Transfer it to the prepared parchment-lined pan and press the butter mochi into the corners and flatten off the top.
  • Chill the mochi in the refrigerator for a few hours to firm it up. Unmold the butter mochi and peel off the parchment paper. Use a sharp knife to cut it into approximately 1" squares and then dust each piece liberally with potato starch. Brush the excess starch off and serve.
Just Another Mochi Muffin (Guava!)

Just Another Mochi Muffin (Guava!)

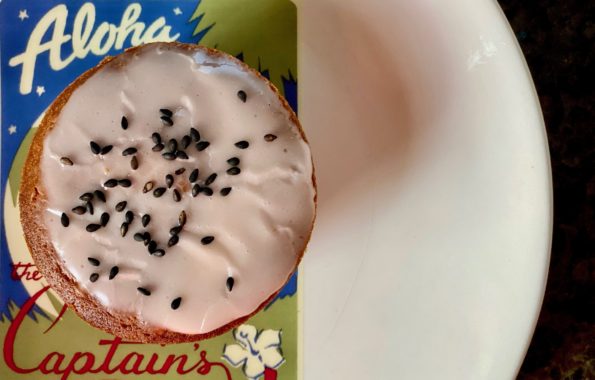
Yes, my romance with mochi muffins continues.

Right next door to Shuei-Do, my favorite manju shop in Japantown, San Jose, is a Poke Shop, Aloha Fresh.  As much as I like Poke, I love going for their butter mochi.  They kick it up a notch by offering different flavors like guava, lilikoi, or a brownie macadamia nut version …all are absolutely onolicious.  Butter Mochi at Aloha Fresh is limited to the weekends but lucky for me and you, Shuei-Do also makes a yummy Butter Mochi. Between the two – you are covered for your mochi fix.

But what if you can’t get to Japantown?

You can make your own AND it’s pretty darn easy.

Mochi desserts run the gamut from chewy, bouncy, creamy to moist, a little chewy, and cakey (is that a word?) texture.  I wanted a tropical flavor, buttery, crisp on the outside, chewy on the inside treat.  A recipe for Blood Orange Mochi Muffins from Cooking Therapy served as inspiration.  In place of blood orange juice, I used Guava Nectar.  The muffins were delicious and I plan to try different nectars like Hawaiian Sun’s POG, passionfruit, orange, and guava juice next time.

The batter comes together quickly, this is almost one bowl, one wooden spoon, easy territory.  The addition of butter is that Hawaiian tweak that makes it so delicious.  Fill well-greased muffin tins about 3/4 full.  Bake for 45 minutes, or a little longer for a crispier edge.  It will lose that crispness with time though.  Store at room temp for 2-3 days max.  Pop them in a toaster oven to crisp them a little bit.  Do not refrigerate.  You can freeze them without the icing.  Thaw and crisp in the oven.  These muffins are moist, chewy, a little squishy, yummy, and addictive.

Ice, Ice Mochi

Making the icing is easy.  Whisk the dry ingredients with coconut milk, vanilla, a pinch of salt, and juice.  The icing should be loose enough to dip each muffin top into but thick enough to adhere to the surface with only a bit of dripping. After dipping one muffin you can adjust the sugar or liquid for the right consistency.  Sprinkle topping of your choice, coconut shreds, orange zest, sesame seeds, or a bit of flaky salt.  Let the muffins sit for a couple of minutes so the icing can set, then serve.

Love mochi?  Here are more recipes using sweet rice flour!  Butter Mochi MuffinsPeanut Butter Mochi, and Chocolate Mochi Donuts.

Print Pin
4.75 from 4 votes

Tropical Mochi Muffins

A delicious, gluten-free mochi muffin, chewy, moist, and flavored with guava nectar and citrus.
Course Dessert
Cuisine Asian-American, Hawaiian
Keyword butter mochi, mochi muffin
Prep Time 10 minutes

Ingredients

  • ½ cup butter melted, if using unsalted butter, add 1/4 tsp salt to dry ingredients
  • ¾ cup granulated sugar
  • 1 cup coconut cream or full fat coconut milk
  • 1 tsp vanilla extract
  • 2 eggs room temperature
  • Zest of 1 orange preferably Cara Cara oranges
  • 1 cup guava nectar substitute mango, passion fruit, or tropical fruit blend nectar or orange juice (Cara Cara)
  • 2 cups sweet rice flour
  • 2 tsp baking powder

Guava Icing

  • 2 tbsp Guava Nectar Substitute mango, passionfruit, or tropical blend, or orange juice.
  • 2 tbsp coconut milk
  • 2 cups powdered sugar
  • 1 tsp vanilla extract
  • Zest of 1 orange optional
  • poppy seeds, shredded coconut, black sesame seeds, orange zest garnish

Instructions

  • Preheat oven to 350 degrees F. Grease one 12-cup standard muffin tin.
  • Sift the sweet rice flour and baking powder into a small bowl and set aside.
  • Add melted butter, sugar, and coconut milk to a large bowl. Mix until combined.
  • Add the vanilla extract and eggs. Mix until combined.
  • Add the guava nectar and zest. Mix until combined.
  • Into the wet ingredients. Mix until a wet batter forms. It should be a pretty loose consistency.
  • Scoop batter into the muffin pan. Tap the muffin pan 1-2 times on a flat surface to get rid of the air bubbles.
  • Bake for 40-45 minutes until the edges start to brown. For a crispier edge, bake 45-50 minutes. Don't go much longer as it may make the inside drier and a little tougher.
  • Cool for 10 minutes in the muffin pan before removing.

Icing

  • While the muffins cool, make your icing. Place powdered sugar In a small bowl. Add coconut cream or milk, nectar, vanilla, and a pinch of salt. Stir with a whisk until completely blended.
  • When muffins have cooled, remove from pan. Dip the top of each muffin into the icing and place on a wire rack. Sprinkle with sesame seeds, poppy seeds, shredded coconut. The consistency of the icing should be thin enough to dip but thick enough that it doesn't all run off the muffin top. A little bit will roll down the side of the muffin. That's okay!
  • The icing is optional. If you don't use it, sprinkle the muffins with sesame seeds or flaked coconut before baking.

Notes

This recipe can be easily halved!  
Icing is optional.  
I like using coconut cream instead of milk.  I think the muffins are little denser, richer and chewier with cream instead of milk.  Don't use lite coconut milk.
Play with flavors.  Any nectar or juice would work.  If you can find Hawaiian Sun Juice Drinks they have a variety of flavors including island favorite, POG (Passionfruit. Orange and Guava).
 
Muffin been the Mochi that Caught My Eye (Butter Mochi Muffins)

Muffin been the Mochi that Caught My Eye (Butter Mochi Muffins)

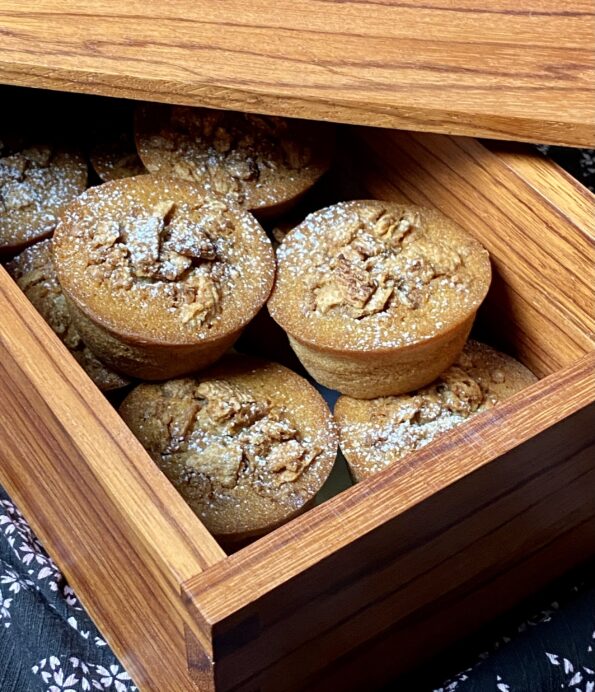
Always searching for new and different treats, I came across an article that spotlighted Third Culture Bakery in Berkeley.  The baker is an alum of Cal (Go Bears) who chose food over toxicology (good choice) and thus Mochi Muffins made with sweet rice flour were put on the map.  Though I haven’t made it to Berkeley to try one, I found a couple of recipes online that sounded scrumptious, so it was off to the rices!  Update: I just posted a new mochi muffin recipe, Mango Mochi Muffins made with mango tea and freeze-dried mangos!  It’s small-batch baking, only 8 regular size delicious muffins.

My Sweet Rice, Oh My Rice

For the uninitiated, mochi (sweet rice flour) is a cornerstone of Asian treats.  Sweet rice is PULVERIZED into flour to which water and flavorings are added.  It ends up looking like the BLOB, really.  It can be flavored, baked, steamed, fried and made into countless delicious treats both sweet and savory.  During New Year’s, Japanese families gather to pound mochi in a tradition called Mochitsuki. Just for your viewing pleasure here is Mitsuo Nakatani, Japanese Mochi Master.  Enjoy

Traditional mochi starts with steamed rice and is pounded and shaped into sweet or savory rice cakes.  Mochi muffins and Hawaiian Butter Mochi start with sweet rice flour, mixed with liquids, and baked.  Since I don’t foresee any of us pounding mochi, let’s make muffins and Hawaiian Mochi. Infinitely easier and pretty darn tasty.

Back on the Muffin Trail

If you have ever had Manju from Shuei-Do Sweet Shop in Japantown in San Jose, or Butter Mochi from Hawaii and liked it…you’re going to love these.  If you haven’t had mochi, this is a good introduction.  Not quite as gooey as Manju and definitely not cakey like a muffin, it’s a delicious hybrid of the two.  A touch of sweetness, crispy on the outside, dense and chewy on the inside, and crunchy from the generous sprinkle of sesame seeds on top.  It’s different but delicious.  If that wasn’t enough, they are GLUTEN-FREE.  You’re welcome.

Rice, Rice, Baby

The most important item in the pic is the Mochiko Sweet Rice Flour by Koda Farms.  This is the go-to brand.  You can definitely find it in any Asian store (along with the sesame seeds), and if you’re lucky, at some of your larger local markets.  Take a walk down the international/ethnic food aisle.

I found quite a few recipes for Mochi Muffins online and finally settled on one from a beautiful blog called Snixy Kitchen.  Her batch made 12 muffins, which made her recipe the frontrunner as most made 24.  As yummy as they are, what am I going to do with 24 muffins?!

Mochi muffin batter

The batter comes together in a snap:  melted butter, coconut milk, egg, brown sugar, and rice flour.  Stir together and pour into a muffin tin.  Boom, done.  My batter was thicker than some of the posts I’ve seen.  This may account for the slight dome mine had.  I also found a recipe from Saimin Noshrat in the NYT.  I think I may try a couple of her tweaks the next time I make these.  Trust me, there will be a next time.  I will use light brown sugar, substitute evaporated milk for some of the coconut milk, and brown my butter.  Not to worry, a full report will follow.  Hmmm, can’t wait to make another batch.

The longer you leave these in the oven, the less gooey and more cake-like they will be.  The first batch was baked for 60 minutes.  I think I should have pulled them out sooner, I like gooey.  Now I check at 40 minutes and pull them out around 45 minutes.  To test them, use a knife to poke the center of a muffin.  It should come out fairly clean with a bit of crumb.

More Mochi Madness

After making these muffins if you like the chewiness, definitely try the Hawaiian Butter Mochi Muffins, inspired by Aloha Kitchen by Alana Kysar.  A little less flour and a bit more liquid kick up the gooey, buttery, lusciousness of these bites.  Bake them in a muffin tin for crispy edges.  I ADORE both of these muffins.

These are soooo good, a little more squishy, very buttery, topped with shredded coconut.

Also check out Peanut Butter Mochi from A Common Table by Cynthia Chen McTernan. Delish! LOVE, love, LOVE

If you would like to try traditional Japanese Mochi, here are my recommendations:  Fugetsu-Do in Little Tokyo in LA, the oldest family-owned Japanese Shop in the US, Shuei Do Manju Shop in San Jose, and in my hometown of SF, Benkyodo Company in Japantown (now closed😢😢😢 )All family-owned artisan shops.

Mochi Muffins
Print Pin
4.50 from 18 votes

Butter Mochi Muffins

Course Dessert
Cuisine Asian-American
Keyword coconut milk, Gluten free, mochi muffin
Prep Time 15 minutes
Cook Time 45 minutes

Ingredients

  • 1/4 cup (2 ounces )unsalted butter, melted and cooled, plus more for greasing pans sub brown-butter
  • 2 cups (320 grams) mochiko sweet rice flour Koda Farms
  • 1 cup (200 grams) organic dark brown sugar* light or dark brown sugar will work
  • 2 teaspoons baking powder
  • 1/2 teaspoon kosher salt 1/4 tsp sea salt
  • 1 13 ounce can full-fat coconut milk Sub evaporated milk, half to all
  • 2 large eggs room temperature
  • teaspoons vanilla extract
  • 1 teaspoon molasses optional, added for flavor or use Golden Syrup or honey
  • tablespoons each black and toasted sesame seeds, for garnish

Instructions

  • Preheat oven to 350°F and place the oven rack in the middle of the oven.
  • Grease the sides and top of a 12-cup muffin tin well with soft butter.
  • In a medium bowl, whisk together the sweet rice flour, brown sugar, baking powder, and salt.
  • In the bowl of a stand mixer fitted with the whisk attachment or a large mixing bowl, whisk together the melted butter, coconut milk, eggs, vanilla, and molasses.
  • With the mixer on low speed, slowly add the dry ingredients to the wet ingredients and mix until completely combined.
  • Divide the batter among the prepared muffin tin, filling each cup all the way to the top.
  • Sprinkle the tops with black and white sesame seeds.
  • Bake 45-50 minutes until the top is brown and crispy and the muffin springs back when poked with a finger.  Bake for less time. for muffins that are chewier and less cakey. Muffins are done when a skewer comes out relatively clean and the tops are brown.
  • Let cool 10 minutes in the pan, then transfer to a wire rack to cool completely.
  • Store in an airtight container for up to 3 days.  Can be frozen and thawed at room temp.

Notes

Organic dark brown sugar is richer and more caramel-y than conventional, but you can use regular brown sugar.
Any muffin tin will do, but for ultimate crispy exterior, use a dark non-stick muffin tin.
If using a light muffin tin, you may have to bake the muffins a little bit longer.
If keeping them for longer, they'll lose their crispiness after a day or two in storage, put them in the oven for a few minutes to crisp again before eating.

Butter Mochi Muffins