Category: Recipes

Recipes I’ve tried and sometimes modified that I think you should try!

Wes’s Tuna Dip (Thrill of Victory & the Agony of Defeat, Tempered by Food)

Wes’s Tuna Dip (Thrill of Victory & the Agony of Defeat, Tempered by Food)

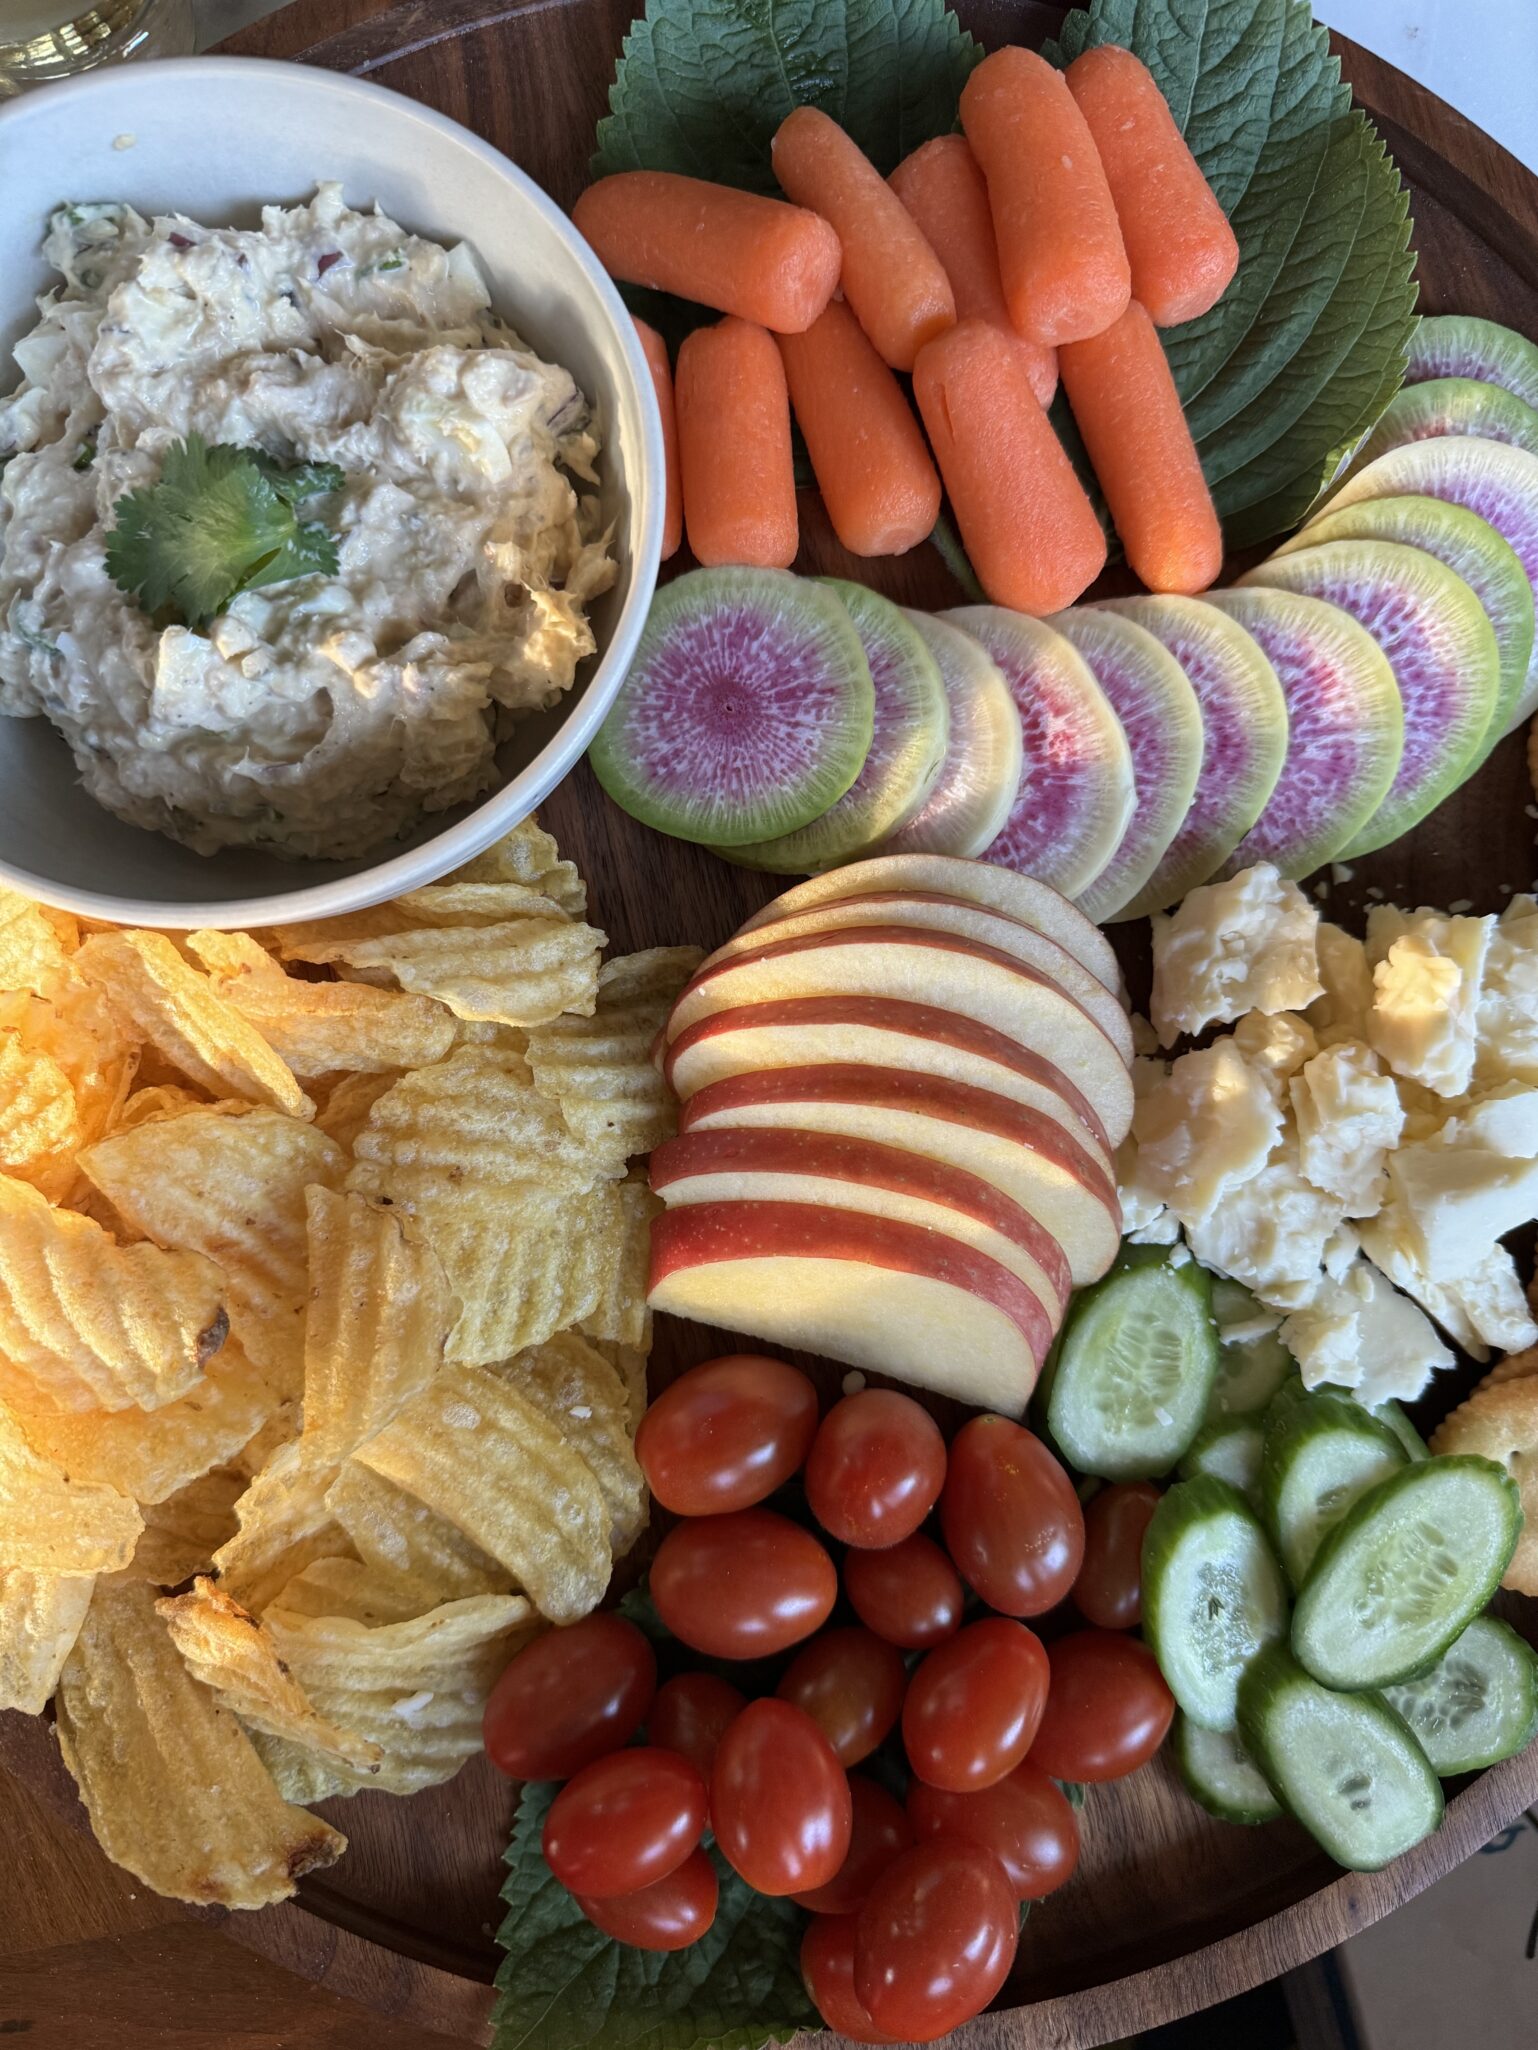
I have actually been meaning to put the Hubster’s Tuna Dip recipe on 3jamigos for a long time.  Tuna Dip is mandatory for every birthday party, impromptu gathering and of course, every 49er football game.  Yep, Sunday is not Sunday unless there is a game on, a bowl of Tuna Dip and a giant bag of ridged potato chips.

By a stroke of good fortune, we are staying in New York for the month of February.  It is no secret that I am a city girl. I grew up in San Francisco and absolutely LOVE urban life.  To spend a month in New York is a dream.  I’m convinced that NYC is one of the great cities of the world (after San Francisco of course, lol) and we have tried to take full of advantage of our time here.  Even better, my kid lives here so we have been spending time with her, Sam and Moose.

The High Line, NYC

Super Bowl Sunday in Manhattan

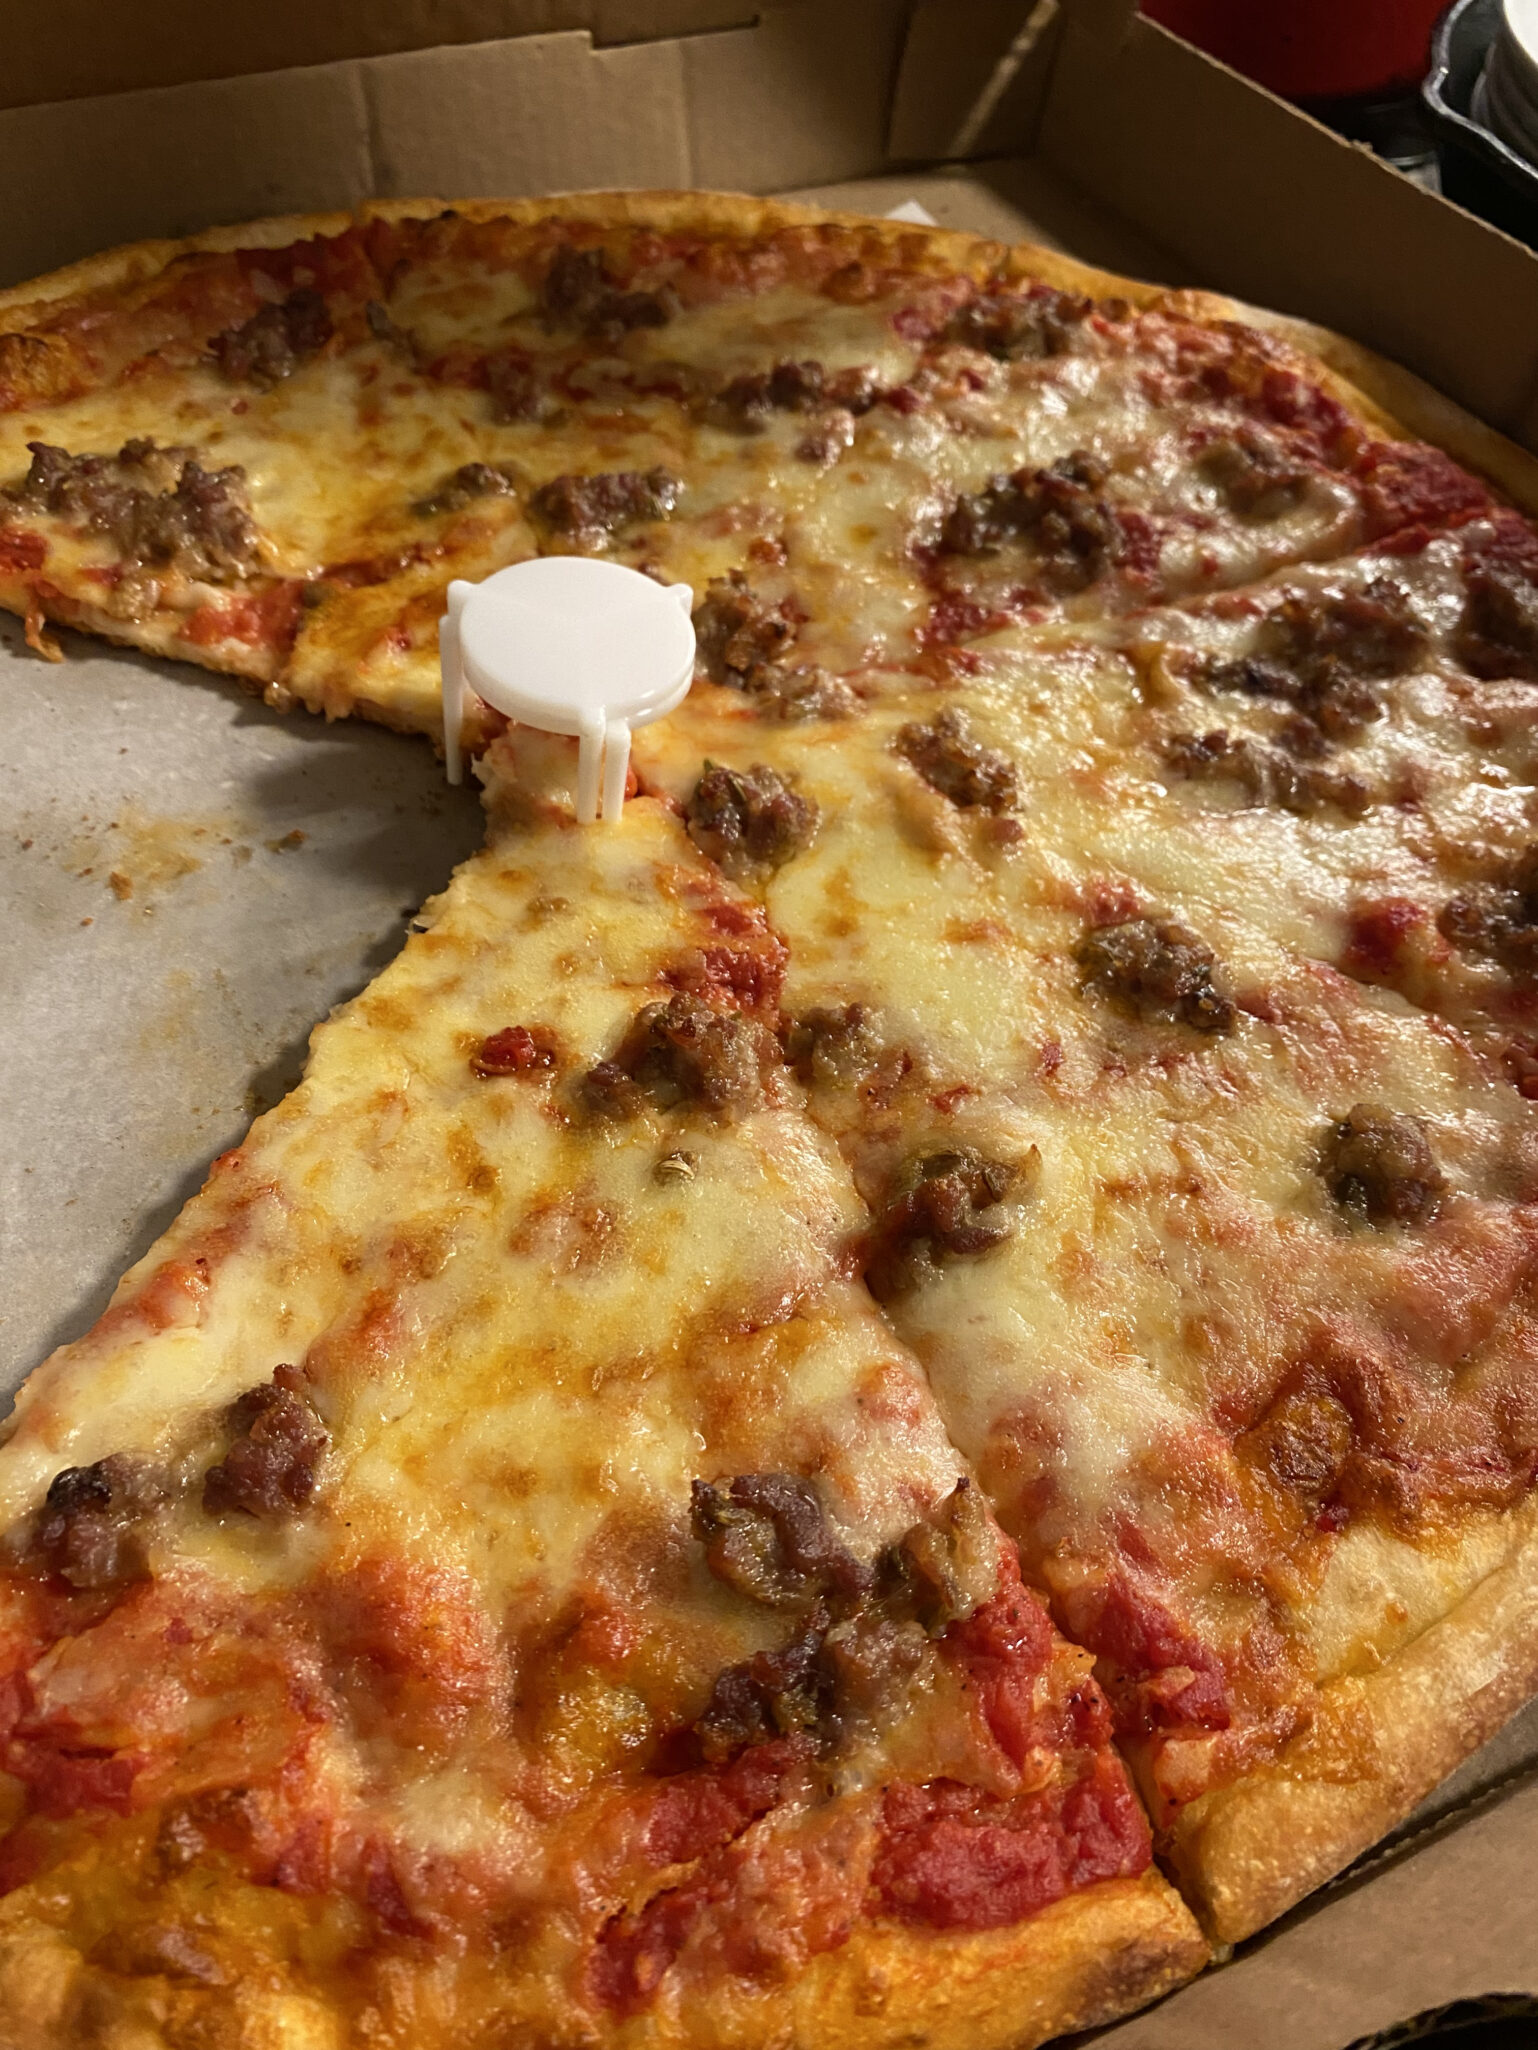
The Super Bowl table, has to have Spam Sushi, and PIZZA!

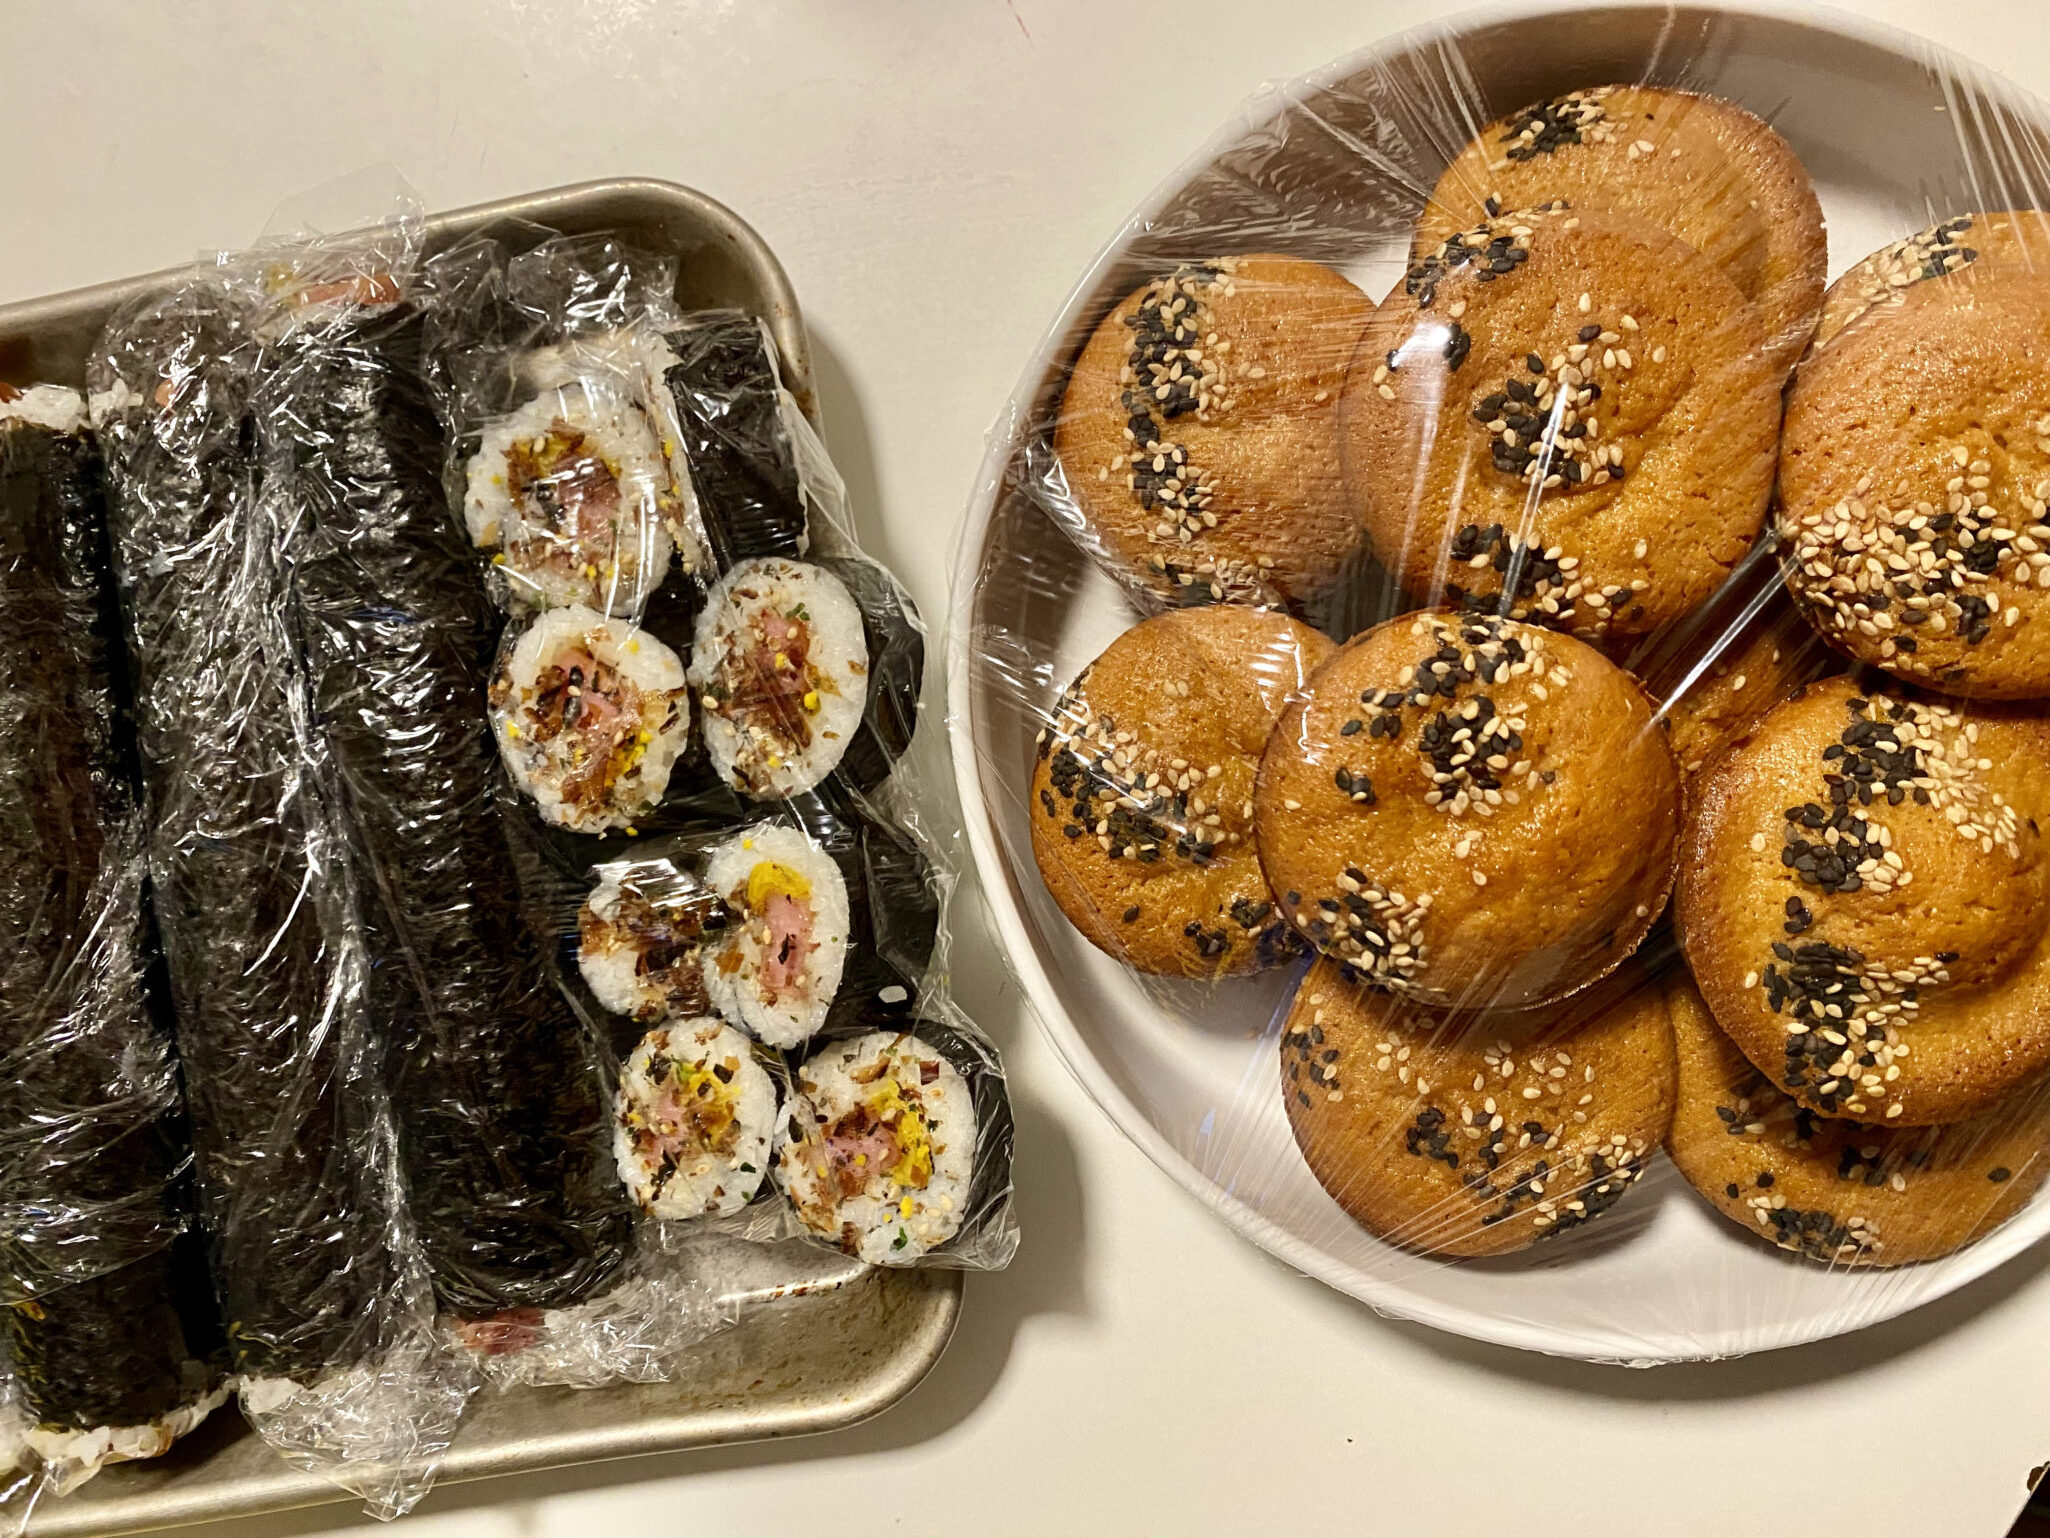
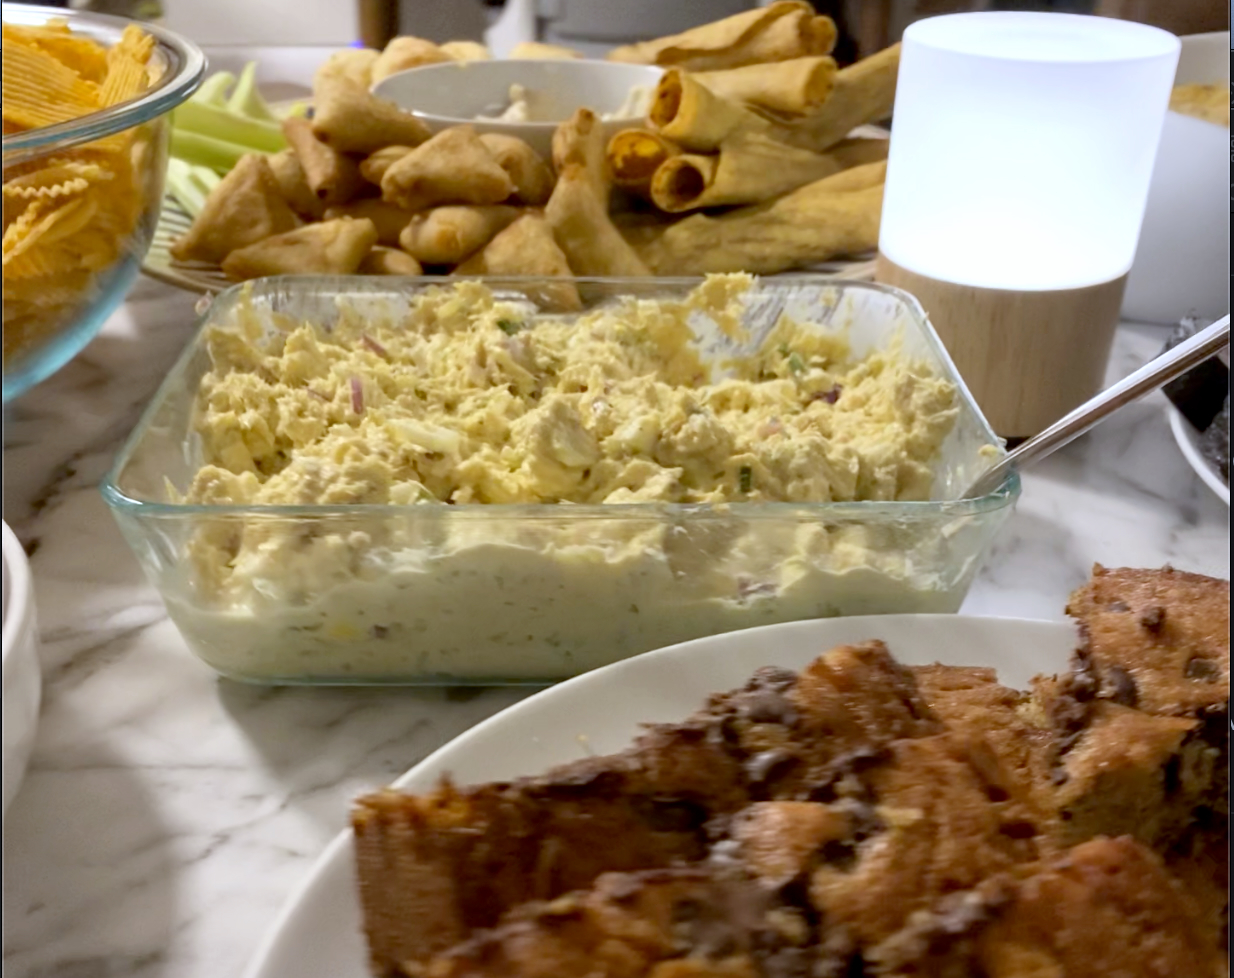
It’s nice to be in a city that doesn’t have a team in the Super Bowl.  We escaped the 2 weeks of incessant hype over the game by being in a city that frankly  didn’t give a damn (no vested interest) and has been perpetually beaten down.  They were doing their darn-dest to forget about the Jets and the Giants and the last season.  Being diehard 49ers fans, of course we were going to watch.  Sam & Jamie hosted a Super Bowl Party, and we made Tuna Dip, Spam Musubi, and Butter Mochi Muffins, cause you can’t watch a game without munchies.  Sadly, the game did not turn out as we would have liked (damn Patrick Mahones) …at least we had yummy finger food and great NY style Pizza from Uncle Sam’s.  Besides, there’s always next year. 😭

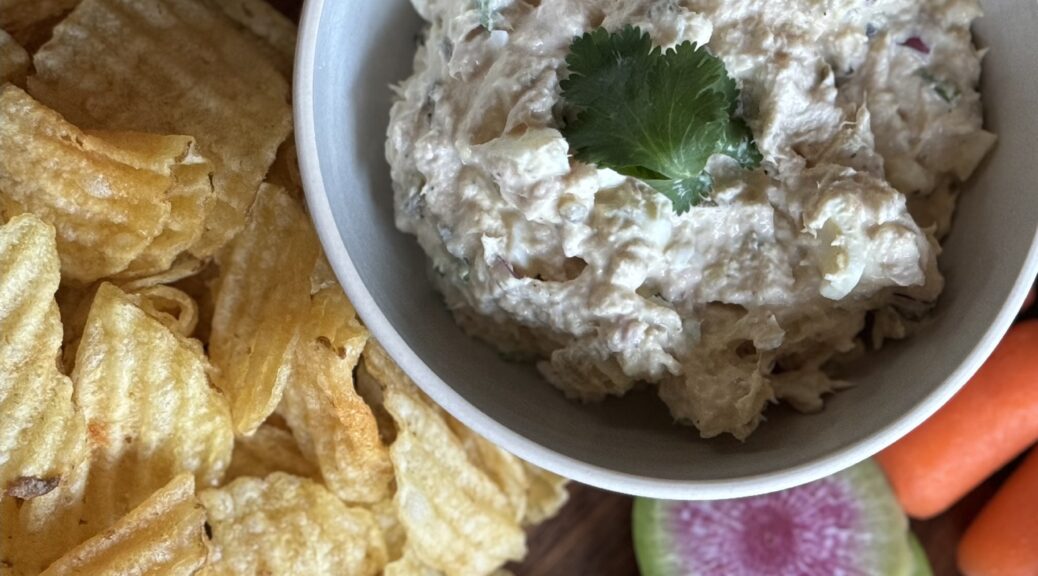
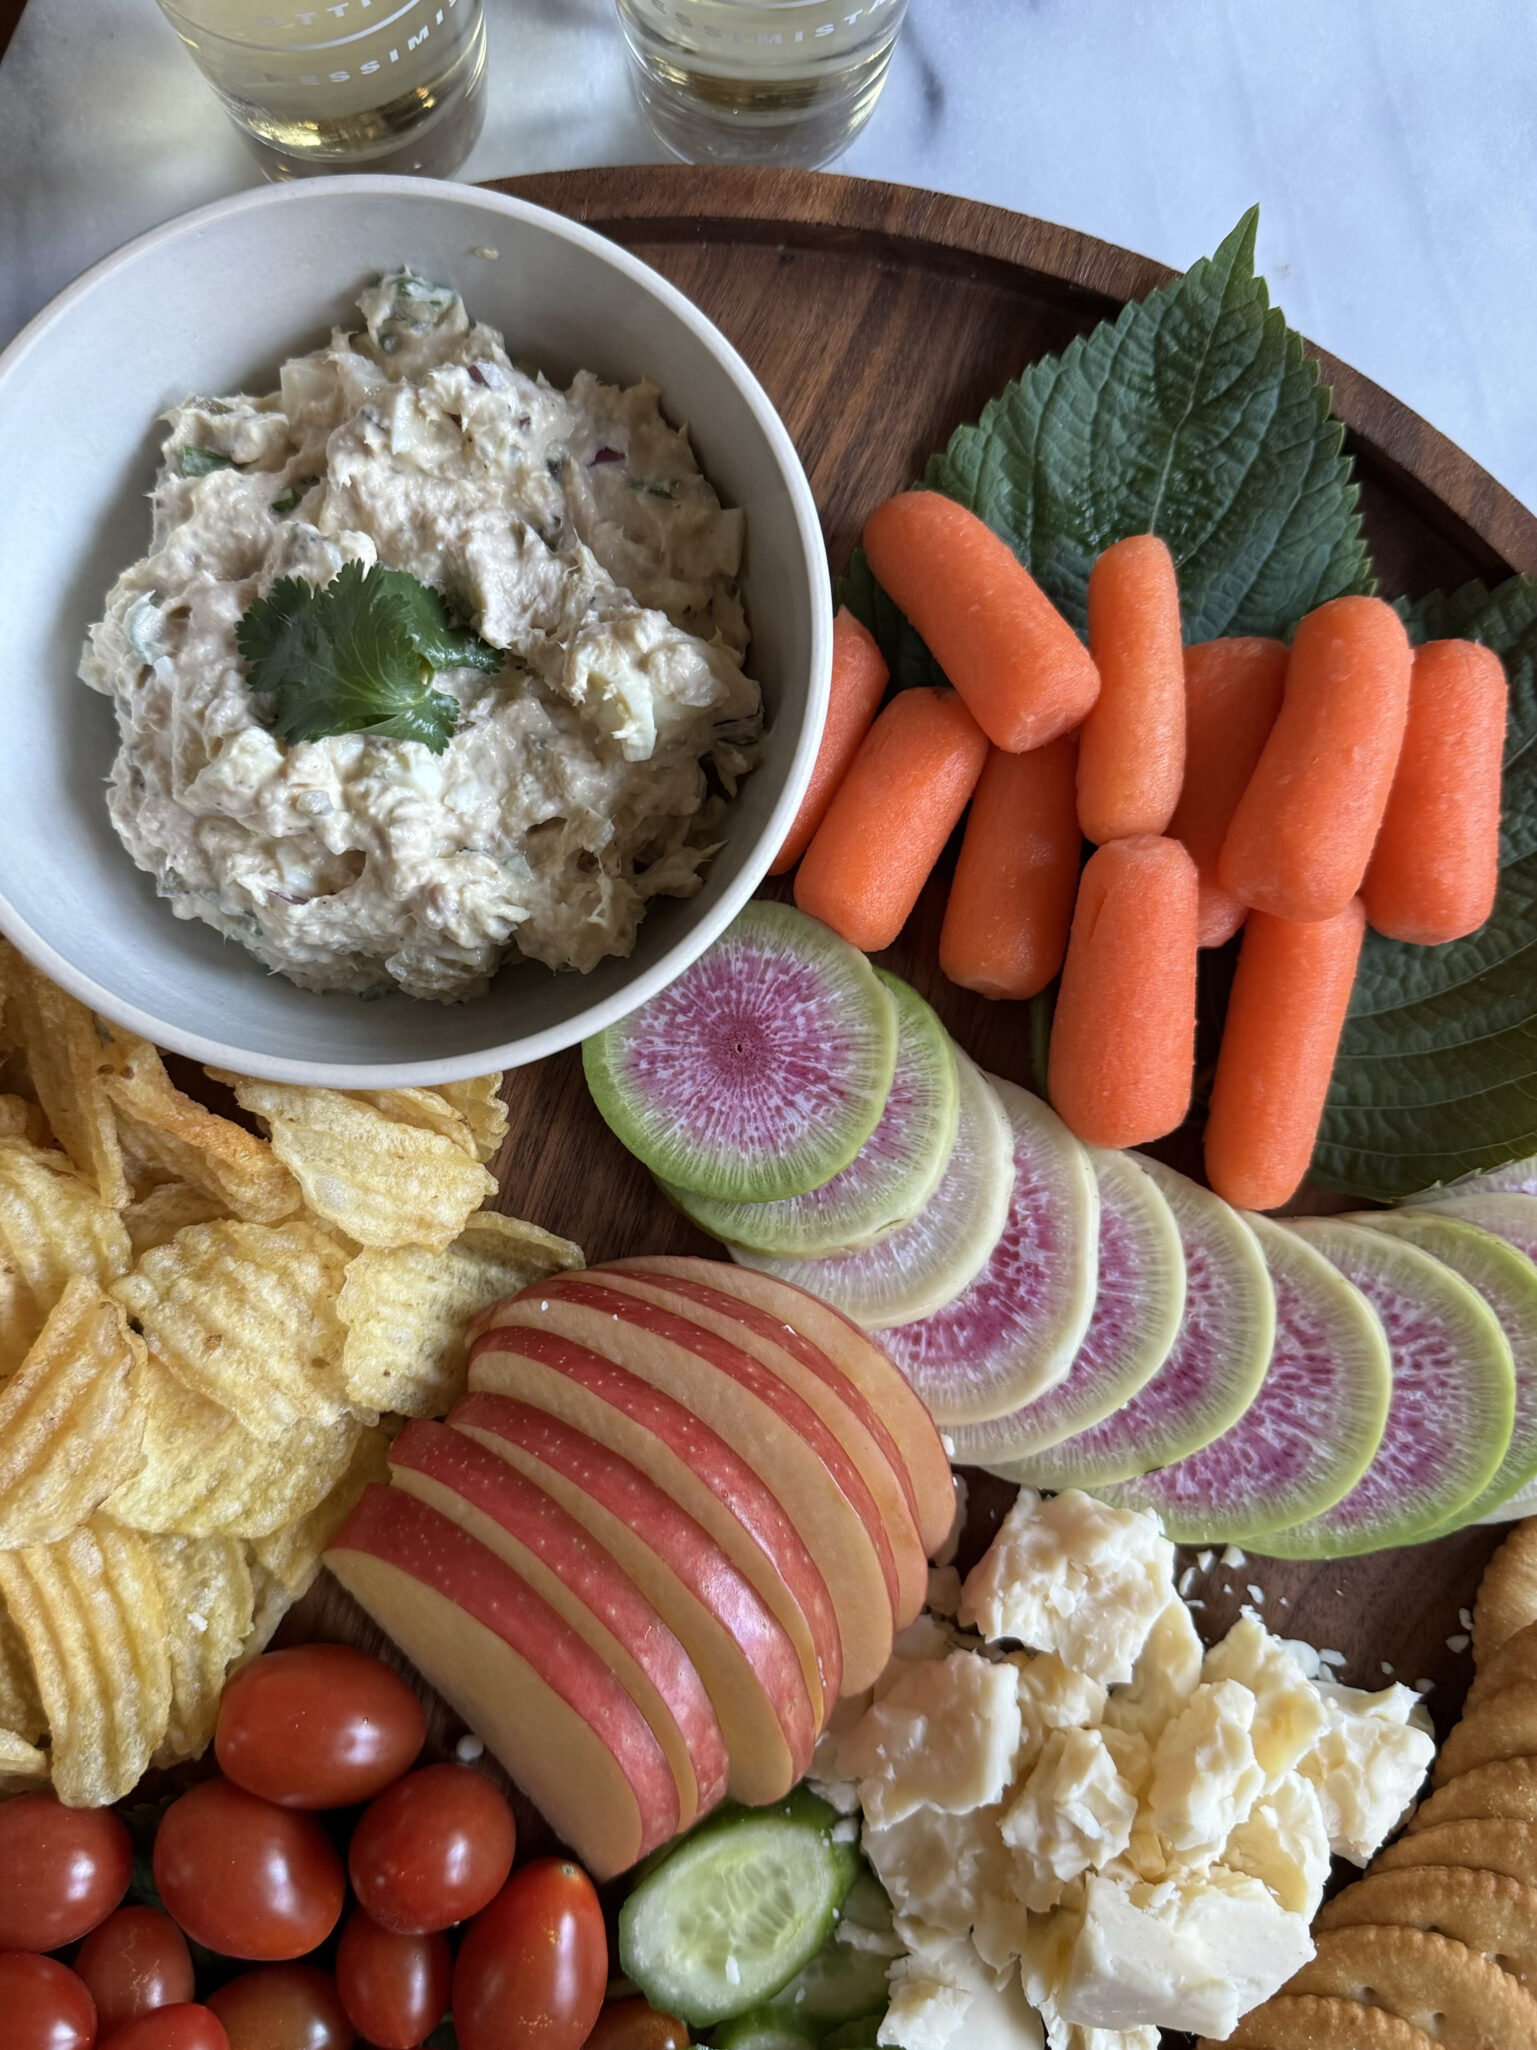
This is hands down the fam’s favorite football food, chips and Tuna dip.  It also makes great tuna sammies when you run out of chips and crackers.  It’s stupid easy.  It is the perfect dip.  If you’re feeling extravagant or have leftover salmon…BOSS substitute for the tuna, really.

Enjoy!

Tuna dip

A family favorite, Tuna Dip, mandatory and any picnic, football game, just about any family gathering!
Course Appetizer
Cuisine American
Keyword tuna dip, chips
Prep Time 15 minutes
Cook Time 13 minutes

Ingredients

Ingredients

  • 12 ounce can water pack tuna, well drained better to get light tuna instead of albacore, less mercury
  • 4 T sweet relish
  • 2 hard-boiled eggs coarsely mashed
  • 4 T red onion, diced
  • 1 stalk green onion, chopped

Dressing

  • 1/2 cup + 1T mayonnaise regular or light
  • 1 tsp French’s yellow mustard
  • couple of grinds of black pepper to taste

Instructions

  • Drain tuna well and place in medium sized bowl.
  • Add relish, hard-boiled eggs and red onion to bowl.
  • Combine dressing ingredients in a bowl, stir to combine. Add to bowl with tuna. Stir to combine well. Adjust seasonings to taste. If it seems a little dry, add mayonnaise. Not tart enough, add mustard.
  • Serve with chips, crackers or veggies like cucumber, carrots or radishes
  • You can also use this for sandwiches!

Notes

For a little tang substitute a couple of tablespoons of sour cream for mayonnaise
Mrs. Singer’s Eggnog, The Real Deal

Mrs. Singer’s Eggnog, The Real Deal

How many of you have had REAL eggnog?  Not the ultra-pasteurized, homogenized version of eggnog found in every supermarket during the holidays.  Who drinks that stuff?

Context

I did a bit of sleuthing on the origins of eggnog.  It has been around since medieval England (1300s), that’s a LONG time.  Its lineage starts as a posset, a milky, warm ale-like drink.   Fast forward to the 1700s, eggnog came along for the ride to the new colonies in America. Farmland was plentiful for cows and chickens which in turn provided lots of milk and eggs.  Rum, the inexpensive alcohol of the time, rounded out the nog.  Thus, eggnog became the festive drink of choice for the everyday man.

Unlucky for us,  the advent of supermarkets and technology led to the eggnog so many of us know.  As soon as pumpkin lattes disappear after Thanksgiving,  red and green cartons of super sweet, weirdly thick (like slime) non-alcoholic eggnog pop up in its place on supermarket shelves.  Whenever I volunteer to make eggnog for a holiday soiree’ I am invariably met with a chorus of yucks and eewwws.

The Eggnog Caper

To which I launch into my oratory, on the much-maligned REAL eggnog.  It starts with the story of Mrs. Ethel Singer.

When my brother and I were babies we were taken care of by a family out in the Sunset, the Singer Family.  Mrs Ethel Singer was the sweetest, most amazing woman, who ran a nursery for babies.  A friendship was born from our stay there and it became a tradition for us to visit them every Christmas. As I admired their gorgeous Christmas tree with an entire miniature town around the base, she brought out her homemade cookies and eggnog.

Not Your Mama’s Eggnog

We would sit sipping our eggnog merrily chatting away. Much to my chagrin, I often found myself getting very sleepy while listening to the conversation. I fought hard to keep my eyes open. How could I be so rude?!  Finally, during a visit I happened to ask for her eggnog recipe. She went over the recipe step by step,  “A quart of milk, 12 eggs (my arteries spasmed), sugar, heavy whipped cream, milk, and make sure to use a CUP of GOOD brandy, like Christian Brothers, lol.   My dear Dr. Watson, the mystery is solved regarding my annual, ill-timed bouts of narcolepsy.  Blame it on the alcohol, the alcohol…

Yes, roughly 15% alcohol, masked by sugar, milk, heavy whipping cream, and eggs. A smooth, creamy, sweet, calorie-laden, festive, delicious, diabolical drink.

Our Annual Cookie Swap

So, for our annual preschool holiday cookie swap, I pulled out Mrs. Singer’s Eggnog recipe.  Martini glasses filled with eggnog seemed a fitting way to toast 25 years of cookie swaps that began with toddlers in tow. Back then we were new moms who could not imagine those toddlers becoming adults making their way in the world.  It seems like in the blink of an eye we have arrived at that point.

Remember When…

2000

2001

2002

2015

2023

Happy Holidays!

Feel free to HALF this recipe

Print
5 from 1 vote

Ethel Singer's Eggnog

(from an add for Yellowstone Whiskey in SF Chronicle, circa 1952)   Note: You should prepare at least 12 hours before serving
Course Drinks
Cuisine American, English
Keyword brandy, Eggnog, eggs, holiday drink, whipped cream
Prep Time 20 minutes
Chill Time 12 hours

Equipment

  • 1 stand mixer
  • 3 large bowls, 1 should be your serving bowl, like a punch bowl

Ingredients

  • 1 dozen eggs 12 eggs
  • 1 pint heavy whipping cream 2 cups
  • 1 cup sugar
  • 1 cup brandy / bourbon/rum
  • 1 quart milk 4 cups
  • 1 tsp vanilla extract
  • Nutmeg for garnish

Instructions

  • Need 3 mixing bowls (2 chilled), and one punchbowl
  • Separate egg whites into 1 chilled bowl, and yolks into room-temp bowl (make sure no yolk is in the egg whites or they won’t beat).
  • Using a stand or hand mixer, beat egg whites until they are firm and peaked.
  • Add 1 cup sugar and 1 cup brandy/bourbon to egg yolks, use mixer to blend completely
  • Pour 1 pint of heavy cream into 2nd chilled mixing bowl, beat until firm – add 1 tsp vanilla
  • Combine beaten egg whites, yolks/sugar/brandy mixture, and beaten cream into a punchbowl, and then add 1-quart milk – mix thoroughly, garnish with nutmeg, and chill overnight.
  • Step 6 Enjoy

Notes

1/2 recipe
6 eggs
1 cup whipping cream
1/2 cup (100gm) sugar                   
1/2 cup brandy, or rum, or Bourbon
2 cups whole milk
1/2 tsp vanilla extract 
Nutmeg for garnish
Jjim Dak (Korean Braised Chicken)

Jjim Dak (Korean Braised Chicken)

Brrrrr… getting chilly out there.  While I love summer, I do look forward to winter.  As the temperature drops I start dreaming of dishes that warm the body and soul.  Soup bowls and spoons that have languished on the shelf all summer are now front and center, waiting to be filled.  Soups, rice bowls, stews, nabes,  dumplings, noodles, and casseroles are always in the winter rotation.  Comfort food with a capital C.

Some of my favorite casseroles or soups don’t require hours on the stove, this is one of them, Jjim Dak or Korean Braised Chicken.  Jjim Dak is a hearty chicken, vegetables, and glass noodle dish that comes together in an hour.  It’s flexible in terms of ingredients (which mean any veggie you have hiding in your crisper is fair game), and filling due to the addition of potatoes and glass noodles.  A TikTok video for this dish caught my attention so I headed to my favorite Korean recipe site, http://Koreanbapsang.com.  A quick search of her site and bada bing, bada boom…I found her recipe for Korean braised chicken.

Let’s get to it…Bowl Food is Soul Food

This is a very flexible recipe. The foundation is chicken, potatoes, carrots, onions, mushrooms and chili.  Braise the chicken in soy sauce, oyster sauce, a bit of sugar and mirin.  This is an easy one-pot meal that comes together quickly and is guaranteed to chase the chilly weather away.

Use chicken thighs or drumsticks, preferably bone-in and cut into large bite-size pieces.  You can use boneless but you run the risk of overcooking the chicken while braising the vegetables.  You can find cut bone-in pieces of chicken at most Asian markets.  If you cut it yourself make sure to rinse the chicken after chopping for bone fragments.

Veggie So Many Choices, So Little Time…Cause I’m Hungry

Traditionally, this dish has the usual suspects, carrots, potatoes, onions, and scallions.  Feel free to add whatever you like and it will be divine.  I added mushrooms, Korean radish, and Korean radish leaves (so excited when I saw the tops on the radishes at the market).  Hands down yummy.  So add whatever you like, including KALE (nooooo, can’t believe I wrote that).  Cut the veggies in smaller bites due to quick cooking time.  In fact, if using boneless chicken, I would dump everything in at once and not cook the chicken first.  Make it in advance, if you can, to let the flavors develop.

The glass noodles take this over the top.  They add texture, flavor (the noods suck up the flavor from the sauce, chicken and veggies-yummo) and substance to the dish. You can find mung bean noodles or glass noodles at most Asian stores.  Do not confuse it with rice noodles or vermicelli.  Pre-soak noods to soften, drain well before adding.

The sauce ingredients are readily available. Use  Korean soy sauce or Kikkoman which are a bit more similar to each other than Chinese soy sauces.  I could go down a rabbit about soy sauces…. Oyster Sauce, as always, my go-to is Lee Kum Kee with the lady and boy in the boat label.

Don’t forget the bap 🍚!

There you go, a delicious one-pot meal.

Jjim Dak

Braised chicken with assorted veggies, perfect for dish for chilly nights
Course comfort food
Cuisine Korean
Prep Time 20 minutes

Equipment

  • Prep Time
  • 20minutes mins
  • Cook Time
  • 30minutes mins
  • Total Time
  • 50minutes mins

Ingredients

The Stars

  • 1 medium-sized chicken cut up (2.5 to 3 pounds of cut pieces)
  • 3 ounces sweet potato starch noodles dangmyeon, 당면
  • 2 medium white or yukon gold potatoes about 10 ounces
  • 1 medium carrot 1/4 inch slices on diagonal
  • 1/2 medium onion cut in half and sliced 1/4-inch thick
  • 3 - 4 mushroom caps rehydrated dried shiitake or fresh shiitake, white, or baby bellas
  • 2 scallions
  • 2 - 3 dried whole red chili peppers optional, mild use 1
  • 1 - 2 fresh chili peppers or jalapenos optional
  • 2 tablespoons minced garlic
  • 1 teaspoon grated ginger

Braising Liquid

  • 1/2 cup soy sauce
  • 2 tablespoons oyster sauce If unavailable, use more soy sauce
  • 2 tablespoons rice wine or mirin
  • 2 tablespoons dark brown sugar if unavailable, use regular sugar
  • 3 to 4 tablespoons corn syrup Korean jocheong (rice syrup), Oligodang (oligo syrup), or 2 to 3 tablespoons honey Adjust to taste or agave would probaly work
  • 1/4 teaspoon black pepper

Finishing

  • 1 tablespoon sesame oil
  • 1 teaspoon sesame seeds

Instructions

  • Soak the starch noodles in warm water for about 30 minutes while preparing the other ingredients. Drain well before using.
  • Clean chicken and cut into small to medium-sized pieces.
  • Cut the potatoes in chunks (about 1-1/2 inch), soak them in water while preparing the other vegetables. Cut the carrot (1/4-inch slices), mushrooms, and onion into bite-sized pieces.
  • Add the chicken pieces to a large pot. Pour 3 cups of water over the chicken. (You should reduce the amount of water if not using the noodles.) Add the sauce ingredients except sesame oil and seeds. Bring it to a boil over high heat, uncovered, and continue to boil for about 10 minutes. Skim off the foam.
  • Add the potatoes, carrot, mushrooms, onion, dried whole red chili peppers, garlic and ginger. Cover, and cook for 8 to 10 minutes. There may still be a lot of liquid, but the potatoes and starch noodles will soak up a lot of it.
  • Stir in the green chili peppers (if using), and glass noodles. Continue to cook, uncovered this time, for an additional 3-5 minutes. Stir in the sesame oil. Garnish with sesame seeds, scallions. Serve immediately.
Nubby Granola Shortbread…More Than Cookies

Nubby Granola Shortbread…More Than Cookies

Me.  The cookbook addict missed a book signing at Omnivore Books.  Literally, took my eye off the book and completely missed Natasha Pickowicz’s More Than Cake book signing event.

In my effort to curtail my cookbook acquisitions, I have limited my cookbook buying to books by POC authors.  There are exceptions of course, anything by Dorie Greenspan and if you own a restaurant in the middle of nowhere, Maine, and pub a new book, iykyk 😉, I’m all in.

Here is my weak defense.  Pickowicz, at first glance, is not an Asian last name, so the fact that she is part Chinese escaped me.  The title, More Than Cake also threw me off.  I’m not a big cake person, more of a cookies and pies gal.  As soon as I saw the word Cake…I tuned out, the MORE THAN got by me.

When I realized she was Asian and that her book contained WAY more than just cake, her book landed on my radar.  Then I found out she organizes amazing BAKE Sales for Planned Parenthood and Brigid Alliance and has raised thousands of dollars (lots of thousands), so I ordered a copy immediately.  It now has a spot on my cookbook shelf.

Holiday Traditions

Thanksgiving is in the books (no pun intended) which means a couple of things in our house.  First, I play Patrick Stewart’s version of A Christmas Carol which also kicks off 24-7 holiday music in our house, I am so stoked.  Second, time to plan those holiday cookie boxes!  I pulled out More Than Cake and found her recipe for Nubby Granola Shortbread.  Shortbread, y’all know I LOVE shortbread.  Time for a test run.

These crispy, buttery bites are made in a food processor.  A little pulse magic and the dough is done. How easy is that?  Plus, shortbread cookies travel well and keep longer than most cookies. These are delicious, lighter, and crunchier than traditional shortbread, perfect with a cuppa coffee or tea.  I made a batch of Jule’s Granola which worked perfectly in these cookies.  Flecks of dried fruit from the granola added a bit of color and sweetness to the shortbread, an unanticipated bonus.

PLUS, I’ll fill cute canning jars with the remaining granola to give away.  Oh this cookie is definitely going in the holiday cookie box.

Tips

  • Use your favorite granola, store-bought or homemade. You don’t have to make your own.  I love making granola so NBD.
  • Using a food processor makes quick work of the dough.  It starts with chilled butter (yay no waiting for butter to soften).

  • Rice flour makes for a fine texture, crumbly, melt-in-your-mouth-cookie. Bob’s Red Mill has rice flour and can be found at larger supermarkets, Whole Foods, and online.
  • No rolling out dough, the dough is pressed into the pan.  The recipe can be cut in half and baked in an 8×8 pan.

  • The tricky part of this recipe is the baking time.  Rice flour produces a drier cookie than AP flour therefore try not to overbake these cookies.  After removing the pan from the oven, lightly score the dough and allow to cool.  Once cooled, cut through the score marks.  Sprinkle with flaky salt and dust generously with powdered sugar to finish cookies.

A buttery, crunchy, gluten-free shortbread cookie that keeps and travels well.  This is a keeper.

Nubby Granola Shortbread

This breakfast-inspired shortbread is a great way to use your favorite granola. It adds a nice crunch to the buttery cookie. Sandy ultrafine rice flour makes a melt-in-your-mouth fine texture. It's delicious!
Course cookies, granola, shortbread
Cuisine American, Asian-American
Keyword granola, Shortbread
Prep Time 15 minutes
Cook Time 27 minutes

Ingredients

  • 2 cups your favorite granola
  • 3/4 cup walnut pieces pecans or almonds would work but lack that characteristic tannic edge of walnuts
  • 2 cups white rice flour
  • 3/4 cup granulated sugar
  • 1 teaspoon kosher salt
  • 8 ounces unsalted butter (2 sticks) cut into 1/2-inch cubes, well chilled

Finish

  • flaky sea salt
  • powdered sugar for dusting

Instructions

  • Preheat the oven to 350 F. Fit a sheet of parchment paper into a quarter-sheet pan (9 by 13 inches). Lightly mist the parchment with cooking spray.
  • In a food processor, combine the granola, nut pieces, white rice flour, granulated sugar, and kosher salt, and pulse until the mixture is pebbly and fine.
  • Add the butter and pulse another 8 to 10 times, until the mixture feels like damp, coarse breadcrumbs. The butter should almost disappear into the dry ingredients but not be taken so far that the dough is clumping and gathering around the blade.
  • Scatter the dough evenly in the prepared sheet pan. Use your knuckles to lightly press the crumb into an even layer. It should be about 1/2 inch thick. Do not apply too much pressure, as this would make the shortbread dense and gummy.
  • Bake until the edges of the shortbread are lightly browned, and the center feels soft but cooked through, 35 to 40 minutes (see tip).
  • Remove the pan from the oven and sprinkle the surface with flaky sea salt. While the shortbread is still hot, use a small knife to score it into 24 squares.
  • Let cool completely, then cut the cookies, still in the pan, along the scored lines and dust with powdered sugar.

Notes

The pan of shortbread can be held in the freezer for up to 1 month and baked from frozen.
The shortbread can be stored, tightly wrapped at room temperature, for up to 1 week.
TECHNIQUE TIP: It's tricky to tell when an unfamiliar recipe is done in your oven. Never throw away a seemingly botched batch of anything — there's always another purpose for it. If the baked shortbread tastes undercooked or feels gummy, invert the shortbread onto a clean sheet pan, so the crumbs spill out. Break it up with your fingers and bake again at 325 F for 10 minutes. Now you have instant streusel. Is the shortbread overbaked and dry? Tip the crumbs into a food processor and blend until fine and add big handfuls to your next layer cake.
Fresh Tomato & Sausage Pasta-When Comfort Food is Required

Fresh Tomato & Sausage Pasta-When Comfort Food is Required

Our final road trip with Moosie (for context, my daughter’s Bernedoodle whom we have been sitting for the last 4 months) took us first to Lake Tahoe for a couple of days.  A pit stop before our final destination, Salt Lake City, where we were to hand off the pooch to Sam.  Moose was bound for New York, back to Jamie and Sam. 😢

It has been a while since we last spent time in Tahoe.  We took time to wander around and check out some the new eateries.  Our favorites include  Coffeebar (☕️☕️☕️☕️/5), Great Gold (🍝🍝🍝🍝+/5),and Truckee Food Stop (🥙🥙🥙🥙/5).   We also perused the shelves at a very cute bookstore Word After Word (📕📕📕📕+/5).  I LOVE bookstores.

Perfect way to start the morning, coffee and a buttery, delicious pastry.

Great Gold, its roots are from Flour + Water in San Francisco, a beautiful restaurant, with great pizza and pasta, don’t pass on the Brussels sprouts!


Truckee Food Shop features pre-made meals to take home.  They also have a nice curated selection of wines, pastas, spices, and cookbooks.  Don’t walk out without an order of their ceviche.

Comfort Food

We spent our last evening in the cabin cooking, sipping wine (thanks to whoever left that nice bottle of Chardonnay in the fridge), and playing with Moose.  I had brought this week’s farmers market bounty, dry-farmed tomatoes, onions, and basil from my garden (apparently the only thing I can grow) with us.  We picked up Italian Sausages and pasta and made a quick and easy dish, Fresh Tomatoes, Sausage, and Pecorino Pasta.

Used spaghettini the first night, I prefer a tube pasta like rigatoni mezze

Tomorrow we start the drive to Salt Lake City, maybe we should turn around and head home?  Guess that would be considered dog-napping though, lol.

Just what I needed a nice, big, bowl of pasta to ward off the pending “I ain’t got me a dog no more blues”.  This sauce comes together in the time it takes for you to cook the pasta.  Chop your tomatoes, thinly slice an onion, smoosh some garlic, crumble the sausage, combine, and saute for a couple of minutes.  That’s pretty much it.  Right before serving, hit it with some fresh herbs, and grated cheese. The OG version calls for Pecorino Romano, which packs a bigger punch than Parmesan so I cut it back a little.  You could also use Parmesan.

So, while you can still get wonderful fresh tomatoes (we are so spoiled in California) this is an easy, lovely meal.  Bowl food is soul food has always been my mantra.  Round it out with a glass of wine, a fresh salad, and some crusty bread.  Boom, done.

I tried this with canned tomatoes and my advice is, don’t. I doctored it with some sugar and butter but still not the same.  Unless it is the dead of winter and fresh, summer tomatoes are a distant memory…no, still don’t.  This dish is meant for fresh, sweet, tomatoes.  I’m thinking of making a batch and freezing it.  That might work.

Fresh Tomato, Sausage, and Pecorino Pasta

Ripe, summer tomatoes are juicy and delicious in this pasta dish, with no seeding or peeling necessary.
Course dinner, lunch
Cuisine Italian-American
Keyword comfort food, fresh tomatoes, italian sausage, one dish meal, quick and easy, rigatoni
Prep Time 10 minutes
Cook Time 12 minutes

Ingredients

  • 8 ounces uncooked penne or meze rigatoni, or tubular pasta of choice
  • 8 ounces sweet Italian sausage or spicy works too
  • 2 teaspoons olive oil Go crazy, use a tablespoon of oil, lol
  • 1 cup vertically sliced yellow onion
  • 2 teaspoons minced garlic
  • 1/2 teaspoon chili pepper flakes optional
  • 1 ¼ pounds tomatoes, chopped dry farmed or Romas work well, or any ripe sweet tomato, some may have more moisture
  • 6 tablespoons grated fresh pecorino Romano cheese divided. sub Parmesan if you want
  • ¼ teaspoon salt to taste
  • teaspoon black pepper to taste
  • ¼ cup torn fresh basil leaves
  • 2 tbsp Italian parsley, chopped optional

Instructions

  • Cook pasta according to package directions, drain and set aside. In the Cooking Light edition this is adapted from, the recipe omits the salt and oil when cooking. I add salt to the pasta water.
  • A carryover from when the kids were little. I drain the pasta and hit it with butter and parmesan cheese. It seems to give the dish that extra oompf. I then add sauce to the pasta. I do this with my ragus, bolognese recipes also. TOTALLY OPTIONAL
  • If using sausage links, remove casings from sausage.
  • Heat a large nonstick skillet over medium-high heat. Add oil to pan; swirl to coat. Add sausage and onion to pan; cook 4 minutes, crumble sausage. by smooshing with your spatula.
  • Add garlic; cook 2 minutes.
  • Stir in tomatoes; cook 2-5 minutes depending on how you like your sauce.
  • Lower heat; stir in pasta, julienned basil, 2 tablespoons cheese, salt, and pepper. If I have Italian parsley I throw that in too.

Final Touches

  • Pour into a big serving platter or individual bowls. Sprinkle with remaining 1/4 cup cheese or let folks sprinkle their own. Garnish with remaining basil leaves. Enjoy!

Notes

Nutrition Facts
Per Serving: 389 calories; fat 10.7g; saturated fat 4g; mono fat 4.5g; poly fat 0.7g; protein 21.6g; carbohydrates 53.5g; fiber 4.5g; cholesterol 27mg; iron 3.3mg; sodium 595mg; calcium 159mg.
Vietnamese Meatballs In Tomato Sauce (Xiu Mai)

Vietnamese Meatballs In Tomato Sauce (Xiu Mai)

Before tomato season ends give this dish, Vietnamese Meatballs in Tomato Sauce, a try. I came across this dish on IG.  It looked scrumptious, and I’m a sucker for meatballs and fresh tomato sauce.

I did a bit of sleuthing and found that this dish is frequently served for breakfast.  Delicious, tender, succulent meatballs in a light, flavorful sweet, tomato sauce, a couple of slices of a baguette on the side to dip into the sauce-yum.  What a way to start your day.

You’ll also find these meatballs in Banh Mi, the Vietnamese version of a meatball sub-sammie.  The bread for a banh mi is a revelation. Incredibly light and fluffy with a thin crisp exterior, a riff by the Vietnamese to suit their taste.  The meatballs nestled in the roll are tender and the sauce is briny, sweet, and flavorful.  To finish, pile pickled radishes, carrots, and a garnish of cilantro, jalapenos, and cucumbers on top of the meatballs.  My kinda sammie!

Meatball Tips

I looked at quite a few recipes and a couple of things stood out.  Steaming the meatballs ensures a tender meatball.  Baking or frying them would work but the meatball won’t be as tender or moist.  The texture is much like Chinese steamed dumplings.  Instead of steaming, gently poach the meatballs in the accompanying tomato sauce. This infuses the tomato flavor into the meat, keeps the meatballs tender, and eliminates the steaming step.

I use pork, the traditional protein source, but I think ground chicken or turkey would work quite nicely in place of the pork.  Use dark meat though, the higher fat content keeps the meatballs moist and tender.

The recipe calls for fresh jicama.  No jicama?  I reach into my pantry for canned water chestnuts which work admirably.  It provides a delightful bit of crunch.  Rinse and drain the water chesnuts and then finely chop.

Try not to overmix the meatball mixture.  Mixing too much causes the protein in the meat to bind and contract leading to tough meatballs, a no-no.  Gently mix just to combine the ingredients evenly and stop.  Use your handy dandy ice cream scoop to portion out each meatball.  Easy peasy.

Sauce Tips

Make the sauce with fresh tomatoes (now, before tomato season ends). To enjoy this year around, make a big batch of sauce and freeze it for later.  A taste of summer in the middle of winter is always a good thing.

This is a very quick tomato sauce, for a chunkier sauce, cook the sauce for less time so the tomatoes don’t break down as much.  Use a cornstarch slurry to thicken the sauce.  You can also use stock in place of water for more flavor, or add chicken powder (Asian secret weapon in boosting flavor) if using water.

Banh Mi Me

These meatballs and sauce are ah-mazing in Banh Mi, the Vietnamese version of a sub sandwich.  A crispy light French roll filled with meatballs topped with not only the sauce but pickled radishes and carrots, cucumber slices, and herbs. This is my dream sammie, directions for the fixings for Banh Mi are here, just sub the meatballs for the chicken.  Delish.

Vietnamese Meatballs (Xiu Mai)

Delicious tender meatballs poached in a sweet tomato sauce. Comes together easily, for breakfast or dinner with sliced baguette, or as a delicious filling for a meatball bahn mi
Course Appetizer, dinner, lunch
Cuisine Vietnamese
Keyword 3jamigos.com, meatballs, Vietnamese, xiu mai
Prep Time 20 minutes
Cook Time 25 minutes
Servings 4 servings

Ingredients

Meatballs

  • 4 oz jicama (1 cup) finely diced, substitute water chesnuts 1-5 ounce can, drained and finely diced
  • 3 green onions, thinly sliced, keep the white and green parts separate. Can substitute finely minced shallots 1 large or two small for the meatballs
  • 1 lb ground pork not too lean 80/20 is perfect
  • 1 tsp garlic minced

Seasonings

  • 1 Tbsp fish sauce I use 3 Crabs, Red Boat is a bit more concentrated, would also work well
  • 1 Tbsp corn starch
  • 1/2 Tsp salt
  • 1/2 tsp sugar
  • 1/2 tsp chicken powder optional
  • 1/2 tsp ground black pepper

Sauce

  • 2 lbs or 4 medium tomatoes I prefer fresh tomatoes, if tomatoes are particularly juicy, reduce water to 1 cup
  • 1/2 Tbsp vegetable oil
  • 1/2 Tbsp garlic minced
  • 1 1/2 Tbsp tomato paste
  • 1 Tbsp sugar
  • 1 Tbsp fish sauce
  • 1 1/2 cups water can use low-sodium chicken broth in place of water
  • 1/4 tsp ground black pepper

Thickener

  • 2 tsp corn starch
  • 2 tsp water

Garnish

  • Green onions, the reserved thinly sliced green parts from the meatballs
  • Cilanto, loosely chopped optional
  • Fresh red chili peppers, deseeded and thinly sliced optional

Instructions

The Meatballs:

  • Remove the jicama skin using a vegetable peeler. Finely dice the jicama.
  • Cut off the white (root) portion of the green onions and finely chop. Chop the green onion stems. Transfer the green onion stems into a small bowl and set aside for later.
  • In a medium bowl, add the ground pork, jicama, green onion (white) root, garlic, fish sauce, cornstarch, and black pepper. Mix together by hand combining all of the ingredients well. Mix in one direction. Combine just until everything sticks together. Avoid over-working the meat mixture as this will make the meatballs tough.
  • Using an ice cream scoop (#40 ~2 T) scoop out some of the meat mixture and transfer to a large plate. Continue making small mounds until all the meat mixture is used. Wet your palms with water to prevent sticking. Gently roll each of the mounds into a ball. ( I use a #40 ice cream scoop to portion out meatballs and then roll each by hand into a ball).

The Sauce:

  • Chop the tomatoes.
  • Heat a large skillet over medium-high heat. When hot add vegetable oil then add the minced garlic and tomato paste. Saute for 15-20 seconds. Add the chopped tomatoes and stir together. Add the sugar, fish sauce, and water. Stir together combining the ingredients. Bring the liquid to a boil. Reduce the heat to medium-low, cover the pan, and cook for 5 minutes.

Cook the Meatballs

  • Make room in the center of the skillet by pushing the tomatoes to the side. Gently transfer the meatballs into the sauce. Cover and cook on medium-low for 5 minutes. After 5 minutes, rotate the meatballs and cook for another 5 minutes. For a thicker sauce, leave uncovered after adding meatballs.
  • Mix the cornstarch and water until smooth and add to the sauce. Stir gently to allow sauce to thicken. Continue cooking for another 2-3 minutes. Grind ground black pepper.
  • To serve, transfer a few meatballs into a small bowl along with a generous amount of tomato sauce. Top with the chopped green onions. I like garnishing with chopped cilantro and sliced fresh chili peppers. Enjoy these scrumptious Vietnamese Meatballs with crusty bread.
Scallion Mac and Cheese from Little Fat Boy

Scallion Mac and Cheese from Little Fat Boy

I have been focused on cookbooks from the Asian Diaspora.  With the way the world is turning, on a definite lopsided tilt, I want to support my community.  Representation matters, and we need to see POCs, LGBTQ, you know, EVERYONE represented in all walks of life.  The gold standard should be human + compassion, empathy, and vision for a better, kinder, world.  A world you are proud to leave your kids.

Recently I dashed into the city for another book signing at Omnivore Books on Food.  Frankie Gaw, author of the long-awaited, First Generation:  Recipes from My Taiwanese-American Home was in town and I couldn’t pass on his book signing.

A graphic designer by trade, his evenings were spent creating the blog, Little Fat Boy.  Stories, beautiful photographs, and recipes, woven together in this mash-up of his Taiwanese roots, midwest upbringing, and Southern ties to Memphis. His recipes are fun, a fusion of his upbringing and later West Coast migration.  His recipes make me happy.  Yep, Cinnamon Toast Crunch Mochi or topped with Pepples cereal, tell me you’re not smiling right now.

It’s VEGAN, yeah baby…More, Please

I LOVE mac and cheese. Frankie’s Vegan version is a riff on this much-loved dish.  Is it Mac and Cheese? Nope.  Is it delicious? YEP.  In place of butter, milk, and cheese you’ll find scallion oil, cashews, garlic, and my own little tweak, nutritional yeast.  Pureeing cashews into a creamy, lovely sauce, is really so good, this may become my go-to mac and cheese when I am feeling a little lactose intolerant, lol.

Not gonna lie, cashews are not diet food, just like a lot of nuts.  The upside is they do supply protein, healthy fats, vitamins, and minerals.  Plus, no animal products were used in the making of this..so there is that.  To offset some of the calories in this dish I reduce the pasta and substitute roasted or steamed cauliflower florets.  Yummos.

I like my mac and cheese super saucy so I decrease the amount of pasta, add more cauliflower florets and throw in some mushroom broth to extend the sauce.  The kid in me likes the macaroni cooked beyond al dente, really who eats mac and cheese that’s not soft and squishy?  This is two very generous servings, actually, I think it serves 3-4 people…see the calories won’t be that bad!

Scallion Mac and Cheese

A delicious vegan version of mac and cheese with loads of umami from scallions, nutritional yeast and garlic adapted from Little Fat Boy
Course dinner, one bowl meal, Side Dish
Cuisine Asian-American
Keyword Crazy good mac and cheese, scallions
Prep Time 17 minutes
Cook Time 10 minutes
Servings 4
Calories 425kcal

Ingredients

  • 1 cup raw cashews
  • 4 scallions finely chopped white and green parts divided
  • 1/8 cup olive oil
  • 2 cloves garlic, smashed
  • 11/2 tsp kosher salt
  • 1/2 tsp granulated sugar
  • 1/8 tsp paprika
  • 1 tbsp nutritional yeast
  • 1/4 lemon, juice of
  • 1/2-1 cup water, or pasta water or mushroom boullion
  • 1 tsp hot sauce to taste optional

Toppings

  • 1/4 cup panko
  • 1 scallion, Thinly sliced

Noods

  • 4 ounces macaroni
  • 1 cup cauliflower florets or broccoli approx 4 oz

Instructions

Cashews

  • Before making dish, place cashews in a medium bowl and cover with water by 1 inch. Let the nuts soak for 2-3 hours.

Carbs & Veggies

  • Cook your pasta as directed on package. With about 3-4 minutes to go, add the cauliflower to the pot. Return to boil and cook until al dente (from original recipe-lol. In my book mac cheese needs pasta cooked beyond al dente). Drain and place back in pot. Set aside.

Sauce

  • In a skillet, heat olive oil over medium-high heat. Add scallions and garlic. The oil should not be smoking but hot enough that the aromatics sizzle when added. Stir and cook for about 2 minutes. The scallions should be soft and your kitchen should smell delicious from the scallions and garlic. Transfer all of it to a blender. Set skillet aside, do not wash! You will be using this to brown the Panko Crumbs!
  • Drain the cashews and add to the blender along with the lemon juice, paprika, salt, sugar, nutritional yeast, and water or pasta water.
  • BLEND til smooth. Add additional water or pasta water to desired consistency.
  • Add sauce to macaroni, and stir to combine. Pour into a casserole dish and spread evenly. Sprinkle Panko Crumbs and diced green onions on top, and serve immediately.

The Crumbs

  • The skillet used to fry the scallion and garlic will have residual oil to brown the Panko crumbs. On medium-high heat toss the panko in the skillet until toasty brown.

Notes

This recipe can be doubled for those times you are feeding a big crowd.  In fact,  the original recipe is double this, I cut it in half cause it's a lot of pasta.
Marbled Ube Cookies (Star Powered)

Marbled Ube Cookies (Star Powered)

I wanted to include an ube dessert or cookie in my “Maui Strong” box for Lahaina.  Since I had made Ube Mochi Muffins for the Ukraine Cookie Box I opted for Constellation Inspiration’s Marbled Ube Cookie.  I have been eyeing her recipe for quite a while, and here was my chance to try it.  I baked the first sheet of cookies, and waited patiently (not really) for the cookies to cool.  With that first bite, I knew this cookie was going in the box. Not only are they delicious but they are so eye-catching.  A great addition to the cookie box.  In fact, I think…

Prince Would Love This COOKIE

Adding Ube extract and powder creates this gorgeous purple color that just POPS.  Ube, or purple yam or potato is popular in Southeast Asia, in particular the Philippines.  It has a vanilla, kind of nutty flavor, and “coconutty” aroma that lends itself well to desserts, bread, and pastries.  It’s definitely having a moment right now with the rising popularity of Filipino food.

Making the Cookie

The cookie dough is essentially a vanilla sugar cookie.  Start by creaming softened butter and sugar until smooth, not fluffy (to avoid a cakey cookie).  Add the egg and vanilla extract, beat to combine, and stir in the flour mixture.

Here comes the hard part, well, actually the hard part comes before making the dough.  Where to find ube powder and extract.  If you live in the Bay Area, you can find ube powder and extract by Butterfly or McCormick at most Asian grocery stores.  If not, there is always Amazon 🤷🏻‍♀️

Divide the dough in half (this is where a scale comes in handy).  Put half of the dough back in the mixing bowl and add ube extract and powder to it.  On the lowest speed of your mixer, blend the ube into the dough being careful not to overmix. You can do this by hand to avoid overworking the dough if you like.

.Using a tablespoon scoop, form dough balls with each dough and place them on a cookie sheet.  It is like having all your ducks in a row before the next step.

Smoosh together a dough ball of each color. Try to wrap one of the dough around the other to create the marble effect.  Then roll each in granulated sugar.  Place on a parchment-lined cookie sheet, 2 inches apart, and bake 11-14 minutes, rotating the sheet at the halfway mark.  Remove when the edges are just golden.

If you like ridges on the edge (all the rage right now) tap the cookie sheet 2-3 minutes before they come out of the oven.  This causes the cookie to deflate and make a ripple effect.  Sometimes the cookies are wonky in shape, if so, place a cookie cutter or glass (slightly bigger) over the cookie and swirl it to shape them into circles.  Or don’t, they’ll be delicious either way.

These Marbled Ube Cookies are a showstopper.  A lovely ube-flavored vanilla cookie with crispy edges, a chewy center, with a nice crunch from the sugar.  I’ll be making these again, and again…and again.

Marbled Ube Cookies

Ube Marbled Cookies, a gorgeous cookie that tastes as good as it looks.
Course Dessert, Snack
Cuisine Asian-American
Keyword drop cookie, marbled ube cookie, sugar cookie, ube
Prep Time 20 minutes
Cook Time 12 minutes

Ingredients

Dry Ingredients

  • 2 1/4 cup all-purpose flour 270gm
  • 1/2 tsp baking powder
  • 1/4 tsp baking soda
  • 1/2 tsp salt

Creamed Mixture

  • 1 cup unsalted butter, room temperature 227gm
  • 1 1/4 cup granulated sugar, and more for rolling 250gm
  • 1 large egg room temperature
  • 2 tsp vanilla extract

Additions to Dough

  • 2 tbsp ube purple yam powder, see note
  • 1 tsp ube extract

Instructions

  • Preheat the oven to 350°F (177°C). Line a large baking sheet with parchment paper.
  • In a medium bowl, whisk together the flour, baking powder, baking soda, and salt and set aside.
  • In the bowl of a stand mixer fitted with a paddle attachment, beat together the butter and 1-1⁄4 cups (250 g) of the sugar on medium speed until they are smooth, about 30 seconds. Add the egg and vanilla and beat to combine.
  • Add the flour mixture to the butter mixture and mix on low speed just until combined and no more streaks of the flour mixture remain, about 45 seconds.
  • Divide the dough into two equal portions (a scale comes in handy here) and leave one portion in the mixer. Add ube powder and extract to the mixer bowl. Mix on low speed until combined. The combination of ube powder and extract makes a nice purple color, no need for food coloring.
  • Take a heaping tablespoon of each dough and combine the dough by rolling between the palms of your hands to create a ball. I used a #40 ice cream scoop.
  • Toss the dough balls in a bowl of granulated sugar until each is coated.
  • Place dough balls on baking sheet, leaving 2 inches between each ball. Bake cookies for 11 to 14 minutes, until the edges of the cookies are light golden brown. Right before the cookies are ready to come out of the oven, tap the baking sheet on the oven rack a few times to create the ripple edges. Do not overbake.
  • Remove cookies from oven. If the cookies aren't round, place a circular cookie cutter or glass over the warm cookie and gently swirl the cookie to reshape. Then allow cookies to cool on the baking sheet for 10 minutes before transferring to a wire rack to cool completely.

Notes

Ube powder and extract can be found in most Asian markets or online.