Tag: Taiwan

Taiwanese Pork Belly Rice Bowl (Lu Rou Fan-卤肉饭)- In Hog Heaven!

Taiwanese Pork Belly Rice Bowl (Lu Rou Fan-卤肉饭)- In Hog Heaven!

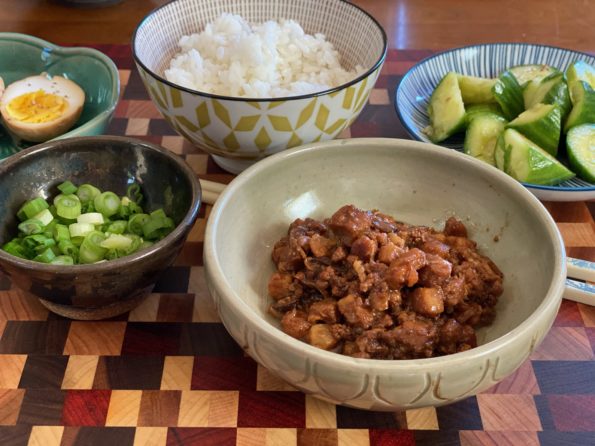
Continuing my virtual traveling by cooking, I’m imagining myself in Taipei right now.  I have not been back to Taiwan in ages and yet I find myself thinking about Taipei and my visit so long ago.  Growing up in San Francisco the majority of Chinese are from Hong Kong and the Guangdong (Canton) region.  I was fortunate enough in college to spend a summer in Taipei (yes, on the Taiwan Love Boat Trip).  I sampled  Shao Lung Bao, Oyster Egg Omelets, Popcorn Chicken, Beef Noodle Soup, and Red Bean Shaved Ice while wandering around the night markets.  Everything was so delicious, different from Cantonese food, and yet familiar at the same time.

Bowl Food is Soul Food

If you have followed 3jamigos, you know I have an obsession with bowl food and eating with a spoon.  The Taiwanese dish Lu Rou Fan 滷肉飯 falls squarely in this category.  In fact, this iconic dish was the basis for Taiwanese Turkey Rice, a favorite bowl I posted around Thanksgiving.  Shreds of turkey garnished each bowl of Lu Rou Fan.  People liked the turkey garnish so much, it got its own gig, Turkey Rice, the spin-off.

Back to Lu Rou Fan.  Season diced pork belly with star anise, cinnamon, and aromatics like garlic, shallots, and ginger,  are braised in a soy sauce and sugar mixture until it is melt-in-your-mouth tender.  Place a generous scoop of the braised pork, half of a hardboiled egg, and greens on top of a bowl of steamed rice.  Grab your spoon and dig in, bowl food is soul food.

After surveying different sites for Lu Rou Fan, my version is a mash-up of recipes I found.  The non-negotiables are pork, ginger, shallots, garlic, and a sauce flavored with star anise, soy sauce, sugar, and rice wine.  Start with pork belly cut into approximately 1/3 inch slices then diced.  Thick slab pork belly can be found in most Asian grocery stores.  I also add ground pork to the diced pork belly for a saucier texture, like a ragu’. Shiitake mushrooms are used to pump up the umami as does dried shrimp.  Shrimp is optional, if you decide to use it, soak and finely mince it before adding.  I have mentioned my lack of affinity for star anise, so I use only one clove and add a cinnamon stick instead.  If you like star anise feel free to use two.  Last but not least…

Pull Out the Instant Pot!

The pressure cooker reduces the effort and time to making Lu Rou Fan, a win-win.  Saute’ pork, add the aromatics and liquid, and 30 minutes later your Lu Rou Fan is ready for the finishing touches.  How easy is that? Make this dish a day in advance to allow the flavors to meld and to chill the Lu Rou.  Skim the solidified fat off before serving.

Finishing Touches

When the pressure cooker is done, release pressure and set the pot to saute bring the pork mixture to a boil, and reduce to desired consistency OR if the sauce is not thick enough, add a cornstarch water mixture to thicken. You want lots of sauce to drizzle on your rice so do not reduce too much.

The star of this dish is the succulent, saucy pork belly dancing on the main stage of rice but there are supporting actors.  Hard-boiled eggs often accompany Lu Rou Fan.  Boil, peel, and place eggs in the pork sauce after it has finished pressure cooking.  While the sauce thickens, the eggs will absorb the color and flavor of the pork.  The eggs will be hard-boiled, so for those who have come to love six-minute ramen eggs-this ain’t it.  Use soft-boiled instead of hard-boiled eggs to add to the sauce for a less-cooked egg.  Or cook six-minute eggs ramen style and use this in place of the hard-boiled eggs.  It’s your bowl of goodness, do what you want.  Serve with greens such as seasoned cucumbers, or steamed bok choy or broccoli.  Garnish with green onions and more fried shallots. YUMMY.

Taiwanese Pork Belly Rice (Lu Rou Fan)

Another Soul Food Bowl, made a little quicker in an Instant Pot. Braised pork belly seasoned with soy sauce, garlic, ginger, star anise and shallots. Delicious over rice or noodles. Comfort food.
Course Main Course, Meat
Cuisine Asian
Keyword Lu Rou Fan, Taiwanese Pork Belly Rice
Prep Time 20 minutes
Cook Time 45 minutes

Equipment

  • Instant Pot

Ingredients

  • 1 lb skin-on pork belly diced into 1/3 inch pieces
  • 1/4 lb ground pork
  • 1 tbsp vegetable oil or shallot oil
  • 3 slices ginger
  • 2 tbsps shaoxing wine
  • 2 tbsps dark soy sauce
  • 1 tbsp regular soy sauce
  • 1/4 cup fried shallots or onions
  • 1 shallot, finely diced
  • 4 cloves garlic chopped (1.5 tbsp)
  • 1 star anise
  • 2-3 dried shiitake mushrooms soaked until mushrooms are softened, remove from water andnreserve soaking liquid, dice mushrooms
  • 1 tbsp dried shrimps chopped OPTIONAL
  • 1 stick cinnamon or 1/2 tsp ground cinnamon
  • 2 tbsp rock sugar or brown sugar (30gms rock sugar_
  • 2/3 cup hot water or reserved liquid from mushrooms
  • Soy sauce /salt to taste
  • fried shallots and green onions garnish
  • 2 eggs hardboiled or cooked Ramen style

Instructions

  • Turn on the "sauté" function of the pressure cooker, press "adjust" once to switch to "more" for browning.
  • Once the oil is hot, add pork belly and give it a stir so that it's not sticking to the bottom. Saute' just until pork belly starts to brown, add ground pork. Let pork cook until it loses its pinkness and the liquid evaporates.
  • Add ginger, shallot, garlic, saute briefly before adding soy sauces, Shaoxing wine, cinnamon, star anise, rock sugar, shiitake mushrooms, and fried shallots. Mix it well and add reserved mushroom liquid or hot water. Cover with the lid.
  • Turn on the "manual" function, set the timer to 25 minutes. Allow 10 minutes before release of pressure and opening. Skim off the fatty oil from the top.
  • If the sauce seems too thin, turn on the "sauté" function, and "adjust" to "more" to thicken and darken the pork belly. Saute to desired sauce thickness and color. Season with light soy sauce or salt to taste. Alternatively, taste sauce after opening the pot. If it has enough flavor but is thin, mix 1 tbsp cornstarch with 2 tbsp water. Add to mixture and bring to a boil to thicken sauce.
  • Ladle the braised pork over rice with some sauce. Top with an egg* and greens of choice. Garnish with green onions and more fried shallots.

Egg

  • Generally, eggs are hardboiled, peeled and added during cooking..which makes a very hard-boiled egg. I like ramen eggs or runny eggs
  • Boil eggs to just past soft boiled stage. See post for link to ramen eggs. Have eggs peeled and ready to go when pork is finished cooking. Add to pork and allow to sit in sauce until you are ready to serve. Cut eggs in half and place 1/2 in each bowl of rice.

Notes

Use skin-on pork belly as the skin becomes tender, juicy and flavorful after absorbing all the flavors from spices and soy sauce. 
Use leaner ground pork (e.g. pork shoulder) as a substitute if the pork belly is too fatty. But really, you don’t need a ton on your rice.  Reduce the cooking time accordingly.  
Pineapple Pockets to the Rescue-Pining for a Cookie

Pineapple Pockets to the Rescue-Pining for a Cookie

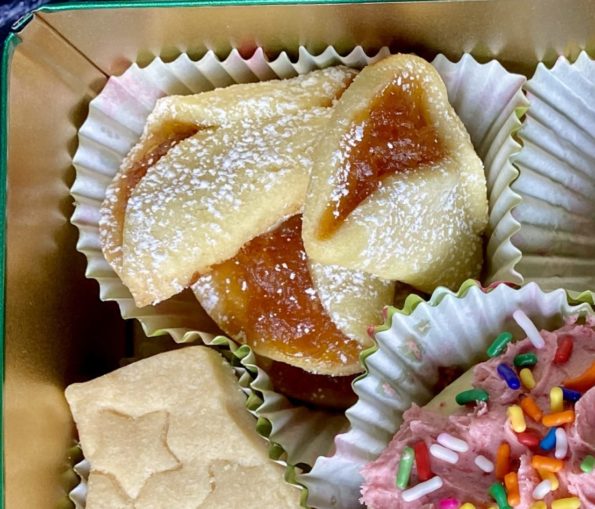
There are a couple of baking books that are my go-tos for cookies, especially during the holidays, like Rose Levy Berenbaum’s Christmas Cookies, Alice Medrich’s Cookies and Brownies and Flo Bracker’s Sweet Miniatures.  I find myself reaching for Sweet Miniatures when I want an elegant, fancy cookie. Yes it will probably require a bit more effort than drop cookies, but it’s Christmas, when else are you going to pull out all the stops?

Pineapple Cakes from Taiwan inspired me to make the Pineapple Pockets from Sweet Miniatures.  Taiwanese Pineapple Cakes are little bite-sized squares of pineapple jam cloaked in a sweet, buttery pastry crust.  I’m obsessed with these little cake-like cookies.  My introduction to these treats came years ago when a friend returning from a trip to Taipei brought back Te Chia Pineapple Cakes. It was love at first bite.  The sweetness from the pineapple offset by the buttery shortbread crust…needless to say, I was smitten.  I casually mention pineapple cakes to every friend that goes back to Taiwan while giving them my best wistful look.

While these Pineapple Pockets are more complicated than your average drop cookie, the resemblance to Taiwanese Pineapple Cakes put these on my must-bake holiday cookie list. The process begins with  making a caramelized pineapple jam then a pastry dough. The dough is rolled and cut into circles, dotted with the jam, and then shaped into cones.  Labor-intensive, but in the end, you are rewarded with a meltingly tender cookie highlighted by the dollop of golden, caramelized pineapple preserves. They are absolutely delicious and well worth the effort.  But most importantly, they are delicious enough to satisfy my Pineapple Cake craving. Now I don’t have to wait for friends to take pity on me and bring them back from Taiwan!

The jam is made first and set aside to cool. I added 1/2 tsp of vanilla to the jam and a pinch of salt to enhance the flavor.   Make the dough, chill it, then roll it into a circle. The dough should be about 1/8-3/16 inch thickness. Use a 2 inch round cutter for the circles.  Your best friend is your refrigerator.  If the dough gets soft or sticky during the process, put it back in the fridge to chill. This will make it easier to handle.

Position the jam off-center.  Using a butter knife or thin blade spatula, flip the edge closest to you over the jam.  Angle your spatula on the opposite side and flip towards you, overlapping with the first.

Ta-da, ready to bake!  Sprinkle powdered sugar on the finished cookies for a festive look.  In a pinch, you could use jarred preserves, make sure whatever you use is not too runny or thin.

Pineapple Pockets

Flo Bracker's delicious Pineapple Pockets. Caramelized Pineapple Jam encased in a buttery, tender pastry and shaped into a cone.
Course cookies
Cuisine American
Keyword cookies, flo bracker, holiday cookies, Pineapple cakes, Pineapple Pockets
Prep Time 1 hour
Cook Time 14 minutes

Ingredients

Dough

  • 6 ounces unsalted butter, room temp 1-1/2 sticks
  • 1/4 cup granulated sugar 50gms
  • 1/2 cup unsifted powdered sugar 50gms
  • 2 egg yolks
  • 1 tsp vanilla
  • 1-2/3 cup unsifted all-purpose flour 235gms

Pineapple Filling

  • 2 tbsp water
  • 1/3 cup granulated sugar 65gms
  • 8-ounce can crushed pineapple in natural juice
  • 1/2 tbsp unsalted butter

Instructions

  • In bowl of mixer, cream butter at medium low speed until smooth, about 1 minute. Beat in sugars at medium speed until creamy. Add egg yolks, one at a time, then vanilla, beating until well combined and slightly fluffy. Scrape down the sides of bowl. Lower mixer speed, and gradually add flour and mix just until it is combined.
  • Gather dough into a disc and chill 15-30 minutes. Divide dough in half and on parchment or wax paper, roll each piece into a circle. approximately 11 inches in diameter and 1/8 inch thick. Transfer to a baking sheet, cover top with parchment and refrigerate until firm about 2 hours.

Pineapple filling

  • In a medium saucepan, combine water and sugar over low heat. Swirl occasionally and wash down any sugar crystals that form on the side with a brush dipped in cold water to dissolve them. Increase heat to medium-high and cook without stirring until sugar thickens and turns amber in color about 8 minutes. Take it off the heat and add crushed pineapple and juice all at once. Careful as mixture will bubble up. Stir to combine and return the pan to stove and cook over med-high heat until mixture is golden and syrupy. Remove from stove and stir in butter. Place in bowl and set it aside to cool.

Putting It All Together

  • Preheat oven to 325
  • Remove one piece of dough, peel off parchment. Put parchment back on dough and flip dough over and peel off bottom parchment.
  • Use a 2 inch round cookie cutter cut out circles and place on lined baking sheets. Place 1/2 teaspoon of cooled jam off-centered on circle. Fold over one edge of dough over jam, then overlap the opposite edge at an angle to form a cone. See pics.
  • Bake one sheet at a time, for 12-14 minutes until edges ar light golden.
  • Remove from oven and place on wire rack to cool for 5 minutes. Lift cookies off and place directly on cooling rack.
  • Sprinkle with powdered sugar. optional)
  • Store at room temp for up to 10 days.

The 2020 Holiday Cookie Tin

Taiwan Turkey Rice, 嘉義火雞肉飯 Deliciousness in a Bowl

Taiwan Turkey Rice, 嘉義火雞肉飯 Deliciousness in a Bowl

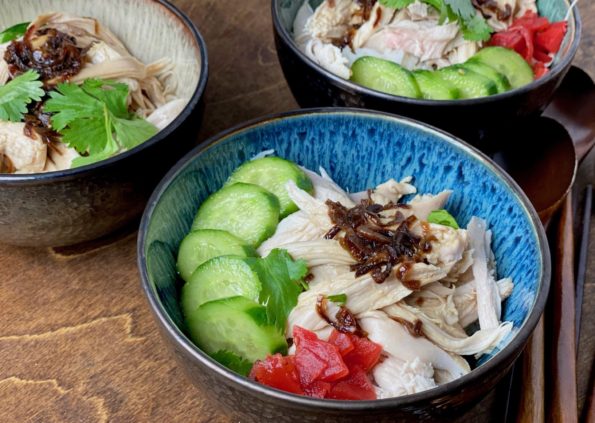
Only a couple of weeks have gone by since Thanksgiving and I have turkey on the brain, again!  Not that I didn’t get my fill of turkey on Thanksgiving but this dish caught my eye as I was roaming around the food-sphere looking for Thanksgiving ideas, Taiwanese Turkey Rice.  What?  Maybe it’s like rice soup? Nope, it is a bowl filled with rice, topped with succulent shreds of turkey, dressed with a soy sauce, fried shallots, turkey dripping emulsion and served with Asian pickles.  Damn, doesn’t that sound delicious?

SIGN ME UP NOW

I was drooling.  If you have perused my IG or blog for recipes you may have noticed that I LOVE one bowl meals like soups and stews.  My comfort zone is curled up on the couch, spoon in hand and a bowl in the other, filled with either rice or noodles topped with anything yummylicious…like THIS.

I did a bit of sleuthing for  this dish.  Turkey is not something you find in the Asian food vernacular.  It turns out, Taiwanese Turkey Rice (嘉義火雞肉飯) hails from southern Taiwan, specifically Jia Yi.  It is a super popular street food and turkeys are grown specifically for this dish.  Originally the turkey was shredded as a garnish for the classic dish, Lu Rou Fan, 魯肉飯, Stewed Pork over Rice, but folks liked the turkey so much, they started making it without the Stewed Pork, thus Taiwanese Turkey Rice was born.

Turkey Rice is similar to Hainan Chicken Rice or Thai Chicken and Rice.  The flavor profile of the sauce sets it apart though, oh yeah, and the turkey, but in a pinch you could use chicken for this dish.  I decided to cook the turkey ala Hainan Chicken style. The turkey is poached so you end up with moist succulent meat plus the stock which serves as the basis for the sauce.  There are a plethora of recipes out there right now that take advantage of turkey leftovers to make this dish including this one from Serious Eatsbut I wanted the real deal so I started with uncooked turkey breast.

Two blogs jumped out and served as the basis for info and recipe for Taiwanese Turkey Rice, Choo Choo-ca-Chew  and The Food Dictator.  A wealth of information and great recipes.

The Turkey

I started with a turkey breast, well, half of a turkey breast and poached it, just like Hainan Chicken.  The poaching liquid is seasoned with salt, ginger, scallion, rice wine and Better Than Bouillon Chicken Base (game changer).  If you have a box of turkey stock from TJ’s, use that and water for a more flavorful stock.  (I think their turkey stock is better than the chicken stock in a box.

When you buy your turkey make sure the skin is still attached***  Remove the skin at home and reserve. Drop the turkey into the boiling poaching liquid (ok, don’t just DROP it, gently place…to avoid 3rd degree burns).  Bring the stock back to a boil and turn the heat down so the stock is simmering.  Cover and let simmer for 10 minutes.  Turn the flame off, NO PEEKING, and let the turkey sit for 25 minutes undisturbed.  Think of it as a spa day for the turkey.  Once it is done take it out of the pot, let it sit until it is cool enough to handle.  Remove meat from bone and shred into bite size pieces.  Reserve in bowl and cover to keep warm.

Gimme Some Skin***

A trip to Minneapolis, back before the time of COVID, we caved into Wes’s penchant for Caesar Salad at the Butcher & The Boar (sadly gone) one night for dinner.  A few tweaks made their Caesar a standout.  The Romaine lettuce was grilled, and in place of croutons, bits of chicken skin baked to a crispy golden finish adorned the salad. ㄹingerlicking good.

Crispy chicken skin (in this case turkey) is pretty quick and easy to make.  Spread the skin out on a parchment lined rimmed baking sheet.  Salt and pepper.  Cover with a sheet of parchment and top with another baking sheet to keep the skin flat.  Bake at 375 degrees for 20-25 minutes until skins are deep golden.  You should have a nice puddle of oil from this, KEEP the oil.

The rendered oil is used in the sauce for the dish.  The crispy skin is a bonus that I use as a garnish for turkey rice.  It provides added crunch and flavor to the dish, its damn delish.

The Sauce

Hainan Chicken or Chinese Poached Chicken is served with a ginger, scallion, sauce with or without slices of chili.  For Taiwanese Turkey Rice, the sauce is made with fried shallots, light soy sauce, a bit of sugar and the rendered oil from the turkey.  It’s deceptively simple for a sauce that is so delicious.  I buy a ton of shallots, thinly slice and fry them. The oil is kept in the fridge and the shallots in a jar on the counter.

Here is a detailed description on how to make fried shallots from Serious Eats.  IN A PINCH, you can buy fried shallots at most Asian markets and avoid frying your own.  IN A DOUBLE PINCH, TJ’s has fried crispy onions in a can during the holidays, (probably for the green bean casserole I hate) that make a pretty good substitute.

The Rice

Traditionally served over plain rice, you can bump it up by using the poaching liquid to cook the rice.  Just reserve enough for the sauce.  For the rice use any long grain or Jasmine Rice.

The Sides

Pickles are often served with Turkey Rice.  I like pickled ginger, takuan (pickled Japanese radish), or Vinegared Chinese pickles.  I love soft boiled eggs (like ramen eggs) and fresh cucumbers lightly dressed as sides. Garnish with scallions or cilantro.  Lip-smackin’ good.

Taiwanese Turkey Rice

Course Main Course, One dish meals
Cuisine Asian
Keyword Rice Bowl, Soul Food, Taiwanese, Turkey Rice
Prep Time 20 minutes
Cook Time 1 hour 15 minutes
Servings 2 servings

Ingredients

  • 2 C Shredded Turkey* You can use Thanksgiving turkey leftovers

Poaching Liquid

  • Water Enough water to cover turkey
  • 2-3 slices ginger
  • 2 scallions
  • 1 tsp salt
  • 1/4 cup rice wine
  • 1 tablespoon Better Than Bouillion Chicken Base

SAUCE

  • 3 Shallots Thinly sliced
  • 1-1/2 TBsp Oil Lard, Vegetable Oil, Chicken Fat or Half and Half
  • 3 TBsp Soy Sauce Light Soy Sauce (Pearl Ridge is good)
  • 1 TBsp Sugar
  • 3/4 C Chicken/Turkey Broth

RICE

  • 2 C Rice Steam or cooked according to instruction. You can also use the chicken stock from boiling the chicken to cook rice if making from scratch. It really enhances the flavor

Instructions

Turkey

  • Start with just enough water to cover the turkey breast in a pot. Add ginger, scallions, rice wine, and stock base and bring to a boil. Add turkey and cook for 10mins then turn the heat off and let it sit in the pot for 25 mins or until cooked through. This method makes silky, tender, turkey.
  • Remove from pot, cool until you can handle and shred into small pieces. Cover and reserve.
  • The poaching liquid can be reduced by 20-30% to concentrate the flavor. Taste.

SAUCE

  • In a frying pan, heat up 1-1/2 TBsp of oil of your choice. I use 1/2 shallot oil and 1/2 rendered fat from turkey
  • Add the sliced shallots to the oil and fry until crispy golden. Remove shallots or you can leave them in the sauce. I like to remove them and sprinkle them on the finished bowl. Or go half and half.
  • Add the turkey stock, soy sauce, and sugar to the pan, careful the oil may splatter
  • Cook on high to slightly reduce the sauce.

The Bowl

  • Layer shredded turkey over steaming rice, pour amount ofsauce you want over the turkey.
  • Garnish with pickles, or green veggies, or cucumbers, fried shallots, scallions, soft boiled egg, or reserved crispy turkey skin.

Notes

Leftover holiday turkey can be used for this dish.  Make sure you keep the pan drippings from the turkey and use this for the oil in the sauce.  You can use turkey stock or water for the sauce.