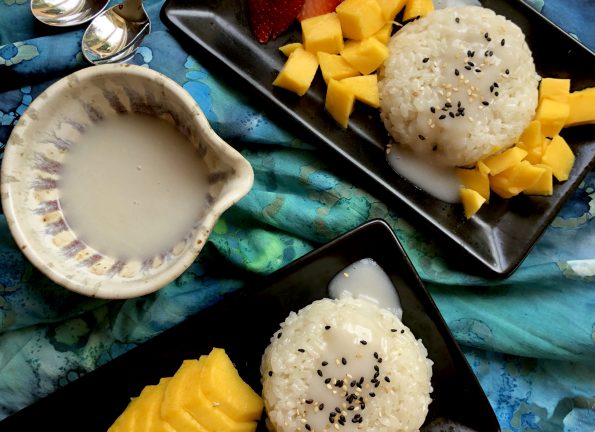
Tag: dessert

Another Day, Another Chocolate Chip Cookie (Brown Butter & Toffee Chocolate Chip Cookie)

Another Day, Another Chocolate Chip Cookie (Brown Butter & Toffee Chocolate Chip Cookie)

What is your favorite chocolate chip cookie recipe?  The one on the back of the Nestle’s Chocolate Chips bag? A treasured family recipe handed down? Mine was given to me by a friend who swore it was the original Mrs. Field’s recipe.  I can’t vouch for that claim, but it is pretty darn good. Over the years I have tweaked the recipe by adding oatmeal, reducing the amount of chocolate (don’t hate me), and adding nuts.  Yep, the perfect cookie. Just kidding.   But it is my go-to chocolate chip cookie.  A serious challenger popped into my feed the other day, Brown Butter and Toffee Chocolate Chip Cookies.

You can have more than one go-to chocolate chip cookie right?  There just might be a new player in the best CCC sweepstakes.

Brown butter chocolate chip toffee cookie ingredients

What makes these cookies so delicious?  BROWNED BUTTER for a toasty rich, caramel flavor-yum.  Chunks of SKOR toffee bars for crunch and another layer of caramel flavor-double yum.  Chocolate wafers in place of chocolate chips stay gooey and soft longer creating a luscious texture in the cookies-triple yum.  Upon finding this recipe I immediately headed to the store to look for those chocolate wafers. I found Guittard’s 67% semi-sweet wafers-YAY.  A bag costs about eight dollars-BOO.  It’s a splurge that’s for sure…but so worth it.


Chocolate wafers and toffee pieces

Fold in chocolate and Skor pieces (Heath Bars would work well too) and let the dough sit for 30 minutes.

These cookies will brown quickly so watch them carefully. Start checking them at the 8-minute mark.  To create the crevices in the cookies, rap the baking sheet on the oven rack (at the 6-7 minute mark), repeat 1-2 minutes later.  This will cause the cookie to deflate creating nooks and crannies.

Brown Butter and Toffee Chocolate Chip Cookies

Another chocolate chip cookie? You bet!
Course cookies, Dessert
Cuisine American
Keyword brown butter, chocolate chip cookie, toffee
Prep Time 30 minutes
Cook Time 15 minutes
Total Time 45 minutes
Servings 20

Ingredients

Dry Stuff

  • 2 cups all-purpose flour
  • 1 teaspoon baking soda
  • ¾ teaspoon kosher salt

Wet Stuff

  • 1 cup unsalted butter 2 sticks
  • 1 cup packed dark brown sugar
  • cup granulated sugar
  • 2 large eggs room temperature
  • 2 teaspoons vanilla extract

The Add-Ins

  • 2 chocolate toffee bars (1.4 oz bars) preferably Skor, chopped into ¼-inch pieces
  • cups chocolate wafers disks, pistoles, fèves; preferably 72% cacao, although I used 67% Guittard -yum
  • Flaky sea salt

Instructions

  • Whisk flour, baking soda, and kosher salt in a medium bowl. Set aside
  • Cook butter in a medium saucepan over medium heat, stirring often, until it foams, then browns, 5–8 minutes. Scrape into a large bowl and let cool slightly.
  • Add brown sugar and granulated sugar to browned butter. Using an electric mixer on medium speed, beat until incorporated, about 1 minute. Add eggs and vanilla and beat until mixture lightens and begins to thicken, about 30 seconds. Reduce mixer speed to low; add dry ingredients and beat just to combine. Mix in toffee pieces and chocolate wafers with a wooden spoon or a rubber spatula.
  • Let dough sit at room temperature at least 30 minutes to allow the flour to hydrate. Dough will look very loose at first, but will thicken as it sits. For less spread, chill dough in fridge.
  • Place a rack in middle of oven; preheat to 375°. Using a 1½-oz. ice cream scoop, portion out 10 balls of dough and place on a parchment-lined baking sheet, spacing about 3" apart (you can also form dough into ping pong–sized balls with your hands). Do not flatten; cookies will spread as they bake. Sprinkle with sea salt.
  • Bake cookies until edges are golden brown and firm but centers are still soft, 9–11 minutes. Let cool on baking sheets 10 minutes, then transfer to a wire rack and let cool completely. Repeat with remaining dough and a fresh parchment-lined baking sheet to make 10 more cookies.
  • Do Ahead: Cookie dough can be made 3 days ahead; cover and chill. Let dough come to room temperature before baking.

Notes

To create ridges in cookies, at 7 minutes open oven and rap pan on oven rack which will cause cookie to deflate and create ridges.
What’s for Dessert? Croutons!

What’s for Dessert? Croutons!

Awhile back I reviewed Food52 Mighty Salads. Flipping through the book I found quite a few recipes to try including a tomato pasta salad, a crab and corncake salad and a tomato cucumber salad with lamb kebabs.  At the very end of the book, snuck in on the last page (those sneaky Food52ers) I found a single non-salad recipe.

Better yet, it is a DESSERT recipe.  A tantalizing little tidbit among a sea of greens and grains.  As part of their thank you page and because they couldn’t write a cookbook without a sweet finish, they came up with Berry Salad with Brioche Croutons.  It is simple, yummy and the perfect ending.

….of course I had to try it.

It is STUPID EASY and delicious.  Start with your favorite loaf of brioche.  Cut 4 slices about 3/4 inch thick and then cut into cubes.  Place in a buttered baking dish, throw in a handful of nuts, your choice.  I like walnuts but feel free to use pecans or almonds or a mix of your favorite nuts. Drizzle with 2 tablespoons honey and finish with a sprinkle of sea salt or kosher salt (a little bigger sprinkle).  Bake in a preheated oven (350 degrees) for 7 minutes or until golden brown.  Cool.  Store in an airtight container.

Now you could just munch on these bad boys all by themselves, which I have been known to do, or you could throw them on top of a bowl of berries-strawberries, blackberries, blueberries, raspberries, whateverberries (just checking if you are paying attention) sweetened with some raw sugar as suggested by the folks at Food52.

My favorite option is on top of plain Greek yogurt with a touch of honey and fresh berries..  It adds a nice crunch and makes my breakfast seem deliciously decadent.  Its way too easy not to try.


Ottolenghi-Ototalyummi Blueberry Lemon Almond Cake

Ottolenghi-Ototalyummi Blueberry Lemon Almond Cake

I am a big fan of Ottolenghi’s cookbooks, the photos are mouthwatering and every dish I have tried has been delicious.  My favorite book is Jerusalem and not just for the recipes and photos but it’s premise. Two men who grew up in opposite ends of Jerusalem, one Jewish, one Arab create wonderful food together.

In today’s America we seem so divided…we should just have a ginormous potluck where everyone brings their favorite dish to share. The rule would be bring a dish your grandmother or your grandfather made for you.  Can you imagine that table?  It would be filled with dishes from every corner of the world.  Hard to hate on someone sharing a bowl of their grandmother’s mandu or kreplach. Mean words to a guy who hands you a plate of brisket perfectly smoked the way his dad taught him?  I hope not.  Food soothes the soul, heals the heart and sways the mind.

A girl can dream right?

A couple of weeks ago Ottolenghi posted a recipe in his New York Times column that looked absolutely scrumptious.  A Blueberry Lemon Almond Loaf.  Lucky for me I have a lemon tree in my garden (an endless supply of lemons makes me happy) and had ripe, sweet blueberries from my trip to the farmers market over the weekend.

Buttery goodness is brightened by lemon zest, with a generous amount of blueberries, and finished with a zingy lemon icing. Yep, making cake, then eating cake.

The batter comes together quickly. The addition of almond flour produces a tender crumb. The only glitch I encountered was adding a reserved portion of blueberries to the batter after 15 minutes in the oven.  At this point, the top of the loaf was brown and pretty set. I ended up throwing the blueberries on top and pushing them down-with a bit of success. Next time I’d check the loaf earlier and throw the berries on a bit earlier so they sink into the batter a bit. I love lemon so I pumped up the amount of lemon zest in the cake and added some to the icing. Bake this cake it’s lemonlicious and bluerrific.

Ottolenghi-Ototalyummi Blueberry Lemon Almond Cake

Blueberry Lemon Almond Cake from Ottolenghi. Buttery, filled with citrus flavor
Course Cake, Dessert
Cuisine European
Keyword Apple Cake, blueberry, lemon, ottolenghi
Prep Time 20 minutes
Cook Time 43 minutes

Ingredients

Ottolenghi New York Times Cooking

    Creamed Mixture

    • 11 tbsp 1 stick plus 3 tablespoons(150 grams) unsalted butter, at room temperature, plus extra for greasing the pan
    • 1 scant cup (190 grams) granulated or superfine sugar caster sugar
    • 1 teaspoon lemon zest
    • 1 teaspoon vanilla extract
    • 3 large eggs beaten

    Dry Mixture

    • cup (90 grams) all-purpose flour plain flour, sifted
    • 1 ¼ teaspoons baking powder
    • teaspoon salt
    • 1 cup (110 grams) almond flour finely ground almonds
    • 1 ½ cups (200 grams) fresh blueberries Split into scant 1 cup for the batter and 3/8 cup for top of cake

    The Finish

    • cup (70 grams) confectioners’ sugar icing sugar, powdered
    • 1 tbsp lemon juice (or more juice as needed)

    Instructions

    • Heat oven to 375 degrees Fahrenheit/200 degrees Celsius. Grease a 9- or 8-inch/21-centimeter loaf pan with butter, line it with a parchment paper sling and butter the paper. Set the pan aside.
    • In a separate bowl, whisk together flour, baking powder, salt and almond flour. Set aside.
    • Place butter, sugar, lemon zest and vanilla extract in the bowl of a stand mixer fitted with the paddle attachment. Beat on high speed for 3 to 4 minutes, until light, then lower speed to medium. Add eggs in three additions, scraping down the sides of the bowl a few times as necessary. The mix may split (look curdled) a little but don’t worry: It’ll come back together once you add the dry ingredients.
    • With the stand mixer on low, add the reserved dry ingredient mixture in three additions, mixing just until no dry specks remain. Fold in about 3/4 of the blueberries by hand, then scoop batter into the prepared loaf pan.
    • Bake for 15 minutes, then sprinkle the remaining blueberries over the top of the cake. Check the cake at the 10 minuteReturn to the oven for another 15 to 20 minutes, until cake is golden brown but still uncooked. Cover loosely with foil and continue to cook for another 25 to 30 minutes (less for a 9-inch pan, more for an 8-inch pan), or until risen and cooked, and a knife inserted into the middle of the cake comes out clean.
    • Remove from oven and set aside in its pan to cool for 10 minutes before removing cake from pan and placing on a wire rack to cool completely.
    • When cake is cool, make the icing: Add lemon juice and icing sugar to a bowl and whisk together until smooth, adding a bit more juice if necessary, just until the icing moves when you tilt the bowl. Pour over the cake and gently spread out. The blueberries on the top of the cake may bleed into the icing a little, but this will add to the look.
    • Let icing set (about 30 minutes), slice and serve.

    My Tweaks

    • I added another teaspoon of lemon zest to the batter and 1/2 teaspoon of zest to the icing. I ❤️ lemon
    • I did not use all the icing, I drizzled the icing on instead. Not a big fan of lots of icing.
    Strawberry Fields Forever-Strawberry Pie Now

    Strawberry Fields Forever-Strawberry Pie Now

    Tasked with dessert for Easter dinner at my brother’s this year, I pondered on what to bring.  Inspiration hit at my local farmer’s market when I spied the baskets of luscious, red, ripe strawberries.

    It’s PIE TIME

    I conjured up an image in my head, fresh sweet ripe strawberries piled in a crispy buttery crust and topped with a dollop of whipped cream.   This perfectly describes Rose Levy Beranbaum’s strawberry pie recipe. .  I own as many of her cookbooks as I do Dorie Greenspan’s and that’s saying a lot, both are baking gurus extraordinaire.  Rose’s recipes are organized, reliable, easy to follow, and best of all delicious. First, the ingredients are listed by volume measurements and weights (ounces and grams, how great is that?) in all her books and then formatted in tables.  In addition, each recipe has pointers for success, helpful hints, and a Harold McGee/ Alton Brown-like blurb on understanding the recipe.  My favorites include Rose’s Christmas Cookies, Cake Bible, and her more recent book  The Baking Bible.

    Her Glazed Strawberry Pie recipe is from The Pie and Pastry Bible. In addition to being delish, it is super easy to make. The strawberries are the star of this pie so make sure your berries are ripe and sweet. Start by slicing the strawberries in half then make the glaze.  The glaze calls for sugar, cornstarch as the thickener, and cranberry-raspberry frozen concentrate.  Yep, frozen fruit juice concentrate.  Finally, fold the strawberries in the glaze and pour them into a pre-baked crust.

    It’s all about the crust and filling, uh-huh

    Use your favorite pie crust recipe (or mine), fully pre-bake it, and as it cools, make the filling.  Keep in mind the pie will need to chill in the fridge for a good couple of hours before serving.  Serve with whipped cream (totally worth the calorie splurge).

    Take advantage of strawberry season and MAKE THIS PIE.  Your family will love you. Your friends will love you.  You could run for office (hint, hint) after making this pie.

    Glazed Strawberry Pie from Pie and Pastry Bible

    Ingredients

    • 1 Basic Flaky Pie Crust for a 9-inch pie
    • 1 tablespoon egg white lightly beaten
    • 1/4 cup sugar
    • 3 tablespoons cornstarch
    • 1 cup liquid cran/raspberry concentrate thawed, undiluted
    • 3/4 cup water
    • 4-5 cups strawberries rinsed, hulled, dried, and halved

    Instructions

    For pie dough:

    • Favorite pie crust recipe, need only a single crust.
    • Remove the dough from the refrigerator. If necessary, allow it to sit for about 10 minutes or until it is soft enough to roll.
    • Roll dough 1/8 inch thick or less and about a 13-inch circle.
    • Transfer the dough to the pie pan. Fold under the excess and crimp the border using a fork or your fingers. Cover it loosely and refrigerate for a minimum of 1 hour and a maximum of 24 hours.
    • Preheat the oven to 425°F at least 20 minutes before baking.
    • Line the pastry shell with foil and fill with pie weights, rice or dried beans. Bake for 20 minutes. Carefully lift out the rice or beans with the foil. With a fork prick the bottom and sides and bake 5 to 10 minutes more or until the crust is a golden. Check after 3 minutes and prick any bubbles that may have formed.
    • Cool the crust on a rack for 3 minutes, so it is no longer piping hot, then brush the bottom and sides with the egg white.

    Make the filling:

    • In a 2-quart saucepan, mix together the sugar and cornstarch. Gradually stir in the cran/raspberry concentrate and water until smooth. Over medium heat, bring to a boil, stirring constantly. Boil for 1 minute. Remove the pan from the heat and cool completely.
    • Gently fold in the strawberries and spoon the filling into the baked pastry shell. Refrigerate for 4 hours or until set.
    • Serve with freshly whipped cream
    • Store:
    • Refrigerated up to 2 days.
    • The Pie and Pastry Bible
    When Life Gives You Lemons…Make Lemon Bars!

    When Life Gives You Lemons…Make Lemon Bars!

    Who doesn’t love lemon bars?  But just to be sure, I do have two recipes for lemon bars to cover just about everyone.

    For the longest time, my favorite Lemon Bar was from Michael Bauer’s column in the San Francisco Chronicle.  A classic lemon bar with a meltingly tender crust topped with a sweet lemon curd and dusted with powdered sugar.  These bars were the hidden gems in a summer picnic basket or the citrus foil to the chocolate cookies on the holiday cookie tray.

    Along came Alice

    ….Medrich that is, the chocolate maven. She penned a wonderful little cookbook simply titled Cookies and Brownies (still available luckily).  Fifty recipes of classic cookies to cookies with a twist.  Hands down the best snickerdoodle, delicious butter cookies with pecans and cocoa nibs, and Steve’s brownies, fudgy and decadent.  For years I shied away from the bar cookies in her book.  The recipe started with melting the butter for the crust.  Whaaat?  Melted butter for a shortbread crust?  Just didn’t seem right.  I finally gave in and I am glad I did.  These lemon bars are a party in your mouth, the classic lemon bar amped up.  The crust is buttery and crispy crunchy not soft, the perfect foil for the filling which is sweet but tart enough to make your taste buds stand up and take notice.

    The next time you make lemon bars, make the classic bars if you are feeding a swarm of little kids.  They’ll love them.  But if you are taking them to your friends, make Alice’s version, all grown up with attitude, just like us!

    This recipe can be baked in a tart pan, once again upping the wow game on these bars. After pressing the dough into the pan, freeze for 15 minutes before baking.  If the crust puffs while baking, poke it back down with a fork.  To ensure it keeps its shape weigh the crust down with pie weights and remove about halfway through baking.  Remember to bake to a rich deep golden brown for a crispy, buttery crust.

    Alice's Lemon Bars

    A grown-up version of Lemon Bars from Alice Medrich. Tart lemon filling in a buttery, crisp base, absolutely delicious.
    Course bar cookies, cookies, Dessert
    Cuisine American
    Keyword alice medrich, buttery, lemon, Lemon Bars, lemon curd, tart
    Prep Time 30 minutes
    Cook Time 1 hour

    Ingredients

    For crust:

    • 8 tbsp unsalted butter, melted 1 stick
    • 1/4 cup granulated sugar
    • 3/4 tsp vanilla extract
    • 1/4 tsp regular table salt or sea salt
    • 1 cup all-purpose flour

    For topping:

    • 1 cup plus 2 tbsp granulated sugar
    • 3 tbsp all-purpose flour
    • 3 large eggs
    • 1 -1/2 tsp finely grated lime or lemon zest
    • 1/2 cup strained freshly squeezed lime or lemon juice
    • Powdered sugar for dusting

    Instructions

    • Position a rack in lower third of oven and preheat oven to 350 degrees. Line bottom and sides of 8- by 8-inch baking pan with aluminum foil.

    To make crust:

    • In a medium bowl, combine melted butter with sugar, vanilla and salt. Add flour and mix until just incorporated. Press dough evenly over bottom of pan. Freeze dough for 15-20 minutes until firm. Start filling while dough chills.
    • Bake 25 to 30 minutes, or until crust is fully baked, well-browned at the edges and golden brown in the center. If dough bubbles poke a few holes in it andpat it down.

    To make topping:

    • While crust is baking, stir together sugar and flour in a large bowl until well-mixed. Whisk in eggs. Stir in lime or lemon zest and juice. When crust is ready, reduce heat to 300 degrees, slide rack with pan out and pour filling onto hot crust. Bake 20 to 25 minutes longer, or until topping no longer jiggles when pan is tapped.
    • Remove from oven to a wire rack to cool completely. Lift up foil liner and transfer bars to a cutting board. If surface is covered with a thin layer of moist foam (not unusual), blot surface gently with a paper towel to absorb excess moisture; repeat with a fresh piece of paper towel if necessary.
    • Using a long, sharp knife, cut bars into 16 or 24 daintier bars and sift powdered sugar over bars, if desired. Stored in an airtight container, bars can be refrigerated for up to 3 days.
    • I bake my lemon bars in a rectangular tart pan with removable bottom. It gives the bars a nice side crust and a nice finished look. The idea came from the blog Baking Obsession Check it out for instructions to bake in a rectangular pan.