Category: Mochi Madness

Chewy Black Sesame Rice Cake #CakeforTimmy

Chewy Black Sesame Rice Cake #CakeforTimmy

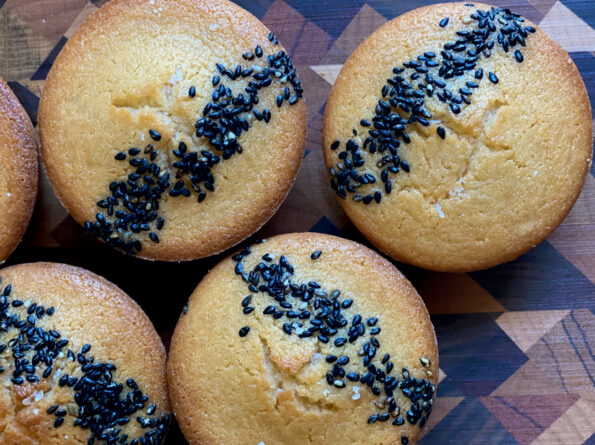
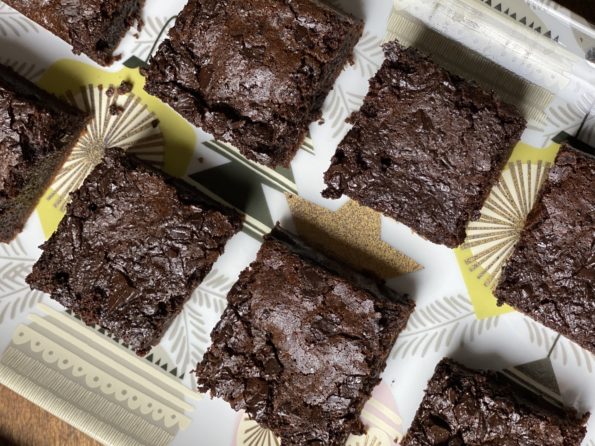
I first made Eric Kim’s Chewy Black Sesame Mochi Cake after a “Bake-a-long” with him, a perk for purchasing his book, Korean American. I was on a “mochi-bender”, if a recipe called for sweet or glutinous rice, I made it.  His cake is not only made with mochi, it has black sesame seeds.  I LOVE sesame seeds in any form, game on.

Bake-A-long

For those of you who #1 Have read this far down, #2  Pretty darn observant…yes, the Bake-A-Long was quite a while ago.  While I loved the sesame flavor and texture of the cake, not gonna lie, the cake was pretty sweet.  Eric seems to have a pretty high sugar barometer.  I made a mental note to file it away in my brain to try again with a smidge less sugar.

52 Reasons To Try It Again

For all the evils of social media (I say this with a half chuckle) the best thing about it has been finding my peeps.  Finding folks with similar interests that I would never in a million years have connected with if not for Facebook or Instagram. A virtual community that shares a common interest.  Groups like Food52’s Cookbook Club on Facebook (yep, you need to use FB) where folks like you and I can share recipes, reviews, and kitchen adventures.

Each month features a new (or old) cookbook, which, if you are like me, a cookbook addict, probably have or are in the process of getting.  It gives me that little shove to open up that cookbook and try it.  It’s also a great resource for tips and reviews for many of the recipes.

This month the selected cookbook is Korean American by Eric Kim.  Which reminded me that I haven’t made anything from it in a while.  Time to tweak that Chewy Black Sesame Rice Cake again.

Oops, I Did It Again.  But as Muffins

I decreased the amount of sugar in the recipe and made muffins instead of a cake.  Kinda like having my own personal dessert.

Sweet or glutinous rice flour is not to be confused with rice flour.  Sweet rice is much stickier than rice flour.  They are not interchangeable.  Koda Farms sweet rice is known as Mochiko and is pretty easy to find especially at Asian grocery stores.

Black sesame seeds can be found at most grocery stores in the spice section.  Asian grocery stores will also carry sesame seeds in larger quantities and not quite as expensive.  You

To reduce the sweetness cut sugar by 1/4 to 1/2 cup.  I cut it by 1/2 and it was still sweet enough for my taste. You may have to play with a little.  The time between making the original recipe (full sugar load) and when I made the muffins with half sugar taxes my memory as to whether the texture was different

The batter is fairly runny and pourable.  Very doable as a cake or muffins.  Shorten baking time to 20-25 minutes if making muffins.

Looking for something just a little different, gluten-free, and delicious, look no more, it’s right here.

Chewy Black Sesame Rice Cake

A delicious, dense, chewy, sesame flavored cake from Eric Kim
Course Dessert
Cuisine Asian-American
Keyword Black Sesame Seed, cake, chewy, ERic KIm, Mochi
Prep Time 20 minutes
Cook Time 1 hour

Equipment

  • 1 9 inch cake pan or
  • 1 12-cup std muffin pan

Ingredients

  • Cooking spray or butter and flour with plain rice flour

Eggs and Tings'

  • 2 large eggs
  • 1 cup sugar (it's pretty sweet, I use 1/2 cup)
  • ¼ cup honey mild
  • ¾ teaspoon kosher salt

The Wet Stuff

  • 1 cup whole milk
  • 2 tablespoons unsalted butter melted
  • 1 tablespoon vanilla extract yes, 1 TABLESPOON
  • ½ teaspoon toasted sesame oil

The Crunch

  • 4 tablespoons toasted black sesame seeds divided equally in half

The Dry Stuff

  • 1 teaspoon baking powder
  • 8 ounces (227g) glutinous rice flour aka mochiko or sweet rice flour NOT plain rice flour

The Finish

  • Powdered sugar for serving

Instructions

  • Preheat the oven to 350°F. Mist an 8-inch round cake pan with cooking spray or buttered and dusted with rice flour.
  • In a large bowl, whisk together the eggs, sugar, honey, and salt until fluffy and pale yellow, about 2 minutes. Whisk in the milk, vanilla, melted butter, and sesame oil until combined. Ain't gonna lie, I use my mixer on medium speed.
  • Using a mortar and pestle (or a coffee/spice grinder), pulverize 2 tablespoons of the black sesame seeds into a rough powder. It should smell very fragrant. Add this sesame powder, along with the remaining 2 tablespoons of whole black sesame seeds, to the bowl with the egg mixture, followed by the baking powder and rice flour. Whisk to combine, then carefully pour the batter into the greased cake pan. This part you can do by hand or machine.
  • Bake until the top is nicely browned and cracked slightly (this is a good sign), 50 to 60 minutes. You can also insert a chopstick or toothpick into the center of the cake, and if it comes out clean, then it’s done.
    For muffins, fill a 12-cup muffin tin that has been buttered to 7/8 full. Bake for approximately 25 minutes.
  • Cool completely before dusting with the powdered sugar and slicing into wedges to serve. The cake will keep in an airtight container at room temperature for up to 5 days.
Cinnamon Toast Crunch Butter Mochi-Cereal Killa

Cinnamon Toast Crunch Butter Mochi-Cereal Killa

I am always on the lookout for mochi recipes.  Aside from being downright delicious, it is nice to have gluten-free options in your arsenal.  The blog, Little Fat Boy caught my attention with a recipe for Cinnamon Toast Crunch Butter Mochi.  Holy moly, dessert with not just one but TWO of my favorite foods, mochi and cereal, I am all in.

Bad, Bad Mom

I’m going to admit, I was one of those crazy militant moms about snacks and cereals.  The only cereals that graced our table included Special K, Honey Bunches of Oats, and Rice Krispies.  BORING.  The grams of sugar had to be in single digits for any box to make the cut.  Hostess was not part of our family’s vernacular.   To this day, I’m not sure if my kids have had a Hostess Twinkie.

Eventually, I came clean to my kids, and the flood gates opened.  They rolled their eyes with righteous indignation as I rattled off my favorite childhood snacks and cereals-Captain Crunch, Lucky Charms, HoHos, Milk Duds, BigHunks…lol.  Hey, I was a latch-key kid…unlike them…so lucky to have a mom to constantly police, I mean, watch over them!

Welcome to Adulthood

The perks of growing up, my days of being their sugar police are long over.  In fact, during their college days, care packages with Dad’s Good Cookies, Brownies, Chocolate Chip Cookies, and candies were sent on a regular basis.  We made up for years of deprivation.

All Things Mochi

Ground Zero for mochi recipes is Butter Mochi Muffin, adapted from Snixy Kitchen (a gorgeous blog featuring gluten-free recipes), and still the most popular recipe posted on 3Jamigos.  Variations followed, Mango Mochi Muffins, Chocolate Mochi Donuts and Brownies, and Misugaru Mochi Muffins…in fact mochi has its own category on 3Jamigos.  This is the latest in my mochi mania recipes, Cinnamon Toast Crunch Butter Mochi. Remember the cereal milk at the bottom of your bowl you savored when you were a kid?  Yep, use it to make your mochi.

Soak the cereal for a minimum of an hour in one and a quarter cups of milk, stirring occasionally.  The recipe calls for 1 cup of milk and half a can (200ml) of coconut milk.  The cereal will absorb some of the milk, after soaking, if there is less than 1 cup of milk, add extra coconut milk to bring it to 1 cup.

For the first batch, I followed Little Fat Boy, made them in a pan, and cut them into squares.  For the second batch, I made muffins because everyone deserves their own sweet treat.

To further crisp the Cinnamon Toast Crunch topping, I used Christina Tosi’s method to make cereal crunch.  Toast crushed cereal bathed in butter in the oven.

Delicious, sweet, with cinnamon and caramel undertones and the characteristic gooey, springy texture of mochi, this is a keeper.  Add this to your bucket list.

Cinnamon Toast Crunch Butter Mochi

Butter Mochi flavored with Cinnamon Toast Crunch. Another delicious, gluten-free treat!
Course Cake, Dessert, Muffins
Cuisine Asian, Asian-American, Hawaiian
Keyword butter mochi, cereal, Cinnamon Toast Crunch, coconut milk
Prep Time 2 hours
Cook Time 1 hour
Servings 12 servings

Ingredients

Wet Stuff

  • 2 large eggs
  • 1.25 cups milk, I like whole but lowfat, skim and alternative milks will work to soak Cinnamon Toast Crunch
  • 1/2 can of coconut milk 200ml I prefer full fat coconut milk
  • 1/4 cup unsalted butter melted
  • 1 Tbsp maple syrup or Golden Syrup
  • 1 teaspoon vanilla extract

The Dry Stuff

  • 1/2 box Mochiko sweet rice flour (glutinous rice flour) 254 g
  • 1 cup brown sugar preferably dark brown
  • 1/4 teaspoon kosher salt
  • 1 tsp baking powder
  • 1-1.25 cups Cinnamon Toast Crunch Cereal to soak in milk

Topping

  • 1 cup Cinnamon Toast Crunch Cereal for topping
  • 2 tbsp unsalted butter, melted
  • unsalted butter to grease pans

Instructions

  • Soak 1.25-1.5 cups of milk with Cinnamon Toast Crunch for at least an hour or overnight. Strain milk into a measuring cup. You should have 1 cup. If it is less than this, use extra coconut milk to make up the difference,
  • Preheat an oven to 350° F. Generously butter an 8x8 baking pan. For muffins, butter a 12-cup muffin tin.
  • In a separate mixing bowl, mix together rice flour, brown sugar, baking powder, and salt. Set aside.
  • Mix wet ingredients in large bowl, 2 large eggs, 1 cup milk (soaked in Cinnamon Toast Crunch), coconut milk, maple syrup, and vanilla extract. Blend until smooth.
  • Slowly pour dry ingredients into a bowl of wet ingredients, whisking as you pour until it becomes a smooth batter. Mix in melted butter into the batter until incorporated, then pour batter into the buttered pan. If making muffins, pour batter into each muffin tin approximately 7/8 full. Should fill 12 cups. Tap pans on the counter to release air bubbles.

Topping

  • Crush the extra Cinnamon Toast Crunch in a small bowl and add melted butter. Stir to coat cereal with butter. Pour onto a small baking sheet and bake at 275 degrees for 20 minutes or until toasty and fragrant. Remove and cool.
  • Sprinkle toasted cereal on batter just before baking. You can forego the toasting of the cereal but you lose some of the crispiness.

Da Finish

  • Cake pan mochi: Bake for approximately 60 minutes until golden brown and set. Stick a toothpick or bamboo skewer in, it should go in smoothly and come out without any sticky stuff. If you like your mochi a little more set bake a bit longer. The less time you bake the gooey-ier your mochi will be.
    For muffins bake approximately 40-45 minutes.
  • Once cool, sprinkle powdered sugar on mochi before serving. Slice cake into squares like brownies and serve.
  • Will keep a couple of days at room temp. Do not refrigerate. Mochi is freezable.
Muffins de Mochi con Misugaru

Muffins de Mochi con Misugaru

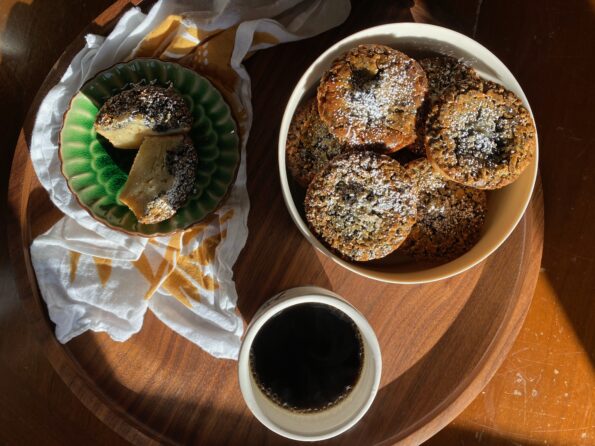
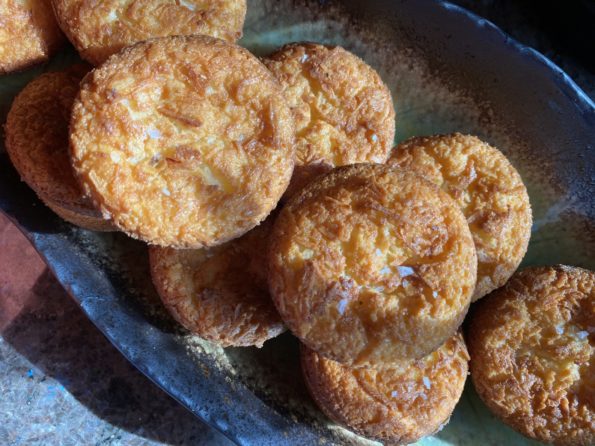
You might be wondering why this post is named Muffins de Mochi con Misugaru.

WELL, let me tell you why…

Apparently, I’m not supposed to use the term Mochi Muffins.  It’s been trademarked.

How crazy is that?

Third Culture Bakery, out of Berkley, has trademarked mochi muffins and has been sending Cease and Desist letters to folks that have used the term mochi muffins, including small mom & pop bakeries, bloggers, Instagrammers, and AAPI-owned businesses.

The term mochi muffins, if you are Asian or Hawaiian, is pretty ubiquitous.  And yet some bozo in the government granted a trademark to Third Culture Bakery in 2018. Shame on the trademark office for not doing their due diligence and shame on Third Culture for trying to trademark a term that is descriptive for a product they did not invent.  Y’all, folks have been making mochi muffins, donuts, and cakes long before they came into existence.

The Happy Ending

It took a little while for me to post these mochi muffins and in the interim much has happened!  After more bad press and focus on the story, Third Culture Bakery re-examined its stand and relinquished the trademark.  Yay! Score one for the little guys and Subtle Asian Baking, a FB group that brought to light the trademark issue.  So now I can go back to using Mochi Muffins!

Best of Both Worlds

I love how Asian American pastry chefs have been blending Asian ingredients with French techniques and visa versa.  Croissants filled with Chinese BBQ pork or mochi, custard flavored pandan, ube snickerdoodles, I could go on and on.

So my contribution? A riff on Butter Mochi Muffins.  I added Misugaru Powder and oat milk (instead of regular milk) to my butter mochi muffins and SHAZAAM, we have a winner.

Misugaru Powder is a  Korean multigrain drink that includes different grains, rice, and beans like sweet rice, brown rice, oats, azuki beans, and sesame seeds.   You can find Misugaru at any Korean store or online.  Mixed with milk or water it is a drink with a sweet, nutty, malty flavor. Kind of like Carnation Instant Breakfast, but tastier and healthier.  I found various recipes using the powder in cookies and breads and thought, why not?

For the uninitiated, mochi is glutinous rice flour also known as sweet rice flour.  “Stuff” made with sweet rice flour has a wonderfully chewy, elastic texture, think dense but still soft marshmallows.  My first post on Mochi Muffins is by far the most popular post on 3jamigos. A staple in Asian and Hawaiian desserts,  it was only a matter of time, before it would make its way into mainstream American desserts like muffins, donuts, and brownies.  Besides being delicious and texturally so intriguing, mochi desserts are gluten-free!  Win-win.

Notes on Making Mochi Muffins

Sweet Rice Flour:  There are different mochi flours available.  Mochiko by Koda Farms is probably the most widely available and works for almost all recipes.  Asian stores will carry Thai and Korean Sweet Rice Flour in addition to Mochiko.

Milk:  Regular or 2% milk can be used in place of the oat milk. Skip the skim.  For Coconut milk, use full fat if possible.  My go-to brands are Arroy-D, Chaokoh, and Trader Joe’s (super convenient).

Butter the muffin tins generously, and use regular rice flour (not the mochi flour) to prep the pans.  If you don’t have any, skip the flour and just butter the pan.

I played with the baking temp to see if I could minimize the pointy top.  I lowered the temperature to 360 degrees on a subsequent batch and it did seem less domed.  This is appearance preference, the muffins tasted the same.

Print
5 from 1 vote

Misugaru Mochi Muffins

Misugaru, is a multigrained Korean beverage that adds a subtle, toasty, malty, nutty flavor to these delicious chewy mochi muffins.
Course Cake, Dessert
Cuisine Asian-American
Keyword butter mochi, Gluten free, hawaiian, misugaru, mochi muffins, muffins
Prep Time 15 minutes
Cook Time 45 minutes
Servings 12 muffins

Ingredients

The Wet Stuff

  • 1/4 Cup Unsalted butter 55gm
  • 3/4 Cup Coconut milk 170gm
  • 1 Cup Oat Milk 240gm, You can use reg 2% milk, do not use skim
  • 2 Large Eggs

The Dry Stuff

  • 1-3/4 Cup Glutinous rice flour 225gm
  • 2 tbsp Misugaru powder
  • 1 Cup Granulated sugar 200gm
  • 1 tsp Baking powder
  • 1/4 tsp salt If not using sprinkling salt, increase this to 1/2 tsp

Wrapping it up

  • Butter for muffin tin
  • Fleur de Sel or Maldon Flake Salt to sprinkle
  • Shredded coconut, sweetened or unsweetened for garnish, optional
  • Black and white sesame seeds for garnish, optional

Instructions

  • Preheat the oven to 375 degrees
  • Brush the cupcake tins liberally with butter and dust with regular rice flour
  • Combine coconut milk and butter in a microwavable bowl, nuke for 1 minute on full power
  • Remove and add milk or oat milk and eggs. Whisk until combined.
  • In a medium-sized bowl combine the glutinous rice flour, sugar, salt, Misugaru powder and baking powder.
  • Add dry ingredients to wet ingredients and stir until smooth. Use a spoon or spatula instead of a whisk to minimize bubbles. The batter will be the consistency of pancake batter.
  • Pour the batter evenly into a 12-cup muffin tin. Tap gently on a counter to remove air bubbles. You will have enough batter to fill each cup 7/8 full.
  • Top with black and white sesame seeds or coconut flakes if you like, and sprinkle with Fleur de Sel or any flaked salt, bake for 40-45 minutes, or until golden brown center and dark brown edge.
  • Remove from oven and let sit for 10 minutes in tin, then remove to cookie rack. Allow muffins to cool completely.
  • Muffins will keep at room temp for 2-3 days. They can be frozen for longer storage.
Hella Good Ube Mochi Muffins-Mochi Madness

Hella Good Ube Mochi Muffins-Mochi Madness

I have been looking for a dessert/cookie recipe using Ube for a while when I came across a recipe for Butter and Ube Bibingka/Mochi on Mark Hella Cooks.  I adapted his Bibingka/Mochi and made muffins, delicious and gorgeous. Just a bit of ube extract gave the batter a vibrant purple that is so whimsical and appealing.

Did I Get Ahead of Myself?

Are you asking what the heck is Ube?  It just dawned on me this is not your dash to the corner store item.  First, ube is similar to a sweet potato BUT it’s PURPLE, so swag, purple food.  It is used in a lot of Asian desserts, particularly Filipino ones. It is mild-flavored, kinda nutty, kinda vanilla-y.  Aside from fresh purple yams (hard to find), it comes as a powder, jam, and extract.  On a recent visit to the Asian Art Museum in the City, I inhaled a delicious Ube Snickerdoodle from Sunday@  the Museum, cafe.  Ever since I have been perusing the internet for ube cookie recipes.  No cookie yet but luckily I found Mark Hella Cooks Ube Mochi recipe. It is easy, delicious, and eye candy worthy.  I made muffins so everyone could have their own little dessert with crispy edges, yum.

Ube-by, Baby, Making Cookies For A Cause

I wanted to include the muffins in my little box of cookies for Ukraine.  The world is upside down right now and I just can’t sit on the sidelines and watch.  So I do what I can by fighting the things I hate with the things I love.  I baked cookies for donations to World Central Kitchen and Sunflower of Peace. My tiny part. #BakersAgainstRacism, #BakersforUkraine

I put together individual boxes of cookies, a first for me, to share with friends and co-workers.  Everyone was so generous, it reminded me that most folks are decent, kind, and caring.  How is it that just a few are actually responsible for so much hate and suffering in the world?  Most folks just want to live their lives and be happy.

Each box included tried & true cookies, comfort cookies, my family favorites.  Here are the Cookies for Ukraine Box.

Purple Yam All In My Brain

Rounding out the cookie box, are these incredibly easy and delicious Ube Butter Mochi Muffins.  Mochi has become my best friend when I need a gluten-free treat.  Made with glutinous sweet rice flour, the texture is chewy, a bit dense in a good way, and totally addicting.  If you have tried Third Culture Bakery or Mochi Donuts, or Manju, you will love these.  If you like to start with the classic butter mochi muffin try this one.  It is by far the most popular recipe on 3Jamigos.

The muffins can be made in one bowl, that’s how easy they are.  The method in the recipe below is from Mark Hella Cooks. Alternatively, place coconut milk and butter in a microwavable bowl and nuke for 1 minute.  Add evaporated milk, vanilla extract and eggs.  Mix well. Combine mochiko flour and baking powder then add to milk mixture.  Whisk until smooth.  Proceed with the recipe at step 3 as written.

Once you have drizzled the ube batter into the muffin tins, be careful not to shake the tin which would cause the batters to blend too much, You want to retain the marbling.

Butter or spray the muffin tin with PAM REALLY well, it determines the rise and the shape of the top of the muffin.

Enjoy!

Ube Butter Mochi Muffins

More mochi muffins! Purple Yams is in my soul
Course Dessert, Muffins
Cuisine Asian-American
Keyword butter mochi, Gluten free, mochi muffin, ube
Prep Time 20 minutes
Cook Time 50 minutes

Ingredients

  • 4 tablespoons butter (2 ounces) (salted is fine) melted
  • 1 cup sugar baker’s/caster sugar preferable
  • 2 large eggs @ room temperature
  • 1/2 teaspoon vanilla extract
  • 1 teaspoon ube extract Available at Asian Stores, online McCormick's
  • 8 ounces mochiko rice flour (1/2 box) 230gms
  • 1 teaspoon baking powder
  • 6 ounces evaporated milk Sub whole milk
  • 7 ounces full fat coconut milk(Arroy-D or Chakot)

Instructions

  • Preheat your oven to 350 degrees (non-convection), and generously grease a standard 12-cup muffin tin with butter.
  • In a large bowl, whisk together the melted butter and sugar. Add the eggs and vanilla extract and continue to mix until combined. Add the rice flour and baking powder and stir until combined. It might look a little lumpy, it's okay. Stir in the evaporated milk and the coconut milk. Continue whisking until smooth*
  • Remove 3/4 cup of the batter and place in a small bowl. Add the ube extract and mix together.
  • The batter will be pretty runny. Using a large ice cream scoop the remaining batter into each muffin tin. It should fill the entire tin, each cup filled approximately 3/4 full. Gently drizzle ube batter onto each muffin tin. A squeeze bottle with a large opening will work otherwise use a teaspoon. The batter will sink so there is no reason to swirl it. I drizzle in a spiral pattern with a healthy glob in the center.
  • Carefully place the muffin pan in the oven and bake for 20-25 minutes.
Chocolate Mochi Brownies (Rice, Rice, Brownie)

Chocolate Mochi Brownies (Rice, Rice, Brownie)

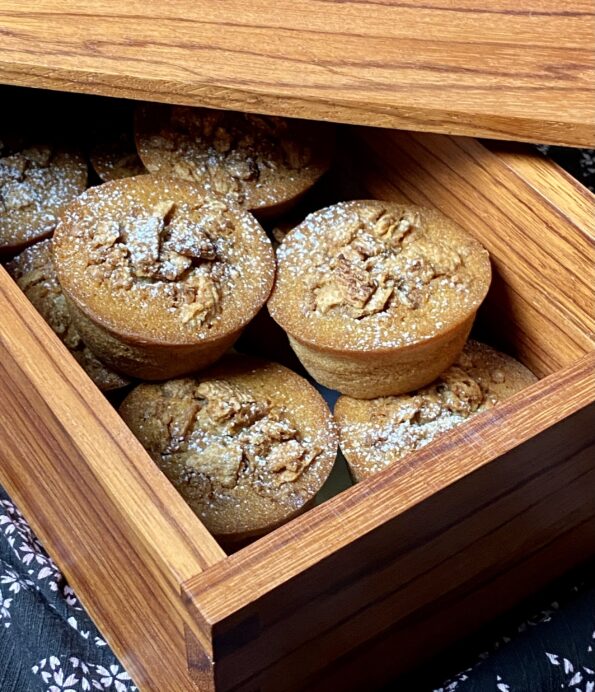
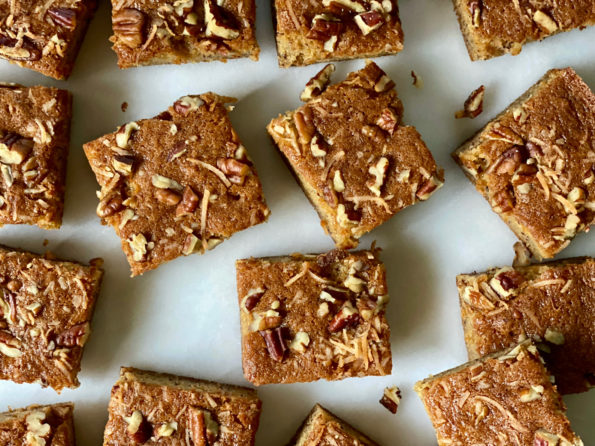
Mochi Ado about Something.  I tried quite a few mochi recipes this year so it seems fitting that 2021 should end on a sweet rice note.  2021, the year of Mochi muffins, donuts, and now, brownies.  Mochi brownies are delicious!  I found quite a few recipes that were fairly similar and picked one from Kirbie’s Cravings as my starting point.  There are a plethora of recipes out there including one from Fix, Feast, Flair whose cookbook I have and love, Aloha Kitchen.

The Mochi Brownies are not too sweet, have that hallmark stretchy, elastic texture of mochi, intensely chocolate, and just darn delicious.  If you like fudgy, chocolatey brownies, you are going to love these.  Bonus, they’re GLUTEN-FREE and super easy to make.  We are talking spoon, whisk, 2-bowl, done.

Look at that, office clips to hold your parchment in place

Cast of Mochi Characters

Mochi– Sweet Rice Flour aka Glutinous Rice Flour.  NOT to be confused with rice flour.  Go-to brand,  Koda Farms Mochiko Sweet Rice Flour.  Found in most big supermarkets, all Asian Markets and online for an arm and a leg 🤷🏻‍♀️. Bob’s Red Mill also has a Glutinous Rice Flour that can be used.

Cocoa-You can use any kind of cocoa powder in this recipe, natural or dutch-processed.  The Dutch-process cocoa will give you a deeper, darker brownie color.  King Arthur carries both types.  Hershey’s is natural cocoa.

Baking Powder vs. Baking Soda- I used baking powder. I’m not sure it makes a difference.  My logic, since I used  Dutch-processed cocoa which has a neutral pH, I did not have an acid to kick start baking soda.  Baking powder needs heat to activate it not acid.  If you use natural cocoa you could use either baking powder or baking soda.

Liquid- I used whole milk, I haven’t tried it but I’m thinking this recipe would work with milk substitutes, evaporated milk, or coconut milk.  It may change the texture a little.

Chocolate-The brownies are not too sweet and pretty chocolate-y.  Try different chocolates to sprinkle on top, milk chocolate or semi-sweet, chopped from bar form.  Chips don’t melt well and don’t look as nifty as shards of chocolate.  I hit the top at the end with my secret sprinkles, a mix of Maldon Salt, Demerara Sugar and Chocolate Sprinkles.  For a festive look, you can use multi-colored sprinkles!

The Setting: Two Bowls, One Spoon, One Whisk

Literally, the ingredient list is the hard part of this recipe.  Combine the dry ingredients in one bowl and the liquids in another, then add the dry to the wet, mix with a spoon or whisk, bada bing bada-boom, done.  No need to worry about overmixing as Mochiko flour doesn’t have gluten.  The batter will be like a runny pancake batter.  Pour batter into your parchment-lined pan and bake.  That’s it!  An hour later you’re pulling mochi brownies out of the oven.  Cool completely before cutting with a sharp knife.  If it sticks put a little oil or butter on your knife.


Rewarded with delicious ooey-gooey chocolate brownies! Cookie #7

Chocolate Mochi Brownies

A gluten-free alternative that is so good you may never go back to traditional brownies!
Course bar cookies, brownies
Cuisine Asian-American
Keyword chocolate brownies, Dark chocolate, Gluten-free, Dairy-free, Mochi, sweet rice flour
Prep Time 15 minutes
Cook Time 1 hour
Servings 16 servings

Ingredients

  • 1 cup mochiko flour
  • 1/2 cup unsweetened cocoa powder Dutch-processed or Natural is fine. Dutch process will give you a deeper, dark brown color
  • 1/2 tsp Instant espresso powder Optional, highlights chocolate flavor
  • 1 cup granulated white sugar
  • 1 ½ tsp baking powder you could actually use baking soda in equal volume, if using natural cocoa which is acidic and will activate the baking soda
  • 5 tbsp unsalted butter melted If you use low fat milk or milk substitute increase butter to 6 T
  • 2 large eggs
  • 12 oz whole milk
  • 1 tsp vanilla
  • 3 tbsp chopped dark chocolate sweeter brownie, use milk chcolate or semi-sweet chocolate
  • Sprinkles! optional but festive!

Instructions

  • Preheat the oven to 350°F. Line an 8 by 8-inch baking pan with parchment paper.
  • In a medium bowl, add mochiko, cocoa powder, sugar and baking powder and espresso powder (optional). Whisk together until evenly mixed.
  • In a large bowl, add melted butter, eggs, milk, and vanilla extract. Whisk until evenly combined and no egg streaks remain. Add in dry ingredients. Mix until blended.
  • Pour batter into prepared baking pan. Sprinkle surface with chopped chocolate.
  • Bake 60 minutes or until mochi is set, there should be no jiggle. A toothpick inserted should come out mostly clean. Remove from oven and top with sprinkles. Cool completely before cutting.

Notes

You can replace whole milk with other milk substitutes. Keep in mind that different milk substitutes may change the texture of the brownies.
Don't even try to cut the brownies before they cool completely!
Store in a sealed container at room temperature for up to 2-3 days.
If you want to make sure you have a nice layer of sprinkles, sprinkle brownies before baking.  Sprinkle flaky salt and sugar when the brownies come out of the oven.
Hawaiian Butter Mochi (Mo Buttah’ Mo Bettah’)

Hawaiian Butter Mochi (Mo Buttah’ Mo Bettah’)

Right before the pandemic hit we capped off a year of traveling by going to Maui.  A celebration for the hubster’s birthday and his early retirement was our excuse to pack our bags and head out for some sun, fun, and food.  Little did we know it would be our last trip for quite a while.

Hawaiian Delights

I am a sucker for Hawaiian food.  A fusion of Native, Chinese, Japanese, Filipino, Portuguese, Korean and all of it tweaked so it taste great and is easy to eat while sitting on a beach!  Our bucket list of food included Spam Musubi, a hunk of rice topped with a fried slice of SPAM and wrapped in seaweed, Poke’ (seasoned raw fish in a bowl with rice), island style bbq, Huli, Huli Chicken. YUM.

Then there are the sweets, Malasadas (best damn donuts), Haupia (coconut jello) and my favorite, Butter Mochi. Hawaiian Butter Mochi is the island’s answer to Blondies or Brownies but better (I know, them is fighting words).  Buttery, gooey, sweet and so satisfying.  Like our Spam Musubi quest, we went out of our way to find all things mochi.

This isn’t my first mochi rodeo, I posted a Butter Mochi Muffin recipe a while back that peeps really like (so says Google analytics, lol).  Since then it has been off to the “rices” trying recipes with Koda Farms Sweet Rice (glutinous rice flour).  Mochi now merits its own category in my recipe index.  These muffins started it all, dense, chewy, with a touch of familiar cakiness, and the perfect amount of sugar. They are a great introduction to mochi-based desserts.  BONUS: Mochi is gluten-free!

Butter Mochi Muffins
The Muffins that started it all!

Mochi Mania-Island Style

Hawaiian Butter Mochi takes mochi back closer to its Japanese roots, lighter, springier, and less cakey.  The recipe calls for coconut milk and regular milk.  The regular milk and less mochi flour are the “denseness” buster and gives the mochi its characteristic texture.  Butter adds flavor.  It is usually baked in a pan and then cut into squares but I decided to bake them in muffin tins.  All for the edges folks.  Each person ends up with their own gooeylicious mini-cake highlighted by a crispy, buttery edge, and finished with toasty shredded coconut and a sprinkle of Fleur de Sel, soooooo yummy.

Inspired by Aloha Kitchen and the website Catherine Zhang, these Butter Mochi Mini-Cakes are onolicious.  I hope you will try them!

The two key ingredients you can find at most Asian stores, sweet rice flour and coconut milk. My go-to brands are Koda Farms Mochiko and Chaokoh or Arroy-D for coconut milk.

The batter will be very pourable due to the use of milk as part of the liquid and less mochi flour.

Don’t be afraid to fill the cups to 7/8.  The mini-cakes will puff up but will fall as they are cooling.  You will end up with a flat top or sometimes even a slight depression, it’s all good.

Enjoy!

Print
5 from 1 vote

Hawaiian Butter Mochi Muffins

This muffin is a mash-up of Hawaiian Butter Mochi and Butter Mochi Muffins! Gooier and less cake-like than my butter mochi muffins. Baked as muffins they have crispy edges and a soft center-onolicious!
Course Dessert, Snack
Cuisine Asian, Fusion
Keyword butter mochi, hawaiian, Mochi, muffin
Prep Time 15 minutes
Cook Time 45 minutes
Total Time 1 hour

Ingredients

Da Wet Stuff

  • 1/4 cup Unsalted butter 55gm
  • 3/4 cup Coconut milk 170gm
  • 1 cup Whole milk 240gm
  • 2 Eggs

Da Dry Stuff

  • 1 3/4 cup Glutinous rice flour 225gm
  • 1 cup Granulated sugar 200gm
  • 1 tsp Baking powder
  • Flaked or shredded coconut for garnish, preferably unsweetened but use what you like

Prep Yo Pan

  • Butter
  • Rice flour optional

Instructions

  • Preheat the oven to 375 degrees
  • Generously grease 12-cup muffin tin with butter and dust with rice flour, if you don't have rice flour, skip it. The flour does help the batter rise in the pan and getting crispy edges.
  • In a large, microwave safe bowl combine the coconut milk and butter, heat in the microwave for 1 minute
  • Add the milk and 2 eggs, whisk until combined. I like whole milk but you can use 2% milk or alternative milk like oat milk.
  • In a medium sized bowl combine the glutinous rice flour, sugar and baking powder
  • Add the dry ingredients to the wet ingredients and whisk until smooth
  • Pour the batter evenly into the 12 muffin cups
  • Sprinkle with coconut and bake for 45 minutes, or until golden brown
  • Remove and cool. Muffins will keep for a couple of days on the counter. Pop them in a toaster oven to re-crisp edges. They also freeze pretty well.
Chocolate Chip Sour Cream Snack Cake-Chip off the Cho Block

Chocolate Chip Sour Cream Snack Cake-Chip off the Cho Block

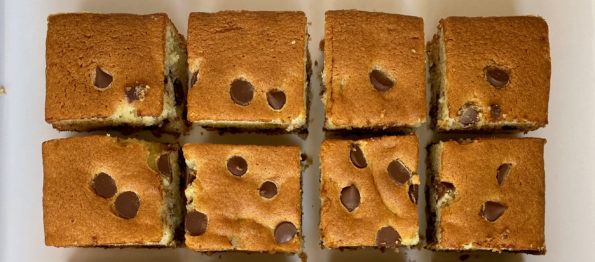
Rounding out Joy Cho month also known as Cakenado, I made her Chocolate Chip Sour Cream Snack Cake.  It all started with her Mochi Banana Bread, which I adore and have made more than once.  Following on its heel (yes, I know, cakes don’t have heels) I came across this recipe on a Food Network post.  I don’t normally follow Food Network, maybe it was just good karma that it popped up, fortunate since it is delicious, easy to make, and has CHOCOLATE.

Stuck on Sticky Rice Flour

Like the Mochi Banana Bread, it is a combination of all-purpose flour and mochiko or sweet rice flour (sticky rice) that sets this snack cake apart.  You get that wonderful bouncy texture from the sweet rice flour and the tender cake with a nice crumb from the all-purpose flour.  Based on her mom’s chocolate chip bundt cake and tweaked with her signature addition of sweet rice flour, this really is a decadent, delicious, simple cake.  Studded with chocolate chips, this cake will keep chocolate fans happy.  Add nuts if you like and serve it with a BIG SCOOP of VANILLA ICE CREAM.  Doesn’t that sound good?

Looking for something a little different, ran out of Mochiko?  Try her Blueberry Balsamic Glaze Cornbread Cake.  Another amazing snacking cake. Cause you never know when you will have a snack attack!

Chocolate Chip Sour Cream Snack Cake

Ingredients

  • 3/4 cup (105 grams) all-purpose flour
  • 1/2 cup plus 2 tablespoons (105 grams) sweet rice flour such as Mochiko
  • 1 teaspoon baking powder
  • 1/2 teaspoon baking soda
  • 1 teaspoon kosher salt
  • 1/2 cup 1 stick unsalted butter, softened
  • 1 cup (200 grams) granulated sugar
  • 2 large eggs at room temperature
  • 1 teaspoon pure vanilla extract
  • 1/2 cup plus 1 tablespoon, (150 grams) full-fat sour cream at room temperature
  • 2 tablespoons milk at room temperature

Instructions

  • Position an oven rack in the middle of the oven and preheat to 350 degrees
  • Lightly grease an 8-inch square pan with nonstick cooking spray. Line the bottom with parchment, leaving a 2-inch overhang on the sides (to make it easier to remove the cake after baking) and grease the parchment.
  • Combine the all-purpose flour, sweet rice flour, baking powder, baking soda, and salt in a medium bowl and whisk until combined.
  • Beat the butter in a large bowl with an electric mixer until smooth. Add the sugar and cream the mixture until light and fluffy, 2 to 3 minutes.
  • Scrape down the bowl with a rubber spatula. Add in the eggs one at a time, beating after each addition until combined. Scrape the bowl once more, then beat in the vanilla.
  • Sift half of the dry ingredients over the egg mixture and beat just until combined. Beat in the sour cream and milk, then sift in the rest of the dry ingredients and beat just until the batter is smooth.
  • Fold in the chocolate chips.
  • Spread the batter into the prepared pan, smoothing the surface with a small offset spatula.
  • Sprinkle additional chocolate chips on top. Bake the cake, rotating the pan halfway through, for about 40 minutes, or until a toothpick inserted in the center comes out clean.
  • Let the cake cool in the pan for 20 minutes, then gently loosen the edges with a small offset spatula and carefully transfer the cake to a cooling rack.
  • Cut into squares and enjoy!
Mochi Banana Bread,The Cho-sen One

Mochi Banana Bread,The Cho-sen One

I think of myself as a pie person but lately, I have found myself baking cakes.  Not fancy multi-layer show-stopper cakes, simple one layer, easy to make, snacking cakes.  That grab-and-go type treat, unfussy, portable, the bar cookie of cakes.

Brooklynite pastry chef, Joy Cho, first caught my attention with her amazing Sour Cream Gem Cakes Made with sweet rice flour and AP flour, the cakes are tender, moist with a bit of springiness. The rice flour gives it that zing that sets them apart from traditional cakes.

The Joy of Snacking Cakes

Her Mochi Banana Bread and Sour Cream Chocolate Chip Snack Cake are a rift on her Gem Cakes.  Baked in an 8×8 pan and cut into squares, they’re the low maintenance but no less yummy cousins to Gem Cakes.

The combination of all-purpose flour and sweet rice flour once again makes them springy yet still tender and moist.  The butter and sour cream add flavor and richness.  The banana cake calls for just ONE banana.  Who doesn’t have one over-ripe banana sitting forlornly on the kitchen counter?  No more waiting for more bananas to ripen to make banana bread.   The toppings add more texture and flavor. Besides nuts and coconut, try chocolate chips or toffee bits.  Doesn’t that sound tasty?

So Berry Good

Strawberries are in season so I tweaked the Mochi Banana Bread to make Mochi Strawberry Pistachio Cake Bars.  Delicious, but I still like the banana version best.  Substitute the same volume of macerated strawberries for the banana.  Sprinkle the top with chopped pistachios.  To intensify the strawberry flavor, crush freeze-dried strawberries and add 1 tablespoon to the batter or sprinkle it on top of the finished cake.

Chip Off the Old Block

The Sour Cream Chocolate Chip Cake also has sweet rice flour and all-purpose flour giving it that trademark springy texture.   Studded with chocolate chips it definitely satisfies any chocolate cravings.  Find it here.

These cakes are in the one bowl realm of simplicity.  Combine dry ingredients in a small bowl, wet ingredients in a large bowl, add dry to wet, stir until just combined then STOP.  BadaBing-BadaBoom, done.  Pour batter into a prepared pan, sprinkle goodies on top, bake, cool, cut.  DONE.  Eatin’ cake in less than an hour.  Yep, easy-peasy.

One of these days when I am in Brooklyn I will try her desserts, on my NYC bucket list.  Until then, I hope she continues to share her creations and recipes.

Print Pin
5 from 1 vote

Mochi Banana Bread

Delicious snack cake made with AP flour and Sweet Rice Flour and one banana, the perfect little treat. The Mochi flour gives the cake a hint of springiness. Delicious.
Course Cake, Dessert
Cuisine Asian-American
Keyword banana cake, Dessert, joy cho, Mochi, mochi banana bread, sweet rice, sweet rice flour
Prep Time 15 minutes
Cook Time 30 minutes

Ingredients

Da Dry Stuff

  • 2/3 cup glutinous rice flour, like Mochiko (Koda Farms) 90 grams
  • 1/3 cup all-purpose flour 40 grams
  • 1/2 teaspoon baking powder
  • 1/2 teaspoon baking soda
  • 1/2 teaspoon kosher salt

Da Wet Stuff

  • 1 medium to large banana ripe (about 110 grams peeled)
  • 1/2 cup-scant granulated sugar 90 grams
  • 1/4 cup light brown sugar 55 grams
  • 1/2 cup unsalted butter, melted and cooled 113 grams or 1 stick
  • 1/4 cup full-fat sour cream, at room temperature 60 grams
  • 1 large egg at room temperature
  • 1/2 teaspoon vanilla extract

Da Toppings

  • Chopped toasted walnuts and/or toasted coconut for topping (optional)
  • Chocolate Sprinkles

Instructions

  • Heat the oven to 350°F. Lightly grease an 8x8-inch baking pan with nonstick cooking spray, line the pan with parchment paper, and grease the parchment.
  • In a medium bowl, whisk the rice flour, all-purpose flour, baking powder, baking soda, and salt together.
  • In a large bowl, mash the banana with a fork; some small chunks are fine. Add both sugars and whisk until combined.
  • Add the butter, sour cream, egg, and vanilla to the banana mixture and whisk until completely smooth.
  • Sift the dry ingredients over the wet ingredients, then whisk just until no flour lumps remain. Try not to overmix.
  • Pour the batter into the prepared pan and smooth the surface with a small offset spatula. Sprinkle top with chopped nuts and/or shredded coconut, or any topping you’d like. Toffee chips or chocolate chips come to mind, but that's just me 🙂
  • Bake for 25 to 27 minutes, rotating the pan halfway through, until a toothpick inserted in the center comes out clean.
  • Cool in the pan for 15 minutes, then transfer to a rack to cool completely before cutting into squares. This will keep for 2 to 3 days in an airtight container.

Notes

Use these to hold your parchment in place, everyone has metal clips lying around. Keeps parchment from getting in batter by clipping to top rim of baking pan.
Mango Sticky Rice-Nuked!

Mango Sticky Rice-Nuked!

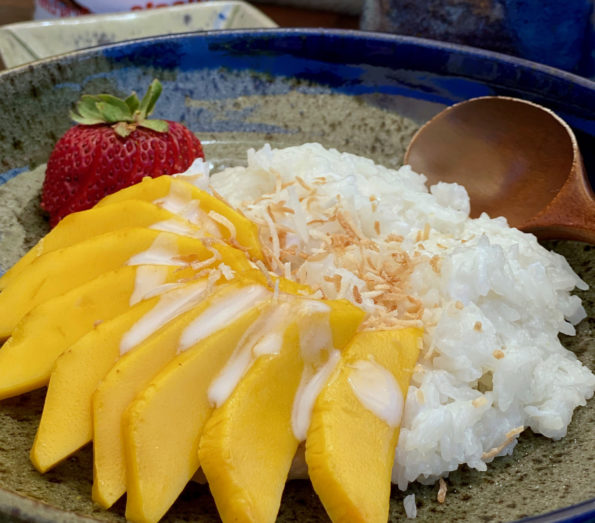
Raise your hand if you have had Mango Sticky Rice.  Just trying to gauge in the pantheon of delicious desserts, where Mango Sticky Rice lands.  I live in a bubble in the Bay Area where you can be in an Asian restaurant or supermarket be it Thai, Chinese, Japanese, Korean, in minutes.  Mango Sticky Rice is a mainstay dessert.  I use to think it was intimidating to make at home but it really isn’t.  Now, making the rice in the microwave takes any trepidation down to zero!

The ultimate mango dessert, Mango Bingsoo from UDessert Story

Vegan and Gluten-Free, Shazam!

Asian desserts generally are not too sweet.  If I had to pick predominant flavors, I’d say mango, coconut, almond, and sesame are pretty popular.  Sticky rice is a cornerstone, as is Tapioca (hello, boba).  Many Asians are lactose intolerant so dairy is not a major player in Asian cuisine.  Mango Sticky Rice is a win-win-win, coconut milk is used for the sauce and flavoring component, sticky rice-the base, so, no butter, eggs or wheat.  Vegan, gluten-free, and dairy-free-mindblowing.

Stuck on Sticky Rice

The foundation of this dessert is sticky or glutinous rice which can be found in most Asian stores.  I use either Sweet Rice from Koda Farms or Thai Three Ladies Sweet Rice (the OG for this dessert).  Normally, the rice is steamed, which is a long process, and then flavored with sweetened coconut milk.

I came across an article on Epicurious that featured Chrissy Teigen’s Mom and her cookbook.  One of the recipes included is Mango Sticky Rice made easy, and not to mention quicker, in the microwave.  This recipe is a mash-up of her recipe and my own recipe.  My original post also has tips on what rice to buy and coconut milk, call it a mango sticky rice primer.

I used my Anyday Microwave Cookware, which worked like a charm-one bowl cooking, very convenient.  Soak the rice for 10 minutes or up to 60 minutes in the same container you will use in the microwave.  I inadvertently soaked the rice longer than 60 minutes (chatting with a neighbor) and the rice was a bit soft.  I tried it again and soaked the rice for only 20 minutes and I washed the rice first (which isn’t in the Epicurious version), definitely recommend washing your rice.

Microwave Magic

Once the rice has soaked, cover the bowl with a vented lid or plastic wrap and place it in the microwave.

Cook for 3 minutes on high power, take it out, and stir the rice bringing the bottom rice up to the top, like a scooping motion.

There was still quite a bit of liquid left and the color of the grains was still opaque.  So I placed it back in the microwave and cooked for another 3 minutes.  After the additional 3 minutes, the liquid had been absorbed in the rice.  The grains were a mix of translucent and opaque and had a bit of a bite, so I stuck it in for another minute.

This was 30 seconds too long along, the grains were a little too soft, the combination of a too-long soak and overzealous nuking.

I have a 700-watt Spacesaver GE Microwave, it’s on the low-end power-wise.  Adjust time and power level based on the wattage of your microwave.  The key is to get to know your microwave and how it cooks.  Just keep in the back of your mind that the dish will only take 6-8 minutes so start fine-tuning the amount of time you microwave the rice at the 5-6 minute mark.

The Sauce

The coconut milk sauce is quick and easy to prepare.  Use full-fat coconut milk, for the best flavor and consistency. Don’t let the milk boil, you just need it hot enough to dissolve the sugar.  I hold some of the sauce back to serve on the side.  Pepper’s recipe calls for 1-1/2 teaspoons of salt, I couldn’t bring myself to put that much salt.  I used 1 teaspoon of Kosher salt which I thought was fine. I added 2 tablespoons of sugar which brought it more in line with my original post.

Pour the hot coconut milk over the cooked rice.  Don’t be alarmed if it looks like a wet gloppy mess, stir well and let it sit for 10-15 minutes so the rice absorbs the milk.

So time savings? The original recipe calls for soaking the rice for 2-8 hours and steaming for 25 minutes.  The microwave recipe calls for soaking the rice for 10-60 minutes and nuking it for 7-8 minutes.  Hmm, don’t need to be a CPA to figure out the time savings.  Enjoy!

Microwave Mango Sticky Rice

A delicious dessert with its roots in Southeast Asia, Mango Sticky Rice is both gluten-free and dairy free. Made quick and easy in the microwave.
Course Dessert
Cuisine Asian, Asian-American
Keyword coconut, Gluten-free, Dairy-free, Mango Sticky Rice, Thai Dessert
Prep Time 45 minutes
Cook Time 7 minutes

Ingredients

  • ½ cup unsweetened shredded coconut Toast and reserve for garnish.
  • cups Thai sticky rice Three Ladies Thai Glutinous Rice or Sweet (Glutinious) Rice from Koda Farms
  • 1 can 13.5-ounce full-fat coconut milk
  • ¼ cup sugar + 1-2 tablespoons Sweeten to taste, if you have a sweet tooth, add additional 1 tablesppon of sugar.
  • 1 teaspoon kosher salt or 1/2 teaspoon reg salt
  • 2 large ripe mangoes peeled, pitted, and thinly sliced
  • Toasted sesame seeds for garnish (optional)
  • Mint leaves for garnish (optional)

Instructions

  • In a dry skillet, toast the coconut over medium-low heat, stirring, until lightly browned and fragrant, 4 to 5 minutes. Transfer to a small dish and set aside.
  • Wash rice to remove excess starch, rinse twice. Drain well and place sticky rice in a microwave-safe bowl and cover with 1¾ cups warm water. Let sit for 20 minutes.
  • Cover bowl with an upside-down plate or plastic wrap. Microwave on high for 3 minutes. Carefully stir the rice from top to bottom, then cover and cook the rice for another 3 minutes. Repeat the process, stirring and microwaving 3 minutes at a time*, until all the water has been absorbed and the rice has turned translucent (this means it’s cooked). Set aside to cool slightly.
  • In a medium saucepan, heat coconut milk just until it starts to bubble. Reduce the heat to a simmer, add the sugar and salt, and stir until they dissolve. Remove from the heat, pour 1-1/4 cups of hot sweetened coconut milk over the warm sticky rice, and stir to combine. Let sit for 5-10 minutes so the rice can absorb the coconut milk. Pour rest of coconut milk into a serving container.
  • Place a scoop of rice in a shallow bowl or plate. Top with slices of mango. Serve with reserved coconut sauce on the side. Garnish with toasted coconut, sesame seeds and mint leaf.
  • This is a substantial dessert, serve small portions or sharable portions. I often garnish with sliced strawberries too.

Notes

This makes quite a bit of rice, the recipe can be halved.