Category: Baking for a Cause

Nubby Granola Shortbread…More Than Cookies

Nubby Granola Shortbread…More Than Cookies

Me.  The cookbook addict missed a book signing at Omnivore Books.  Literally, took my eye off the book and completely missed Natasha Pickowicz’s More Than Cake book signing event.

In my effort to curtail my cookbook acquisitions, I have limited my cookbook buying to books by POC authors.  There are exceptions of course, anything by Dorie Greenspan and if you own a restaurant in the middle of nowhere, Maine, and pub a new book, iykyk 😉, I’m all in.

Here is my weak defense.  Pickowicz, at first glance, is not an Asian last name, so the fact that she is part Chinese escaped me.  The title, More Than Cake also threw me off.  I’m not a big cake person, more of a cookies and pies gal.  As soon as I saw the word Cake…I tuned out, the MORE THAN got by me.

When I realized she was Asian and that her book contained WAY more than just cake, her book landed on my radar.  Then I found out she organizes amazing BAKE Sales for Planned Parenthood and Brigid Alliance and has raised thousands of dollars (lots of thousands), so I ordered a copy immediately.  It now has a spot on my cookbook shelf.

Holiday Traditions

Thanksgiving is in the books (no pun intended) which means a couple of things in our house.  First, I play Patrick Stewart’s version of A Christmas Carol which also kicks off 24-7 holiday music in our house, I am so stoked.  Second, time to plan those holiday cookie boxes!  I pulled out More Than Cake and found her recipe for Nubby Granola Shortbread.  Shortbread, y’all know I LOVE shortbread.  Time for a test run.

These crispy, buttery bites are made in a food processor.  A little pulse magic and the dough is done. How easy is that?  Plus, shortbread cookies travel well and keep longer than most cookies. These are delicious, lighter, and crunchier than traditional shortbread, perfect with a cuppa coffee or tea.  I made a batch of Jule’s Granola which worked perfectly in these cookies.  Flecks of dried fruit from the granola added a bit of color and sweetness to the shortbread, an unanticipated bonus.

PLUS, I’ll fill cute canning jars with the remaining granola to give away.  Oh this cookie is definitely going in the holiday cookie box.

Tips

  • Use your favorite granola, store-bought or homemade. You don’t have to make your own.  I love making granola so NBD.
  • Using a food processor makes quick work of the dough.  It starts with chilled butter (yay no waiting for butter to soften).

  • Rice flour makes for a fine texture, crumbly, melt-in-your-mouth-cookie. Bob’s Red Mill has rice flour and can be found at larger supermarkets, Whole Foods, and online.
  • No rolling out dough, the dough is pressed into the pan.  The recipe can be cut in half and baked in an 8×8 pan.

  • The tricky part of this recipe is the baking time.  Rice flour produces a drier cookie than AP flour therefore try not to overbake these cookies.  After removing the pan from the oven, lightly score the dough and allow to cool.  Once cooled, cut through the score marks.  Sprinkle with flaky salt and dust generously with powdered sugar to finish cookies.

A buttery, crunchy, gluten-free shortbread cookie that keeps and travels well.  This is a keeper.

Nubby Granola Shortbread

This breakfast-inspired shortbread is a great way to use your favorite granola. It adds a nice crunch to the buttery cookie. Sandy ultrafine rice flour makes a melt-in-your-mouth fine texture. It's delicious!
Course cookies, granola, shortbread
Cuisine American, Asian-American
Keyword granola, Shortbread
Prep Time 15 minutes
Cook Time 27 minutes

Ingredients

  • 2 cups your favorite granola
  • 3/4 cup walnut pieces pecans or almonds would work but lack that characteristic tannic edge of walnuts
  • 2 cups white rice flour
  • 3/4 cup granulated sugar
  • 1 teaspoon kosher salt
  • 8 ounces unsalted butter (2 sticks) cut into 1/2-inch cubes, well chilled

Finish

  • flaky sea salt
  • powdered sugar for dusting

Instructions

  • Preheat the oven to 350 F. Fit a sheet of parchment paper into a quarter-sheet pan (9 by 13 inches). Lightly mist the parchment with cooking spray.
  • In a food processor, combine the granola, nut pieces, white rice flour, granulated sugar, and kosher salt, and pulse until the mixture is pebbly and fine.
  • Add the butter and pulse another 8 to 10 times, until the mixture feels like damp, coarse breadcrumbs. The butter should almost disappear into the dry ingredients but not be taken so far that the dough is clumping and gathering around the blade.
  • Scatter the dough evenly in the prepared sheet pan. Use your knuckles to lightly press the crumb into an even layer. It should be about 1/2 inch thick. Do not apply too much pressure, as this would make the shortbread dense and gummy.
  • Bake until the edges of the shortbread are lightly browned, and the center feels soft but cooked through, 35 to 40 minutes (see tip).
  • Remove the pan from the oven and sprinkle the surface with flaky sea salt. While the shortbread is still hot, use a small knife to score it into 24 squares.
  • Let cool completely, then cut the cookies, still in the pan, along the scored lines and dust with powdered sugar.

Notes

The pan of shortbread can be held in the freezer for up to 1 month and baked from frozen.
The shortbread can be stored, tightly wrapped at room temperature, for up to 1 week.
TECHNIQUE TIP: It's tricky to tell when an unfamiliar recipe is done in your oven. Never throw away a seemingly botched batch of anything — there's always another purpose for it. If the baked shortbread tastes undercooked or feels gummy, invert the shortbread onto a clean sheet pan, so the crumbs spill out. Break it up with your fingers and bake again at 325 F for 10 minutes. Now you have instant streusel. Is the shortbread overbaked and dry? Tip the crumbs into a food processor and blend until fine and add big handfuls to your next layer cake.
Marbled Ube Cookies (Star Powered)

Marbled Ube Cookies (Star Powered)

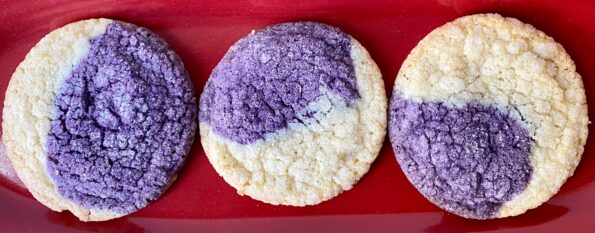
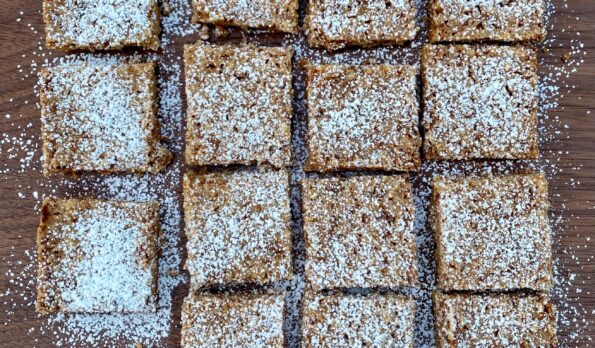
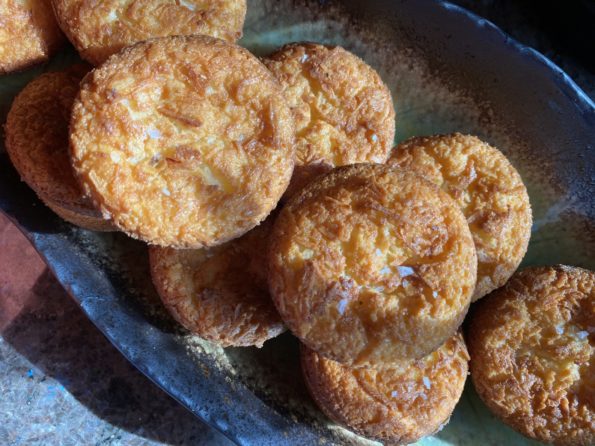
I wanted to include an ube dessert or cookie in my “Maui Strong” box for Lahaina.  Since I had made Ube Mochi Muffins for the Ukraine Cookie Box I opted for Constellation Inspiration’s Marbled Ube Cookie.  I have been eyeing her recipe for quite a while, and here was my chance to try it.  I baked the first sheet of cookies, and waited patiently (not really) for the cookies to cool.  With that first bite, I knew this cookie was going in the box. Not only are they delicious but they are so eye-catching.  A great addition to the cookie box.  In fact, I think…

Prince Would Love This COOKIE

Adding Ube extract and powder creates this gorgeous purple color that just POPS.  Ube, or purple yam or potato is popular in Southeast Asia, in particular the Philippines.  It has a vanilla, kind of nutty flavor, and “coconutty” aroma that lends itself well to desserts, bread, and pastries.  It’s definitely having a moment right now with the rising popularity of Filipino food.

Making the Cookie

The cookie dough is essentially a vanilla sugar cookie.  Start by creaming softened butter and sugar until smooth, not fluffy (to avoid a cakey cookie).  Add the egg and vanilla extract, beat to combine, and stir in the flour mixture.

Here comes the hard part, well, actually the hard part comes before making the dough.  Where to find ube powder and extract.  If you live in the Bay Area, you can find ube powder and extract by Butterfly or McCormick at most Asian grocery stores.  If not, there is always Amazon 🤷🏻‍♀️

Divide the dough in half (this is where a scale comes in handy).  Put half of the dough back in the mixing bowl and add ube extract and powder to it.  On the lowest speed of your mixer, blend the ube into the dough being careful not to overmix. You can do this by hand to avoid overworking the dough if you like.

.Using a tablespoon scoop, form dough balls with each dough and place them on a cookie sheet.  It is like having all your ducks in a row before the next step.

Smoosh together a dough ball of each color. Try to wrap one of the dough around the other to create the marble effect.  Then roll each in granulated sugar.  Place on a parchment-lined cookie sheet, 2 inches apart, and bake 11-14 minutes, rotating the sheet at the halfway mark.  Remove when the edges are just golden.

If you like ridges on the edge (all the rage right now) tap the cookie sheet 2-3 minutes before they come out of the oven.  This causes the cookie to deflate and make a ripple effect.  Sometimes the cookies are wonky in shape, if so, place a cookie cutter or glass (slightly bigger) over the cookie and swirl it to shape them into circles.  Or don’t, they’ll be delicious either way.

These Marbled Ube Cookies are a showstopper.  A lovely ube-flavored vanilla cookie with crispy edges, a chewy center, with a nice crunch from the sugar.  I’ll be making these again, and again…and again.

Marbled Ube Cookies

Ube Marbled Cookies, a gorgeous cookie that tastes as good as it looks.
Course Dessert, Snack
Cuisine Asian-American
Keyword drop cookie, marbled ube cookie, sugar cookie, ube
Prep Time 20 minutes
Cook Time 12 minutes

Ingredients

Dry Ingredients

  • 2 1/4 cup all-purpose flour 270gm
  • 1/2 tsp baking powder
  • 1/4 tsp baking soda
  • 1/2 tsp salt

Creamed Mixture

  • 1 cup unsalted butter, room temperature 227gm
  • 1 1/4 cup granulated sugar, and more for rolling 250gm
  • 1 large egg room temperature
  • 2 tsp vanilla extract

Additions to Dough

  • 2 tbsp ube purple yam powder, see note
  • 1 tsp ube extract

Instructions

  • Preheat the oven to 350°F (177°C). Line a large baking sheet with parchment paper.
  • In a medium bowl, whisk together the flour, baking powder, baking soda, and salt and set aside.
  • In the bowl of a stand mixer fitted with a paddle attachment, beat together the butter and 1-1⁄4 cups (250 g) of the sugar on medium speed until they are smooth, about 30 seconds. Add the egg and vanilla and beat to combine.
  • Add the flour mixture to the butter mixture and mix on low speed just until combined and no more streaks of the flour mixture remain, about 45 seconds.
  • Divide the dough into two equal portions (a scale comes in handy here) and leave one portion in the mixer. Add ube powder and extract to the mixer bowl. Mix on low speed until combined. The combination of ube powder and extract makes a nice purple color, no need for food coloring.
  • Take a heaping tablespoon of each dough and combine the dough by rolling between the palms of your hands to create a ball. I used a #40 ice cream scoop.
  • Toss the dough balls in a bowl of granulated sugar until each is coated.
  • Place dough balls on baking sheet, leaving 2 inches between each ball. Bake cookies for 11 to 14 minutes, until the edges of the cookies are light golden brown. Right before the cookies are ready to come out of the oven, tap the baking sheet on the oven rack a few times to create the ripple edges. Do not overbake.
  • Remove cookies from oven. If the cookies aren't round, place a circular cookie cutter or glass over the warm cookie and gently swirl the cookie to reshape. Then allow cookies to cool on the baking sheet for 10 minutes before transferring to a wire rack to cool completely.

Notes

Ube powder and extract can be found in most Asian markets or online.
Nuts for Macadamia Shortbread (Cookies for Lahaina)

Nuts for Macadamia Shortbread (Cookies for Lahaina)

It sucks to feel helpless which is exactly how I felt while watching the coverage of the wildfires in Maui.  In a twisted way it brought back memories of a family trip to Maui right before COVID, to celebrate hubby’s birthday and retirement.  We spent his b-day in Lahaina.  We grabbed shaved ice at Ululani, strolled down Front Street, and took in the majesty and beauty of the ancient Banyan Tree in the heart of town.  The day ended with a scrumptious dinner at Lahaina Grill and a stroll on the beach.  The stark reality of the devastation in Lahaina jolted me out of my memories and morphed into a voice in my head, “how are you going to help, Deb”.

Today, in the midst of the ruins, that Banyan Tree is struggling to survive.  Arborists are hopeful that the tree will survive, emblematic of the resiliency of the people of Maui.

I resorted to what I do when I am sad or stressed and feeling helpless, I bake.  For a box of homemade goodies, I asked friends and family to donate any amount to either Chef Hui Maui Relief to help feed folks displaced by the fire, and to Hawaii Community Foundation/Maui Strong to provide immediate and long-term resources for recovery.

A Big Mahalo

We raised over 1,500 dollars which was split between the two organizations ❤️❤️❤️.  Thank you for your generosity and for giving me a reason to bake!   👏👏👏.  It is greatly appreciated.

The Box

I wanted the box of cookies to feel connected to Maui in some small way.  I turned to cookbooks and blogs written by folks from Hawaii like Top Chef Sheldon Simeon and Alana Kysar. Sheldon has two restaurants on Maui, Tin Roof and Tiffany’s, and recently published his cookbook, Cook Real Hawai’i.  Alana is a blogger and the author of Aloha Kitchen Cookbook.  Her cookbook evokes the spirit of islands and her Butter Mochi recipe is amazing.  Find these books at Bookshop.org which supports independent bookstores.  I also culled recipes using my favorite tropical ingredients like pineapple, macadamia nuts, and coconut.  All of these baked goodies are on 3Jamigos or will be soon, promise.

Starting at the top right:

Travel Bites

Shortbread is perfect for a box, they travel well, keep longer than drop cookies and just happen to be my favorite cookie.  I found the perfect recipe in Nick Malgeri’s Modern Baker.  Using your food processor to make these cookies really makes it quick and easy.  This is one bowl (albeit, a food processor bowl) territory.

Process the nuts with the sugar until FINELY ground, add flour and baking powder, pulse to combine, add cold butter, and pulse until the dough is powdery then STOP.  Pour this mass into your prepared pan and press it down with a lightly floured flat glass or your hand.  Use a spray bottle to mist the dough with water which will help the nuts adhere to the dough.

Use either lightly salted or unsalted macadamia nuts.  I bought macadamias at Trader Joe’s, a bag of each, salted and unsalted. I used a 2:1 ratio of salted to unsalted nuts both in the cookie and on the top.  Cut the recipe in half and bake in an 8×8 pan as I did…cause I would eat the whole damn pan if given the chance.

Grind nuts by pulsing in a food processor or chopping by hand.  You want the pieces fairly small, but not pulverized. The nuts provide both flavor and texture.  Line the pan with parchment.  The OG recipe calls for lifting the cookies out of the pan using the parchment but that’s pretty hard to do and not crack it.  I let them cool for a couple of minutes and then used a bench scraper to cut the still-warm shortbread into squares before removing them from the pan.  Easy-peasy.

The finished cookie should be crispy.  If they aren’t, return the shortbread to the oven set at 300 degrees for 10-15 minutes.  I love these cookies, sweet, crispy, infused with macadamia nut flavor, and just delightful.

MACADAMIA SHORTBREAD

Adapted from Nick Malgeri Modern Baker, an easy, delicious Macadamia Shortbread. Buttery, nutty, crispy with a crunchy top of nuts and sugar. Simply divine.
Course Dessert
Cuisine American
Keyword butter, Crispy, macadamian nuts, Shortbread
Prep Time 20 minutes
Cook Time 30 minutes

Equipment

  • 1 food processor
  • 1 9x13 pan
  • parchment paper to line pan

Ingredients

Shortbread Base

  • 1/2 cup granulated sugar 100gm
  • 1-1/2 ounces unsalted or lightly salted macadamia nuts, chopped 42gm
  • 2-1/4 cups all-purpose flour 270gm
  • 1/2 teaspoon baking powder
  • 12 tablespoons cold unsalted butter, cut into tablespoon-size pieces 170gm

Topping

  • 1/3 cup granulated sugar 67gm
  • 3/4 cup unsalted or lightly salted macadamia nuts, finely chopped 111gm

Instructions

  • Preheat oven to 325°F. Line a 9″x 13″x 2″ baking pan with parchment paper or foil, leaving a couple of inches hanging over each short side. Butter the lining.
  • Combine 1/2 cup sugar and 1 & 1/2 ounces macadamias, (I use both salted and unsalted nuts in a 2:1 ratio) in a food processor. Pulse until finely ground. Add the flour and baking powder. Pulse until mixed. Add the butter and pulse until the mixture is combined and powdery.
  • Using a lightly floured, flat bottom glass or hands, press the dough firmly into the bottom of the prepared pan. Sprinkle the top of the dough with water. Sprinkle the finely chopped macadamias and then 1/3 cup sugar on top of the dough. Press firmly into the dough.
  • Bake for 30-35 minutes, or until the cookies are golden and firm.
  • While the cookies are still warm, use the overhanging lining to remove the cookies from the pan onto a cutting board. Cut into squares, using a sharp knife.
  • Let the cookies cool completely. They should become crisp as they cool. If they aren’t crisp after cooling, place them back in the pan and bake for 10-15 minutes at 300°F.

Gochujang Caramel Cookies Sweet & Spicy-Winner, Winner from Eric Kim-mer

Gochujang Caramel Cookies Sweet & Spicy-Winner, Winner from Eric Kim-mer

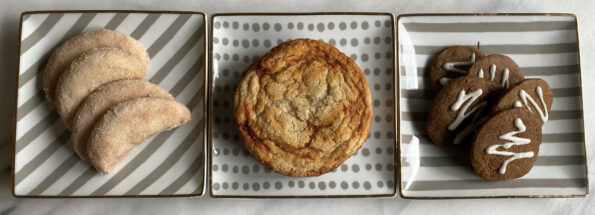
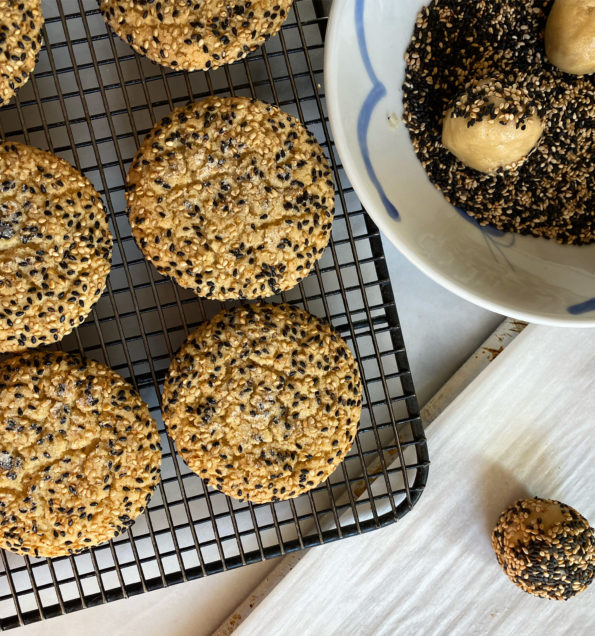
My favorite cookie this past holiday season was Eric Kim’s Gochujang Caramel Cookie.   I worked my way to writing about it by posting my two other favorite new cookies for the season first, Sue Li’s Orange, Pistachio, and Chocolate Shortbread and Rose’s Almond Crescents. Yep, just like the ones your Grandma, Abuela, Oma, or Nonna probably made.

Back to Eric’s holiday cookie for the New York Times.  His first holiday cookie, a couple of years ago was a homemade version of the Lofthouse Grocery Store Cookie.  A cakey, vanilla-forward cookie topped with real buttercream flavored with freeze-dried berries and finished with a generous amount of sprinkles.  So damn good.  Last year’s M&M Cookie, a kid favorite, is a buttery, chewy cookie, dotted with M&M’s, a precursor to this year’s cookie.

Sweet & Spicy

His Gochujang Caramel Cookie is a bold stroke of genius and gumption.  Gochujang is a fermented spicy chili paste with a touch of sweetness, a mainstay of Korean cooking.  But in a cookie?  It works! Ribbons of Gochujang enveloped in a buttery, chewy, vanilla-forward cookie. Butter and brown sugar are mixed into the Gochujang paste to mellow the chili which helps caramelize it while baking.   The trickiest part when making these is to not overmix the Gochujang butter into the cookie dough so you see the orange-colored swirls of Gochujang in the cookie. Not only do they taste fabulous, but they are visually stunning.

Easy Peasy

The key to making these is having soft butter.  Leave the butter at room temperature for at least an hour before. The butter should be soft but not melty.  Although he recommends making these by hand you can use a mixer.  Remember the golden rule-don’t overmix!  If you use a mixer,  stick to the stir and the low-speed setting.

Watch Eric make these cookies for NYTcooking HERE.

Spicy Pearls of Wisdom- Gochujang Paste is made of chili flakes for heat, glutinous rice for sweetness, and fermented soybeans for flavor.  It is a cornerstone of Korean cooking.  I use the mild paste for the cookies as it does come in various heat levels.  You can find it in most Asian grocery stores or TJ has small tubs of Gochujang made in Korea (full transparency, I haven’t tried it).

Here’s the Hard Part

The tricky part is combining the gochujang butter with the cookie dough.  Eric calls for chilling the cookie dough for a couple of minutes so it is denser than the paste.  The goal is to have streaks of the orange-red paste running through the lighter vanilla dough.  Bites vary in spiciness and sweetness if you don’t blend too much (upping the interest factor).  Spread plops of the paste on the dough and run a small spatula through it to drag the paste into the dough.  NOT TOO MUCH since when you scoop out the dough this will further blend it.  Use a cookie scoop to form balls of dough.  A #40 scoop will give you approximately 18 cookies about 3 inches in diameter with crisp edges and a chewy center.  Reduce baking time to 9-11 minutes.  These are a bit smaller than Eric’s cookie cause I don’t need to eat a 5+ inch cookie and trust me I would, lol.

Cookie Hack

The cookies spread quite a bit so allow lots of space on your cookie sheet for each cute dough ball.  This also allows room around the cookie to use my jar hack/cookie cutter to shape the cookies as soon as they come out of the oven.  The chili paste will spread more than the cookie itself creating a funny-shaped cookie.  Take a cup or a bowl just a little bit bigger than the cookie, place it over the cookie and swirl the cup and cookie.  This “rounds” the cookie out.

Spicy Tip Number 2? Or is it 3?

Have friends and fam that are spice adverse?  Tell them to pick the cookie that is the least amount of orange!

I adore this cookie for its flavor, texture, and uniqueness!

Gochujang Caramel Cookies

From Eric Kim and NYTcooking, my favorite cookie this past year! Gochujang Caramel Cookies
Course cookies, Dessert
Cuisine Asian-American, Korean-American
Keyword gochujang, Gochujang Caramel Cookie, holiday cookies
Prep Time 20 minutes
Cook Time 11 minutes

Ingredients

Gochujang Butter

  • 1 tablespoon unsalted butter very soft
  • 2 tablespoons packed dark brown sugar
  • 1 tablespoon gochujang paste heaping

Creamed Mixture

  • 7 tablespoons unsalted butter, softened
  • 1 cup granulated sugar (200 grams)
  • 1 large egg at room temperature
  • ½ teaspoon coarse kosher salt (Morton's) or ¾ teaspoon if using Diamond Crystal
  • ¼ teaspoon ground cinnamon
  • 1 teaspoon vanilla extract

Dry Stuff

  • ½ teaspoon baking soda
  • cups all-purpose flour 185 grams

Instructions

  • In a small bowl, stir together 1 tablespoon butter, the brown sugar and gochujang until smooth. Set aside for later, at room temperature.
  • In a large bowl, by hand, whisk together the remaining 7 tablespoons butter, the granulated sugar, egg, salt, cinnamon and vanilla until smooth, about 1 minute. Switch to a flexible spatula and stir in the baking soda. Add the flour and gently stir to combine. Place this large bowl in the refrigerator until the dough is less sticky but still soft and pliable, 15 to 20 minutes.
  • While the dough is chilling, heat the oven to 350 degrees and line 2 large sheet pans with parchment.
  • Remove the dough from the refrigerator. In 3 to 4 separately spaced out blobs, spoon the gochujang mixture over the cookie dough. Moving in long circular strokes, swirl the gochujang mixture into the cookie dough so you have streaks of orange-red rippled throughout the beige. Be sure not to overmix at this stage, as you want wide, distinct strips of gochujang.
  • Use an ice cream scoop to plop out ¼-cup rounds spaced at least 3 inches apart on the sheet pans. (You should get 4 to 5 cookies per pan.) Bake until lightly golden at the edges and dry and set in the center, 11 to 13 minutes, rotating the pans halfway through. Let cool completely on the sheet pan; the cookies will flatten slightly and continue cooking as they cool. *See post for making smaller cookies. I used a #40 scoop which is just shy of an ounce. 1/4 cup is 2 ounces for comparison.
  • The cookies will keep in an airtight container at room temperature for up to 2 days.

Notes

Mixing this dough by hand is highly recommended for the most defined crinkles and the chewiest texture.
White Rabbit CC Cookies-We Got Em, Go Tell Alice

White Rabbit CC Cookies-We Got Em, Go Tell Alice

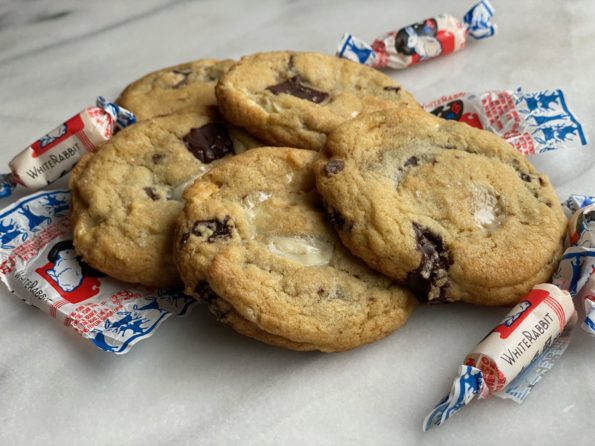
As a kid, I spent a lot of time running the streets of Chinatown in San Francisco.  After school, I headed to Chinatown to attend Hip Wo Chinese School, which conveniently was housed in the same church our family attended.  I’d love to tell you I was a stellar student and fluent in both Cantonese and English but that would be a lie.  The highlights of Chinese School were recess, calligraphy (a lot like painting), and stopping at the little grocery store right next to the church at the end of the day.  We would grab a Carnation cup of ice cream with the little wooden paddle-spoon, or a cup of noodles (this was before instant noodles, so the shopkeeper made catsup noodles, delish, trust me) to hold us until we got home.

Candyland

More often than not, we bought candy from the array right by the register.  I fancy myself a candy aficionado thanks to Chinese School.  My favorites included Ice Cubes, Flickers, Charleston Chews, Big Hunks, Watermelon Stixs, and Milk Duds.  If you recognize all these you’re a genius or just old like me.  I also loved their Asian candies.  Sugus, the precursors to Starburst, Haw Flakes (a sweet-sour plum wafer), and White Rabbit Candy.  White Rabbit is kinda like taffy.  It tastes like sweetened milk.  They’re hard when you first pop one in your mouth but soften as you chew on it. Kinda like a Big Hunk or Look bar.

I haven’t had a White Rabbit in YEARS.  But, they have been showing up in the new crop of Asian bakeries in the Bay Area.  These inventive bakeries and pop-ups like Grand Opening (From the folks at Mr. Jiu’s), Sunday Bakeshop, Breadbelly, Pineapple King Bakery and Spoons Patisserie are fusing French techniques and Asian ingredients (and visa-versa) to create some delightful sweets and pastries.  Char Siu Bao? Nah, gimme a BBQ Pork Danish, how about an Ube Snickerdoodle or Matcha custard-filled Puff?  Genius.  Instead of strawberry, try passionfruit. Black sesame seeds instead of poppy seeds, why not?  Then there is Third Culture Bakery which popularized sweet rice or mochi desserts.  A little gooey, a lot delish, and gluten-free!

CCC with a Twist

Luckily, White Rabbit Chocolate Chip Cookies from Beyond the Noms, popped up on my feed, bingo (was it luck or an algorithm that reads my mind?).  I knew I had to try it.  Essentially it is a chocolate chip cookie with an Asian twist.  Cream butter with sugars until light and fluffy, one to two minutes and the egg and vanilla, beat again.  Add flour mixture and stir just until the flour is mixed in.  Add the stars of the show, the chocolate, and White Rabbit pieces ( you could substitute white chocolate if you can’t find the White Rabbit candy). Done.  I like to chill my dough before baking.  Allows flavors to blend and helps with spreading.

They’re delicious.  A combination of the milky, vanilla candy, and dark chocolate chunks in a buttery, crispy-edged, tender cookie.  Just out of the oven the White Rabbit candy is gooey, chewy, and sticky-soft.  As the cookie cools, it does become denser, just like a Big Hunk.  If you grew up eating White Rabbit morsels or any of the taffy-like candy bars, you are going to love these cookies.  They will stick to your teeth (ahh transparency). Buy a bag when you are going to make these cookies, the fresher the bag the better for softness.  White Rabbit Candy can be found in Asian Grocery Stores, especially Chinese ones.

Beat until light
Stir in chocolate and candy pieces just until incorporated. Don’t overmix.
Use a #40 ice cream scoop to create dough balls. I plopped one chocolate chunk and one piece of White Rabbit on each ball,
Delicious candy cookies with an Asian twist! If the White Rabbit seems a bit hard in cookies that are cold, try warming the cookie up a little which will soften the candy again.

White Rabbit and Chocolate Chunk Cookies

Asian Twist to Chocolate Chip Cookies, added White Rabbit Candy to cookies!
Course Dessert
Cuisine Asian-American
Keyword beyondthenoms, chocolate chip cookies, cookies, White Rabbit Candy
Prep Time 10 minutes
Cook Time 12 minutes

Ingredients

Dry Ingredients

  • 1 1/2 cups all purpose flour
  • 3/4 teaspoon baking soda
  • 1/4 teaspoon salt

Ingredients to Cream

  • 1/2 cup unsalted butter softened
  • 1/2 cup brown sugar packed light or dark
  • 1/4 cup sugar
  • 1 egg
  • 1 teaspoon vanilla extract

Additions

  • 1 cup chocolate chunks chips are also fine
  • 15-20 white rabbit candies chopped I used ~15 pieces, tap to cut and it will break easily into pieces. Don't try to saw through them. Leave the rice paper wrapper on, its edible and will dissolve.
  • Maldon sea salt flakes optional

Instructions

  • Sift flour, baking soda and salt together in a small bowl. Set aside.
  • In a stand mixer on medium speed, beat butter, sugar, and brown sugar for 2 minutes. The mixture will lighten in color.
  • Add egg and vanilla and mix on medium speed for 1-2 minutes, until it looks like a buttercream. Scrap down the sides of the bowl occasionally.
  • Add flour mixture and stir (low speed on mixer) until just combined.
  • Stir in chocolate chunks and white rabbit candies.
  • Scoop approximately 2 tbsp. of cookie dough and place on a baking sheet lined with parchment paper. Leave roughly 1.5-2 inches between cookies. Optional: stick additional chocolate and candy pieces in each dough ball. Refrigerate for approximately one hour.
  • Preheat the oven to 350˚F. Bake the cookies for 12-15 minutes until the edges are golden brown and the center has lost that wet sheen look. I like baking one sheet at a time. If you bake multiple sheets, be sure to switch places and rotate sheets midway through baking.
  • The White Rabbit Candy will soften and melt at times creating a not-quite-round cookie. The candy melts and creates crispy edges. While the cookies are still warm just out of the oven you could take a glass and place it over each cookie and swirl thus smooshing the cookie into a round shape OR you could embrace the not-round look and enjoy the sweet crispy edges that look like lava flow off an island.
  • Transfer to a cooling rack and top with Maldon sea salt flakes if desired. Serve warm.

Notes

I use a #0 scoop which is just a little less than an ounce, approximately 1.6 tablespoons.  You could use #30 which is just over 2 T.
Calories: 224kcal
Carbohydrates: 29g
Protein: 2g
Fat: 11g
Hella Good Ube Mochi Muffins-Mochi Madness

Hella Good Ube Mochi Muffins-Mochi Madness

I have been looking for a dessert/cookie recipe using Ube for a while when I came across a recipe for Butter and Ube Bibingka/Mochi on Mark Hella Cooks.  I adapted his Bibingka/Mochi and made muffins, delicious and gorgeous. Just a bit of ube extract gave the batter a vibrant purple that is so whimsical and appealing.

Did I Get Ahead of Myself?

Are you asking what the heck is Ube?  It just dawned on me this is not your dash to the corner store item.  First, ube is similar to a sweet potato BUT it’s PURPLE, so swag, purple food.  It is used in a lot of Asian desserts, particularly Filipino ones. It is mild-flavored, kinda nutty, kinda vanilla-y.  Aside from fresh purple yams (hard to find), it comes as a powder, jam, and extract.  On a recent visit to the Asian Art Museum in the City, I inhaled a delicious Ube Snickerdoodle from Sunday@  the Museum, cafe.  Ever since I have been perusing the internet for ube cookie recipes.  No cookie yet but luckily I found Mark Hella Cooks Ube Mochi recipe. It is easy, delicious, and eye candy worthy.  I made muffins so everyone could have their own little dessert with crispy edges, yum.

Ube-by, Baby, Making Cookies For A Cause

I wanted to include the muffins in my little box of cookies for Ukraine.  The world is upside down right now and I just can’t sit on the sidelines and watch.  So I do what I can by fighting the things I hate with the things I love.  I baked cookies for donations to World Central Kitchen and Sunflower of Peace. My tiny part. #BakersAgainstRacism, #BakersforUkraine

I put together individual boxes of cookies, a first for me, to share with friends and co-workers.  Everyone was so generous, it reminded me that most folks are decent, kind, and caring.  How is it that just a few are actually responsible for so much hate and suffering in the world?  Most folks just want to live their lives and be happy.

Each box included tried & true cookies, comfort cookies, my family favorites.  Here are the Cookies for Ukraine Box.

Purple Yam All In My Brain

Rounding out the cookie box, are these incredibly easy and delicious Ube Butter Mochi Muffins.  Mochi has become my best friend when I need a gluten-free treat.  Made with glutinous sweet rice flour, the texture is chewy, a bit dense in a good way, and totally addicting.  If you have tried Third Culture Bakery or Mochi Donuts, or Manju, you will love these.  If you like to start with the classic butter mochi muffin try this one.  It is by far the most popular recipe on 3Jamigos.

The muffins can be made in one bowl, that’s how easy they are.  The method in the recipe below is from Mark Hella Cooks. Alternatively, place coconut milk and butter in a microwavable bowl and nuke for 1 minute.  Add evaporated milk, vanilla extract and eggs.  Mix well. Combine mochiko flour and baking powder then add to milk mixture.  Whisk until smooth.  Proceed with the recipe at step 3 as written.

Once you have drizzled the ube batter into the muffin tins, be careful not to shake the tin which would cause the batters to blend too much, You want to retain the marbling.

Butter or spray the muffin tin with PAM REALLY well, it determines the rise and the shape of the top of the muffin.

Enjoy!

Ube Butter Mochi Muffins

More mochi muffins! Purple Yams is in my soul
Course Dessert, Muffins
Cuisine Asian-American
Keyword butter mochi, Gluten free, mochi muffin, ube
Prep Time 20 minutes
Cook Time 50 minutes

Ingredients

  • 4 tablespoons butter (2 ounces) (salted is fine) melted
  • 1 cup sugar baker’s/caster sugar preferable
  • 2 large eggs @ room temperature
  • 1/2 teaspoon vanilla extract
  • 1 teaspoon ube extract Available at Asian Stores, online McCormick's
  • 8 ounces mochiko rice flour (1/2 box) 230gms
  • 1 teaspoon baking powder
  • 6 ounces evaporated milk Sub whole milk
  • 7 ounces full fat coconut milk(Arroy-D or Chakot)

Instructions

  • Preheat your oven to 350 degrees (non-convection), and generously grease a standard 12-cup muffin tin with butter.
  • In a large bowl, whisk together the melted butter and sugar. Add the eggs and vanilla extract and continue to mix until combined. Add the rice flour and baking powder and stir until combined. It might look a little lumpy, it's okay. Stir in the evaporated milk and the coconut milk. Continue whisking until smooth*
  • Remove 3/4 cup of the batter and place in a small bowl. Add the ube extract and mix together.
  • The batter will be pretty runny. Using a large ice cream scoop the remaining batter into each muffin tin. It should fill the entire tin, each cup filled approximately 3/4 full. Gently drizzle ube batter onto each muffin tin. A squeeze bottle with a large opening will work otherwise use a teaspoon. The batter will sink so there is no reason to swirl it. I drizzle in a spiral pattern with a healthy glob in the center.
  • Carefully place the muffin pan in the oven and bake for 20-25 minutes.
Chew On This! Toasted Sesame Cookies

Chew On This! Toasted Sesame Cookies

How’s the New Year’s Resolution thing going?  I’ve gotten strategic, I only make new year’s resolutions that are fun.  That way I stand a chance of actually following through on them.  One of my perpetual resolutions is to make a concerted effort to actually use the many cookbooks I have collected.  Don’t laugh, it may not sound like a resolution but it is.

Olympic Medal goes to….these cookies!

Last night, sitting on the couch, watching Chloe Kim and Nathan Chen do their thing, and flipping through a cookbook (I can multi-task) I wondered (out loud, unfortunately) how many cookbooks I have that I haven’t ever used.  The hubs laughed and said TOO MANY.

The laugh was pure motivation.  I got up, went to the kitchen, pulled out Jesse Szewczyk’s Cookies: The New Classics, and picked his recipe for Chewy Toasted Sesame Cookies.  Sooo making these now, before my resolve fades or I get distracted by Nathan Chen’s final routine.

So glad I did.  These cookies are delectable!  As much as I love SHORTBREAD type cookies, it was time to go back to fam-fav chewy cookies.  These did the trick. Chewy centers, a bit of crispness on the edges….yum, yum.

Not to say I wasn’t happy.  My current OBSESSION is sesame.  Jesse uses toasted sesame oil in these cookies, which ups the flavor game. Sesame oil, sesame seeds…win, win.

These cookies are pretty easy to make…think Snickerdoodle method. Make the dough, chill it, roll it into balls. Roll said balls in black and white toasted sesames, hit it with some sugar, bake and EAT or in my case, inhale.  Really, that good.

If this cookie is any indication…I will be baking a lot out of his book!

Seeds of Sesame Tips

It may seem fussy, I am sure it was a texture chase, the recipe calls for not only butter, but cream cheese, and oil.  A balancing act to make a moist, chewy, soft cookie with a bit of crispness on the edges.

Sesame Oil, Sesame Seeds

You want TOASTED Sesame oil which can be found easily in Asian markets.  The French brand, La Tourangelle makes a tosted sesame oil that is very good.  It’s a little pricier but generally can be found in your larger grocery stores.  I buy toasted sesame seeds at the Asian markets because I go through the stuff in no time flat.  You can buy untoasted seeds and toast them yourself if roasted seeds are not available.

I was able to form the just-made dough into round balls even though it was pretty soft.  But if you chill the dough for 30-60 minutes, makes it easier to work with.

Best thing since sliced bread, ice cream scoops for cookie dough….just saying. I used a 1.6 tablespoon scoop (#40) and sprinkled each cookie with regular granulated sugar.  Raw or Demerara Sugar would work well too.  Baking time was 11 minutes.  The cookies will puff up but fall and create those neat fissures as they cool.

The hubs is not a fan of sesame seeds so I actually baked a couple that I rolled in chocolate sprinkles.  I nixed his request for raisins (Ewww).  The sprinkles were a hit.  Honestly, this dough is so tasty, it would be good rolled in anything…except raisins.

Put these on your bucket list…like now.

Print Pin
5 from 1 vote

Chewy Toasted Sesame Cookies

A delicious, chewy, buttery, sesame cookie from Jesse Szewczyk's Cookies: The New Classics.
Course cookies
Cuisine American
Keyword Chewy Toasted Sesame Cookies
Prep Time 20 minutes
Servings 24 cookies

Equipment

  • 1 #40 ice cream scoop If you don't have one, spoon out 2 tablespoons of dough and roll into round balls.

Ingredients

Dry Stuff

  • 21/2 cups All purpose flour (320gms)
  • 1 teaspoon baking powder
  • 1/2 teaspoon baking soda
  • 1/4 teaspoon kosher salt reg table salt, use 1/8 teaspoon

Fat Stuff

  • 6 tablespoons unsalted butter, softened (85gms) leave the butter on your counter for a couple of hours approximate temp 68 degrees
  • 2 ounces cream cheese, room temp (57 gms)
  • 1 tablespoon TOASTED sesame oil see post for notes on oil
  • 1/4 cup canola oil (60ml)

The Sweet Stuff

  • 1 cup granulated sugar (200gms)
  • 1/2 cup packed light brown sugar (100gms)

Wet Stuff

  • 1 large egg, room temperature
  • 2 tablespoons whole milk (30ml)
  • 1 tablespoon vanilla extract

The Finishing Touches

  • 1/3 cup toasted white sesame seeds
  • 1/3 cup toasted black sesame seeds
  • 1/4 cup granulated sugar

Instructions

  • Preheat oven to 350 degrees. I'm a stickler, I bake one sheet at a time in the middle of the oven. To bake two sheets at a time, set your oven racks in the upper-middle and lower-middle positions of your oven. Line sheets with parchment or Silpat. Preference is for parchment as silicon mats retain more heat.
  • In a medium bowl, combine dry stuff, set aside.
  • In the bowl of a stand mixer fitted with the paddle, toss in the fats, (butter, cream cheese, sesame oil, canola oil), and sweet stuff granulated sugar, brown sugar. Beat on medium speed until smooth and fully blended, about 2 minutes.
  • Turn mixer off and add the wet stuff. Beat on medium speed until light and ribbon-like, about 2-3 minutes.
  • Turn mixer speed to low and gradually add flour mixture, mix until just blended, don't overmix. Rest dough for 10 minutes, it will firm up a bit. If it seems to soft still, chill in fridge for 30 minutes.
  • Using a 1-3/4 inch ice cream scoop (~2 tablespoons), form dough balls, hand- roll each to create smooth round balls.
  • Combine sesame seeds in a shallow bowl. Roll each dough ball in the sesame seeds and place them on parchment-lined sheets 2-1/2 inches apart. Sprinkle with the granulated sugar.
  • Bake 10-12 minutes, turning sheet midway through baking. Bake until golden brown on the edges. Cool cookies on baking sheet for a couple of minutes before removing them to a rack to cool completely.

Notes

Store in an airtight container.
Hawaiian Butter Mochi (Mo Buttah’ Mo Bettah’)

Hawaiian Butter Mochi (Mo Buttah’ Mo Bettah’)

Right before the pandemic hit we capped off a year of traveling by going to Maui.  A celebration for the hubster’s birthday and his early retirement was our excuse to pack our bags and head out for some sun, fun, and food.  Little did we know it would be our last trip for quite a while.

Hawaiian Delights

I am a sucker for Hawaiian food.  A fusion of Native, Chinese, Japanese, Filipino, Portuguese, Korean and all of it tweaked so it taste great and is easy to eat while sitting on a beach!  Our bucket list of food included Spam Musubi, a hunk of rice topped with a fried slice of SPAM and wrapped in seaweed, Poke’ (seasoned raw fish in a bowl with rice), island style bbq, Huli, Huli Chicken. YUM.

Then there are the sweets, Malasadas (best damn donuts), Haupia (coconut jello) and my favorite, Butter Mochi. Hawaiian Butter Mochi is the island’s answer to Blondies or Brownies but better (I know, them is fighting words).  Buttery, gooey, sweet and so satisfying.  Like our Spam Musubi quest, we went out of our way to find all things mochi.

This isn’t my first mochi rodeo, I posted a Butter Mochi Muffin recipe a while back that peeps really like (so says Google analytics, lol).  Since then it has been off to the “rices” trying recipes with Koda Farms Sweet Rice (glutinous rice flour).  Mochi now merits its own category in my recipe index.  These muffins started it all, dense, chewy, with a touch of familiar cakiness, and the perfect amount of sugar. They are a great introduction to mochi-based desserts.  BONUS: Mochi is gluten-free!

Butter Mochi Muffins
The Muffins that started it all!

Mochi Mania-Island Style

Hawaiian Butter Mochi takes mochi back closer to its Japanese roots, lighter, springier, and less cakey.  The recipe calls for coconut milk and regular milk.  The regular milk and less mochi flour are the “denseness” buster and gives the mochi its characteristic texture.  Butter adds flavor.  It is usually baked in a pan and then cut into squares but I decided to bake them in muffin tins.  All for the edges folks.  Each person ends up with their own gooeylicious mini-cake highlighted by a crispy, buttery edge, and finished with toasty shredded coconut and a sprinkle of Fleur de Sel, soooooo yummy.

Inspired by Aloha Kitchen and the website Catherine Zhang, these Butter Mochi Mini-Cakes are onolicious.  I hope you will try them!

The two key ingredients you can find at most Asian stores, sweet rice flour and coconut milk. My go-to brands are Koda Farms Mochiko and Chaokoh or Arroy-D for coconut milk.

The batter will be very pourable due to the use of milk as part of the liquid and less mochi flour.

Don’t be afraid to fill the cups to 7/8.  The mini-cakes will puff up but will fall as they are cooling.  You will end up with a flat top or sometimes even a slight depression, it’s all good.

Enjoy!

Print
5 from 1 vote

Hawaiian Butter Mochi Muffins

This muffin is a mash-up of Hawaiian Butter Mochi and Butter Mochi Muffins! Gooier and less cake-like than my butter mochi muffins. Baked as muffins they have crispy edges and a soft center-onolicious!
Course Dessert, Snack
Cuisine Asian, Fusion
Keyword butter mochi, hawaiian, Mochi, muffin
Prep Time 15 minutes
Cook Time 45 minutes
Total Time 1 hour

Ingredients

Da Wet Stuff

  • 1/4 cup Unsalted butter 55gm
  • 3/4 cup Coconut milk 170gm
  • 1 cup Whole milk 240gm
  • 2 Eggs

Da Dry Stuff

  • 1 3/4 cup Glutinous rice flour 225gm
  • 1 cup Granulated sugar 200gm
  • 1 tsp Baking powder
  • Flaked or shredded coconut for garnish, preferably unsweetened but use what you like

Prep Yo Pan

  • Butter
  • Rice flour optional

Instructions

  • Preheat the oven to 375 degrees
  • Generously grease 12-cup muffin tin with butter and dust with rice flour, if you don't have rice flour, skip it. The flour does help the batter rise in the pan and getting crispy edges.
  • In a large, microwave safe bowl combine the coconut milk and butter, heat in the microwave for 1 minute
  • Add the milk and 2 eggs, whisk until combined. I like whole milk but you can use 2% milk or alternative milk like oat milk.
  • In a medium sized bowl combine the glutinous rice flour, sugar and baking powder
  • Add the dry ingredients to the wet ingredients and whisk until smooth
  • Pour the batter evenly into the 12 muffin cups
  • Sprinkle with coconut and bake for 45 minutes, or until golden brown
  • Remove and cool. Muffins will keep for a couple of days on the counter. Pop them in a toaster oven to re-crisp edges. They also freeze pretty well.
Pineapple Pockets to the Rescue-Pining for a Cookie

Pineapple Pockets to the Rescue-Pining for a Cookie

There are a couple of baking books that are my go-tos for cookies, especially during the holidays, like Rose Levy Berenbaum’s Christmas Cookies, Alice Medrich’s Cookies and Brownies and Flo Bracker’s Sweet Miniatures.  I find myself reaching for Sweet Miniatures when I want an elegant, fancy cookie. Yes it will probably require a bit more effort than drop cookies, but it’s Christmas, when else are you going to pull out all the stops?

Pineapple Cakes from Taiwan inspired me to make the Pineapple Pockets from Sweet Miniatures.  Taiwanese Pineapple Cakes are little bite-sized squares of pineapple jam cloaked in a sweet, buttery pastry crust.  I’m obsessed with these little cake-like cookies.  My introduction to these treats came years ago when a friend returning from a trip to Taipei brought back Te Chia Pineapple Cakes. It was love at first bite.  The sweetness from the pineapple offset by the buttery shortbread crust…needless to say, I was smitten.  I casually mention pineapple cakes to every friend that goes back to Taiwan while giving them my best wistful look.

While these Pineapple Pockets are more complicated than your average drop cookie, the resemblance to Taiwanese Pineapple Cakes put these on my must-bake holiday cookie list. The process begins with  making a caramelized pineapple jam then a pastry dough. The dough is rolled and cut into circles, dotted with the jam, and then shaped into cones.  Labor-intensive, but in the end, you are rewarded with a meltingly tender cookie highlighted by the dollop of golden, caramelized pineapple preserves. They are absolutely delicious and well worth the effort.  But most importantly, they are delicious enough to satisfy my Pineapple Cake craving. Now I don’t have to wait for friends to take pity on me and bring them back from Taiwan!

The jam is made first and set aside to cool. I added 1/2 tsp of vanilla to the jam and a pinch of salt to enhance the flavor.   Make the dough, chill it, then roll it into a circle. The dough should be about 1/8-3/16 inch thickness. Use a 2 inch round cutter for the circles.  Your best friend is your refrigerator.  If the dough gets soft or sticky during the process, put it back in the fridge to chill. This will make it easier to handle.

Position the jam off-center.  Using a butter knife or thin blade spatula, flip the edge closest to you over the jam.  Angle your spatula on the opposite side and flip towards you, overlapping with the first.

Ta-da, ready to bake!  Sprinkle powdered sugar on the finished cookies for a festive look.  In a pinch, you could use jarred preserves, make sure whatever you use is not too runny or thin.

Pineapple Pockets

Flo Bracker's delicious Pineapple Pockets. Caramelized Pineapple Jam encased in a buttery, tender pastry and shaped into a cone.
Course cookies
Cuisine American
Keyword cookies, flo bracker, holiday cookies, Pineapple cakes, Pineapple Pockets
Prep Time 1 hour
Cook Time 14 minutes

Ingredients

Dough

  • 6 ounces unsalted butter, room temp 1-1/2 sticks
  • 1/4 cup granulated sugar 50gms
  • 1/2 cup unsifted powdered sugar 50gms
  • 2 egg yolks
  • 1 tsp vanilla
  • 1-2/3 cup unsifted all-purpose flour 235gms

Pineapple Filling

  • 2 tbsp water
  • 1/3 cup granulated sugar 65gms
  • 8-ounce can crushed pineapple in natural juice
  • 1/2 tbsp unsalted butter

Instructions

  • In bowl of mixer, cream butter at medium low speed until smooth, about 1 minute. Beat in sugars at medium speed until creamy. Add egg yolks, one at a time, then vanilla, beating until well combined and slightly fluffy. Scrape down the sides of bowl. Lower mixer speed, and gradually add flour and mix just until it is combined.
  • Gather dough into a disc and chill 15-30 minutes. Divide dough in half and on parchment or wax paper, roll each piece into a circle. approximately 11 inches in diameter and 1/8 inch thick. Transfer to a baking sheet, cover top with parchment and refrigerate until firm about 2 hours.

Pineapple filling

  • In a medium saucepan, combine water and sugar over low heat. Swirl occasionally and wash down any sugar crystals that form on the side with a brush dipped in cold water to dissolve them. Increase heat to medium-high and cook without stirring until sugar thickens and turns amber in color about 8 minutes. Take it off the heat and add crushed pineapple and juice all at once. Careful as mixture will bubble up. Stir to combine and return the pan to stove and cook over med-high heat until mixture is golden and syrupy. Remove from stove and stir in butter. Place in bowl and set it aside to cool.

Putting It All Together

  • Preheat oven to 325
  • Remove one piece of dough, peel off parchment. Put parchment back on dough and flip dough over and peel off bottom parchment.
  • Use a 2 inch round cookie cutter cut out circles and place on lined baking sheets. Place 1/2 teaspoon of cooled jam off-centered on circle. Fold over one edge of dough over jam, then overlap the opposite edge at an angle to form a cone. See pics.
  • Bake one sheet at a time, for 12-14 minutes until edges ar light golden.
  • Remove from oven and place on wire rack to cool for 5 minutes. Lift cookies off and place directly on cooling rack.
  • Sprinkle with powdered sugar. optional)
  • Store at room temp for up to 10 days.

The 2020 Holiday Cookie Tin