Tag: #quickandeasy

A Tale of Two Pancakes and Sushi

A Tale of Two Pancakes and Sushi

Nothing beats coming home.  Though we had a blast on our trip to Korea and Japan, it always feels good to open the front door, drop the bags and sleep in my OWN bed!  Aaaaahhhh, bliss.

What else is nice, hmmmmmm

HOME COOKING

Yep, time to get back in my kitchen and make a mess.  I envisioned our first day back, a big pot of rice soup (congee), kick up our feet, and flip on the telly to catch up with the Warriors and Sharks.

But before going home we spent our last day in Japan running around Osaka looking for early morning sushi, soufflé pancakes and Michelin starred Instant Ramen.  We went 2 for 3, couldn’t find the Instant Ramen which was just as well since I couldn’t fit much more in my suitcase anyway.

Breakfast of Champions

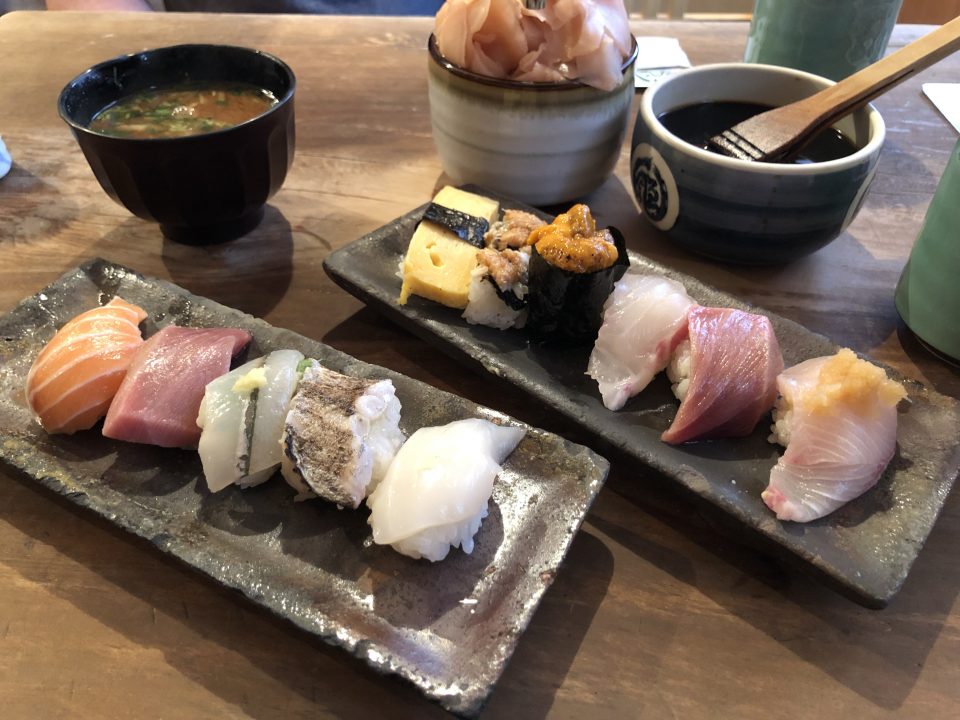
At 6:30 am we found ourselves sitting in a small sushi place at the Osaka Fish Market, Endo Sushi.  Surprisingly, we were not alone nor the first ones there.  To make it easy, there is a set menu of sushi flights.  Each flight focus was different, shellfish, fish, tuna.  Fresh and delicious we ordered a set each, then another, then another to share.  Not a bad way to start the day.

My Happy Place

From there we headed back to town.  It was only 8:30.  Yes, enough time to find soufflé pancakes, the current rage.  So we head to Happy Pancake which doesn’t open until 10AM.  First in line baby, uh-huh.  The perks of getting up early.

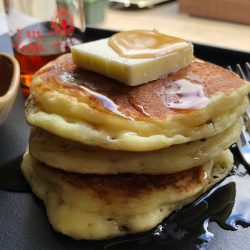
Happy Pancakes with butter and syrup.  Number two on the bucket list, checked off.

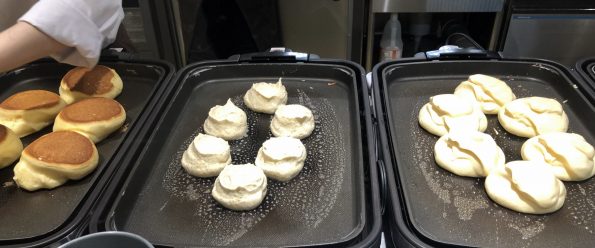
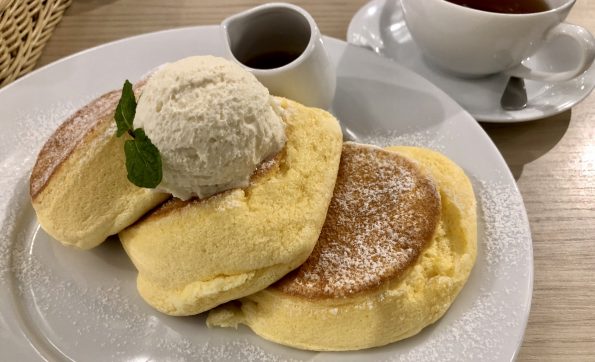
Light, fluffy, souffle-like, and EGGY.  Now, this might be your cup of tea…but for me, they were just way too eggy tasting, reminded me of a French omelet.  Y’all, if I wanted eggs, I would have ordered eggs. I hear there is a joint in Stonestown in San Francisco, and after a three-hour wait, you can try them…Me?  Nah.  I want real pancakes.

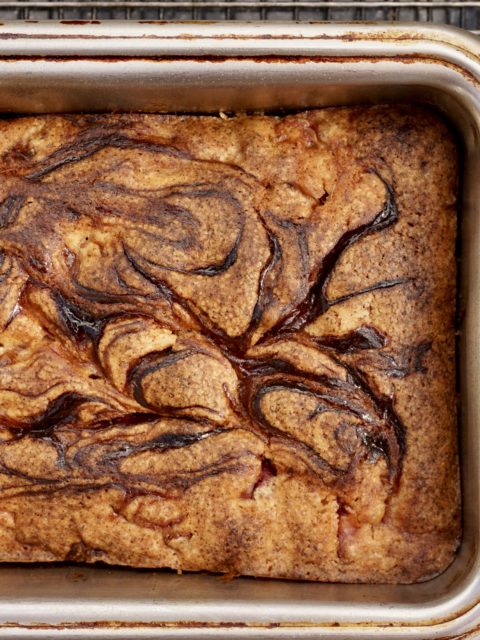
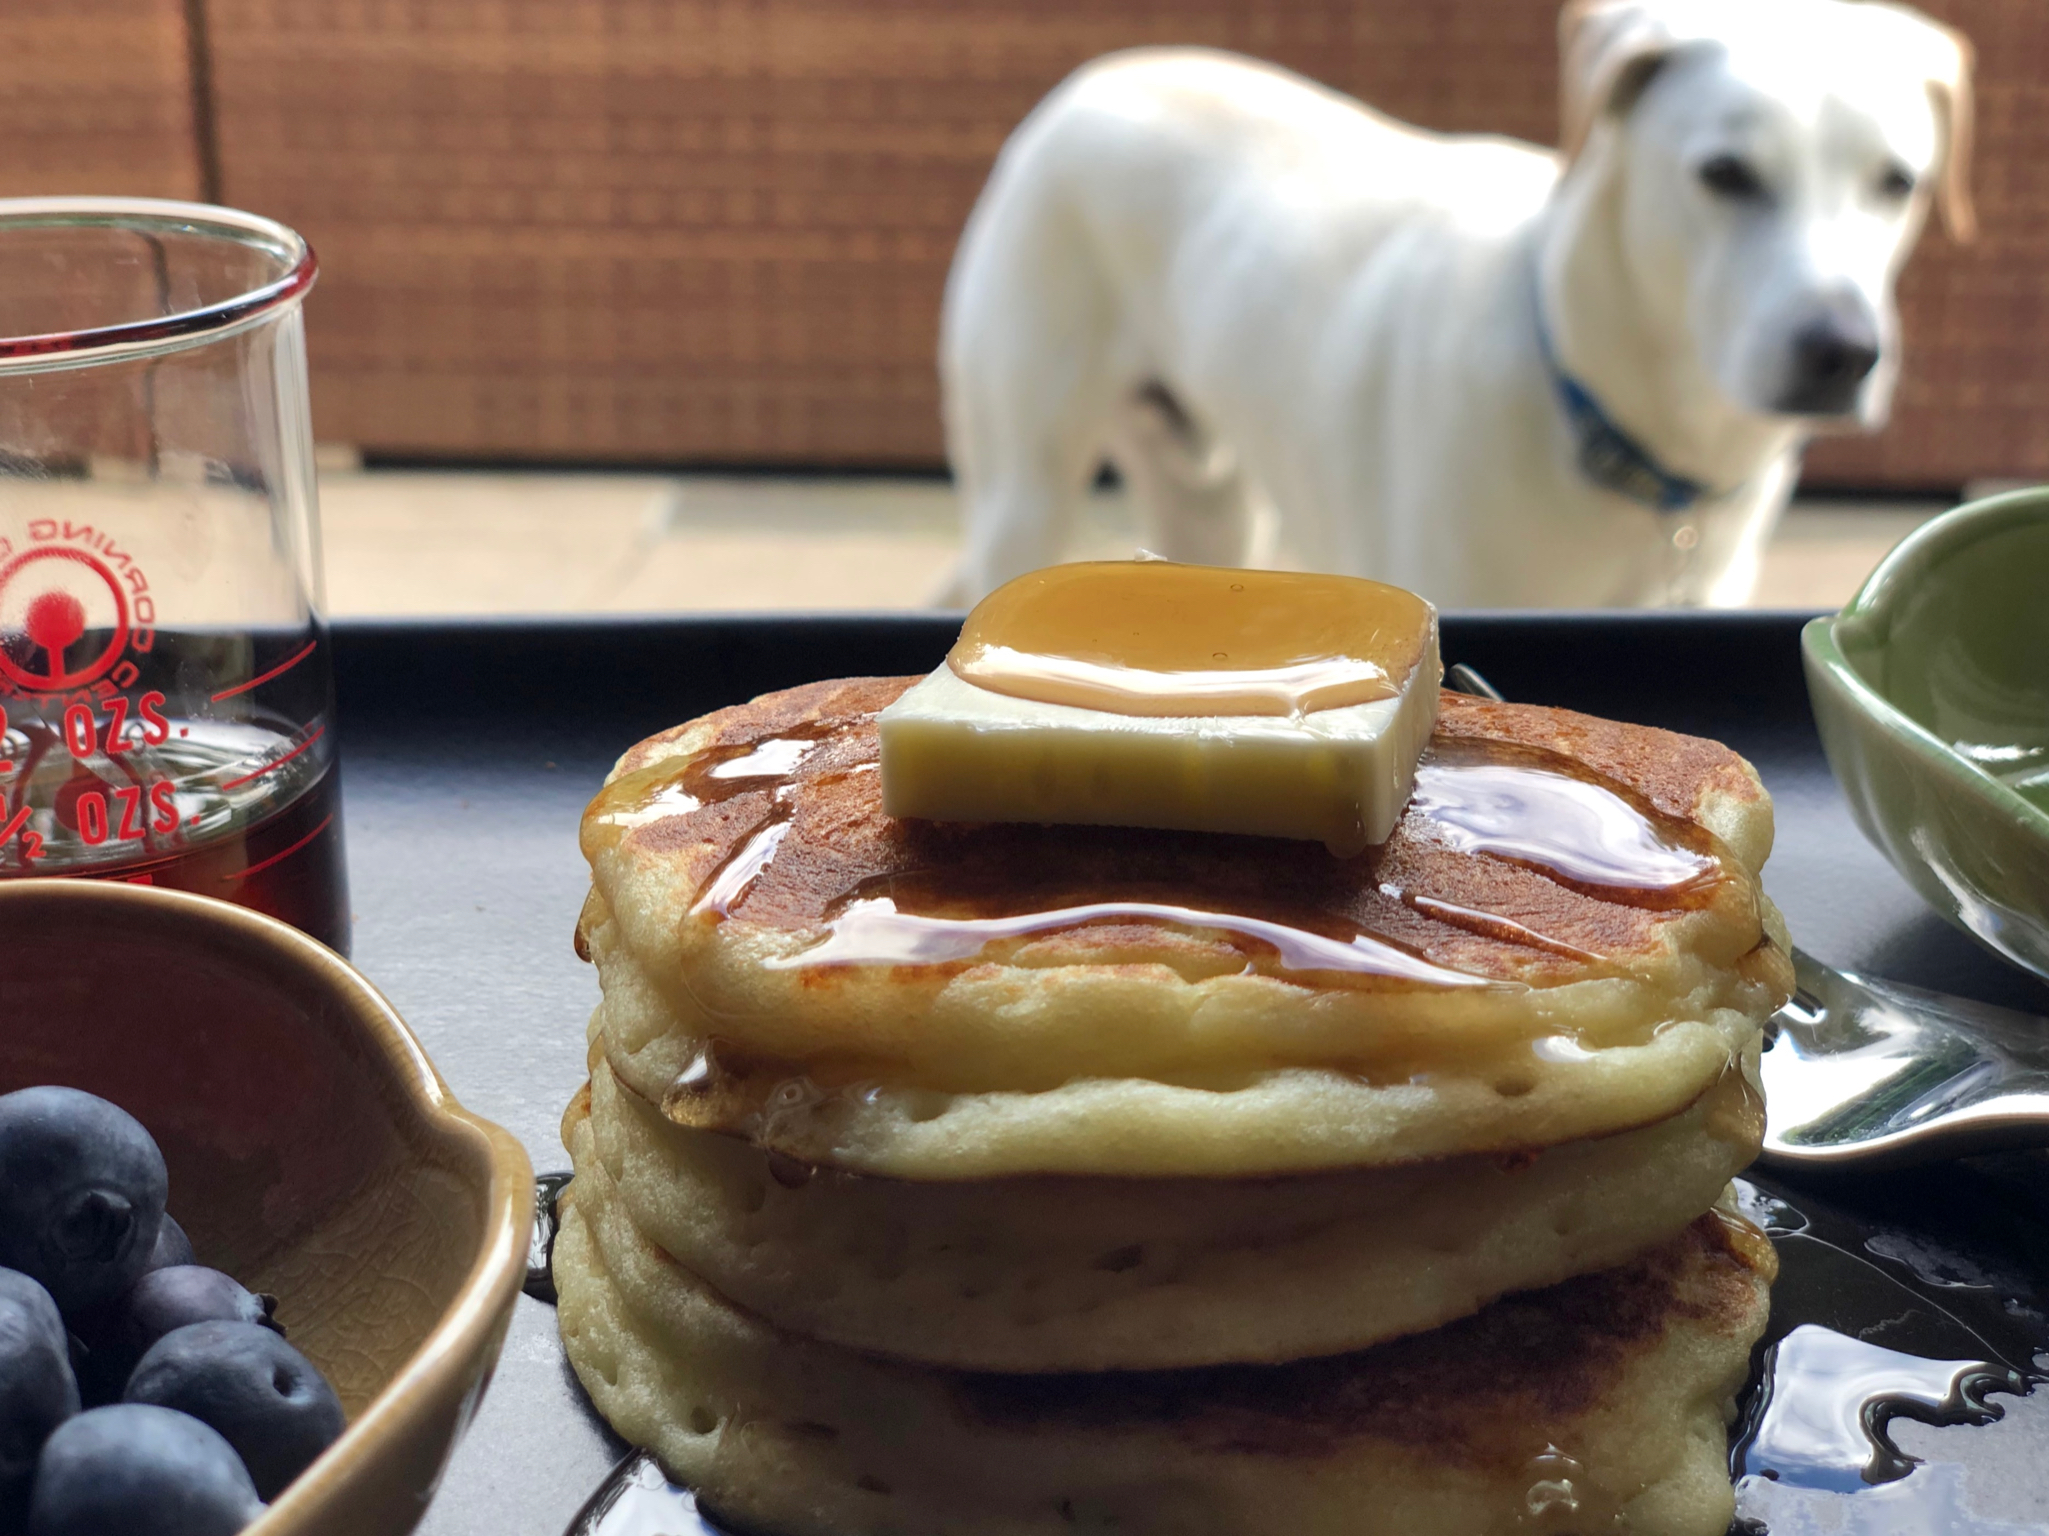
When we finally made it home, top on my breakfast bucket list (or due to my screwed up time-clock, dinner bucket list), PANCAKES of course.  I pulled out my current favorite cookbook, A Common Table by Cynthia Chen McTernan of the blog Two Red Bowls and flipped to her recipe for Buttermilk Mochi Pancakes.

Her little tweak is genius.  Using half all-purpose flour and half sweet rice flour, you end up with a light fluffy pancake with a nice, subtle, chew or elasticity and a tiny hint of that rice/mochi flavor.  It’s not eggy.  It’s pancakey!  I love it.  It’s delicious.  If you are a fan of the latest rage..mochi donuts and muffins, you’ll love these griddlecakes.

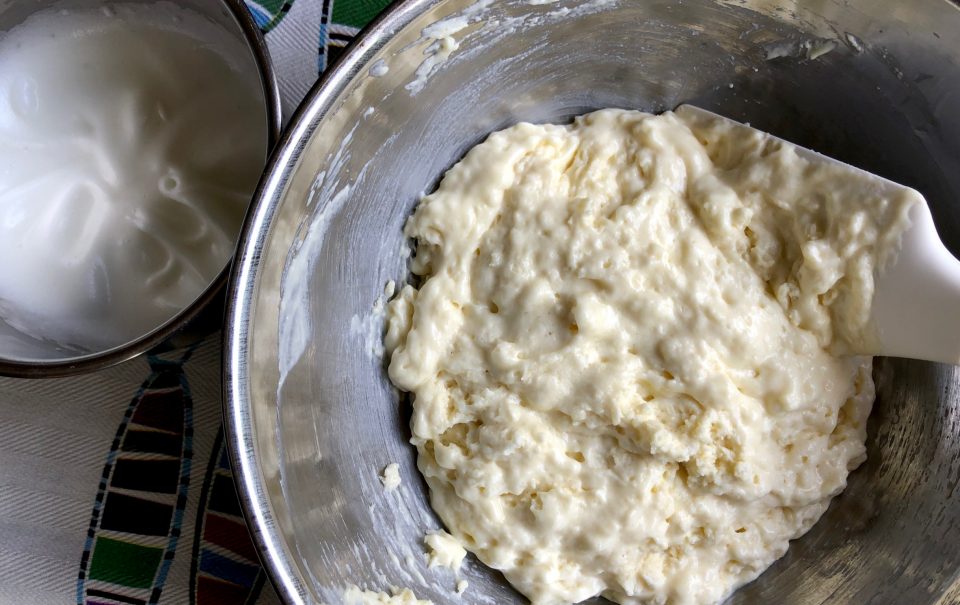
It’s an easy batter to whip up.  I did stray from the recipe a bit.  I decided to whip the egg white and gently fold it into batter.  The recipe calls for just adding in the unbeaten egg white, but whipping the whites hopefully, adds air and lightness to the batter so I took the extra step.

Mix wet ingredients with dry ingredients just to incorporate.
Whip egg white  until soft peaks and gently fold into batter
CHEAT tip: Use an ice cream scoop to dole out the batter.
If you use a non-stick pan, you won’t need oil or butter on your pan.

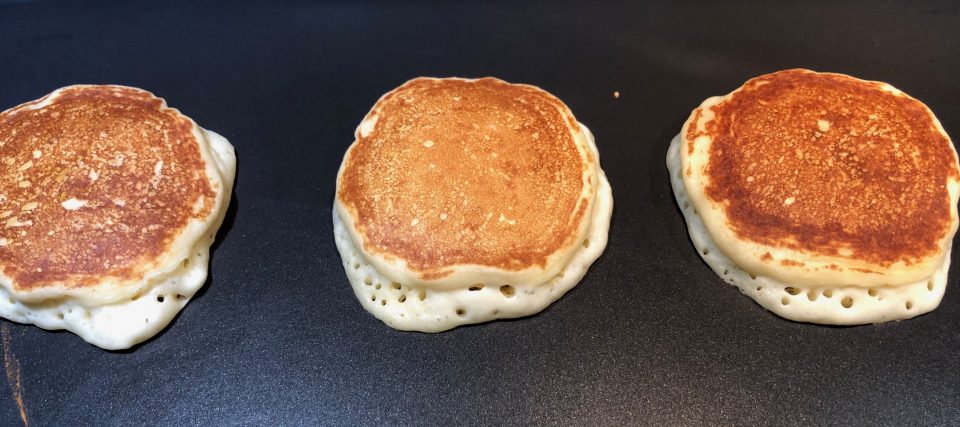
These babies are so badass.  You need to try them.  If you don’t have sweet rice flour, use 100% AP flour, you’ll get perfectly respectable traditional pancakes but really, get yourself some sweet rice flour.  You’ll thank me, plus you now have rice flour to make her delicious Peanut Butter Mochi.

Buttermilk Mochi Pancakes

Course Breakfast
Cuisine American
Keyword Butttermilk Mochi Pancakes
Prep Time 15 minutes
Cook Time 10 minutes
20 minutes
Servings 3

Ingredients

  • 1/2 cup 63gm all-purpose flour
  • 1/2 cup 70gm sweet rice flour like Mochiko Blue Star
  • 1 tablespoon sugar
  • 1 teaspoon baking powder
  • 1/2 teaspoon baking soda
  • 1/4 teaspoon salt
  • 1 large egg separated
  • 1/2 cup Greek yogurt whole yogurt
  • 1/2 cup milk of your choice I used 2%, I also warmed the milk before combining milk, butter and egg
  • 2 tablespoons unsalted butter melted and cooled, plus more for the pan and for serving
  • maple syrup or syrup of your choice for serving

Instructions

  • In a medium bowl, whisk together the flours, sugar, baking powder, baking soda, and salt.
  • Separate egg, reserve egg yolk in small bowl. Place egg white in a medium small bowl and whisk until soft peaks are formed.
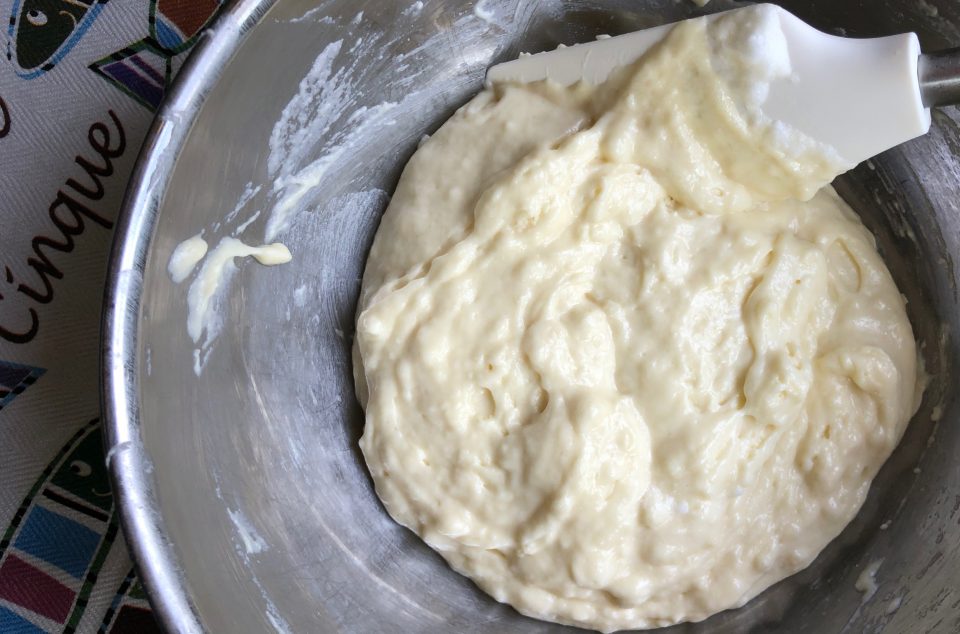
  • Add the egg yolk, yogurt, milk, and melted butter, and stir until just incorporated.
  • Gently fold egg white into batter.
  • Heat a 10-inch or 12-inch cast-iron or nonstick skillet over medium flame until a drop of water sizzles when it hits the pan. Lightly grease the skillet with butter (or flavorless vegetable oil), or if using a non-stick pan, forego greasing.
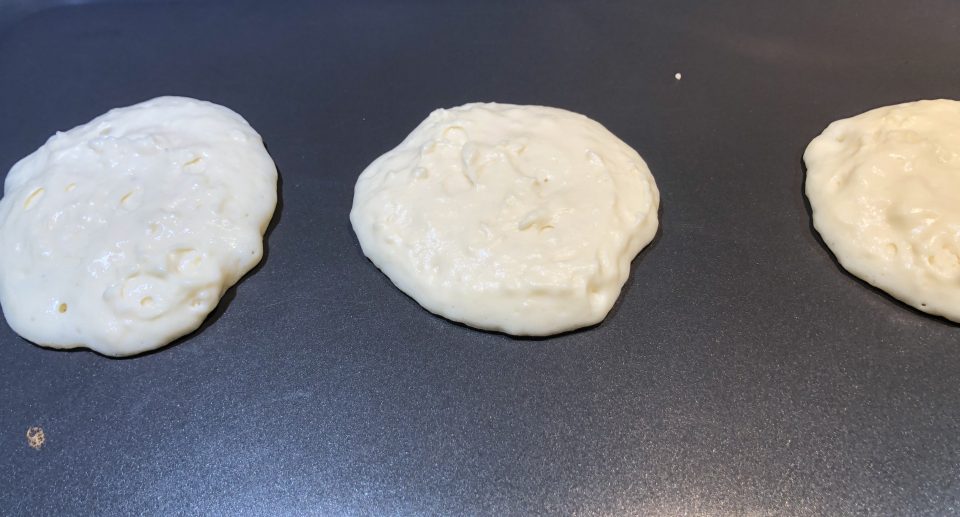
  • Use a measuring cup or a large ice cream scoop to drop 1/4 cup batter onto the pan.
  • When the edges of the pancake look dry and bubbles begin to form in the center, approximately 2 minutes, flip and cook on the second side until lightly golden, 1 to 2 more minutes.
  • Remove to a plate and repeat with the remaining batter. If desired, use an ovenproof plate (or a metal rack on a baking sheeand place the finished pancakes in the oven on its lowest heat setting to keep them warm while you cook the rest.
  • Serve immediately, with butter and maple syrup.

Notes

Add rice flour to your pancakes for a delightful twist! The rice flour adds a bit of elasticity and flavor while the pancake is still tender and fluffy. The best of both worlds for these mochi pancakes!
Tryin’ to Squash A Cold! (Instant Pot Butternut Squash Soup)

Tryin’ to Squash A Cold! (Instant Pot Butternut Squash Soup)

How does that old adage go? Feed a cold, starve a fever?  The thought crossed my mind as I was miserably lying in bed, achy, congested, and generally feeling like crap.  Thank goodness for laptops and search engines…I found a Scientific America article that addressed this very proverb and whaddya know, going all Mythbuster, Scientific America, not only debunked it, but concluded it really should be “Feed a cold, FEED a fever”.  Yeah baby, I love science.

What is the perfect antidote when it is cold, when you are sick, when you crave comfort, but you are too tired to fuss?  SOUP.  Am I right?  Yep, bowl therapy to the rescue.  It didn’t take long to find a soup that fit the bill.  From the blog Creative Bites, Pressure Cooker Creamy Butternut Squash Soup.  Lucky for me I had bought a butternut squash at the market and had all of the ingredients handy.  “Kold karma” pointed me to this quick (thanks to my Instant Pot) and easy, delicious soup.

Here’s the HARD part.  The PREP.  Yeah, no getting around peeling that butternut squash and dicing ALL THOSE vegetables.  Well,  I suppose you could buy pre-cut squash, diced onions and minced garlic, but that’s your call. It’s part of cooking therapy for me.

Butternut Squash soup Prep

NOW, the EASY part.  Prep was 90% of the game.  You’re now sitting pretty on 3rd base ready to score, just a mere minutes from homebowl. Get it?  I love the apples and red bell pepper, they add a nice sweetness.   Saute the veggies in your Instant Pot.  It’s important when you add the stock, really stir the bottom of pot to release all those bits of saute goodness.   The pot is very sensitive to bits stuck on the bottom and will turn off as a safety precaution if the bottom isn’t clean.  Add the stock, seal the pot, and then set the timer for 5 MINUTES.  Yep, five minutes and quick release at the end.  With the time it takes to come to pressure, you’re still only looking at 15 minutes of cooking time.  Not bad.

I used an immersion blender in the pot to puree the soup.  There are a lot of comments online about how it doesn’t work as well as a blender.  BUTTERNUTS.  Not creamy enough?  Throw the immersion stick back in and blend some more.  I’m willing to sacrifice a bit of creaminess (though I don’t think I am) to do this, as oppose to pouring HOT soup, in batches, into my blender.  I’m saving my blender for smoothies and Margaritas.

Butternut Squash Soup in Mugs

Go ahead and play around with this soup recipe. It’s very forgiving.  Got thyme?  Substitute for sage.  Got time?  Skip the Instant Pot, roast the vegetables instead.  See the prepped veggies above? Throw it all in a roasting pan, give it a good swig of olive oil, toss, salt and pepper and roast at 425 for about an hour).  The vegetables caramelize in the oven and add a sweetness to the soup that’s “souper” yummy.  Creative bites calls for goat cheese or cream cheese.  I like cream cheese because it adds a whole lot of mouth feel and just a slight tanginess.  You could probably use sour cream, creme fraiche or even just a touch of heavy whipping cream instead.  This would lighten the soup but you might lose that creaminess.

FINISH WITH TOPPING MADNESS.  Once your soup is done, garnish with ANYTHING your little heart desires.  Toasted nuts or pepitas, bacon, sliced apples, or more BACON, croutons.  Did I mention bacon?  I was sent a mix of nuts as a soup topping by my Food52 Holiday Gift Swap buddy- it was perfect.

Creamy Butternut Squash Soup Instant Pot

Course Soup
Cuisine American
Keyword butternut squash
Prep Time 15 minutes
Cook Time 15 minutes
Total Time 30 minutes

Ingredients

  • 1 Tbsp. olive oil
  • 1 large yellow onion diced
  • 1 red bell pepper chopped
  • 2 tsp. diced garlic
  • 1 tsp. fresh ground ginger
  • 2 lb. butternut squash peeled and cubed 1 medium squash
  • 1 medium apple peeled cored and chopped
  • 1 tsp. sage Substitute thyme or curry powder
  • 1/8 tsp. chili powder
  • 1/4 tsp. sea salt
  • 3 c. chicken stock I used additional cup to thin down the soup a bit
  • 3 oz. cream cheese Sub goat cheese
  • 1/3 c. Parmesan cheese
  • Salted Pepitas for garnish Or anything you like, like BACON BITS, spicy nuts, chives, sliced apple, sautéed wild mushrooms...
  • 1 Tbsp Brown sugar, optional To add roasted squash’s sweetness

Instructions

  • Turn on the Saute function on Instant Pot. Add the olive oil, onions and bell pepper. Saute on high for 4 minutes. Add the garlic and ginger and cook for 1 minute. Add the cubed squash, apple, sage, chili powder, sea salt and chicken stock.
  • Place the lid on your Instant Pot and move the knob to seal. Cook on high pressure for 5 minutes and do a quick release of the pressure.
  • Using an immersion blender in the Instant Pot, puree the mixture. Add the cream cheese and Parmesan, stir to melt and continue to puree until very smooth.
  • Garnish and serve.
Instant Pot Easy Kheema Pulao (Spicy Indian Rice Dish)

Instant Pot Easy Kheema Pulao (Spicy Indian Rice Dish)

Sometimes other events dominate your life for a bit…but I’m back!

After weeks of knocking on doors to get out the vote, I was ready for some downtime.  I drove home from Bakersfield (four hours each way, ugh) and wanted to chill and enjoy some home cooked food.  As yummy as it is, (Wo)”Man”(me) cannot live on taqueria fare alone. I arrived home right around the dinner hour so I needed something quick and easy to make, but still comforting and delicious. I pulled out my Instant Pot, clicked on Ministry of Curry “Kheema Pulao” (think Indian version of a mixed rice dish) in my saved links, and voila’ 40 minutes later I was curled up on the couch, watching my favorite K-drama (Goblin), spooning hot, spicy pulao into my mouth.  Ahhh, my reward for doing my part to save Democracy…and that’s all I will say about that (thanks, Forrest).

Kheema Pulao

I love Biryani, a spicy Indian Rice dish that is both complex in flavor and in preparation. That means going to a restaurant and letting them make it for me. My job is to enjoy every bite. On the other hand, pulao is a simple version of a biryani, easily made at home and delicious.  Vegetables, ground meat, aromatics, and spices are sauteed, then rice is added along with water or stock. A touch of sweetness from the cinnamon and onions, spicy from the ginger, garlic, and chili, then finished with cilantro and lime.  Welcome to Flavortown.  So good.

Kheema means minced or ground, in this recipe, ground chicken is used but you could use turkey or beef.  The flavors are infused into the meat and the ground chicken cooks quickly, win-win.  The rate-limiting step would be the time it takes for the rice to cook which, ta-da, is shortened by using your Instant Pot, PLUS the entire dish is done in one pot…no muss, no fuss, I’m doing the happy dance now.

Saute’ ingredients in the pot.


Add liquid and rice, cover, seal, set for 5 minutes, wait 5 minutes then quick release and done.  How easy is that?

Kheema Pulao finish

Garnish with cilantro and lime to make it pretty.

Add this to your things to make in my Instant Pot.  Really.

Kheema Pulao

A one pot meal made with long grain basmati rice cooked with ground chicken and a host of aromatics ginger, garlic, onions, bay leaves, black pepper, cumin seeds and cinnamon.  A flavor explosion. Adapted from Ministry of Curry
Course Main Course
Cuisine Indian
Keyword Kheema Pulao
Prep Time 15 minutes
Cook Time 30 minutes
Total Time 45 minutes
Servings 4 people
Calories 422kcal

Ingredients

  • 2 tablespoons ghee
  • 1 teaspoon shah jeera or cumin seeds
  • ½ teaspoon black peppercorns
  • 2 inch cinnamon stick
  • 2 bay leaves
  • 1 medium onion thinly sliced
  • 1 teaspoon ginger grated
  • 1 teaspoon garlic grated
  • 1 pound ground chicken can use , beef or turkey
  • 1 tomato, diced
  • 1 teaspoon red chili powder
  • ¼ teaspoon turmeric
  • Handful of mint leaves chopped
  • 2 teaspoon kosher salt
  • 1 cup long grain Basmati rice
  • 1 ½ cups water

Garnish

  • 1 lime
  • ½ cup cilantro chopped
  • 1 teaspoon black pepper freshly ground

Instructions

  • Set the Instant Pot to sauté(more) mode and heat ghee. Add cumin seeds, black peppercorn, cinnamon and bay leaves. Saute for 30 seconds.
  • Add onions and sauté for 5-8 minutes or until the onions start to brown. Add ginger, garlic and chicken. Sauté, breaking the chicken and browning it for a minute. Add tomatoes, red chili powder, turmeric, mint leaves, and salt. Mix well.
  • Add rice and water. Gently mix making sure all the rice is under the liquids. Close the Instant Pot lid with pressure valve to sealing. Cook on Manual /Pressure cook (Hi) 5 mins with 5 min NPR.
  • Open the Instant Pot and gently fluff the top rice (Note, if the rice looks uncooked on the top, just mix it with the rice under and close the Instant Pot for 5 minutes)
  • If rice seems a little wet, let it sit for a couple of minutes, top open.
  • Add lime juice, cilantro and black pepper. Turn the Instant Pot off and take the insert out so the rice does not overcook or get mushy. Enjoy hot.
Karma’s a Batch…of Meyer Lemon Scones

Karma’s a Batch…of Meyer Lemon Scones

I got up this morning with scones on the brain.  A while ago I had come across a recipe on the blog Dessert for Two for Small Batch Meyer Lemon Scones. They looked delicious.  I filed it away under the “I should try these cause they look yummy” recesses of my mind.  This past weekend my goal was to clean and reorganize the fridge (inspired by Sam Kass’s new book). As luck would have it, squirreled away in the back of the crisper drawer I found a forgotten bag of Meyer Lemons from my baking buddy, Kathy.

Karma, I was Meant to Make These Scones.

The recipe makes four more-than-generous scones so my first change was to make six instead.  A nice size to accompany a breakfast plate or on its own as an afternoon tea treat. You can whip up a batch in no time flat and that’s without using a mixer. The keys are to keep everything as cold as possible and to not overwork the dough.  The mantra for any scone, biscuit, or pie dough.

I used a pastry cutter to mix the butter in the flour.  The butter should be in small pieces no bigger than petite peas.  Add the wet ingredients and blend together.  The mixture will not hold together but will be shaggy.  Pour onto a parchment-lined cookie sheet.  Fold and compress the dough to form a disc.  The heat of your hands will help the dough clump together.  Cut the disc into four to six pieces.

Separate the scones and paint the tops with heavy cream.  Bake until golden.  I made the icing but it didn’t stand out on the scones. It did add a nice sweet-tart finish though.

Meyer Lemon Scones

These scones are tender, buttery, and lemony sweet.  The perfect beginning or ending to a day.  It’s a good thing this is a small batch recipe…I’d be tempted to eat them all.

Karma’s a Batch…of Meyer Lemon Scones

A lovely buttery, light, lemony scone from Dessert for Two that is easy to make, a perfect weekend morning pick me up.
Course Biscuits and scones, Breakfast
Cuisine American
Keyword Cream Scones, meyer lemon scones, Meyer lemons
Prep Time 15 minutes
Cook Time 15 minutes

Ingredients

Dry Ingredients

  • 1 1/4 cup all-purpose flour
  • 1/4 cup sugar
  • 1/4 teaspoon salt
  • 1/4 teaspoon baking soda
  • 1 teaspoon baking powder

Wet Ingredients

  • 4 tablespoons unsalted butter cold
  • 1/3 cup + 2 tablespoons heavy cream plus extra for brushing
  • 1 large egg yolk
  • zest of 2 Meyer lemons* I'm thinking grapefruit or reg lemons would work well too.

For the optional glaze: Try not to skip it, it is a nice finish.

  • 1/3 cup powdered sugar
  • 1 teaspoon heavy cream
  • 2 teaspoons freshly squeezed Meyer lemon juice

Instructions

  • Preheat the oven to 400 degrees
  • In a medium bowl, stir together the flour, sugar, salt, baking soda, and baking powder.
  • Dice the butter and add it to the flour mixture. Work the butter into the flour mixture until it's evenly distributed and smaller than peas. Use two knives, a pastry cutter, or your fingertips (quickly squeeze the butter pieces between your fingers pressing them into little flakes.
  • Whisk heavy cream, egg yolk and lemon zest in a small bowl. Pour ontothe flour mixture and stir until a shaggy dough forms. Don't overmix, but incorporate things well.
  • Scoop the dough out, place it on the baking sheet, and use the warmth of your hands to fold and press dough together until it sticks together into a round disc form.
  • Cut the dough circle into 4-6 even pieces. Brush each piece with extra heavy cream. (Cut by pressing knife in one downward motion, don't use a sawing motion which will cause uneven rising)
  • Bake for 13-15 minutes, until a toothpick inserted comes out clean and they lightly brown on the edges.
  • While the scones bake, whisk together the glaze ingredients.
  • Glaze the scones when cool.
NOM-NOM-licious Chicken and Gravy (Instant Pot Chicken and Gravy)

NOM-NOM-licious Chicken and Gravy (Instant Pot Chicken and Gravy)

AN HOUR AND A HALF commute home from work left me cranky and hungry.  I slammed my stuff down on the kitchen table and headed to the fridge, yanked the door open and searched for something quick to make for dinner.  I found a whole chicken I had bought the day before and thought ugh, that will take a while…I WANT TO EAT NOW.  Lightbulb moment, I remembered I had saved an Instant Pot recipe for Chicken and Gravy from NOM NOM Paleo.  Quick and easy, the perfect solution for my dinner dilemma. Though not a strict Paleo diet follower, I do like the NOM NOM cookbook and blog and I have an affinity for the NOM NOM author (plus I love saying NOM NOM).  Like me, she is a pharmacist by trade, a fellow drug pusher-legit ones, lol.  There is a natural crossover between being a pharmacist and being a cook or baker.  Numbers, measurements, proportions, being a bit OCD- all part of both professions.

A few easy steps and dinner is on the table in 44 minutes and 37 seconds at most.  See, pharmaceutical precision.  While the chicken is cooking, make some rice or egg noodles to go along or if you want to keep this a paleo meal, make cauliflower rice or potatoes (Po-ta-toes! Boil them, mash them, stick them in a stew. Lovely big golden chips with a nice piece of fried fish-that line pops in my head every time). The sauce is so yummy you will want something to soak up every drop.

The recipe calls for browning the chicken in your pressure cooker, taking it out and sautéing onions, garlic and a bit of tomato paste, putting the chicken back in the pot, on top of the onions, adding a bit of broth and setting the pot timer to 20 minutes cooking.  Yep, that’s it.

Saute onions and garlic until soft.

Add tomato paste and broth to pot. Place a wire rack on top to hold the chicken.  You can add a bit of herb for additional flavors such as a sprig of thyme, oregano or rosemary. Just to kick it up a bit.

After removing the chicken (and fresh herb sprigs), use a hand blender to puree the onion-garlic mixture which becomes the luscious gravy-yum yum. The original recipe calls for thickening the sauce but I didn’t bother.  I wanted to dig in!  So delicious!!!!!

Dinner is served and definitely elevated my mood, happy, happy, happy.

NOM-NOM-licious Chicken and Gravy

Ingredients

  • Adapted from Nom Nom Paleo
  • 1 4-pound organic chicken (a bigger chicken won’t fit in a 6-quart Instant Pot)
  • 1.5-2 teaspoons kosher salt if using table salt, cut amount to 1 teaspoon
  • ¼ teaspoon freshly ground black pepper
  • 2 tablespoons of ghee or vegetable oil divided
  • 2 large yellow onions diced (or use 1 yellow, 1 red)
  • 6 garlic cloves peeled
  • 2 teaspoons tomato paste
  • ½ cup chicken stock
  • 1 tablespoon cornstarch mixed with 2 T water

Instructions

  • Sprinkle 2 teaspoons salt and ¼ teaspoon pepper all over the chicken, inside and out. Tuck the wings behind the back.
  • Add 1 tablespoon of ghee or oil to the pressure cooker, press “Sauté” function on your electric pressure cooker.
  • When the fat is shimmering, sear the chicken breast-side down in the center of the pot for approximately 5 minutes or until lightly browned.
  • Flip the bird breast-side up. Cook for another 5 minutes or until browned on the back. Don’t worry if the skin sticks and tears—the skin won’t be crispy when you’re done cooking anyway. You’re just browning the skin to deepen the flavor of the gravy.
  • Transfer the chicken to a plate and add the remaining tablespoon of ghee or oil to the pot. Once it is heated, toss in the chopped onions, 6 garlic cloves, and a sprinkle of salt.
  • Cook for 1 to 2 minutes or until softened.
  • Stir in 2 teaspoons tomato paste and cook for about 30 seconds.
  • Turn off the sauté function. Pour in ½ cup broth, scraping up any browned bits.
  • Add steamer insert to the bottom of the pressure cooker, and lay the bird on top of it, breast-side up. Cover and pressure-cook on high for 20 minutes).
  • Turn off the electric pressure cooker, and immediately release the pressure manually. Open the lid and transfer the chicken to a plate or carving board. Tent the cooked bird with foil, and rest it for 10 minutes.
  • Use an immersion blender to purée the contents of the insert to make a smooth gravy. Season to taste with salt and pepper.
  • If you want to thicken the gravy, mix 1 tablespoon cornstarch with 2 tablespoons water. Then, turn on the sauté function and bring the contents to a simmer. Stir in the arrowroot powder slurry and cook until thickened.
  • Carve the chicken and top with gravy. Garnish with parsley if desired.
  • Make sure to have a ginormous bowl of rice or buttered noodles to serve along side..just for the extra gravy!
So Eat It, Just Eat it (Roasted Cauliflower with Cumin, Turmeric and Lemon)

So Eat It, Just Eat it (Roasted Cauliflower with Cumin, Turmeric and Lemon)

When I was a kid there was a definite hit list of vegetables we absolutely hated.  My brother and I had all sorts of tricks to avoid eating them.  We would stuff our mouths full of peas, run to the bathroom and spit them out.  We weren’t too big on brussels sprouts or cauliflower either, we would drop them in our napkins and again run to the bathroom to toss them out.  In defense of these veggies, our vitriol came not from the veggies themselves, but from the method of preparation.  Peas were often from a can (uh-huh, how many of you remember canned peas, greenish-gray mush balls-bleah). Cabbage and cauliflower were boiled-just the smell emanating from the kitchen would make us run and hide.  Brussels sprouts were absolutely horrible, bitter, sulfurous, and barely edible.

These days the quality of today’s produce is so much better. We can go to our local farmer’s market and find just picked brussels sprouts and cauliflower, vine-ripened tomatoes or corn that was still on the stalk that morning.  We have also discovered new ways to cook said vegetables that are INFINITELY better than boiling or steaming.

FOR EXAMPLE. I love roasted vegetables.  Roasting brings out the sweetness in veggies like cauliflower or brussels sprouts, making them absolutely delicious. Perusing Meera Sodha’s Made in India I came across a recipe for Roasted Cauliflower with Cumin, Turmeric, and Lemon. My first thought? Oh yeah, SO making that.

The recipe, like many in the book, calls for a mortar and pestle to grind the spices.  I know what you are thinking, oh please, you don’t have a mortar and pestle do you?  Way back when I graduated from pharmacy school I received a set of spatulas from Eli Lily (pharmaceutical gorilla) and a mortar and pestle.  They have served me well…just not in my profession.  The spatulas and the mortar and pestle were long ago re-purposed and added to my culinary gadget collection.  The mortar and pestle proved to be the perfect tool for grinding spices and making the spice paste for this dish.

The cauliflower is blanched for a quick minute, seasoned with the spice oil which gives it a vibrant golden yellow hue.  Pop it in the oven for a quick roast and yep, dunzo, dinner is ready.  A bowl of warm cauliflower, crispy on the edges, creamy in the center seasoned with cumin and turmeric in just thirty minutes.  I am thinking about adding cubed potatoes the next time I make this, a riff on Aloo Gobi.

Excuse me it’s time for me to run TO the dinner table.

Roasted Cauliflower with Cumin, Turmeric and Lemon

Ingredients

  • 1 large head of cauliflower around 1 1/4 pounds
  • 2 teaspoons cumin seeds
  • 1 to 1 1/4 teaspoons salt
  • 1 teaspoon chili powder
  • 1/2 teaspoon ground turmeric
  • 5 tablespoons canola oil
  • 1 lemon

Instructions

  • Preheat the oven to 350 degrees. Line two oven trays with foil and bring a deep-sided pan of water to a boil.
  • Wash the cauliflower, pull off the leaves from around the side, and discard. Break the cauliflower into small, fairly even-sized florets and set aside.
  • Put the cauliflower into the saucepan of boiling water and blanch for 1 minute, then drain really well. Let it dry for around 5 minutes in its own steam; if it is waterlogged it won’t crisp up nicely in the oven.
  • Using a mortar and pestle, grind the cumin along with the salt, then add the chili powder and turmeric, followed by the oil. Mix it all together really well.
  • Lay the cauliflower out onto trays in one layer and drizzle the spicy oil over it. Make sure the cauliflower is well coated
  • Put trays in the oven for around 30 minutes, shaking them every 10 minutes or so to ensure the florets roast and brown evenly. If they start to burn, loosely cover them with foil.
  • Put the roasted cauliflower in a dish or bowl, and squeeze the lemon over the top before serving.
  • Adapted From “Made in India” by Meera Sodha

Happy birthday Claire!

Soured by Cookies, Saved by Lemon Cake

Soured by Cookies, Saved by Lemon Cake

I tried a couple of new cookie recipes recently and as the saying goes, you win some you lose some.  The first recipe Malted Milk Chocolate Cookies came from a book I received to review, Holiday Cookies.  Decidedly MEH.  The malt flavor was barely discernible and the milk chocolate did not stand out.

Another Cookie Bust

A few days later with the fall season in full swing, a recipe for pumpkin snickerdoodles popped up on my feed. Never get swept up by fall pumpkin fever.  But they looked delicious so I baked a batch.  I waited for the first batch to cool, grabbed one off the rack, and took a bite…MEH.  Noooo, another cookie bust.  Little pumpkin or spice flavor, very nondescript.

It’s Not a Lemon

A new recipe caught my eye, not a cookie but a cake recipe.  Food52 posted a lovely lemon poppy seed cake from Ottolenghi.  I am a sucker for lemon and poppy seeds.  Hoping my luck would change, and having the utmost confidence in Food52 and Ottolenghi, I decided to make the cake.  After all, I can’t have three lemons in a row, even if the last recipe actually calls for lemons.

The cake is quick and easy. The recipe starts with beating eggs and sugar together until thick and frothy. Heavy cream is then added to the egg and sugar blend. I took the heavy whipping cream straight out of the fridge and with the mixer running, added it in a steady stream to the egg mixture. Beat until it has the consistency of pancake batter. The flour is then folded in along with the melted butter, lemon zest, and poppy seeds. The recipe calls for 3 lemons to make 1 tablespoon lemon zest but I only needed two good sized lemons and that’s with really packing the measuring spoon (because I LOVE lemon). The lemon was not overpowering. While the cake was baking, I made the lemon icing.  Easy peasy lemon squeezy.

Spread the icing over the top as soon as you remove the cake from the oven.  Do not even think of forgoing the icing.  It adds that sweet-tart lemony oomph and creates a beautiful glossy sheen.  The cake has a nice crumb and is denser than say a sponge cake but lighter than a traditional pound cake. If you are a poppy seed addict you could increase the amount as you like. Thankfully this cake saved my week of baking.  From cookie bust to cake champ. Sweet success.

Bookmark this cake and make it soon, you’ll thank me.

Lemon Poppy Seed Cake (National Trust)

An easy, absolutely delicious lemon poppy seed cake from Ottolenghi
Course Cake, Dessert
Cuisine British
Keyword banana cake, lemon, poppyseed
Prep Time 20 minutes
Cook Time 1 hour
Cooling time 16 minutes

Equipment

  • 1 standard loaf 9x5 loaf pan

Ingredients

The Dry Stuff

  • 1 1/3 cups all-purpose flour 170 grams
  • 1 1/4 teaspoons baking powder
  • 1/4 teaspoon salt

The Wet Stuff

  • 3 large eggs
  • 1 cup plus 2 tablespoons granulated sugar 225 grams
  • 1/2 cup heavy cream, cold 120 milliliters

Butter Mixture

  • 5 tablespoons 70 grams unsalted butter, cubed, plus extra for greasing
  • 1 -1.5 tablespoon poppy seeds
  • 1 tbsp Finely grated zest of 3 lemons I needed only 2 lemons

The Icing

  • 3/4 cup 90 grams confectioners' sugar, sifted
  • 2 tablespoons lemon juice

Instructions

  • Heat the oven to 350° (180° C).
  • Grease the loaf pan(s) and line with parchment paper, then set aside.
  • Sift the flour, baking powder, and salt together into a bowl, then set aside.
  • Melt the butter in a small saucepan over low heat, stir in the poppy seeds and lemon zest, and set aside.
  • Place the eggs and granulated sugar in the bowl of an electric mixer fitted with the paddle attachment and beat on medium-high speed for about 2 minutes, until pale and frothy.
  • Add the cold whipping cream and continue to beat for about 2 minutes, until the mixture has combined, thickened a little, and turned pale.
  • Use a rubber spatula to fold the dry ingredient mix into the egg mixture. Then fold the melted butter, poppy seeds, and zest mixture in.
  • Spoon the mixture into the loaf pan(s) so that it rises three-quarters of the way up the sides.
  • Place on a baking sheet and bake for about 50 minutes, or until a skewer inserted into the center comes out clean.

The Glaze

  • To make the glaze, whisk the confectioners' sugar with the lemon juice in a bowl. Pour the glaze over the top of the cake as soon as it comes out of the oven, spreading it over the top so that it sinks in and creates a nice coating.
  • Set aside to cool for 30 minutes before removing from the pan.
  • Let it come to room temperature before serving.
TGI Friday: Dinner and A Movie (Picadillo)

TGI Friday: Dinner and A Movie (Picadillo)

Do you remember TBS’s Dinner and A Movie Night on Friday nights?  During each commercial break hosts Paul and Janet and their resident chef would prep and cook a dish that thematically went along with the movie being aired (prime example-Russell’s Mussels for the movie Gladiator).  Silly banter, fun factoids about the movie and cooking tips plus a movie…pretty nifty?  Fast forward a lot of years-babies, kids, teens, gray hair, thinning hair, expanding waistlines, empty-nest and our Monday mom’s coffee klatch has resurrected Friday night Dinner and a Movie.

We started with Big Little Lies, best described as the Housewives of Monterey gone batsh*t crazy and moved on to The Handmaid’s Tale. Based on Margaret Atwood’s book it takes intensity and darkness to a new level.  Luckily cocktails and dinner after each airing helps lighten the mood.  A combination of factors including work and not being able to stomach a dystopian world (it hits a little too close to real life) I show up, along with the hubbies, just in time to enjoy drinks, dinner and conversation.  I rationalize my absence from watching with the feeble excuse “I read the book once upon a time”.

Dinners are potluck and lucky for me Stephanie brought one of her favorite dishes, Picadillo. Its roots are Latin, regional versions can be found from Mexico to Cuba. It’s a delicious mixture of ground beef, sautéed with tomatoes, seasoned with bay leaves and raised to flavor-town by, drum roll please, olives and raisins. The briny tartness from the olives and that little pop of sweetness from the raisins makes this dish a stand out.

Mind blown…never dreamed I would be enamored with a savory dish that included raisins and olives.  Not only is it delicious it is also easy to prepare.  Served with steamed coconut or brown rice and fried plantains this is a simple, beautiful meal.

Stephanie’s recipe is adapted from Cooking Light that includes generous amounts of finely diced carrots and bell peppers not always found in traditional Picadillo. Think of this as Picadillo Light. The dish can be lightened even more by substituting ground turkey or chicken for part of the beef (I would definitely keep it at least 50% beef though).

I perused other recipes for Picadillo and found some included other spices including cumin, oregano, cinnamon, chili, and cloves.  I enjoy the simplicity and the clean bright flavors of Steph’s recipe but I love cumin and cinnamon.  Next time.

Picadillo

Ingredients

  • 2 pounds ground beef or a combination of ground beef and turkey or chicken
  • 1 tablespoon olive oil
  • 1 1/2 cups thinly sliced onion
  • 1 garlic clove minced
  • 1 1/2 cups 1/4-inch-thick slices yellow bell pepper, each slice cut in half
  • 1 1/2 cups 1/4-inch-thick slices red bell pepper, each slice cut in half
  • 1 cup finely chopped carrot
  • 3/4 cup golden raisins
  • 1/2 cup dry white wine
  • 1/4 cup sliced pimento-stuffed manzanilla or green olives about 15 olives
  • 2 tablespoons balsamic vinegar
  • 1 1/2 teaspoons salt
  • 1/8 teaspoon black pepper
  • 2 bay leaves
  • 1 14.5-ounce can no-salt-added stewed tomatoes, undrained
  • 1 8-ounce can no-salt-added tomato sauce

Instructions

  • Cook beef in a large nonstick skillet over medium-high heat until browned; stir to crumble. Remove from pan; drain well.
  • Add oil to pan. Add onion and garlic; sauté 3 minutes. Add bell peppers and carrot; sauté 3 minutes. Return beef to pan. Stir in raisins and remaining ingredients; bring to a boil. Reduce heat; simmer for 15 minutes, stirring occasionally. Discard bay leaves.


Strawberry Squared (Strawberry Bread)

Strawberry Squared (Strawberry Bread)

The problem with going to the Farmer’s Markets is I end up with way more than we will be able to finish.  As I walk through the market everything looks so delicious and smells so good. The aroma of sun ripened fruit is intoxicating, the variety of greens and tomatoes are mind boggling, every where I turn I see or smell something that I just have to try.

The old adage “my eyes are too big for my stomach” fits me perfectly.  I return home from my market excursion, bag brimming with way too many things and in quantities that make me slap my forehead and wonder “what was I thinking”.  I don’t just have one basket of strawberries (the perfect amount for Wes and me) but a three pack (way too many).

By mid-week I am hunting for recipes that contain strawberries.

I came across this Strawberry Bread recipe in Saveur magazine.  A luscious quick bread that called for not only fresh strawberries but strawberry jam.  Strawberry squared!  It looked and sounded heavenly so I quickly pulled out my loaf pans, my baskets of strawberries and set to work making this bread.  In a wink I had the batter made (the beauty of quick breads) and I was sliding the pans into the oven.

I no longer have to worry about buying too many berries at the market.  This bread is delicious.  It is moist, slightly tart from the fresh berries, sweet from the jam that I swirled into the batter and bursting with strawberry flavor. The cinnamon adds just a hint of spice. I imagine this bread would lend itself well to other fruits. I have plans to try this with the nectarines currently sitting on my counter.

This bread is great warm just out of the oven but it’s also wonderful with a cup of tea or coffee, toasted and spread with a bit of butter.

Boy I love summer.


Strawberry Loaf Cake

Ingredients

  • MAKES 2 LOAVES
  • Ingredients
  • Unsalted butter for greasing pans
  • 3 cups flour plus more for dusting
  • 1 tsp. baking powder
  • 1 tsp. ground cinnamon
  • 1 ⁄2 tsp. kosher salt
  • 2 cups sugar
  • 1 1 ⁄4 cups canola oil
  • 4 eggs
  • 4 cups roughly chopped strawberries substitute peaches or nectarines
  • 1 ⁄2 cup strawberry jam optional or peach jam

Instructions

  • Heat oven to 350°. Grease 2 (9" x 5" x 2¾") loaf pans with butter and dust with flour; set aside. Whisk flour, baking powder, cinnamon, and salt in a large bowl; set aside.
  • In a separate bowl, whisk sugar, oil, and eggs.
  • Pour wet ingredients over dry ingredients and whisk until just combined.
  • Stir in strawberries and pour batter into prepared pans. If using jam, spoon ¼ cup over each loaf and using a knife, swirl jam into batter.
  • Bake until golden brown and a toothpick inserted in the middle of the loaves comes out clean, about 1 hour.
  • Let cool for 30 minutes before slicing and serving.