Tag: cookies

Snickerdoodles (Alice in Cookiewonderland)

Snickerdoodles (Alice in Cookiewonderland)

It has been 1610 days since I sat down and penned my inaugural post, Jamigos 2.0 to launch 3jamigos.  As I reflect on that number all I can think is WHAT TOOK ME SO LONG TO INCLUDE MY FAVORITE COOKIE?  I mean, sheesh, of the 100 cookie recipes I have posted, it doesn’t include my all-time favorite non-shortbread cookie (notice how I slipped in that qualifier, shortbread=cookie perfection).  Unbelievable, and how did I discover this faux pas?

I was tasked with making cookies for an End of Summer Party for our political action group (sanity saver).   I automatically went to my blog and typed in S N I C K E R D O O D L E S in the search box and waited, NOTHING popped up.  A quick search of my cookie index revealed, what the heck, no Snickerdoodles.

Are you kidding?

I’ve never posted Snickerdoodles on my blog?  Hellooo, time to fix that.  I got busy, made a batch for the meeting, snitched a couple to have with an ice-cold glass of milk, and sat down to write this post.

EVERYONE needs a scrumptious recipe for Snickerdoodles.  Buttery, sweet and spicy, crispy edges, soft chewy center,  finished with cinnamon sugar.  The quintessential cookie.  My favorite recipe comes from the cookie maven, Alice Medrich.  Unlike other recipes I have seen, hers are made with just butter. Yep, no shortening in these bad-boy bites of sweet cinnamon bliss.  The recipe is from her small but mighty book, Cookies and Brownies, long out of print but available on the secondary market. The book is worth getting just for this and her Lemon Bar recipe. Well written with easy-to-follow directions, it’s a keeper.  My copy is frayed and tattered, well worn from use.

Cream butter and sugar together to smooth but NOT fluffy.  Add eggs, beat until blended.

Add flour and stir just until combined.  Don’t overmix.  The mixing changes the consistency of the cookie.  Fluffy butter-sugar mixture gives a cakier cookie, go for smooth and creamy.  After adding the flour mixture do not beat the dough too much or you will end up with a tough cookie.

Gather dough into a disc, shape doesn’t matter.  Keep the thickness to about an inch.  This will make it easier to scoop and form the cookies after chilling.

After chilling the dough,  use a 1 tablespoon ice cream scoop (#70) to form balls.  Shape the scoops into smooth balls and roll in cinnamon sugar.  Use a good quality cinnamon, like Penzey’s . This is a great cookie to make with the kids or grandkids, never met a kid that didn’t like to roll balls of cookie dough in copious amounts of cinnamon sugar all the while licking their fingers.

The one tablespoon scoop yields a cookie about 2 inch in diameter.  All well and good, BUT, the smaller you make the cookie the harder it is to end up with a cookie that has crisp edges and a soft center.  If that is what you are looking for, try making bigger cookies. Increase your baking time by a couple of minutes.

Bake cookies 8-10 minutes until the edges are golden brown.  I like the centers soft, if you like crunchy cookies, bake them a bit longer.  How long?  Don’t know, I don’t like them that way.

Snicker Doodles

Course cookies
Cuisine American
Keyword Snickerdoodles
Prep Time 20 minutes
Cook Time 10 minutes

Equipment

  • Cookie sheets, lined with parchment paper or greased

Ingredients

  • 3 cups unbleached all-purpose flour (13.5 ounces)
  • 2 teaspoons cream of tartar
  • 1 teaspoon baking soda
  • ½ teaspoon salt
  • ½ pound unsalted butter, softened (2 sticks)
  • cups sugar 10.5 ounces
  • 2 large eggs
  • 2 teaspoons ground cinnamon
  • 2 tablespoons granulated sugar

Instructions

  • Preheat the oven to 400° Position rack in the middle of the oven.
  • Combine the flour, cream of tartar, baking soda, and salt in a bowl and mix thoroughly with a whisk or fork.
  • In a medium mixing bowl with an electric mixer, beat the butter with the 1½ cups sugar until smooth and creamy, not fluffy. Beat in the eggs just until blended. Add the flour mixture and stir or beat on low speed just until incorporated. Gather the dough into a disc and wrap in plastic wrap. Refrigerate until firm, at least 30 minutes.
  • Mix the remaining 2 tablespoons sugar and the cinnamon in a small bowl. Form level tablespoons of dough with an ice cream scoop, into 1-inch balls. Roll the balls in the cinnamon sugar and place 2 inches apart on the lined or ungreased cookie sheets.
  • Bake for 8 to 11 minutes, until the cookies puff and begin to settle down. To create crevices, when cookies puff, tap cookie sheet on rack. This causes the cookie to sink, creating crinkles. Rotate the cookie sheet from front to back halfway through the baking time to ensure even baking. Bake until the edges are golden. Remove from oven and allow to cool for a couple of minutes. Remove cookies with a spatula to a wire rack. Don't let them cool completely or the cookies will stick to the sheet. I bake on ungreased sheets to minimize spreading.
  • Cool the cookies completely before stacking or storing. May be kept in an airtight container for several days.
Thumbprints: Thumbs Up for Day 9 of 12 Days of Cookies

Thumbprints: Thumbs Up for Day 9 of 12 Days of Cookies

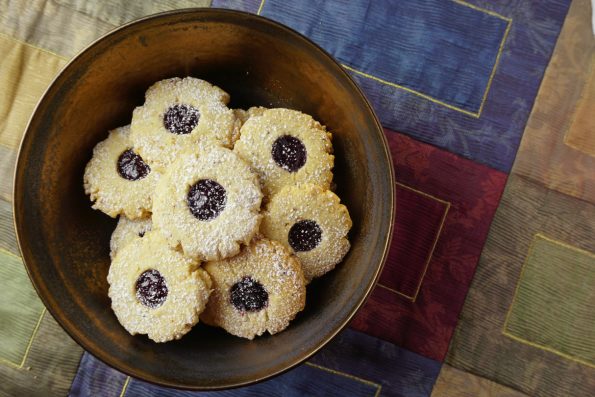
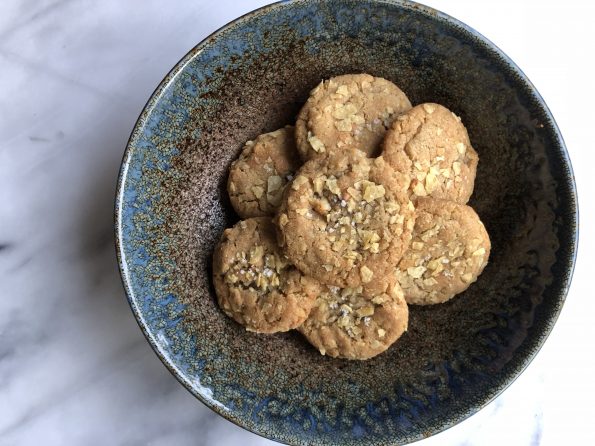
Only 3 more cookies to bake for my 12 days of cookies 2018.  Cookie no. 9 is a riff on my go-to thumbprint cookie.  I decided to use toasted hazelnuts in place of walnuts.  Ok, not earth-shattering but enough of a twist that the hubster noticed (he is a thumbprint afficionado) and loved the nuanced change. The hazelnut MO?  More assertive than other nuts such as almonds or pecans, buttery and sweet.  It’s flavor shines in these thumbprint cookies. I filled the center with a berry-lime jam I had made at the end of summer and added a tease of vanilla to the dough to complement the jam.  Yummy!

Measure the amount of  nuts needed before grinding them.  You want the nuts to be finely ground but not to the point  where it starts to get pasty.

Take out your trusty ice cream/cookie scoop. I use a tablespoon scoop and line up the cookie dough balls, assembly line mentality, on a sheet.  Place dough balls on a cookie sheet approximately 1.5-2 inches apart. Press each one to flatten to 1/4-3/8 inch thick (thicker if larger).  Use the end of a wooden spoon or utensil of similar size, to create a depression in the center of each cookie.  I use a hand blender to puree my jam (no fruit lumps!) and a squeeze bottle to squirt the jam into the center of each cookie. How easy is that?

This turned out to be a delish version of thumbprint cookies.  Perfect during the holidays and especially nice with a bit of the bubbly to bring in the new year!

Riff on Thumbprint Cookies

Course cookies
Cuisine American
Keyword thumbprints
Prep Time 10 minutes
Cook Time 20 minutes
Total Time 30 minutes

Ingredients

  • 1 1/2 cup coarsely chopped toasted hazelnuts
  • 1 cup butter at room temperature
  • 3/4 cup granulated sugar
  • 2 1/4 cups all-purpose flour
  • 1/2 teaspoon vanilla extract
  • 1/4 cup seedless berry-lime preserves or your choice
  • Dash of salt
  • Powdered sugar

Instructions

  • Preheat oven to 350 degrees.
  • Chop nuts in food processor until very fine. Beat butter, nuts, salt and granulated sugar in mixer bowl until light. Beat in flour into blended.
  • Shape dough into 1 inch balls.
  • Place 2 inches apart on ungreased cookie sheets and flatten to 1 1/2 inch circle.
  • Press into centers with a fingertip.
  • Fill each indentation with 1/4 teaspoon preserves.
  • Bake 10-12 minutes, until golden.
  • Cool.
  • Sift confectioner's sugar over cookies.

Notes

Substitute your favorite jam, I plan to use a pineapple-orange jam for the next batch.

Ladies and Gentlemen, This is Cookie Number 5 (Nibby Buckwheat Butter Cookies)

Ladies and Gentlemen, This is Cookie Number 5 (Nibby Buckwheat Butter Cookies)

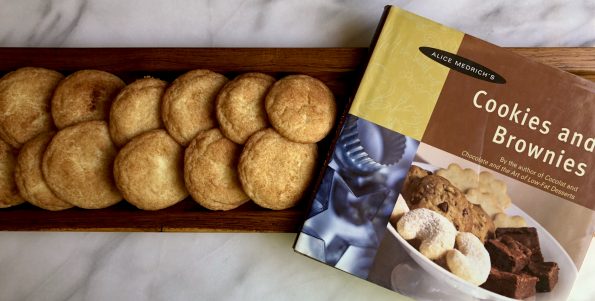
One of my favorite baking goddesses (I have many) is Alice Medrich. Yes, that Alice, Chocolate Maven, Dessert Queen and creator of quite possibly the best damn lemon bars ever. Don’t get me started on her Snickerdoodles, so good.  Cookie number 5 is from her book, Pure Desserts, a shortbread cookie with a twist-Nibby Buckwheat Butter Cookies.

If you have been following 3jamigos you know that I fall in the shortbread camp for my favorite type of cookie. Buttery goodness in bite-size morsels with a hint of sweetness, sign me up.  Well lucky me, this cookie falls in that camp-buttery, slightly sweet, tender, nice sandy texture, and a cool, slightly bluish brown hue.  The cookies get kicked up a notch with the addition of cocoa nibs. This adds a subtle hint of chocolate at the finish. The color and slight earthiness from the buckwheat and the “is it chocolate or isn’t it?” from the nibs, are a cookie mindblower.

So if you are looking for a shortbread that is a little different but still buttery delicious, put this one on your list.

Bonus: Easy to make.

Do not overbeat when creaming the butter and sugar which will incorporate too much air into the dough (I might have done this which accounts for the puffiness and soft edges).  The mixture should be smooth and creamy.  Add flour and beat until it comes together, don’t overmix.

The dough can be shaped into a log, chilled and finished as slice and bake cookies.  The dough can be stored in the fridge or freezer so you have freshly baked cookies when family and friends drop by.  Everyone will think you are a badass baking queen.

Or you can get fancy-schmancy and roll out the dough and cut out cookies for a more festive look.  Put the dough in a gallon sized Ziploc bag and roll to the edges.  This will give you a sheet of dough about 1/4 inch thick, perfect for cutout cookies.  I used a fluted metal cutter which may work better than a plastic one as you have to cut through the nibs. To add festive bling, sprinkle the cookies with sanding sugar and a touch of flake salt (like Maldon) before baking.  That takes these cookies to the “bend and snap” (Legally Blond-remember?) level of attention.

Chill the dough after cutting out the cookies, the edges won’t spread as much. I was having oven issues so the edges ended up less defined. But still yummy!

Okay, not hooked yet? Still looking for a classic shortbread, try this onemy favorite traditional Scottish Shortbread or Bouchon’s Shortbread.

Nibby Buckwheat Butter Cookies

Nibby Buckwheat Butter Cookie

A delicious riff on shortbread, buckwheat flour and cocoa nibs take these cookies to a new level.
Course cookies
Cuisine American
Keyword NIbby Buckwheat Butter Cookies
Author Adapted from 101 Cookbooks (Alice Medrich)

Ingredients

  • 1 1/4 cups 5.6 ounces all-purpose flour
  • 3/4 cup 3 ounces buckwheat flour
  • 1/2 pound 2 sticks unsalted butter, softened
  • 2/3 cup sugar
  • 1/4 teaspoon salt
  • 1/3 cup cacao nibs
  • 1 1/2 teaspoons pure vanilla extract

Instructions

  • Whisk the all-purpose and buckwheat flours together in a medium bowl. Set aside. In a medium bowl, with the back of a large spoon or with an electric mixer, beat the butter with the sugar and salt for about 1 minute, until smooth and creamy but not fluffy. Mix in the nibs and vanilla. Add the flours and mix just until incorporated. Scrape the dough into a mass and, if necessary, knead it with your hands a few times, just until smooth.
  • Form the dough into a 12 by 2 inch log. Wrap and refrigerate for at least 2 hours, or, preferably overnight. Or place dough in a gallon ziploc and roll to the edges of the bag.  Dough will be about 1/4 inch thick.  Chill thoroughly before cutting out shapes.  These cookies do puff and expand a bit so also chill dough after cutting to ensure crisp edges. 
  • Position the racks in the center of the oven and preheat the oven to 350F degrees. Line the baking sheets with parchment paper.
  • Use a sharp knife to cut the cold dough log into 1/4-inch-thick slices. Place the cookies at least 1 1/2 inches apart on the baking sheets.* Or follow instructions for cut-out cookies.
  • Optional:  Sprinkle cookies with a bit of sanding sugar and an even tinier bit of flake salt like Maldon before baking.
  • Bake until the cookies are just beginning to color at the edges, 12 to 14 minutes, rotating the baking sheet from front to back halfway through the baking. 
  • Cool the cookies in the pans on a rack, or slide the parchment liners carefully onto the rack to free up the pans. Let cool completely.

Notes

The cookies are delicious fresh but even better the next day. They can be stored in an airtight container for at least one month. My batch made about 30 3-inch cookies. Recipe states approximately 48 2-1/2 inch cookies.
Strawberry Vanilla Shortbread Day 4 Holiday Cookies

Strawberry Vanilla Shortbread Day 4 Holiday Cookies

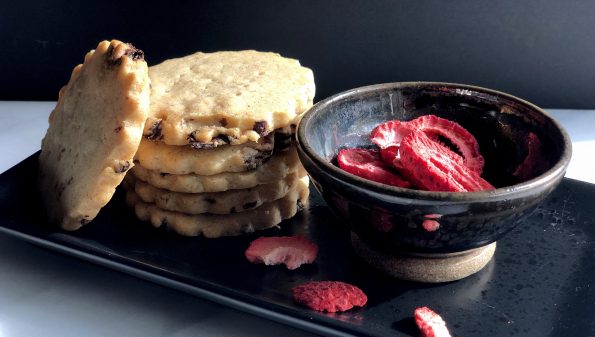
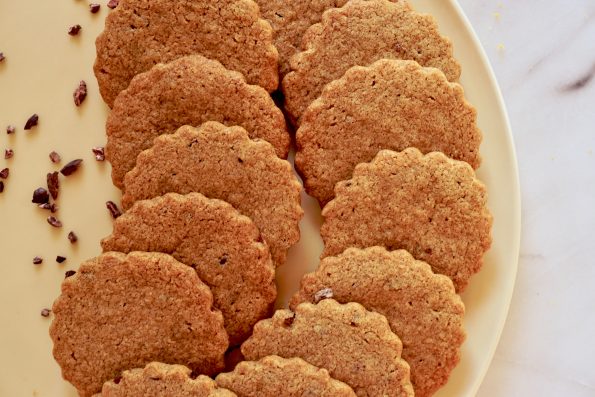
Day 4 of the 12 Days of Cookies is a keeper.

I LOVE shortbread, it is hands down my all-time favorite cookie.  During the holidays I usually bake a batch of classic Scottish ShortbreadThis year, I am adding Strawberry Vanilla Shortbread Cookies from Use Real Butter to the rotation. Sweet strawberries and a hefty dose of vanilla add a one-two punch to a buttery, tender cookie. I made a batch and the fam scarfed them down in no time flat.

I almost didn’t try this recipe. The first part of Jen’s post is a how-to on drying strawberries.  It’s winter, where am I going to find fresh sweet strawberries to dry?  Not happening in my house, even if it’s the height of strawberry season, I’m way too lazy.  Luckily, at the very end of the instructions, she adds “If this is too much of a pain…you can always grab a bag of freeze-dried strawberries at Trader Joe’s.  Bingo, I am all over that idea.

I should have cut the strawberry pieces smaller for better distribution.  I used vanilla paste in place of the pods and part of the extract.  Once the dough is made, place it in a gallon-sized Ziploc bag and roll the dough flat using the Ziploc border to create a square.  You can also shape the dough into a log for slice and bake cookies.

I used a fluted cookie cutter, chilled the dough to help keep its shape.  It was a little tough cutting through the bits of strawberries but still doable.

This is an absolutely delicious cookie.  If you like buttery, sweet-tart strawberry, and vanilla, bake this cookie.

Strawberry Vanilla Shortbread Cookies

Ingredients

  • 8 oz. unsalted butter room temperature
  • 1 cup 3.5 oz. or 100g powdered sugar
  • 2 vanilla beans split and seeds scraped
  • 1 tbsp vanilla extract 2 tbsp of vanilla paste can be subbed for the pods and reduce extract to 1/2 tbsp
  • 1 tbsp Grand Marnier or orange liqueur
  • 2 cups 9 oz. or 260g all-purpose flour
  • 1/4 tsp sea salt
  • 1 cup 4 oz. or 115g chopped dried strawberries (recipe below) or 1 cup freeze-dried strawberries

Instructions

  • Beat the butter with a paddle attachment until smooth.
  • Add the powdered sugar to butter and beat on medium speed until blended.
  • Add the vanilla bean seeds (use the pods for something else) or vanilla paste, vanilla extract, and Grand Marnier to the butter mixture and beat until incorporated.
  • Mix the flour and salt into the butter mixture until the flour is absorbed and no dry flour remains.
  • Stir the chopped strawberries into the dough. Scrape the dough into a gallon-size ziploc bag and roll flat with a rolling pin until the dough fills the bag in an even layer.
  • Seal the bag and refrigerate for at least an hour.
  • Preheat oven to 325°F and line your baking sheet(s) with parchment paper. When the dough is chilled, peel off the plastic and slice the dough into desired shapes or use a cookie cutter (circles show the least deformation) and re-roll scraps to use again.
  • Arrange your raw cookies 1.5 inches from each other on the baking sheet and dock them (prick them) with a fork three times across each cookie.
  • Bake 16-20 minutes (18 minutes worked well for me) until the bottoms are golden. Remove from oven and let cool on a cooling rack.

Notes

Makes about 36 2-inch round cookies or 42 1.5-inch square cookies.


Double Chipping (Butterscotch Potato Chip Balls)

Double Chipping (Butterscotch Potato Chip Balls)

The classic potato chip cookie, updated in The Vintage Baker by Jessie Sheehan.  Add butterscotch chips and triple the amount of potato chips, for the new and improved, Version 2.0 of Potato Chip Cookie.  I found these cookies by way of Ipso Fatto a favorite blog I follow.  How could I pass up a cookie described as chewy, crunchy, buttery, rolled in Kettle potato chips and studded with butterscotch chips?  I couldn’t and I didn’t.

These are a snap to put together.  You start with melted butter, no waiting for butter to soften and you can bake off a batch without chilling the dough.  That’s almost like instant cookies in my book.

Chips Matter

For my first batch, I purchased the only Kettle chips I could find at Whole Foods, their house brand,  I like Whole Foods, and shop there often, do not buy their Kettle Chips…bleah, flat and tasteless.  For my second batch, I used Cape Cod’s Kettle Chips.  Did it make a difference in the cookies?  I think so. Saltier and crunchier.  It made a difference with the extra chips left in each bag.  Much to my chagrin, I polished off the rest of the Cape Cod Chips in a New York minute.  The moral of the story is to use your favorite Kettle chips.

Butterscotch chips are not commonplace in my kitchen.  The few times I used them, I wasn’t thrilled with the texture or taste, they always seemed a bit artificial.  After an exhaustive search (King Arthur Flour website), I got Guittard’s Butterscotch chips.  They are surprisingly flavorful.  It would have been nice if they were “meltier” like chocolate chips.  Ipso Fatto used caramelized white chocolate or “blond chocolate” for the butterscotch but it is both hard to find and pretty pricey.  By all means, use the chips you like the most, that’s what counts. This recipe doesn’t use the entire bag of butterscotch chips, lucky for you I have another tasty cookie recipe that calls for melted butterscotch chips-Butterscotch Cookies, from The Perfect Cookie.

The recipe calls for putting the potato chips into the dough and crushing them as you mix the dough.  That leaves some big chips in the dough.  rushed the chips before adding them to the batter.

Chill the dough for a bit so the cookies don’t spread a lot.  Use a 1.5 tablespoon scoop which makes a 2-1/2 inch diameter cookie.  As soon as they come out of the oven flatten them with a spatula and push in the sides to make them round (optional).  Y’all probably know this but ice cream/cookie scoops are PERFECT for making uniform cookies.  I have had mine for ages (made in Italy, not China-that’s how old they are).  If you have a baker in your family, scoops would make great stocking stuffers.

Chip Off the Old Cookie

These cookies are delicious.  I took a batch to my professional testers (my co-workers), and they gobbled them up.  The potato chips add a nice crunch and saltiness, the butterscotch chips add sweetness, the touch of flaked salt at the end accentuates the sweet-salty “thang” and butter is butter, say no more.  The over-the-top factor-potato chips mixed in the dough and the dough then rolled in more chips, that’s what I call the “double-chip hit”.   Run, don’t walk to your kitchen, and make a batch now.

Butterscotch–Potato Chip Balls Potato Chip Balls

Course cookies
Cuisine American
Keyword Butterscotch Potato Chip Balls
Prep Time 20 minutes
Cook Time 10 minutes
Total Time 30 minutes
Servings 36 cookies

Ingredients

  • 2 1/3 cups [325 g] all-purpose flour 1 tsp baking soda
  • 1 tsp table salt
  • 1 cup [180 g] butterscotch chips
  • 1 cup [220 g] unsalted butter melted
  • 1 cup [200 g] packed light brown sugar 1/2 cup [100 g] granulated sugar
  • 1 egg
  • 1 egg yolk
  • 2 tsp pure vanilla extract
  • 5 cups [175 g] kettle-style potato chips Flaky sea salt for sprinkling

Instructions

  • Preheat the oven to 350°F [180°C]. Line a rimmed baking sheet with parchment paper.
  • In a medium bowl, combine the flour, baking soda, and salt and whisk together. Add the butterscotch chips and set aside. In the bowl of a stand mixer fitted with the paddle attachment, cream the melted butter and sugars on medium-high speed until thick, light, and glossy, 3 to 5 minutes, scraping the bowl with a rubber spatula as needed.
  • Decrease the mixer speed to medium-low and add the egg and yolk, one at a time, beating well and scraping the bowl aer each addition with a rubber spatula. Add the vanilla and mix to combine. Add the dry ingredients all at once, mixing just to combine. Remove the bowl from the stand mixer and add 3 cups [105 g] of the potato chips to the dough, combining and crushing the chips with a rubber spatula.
  • In a small bowl, crush the remaining 2 cups [70 g] potato chips. Scoop the dough into 1 1/2-tablespoon balls with a cookie scoop or measuring spoon, rolling each ball in the leover crushed chips, and evenly place 12 on the prepared baking sheet.
  • Sprinkle each cookie with flaky sea salt, and bake for 8 to 10 minutes, rotating at the halfway point, until lightly browned. Remove from the oven and press down on each cookie with a spatula to slightly flatten.
  • Repeat with the remaining cookie dough.
  • Let cool briefly and serve warm, because who doesn't love a cookie warm from the oven? The cookies will keep in an airtight container on the counter for up to 3 days.

The recipe can be found on Epicurious.com

Finding Ranger Cookies

Finding Ranger Cookies

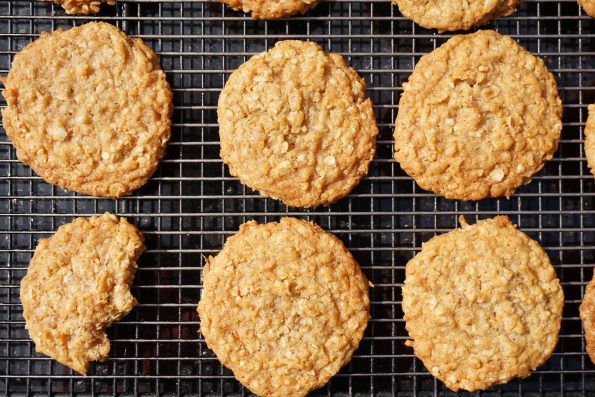
We are a divided family. Hubby likes chewy oatmeal cookies and ooey-gooey chocolate chip cookies.  Me? I love shortbread, crumbly, buttery, melt-in-your-mouth cookies with a hint of sweetness, and decidedly not chewy. Perhaps, cookie preference is a dominant gene trait?  ALL my kids love chewy cookies just like Wes.  I thought it was a kid thing (I consider the hubs a kid).  I assumed when they got older their palates would become more refined, sophisticated m.  Surely, they would come around.

Nope

Even now, when I make cookies that aren’t chewy the response is “They’re ok” or “I like chewy cookies better” or “Wonder if Dad can make some Good Cookies.” The only rational explanation?  Mendelian Genetics. Yep, a predisposition to chewy cookies. Ooh, did you just have an involuntary flashback to high school biology? I concede, in our house, chewy cookies reign supreme.

I Went to a Garden Party

For a summer fundraiser, I volunteered to make Mexican Wedding Cookies. My partner at the dessert table, Emily, brought an unassuming looking oatmeal cookie,   They disappeared in a flash which caught my attention.  I grabbed one and took a bite.  Yum!  This cookie was CHEWY, sweet, buttery, with a bit of crunch.  It definitely fell into the Wes and kids’ cookie camp.  I snuck a couple (ok, more than a couple) onto my cookie plate to take home.

As soon as I got home, Jordan grabbed one of the cookies and gobbled it down, then he grabbed another and exclaimed: “This might be the best cookie yet!”

Determined to make them asap, I Googled cookies, coconut, Rice Krispies, and oatmeal, the ingredients Emily had rattled off to me.  Instantly, a bunch of recipes popped up for Ranger Cookies.  Some had chocolate or butterscotch chips, and some had different cereals.  The blog, Let’s Dish, contained all the ingredients Emily mentioned so this became my starting point.  I hit the jackpot, these were just like hers.

Ranger Cookie Tips

Start by creaming butter and sugar until light and fluffy should take about 2-3 minutes tops. Then add eggs and vanilla, mix until well combined.  The recipe calls for gradually adding dry ingredients.  My detour, add it all at once and combine at low speed just until dry ingredients are fully incorporated.  Finally, stir cereal, coconut, and oatmeal in by hand.

Chilling the dough before baking prevents spreading.  Use an ice cream scoop to portion out the dough. Bake cookies on parchment paper.  With 3-4 minutes left to bake, rap the pan on the wire rack to get the cookies to fall, this helps create those cool crevices.

If your cookies aren’t perfectly round, after taking the cookies out of the oven, quickly invert a glass over each cookie and swirl it around.  This will shape cookies into perfect little circles.  Or skip it, they’ll be gone before anyone besides you notices.

Feel free to add chocolate chips or butterscotch chips for a twist. You can replace the Rice Krispies with partially crushed Corn Flakes, they’rrrrre great!  All you Tony the Tiger fans.

Ok, maybe chewy is not a genetic thing…maybe chewy cookies are just really, really delicious (don’t tell my kids I said that).  Either way, they belong on your gotta bake cookie list.

RANGER COOKIES

Chewy oatmeal cookies loaded with coconut and crisp rice cereal. Simple and delicious, these cookies are a favorite with kids and grown-up kids as well!
Course cookies, Dessert
Cuisine American
Keyword coconut, cookies, oatmeal, ranger cookies, rice krispies
Prep Time 15 minutes
Cook Time 15 minutes

Ingredients

Creaming Mixture

  • 1 cup butter softened, this is an old recipe, before unsalted butter was so widely available. I would guess folks normally used salted butter. If using unsalted butter, increase salt in recipe to 1 teaspoon.
  • 1 cup white sugar
  • 1 cup packed brown sugar light or dark

The Wet Ingredients

  • 2 eggs
  • 1 tablespoon vanilla extract

The Dry Ingredients-Combine and set aside

  • 2 cups all-purpose flour I use King Arthur Flour and it worked fine. Once again an old recipe, Gold Medal was probably the standard, which has slightly less protein than KA.
  • 1 teaspoon baking soda
  • 1/2 teaspoon baking powder
  • 1/2 teaspoon salt

The Adds

  • 2 cups quick cooking oats NO instant oatmeal please
  • 2 cups Rice Krispies cereal
  • 1 cup flaked sweetened coconut you could probably use unsweetened coconut too.

Instructions

  • Preheat oven to 350 degrees.
  • In a medium bowl, whisk together flour, baking soda, baking powder, and salt. Set aside.
  • In a large bowl, cream butter and sugars until light and fluffy. (2-3 min) Beat in eggs and vanilla.
  • Gradually add flour mixture to creamed mixture and mix well (do not overmix though). Stir in oats, cereal, and coconut.
  • Drop by rounded tablespoonfuls onto ungreased baking sheets. If you have a #40 ice cream scoop (1.75 Tablespoons) use that to create uniform dough balls.
  • Bake 8-10 minutes or until golden brown. Let cool on pan for 3-5 minutes before removing to a wire rack to cool completely.

Notes

I use parchment paper to line my baking sheets.  These cookies can be baked directly on an ungreased cookie sheet.
Tropical Flair to Mexican Wedding Cookies when Married with Lime and Coconut

Tropical Flair to Mexican Wedding Cookies when Married with Lime and Coconut

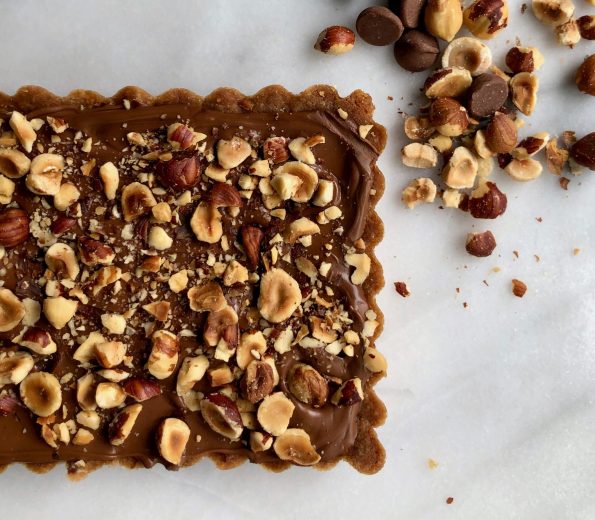
The political action group I belong to (please continue to read, that is as political as this post is going to get) hosted a fundraiser this past weekend.  A garden party with a Mexican theme. Of course, I volunteered to make something sweet.  Cookies, specifically, Mexican Wedding Cookies, instantly popped into my head.  Usually, I bake a batch of these nutty, buttery, nuggets during the holidays but it is the middle of summer so I wanted to change it up just a bit.  I found the perfect riff on the classic wedding cookie, a coconut lime version, on the blog Once Upon A Chef by Jenn Segal.  Garden Party, Fiesta theme, coconut, lime-yep, spot on.

Delicious AND easy to make.  The dough is made in a food processor which makes these cookies STUPID easy.  You throw the dry ingredients into your food processor bowl, give it a couple of whirls, add the butter, vanilla and lime zest, pulse to it comes together and boom, you are done.  Wrap the dough in plastic wrap, and forget about it in the fridge for about an hour.  Use a teaspoon ice cream scoop to make balls of dough, bake, and roll in a ton of powdered sugar.  HOW EASY IS THAT? Ipso Facto Dunzo.

Coconut-Lime Mexican Wedding Cookies

Course cookies, Dessert
Cuisine American
Keyword Mexican Wedding Cookies
Prep Time 10 minutes
Cook Time 12 minutes
Total Time 22 minutes

Ingredients

  • 1 cup all-purpose flour spooned into measuring cup and leveled-off
  • 1/4 teaspoon salt
  • 1/2 cup confectioners' sugar plus about 3/4 cup more for coating
  • 1/3 cup pecans
  • 1/4 cup sweetened flaked coconut
  • 1 stick 1/2 cup unsalted butter, softened
  • 1 packed teaspoon lime zest from 1 lime
  • 1 teaspoon vanilla extract

Instructions

  • In the bowl of a food processor fitted with the steel blade, combine the flour, salt, confectioners' sugar, pecans and coconut. Process until the pecans and coconut are finely ground, and the mixture looks like sand. Add the butter, lime zest, and vanilla extract; process until the mixture comes together into a cohesive dough. Remove the dough from the bowl and wrap in plastic. Chill until firm enough to roll, 45 minutes to 1 hour.
  • Meanwhile, preheat the oven to 350°F. Line two baking sheets with parchment paper.
  • Measure the dough into heaping teaspoon-size pieces and roll each piece into a ball. Place the balls about 1-1/2 inches apart on the prepared baking sheets. Bake until the edges of the cookies barely begin to brown, 12 to 14 minutes. Let cool on the baking sheets, then roll in the confectioners' sugar while still warm. Let the cookies cool on a rack, then roll again in confectioners' sugar once they are cool. Store in an airtight container at room temperature.

Snowy Topped Brownie Drops, Cookie Number 4

Snowy Topped Brownie Drops, Cookie Number 4

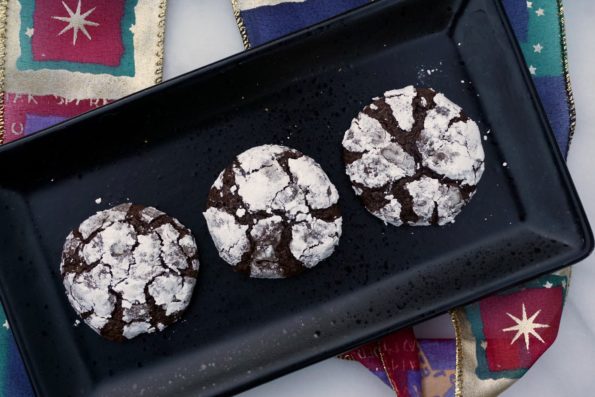
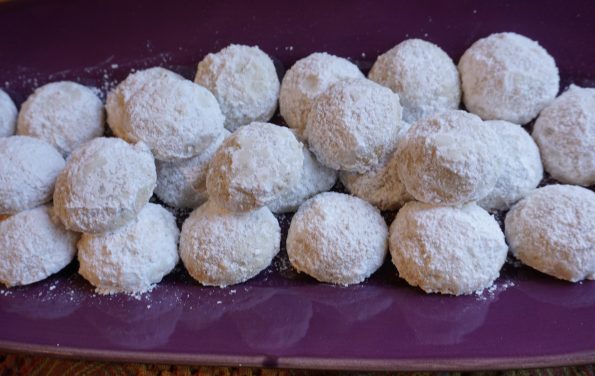
Another winner from Dorie!

Though a tough call, the favorite out of this holiday trio was the Snowy Topped Brownie Drops.  A decadent, chocolatey, cookie finished with generous dusting of powdered sugar.  Have an office party coming up?  This is the cookie to make to guarantee an invitation to all of the holiday parties of the season!  But don’t reserve these just for the holidays, they are too good not to bake any time of the year!

Snowy-topped Brownie Drops

Ingredients

  • 5 tablespoons 71 grams unsalted butter cut into small pieces
  • 8 ounces 226 grams bittersweet chocolate*
  • 3/4 cup 150 grams granulated sugar
  • 2 large eggs cold
  • 1 teaspoon pure vanilla extract
  • 1/2 teaspoon sea salt
  • 3/4 cup 102 grams all-purpose flour
  • Confectioners’ sugar for rolling

Instructions

  • Coarsely chop the chocolate. Place 6 ounces of the chocolate together with the butter pieces in a heatproof, microwave safe bowl or the top of a double boiler. If using a microwave, microwave for 3-5 segments of 30 seconds on high, stirring in between to help melt. If using a double boiler, place the double boiler (or any heatproof bowl) over gently simmering water, taking care that the water doesn't touch the bottom of the pan. Stirring until the chocolate and butter are just melted, then remove the bowl from the heat.
  • Immediately whisk in the granulated sugar into the melted chocolate. The mixture will turn grainy.
  • One at a time, add in the eggs, whisking for one minute after each addition. The batter should become quite smooth, shiny, and noticeably thicker. Whisk in the vanilla and salt.
  • Using a silicone spatula, fold in the flour until it just disappears. Fold in the reserved 2 ounces of chopped chocolate. The dough will be very sticky.
  • Cover the batter with plastic wrap or in an airtight container and refrigerate for at least 3 hours.
  • Preheat the oven to 350 F. Line a baking sheet with parchment paper or a silicone liner. Place about 1/3-1/2 cup of confectioner's sugar in a small bowl. Using a small cookie scoop, scoop out round portions of the dough, and roll each ball in the confectioner's sugar to create the snowy top. Once the ball is generously coated in confectioner's sugar, place it on the baking sheet. Repeat for the remaining dough, spacing cookie balls 2 inches apart.
  • Bake only one baking sheet of these cookies at a time, for a total of 12 minutes, rotating after 6 minutes. The cookies should spread and crack, with set sides, but will still appear fairly underbaked in the middle. This is how they should look.
  • Set the cookies on a metal cooling rack to cool at least 2-5 minutes, then serve warm or at room temperature.
  • Unbaked dough can be stored in the refrigerator for up to 4 days and in the freezer for 1-2 months. Once baked, these cookies will keep 3-4 days but will gradually lose their softness.

Notes

You could use semi-sweet or a high percentage dark chocolate here instead, but the cookies will be a bit sweeter.
Another Day, Another Chocolate Chip Cookie (Brown Butter Toffee Chocolate Chip Cookie)

Another Day, Another Chocolate Chip Cookie (Brown Butter Toffee Chocolate Chip Cookie)

What is your favorite chocolate chip cookie recipe?  The one on the back of the Nestle’s Chocolate Chips bag? A treasured family recipe handed down? Mine was given to me by a friend who swore it was the original Mrs. Field’s recipe.  I can’t vouch for that claim, but it is pretty darn good. Over the years I have tweaked the recipe by adding oatmeal, reducing the amount of chocolate (don’t hate me), and adding nuts.  Yep, the perfect cookie.  It is my go-to chocolate chip cookie…until now.  A serious challenger, Brown Butter Toffee Chocolate Chip Cookies, has entered the best CCC sweepstakes.

You can have more than one go-to chocolate chip cookie, right?  There might be a new player in town.

Brown butter chocolate chip toffee cookie ingredients

What makes these cookies so delicious?  BROWN BUTTER for a toasty rich, caramel flavor-yum.  Chunks of toffee bars for crunch and another layer of caramel flavor-double yum.  Finally, Chocolate wafers instead of chips, stay gooey and soft longer creating a luscious texture-triple yum.  Upon finding this recipe I immediately headed to the store to look for those chocolate wafers. I found Guittard’s 67% semi-sweet wafers-YAY.  A bag costs about eight dollars-BOO.  It’s a splurge that’s for sure…but so worth it.


Chocolate wafers and toffee pieces

Fold in chocolate and toffee pieces and chill dough for at least 30 minutes in the fridge before baking.  Scoop dough balls with a #24 scoop (1.5 ounces) or #30 (1.125 ounces) for a touch smaller cookie.  They spread so place cookie dough 3″ apart, especially if you don’t chill the dough.

These cookies will brown quickly so watch them like a HAWK. Start checking them at the 8-minute mark.  To create the crevices in the cookies, rap the baking sheet on the oven rack (at the 6-7 minute mark), and repeat 1-2 minutes later.  This will cause the cookie to deflate creating those lovely nooks and crannies.

Brown Butter Toffee Chocolate Chip Cookies

Another chocolate chip cookie? You bet!
Course cookies, Dessert
Cuisine American
Keyword brown butter, chocolate chip cookie, toffee
Prep Time 30 minutes
Cook Time 15 minutes
Total Time 45 minutes
Servings 20

Ingredients

Dry Stuff

  • 2 cups all-purpose flour preferably KIng Arthur
  • 1 teaspoon baking soda
  • ¾ teaspoon kosher salt

Wet Stuff

  • 1 cup unsalted butter 2 sticks
  • 1 cup packed dark brown sugar
  • cup granulated sugar
  • 2 large eggs room temperature
  • 2 teaspoons vanilla extract

The Add-Ins

  • 2 chocolate toffee bars (1.4 oz bars) Skor, Heath or Trader Joe Toffee Bars, chopped into ¼-inch pieces
  • cups chocolate wafers disks, pistoles, fèves; preferably 72% cacao, although I used 67% Guittard -yum
  • Flaky sea salt

Instructions

  • Whisk flour, baking soda, and kosher salt in a medium bowl. Set aside
  • Cook butter in a medium saucepan over medium heat, stirring often, until it foams, then browns, 5–8 minutes. Scrape into a large bowl and let cool slightly.
  • Add brown sugar and granulated sugar to browned butter. Using an electric mixer on medium speed, beat until incorporated, about 1 minute. Add eggs and vanilla and beat until mixture lightens and begins to thicken, about 30 seconds. Reduce mixer speed to low; add dry ingredients and beat just to combine. Mix in toffee pieces and chocolate wafers with a wooden spoon or a rubber spatula.
  • Let dough sit at room temperature at least 30 minutes to allow the flour to hydrate. Dough will look very loose at first, but will thicken as it sits. For less spread, chill dough in fridge.
  • Place a rack in middle of oven; preheat to 375°. Using a 1½-oz. ice cream scoop, portion out 10 balls of dough and place on a parchment-lined baking sheet, spacing about 3" apart (you can also form dough into ping pong–sized balls with your hands). Do not flatten; cookies will spread as they bake. Sprinkle with sea salt.
  • Bake cookies until edges are golden brown and firm but centers are still soft, 9–11 minutes. Let cool on baking sheets 10 minutes, then transfer to a wire rack and let cool completely. Repeat with remaining dough and a fresh parchment-lined baking sheet to make 10 more cookies.
  • Do Ahead: Cookie dough can be made 3 days ahead; cover and chill. Let dough come to room temperature before baking.

Notes

To create ridges in cookies, at 7 minutes open oven and rap pan on oven rack which will cause cookie to deflate and create ridges.