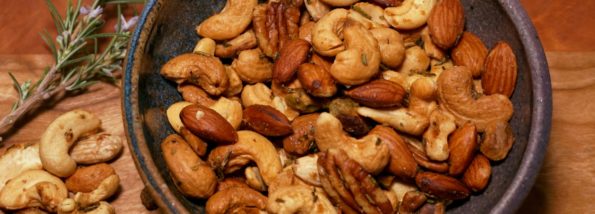
Category: Stupid Easy

These recipes are seriously easy and delicious!

Epic Fail: Homemade Kahlua 12 Days of Cookies: Day 4

Epic Fail: Homemade Kahlua 12 Days of Cookies: Day 4

I have been in a funk this holiday season.  Every time I go to bake cookies I get de-railed.  I thought I would make a final push and get a few done, but I was struck by the flu bug which put the big kabash on any last minute baking. This effectively ended all hope of any more scrumptious cookies.  I have the dough for these wonderful crescents from Rose’s Christmas Cookies and for Mrs. Sugaya’s pecan tartlets chilling in the fridge. But they will have to wait until after Christmas.

But all is not loss.  I did manage to make some homemade goodies that I hope you will try.  I made favorite breakfast munchies, Juli’s granola and my cousin Bonnie’s spicy pecans. Cookies are little gifts of love, peace and hope and I just couldn’t bring myself to bake many.  I wish everyone love and joy with family and friends during this holiday season even if a few of us are on opposite sides of the political spectrum.

So, what did I make instead of cookies? Who guessed booze?  You would be right!  I started a couple of weeks ago after searching for a homemade Kahlua recipe. Big mistake, there must be a thousand recipes for something so simple!  So I came up with my own concoction that I think is pretty darn good and very easy.  Couple of tips, you are using a boat load of sugar and coffee, DO NOT break the bank on the vodka or rum.  I used the same vodka I used to make vanilla extract with last year, a brand from TJ’s. I picked it cause the bottle was cool looking.  I had some Meyer’s rum so I used that too.

I started with 1/4 cup instant expresso (Medaglia D’Oror) and my first batch didn’t have enough coffee flavor so I made a second batch using 1/2 cup and mix the two batches.  So I leave it to you to decide how much coffee flavor you want.  I will keep you posted on the feedback!

Homemade Coffee Liqueur

Make your own coffee liqueur aka Kahlua, easy and sure to impress your friends and family!
Course Drinks
Cuisine Mexican
Keyword coffee liquer, easy to make, kahlua

Ingredients

Adapted from Creative Culinary

  • 4 cups water
  • 2 cups brown sugar
  • 2 cups white sugar
  • 1/3-1/2 cup dried espresso
  • 500 ml vodka
  • 250 ml Rum
  • 2 vanilla beans split
  • 2 shots of chocolate liqueur or 1 tablespoon cocoa nibs

Instructions

  • Combine the water, sugars and dried espresso in a large saucepan over medium-high heat.
  • Bring to a boil; turn the heat to low and simmer for a minimum of 1 hour.to reduce the mixture and make a more syrupy consistency. I had a final volume of approximately 3 cups.
  • Watch constantly and stir occasionally. It will boil over if not watched!!!
  • Remove from heat and let cool.
  • Add vodka, rum, vanilla beans and chocolate liqueur or cocoa nibs
  • Pour everything into a clean storage container. I love these Ball Jars.
  • Age for 3-4 weeks in a cool, dark location; stirring once or twice a week.
  • When ready to bottle, remove vanilla beans, bottle mixture and store. I strained the mixture into the bottle.
  • How easy is that?
  • Serve straight, over ice cream, mixed drinks
(Coconut Cookie Sticks) Cuckoo for Coconuts by Alice Medrich

(Coconut Cookie Sticks) Cuckoo for Coconuts by Alice Medrich

I snappd this photo at Black Sand Beach on the Big Island.  When I saw the sign on the tree, one of my favorite cookies just popped into my head, Alice Medrich’s Coconut Sticks.  Hmmm….I wonder why?  I love her coconut sticks.  A riff on biscotti, they often end up in a holiday cookie tin or in a cellophane bag with a cute ribbon as an appreciative thank you gift.

CoconutsNowadays I often find myself using coconut in my cooking & baking.  This is SO surprising since for as long as I can remember I have HATED coconut. As a kid the sight of coconut anything, cake, cookies candy elicited an automatic “Ewwww!” The feeling persisted well into adulthood.  Maybe it’s age, but I have grown to like coconut right along with brussels sprouts and naps.

With my changed coconut conviction. I have jumped off the deep end.  Curries without coconut milk, not happening. My Ranger cookies and World’s Best Cookies are made with shredded coconut, definitely bumping up the chewiness and flavor.  And of course, every batch of homemade granola has flaked coconut for that extra zing and crunch.

It’s like a new found secret weapon

I love making and nibbling on these Coconut Sticks. Thin, crispy and buttery with shreds of coconut dancing through, they are the perfect foil for a steaming cup of tea or that morning latte.  This recipe comes from Alice Medrich’s book Chewy, Crispy, Crunchy Melt-in-Your Mouth Cookies.  If you love cookies add this book to your collection.

Did I mention these crunchy wonders are EASY to make?  Well of course they are, you can make the dough by hand or in a food processor (ah, yes-thereby upping them to the STUPID EASY category).  Another wonderful slice and bake refrigerator cookie.  Press the dough into a loaf pan.  Chill.  Slice.  Bake.  Eat.  Donzo.  Easy Peasy.

What took me so long to become a coconut convert?  I don’t know.  Guess I will have to make up for lost time.

Life is good, dream coconuts.

Coconut Sticks Dough

Cuckoo for Coconuts (Alice Medrich's Coconut Sticks)

Buttery coconut cookie sticks.
Course cookies, desserts
Cuisine American
Keyword Coconut Cookie Sticks
Prep Time 20 minutes
Cook Time 15 minutes

Ingredients

  • 1 1/4 cups 5.625 ounces unbleached all-purpose flour
  • 2/3 cup 4.625 ounces sugar
  • 1 cup ~3 ounces shredded dried unsweetened coconut
  • Scant 1/2 teaspoon salt
  • 6 tablespoons cold unsalted butter
  • 1 teaspoon pure vanilla extract
  • 2 tablespoons cold water

Instructions

  • Prepare: A 5-x-9-inch loaf pan, lined on the bottom and sides with foil or plastic wrap
  • Put the flour, sugar, coconut, and salt in a large mixing bowl and whisk to blend.
  • Cut the butter into the flour mixture with a pastry blender or two knives until the butter is reduced to small pieces.
  • With the fingertips of both hands, lightly toss and rub the mixture together until the mixture resembles coarse meal.
  • Combine the vanilla and cold water in a small pitcher or cup.
  • Stir the flour and butter mixture with a fork while drizzling the water and vanilla into the bowl. Continue to toss and stir lightly with the fork or your fingers until all of the dry ingredients are slightly damp. The dough should remain crumbly and stick together only when pinched.
  • Food Processor method: Place flour, sugar, coconut and salt in food processor bowl. Pulse 2-3 times to combine.
  • Cut butter into 1/2 inch cubes and scatter on top of flour mixture. Pulse until mixture reveals coarse meal. Small lumps are okay.
  • Combine water and vanilla extract in small cup. Continue to pulse the flour mixture and drizzle water into processor bowl.
  • Pulse into mixture starts to clump. It should not come together completely but will still be crumbly. It will stay together if pinched.
  • If using a loaf pan, dump the mixture into the lined pan and spread it evenly. Press it very firmly, making a thin layer. Or dump the mixture onto a piece of foil on a baking sheet and distribute it evenly over an area about 4 by 9 or 10 inches. Press it firmly, squaring up the edges, to make an even compact layer about 1/2-3/4 inch thick. Fold the foil over the dough and wrap it tightly. Refrigerate for 2 hours or overnight.
  • Preheat the oven to 350°F. Position racks in the upper and lower thirds of the oven.
  • Unwrap the dough and transfer it to a cutting board. Use a long sharp knife to cut the dough crosswise into 1/4-inch (or thinner if possible) slices. Use the knife to transfer each slice to the lined or greased cookie sheets, placing the slices 1 inch apart. The slices will be fragile and require the support of the knife in transit; the results will be worth your careful effort.
  • Bake for 11 to 14 minutes (baking time will vary depending on thickness of cookie), until the cookies are golden with golden brown edges. Rotate the pans from top to bottom and from front to back halfway through the baking time to ensure even baking.
  • For lined pans, set the pans or just the liners on racks to cool; for unlined pans, use a metal spatula to transfer the cookies to racks. Cool the cookies completely before stacking or storing.
  • May be kept in an airtight container for several days.
Miso Black Cod (A Fable About Sablefish)

Miso Black Cod (A Fable About Sablefish)

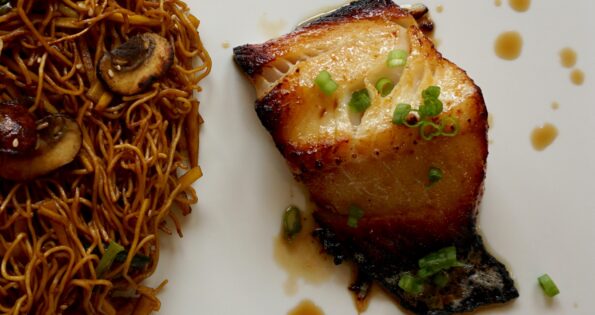
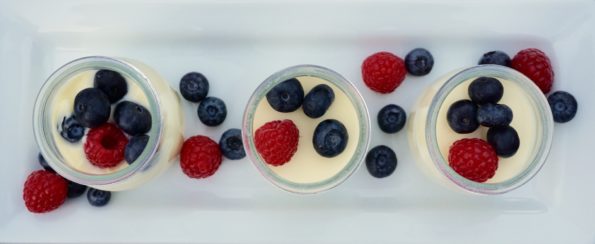
Surprised? Forehead slap in disbelief that this is not another sugar-filled dessert recipe?  I know, me too!  But this dish is so yummy and so simple I just had to pass it along.

Lately, I have been going to Whole Foods to shop for my seafood and meat.  Why?  Partially out of environmental guilt and I know this is going to sound awful because it is much easier on the pocketbook when it is just Wes and me.  If you know my kids, you know what I mean.  While Wes and I are feasting on sushi or a beautiful piece of grilled salmon my kids are eating dorm food or cold pizza.  I’m not that cold-hearted though, they pick where and what they want to eat whenever they come home or if we go to visit them, it’s definitely no-holds barred.

DSC04410

While perusing the seafood selection at WF I came across some black cod also known as sablefish.  I first tasted this lovely fish at a Chinese restaurant, Hong Kong Lounge, in the City and was absolutely floored.  I was at a banquet and looking forward to the whole fish steamed with ginger and onions topped with soy sauce to finish the meal when…

What?

Instead out from the kitchen comes this little chunk of fish, no head, no tail, unceremoniously plopped on a platter unadorned with any of the usual trappings.  The outside had a nice toasty brown glaze, my guess, it had been roasted.   Didn’t look like much but supposedly their signature dish.  I took a piece and popped it in my mouth…..BAM! WOW! Flavor explosion, sweet, salty, and smokey all at once, and the texture-oh my, buttery, silky, fatty..holy mackerel, it was DELICIOUS!  I raved about it all the way home, an hour’s drive from the City to Los Gatos. Miso Black Cod

More upside, this fish is on the Monterey Bay Aquarium’s Seafood Watch sustainable fish list and it is loaded with alpha omega fatty acids…woohoo, I think we have a winner.

For the sake of transparency, though not unique to black cod…if you can cook it on your grill outside, do it. If not, I hope you have air fresheners and good ventilation in your kitchen or all the neighborhood cats will be hanging out at your house.  But that’s fish for you. Oh, and it will set you back a pretty penny but oh so worth it.

Nobu Knows

I immediately bought a piece (yes, one piece, just me and Wes) and googled recipes for Black Cod.  The first recipe that jumped off the screen was Nobu’s Miso Roasted Black Cod.  His recipe has been shared so many times I’m sure it has rock-star status on Pinterest.  It’s simple to prepare and just takes a couple of minutes to assemble.  Yep, stupid easy! Make the marinade, toss it and the fish in a zip-loc bag, and let it sit luxuriating in the miso for 24-48 hours.

The marinade is all of 4 ingredients. White miso paste, Mirin (Japanese cooking wine), Sake (Japanese rice wine), and sugar.  That’s it, folks.  You can embellish if you want.  A touch of Ponzu (citrus soy sauce), a dash of sesame oil, or a smidgen of grated fresh ginger would go well.  This first time I stuck to the recipe and it was delicious but I’m sure I will experiment. It’s how I roll.

If you like fish, run, don’t walk to your nearest seafood purveyor or Whole Foods, and pick up some Black Cod. So good.  Serve with a bowl of rice or with Hong Kong Style Soy Sauce Noodles (pictured).  Delish.

A Fable of Sablefish (Miso Black Cod)

Easy and delicious roasted black cod!
Course Main Course
Cuisine Asian
Keyword Black Cod, Miso, Sablefish
Prep Time 10 minutes
Cook Time 15 minutes
Total Time 25 minutes

Ingredients

  • 2 tablspoons sake
  • 2 tablespoons mirin
  • 2 tablespoons white miso paste
  • 1.5 tablespoons sugar
  • 2 black cod fillets about 1/2 pound each
  • 1 scallion chopped for garnish

Instructions

  • Bring the mirin and sake to a boil in a small non-reactive saucepan over high heat. Reduce heat and add miso, stir to dissolve the miso. Add sugar, increase heat and continue to cook until sugar is completely dissolved. Set aside to cool.
  • If the plan is to use your oven, you can take the skin off the fish. If grilling leave it on to help keep the fish together.
  • Once cooled, spread the marinade on the fish evenly. Cover tightly or seal it in ziplock bag. Let it sit for 24-48 hours
  • Before cooking, wipe excess marinade off of fish
  • To cook: Preheat oven to 400 degrees or outdoor grill.
  • Oven method: Roast at 400 degrees for 8-10 minutes. Finish fish by broiling a couple of minutes to hear the edges and brown the outside.
  • You can also panfry the fish first to brown and create those crispy edges before finishing the fish in the oven for 7-10 minutes or until fish flakes.
  • Grill method: Place fish skin side up on grill and cook on indirect heat for 8-10 minutes.
  • Garnish with green onions and serve with pickled ginger if you like.

Notes

You can use any firm fish with this marinade and method, salmon, bass or halibut would also work.


Artie Chews, Artie Swallows, Artichokes (Artichoke Parmesan Dip)

Artie Chews, Artie Swallows, Artichokes (Artichoke Parmesan Dip)


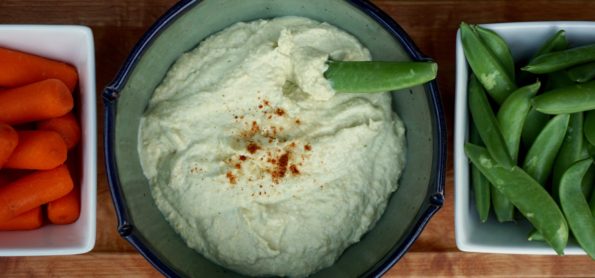
Continuing with our summer fun, happy hour, and stupid easy theme.  This is my GO TO dip.  I usually have all the ingredients at hand, it comes together in minutes and someone will invariably ask me for the recipe. That’s a triple play in my book.  I found it a long long time ago in Gourmet Magazine.  Whenever I make this dip it reminds me of a favorite book I read with my kids, A Cake for Herbie.  Hoping to win a poetry contest where a cake is the prize, Herbie writes a poem that starts with Artie chews, Artie swallows, Artichokes.  Ya gotta love poetry about food by a duck named Herbie.

When I was a kid I had a friend whose mom was super young.  While my parents listened to Sinatra, her mom listened to the same music we did, used words that we used, wore jeans and giant hoop earrings, in short she was so cool. Well, I liked to say that’s me now BUT it is not.  Definitely not the young hipster mom but having my kids later than many of my friends has kept me young.  I am way cooler by virtual of being around them…I even have a Spotify account, lol.  Ok, I admit I haven’t quite gotten the hang of snapchat and I cannot text at light speed.  As my kids read this I’m sure they’ll roll their eyes and groan but I’m here to say that this artichoke dip is HELLA EASY and DANK.

Crackers, crostini and breadsticks are a no-brainer plus this dip goes well with veggies like carrots, sugar snap peas, slices of cucumbers or bite sized sweet tomatoes.

Starting with canned artichokes hearts is fine.  I always keep a couple of cans in my pantry.  Be sure to drain them well. I will squeeze the artichokes by hand to remove additional moisture.  Here’s the hard part, throw the artichokes and the rest of the ingredients, except for the parmesan cheese, into a blender or food processor.  Whirl until smooth.  Fold in the parmesan cheese. Dunzo.  You can substitute sour cream or low fat mayonnaise for the yogurt.  Salt and pepper to taste.  That’s it, ready to serve.

I hope this becomes a go-to munchie for you too.


Artie Chews, Artie Swallows, Arti-chokes (Artichoke Parmesan Dip)

Ingredients

  • 1 14 ounce can artichoke hearts drained well
  • 1/2 cup parmesan grated
  • 3/4 cup mayonnaise
  • 1/4 cup plain yogurt you can use non-fat or low fat or sour cream
  • 1 garlic clove minced and mashed to a paste with a pinch of salt
  • 2 teaspoons fresh lemon juice or to taste
  • 1 scallion chopped
  • Tabasco to taste
  • breadsticks or lightly toasted french bread
  • Vegetables such as carrots sugar snap peas, cucumbers, and tomatoes

Instructions

  • In a food processor puree the artichoke hearts, mayonnaise, yogurt, garlic paste, lemon juice, scallion and Tabasco until the mixture is smooth. Fold in Parmesan cheese. Add salt and pepper to taste. Serve the dip with vegetables, breadsticks or toasts. Makes 2 3/4 cups.
Happy Hour Happy Food

Happy Hour Happy Food

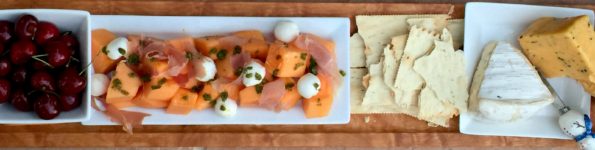
Jamie loves happy hour.  What’s not to like?  An array of low maintenance deliciousness and refreshing drinks like sangria or cocktails.  We like loading up our bread boards with cherries, fresh sweet melon, naan topped with fruit, brie and arugula (yum) and of course a variety of cheeses and crackers.  The perfect fare that screams “kick your feet up, relax and enjoy”.  So easy.  But I’ll let her tell you…

DSC04253

I bet you guys were surprised to see another post from me so soon, weren’t ya?  P.S. this is Jamie.  As promised, this post will be about happy hour!  Apart from following my mom and dad around all day, happy hour with my mom is one of my favorite things to do on the weekends when I am home.

DSC04254

I’ve been bugging her all summer to invite some of her friends over for happy hour, yes I admit it, I love hanging out with my mom and her friends.  They’re absolutely crazy in the most fun way possible.  On Friday, my parents and I went with some friends to go see Secret Life of Pets (If you haven’t seen this yet, stop reading and go see it now, it is great) and we ran into one of her favorite rowing buddies (also one of my favorites, what a coincidence!!!) I finally convinced her to text her crew (HAH get it?)  and have them come over for an impromptu happy hour the next day.  It was a little last minute, so not everyone came, but naturally, my mom and I made food for an army.
DSC04255

And now to go along with our theme “Happy” by Pharrell


Strawberry bruscettaI decided to experiment, and made strawberry bruschetta, which turned out to be a hit!  We went to Trader Joe’s and bought a baguette of regular French bread, sliced it up, brushed it with some olive oil, and popped it into our toaster oven.  While it was crisping up, I diced up about a cup and a half of strawberries, mixed them with some olive oil, balsamic vinegar, minced garlic, salt and pepper, and stuck it in the fridge til it was time to serve.  When it was time to eat, I spread each piece of toast with either goat cheese or brie cheese, topped it with the strawberry mixture, and sprinkled over some basil and goat cheese.  Stupid. Easy.

To go along with it, my mom and I made another watermelon and cantaloupe caprese salad, and crispy and garlicy smashed potatoes, one of our new obsessions.  We haven’t totally figured out how to perfectly smash them, but I’m sure we’ll figure it out soon.

And we made Bellinis!  My mom had a chilled bottle of Prosecco so we took out some flutes, poured in some peach nectar then the Prosecco and threw in a couple of fresh raspberries (ratio 2oz:4oz peach nectar to Prosecco) YUM!

By the way those cool wooden boards…made by my Dad.  Oh yeah.  If you’re lucky I’ll write down his special tuna dip recipe next time!


Hi Claire 🙂

Happy Hour Happy Food

Ingredients

Yummy Happy Hour food

  • Take advantage of summer fruits!
  • Berries peaches, melons the list goes on and on
  • Your favorite Cheeses I like Cotswold, Brie
  • Guacamole
  • Chips
  • bruschetta or crostini

Brochettes of melon, prosciutto and mozzarella (adapted from Epicurious)

  • 1/2 cup olive oil
  • 1/3 cup packed fresh basil leaves plus sprigs for garnish
  • 1 medium shallot quartered
  • 1 small about 2-pound cantaloupe, halved crosswise, seeded, cut into 6 wedges, peeled
  • 6 small fresh water-packed mozzarella balls or one 8-ounce ball * drained
  • 6 thin slices prosciutto cut in half lengthwise, gathered into ruffle
  • 6 8- inch wooden skewers

Strawberry Crostini

  • Super easy and the recipe is in the text above!

Instructions

Don't really have a recipe for anything! Its just stuff I like to eat!

    Flatbreads pizzas

    • We used naan we just got at the farmer's market, grilled them quickly and placed slices of fresh mozzarella, prosciutto, grilled peach slices on them and back on the grill to melt the cheese. You could use brie or really any cheese you want. We topped them with fresh arugula that we dressed with a bit of lemon juice and olive oil. Sprinkle of pepper. DUNZO EASY

    Melon Salad we don't bother with the skewers we just throw it all in a bowl.

    • Cantalopes have been sweet! Cut melon into bite sized pizza and place on platter or bowl. Add small fresh mozarella balls and prosciutto that has been shredded into bite sized shreds.
    • Make the basil oil by combining the shallot, basil and olive oil in a processor. Process until basil and shallot is minced.
    • Drizzle oil on melon and cheese. Sprinkle on some coarse salt and cracked fresh pepper. Another DUNZO.
    What the Heck is Posset? Hmm Think Delicious Pudding or Panna Cotta Asian Style

    What the Heck is Posset? Hmm Think Delicious Pudding or Panna Cotta Asian Style

    This recipe is STUPID. EASY.  Recipes on my blog are generally straight forward and simple, tailor made for a busy family, but this one?  Well, this one is the poster child for stupid easy. DSC04316But it is delicious, the perfect summer dessert.   I found it on the blog NoRecipes by Marc Matsumoto (which, by the way, you should bookmark right now). Just three ingredients: cream, sugar and a citrus juice.  It comes together in a snap.  Heat and the citrus juice act as a natural thickener to create this delicious posset that is a cross between creme brûlée and pudding.  The twist in this recipe is the Yuzu juice which gives it an exotic slightly tart flavor.  It will have your friends guessing, “Hmmm, what is it?”

    Do You YuZu?

    Yuzu is a Japanese fruit aptly described as what happens after a hook up between lemon, lime and grapefruit. You can be like me and let your inner OCD come out and hunt down actual Yuzu juice or you can go the easier, less pricey but still pretty tasty route and use lemon or lime juice.  I found my Yuzu juice at a Japanese market.  It is sold in bottles much like key lime juice.  Look for real Yuzu juice as oppose to the stuff that is made from citrus fruit concentrates (I asked one of the employees to translate the labels).  Actual Yuzu will be a bit more expensive.

    I Couldn’t Contain Myself

    Notice the cute little containers  I used for my posset?  The perfect size to serve a sweet treat at the end of any meal.  These cute little jars started their lives as designer yogurt containers that caught my eye at the market.  A cynic would say I paid for the packaging (ok they got me) but the yogurt was yummy and the jars are great for mouthwatering treats like these possets.  They would also be perfect for panna cotta or a decadent homemade chocolate pudding.  Hmmm, I think I need to go to the store for more yogurt now.

    Posset (English Pudding)

    Quick and easy, decadent dessert with 3 ingredients! Cream, sugar and Yuzu (Citrus) Juice
    Course Dessert
    Cuisine Asian, English
    Keyword almond cream, Dessert, panna cotta, Posset
    Prep Time 10 minutes
    Chill Time 1 hour
    Servings 3 -4 servings

    Ingredients

    • 1 cup heavy whipping cream
    • 1/4 cup granulated sugar ~2 ounces
    • 2 tablespoons yuzu juice* or substitute lemon or lime juice or a combination of the two
    • Fresh berries for garnish

    Instructions

    • Combine heavy cream and sugar in a medium saucepan. Over medium heat bring to a boil, reduce heat and stir until sugar is completely dissolved.
    • Remove saucepan from heat and add all of the yuzu or lemon juice at once.
    • Stir until mixture thickens. It will still be a liquid just slightly thicker than the heavy whipping cream.
    • Pour into cute little jars or cups.
    • Place in fridge to chill. As the posset chills it will thicken to a pudding like consistency.
    • Garnish with fresh berries
    • This entire will process will take you about 10 minutes...really stupid easy

    Notes

    Yuzu Juice can be found in Asian markets, in particular Japanese Markets.  Similar to Key Lime Juice (you could probably use Key Lime in place of Yuzu!), it is a bottled product found on the shelves not in the refrigerator section.
    Crazy Stupid Lemon Love (Atlantic Beach Pie)

    Crazy Stupid Lemon Love (Atlantic Beach Pie)

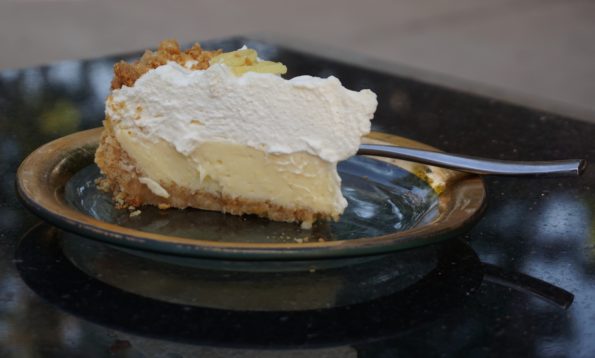
    STOP Whatever You Are Doing Right Now

    Go to your pantry, take out the box of Ritz Crackers, sugar, and that can of sweetened condensed milk from last year’s holiday dessert extravaganza.  Reach into your fruit bowl, grab a couple of lemons and from the fridge pull out eggs, butter and whipping cream.  That’s it, everything you need to make this absolutely scrumptious pie.  Six items to launch yourself into pie bliss.

    NPR-Nice Pie Review

    During my drive to work one day, a segment on NPR caught my attention when I heard the word PIE followed by “Oh My God, Oh My God, Oh My God”.  It was cookbook author Katie Workman describing her first bite of Bill Smith’s Atlantic Beach Pie.  I adore pie and here was a story about a lemon pie that originated in North Carolina and is a favorite of the folks in the South.  Is it a lemon meringue pie?  Kind of, except top the citrusy filling with billowy mounds of whipped cream.  No meringue here. The crust is made with saltines instead of graham crackers and is delightfully crispy, sweet and salty .

    I couldn’t wait to get home and make this pie.

    DSC04239Though the original recipe calls for saltines, I used Ritz crackers instead.  I love Ritz crackers and I always have a box around.  The crushed Ritz crackers (do not pulverize your crackers but should be fine crumbs) are mixed with sugar and softened butter.   The key is to mix the crumbs with the butter until they hold together similar to dough.  This is best accomplished by first pulsing your crackers in a food processor or smashing them with a rolling pin in a Ziploc. Then use your hands to combine the crumbs and butter.   Press crumbs into an 8-inch buttered pie plate.  Don’t worry, the mixture will still be loose when you are pressing it in the pie plate, especially on the rim, but it’s ok.  Bake until golden color about 15 minutes.

    Easy Peasy Lemon Squeasy Filling

    Combine egg yolks, sweetened condensed milk, and lemon or lime juice (or both).  I added two tablespoons heavy cream (not in the original recipe but an optional add). Whisk together, pour the filling into the pre-baked crust and bake for 15 minutes. EASY-PEASY  As the pie cools, whip one cup of heavy cream until soft peaks form and hold their shape.  I did sweeten my whip cream slightly (1-2 teaspoons sugar and 1 teaspoon vanilla).  Chill the pie until set and then pile on the cream.  Garnish with a sprinkling of coarse salt and strands of lemon zest.  DIG IN!  Yum, yum, yum.

    Yep, CRAZY good, STUPID easy.

    Here is the link to the NPR segment on Atlantic Beach Pie in Found Recipes.

    Atlantic Beach Pie, Crazy Stupid Lemon Love

    This pie is so good it's iconic now, Atlantic Beach Pie, crumb crust, lemon filling topped with whipped cream, delicious.
    Course Dessert, Pie
    Cuisine American
    Keyword Atlantic Beach PIe, lemon, pie
    Prep Time 15 minutes
    Cook Time 35 minutes

    Ingredients

    For crust:

    • 1 1/2 sleeves of saltine crackers or Ritz crackers about 6 ounces
    • 1/3 to 1/2 cup softened unsalted butter
    • 3 tablespoons sugar

    For the filling

    • 1 can 14 ounces sweetened condensed milk
    • 4 egg yolks
    • 1/2 cup lemon or lime juice or a mix of the two
    • 2-4 tablespoons of heavy whipping cream
    • 1 teaspoon lemon zest optional I added zest to increase the lemon flavor

    Da Finish

    • 1 cup heavy cream
    • 1 tsp vanilla
    • 1-2 tsp granulated sugar
    • Coarse sea salt for garnish
    • lemon or lime zest for garnish

    Instructions

    • Preheat oven to 350 degrees.
    • Crush the crackers finely, but not to dust. I use my food processor or dump the crackers into a ziploc and crush with a rolling pin.
    • Add the sugar, then knead in the butter until the crumbs hold together like dough.
    • Press into a buttered 8 inch pie pan.
    • Chill for 15 minutes, then bake for 18 minutes or until the crust colors a little.
    • While the crust is cooling (it doesn't need to be cold), beat the egg yolks into the condensed milk, then stir in the citrus juice. Make sure filling is well combined.
    • Pour into the shell and bake for 14-16 minutes until the filling has set.
    • Chill until set.
    • Pile whipped cream on top of pie. Sprinkle with salt or garnish with zest
    Its a Dog’s Life

    Its a Dog’s Life

    I was so confident I would plow through my Holiday Cookie List.  After all, I usually make a ton of holiday cookies.  But blogging about each recipe threw me for a loop..that and 20+ people for Christmas dinner!  But I am doggedly determined to complete my 12 days of Cookies even though Christmas has passed.  Finding myself in the doghouse for not completing my list made me think of Sammy which of course made me think of dog biscuits.  I found a really easy recipe on a favorite site, Use Real Butter.  Urb was one of the first blogs I started following and has definitely served as inspiration for my blog.  Absolutely gorgeous photos, great recipes and entertaining writing, it has it all.  A bonus of the blog are posts about their beautiful dogs, first Kaweah and now Neva both black labs.  If I were a dog I would want my family to be Jen and Jeremy, well, after us of course.

    IMG_1254 These treats contain pumpkin, peanut butter, whole wheat flour and eggs thats it.  Simple, just four ingredients. Your mixer does all the work.  The dough is easy to roll out and cut.  Pop them in the oven and 20-30 minutes later you have treats for your favorite four legged friend.  Some dogs have allergies and this recipe does have wheat flour-just a heads up.  Various followers on Use Real Butter have used oat flour or rice flour with success.
    Sammy, being part lab gobbles up almost everything we give him, these were no exception!  We baked them for 30 minutes for a nice crunchy biscuit.  Baking them less would yield a soft chewy biscuit that lasts approximately 3-5 days.  The drier version will last a bit longer.


    Pumpkin Peanut Butter Treats

    Ingredients

    From Use Real Butter

    • 2 1/2 cups whole Wheat flour
    • 2 eggs
    • 2/3 cup pumpkin puree
    • 3 Tablespoons peanut butter

    Instructions

    • Preheat oven to 350 degrees. Place ingredients in mixer bowl, blend on low speed until dough comes together and forms clumps. Remove from mixer and knead until it comes together. Add a little more flour if it seems too sticky.
    • Roll to 1/4 inch thickness and cut into desired shapes. Bake on parchment or a silpat 20-30 minutes. 20 minutes will yield a soft chewy cookie while 30 minutes will a drier crunchy cookie. Store soft cookies in refrigerator or freezer. Drier cookies can be left out overnight to insure dryness and then stored in a container.


    A Ridiculously Easy Peanut Butter Cookie

    A Ridiculously Easy Peanut Butter Cookie

    Are you ready to start baking for the holidays?  I tried two new cookie recipes yesterday to take to our annual holiday cookie swap and both are winners.  We started our swap way back when the kids were in pre-school and through the years we have managed to keep the tradition alive.  Our early gatherings were during the day with kids and babies in tow but have now morphed into a mom’s happy hour. We eat, drink, catch up on what we are doing as well as the kids and of course trade cookies.  Amazing how quickly 17 years have flown by.

    The first thing you should know is that both recipes are STUPID EASY.  My favorite cooking category.  If you are looking for cookies that are delicious and will illicit oohs and aahs, look no further. Oh, did I mention they are both GLUTEN FREE?  BAM! The trifecta.  I did not choose them because of that, they just happen to be gluten free. Here is the first one, Flourless Peanut Butter Cookies.

    FlourlessPeanutButter

    To go along with these crazy good cookies here is a Peanuts favorite The Charlie Brown Christmas Song sung by Mariah Carey.


    As the song is playing, pullout the peanut butter (smooth or chunky), brown sugar, white sugar, baking soda, vanilla and 1 egg.  That’s all you need for this recipe!  I found multiple versions of this recipe online and adapted the one from Our Best Bites.  These cookies are soft, chewy and scream peanut butter flavor.  You can add chocolate to take it to another level, its entirely up to you.  Enjoy!

    Flourless Peanut Butter Cookies

    Ingredients

    • 1 cup peanut butter smooth or chunky
    • 3/4 cup packed brown sugar (I use 1/2 cup white sugar & 1/4 cup golden brown sugar
    • 1 large egg
    • 1 teaspoon vanilla extract
    • 3/4 teaspoon baking soda
    • 1/4 teaspoon table salt
    • Sugar for rolling
    • Chocolate chunks I use the chunks from TJs, you can use chips if you like
    • optional: heaping 1/2 cup chopped chocolate or chocolate chips I recommend dark or semi-sweet

    Instructions

    • Preheat oven to 350 degrees.
    • Combine peanut butter and sugars and until smooth (1-2 minutes on medium speed).
    • Add egg, vanilla, baking soda, and salt. Mix for about a minute.
    • If adding chocolate, fold into dough now. Chocolate is optional, really.
    • Using a tablespoon ice cream scoop, scoop and shape dough into balls, roll in sugar.
    • Place balls on parchment lined cookie sheet, approximately 11/2 inches apart.
    • Using a fork, flatten with a criss cross pattern, or simply flatten with the bottom of a glass.
    • Press one chocolate chunk or chip into the center of cookie after flattening the dough.
    • Bake for 8-9 minutes, don’t overbake!
    • Let them sit on the baking sheet for a few minutes before transferring to a cooling rack. Makes approximately 2 dozen cookies. Recipe can be doubled easily.