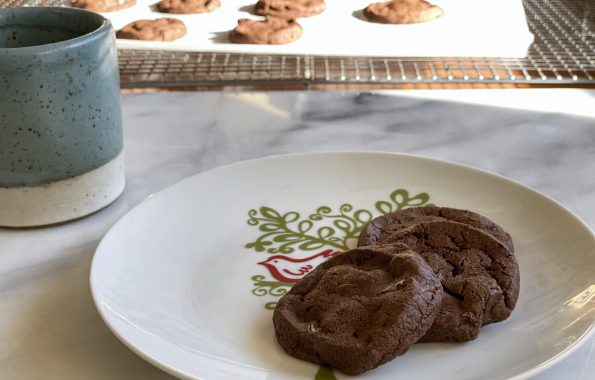
Category: Quick & Easy

Easy Dishes

Bowled Over, Udon Want to Miss My Newest Obsession (Udon)

Bowled Over, Udon Want to Miss My Newest Obsession (Udon)

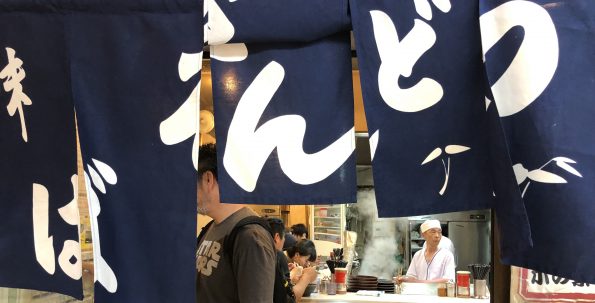
Hang on to your hats, imagine Times Square, with all its neon signs and flashing lights dedicated solely to FOOD.  Yep, that’s the only way I can describe the Dotonbori area of Osaka.  Swarms of people, whose sole purpose is to find all things delicious to eat.  A giant 3-D crab, or shrimp or potsticker over the door of a dining establishment making it easy to figure out their specialty.  The delicious aromas swirling around, changing with every step as they walk by tempura houses, ramen joints, crab feasts and yakitori vendors.

Welcome to Crazy Town for food

Yep, we bit.  Drawn by the people, hypnotized by the lights, we ate our way down the street.  We tasted Takoyaki, octopus cakes, (not really cakes, I just couldn’t bring myself to call them balls).  Think Ebelskiver with octopus bits.  We munched on skewers of yakitori, sampled matcha and black sesame soft serve and found taiyakis, fish-shaped cakes filled with red beans.

Udon want to miss the noodles

Our last stop was the perfect cap for the evening.  Walking back to our hotel we found a local shop in Namba with a trio of old cooks serving up delicious udon noodles.  We decided what toppings we wanted on our noodles, slipped our yens (=TWO DOLLARS A BOWL) into the machine, and handed the tickets to the chef.  Minutes later 3 hot steaming bowls of udon were placed in front of us.

Unlike ramen, the noodles are much thicker with a definite chew.  The broth is flavorful but clear and light, fish-based, different than the rich, heavy broth that you find with ramen.  Toppings are simple-fried tofu (abura-age), a raw egg that cooks in the steaming hot broth, a single tempura shrimp, or a clump of shredded seasoned beef and a sprinkling of green onion.  We slurped our noodles and tipped the bowls to spoon out the last drops of broth.  You’d think we hadn’t eaten all day.  Ha!


Oyako-Udon combo set

Thus My Obsession with Udon Began…

As soon as I got home plus 12 hours of catch-up sleep, I pulled out my copy of Japanese Soul Cooking by Tadashi Ono.  A gem of a book on homey Japanese comfort food.  I flipped to the udon section and then I was off to the market to look for ingredients.  I had purchased a delicious Dashi base in Tsujiki Market in Tokyo, perfect for my udon.  To make your own Dashi here is a great primer from Just One Cookbook. OR, Kikkoman makes a soup base Hon Tsuyu that makes a pretty good dashi broth base.

Working down my list, next the udon noodles. Udon comes fresh, frozen, and (if you can’t find fresh or frozen udon) dried.  Sigh, just not the same.  I also found abura-age or fried tofu skin which is used to make Kitsune Udon. The fried tofu skins are flattened and seasoned with soy sauce and placed on top of the udon.  Really delicious, and substantial enough for a satisfying vegetarian bowl of udon. It can be difficult to find abura-age though and in that case, Inari-age, seasoned deep-fried tofu pouches used to make Sushi Rice balls, is a convenient and easy substitute.  No need to season, just plop them on top of the cooked noodles.  Confused about tofu? Serious Eats’s Tofu primer is your ticket.  The carnivore in me though, bought some thinly sliced beef (sukiyaki beef is perfect) to make Niku Udon, yummo.

Making udon is very approachable.  It’s perfectly acceptable to start with a broth made from Dashi bags and pre-made noodles.

Udon Ingredients

Travel to Eat

People travel to buy clothes and souvenirs, I buy food, Dashi, Furikake’, Soba Boro cookies…yep, travel driven by food.

Studying up, here’s the scoop, on udon.

I used Dashi packets to make the Tsuyu.  This is your base,  add soy sauce and mirin to flavor the Tsuyu.

Optimally, use Sanukiya noodles, most likely found in the frozen section of your favorite Asian market.  The noodles are a bit firmer and hold up well.  The pre-cooked noodles only take a couple of minutes to separate and heat in hot water, presto-dunzo.  There are Korean versions of Udon noodles too, and they are very good.

Toppings for udon can be as simple as an egg, gently poached for the raw egg-squeamish, Abura-age, tempura, fishcake, or really ANYTHING you feel like putting on your noodles!

Kitsune Udon

Simple, satisfying, soulful, best describes a bowl of Udon, thick, slurpable, noodles, in a clear broth.
Course noodles, one bowl meal, One dish meals
Cuisine Asian
Keyword Kitsune, Udon
Prep Time 20 minutes
Cook Time 10 minutes

Ingredients

Abura-age (Tofu)

  • 1 package Abura-age or 4 Abura-age

For Simmering Abura-age:

  • 3/4 cup dashi soup stock
  • 2 Tbsp. sugar
  • 1 Tbsp. soy sauce
  • 1 Tbsp. mirin

For Soup:

  • 5 cup dashi soup stock
  • 3 Tbsp. mirin
  • 2 Tbsp. soy sauce
  • Salt adjusting the amount of salt to your preference

Noods and Garnishes

  • 4 packages pre-boiled udon noodles
  • Optional: 4 slices kamaboko fish cake for topping
  • green onions, sliced

Instructions

  • Heat dashi, mirin, sugar, and soy sauce in a medium pan and bring to a boil. Adjust the flavor with salt as you like.
  • Simmer aburaage in the soup on low heat until the liquid is almost gone. Set aside.
  • Boil water in a large pan and heat udon noodles as indicated in the package.
  • Drain the udon and divide into four bowls.
  • Pour the hot soup over udon noodles.
  • Top with seasoned aburaage and kamaboko slices.
  • Garnish with green onions

OR buy the more readily available Inari age or seasoned tofu pouches and just plop those straight into your bowl. Inari age is the fried tofu pouches used to make Inari Sushi

    Or the carnivore delight…

    Niku Udon

    Udon Noodles topped with stir fried seasoned beef and onions.
    Course Soup
    Cuisine Asian
    Keyword japanese, Noodle, soup, Udon
    Prep Time 20 minutes
    Cook Time 15 minutes
    Servings 4 servings
    Author Adapted from Japanese Soul Food

    Ingredients

    Niku Ingredients

    • 1/4 cup sake
    • 1/4 cup sugar
    • 1/4 cup soy sauce
    • 1 pound sukiyaki beef or thinly sliced flank steak, ribeye
    • 1/4 yellow onion, thinly sliced optional

    Soup

    • 6 cups udon tsuyu*
    • 4 bricks fresh or frozen udon noodles can substitute dried Sanuki Udon
    • 1-2 green onion thinly sliced
    • Shichimi togarashi

    Udon Tsuyu

    • 6 cups dashi
    • 1/2 cup mirin
    • 1/2 cup Usukuchi soy sauce light soy sauce
    • 1/2 - 1 teaspoon salt or to taste

    Instructions

    Tsuyu

    • Prepare broth and keep warm.

    Beef

    • Combine sake, sugar and soy sauce in a bowl and stir well. Add beef and mix together, coating meat well. Marinade beef for 10 minutes.
    • Preheat dry non-stick skillet or well seasoned wok/iron skillet. If including onion, saute onion slices just until soft before adding the beef. Add beef and marinade to skillet. Spread beef in skillet to cook evenly. Cook over high heat until beef has lost its pinkness and most of liquid has evaporated, approximately 5 minutes. Remove from heat and set aside.

    Udon Noodles

    • Bring large pot of water to a boil. Add each packet of noodles. gently spread noodles out. When water comes back to a boil, the noodles are done. Drain well and divide among bowls.
    • Pour hot broth over noodles. Divide beef among bowls, garnish with green onions and shichimi togarashi. Serve immediately.
    Yeh! A Delicious Chocolate Marzipan Scone Loaf

    Yeh! A Delicious Chocolate Marzipan Scone Loaf

    I recently added the cookbook Molly on the Range to the 3Jamigos shop.  I couldn’t resist, the Kindle edition is going for a buck ninety-nine. That’s just ridiculous, you can’t even get a cup of joe for that.  Molly on the Range has been out a couple of years and every now and then it would dance across my feed.  I’d think, cute book from that blogger, My Name is Yeh, and keep going.  Fast forward a couple of years, and well whaddya know, her book took off and she has a television show, Girl Meets Farm.  Overachiever, just kidding…but it piqued my interest so I got a copy.  I started reading… Julliard trained percussionist, city girl who moved from Chicago to the Big Apple to a farm in North Dakota. Huh?

    Well, the book is delightful. Her writing is warm, friendly, and spunky.  Her photos make me hungry and the drawn illustrations are a really nice touch.  I love cookbooks that tell a story.  Just like A Common Table, the recipes are the icing on the cake and the cake is the delicious stories of family, friends, and discovery.

    Her riff on a Midwest tradition the “hot dish”,  a casserole with wild rice or some sort of starch, canned cream soup, and frozen veggies   Come on now, who didn’t grow up with a casserole that started with Cream of Mushroom or Chicken Soup, hmm, hmm, good.  Her version is a made from scratch, a chicken pot pie filling topped with loads of tater tots.  SOUNDS GOOD TO ME.  As much as I love pie crust, I do have a soft spot for tots.

    Plus, she had me laughing with “You cover the bitch with Tater Tots”.  Cute with attitude, I like that.

    But before trying the classic hot dish, another one of her recipes beckoned my baker side, Dark Chocolate Marzipan Scone Loaf.  Whaat? Scone loaf?  Yep, scone dough baked in a loaf pan. The texture is much like a scone, buttery, crumbly, not too sweet, PERFECT with coffee or tea.  The kicker? Little chunks of marzipan provide a burst of sweet almond flavor in each bite tempered by the bitterness of dark chocolate.  Like a rumble in your mouth.  Soooo good.

    Chocolate and Marzipan Loaf

    The dough is a snap to put together.  Dry ingredients go into your food processor, pulse cold chunks of butter into the flour mixture. Pour butter-flour mixture into a bowl with marzipan and chocolate chunks.  Stir in eggs, cream, and extracts just until combined. Don’t overmix and keep ingredients cold (just like biscuits and scones).  Scoop the dough into a loaf pan, gently shaping it so the dough is even.  Sprinkle the top with sugar and bake. Before you know it you’ll be sitting down enjoying a delicious slice of chocolatey-almondy scone bread.  Yum!

    Dark chocolate Marzipan Scone Loaf

    Course Dessert
    Cuisine American
    Keyword Dark chocolate, marzipan, quick bread, scone loaf
    Prep Time 20 minutes
    Cook Time 45 minutes
    Total Time 1 hour 5 minutes
    Servings 8 servings

    Ingredients

    • 7 or 8 ounces marzipan chopped into ½-inch pieces
    • 1 tablespoon powdered sugar
    • ½ cup dark chocolate chips
    • 2 cups flour plus more for dusting
    • 1 tablespoon baking powder
    • ½ teaspoon kosher salt
    • 2 tablespoons sugar plus 1 teaspoon
    • ¾ cup cold unsalted butter cut into ½-inch cubes
    • 2 large eggs
    • ½ cup buttermilk or heavy cream
    • ½ teaspoon vanilla extract
    • ½ teaspoon almond extract
    • Jam for serving

    Instructions

    • Preheat the oven to 400ºF. Line an 8 x 4-inch loaf pan with parchment paper, allowing 1-inch wings to hang over the edges on the long sides.
    • In a large bowl, toss together the marzipan and powdered sugar to coat. Add the chocolate and set aside.
    • In a food processor, combine the flour, baking powder, salt, and 2 tablespoons of the sugar and pulse to combine.
    • Add the butter cubes and pulse until the butter is the size of peas. Add this to the bowl with the marzipan.
    • In a small bowl, whisk together the eggs, buttermilk or cream, and extracts and add to the dry ingredients. Use a spatula to stir just until combined.
    • Pour the mixture into the prepared loaf pan and spread it out evenly.
    • Sprinkle the top with the remaining 1 teaspoon sugar and bake until golden brown on top and a toothpick inserted into the center comes out clean.
    • Begin checking for doneness at 40 minutes.
    • Cool in the pan on a wire rack for 10 minutes. Remove to the rack to cool completely.
    • Slice with a serrated knife and serve with jam.
    Bacon Up Some Candied Bacon Bites

    Bacon Up Some Candied Bacon Bites

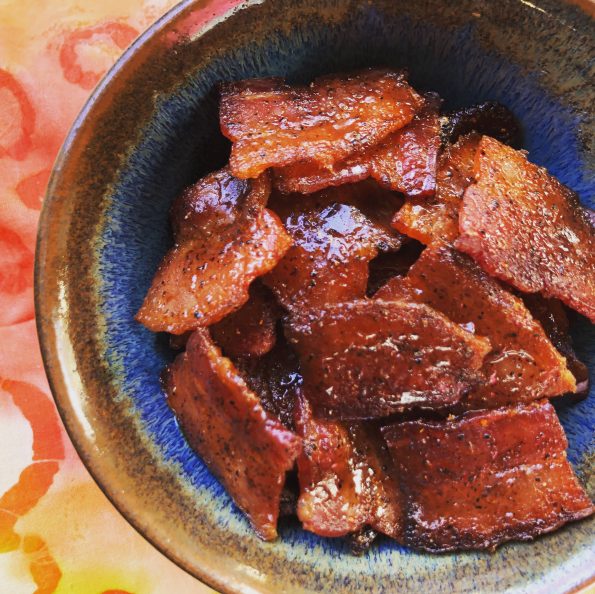
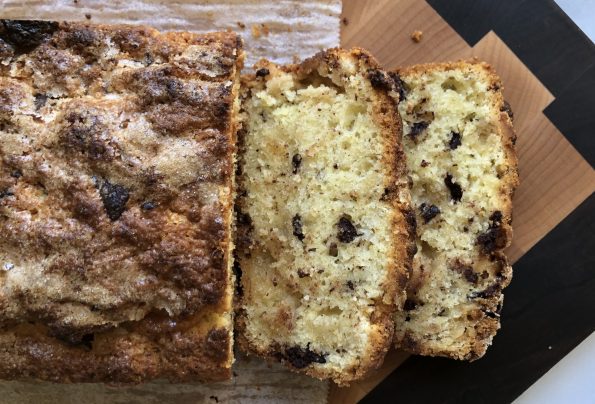
    Looking for something sweet and salty to round out a cheese board for a weekday meeting, I thought of the Bloody Mary I had at a happy hour in Minneapolis with Jamie. I don’t remember much about the Bloody Mary but the CANDIED BACON swizzle stick that served as a stirrer and edible garnish was delicious.

    Candied bacon would be perfect for my cheese board but in bite-size pieces to go along with the cheese and crackers.  In its simplest form, coat thick cut bacon pieces with brown sugar and bake, but no one leaves well enough alone.  For this batch, I used brown sugar and chili powder.  Next time I might use cayenne for spice, or smoked paprika for smokiness, chili pepper or black pepper…really whatever you like.  Another riff, combine Siracha Sauce and brown sugar, coat the bacon with the sauce and bake as directed.

    Note: Line the pan with foil before placing the metal rack on the pan for the bacon.  You only need to spread the brown sugar and spices on one side.

    20 minutes later-ta-da, candied bacon for breakfast, drinks, happy hour munchies, salads…anything and everything is better with bacon.

    Candied Bacon

    Bacon Candy!
    Course Appetizer
    Cuisine American
    Keyword Candied bacon
    Prep Time 10 minutes
    Cook Time 20 minutes
    Total Time 30 minutes

    Ingredients

    • 1/2 cup packed light brown sugar
    • 1-11/2 teaspoon chili powder or 1 teaspoon black pepper, or smoked paprika, or 1/2 teaspoon cayenne pepper
    • 20 slices of thick-cut bacon 1 pound

    Instructions

    • Step Preheat the oven to 400°. Line large rimmed baking sheet with foil. Place a wire rack over the foil.
    • In a small bowl, whisk the brown sugar with the chili powder.
    • Cut bacon into approximately 2-inch pieces.  Arrange the bacon pieces on the rack and coat the tops with the chili sugar.
    • Bake for 20 to 25 minutes, until caramelized and almost crisp.
    • Allow bacon to cool completely on rack; remove from rack and serve.  If bacon is made early, leave at room temperature before serving.

    Notes

    A spicy twist, combine 1/2 cup brown sugar and 1/4 cup Siracha Sauce.  Coat the bacon and bake as directed.


    Muffin been the Mochi that Caught My Eye (Butter Mochi Muffins)

    Muffin been the Mochi that Caught My Eye (Butter Mochi Muffins)

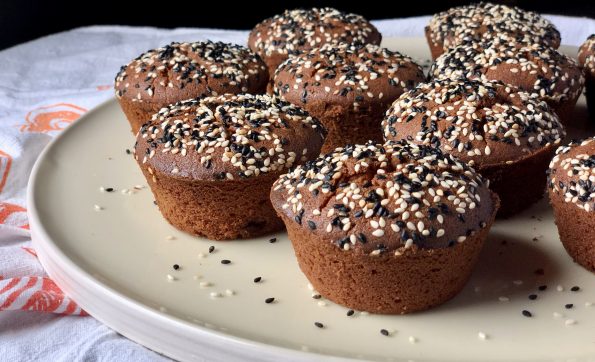
    Always searching for new and different treats, I came across an article that spotlighted Third Culture Bakery in Berkeley.  The baker is an alum of Cal (Go Bears) who chose food over toxicology (good choice) and thus Mochi Muffins made with sweet rice flour were put on the map.  Though I haven’t made it to Berkeley to try one, I found a couple of recipes online that sounded scrumptious, so it was off to the rices!  Update: I just posted a new mochi muffin recipe, Mango Mochi Muffins made with mango tea and freeze-dried mangos!  It’s small-batch baking, only 8 regular size delicious muffins.

    My Sweet Rice, Oh My Rice

    For the uninitiated, mochi (sweet rice flour) is a cornerstone of Asian treats.  Sweet rice is PULVERIZED into flour to which water and flavorings are added.  It ends up looking like the BLOB, really.  It can be flavored, baked, steamed, fried and made into countless delicious treats both sweet and savory.  During New Year’s, Japanese families gather to pound mochi in a tradition called Mochitsuki. Just for your viewing pleasure here is Mitsuo Nakatani, Japanese Mochi Master.  Enjoy

    Traditional mochi starts with steamed rice and is pounded and shaped into sweet or savory rice cakes.  Mochi muffins and Hawaiian Butter Mochi start with sweet rice flour, mixed with liquids, and baked.  Since I don’t foresee any of us pounding mochi, let’s make muffins and Hawaiian Mochi. Infinitely easier and pretty darn tasty.

    Back on the Muffin Trail

    If you have ever had Manju from Shuei-Do Sweet Shop in Japantown in San Jose, or Butter Mochi from Hawaii and liked it…you’re going to love these.  If you haven’t had mochi, this is a good introduction.  Not quite as gooey as Manju and definitely not cakey like a muffin, it’s a delicious hybrid of the two.  A touch of sweetness, crispy on the outside, dense and chewy on the inside, and crunchy from the generous sprinkle of sesame seeds on top.  It’s different but delicious.  If that wasn’t enough, they are GLUTEN-FREE.  You’re welcome.

    Rice, Rice, Baby

    The most important item in the pic is the Mochiko Sweet Rice Flour by Koda Farms.  This is the go-to brand.  You can definitely find it in any Asian store (along with the sesame seeds), and if you’re lucky, at some of your larger local markets.  Take a walk down the international/ethnic food aisle.

    I found quite a few recipes for Mochi Muffins online and finally settled on one from a beautiful blog called Snixy Kitchen.  Her batch made 12 muffins, which made her recipe the frontrunner as most made 24.  As yummy as they are, what am I going to do with 24 muffins?!

    Mochi muffin batter

    The batter comes together in a snap:  melted butter, coconut milk, egg, brown sugar, and rice flour.  Stir together and pour into a muffin tin.  Boom, done.  My batter was thicker than some of the posts I’ve seen.  This may account for the slight dome mine had.  I also found a recipe from Saimin Noshrat in the NYT.  I think I may try a couple of her tweaks the next time I make these.  Trust me, there will be a next time.  I will use light brown sugar, substitute evaporated milk for some of the coconut milk, and brown my butter.  Not to worry, a full report will follow.  Hmmm, can’t wait to make another batch.

    The longer you leave these in the oven, the less gooey and more cake-like they will be.  The first batch was baked for 60 minutes.  I think I should have pulled them out sooner, I like gooey.  Now I check at 40 minutes and pull them out around 45 minutes.  To test them, use a knife to poke the center of a muffin.  It should come out fairly clean with a bit of crumb.

    More Mochi Madness

    After making these muffins if you like the chewiness, definitely try the Hawaiian Butter Mochi Muffins, inspired by Aloha Kitchen by Alana Kysar.  A little less flour and a bit more liquid kick up the gooey, buttery, lusciousness of these bites.  Bake them in a muffin tin for crispy edges.  I ADORE both of these muffins.

    These are soooo good, a little more squishy, very buttery, topped with shredded coconut.

    Also check out Peanut Butter Mochi from A Common Table by Cynthia Chen McTernan. Delish! LOVE, love, LOVE

    If you would like to try traditional Japanese Mochi, here are my recommendations:  Fugetsu-Do in Little Tokyo in LA, the oldest family-owned Japanese Shop in the US, Shuei Do Manju Shop in San Jose, and in my hometown of SF, Benkyodo Company in Japantown (now closed😢😢😢 )All family-owned artisan shops.

    Mochi Muffins
    Print Pin
    4.50 from 18 votes

    Butter Mochi Muffins

    Course Dessert
    Cuisine Asian-American
    Keyword coconut milk, Gluten free, mochi muffin
    Prep Time 15 minutes
    Cook Time 45 minutes

    Ingredients

    • 1/4 cup (2 ounces )unsalted butter, melted and cooled, plus more for greasing pans sub brown-butter
    • 2 cups (320 grams) mochiko sweet rice flour Koda Farms
    • 1 cup (200 grams) organic dark brown sugar* light or dark brown sugar will work
    • 2 teaspoons baking powder
    • 1/2 teaspoon kosher salt 1/4 tsp sea salt
    • 1 13 ounce can full-fat coconut milk Sub evaporated milk, half to all
    • 2 large eggs room temperature
    • teaspoons vanilla extract
    • 1 teaspoon molasses optional, added for flavor or use Golden Syrup or honey
    • tablespoons each black and toasted sesame seeds, for garnish

    Instructions

    • Preheat oven to 350°F and place the oven rack in the middle of the oven.
    • Grease the sides and top of a 12-cup muffin tin well with soft butter.
    • In a medium bowl, whisk together the sweet rice flour, brown sugar, baking powder, and salt.
    • In the bowl of a stand mixer fitted with the whisk attachment or a large mixing bowl, whisk together the melted butter, coconut milk, eggs, vanilla, and molasses.
    • With the mixer on low speed, slowly add the dry ingredients to the wet ingredients and mix until completely combined.
    • Divide the batter among the prepared muffin tin, filling each cup all the way to the top.
    • Sprinkle the tops with black and white sesame seeds.
    • Bake 45-50 minutes until the top is brown and crispy and the muffin springs back when poked with a finger.  Bake for less time. for muffins that are chewier and less cakey. Muffins are done when a skewer comes out relatively clean and the tops are brown.
    • Let cool 10 minutes in the pan, then transfer to a wire rack to cool completely.
    • Store in an airtight container for up to 3 days.  Can be frozen and thawed at room temp.

    Notes

    Organic dark brown sugar is richer and more caramel-y than conventional, but you can use regular brown sugar.
    Any muffin tin will do, but for ultimate crispy exterior, use a dark non-stick muffin tin.
    If using a light muffin tin, you may have to bake the muffins a little bit longer.
    If keeping them for longer, they'll lose their crispiness after a day or two in storage, put them in the oven for a few minutes to crisp again before eating.

    Butter Mochi Muffins

    Oyako Donburi Hmmm, Maybe the Chicken and the Egg Came Together?

    Oyako Donburi Hmmm, Maybe the Chicken and the Egg Came Together?

    I am soooo excited! We are adding a new category to 3Jamigos!  The kids have flown the coop and are making their own way, Jeff in the City close by (yippee), Jorge in Korea teaching (so far away) and Jams currently working and freezing her tush off in Minneapolis (half of so far away).  Luckily we have FaceTime, phones, texting and when that just won’t do, flights.  Just an airplane ride away.

    A California-Texas kinda gal, winter in Minneapolis is a new experience for Jamie.  Down jackets, scarves and gloves are now a part of her wardrobe vernacular, as is staying indoors. The winter weather has her looking for activities inside to keep her busy.  For Christmas, we gave her knitting needles, yarn and starter lessons from Wes on how to knit.  Big hit, knitting up a storm haha.

    Jamie has always loved to bake and cook.  She’s a natural, and with this weather, she has been doing alot more cooking and baking.

    A recent call went like this:

    Mui (her nickname):  Mom, can you send me your Oyako Donburi recipe?  Is it easy to make?

    Me: Sure.  Yep, it’s pretty easy.  One pan, a couple of eggs, chicken, and onions.

    Mui: That sounds good, I love rice bowls and I can bring the leftovers to work.

    LIGHTBULB MOMENT:  Hey, why don’t we both make Oyako Donburi and then post about it?  You have done spots before on 3Jamigos. We’ll alternate picking recipes to make and blog about!

    THUS a new 3jamigos category was born, M&M which stands for Mom and Mui.  Mui means little sister.  We have been calling Jamie Mui since Day One.

    Oyako Donburi is the perfect dish to launch M&M.  Chicken, sliced shiitake mushrooms, onions are cooked in a savory-sweet sauce of soy sauce, sake, dashi.  Lightly beaten eggs are then poured on top of the chicken and sauce and simmered until just cooked through, then the chicken and egg mixture is placed on top of hot rice.  Watch your kids, hubby, neighbors, everybody gobble it up.  So delicious, classic Japanese soul food.

    So without further adieu, our inaugural M&M post by Jamie on making Oyako Donburi in cold & snowy Minneapolis.

    HELLOOOO WORLD/readers of 3jamigos.com. It’s ME. J A M I E. Ya know, that crazy girl who moved to Minneapolis to live in -30 DEGREE WEATHER. Nope, that wasn’t a typo. It really was NEGATIVE 30 on my drive into work last week.  GLOBAL WARMING IS REAL PEOPLE. (I know that doesn’t really make sense, but global warming is causing polar vortexes normally over THE NORTH POLE to break apart and dip down to lower parts of the globe).  It’s so cold that you can’t stand outside with exposed skin for more than 5 minutes without getting frostbite. FROSTBITE. Schools were closed. The roads were empty. But I still had to go to work. Once I got over that, it really wasn’t bad. They are GREAT about paving and salting the roads, so it was actually a breeze getting to and from work.

    BUT enough about me. Let’s talk about the fact that my mom and I decided to start a mother-daughter blog where we cook the same dish separately and talk about it, AND THE FIRST DISH WE PICKED JUST HAPPENED TO TRANSLATE TO “Parent (chicken) and child (egg).” Damn, we are GOOD, people. You couldn’t even make this stuff up. I mean, I guess you could. It would make a great lifetime/hallmark movie. Ok. Enough interruptions. Let’s get down to the food.

    Okayo Donburi. The ultimate comfort food.  It’s a mix of chicken and eggs (parent and child) with a sweet/salty/chickeny sauce and sautéed onions.  Pour it over some rice, and all the stresses of your day melt away. The best part? It is SO easy to make.

    Chop up some onions, slice some mushrooms, toss it into the pan with some chicken broth, mirin, soy sauce, and sugar, and top it off with some eggs and chicken.  E A S Y and so foolproof even my mom could make it and she suuuuckkss at cooking (if you couldn’t tell). I like to add in extra mushrooms and chicken. Sometimes extra onions. Pretty much extra everything. It is that good.  Mom used to make it all the time when I was little, and it was one of my favorite dishes then too.  So far, I’ve made it 3 times since winter started. That’s how good it is.

    So now, for lack of a better conclusion, stop reading this post and go make it. Go!

    Oyako Donburi

    Course Main Course
    Cuisine Asian
    Keyword Oyako Donburi
    Prep Time 15 minutes
    Cook Time 15 minutes
    Total Time 30 minutes
    Servings 4 servings

    Ingredients

    • 3-4 boneless, skinless chicken thighs cut into bite-sized pieces
    • 4-5 eggs lightly beaten
    • 1/2 yellow onion thinly sliced, red onion can be used
    • 1 green onion sliced on the diagonal
    • 2-3 dried shiitake mushrooms soaked to soften, sliced
    • 1 tablespoon vegetable oil

    Sauce Mixture

    • 1 cup dashi (fish based stock) can substitute low sodium chicken broth
    • 5 T soy sauce
    • 2 1/2 T sugar can cut to 2 T
    • 21/2 T mirin substitute sake to decrease sweetness
    • cilantro garnish if desired

    Instructions

    • In a small bowl, lightly beat eggs and set aside.
      Oyako Prep
    • Heat saute' pan, add vegetable oil then onions and mushrooms, fry for 1-2 minutes until onions are soft. Add sauce mixture, heat through. 
    • Add chicken and lower flame to medium-low. Cook for 3-4 minutes, turning the chicken over. Cook until chicken loses pinkness
    • Add eggs evenly over top of chicken. Cover and cook over low heat until eggs are just cooked should not be dry. 
    • Garnish with green onions or cilantro and nori strips
    • Divide into portions and serve over rice.  If desired, individual portions can be made.  Quarter ingredients and use a small omelet pan to make.  
    Potato Leek-i-ty Split Soup (Instant Pot Potato Leek Soup)

    Potato Leek-i-ty Split Soup (Instant Pot Potato Leek Soup)

    I love Potato Leek Soup. If you dig into the 3jamigos archive this soup pops up a couple of times.  This is my go-to soup.  In the winter, I make a hearty, rustic version with lots of potatoes, smokey bacon, and heavy cream, perfect for a chilly evening.  The summer version is lightened with a bit more stock and light cream, pureed so it is silky smooth, and served at room temperature. Both are crazy delicious and proof of the “Versatility of Vichyssoise”.


    The hubs called me at work one afternoon last week with that age old question, “What’s for dinner?”. With my long commute, I knew it had to something quick and easy. A salad? stir fry? Quick pasta dish? As ideas popped up in my brain (including restaurant names), I heard Wes say, how about potato leek soup?

    Crusty French bread, glass of wine, bowl of soup..I was all in.  But, silly, soup takes awhile…wait, hmmm.

    Enter the Instant Pot.  I have made other soups in my IP.  Why not?  A quick Google search landed on quite a few recipes for Potato Leek in an Instant Pot. Why didn’t I think of this before?

    Dinner is served

    I saute’ the vegetables in the Instant Pot, added the stock, set the timer to 7 minutes and forgot about it until I heard the beep-beep-beep.  Finish with cream and garnish…DONE.  How easy is that?  Ahhh dinner on the table in less than an hour and only 1 pot to clean.  Perfect.

    Instant Pot Potato Leek Soup

    A delicious, quick and easy recipe for Potato Leek Soup made in your pressure cooker
    Course Soup
    Cuisine French
    Keyword Instant Pot, Potato Leek Soup
    Prep Time 15 minutes
    Cook Time 15 minutes
    Resting time 10 minutes
    Total Time 30 minutes
    Calories 244kcal

    Ingredients

    • 1 Tbsp Olive Oil
    • 2 Tbsp Butter
    • 3 large Leeks white part only, cleaned and sliced into rounds(1/8")
    • 1 yellow onion diced
    • 2 cloves Garlic minced
    • 2 Tbsp Flour
    • 5-6 cups Chicken Broth
    • 1 Bay Leaf
    • 1 tsp Salt
    • 1/4 tsp White Pepper
    • 1 lb Gold Potatoes (4-5 spuds if using Yukon Gold, 3 russets) peeled and diced
    • 1/2 cup heavy cream or half and half
    • Garnish
    • Chopped Chives
    • Sour Cream
    • Anything your little heart desires

    Instructions

    • Press the Sauté button on the Instant Pot. When hot, add the oil and butter.
    • Add the onion. Cook until soft, stirring occasionally, approximately 5 minutes. Try not to let it brown. Add leeks, cook for additional 3-4 minutes until the leeks are soft.
    • Add garlic and cook for about 30 seconds, until fragrant, stirring frequently.
    • Sprinkle the flour over the onion-leeks mixture and stir. Cook for a minute to get the raw taste out of the flour.
    • Stir in the broth. Be sure to dissolve the flour and scrape the bottom of the pot. The Instant Pot senses particles on the bottom and will shut off to prevent burning.
    • Add the bay leaf, salt, pepper, and the potatoes. Stir.
    • Put the lid on the pot and set the steam release knob to the Sealing position.
    • Press the Manual (or Pressure Cook) button, and the + or - button to choose 7 minutes. then forget about it until the timer goes off.
    • When the cooking cycle has ended, let the pot naturally release pressure for 10 minutes. Then manually release the remaining steam.
    • 10. When the pin in the lid drops, open it and stir the soup. Remove the bay leaf. Then use an immersion blender to puree it. If you don't have an immersion blender, you can use a blender, pureeing the soup in small batches very carefully.
    • 11. Stir in the cream or half and half.
    • 12. Taste and adjust salt, if needed.

    Garnish with chopped chives, sour cream, bacon...just about anything you like, corn, shrimp, crab.

      Notes

      Blend soup just a bit leaving chunks of potatoes for a more rustic soup. Blend until completely smooth for a classic version.  Reserve part of the soup, before adding the cream, to freeze for a rainy day.  Rainy day instructions-heat soup slowly and add cream once it is warmed.  
      This soup serves as a wonderful base for a vegetable soup.  Add chopped spinach at the end and heat and stir occasionally until spinach wilts.   
      Use clam juice as part of the stock for a seafood twist.  Garnish with shrimp or crab. yummos.
      Cool as a Cucumber Banchan (Simple Asian Cucumber Salad)

      Cool as a Cucumber Banchan (Simple Asian Cucumber Salad)

      Are you like me? I hate making salads. I love salads, but prepping veggies, not so much. I only have enough bandwidth to prep maybe 1-2 fixings for a salad. Which means my salads are pretty darn boring. Helloooo, Banchan.  Banchan are little appetizers plates that come with every Korean meal.  Banchan can include seafood like fishcake but are generally comprised of vegetables such as soybeans, radishes, potatoes or CUCUMBERS (my favorite). It’s my veggie salvation.  Instead of a salad, I pull out my jar of kimchi or pickled radishes, slice some cucumbers and splash a soy sauce, sesame oil, and green onion dressing on the cucumbers.  So refreshing and delicious.  Yep, rockin’ the banchan.

      One of my favorite kitchen gadgets is the Japanese Behringer mandoline.  I purchased mine when I was in school in  Los Angeles a long time ago, and I mean a LONG time ago.  Thirty years later it’s still going strong, it’s a great option if you don’t have a mandoline.  It is sturdy, inexpensive and apparently very durable (I can vouch for that), find it here.

      I love this little salad.  It is stupid easy to make and delicious. I use soy dashi, (a combination of soy sauce and dashi, a fish-based stock) when I want a smokey, slightly briny taste to the cucumbers.  Would be a lovely side dish with the Gochujang-Lime Salmon or the Braised Pork Belly rice bowl.

      Cucumber Banchan

      Course Side Dish
      Cuisine Asian
      Keyword cucumber salad
      Prep Time 10 minutes

      Ingredients

      • 1 cucumber Japanese, English, Persian about 1 1/2 cup sliced for 1 cucumber

      Dressing

      • 1 Tbs soy sauce or Soy Dashi
      • 2 Tbs rice vinegar
      • 1 Tbs sugar
      • 1/2 tsp Korean red chili powder
      • 1 tsp sesame oil

      Garnish

      • 1/4 tsp sesame seeds
      • 2 green onions chopped

      Instructions

      • Slice cucumbers into thin slices. Around 1/8 inch (3 mm).
      • Mix soy sauce, vinegar, sesame oil and sugar in a bowl. Pour soy vinegar into the bowl with cucumbers.
      • Then, add 1/2 tsp chili powder and sesame seeds. Mix and taste. Add more chili powder if you want. Doing it in this order allows you to taste and control the amount of chili powder based on how spicy you want it.
      • Add chopped green onions and mix again.
      • YOU ARE DONE!! Serve immediately for the freshest and crunchiest cucumbers. You can also let it sit for 10-15 minutes for the cucumbers to absorb the dressing before serving.
      Crazy 8 Day: It’s Crack Not A Cookie but It Deserves to be on the List

      Crazy 8 Day: It’s Crack Not A Cookie but It Deserves to be on the List

      This year I joined in on Food52’s Holiday Gift Swap. It was simple, all I had to do was  make a donation to their designated charity and promise to send a food-centric gift by Dec. 10th.  A couple of days later, I received my “Secret Santa” swapee’s name and address.  My swappee lives in Colorado, I already had a list of go to items I wanted to send her like Jule’s granola and my cousin’s spiced pecans.

      My box of goodies came from Catherine of Salt Lake City.  Like a kid in a candy store, I quickly tore the box open and discovered a treasure trove of gifts, sweet and salty chocolate sprinkles, popcorn seasoning, salad toppings, a too cute kitchen towel and a delicious cereal mix- Ashure Cereal that I started munching on immediately.  Luckily, Cathy included the recipe by Saimin Nosrat in the NY Times. It starts with a base of puffed wheat, nuts, and sesame seeds.  Then spiced with cinnamon, cardamon and mahaleb, (a middle eastern spice from cherry seeds, think bitter almond) and finally toasted in the oven with brown sugar, honey and oil.  It is addictively delicious.

      After scarffing down the bag, I knew I had to make my own batch.

      This is where the search begins…

      I head to my favorite market, International Food Bazaar.  I unwittingly thought that the spices would be the hardest to find. Surprisingly not true.  Most of the ingredients and spices can also be found online.

      With Mahaleb in hand, I head to my neighborhood grocery for the puffed wheat cereal…

      4 STORES later, I walk out empty-handed and dejected.  Not a bag or box of puffed wheat to be found.  Apparently it is really hard to find puffed cereals without sugar added.  Who would have “thunk” it?

      I took to the internet, and found Vitacost, a supplement/health food site where I not only find Puffed Wheat, but Puffed Kamut (an ancient grain), Puffed Corn and Puffed Rice. You can find Puffed Rice by Quaker Oats in the supermarket, a great alternative for a gluten free version. I like Puffed Kamut. I would definitely cut a bit of the cereal and add more nuts and Mahaleb.  Watch carefully when baking as it browns fairly quickly.  I love it over yogurt and fresh fruit or straight out of hand.

      So be forewarned, the most difficult ingredient to find will be the cereal.  But it will be well worth it, Ashure Cereal is absolutely delicious.

      Here, for you to drool over, my Food 52 holiday swap gift  from Cathy!

      Ashure Cereal

      Course Snack
      Cuisine Middle Eastern
      Keyword cereal
      Cook Time 15 minutes
      30 minutes
      Servings 10 servings
      Author Adapted from NYT

      Ingredients

      • 1/2 cup /85 grams neutral-tasting oil such as canola
      • 6 tablespoons /110 grams honey
      • 1⁄2 cup /110 grams dark brown sugar packed
      • 1 teaspoon fine sea salt
      • 1 teaspoon ground cinnamon
      • 1⁄2 teaspoon ground mahaleb increase to 3/4 -1
      • 1⁄2 teaspoon ground cardamom
      • 10 cups /160 grams puffed wheat sub Puffed Kamut or Rice
      • 3/4 Scant cup /85 grams halved pecans increase to 1 cup
      • 1⁄3 cup /50 grams pumpkin seeds
      • 3 tablespoons /30 grams sesame seeds
      • 1⁄2 cup /85 grams almonds very roughly chopped, or left whole with skin

      Instructions

      Step 1

      • Adjust oven racks to lower-middle and upper-middle positions. Heat to 350. Line two baking sheets with parchment paper, and set aside.

      Step 2

      • Combine oil, honey and sugar in a medium saucepan, and set over medium-high heat. Whisk well, and bring to a boil, stirring occasionally to prevent scorching.

      Step 3

      • In a large bowl, combine remaining ingredients, and mix well. Once the honey mixture comes to a boil, carefully pour it over the dry ingredients. Working quickly, use a large silicone spatula to stir, turning the contents of the bowl over until everything is coated evenly with the syrup. Transfer mixture to baking sheets, and use spatula to flatten out cereal into an even layer.

      Step 4

      • Place baking sheets on prepared oven racks, and bake for 10 minutes.
      • Carefully remove 1 tray at a time, and use spatula to stir cereal around. Rotate trays 180 degrees, and switch oven positions to ensure even baking. Bake for 4 to 6 minutes longer, until golden brown and well caramelized. Remove from oven, and allow to cool entirely on the trays before breaking cereal into large clusters.

      Step 5

      • Store in an airtight container for up to 2 weeks.

      Happy holidays and happy baking!

      Keep Calm and Salmon On

      Keep Calm and Salmon On

      Growing up, most meals included at least one seafood dish.  Steamed rock cod with ginger and scallions, flounder with brown bean sauce sitting on a bed of tofu or stir-fried prawns with tomato and garlic (SOUL FOOD).  My dad would finish work and then head out to the shops in Chinatown to find the fresh catch of the day.  The markets carried locally caught cod, bass, or flounder kept cold on a bed of ice. My dad checked the freshness by looking at the clarity of the eyes. Sometimes he opted for live fish, crab, or shrimp from the tanks that lined the wall.  He peered into each tank before selecting the one he wanted. Once satisfied with his choice he would barter with the fishmonger for a good price.

      So my exposure to seafood was two extremes

      Freshly caught fish steamed and flavored with ginger, green onions, and cilantro. The sauce was pure heaven, an amalgamation of liquid created from the fish juices, soy sauce, and aromatics.  My brother and I fought over who could ladle the most sauce over their rice, a tradition my kids have continued.

      On the flip side was Friday night frozen FISHSTICKS with catsup!  Date night for the folks meant dinner in front of the TV for my brother, my cousins and me.  I hate to admit it, but from the ages of 4-10, I probably liked the fish sticks more. Silly girl.

      One fish not typically part of Asian cuisine is Salmon. I discovered salmon late in the game and ironically it’s the fish we prepare at home now more often than any other fish. I am always on the lookout for new and different recipes for salmon.  Whaddya know…from Everyday Korean Cookbook, one of my current favs (check out her site to preview a couple of recipes), I found the recipe, Roasted Salmon with Gochujang Mayo. The sauce, sweet from the mayonnaise, spicy from the Gochujang, and citrusy (is that a word?) from a squeeze of lime is pretty darn tasty.  The mayo comes together in a snap.  Slather it on the fish, pop it in the oven and finish it under the broiler.  So easy and so delicious.  It’s a keeper.  The recipe calls for the Japanese mayo, Kewpie, but you can make your own with Best Foods mayo.

      From the Japanese cookbook, Just One Cookbook. Kewpie imposter recipe!

      For 1 cup of American mayonnaise (like Best Foods), add 2 Tbsp rice vinegar and 1 Tbsp sugar. Whisk until the sugar dissolves. For 1 Tbsp of American mayonnaise, add 1/2 tsp rice vinegar and 1/8 tsp sugar.

      That’s a WRAP

      What is my favorite way to serve this salmon? Classic Korean style-bibb lettuce used as a wrap.  It’s the Asian version of a taco. I put a bite of rice or noodle, bit of kimchi, morsel of salmon and dab of chili sauce in the lettuce, wrap it, and eat the whole thing in one bite.  Hmmm…. Crispy cool lettuce, warm soft kernels of rice, spicy sweet salmon, salty, briny umami-packed kimchi topped with scallions, cilantro and lime.  A party in my mouth, sooooo good!

      Next time you need a delicious marinade for your salmon, give this one a go!

      Roasted Salmon with Gochujang Mayo adapted from Everyday Korean

      Quick and tasty roasted salmon with spicy, sweet Gochujang Mayo. Perfect meal at the end of a long day.
      Course Main Course
      Cuisine Asian
      Prep Time 10 minutes
      Cook Time 20 minutes
      Total Time 30 minutes

      Ingredients

      • 1 1 1/2-to-2-pound wild salmon fillet (skin on is fine), pin bones removed
      • 2 tablespoons mayonnaise preferably Kewpie.
      • 2 tablespoons oyster sauce Lee Kum Kee-please
      • 1-2 teaspoons gochujang Korean red pepper paste
      • 1 teaspoon fresh grated ginger
      • 3-4 cloves garlic minced (~2 teaspoons)
      • 1 tablespoon fresh squeezed lemon lime, or tangerine
      • 1 Garnish scallions, cilantro, toasted sesame seeds, lime wedges,

      For serving: Steamed rice, kimchi or sliced cucumbers and bibb lettuce leaves

        Instructions

        • Place 1 oven rack on the highest level of oven and a second rack below. Heat oven to 475 degrees. Line sheet pan (shallow baking sheet) with aluminum foil; lightly grease foil with cooking spray.
        • Pat salmon dry with paper towels. Place fillets (skin-side down) on foil-lined baking sheets; set aside.
        • Mix together mayonnaise, oyster sauce, gochujang, ginger or garlic, lime juice in a small bowl. Brush or spoon sauce evenly over salmon.
        • Place baking sheet on second rack in oven, and roast 8 minutes, until sauce sizzles and begins to brown. Heat oven to broil. Place salmon on top rack of oven, and broil on high another 3 to 5 minutes, depending on thickness of fillet and desired doneness. 
        • Serve with bibb lettuce, rice and garnish, if desired, with toasted sesame seeds, sliced green onion, cilantro, lime wedges, kimchi, and/or cucumber slices.

        Notes

        Serve with bibb lettuce, rice and garnish, if desired, with toasted sesame seeds, sliced green onion, cilanto, lime wedges, kimchi, and/or cucumber slices.