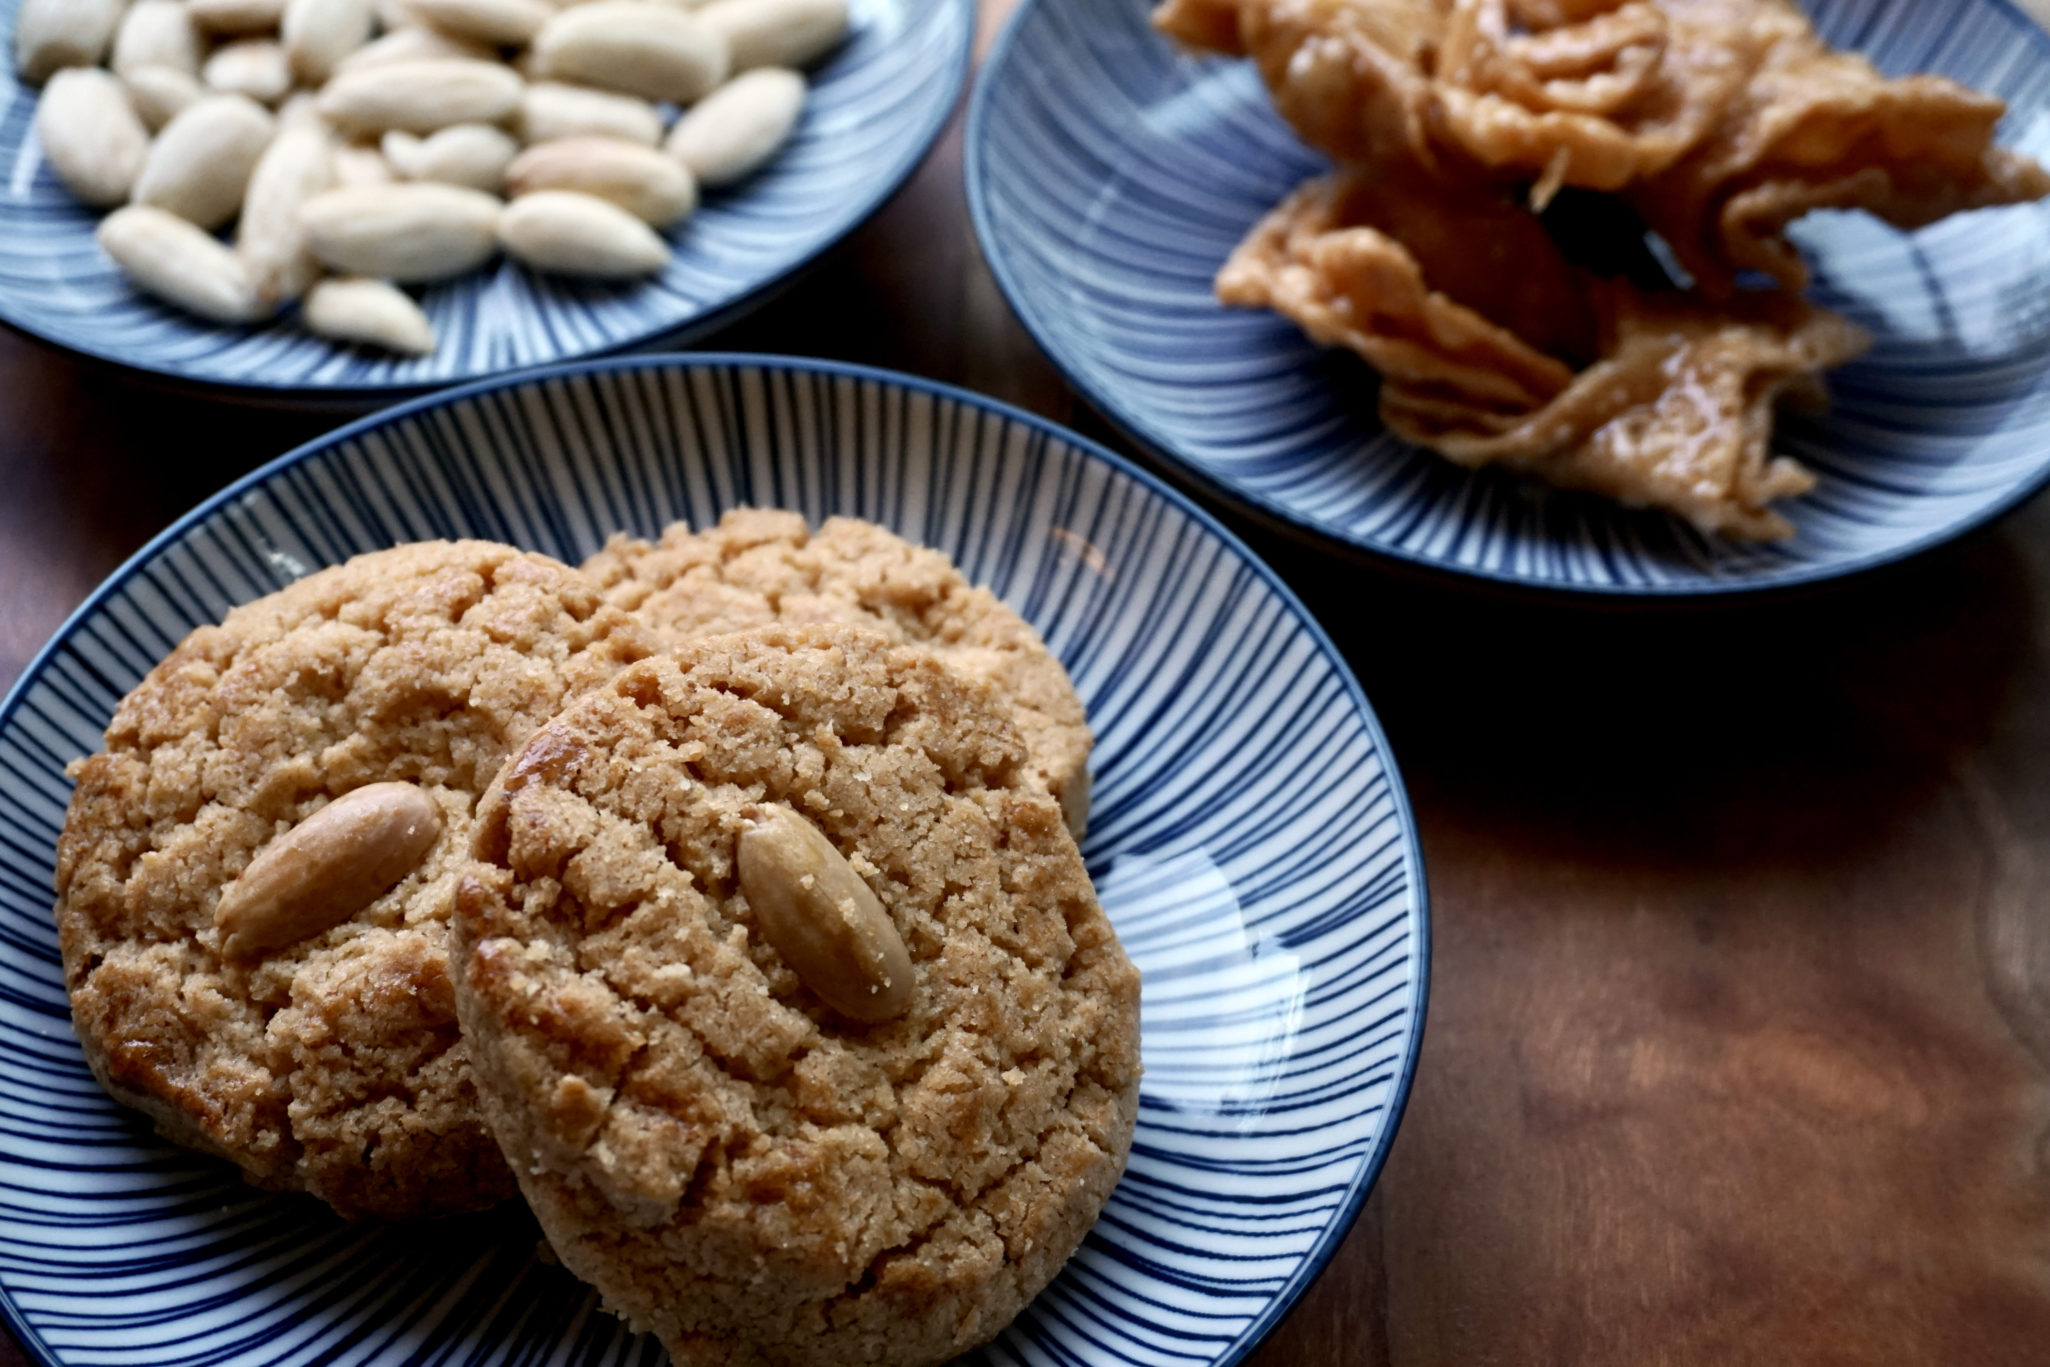
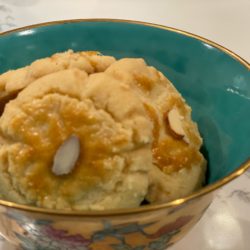
Growing up in Chinatown the standard plate of cookies found on our table was not Chocolate Chip Cookies, but Almond Cookies. Found in every Chinese Bakery, these were my favorite cookie, well except for the almond in the center, which I ate around, kids, what do you do.
Phoenix Bakery
Last Roadtrip
One of my favorite Almond Cookies comes from Phoenix Bakery in Los Angeles Chinatown. It’s been there a long time, three generations of the Chan family (hopefully there is a fourth generation) cranking out cookies and cakes. Theirs is the quintessential Almond Cookie, crumbly not crisp, nutty, dense but not tough, and distinctly almond-flavored. Growing up, every family trip to Los Angeles included the prerequisite stop at Phoenix Bakery for those pink boxes filled with almond cookies and sweet, sticky butterfly cookies. Right before COVID hit, I drove down to LA for my favorite auntie’s birthday and of course, I stopped at Phoenix Bakery.
An Homage
Every Christmas my brother-in-law’s mother baked boxes and boxes (pink cake boxes of course) of cookies. We were one of the lucky recipients. My favorite, her almond cookie. With that first bite, I was transported back to the Chinatown of my childhood.
As a testament to how much I like Almond Cookies, I have multiple almond cookies on 3Jamigos. The first time I wrote about Mrs. F’s Almond Cookies, I actually included the Almond Cookie recipe from B’s Patisserie in San Francisco. It’s a luscious almond cookie, buttery, crispy, filled with almond flavor, delicious in its own right, but texturally different from the classic Chinatown Almond Cookie.
Finally, Mrs. F’s Almond Cookies
Why didn’t I make Mrs. F’s cookies from the get-go? Embarrassingly, I had misplaced her recipe. After an all-out hunt, I finally found it (or did I ask my brother-in-law?). Well, bottom line, I have it now my little duckies.
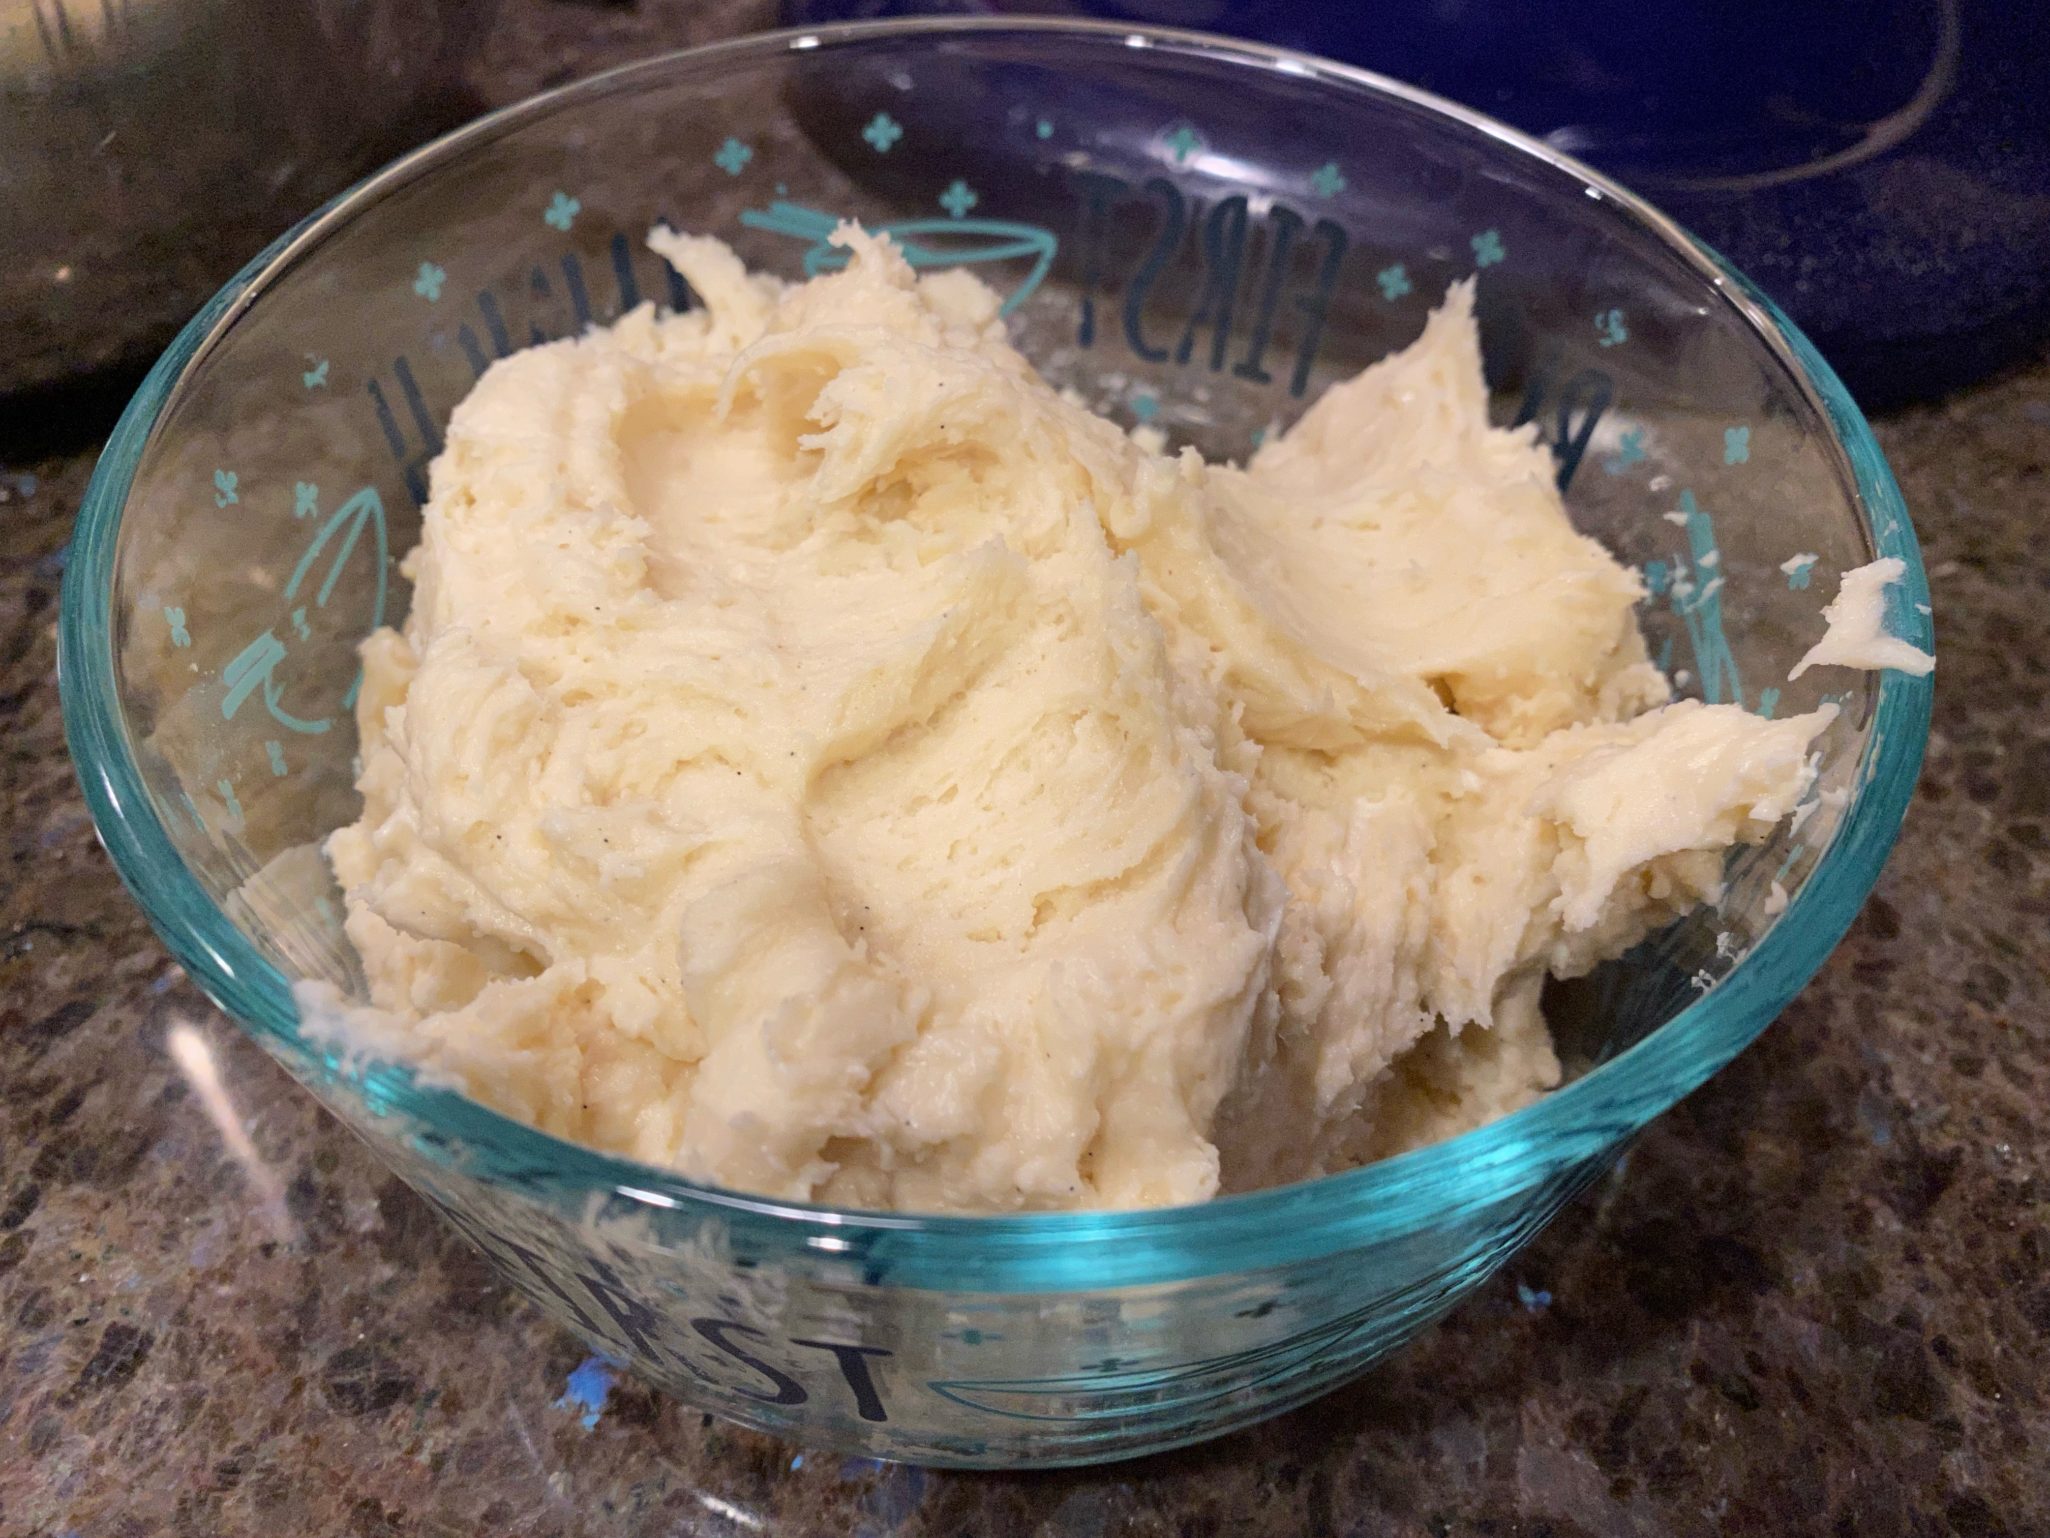
After the first batch, I tinkered with the recipe just a little. The cookies texturally were spot on. Here is the secret, the texture comes from using lard or shortening. Yep, no butter in these bad boys. Hmmm…butter-flavored shortening? Why not. This was my inaugural use of butter-flavored Crisco in place of regular shortening. Judging by the response to these cookies, it worked! If you have an aversion to butter-flavored shortening, use regular shortening. If and when I try lard I will report back. I have no problems using lard, it’s more of an access issue. I prefer leaf lard which is less processed than the stuff in supermarkets.
Shortening is easy to work with and inherently a little softer than butter. I keep my shortening in the fridge. Beat the dough until light and fluffy 2-3 minutes before adding dry ingredients.
Let’s Go Nutty
The other tweak MORE almond flavor. I upped the amount of almond extract cause in my book, you can never have too much almond flavor. JK, but I did think the cookies benefitted from a smidge more.
Year of the Tiger
Don’t think cookie season is over! Chinese New Year is right around the corner and these would be purr-fect in an assortment of goodies to ring in the Year of the Tiger!
This recipe was generously shared with me by my brother-in-law's family. Made with lard or shortening, these are the quintessential Chinese Almond Cookies found in Chinatown bakeries and restaurants. Crumbly, almond-forward, delicious
Course cookies, Dessert
Cuisine Asian
Keyword Chinatown Almond Cookies
Prep Time 15 minutesminutes
Cook Time 20 minutesminutes
Ingredients
Dry Ingredients
5cupssifted flour
1tspbaking soda
1/4tspsalt
Wet Ingredients
2 1/2cupsShortening, either reg or butter-flavored40T (35 T will do)
1 1/2cupssugar
1largeegglightly beaten
1.5tspalmond extractUse up to 2 tsp
1/4tsppotassium carbonate liquid or 1/4 t baking soda
Finishing Touches
1eggbeaten for egg wash
almond halves or sesame seedsgarnish
Instructions
Combine flour, baking soda and salt, set aside.
Cream shortening and sugar till fluffy. Add egg and blend thoroughly. Add almond extract and k+Co3 and blend well.
Gradually add flour and stir until well combined. Form round balls (size of small walnut, I use a 1 tablespoon+ ice cream scoop to portion out the dough. At this point, if the dough seems a little soft, chill in fridge for 30-60 minutes.
Using a flat bottom glass, dip in a little bit of flour and press dough flat on a cookie sheet to about 1/2 inch thickness. Leave about 1.5 inches between cookies. Brush each cookie with egg wash. Place almond or sesame seeds centered on top.
Bake 350 degrees 15 minutes or until slightly golden in color.
Notes
The recipe is easily halved. A large beaten egg is approximately 3.25 tablespoons, use half for the dough and half for the egg wash. You have some play with the amount of egg in the dough. I have used a whole large egg in a half recipe and it turns out fine, the cookie is just a bit more fragile. I'd use a small egg in a half recipe.I like the butter-flavored Crisco in the cookie. Gives a bit more flavor without sacrificing the texture of the cookie.
I am the happy owner of Anyday Cookware, a set of bowls designed for the microwave. A podcast junkie, I am hooked on “All Things Chang”. That is Dave Chang, chef, restauranteur, face, and creator of the Momofuku Empire. He has waxed poetically about microwave cooking and I figure if it is good enough for him…why not?
What I really wanted to do was adapt well-loved dishes to the microwave. Lucky me, dishes that I normally steam, microwave beautifully. Bonus, not only is the cooking time shortened, but the process is simplified. No messing with steamer racks, or a large wok or pan to steam in. You cook in the same bowl you use to prep the dish. How cool is that? If you hate washing dishes like me, this is a HUGE.
I adapted a recipe from the site Made with Lau. Inspired to archive his chef father’s cooking, Randy Lau created Made with Lau featuring videos of his chef-father cooking classic Chinese dishes, in particular Cantonese dishes.
The Lowedown on Lau
His are the dishes of my childhood. The videos are easy to follow and more importantly, the recipes work. His father speaks in Cantonese, so I get to brush up on my Chinese skills, while learning how to make a great dish, win-win! My family is from the same region in China and listening to him feels like being home with my grandparents, aunties, and uncles. Randy does a yeoman’s job translating his Dad’s cooking wisdom and his recipes into English.
The Wrap
After each cooking session, the family gathers around the table to enjoy the fruits of Daddy Lau’s labor. They give the background and history of the dish and additional cooking tips. It is the perfect way to round out each segment. Made with Lau is a gem and I hope you check out their site.
The Dish
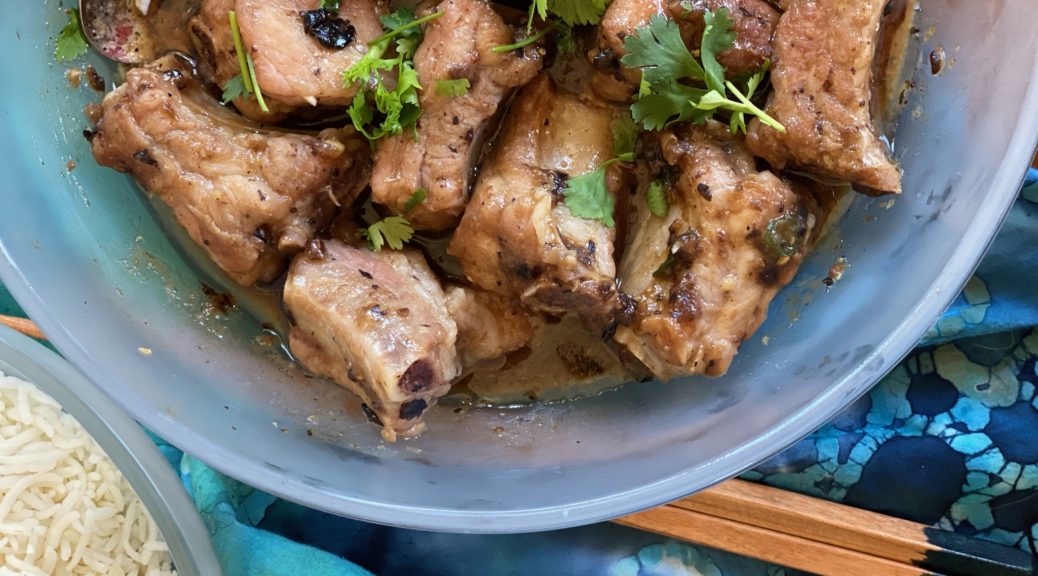
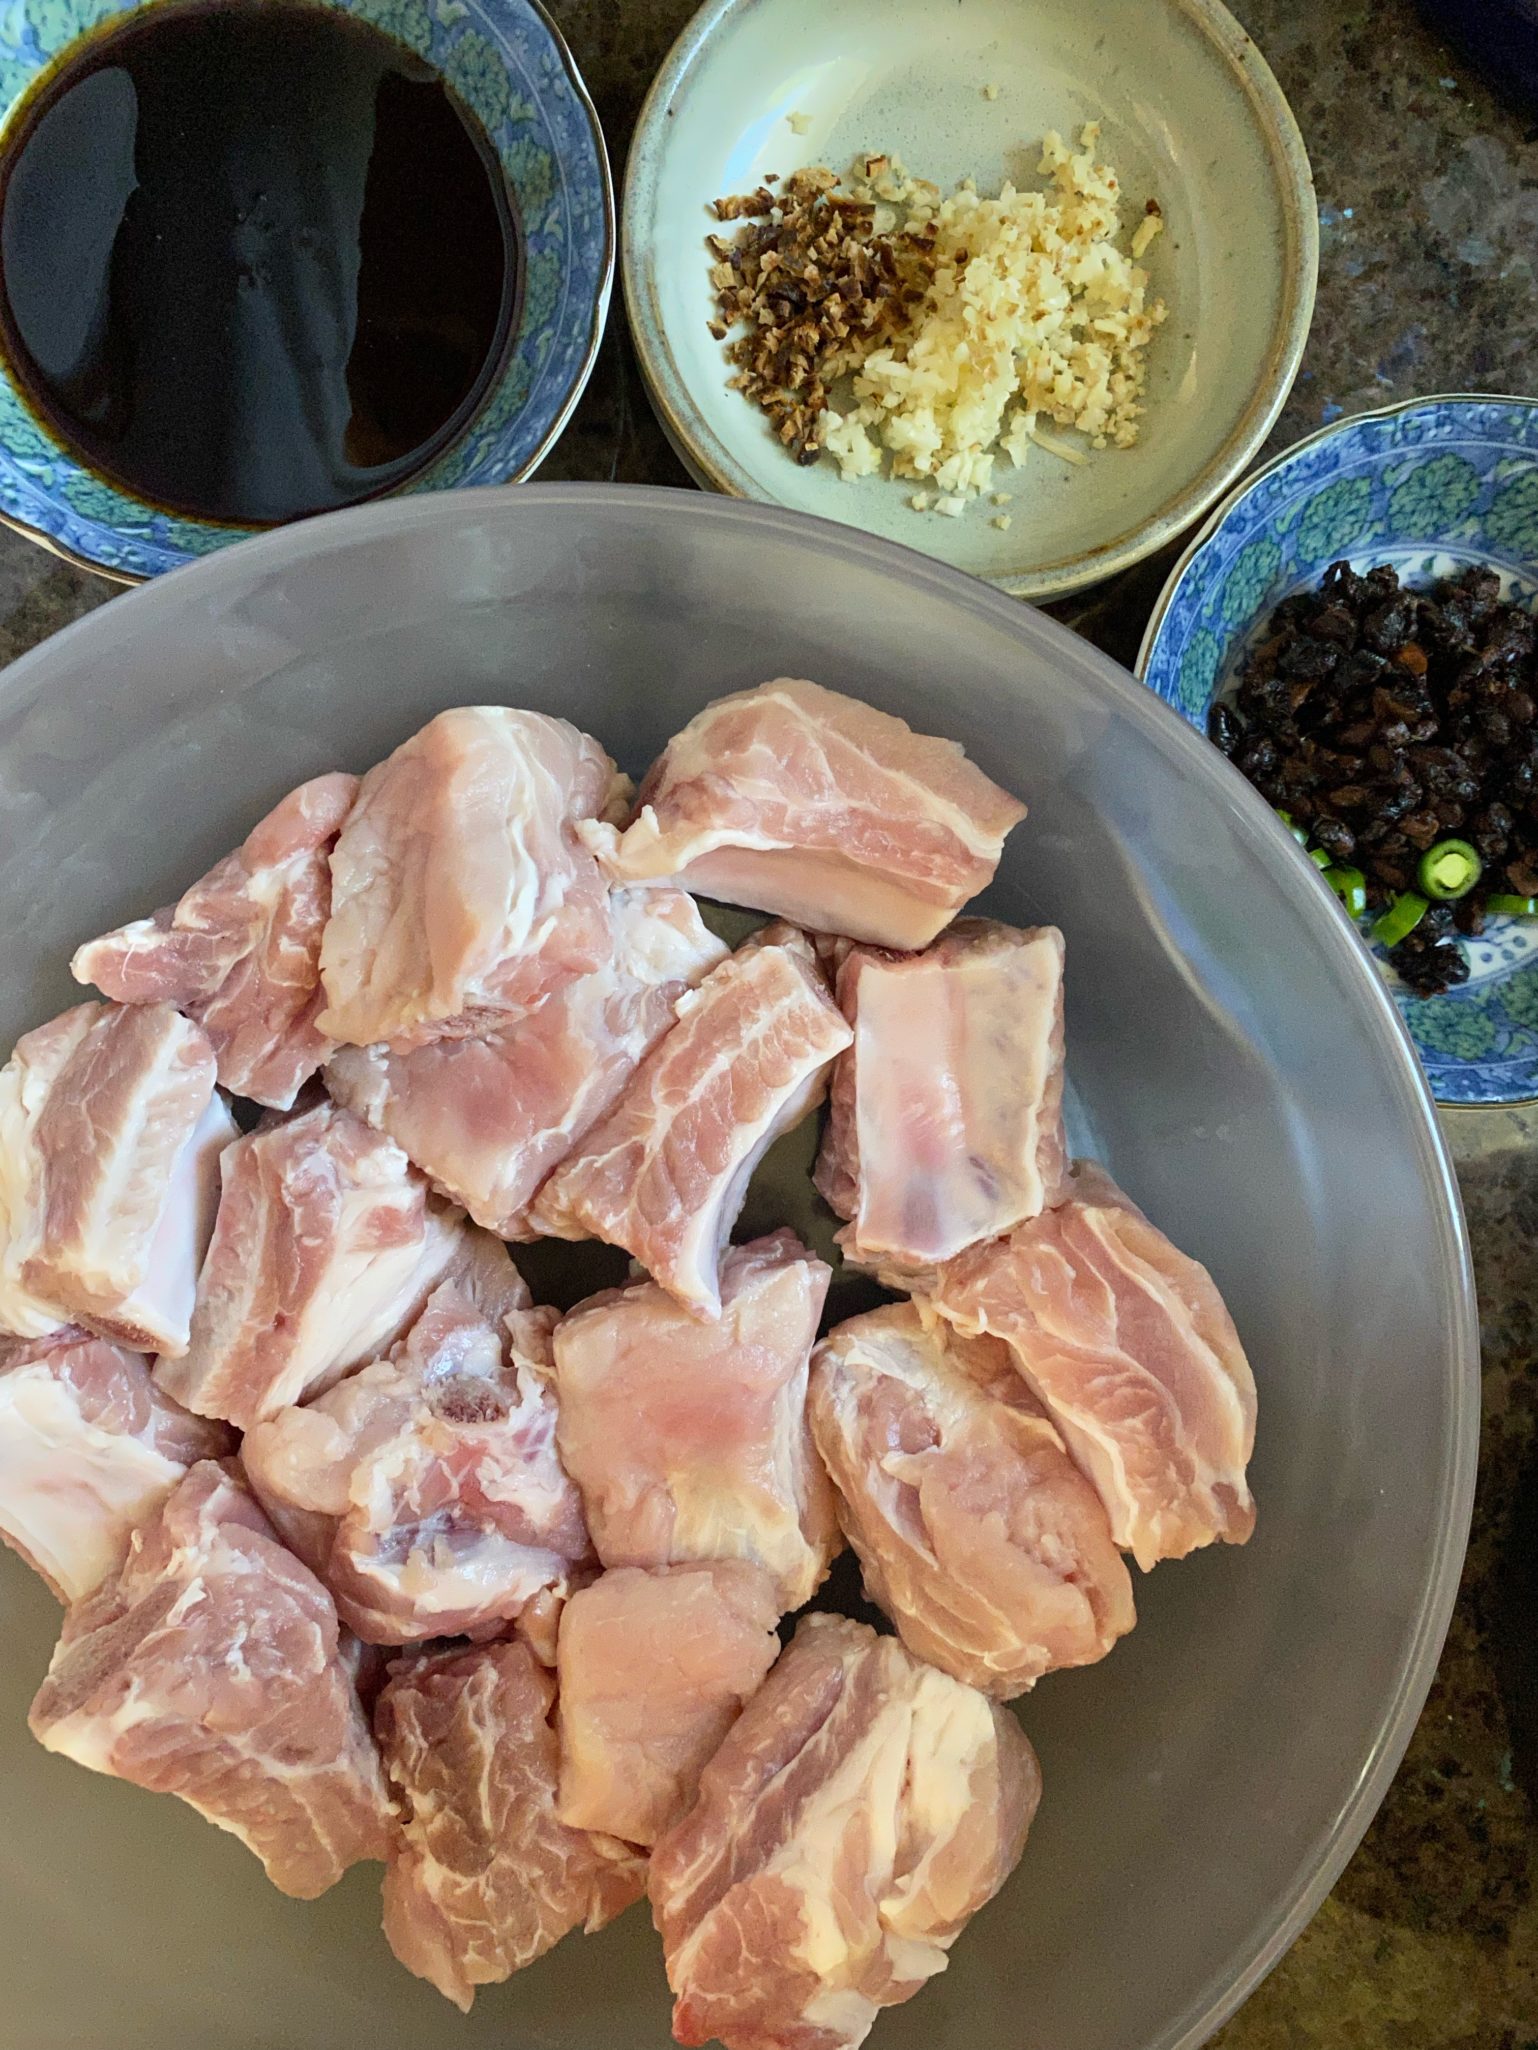
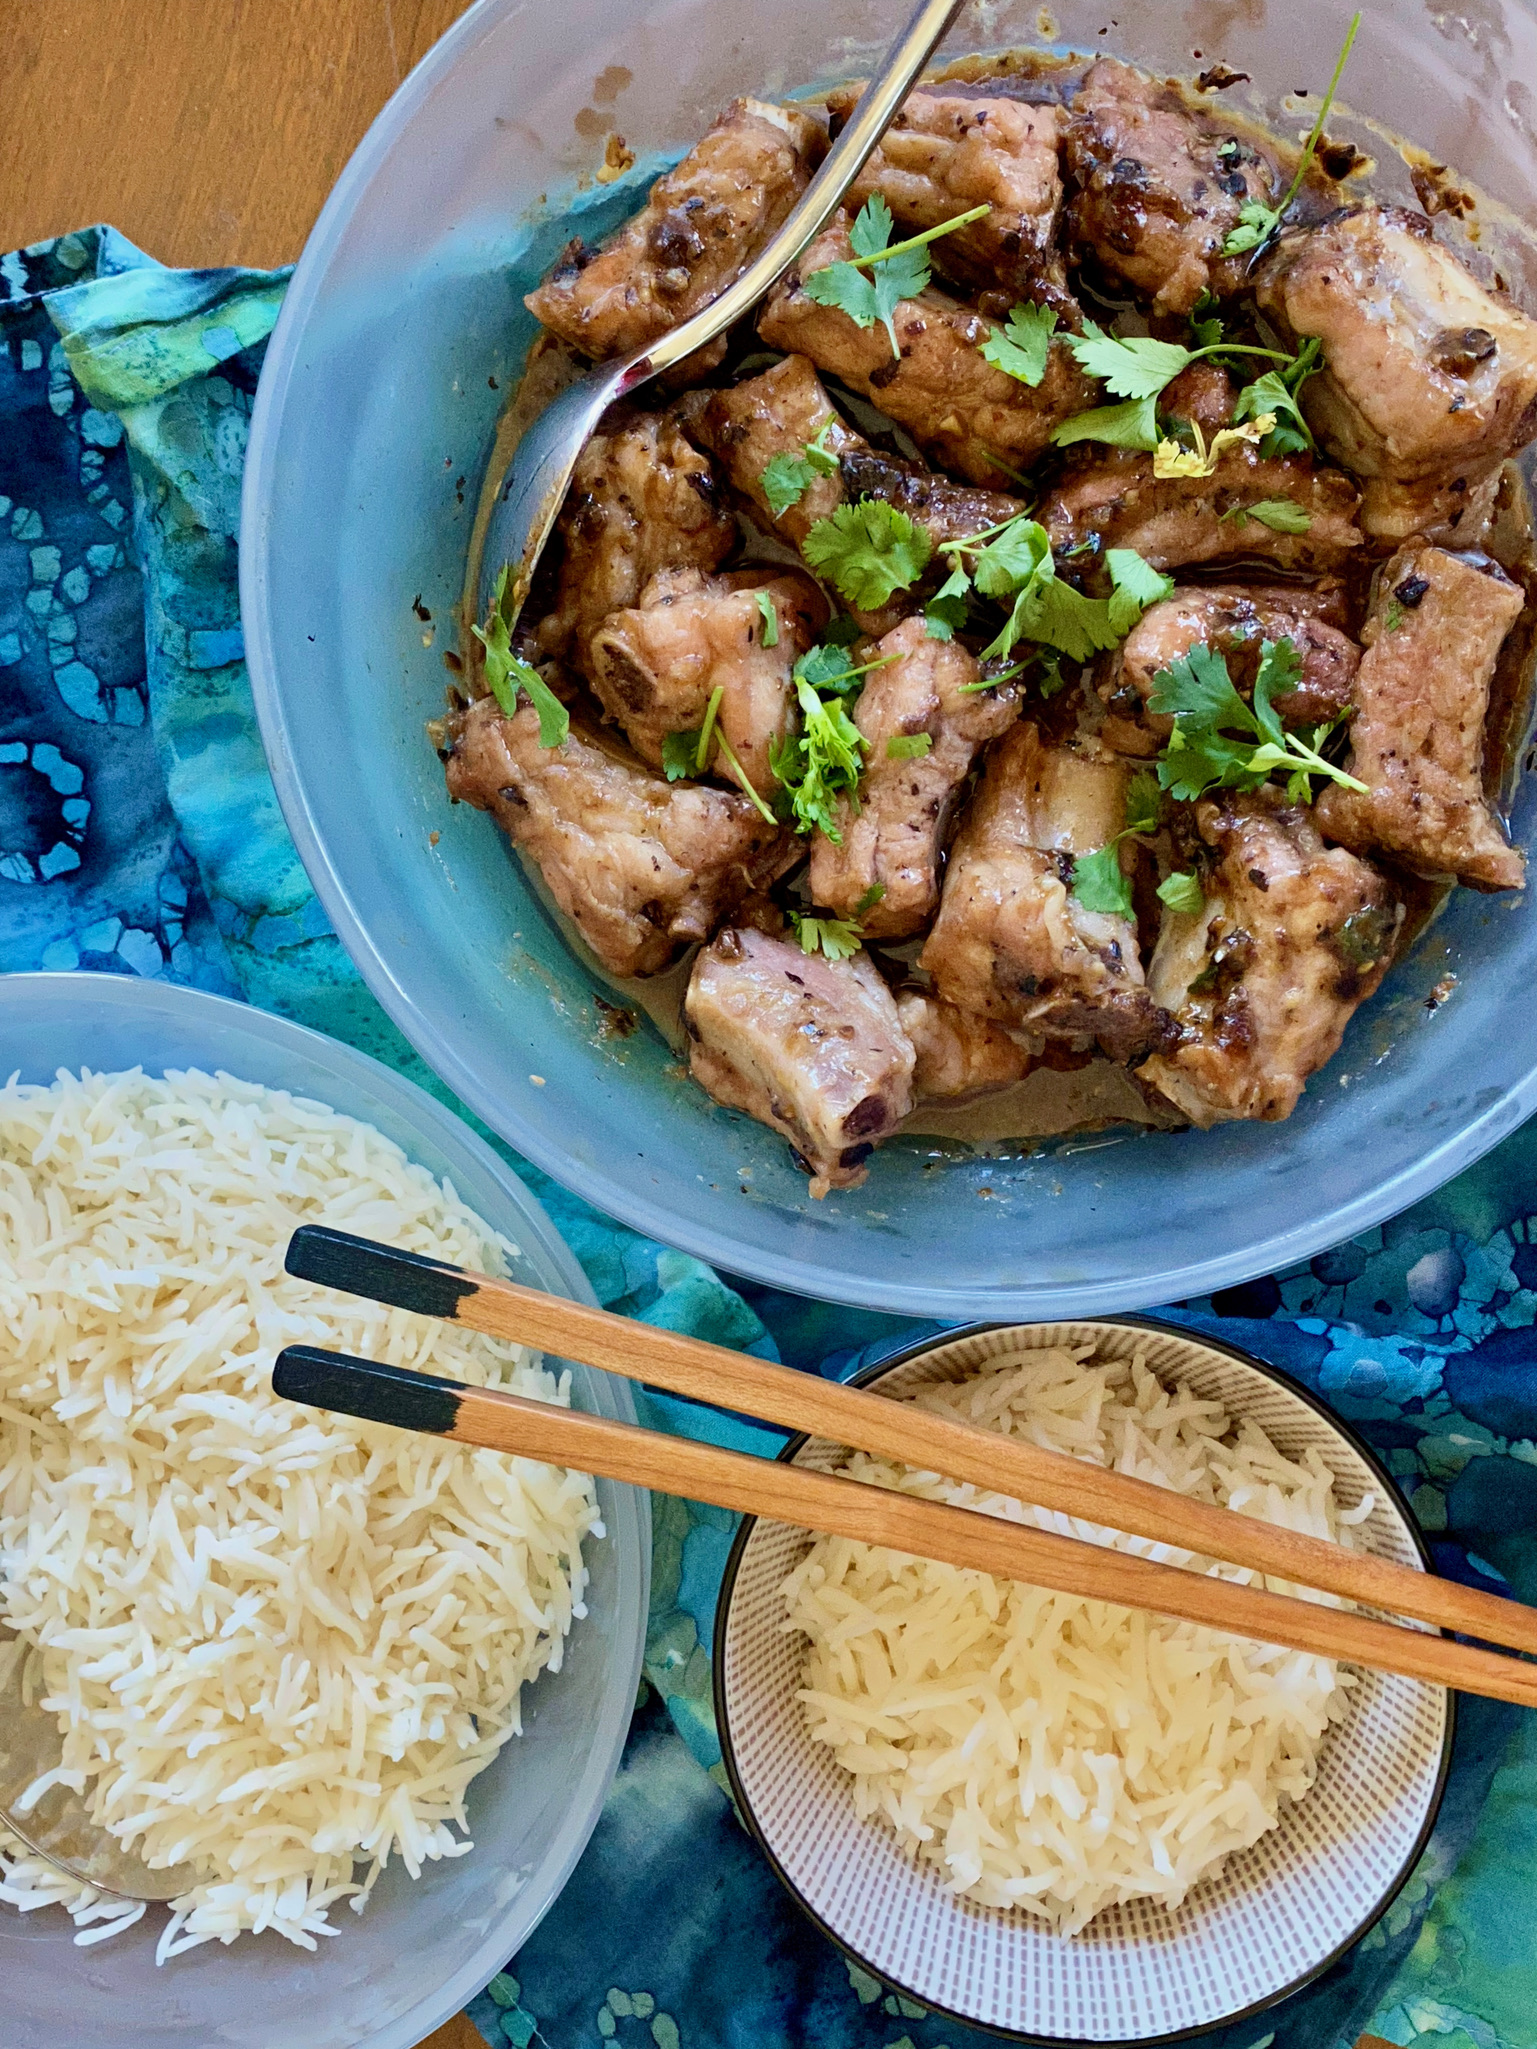
Black Bean Spareribs is a family favorite which until now, we only have when we are out for Dim Sum. The spareribs are steamed with chilis, fermented black beans, which have lots of umami, and seasonings. As soon as Made with Lau posted the video recipe I jumped at the chance to try it. My biggest deviation was cooking it in the microwave instead of steaming. Worked like a charm.
Use pork spareribs cut into bite-size pieces or you can cheat and use boneless pieces of pork. Both are equally tasty. Chinese markets carry ribs cut into 1-inch segments so if you are close to an Asian market go for it…don’t cut them yourself. It’s a lot of trouble and invariably you will have shards of bone in the cut ribs-no fun. For boneless, use pork belly or pork butt for this dish. It shouldn’t be too lean, the fat contributes both flavor and tenderness to the dish.
Fermented black beans can be found in Chinese grocery stores. Salted and fermented black soybeans are pungent and full of umami. A little goes a long way but it does keep well in the fridge. There is a black bean sauce in a jar that might be a suitable sub, you would need to adjust for salt and some of the seasonings. I haven’t tried it yet.
This is Cantonese soul food. Serve with steaming bowls of rice and a green veggie dish like stir-fried pea sprouts.
Cantonese dish generally served at teahouse for Dim Sum. Microwaved instead of steamed! Fast, easy and delicious.
Course dim sum, Main Course, Muffins
Cuisine Asian
Keyword Black beans spareribs, Cantonese cooking, dim sum, steamed pork with black beans
Prep Time 15 minutesminutes
Cook Time 10 minutesminutes
Ingredients
1lbspare ribs (baby back ribs)cut into 1-1.5 inch pieces or sub 1 lb. pork belly or pork butt cut into bite-sized pieces.
1tbspcornstarchfor rinsing ribs
Bowl 1
0.50tbsplight soy sauce
1tbspoyster sauce
1/2tbspShaoxing wine
1/4tspsalt
1tspsugar
1-2 tbspwater or low sodium chicken stockAdd if using microwave to cook
Bowl 2
1tspdried mandarin orange peeloptional, small thumbnail sized piece
1clovegarlicminced
1tspgingerminced
Bowl-3
1tbspfermented dried black beansrinsed and dried, smooshed
1tspsesame oil
1tbspcornstarchfor pork
0.50tspvegetable oil
Garnish
red chili pepper, deseeded and deveineda few slices, optional
2green onionssliced
Instructions
Place our fermented black beans in a bowl, and rinse them under running water for 15-20 seconds. Gently massage the beans as you do this. Drain the water, and set the bowl aside to let the beans rehydrate for a couple of minutes then smoosh them with the back of a spoon. Set asideSoak orange peel in warm water, set aside for 10-15 min. Once soft, dice.
Slice red chili pepper and green onions. Set aside
Rinse and dry ribs and place in bowl. Add cornstarch to the ribs, and massage the ribs around to evenly mix the cornstarch around the surface of each rib.
Rinse the ribs in running water for 1 to 2 minutes, massaging the ribs as you go. Pour out all of the water, and press and squeeze the ribs against a colander to get rid of excess water.
Wrap the ribs in a thick paper towel, pressing and patting to absorb moisture.
Place ribs in a large microwavable bowl. Make marinade.
Combine salt, sugar, light soy sauce, oyster sauce, Shaoxing wine in a small bowl. Mince garlic, ginger, orange peel, and add to a second bowl.
Add soy mixture and ginger-garlic mixture to bowl of ribs. Mix and massage the bowl of ribs well. Approximately 45-60 seconds to blend.
Add black beans to the bowl of ribs, mix well.
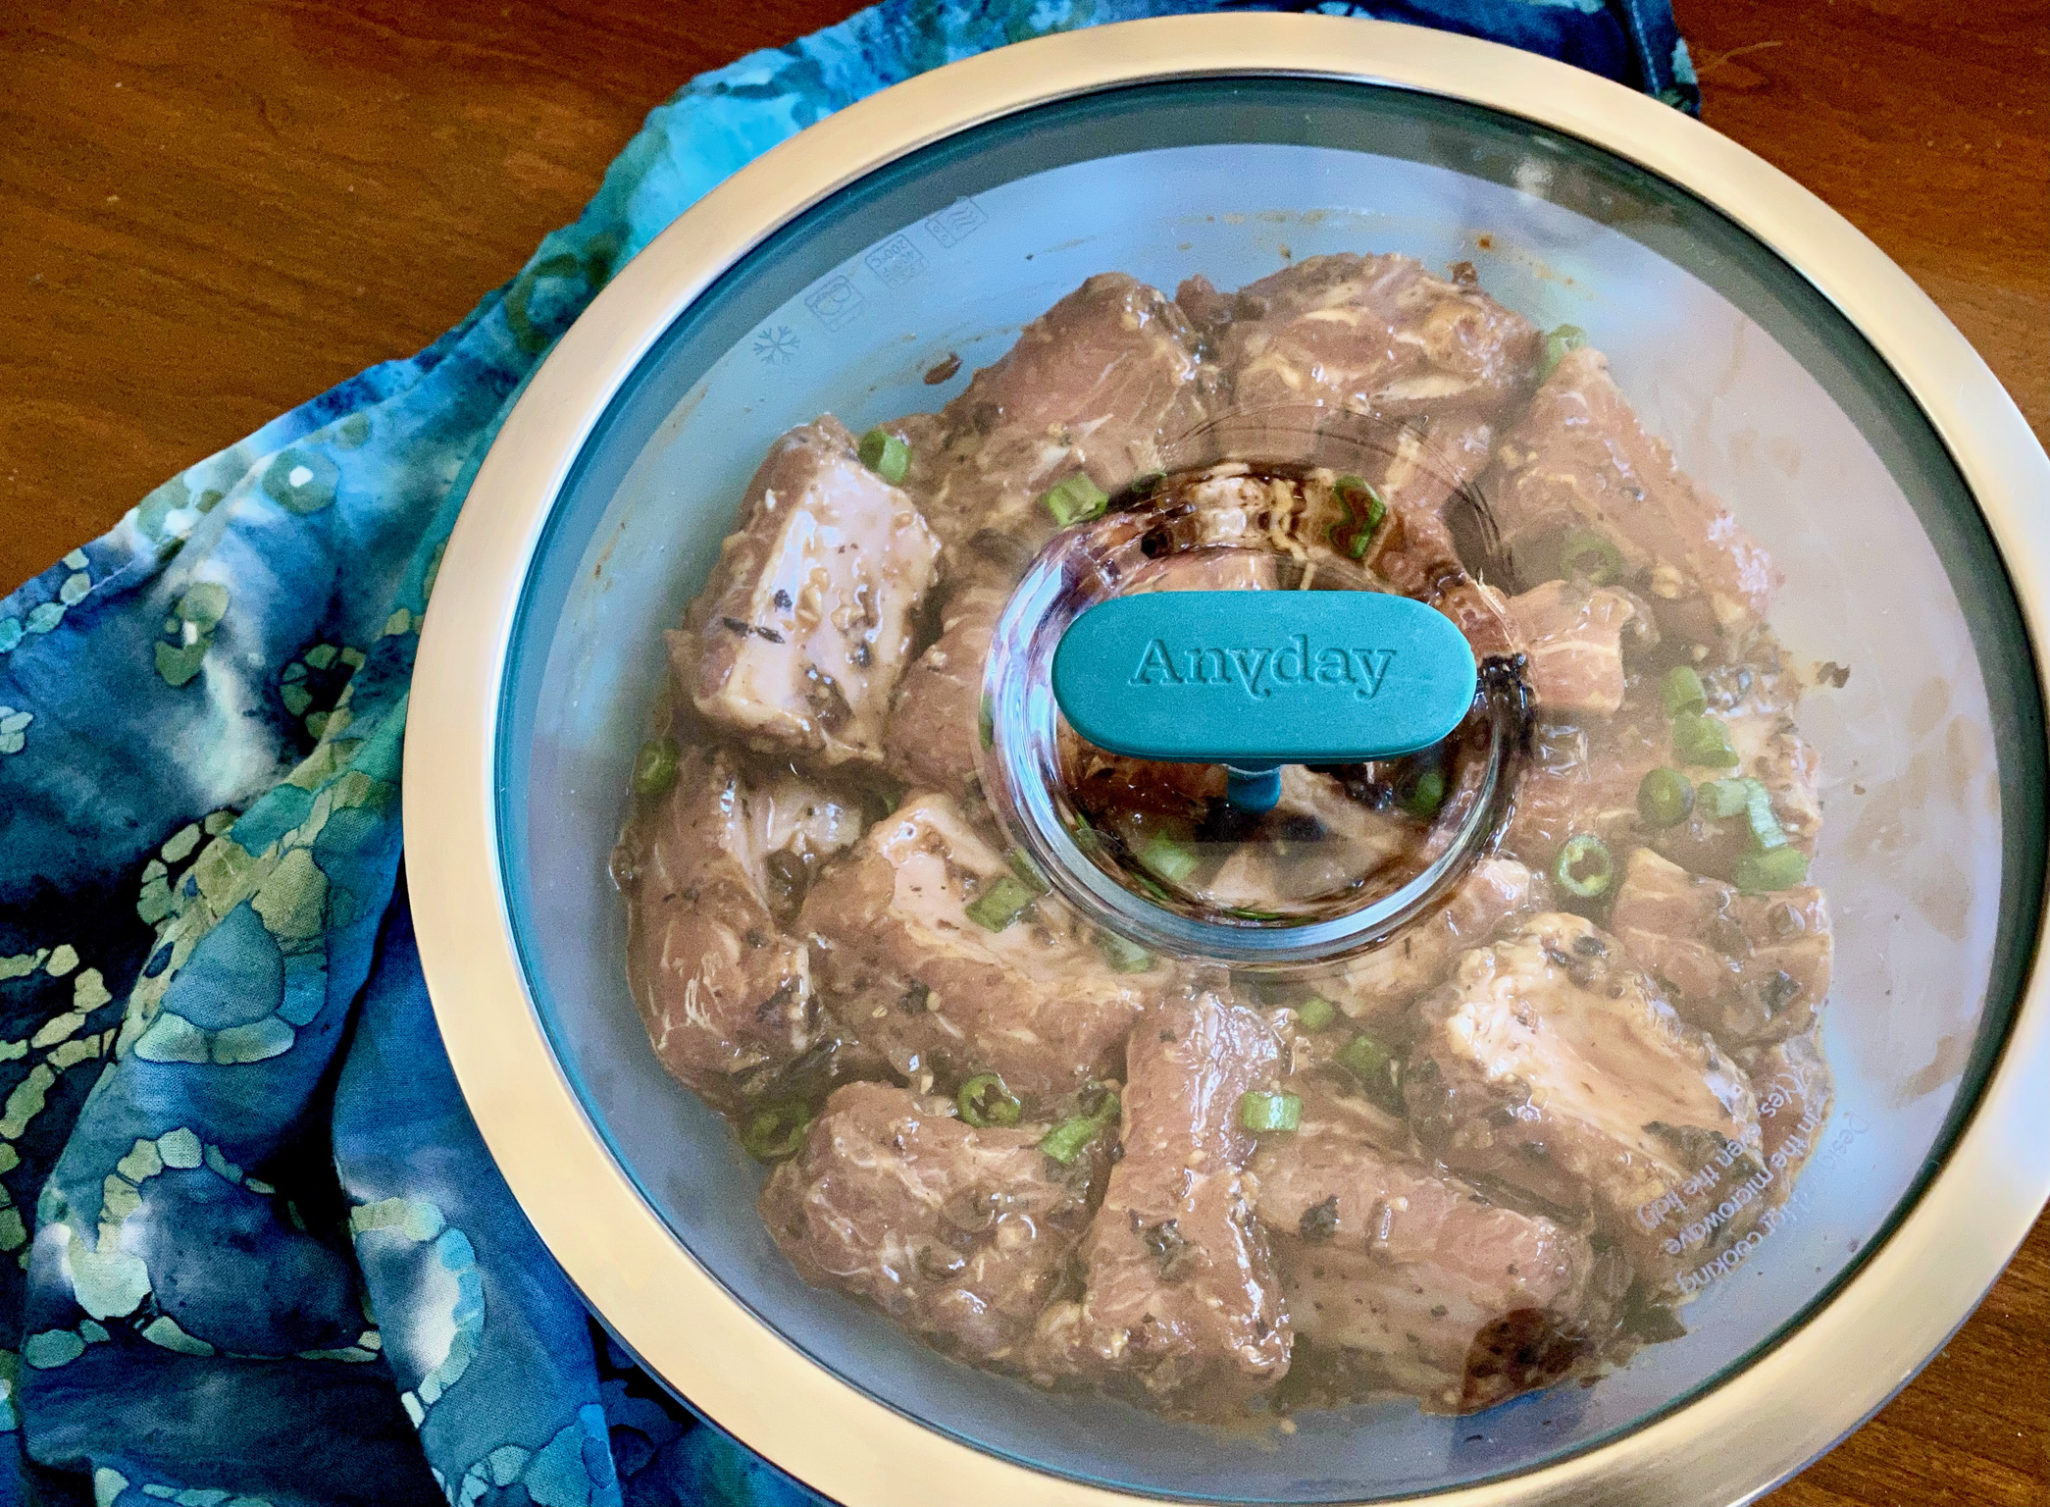
Add sesame oil and cornstarch. Mix the ribs to evenly coat each rib with cornstarch. Spread out evenly in bowl. Sprinkle chilis on top and drizzle with remaining 1/2 tbsp of oil. Cover with lid, open the vent on lid if it has one, or leave lid slightly ajar on bowl.
Microwave on full strength for 5 minutes. Remove, careful it's hot and stir mixture. If it seems dry or the sauce is too thick add 1-2 tablespoons of water or stock. Scatter green onions on top. Place lid back on and microwave for anouther4-5 minutes.
Remove from microwave and allow to stand for 30-60 seconds. Serve with lots of rice.
Notes
Heat wok on stove, placing a steamer rack in the center of the wok. Add enough boiled water so that it just barely covers the entire steamer rack. Transfer the ribs into the plate you'll be steaming with, being careful not to let any ribs be covered by one another. Add the chili pepper slices, and pour vegetable oil on the ribs.Cover the wok, set the stove to its highest heat setting, and steam the spare ribs for 20 minutes.After 20 minutes, turn the heat off, uncover the wok, garnish with the green onions and serve.
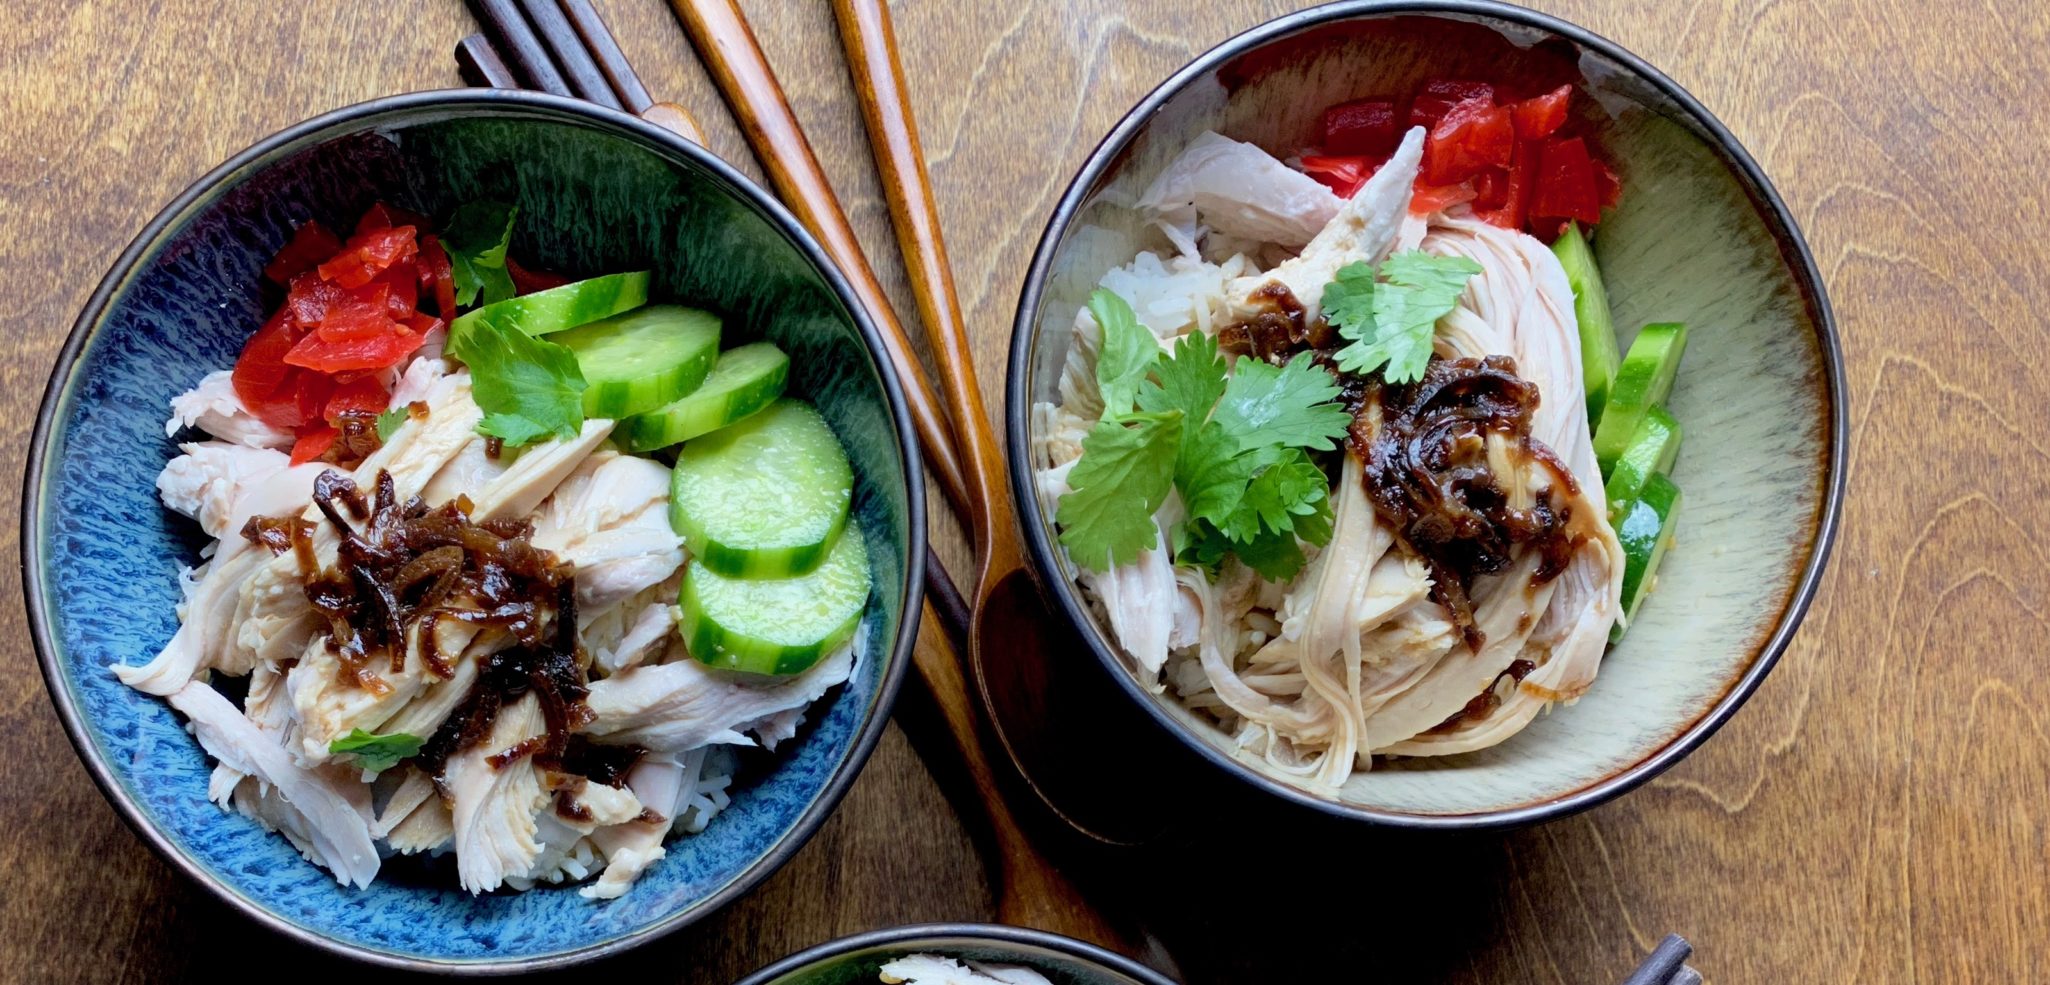
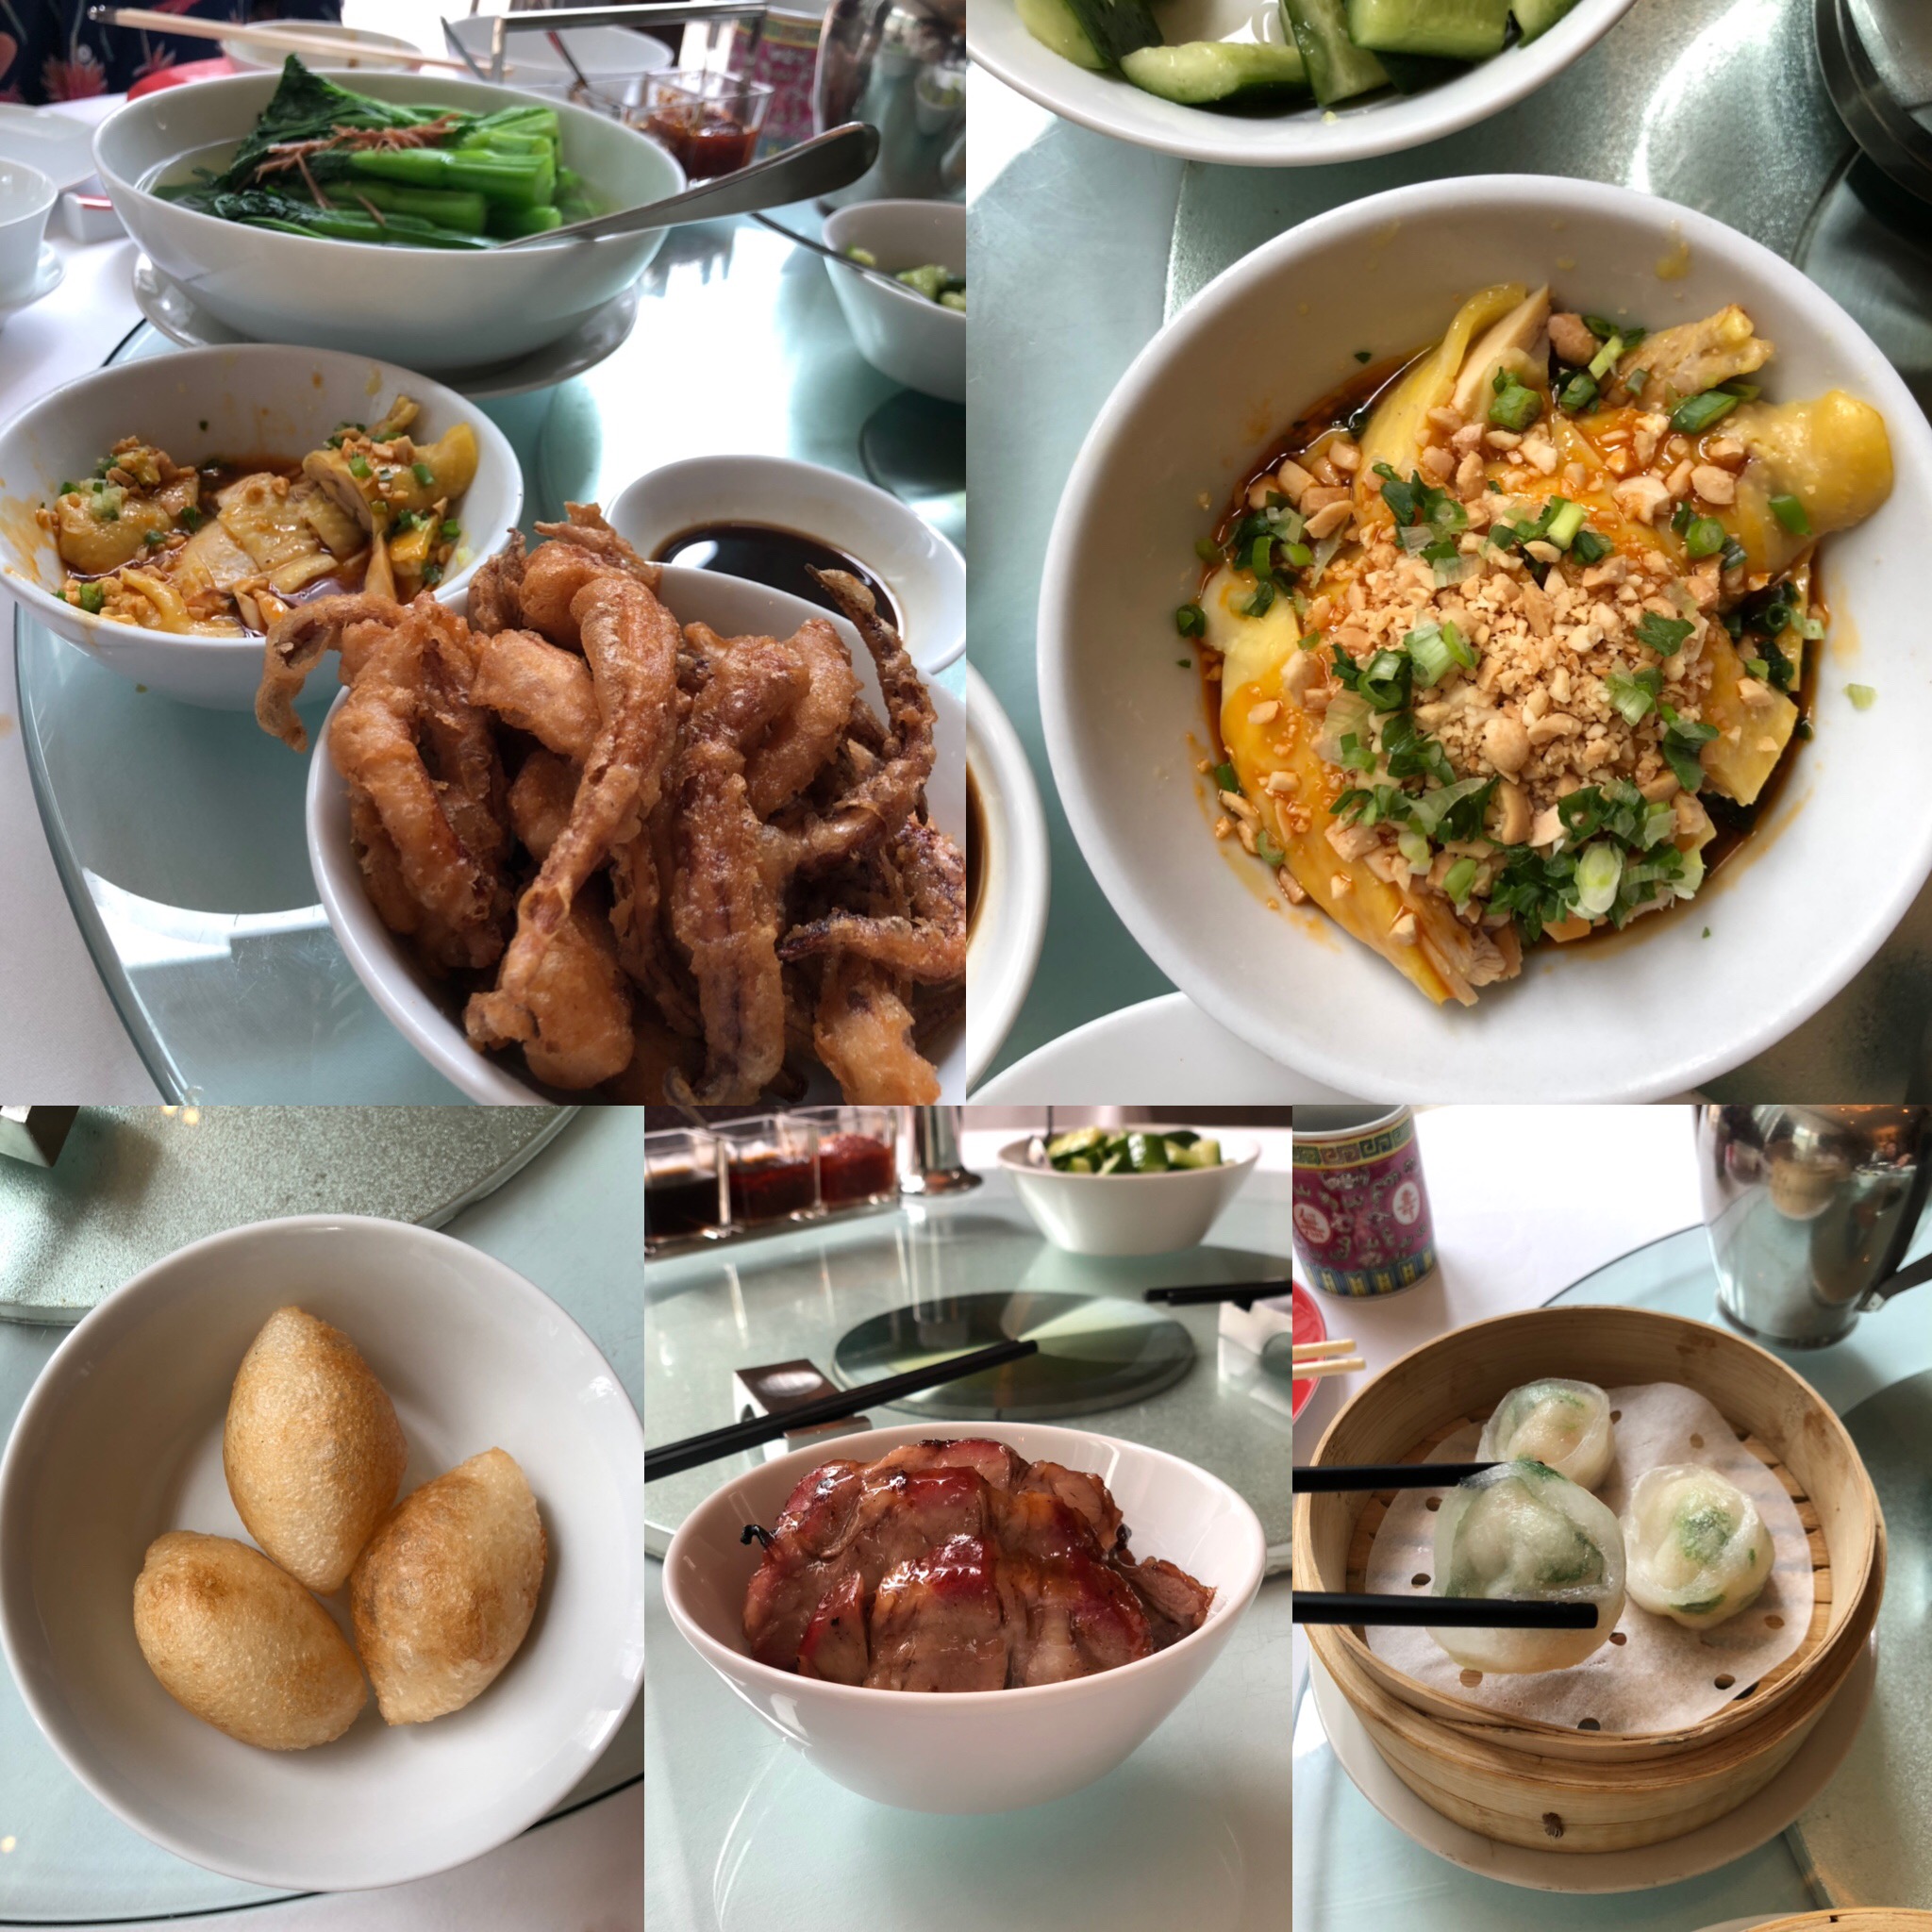
One of our favorite lunch outings is going for Dim Sum or Yum Cha. Dim Sum refers to the dazzling array of bite-size dumplings and morsels while Yum Cha means to drink tea. Yum Cha is a uniquely Chinese experience. In the good old days (pre-COVID), after being seated (after an interminable wait), a procession of carts appear and snake their way around the tables. Each cart holds steamer baskets of dumplings, plates of fried dumplings and egg tarts, chicken feet, black bean spareribs, noodles, and greens.
Let the games begin.
Start by waving your hand to get their attention and then point to the dishes you want. A running tab is kept, stamped for each dish placed on the table. Which, if you have hearty eaters, can run as much as going out for sushi!
Hyatt Regency Hong Kong
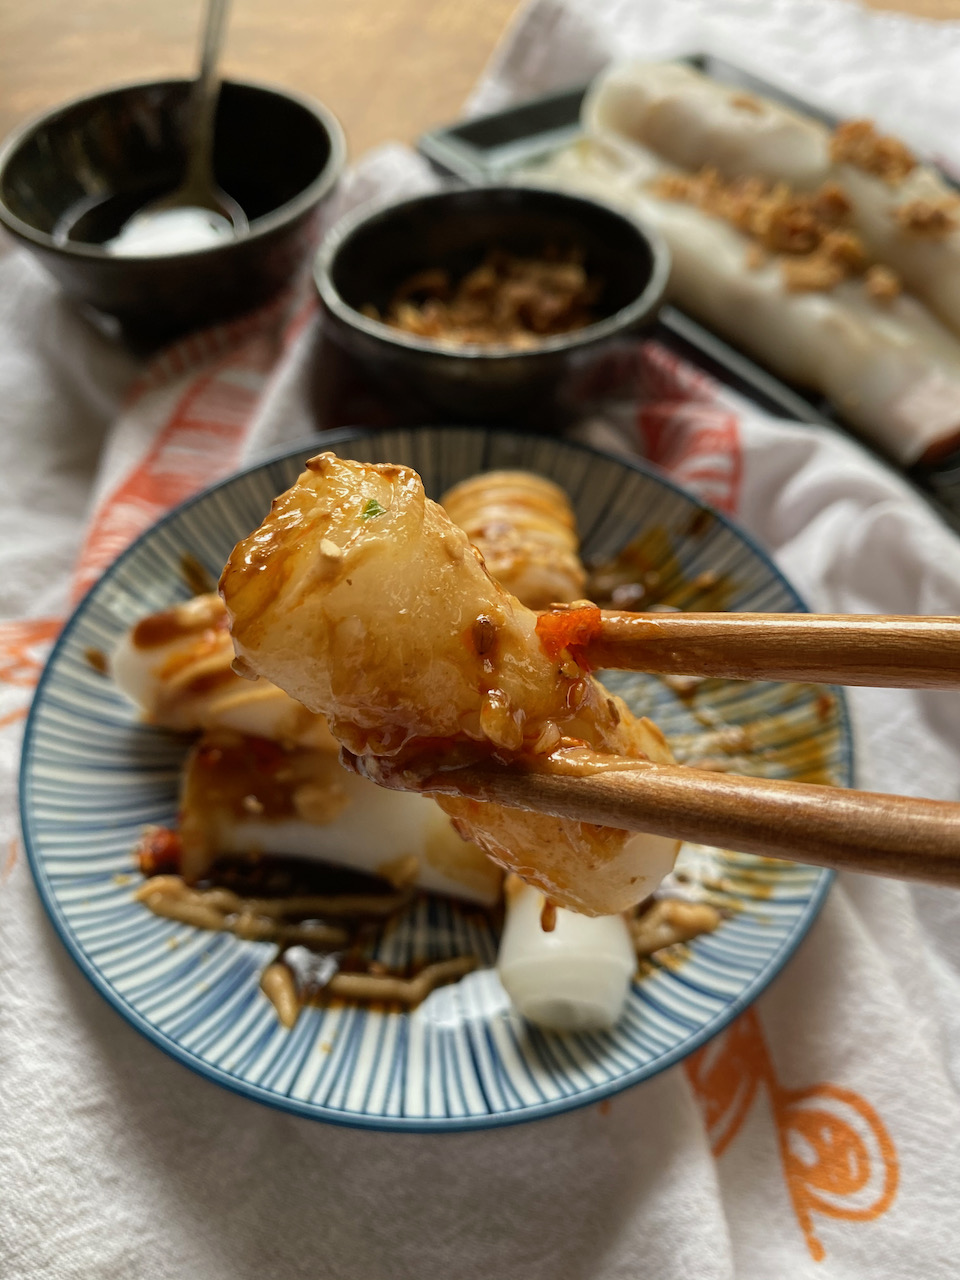
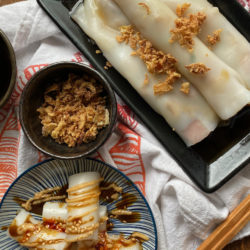
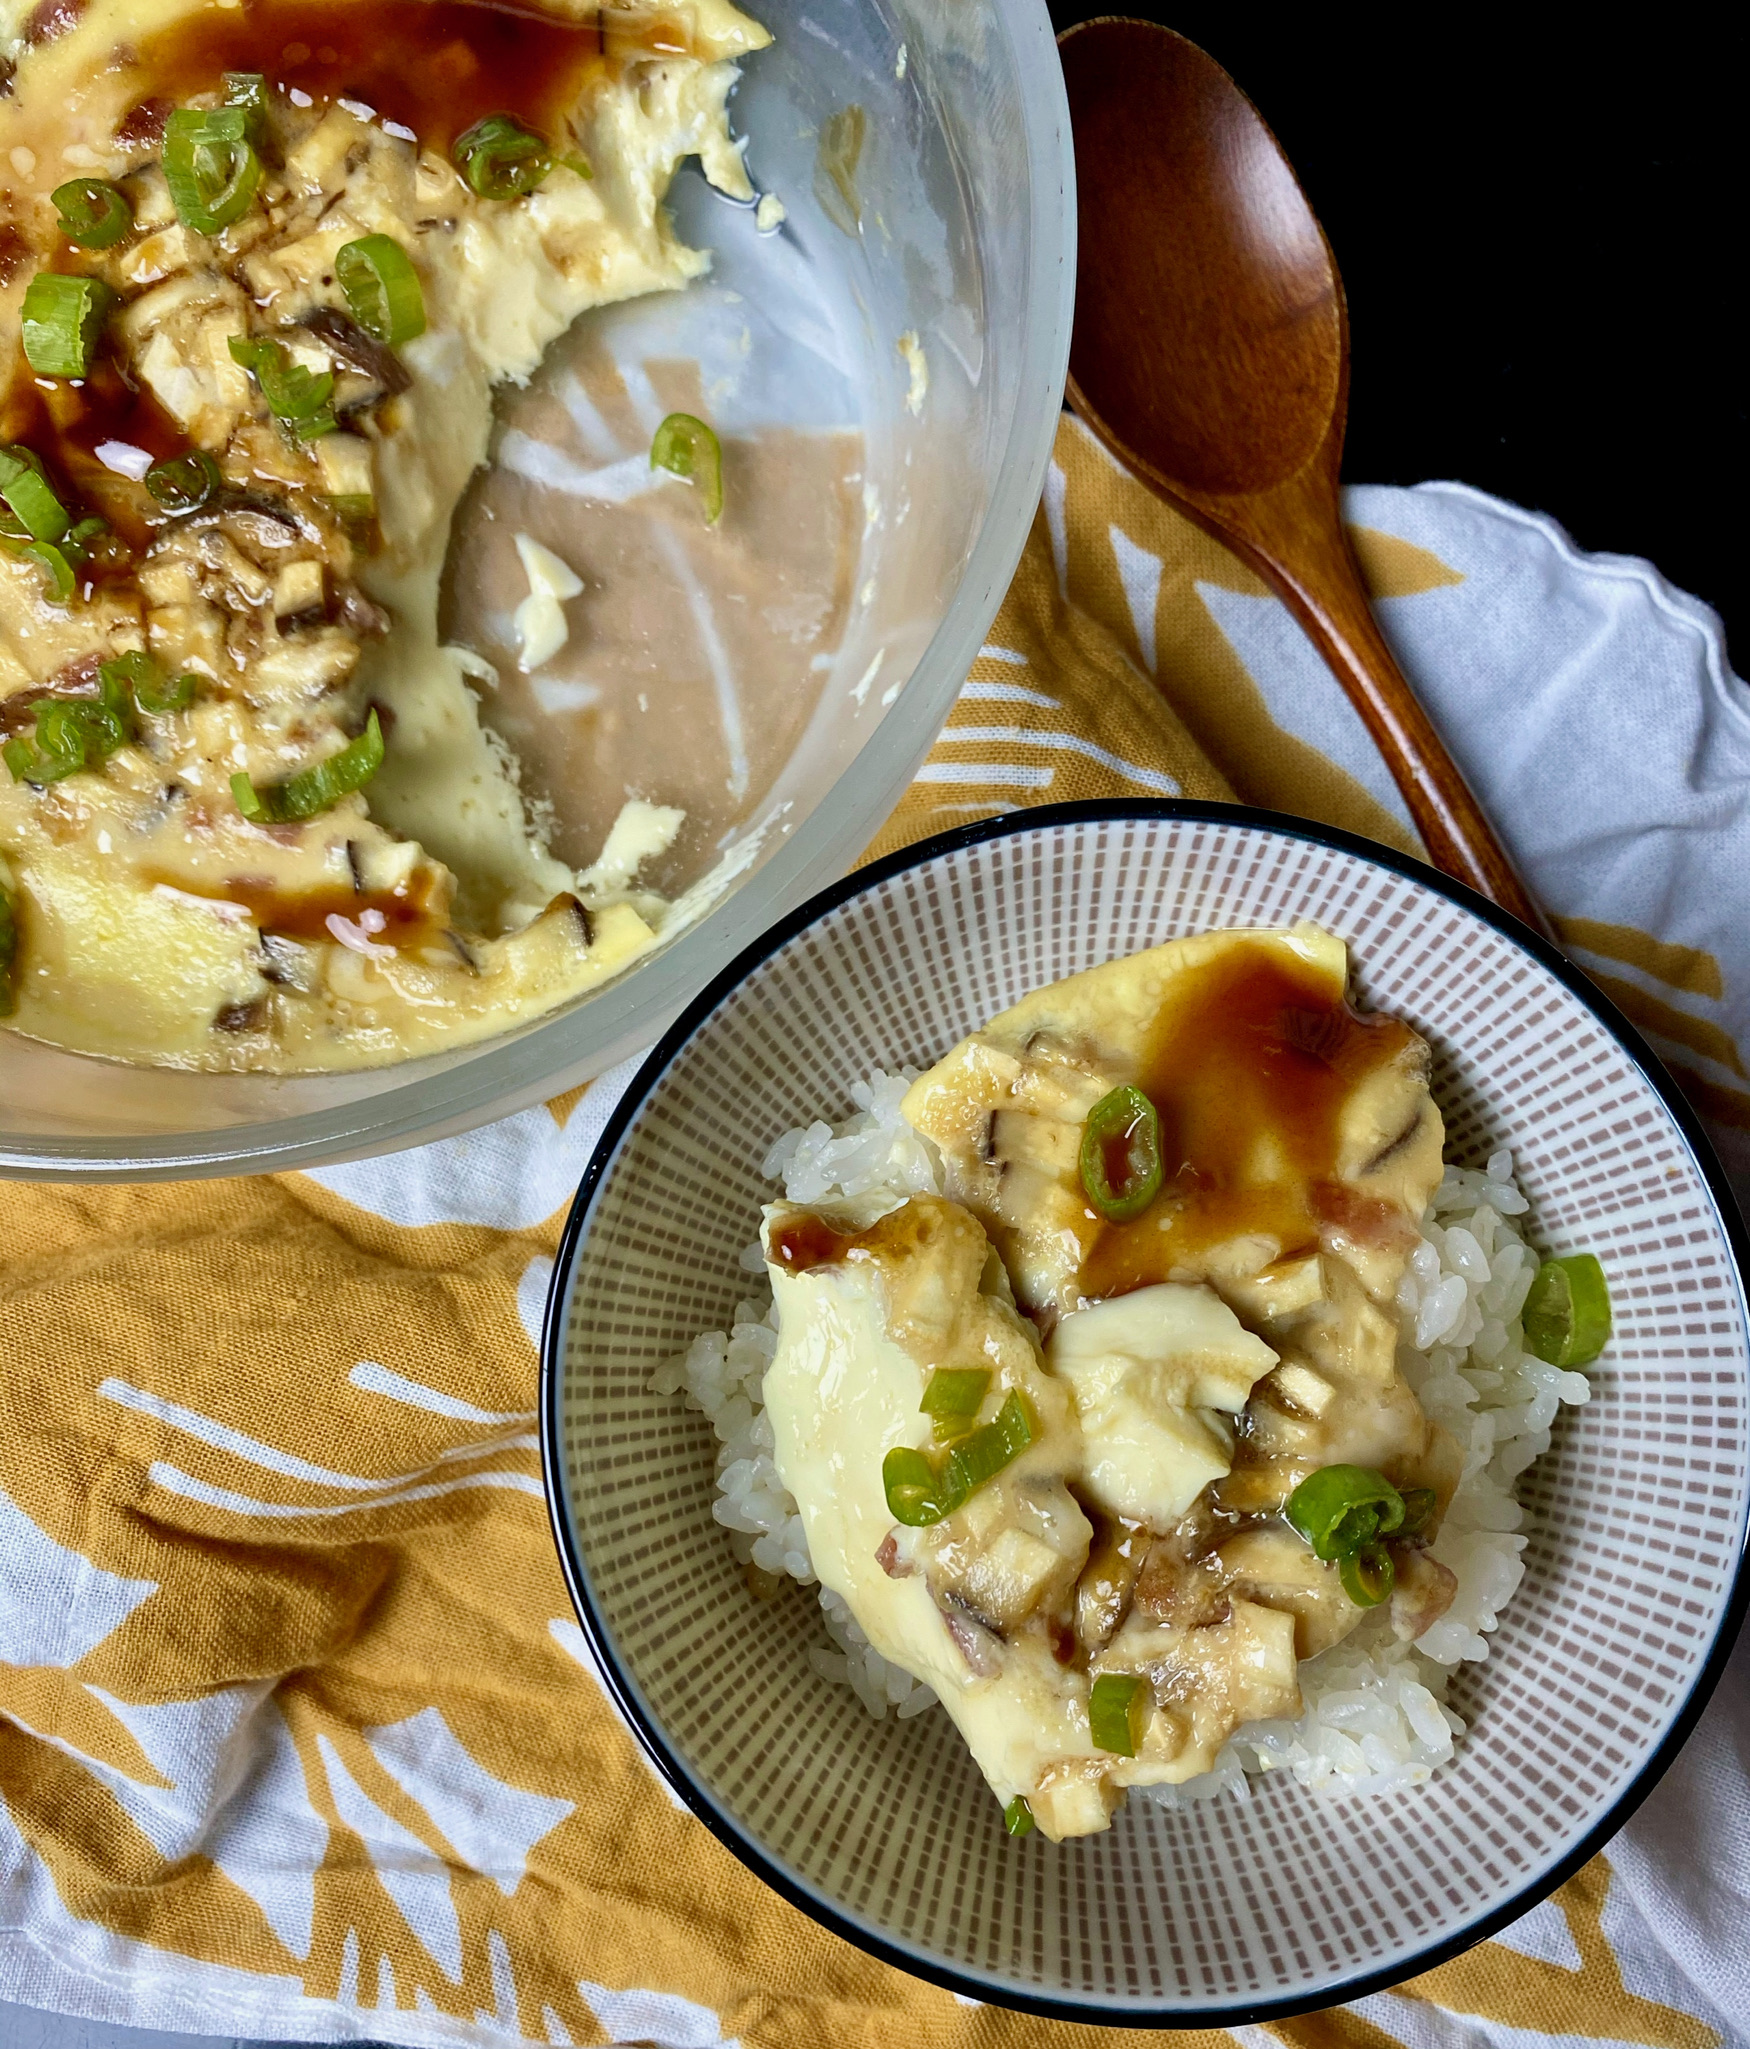
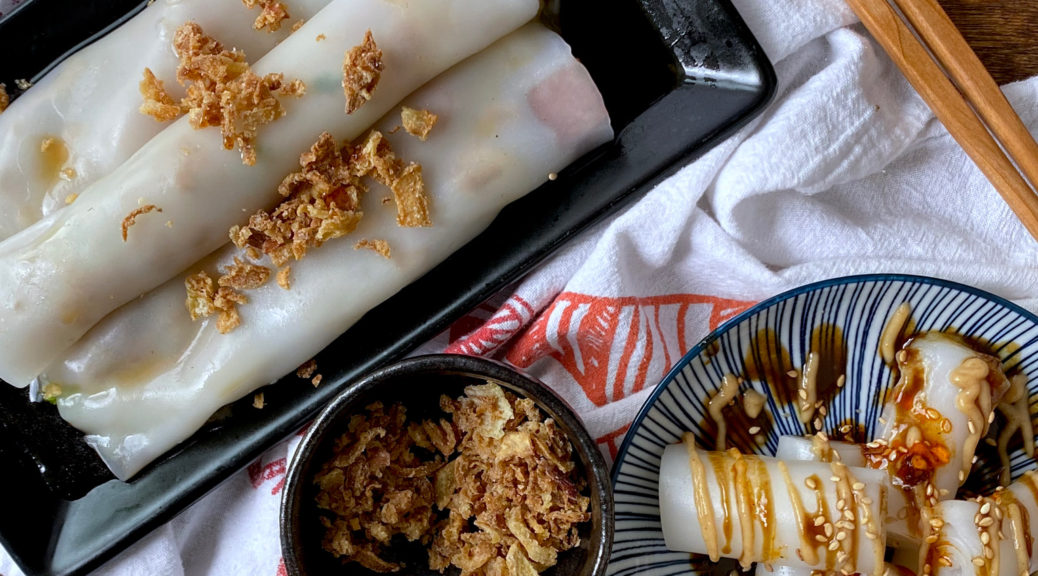
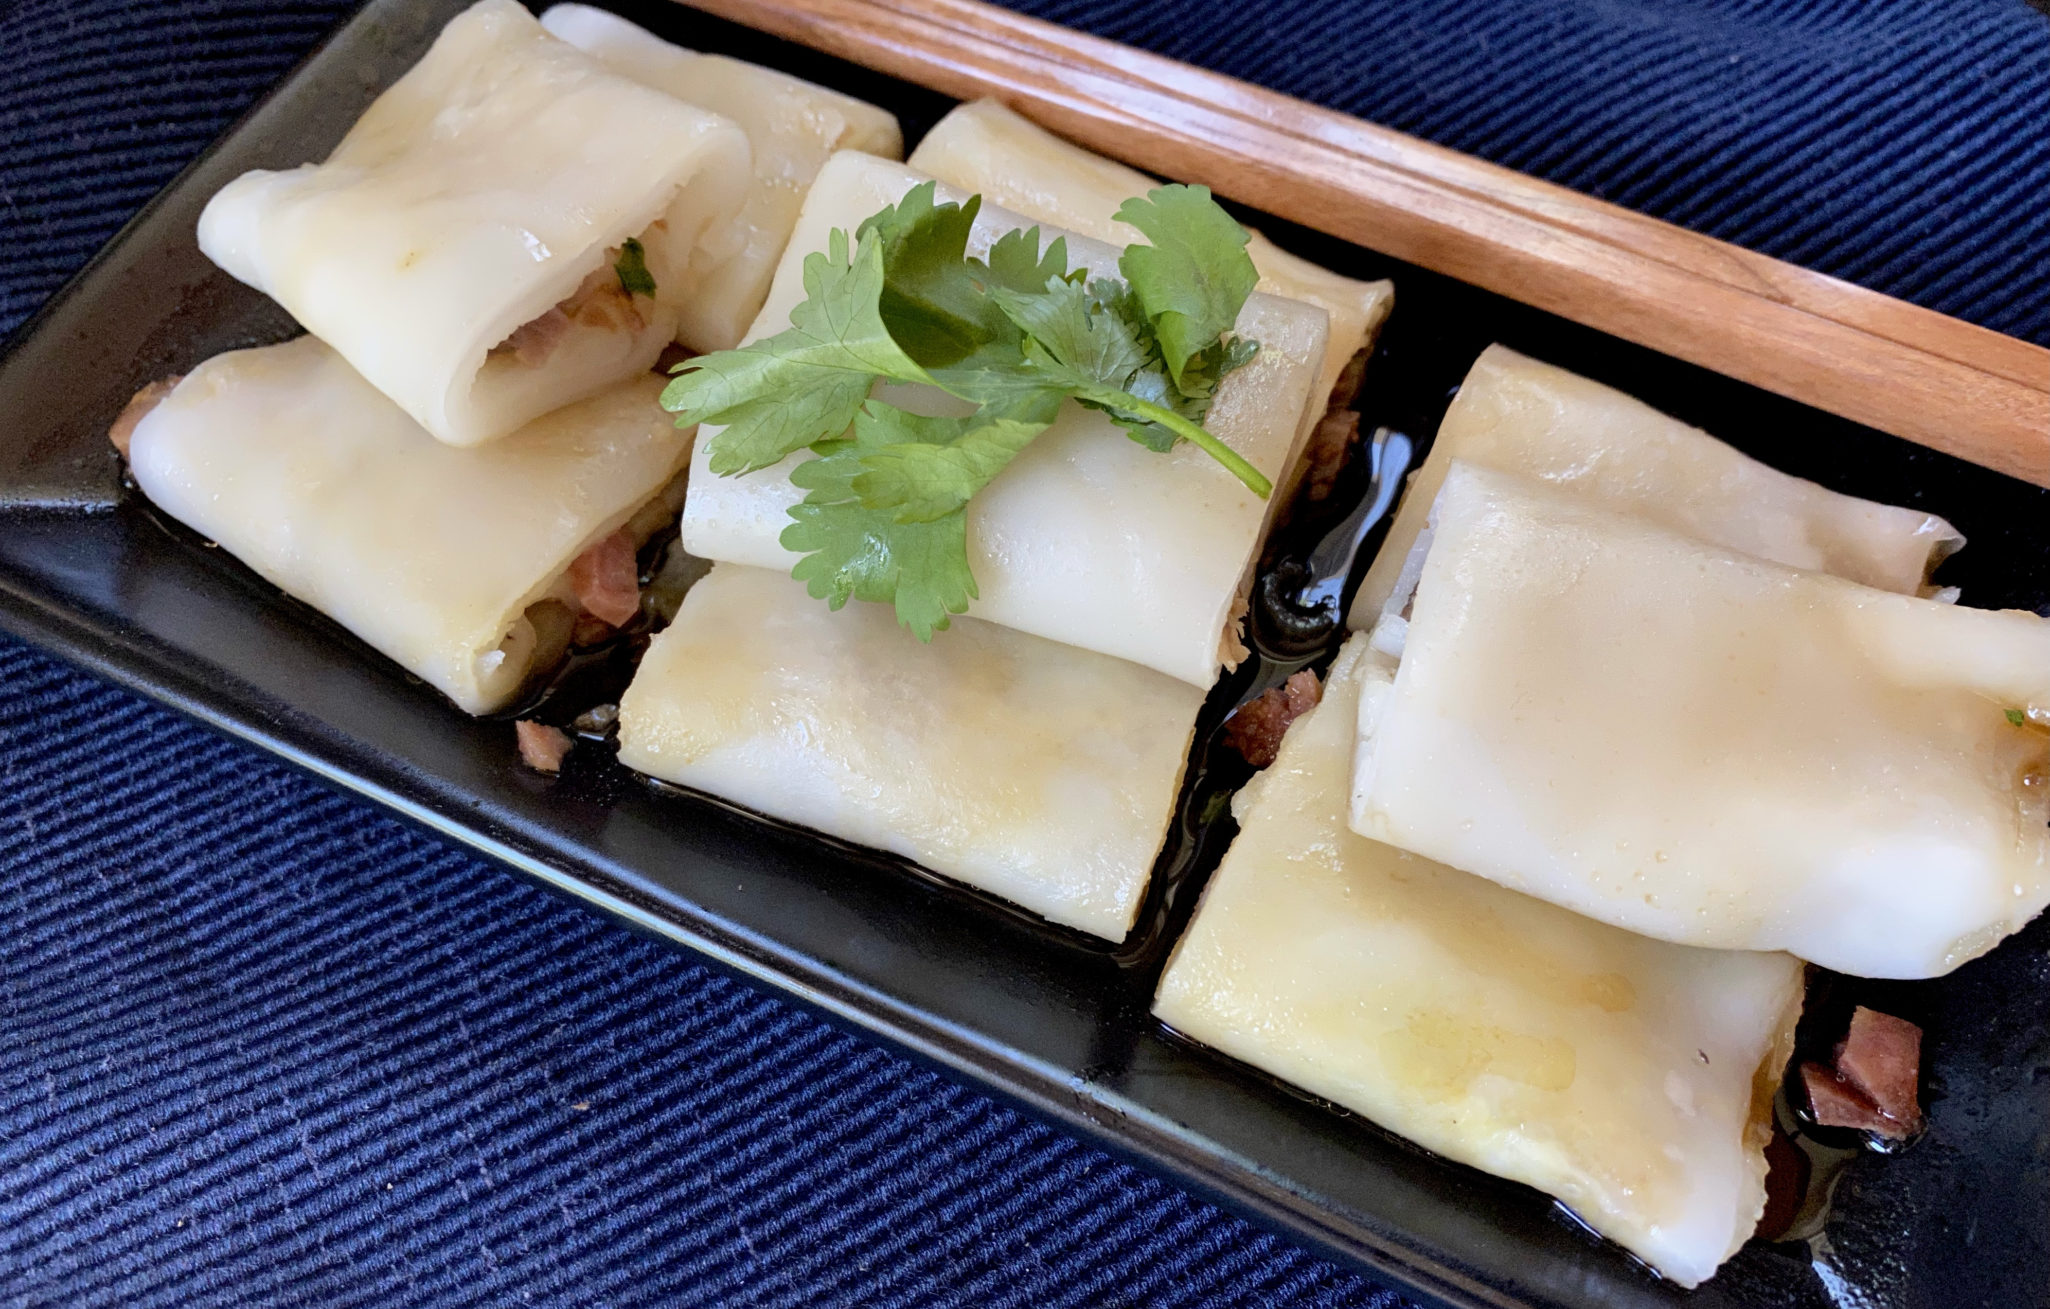
In the sweepstakes of little dishes that end up on our table when we go for Dim Sum, Cheung Fun or Rice Noodle Roll is an automatic ticket punch. The noodles have a soft, silky, smooth, texture and are neutral in flavor. This lends itself well to a variety of fillings like shrimp, bbq pork, or minced beef, and sauces. Filled noodle rolls are topped with a sweet, salty soy sauce while rice rolls without fillings are topped with sesame or Hoisin-based sauce (my favorite). These are known as Chee Cheung Fun (猪肠粉). (Funny story, the literal translation is Pig Intestine Noodle owing to their resemblance to said pork anatomy).
Never in a zillion years would I have thought of making Cheung Fun at home UNTIL I came across a recipe to make the noodles in the microwave. I was sold.
Game ON
The first hurdle is the ingredients. The rice noodle batter is a combination of:
Rice flour-plain rice flour NOT glutinous or sweet rice flour! Bob’s Red Mill at Whole Foods or Asian stores will have rice flour
Tapioca starch– also known as tapioca flour (I know, confusing!), derived from the starchy pulp of the cassava root. Used as a thickening agent like cornstarch.
Potato starch– is made from just the starch grains of potato and is NOT the same as potato flour which is cooked whole potatoes, that are dried and ground into flour. Potato starch is used as a thickener like cornstarch. It is used in gluten-free flour blends to provide texture and structure (straight from Bob’s Red Mill site, lol). Bob’s Red Mill sells potato starch as does most Asian markets.
No wheat products…gluten-free, ta-da!
This is How We Roll
Having Some “FUN”
Combine the flour and starches in a mixing bowl, add liquid, stir…dunzo. How easy is that?
The batter has a thin consistency and the starch and water will separate as it sits. Stir or whisk the batter well before pouring it into the cooking dish. I used two microwavable dishes to make the noods. A rectangular 9×6 glass pyrex dish and the shallow round Cook Anyday Microwave-ware bowl. The rectangular dish is the perfect shape to make rolls but doesn’t have a vented lid. You can use the plastic lid but keep it ajar when cooking to allow moisture to escape.
Lightly oil the bottom and 1/4 inch up the sides of your dish to prevent sticking. Brush the dish as needed, you may need to each time you make a roll. Pour about 1/3 cup of batter into the 9×6 dish ( a little less for the round bowl) to create a thin layer on the bottom. The round bowl needed only a generous 1/4 cup to cover the bottom of the bowl.
Microwave Magic
Place vented lid on top and microwave at full strength for 2 min and 10 seconds. My microwave is small and rated at 700 watts, you will need to find your microwave wattage and adjust accordingly either reducing the power or shortening the cooking time on a more powerful microwave. If your microwave has a turntable, use it. I found the noodles cooked more evenly when using the turntable. The noodle is done when it looks translucent and has some bubbles. Cracks in the cooked noodle are caused by either overcooking or using too much batter. Remove from the microwave and place in a cold water bath to cool. It will only need a couple of minutes but makes it much easier to roll.
Using a spatula or dough scraper, start on one edge and lift and roll the sheet to make a roll. For filled rolls, scatter filling on one side of noodle, lift noodle, and roll to cover the filling. The noodle is pretty forgiving so just push, roll. Don’t worry, the rolling hides a lot of imperfections. A bench scraper is the perfect size for the rectangular Pyrex dish, score another point for the Pyrex pan.
The Bling, Fillings and Toppings
Rice noodles are neutral in flavor so it is the perfect foil for lots of different fillings and sauces. Favorite fillings include barbecue pork, shrimp, or a medley of fried egg, Chinese pickles, green onions, cilantro, and bbq pork. Use your imagination, leftover roast duck, roast pork, or go vegetarian, sauteed mushrooms, caramelized onions, corn, the possibilities are unlimited. I have added SPAM in a pinch! Top rolls with a sweet soy sauce, don’t skip it, you could add some chili oil, that’s copasetic. For a little crunch, I top the rolls with fried shallots or onions, totally optional.
Ji Cheung Fun is my favorite rice noodle roll. Roll the noodle into a cylinder since Ji Cheung Fun does not have a filling. Top with sauces, Peanut Sauce, and Hoisin Sauce, a play on sweet and salty flavors. Sprinkle peanuts or sesame seeds on top to add a nice crunch. I also hit it with Chili Crunch Oil…BAM, straight to Yumsville.
Comfort Finale
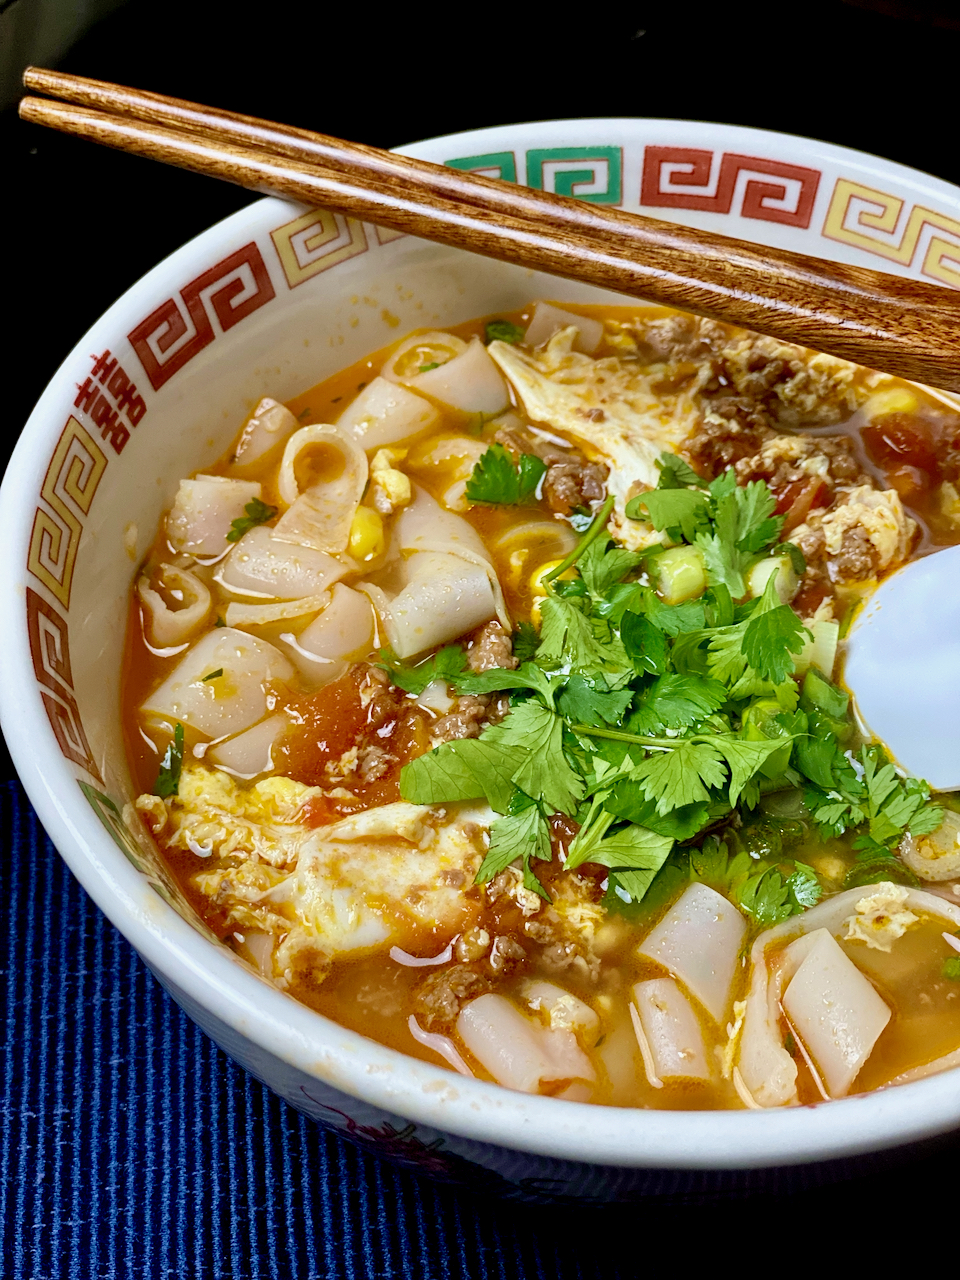
I rolled my last noodles intending to make a plate of Ji Cheung Fun but I really wasn’t in the mood for it. Instead, I had soup noodles on the brain, so I cut each roll into 1/2 inch wide noodles, placed them in a bowl, and turned my attention to the soup. Luckily, I had heirloom tomatoes from the market, a little bit of beef, and a couple of eggs in the fridge. A warm bowl of Tomato Egg Drop Soupwith Rice Noodles was ready in minutes and hit the spot.
A favorite dim sum dish, steamed rice noodles filled with bbq pork, shrimp or minced beef, served with sweet soy sauce. Made easy in the microwave!
Course Appetizer, dim sum, Side Dish
Cuisine Asian
Keyword Cantonese cooking, Cheung fun, dim sum, ji cheung fun, microwave, rice noodles
Prep Time 45 minutesminutes
Cook Time 3 minutesminutes
Ingredients
Batter
1cuprice flour140g
1/2cuppotato starch90g
1/2cuptapioca starch/flour70g
1tablespoonsugar
1/2teaspoonsalt
1tablespooncanola or vegetable oilplus more for brushing
2cupsroom temperature water470ml
2cupsjust boiled water470ml
Adds-ins
3tablespoonsthinly sliced scallions
3tablespoonschopped cilantro
Toppings
red pepper flakes
toasted sesame seeds
chili oil
Sweetened Cheung Fun Soy Sauce
2-2.5Tbsp light soy sauce adjust to taste
1/4cupwater
1½ tsp sugar
¼ tsp chicken powder
¼ tsp sesame oil
Hoisin Sauce
0.5Tregular soy sauce or dark soyreduce agave to 1/2 t if using dark soy
1.5THoisin Sauce
0.5TSesame oil
1-2Twater
1tAgave syrup or sugar
Peanut Sauce
1tbsppeanut butter1 generous tablespoon
2Twater
1/2tagave or sugar
1/2tsesame oil or chili sesame oil
Cheong Fun Sauce Simplified (variation of Sweetened Cheung Fun Soy Sauce)
1/2cuphot water
2tablespoonssugar
3tablespoonssoy sauce
1/2teaspoonsesame oil.
Instructions
Batter
Whisk together all the flours, sugar, and salt in a mixing bowl. Add 1 tablespoon of oil and 2 cups of room temperature water to the batter and stir to combine. Some of the flour will clump up. Don’t worry–keep stirring and the flour will loosen eventually.
Gradually add the boiled water to the batter. Pour the water in a steady stream with one hand and stir the batter with the other hand. Place a towel underneath the bowl to steady it while you pour and stir.
Set the batter aside. The flour will settle to the bottom in just a few minutes. Make sure to stir the batter before each time you are ready to pour a sheet of cheung fun.
MIcrowave directions:
1 9x6 or 8x8 glass pyrex dish
Rectangular Pyrex ~9x6 glass container, 8x8 glass container or Large shallow Cook Anyday Bowl
Brush bottom and 1/4 inch up sides of glass container or pan with vegetable oil. Stir batter and pour approximately 1/3 cup of batter into Pyrex pan. Loosely cover with lid. Place in microwave and set time for 2 minutes and 10 seconds, full power. (For reference microwave I have is ~700 watts, the low end of power for a microwave)
Set up a pan with cold water large enough to fit Pyrex container you are using to microwave.
When cooking is complete, remove from microwave and immediately place in pan of cold water. Allow pan to sit for a couple of minutes to cool. The rice noodle sheet should look transparent with a couple of bubbles. If there are opaque spots where it still looks white, microwave for additional 15-20 seconds.
Remove container from water bath. Using a bench scraper, run it around the edge of the noodle to loosen. Starting from the edge (short or long) nearest to you, use a bench scraper or spatula, lift and roll the rice noodle away from you. Keep lifting and rolling. Divide the rice noodle roll in to the length desired. For Ji Cheung Fun the pieces are approximately 2 to 2.5 inches in length.
For filled Cheung Fun: Pour batter into dish, scatter a line of filling at about 1/3 line of batter in the pan , from the edge you will begin to roll. See video.
Fillings
Go crazy, rice noodles are very neutral and will compliment almost anything you pair with it.
Have approximately 1/2 pound of filling for this recipe. But if you come up short, make non-filled noods, cut them up for nice big bowl soup.
Shrimp
Use medium sized shrimp, peel and deveined. Toss the cleaned shrimp with 2 tablespoons water, 1/2 teaspoon sugar and 1/8 teaspoon baking soda. After the shrimp have been coated, cover and refrigerate for 2 hours. After 2 hours, rinse the shrimp under a gentle stream of cold running water for 5 minutes to wash away the sugar and baking soda and pat thoroughly dry with a paper towel. This step is sort of optional. The texture is greatly improved but your prep time is increased. But, if you want snappy shrimp-just do it. This is from Woks of Life, boss site.
Marinate the shrimp with 1/4 teaspoon sesame oil, a pinch of salt, 1/2 teaspoon cornstarch, and 1/4 teaspoon ground white pepper. Cover and return to the refrigerator while you prepare the rest of the ingredients.
Pre-cook your shrimp so they will be ready when you make your noods. Lay the shrimp out in a single layer in a microwaveble dish, the shallow Anyday Bowl works, cover and microwave on full power for 4 - 5 minutes until the shrimp are opague, pink and cooked through. AS always, adjust time for your microwave. These numbers are for my 700 watt Spacesaver, adjust accordingly.
Other stuff
BBQ Pork- Dice or julienne. You can mix in green onions if you like.
Dried Shrimp, found in Asian grocery stores, soak to soften before using.
Shiitake mushrooms Use dried or fresh. Rehydrate dried and dice. Fresh shiitakes should be seasoned sitr fried.
Egg-Straight from wathching the Joe's Rice Roll Video. Scramble an egg and use with the batter. Add 1 -2 tablespoons of egg after pouring batter into pan. Nice effect and great with bbq pork and green onions!
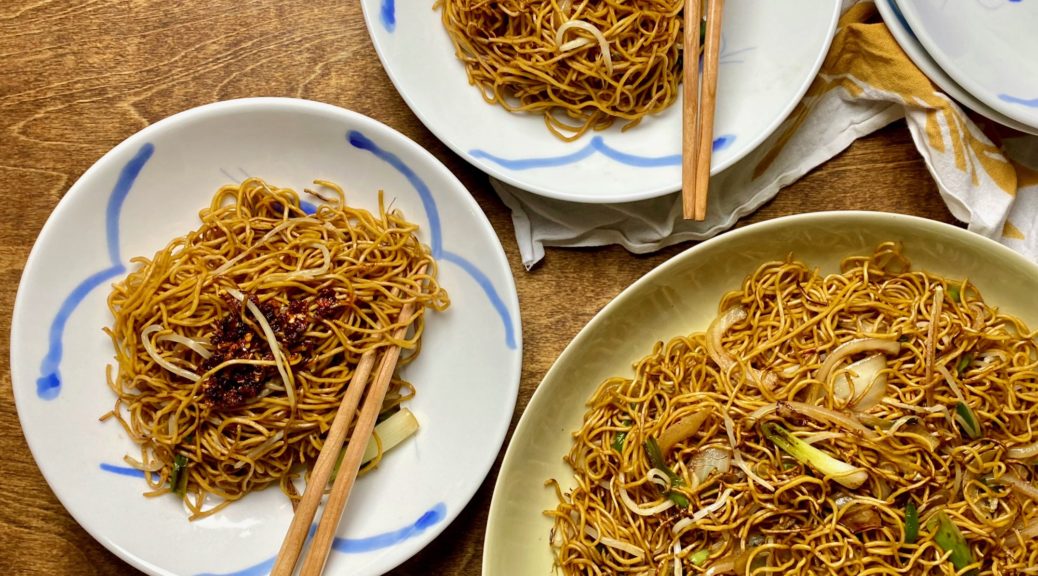
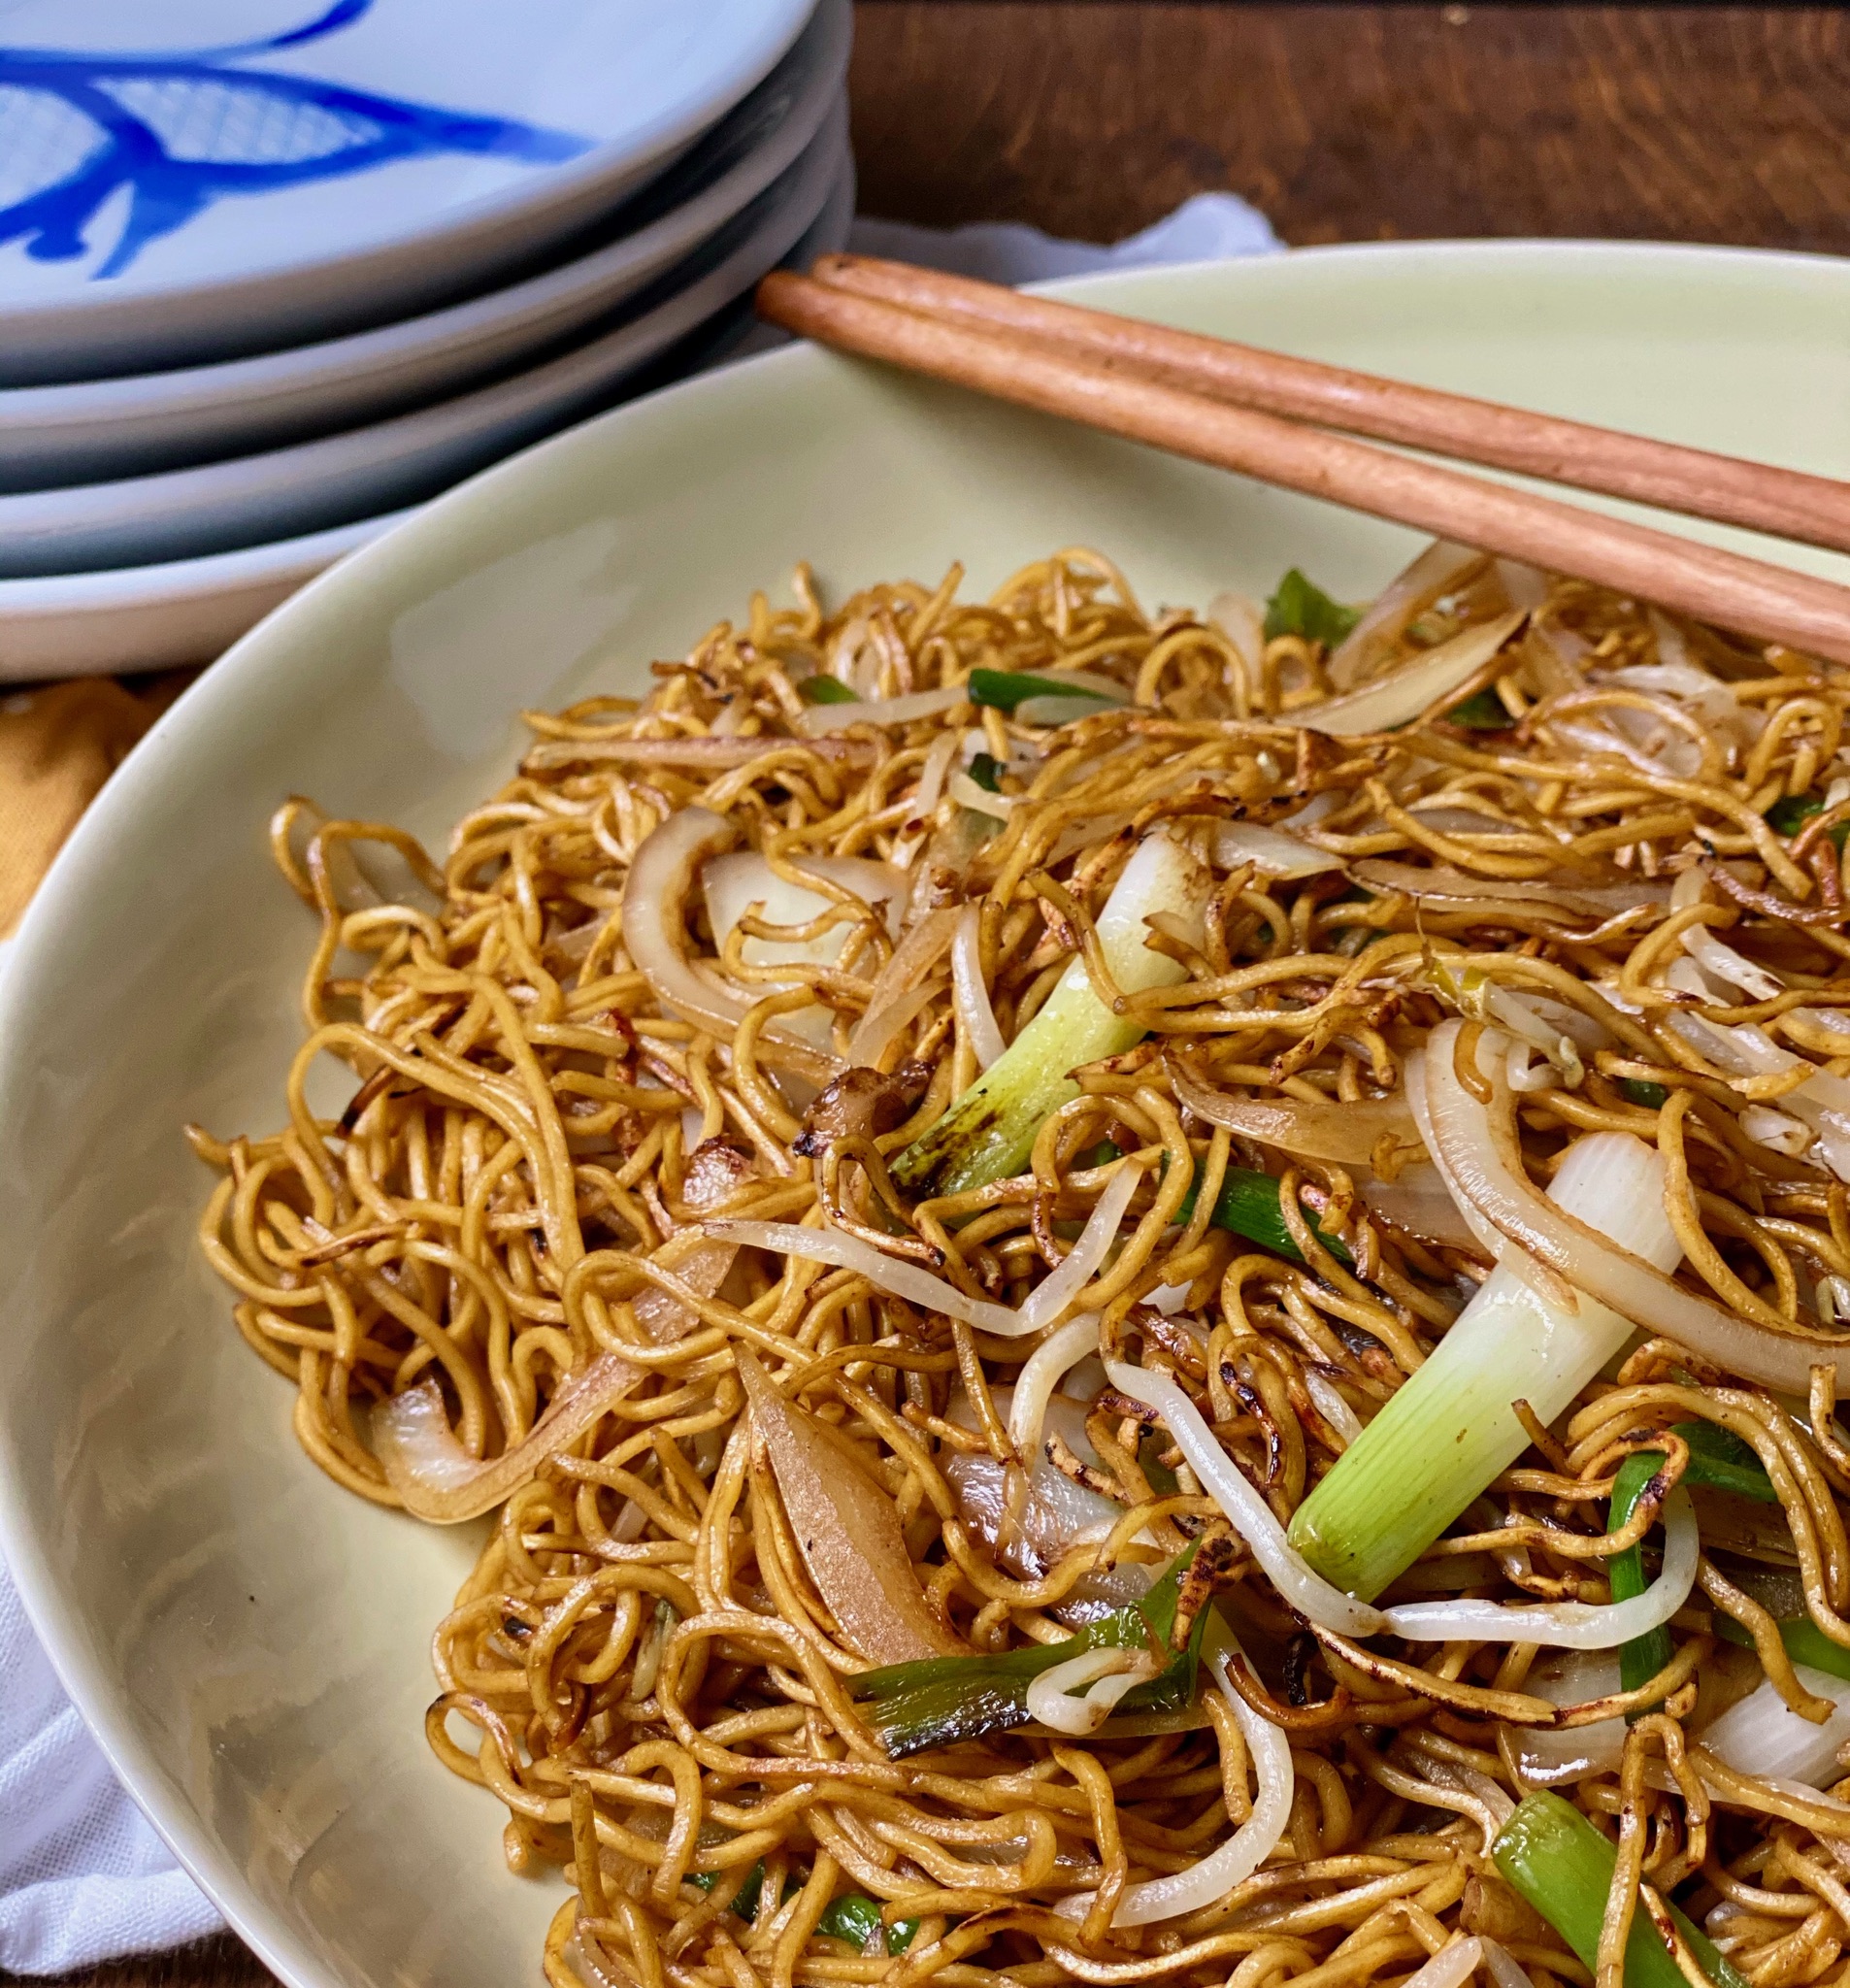
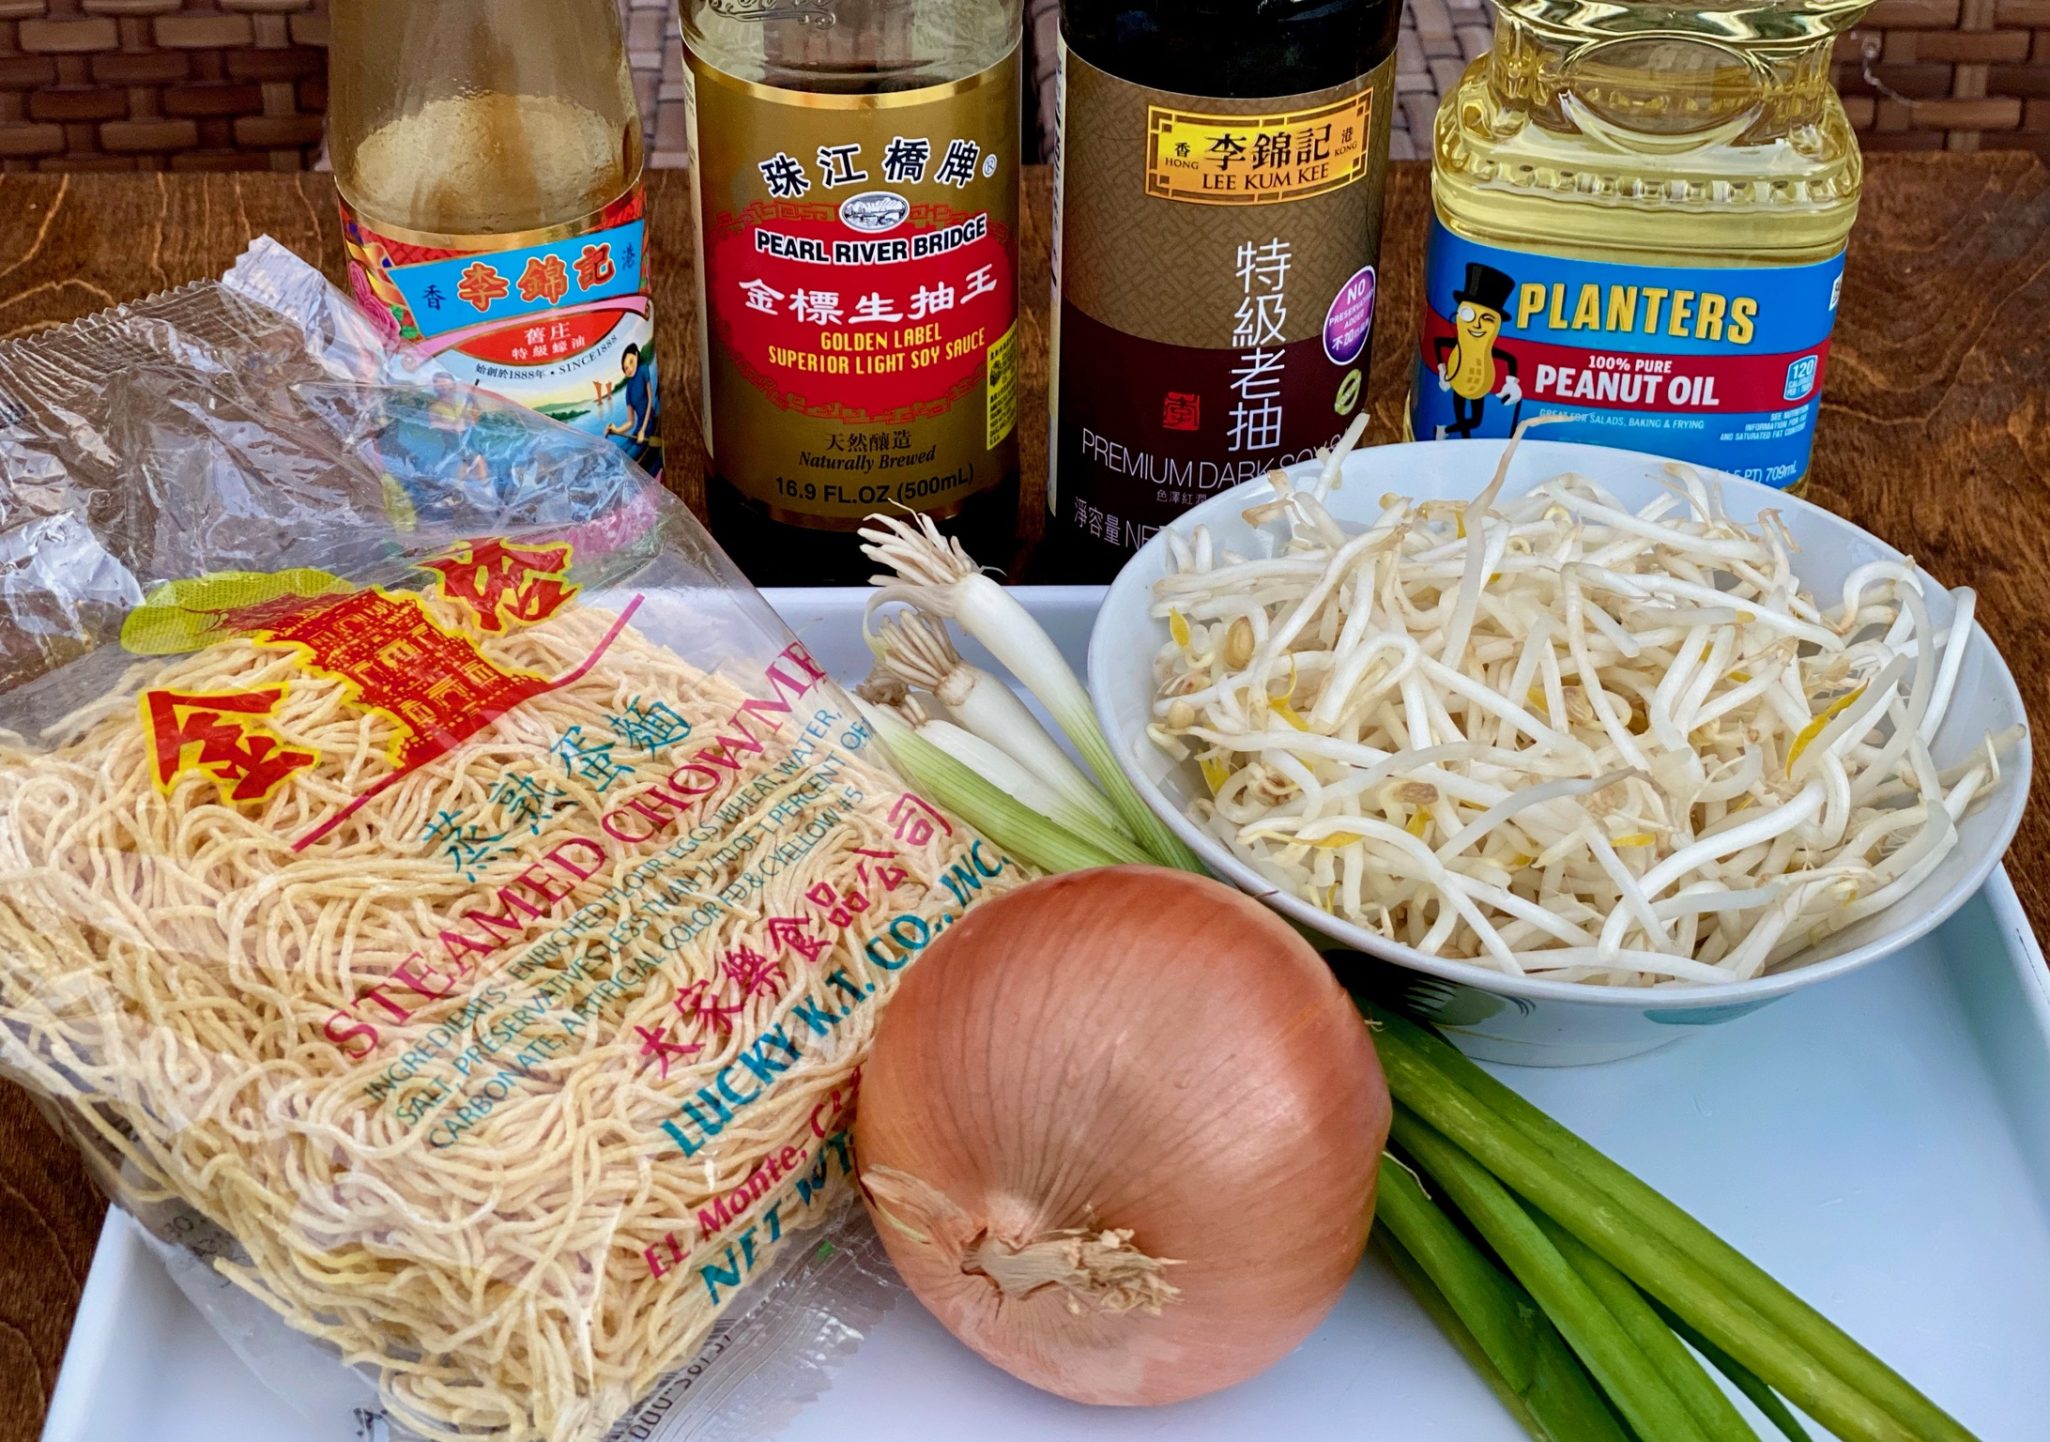
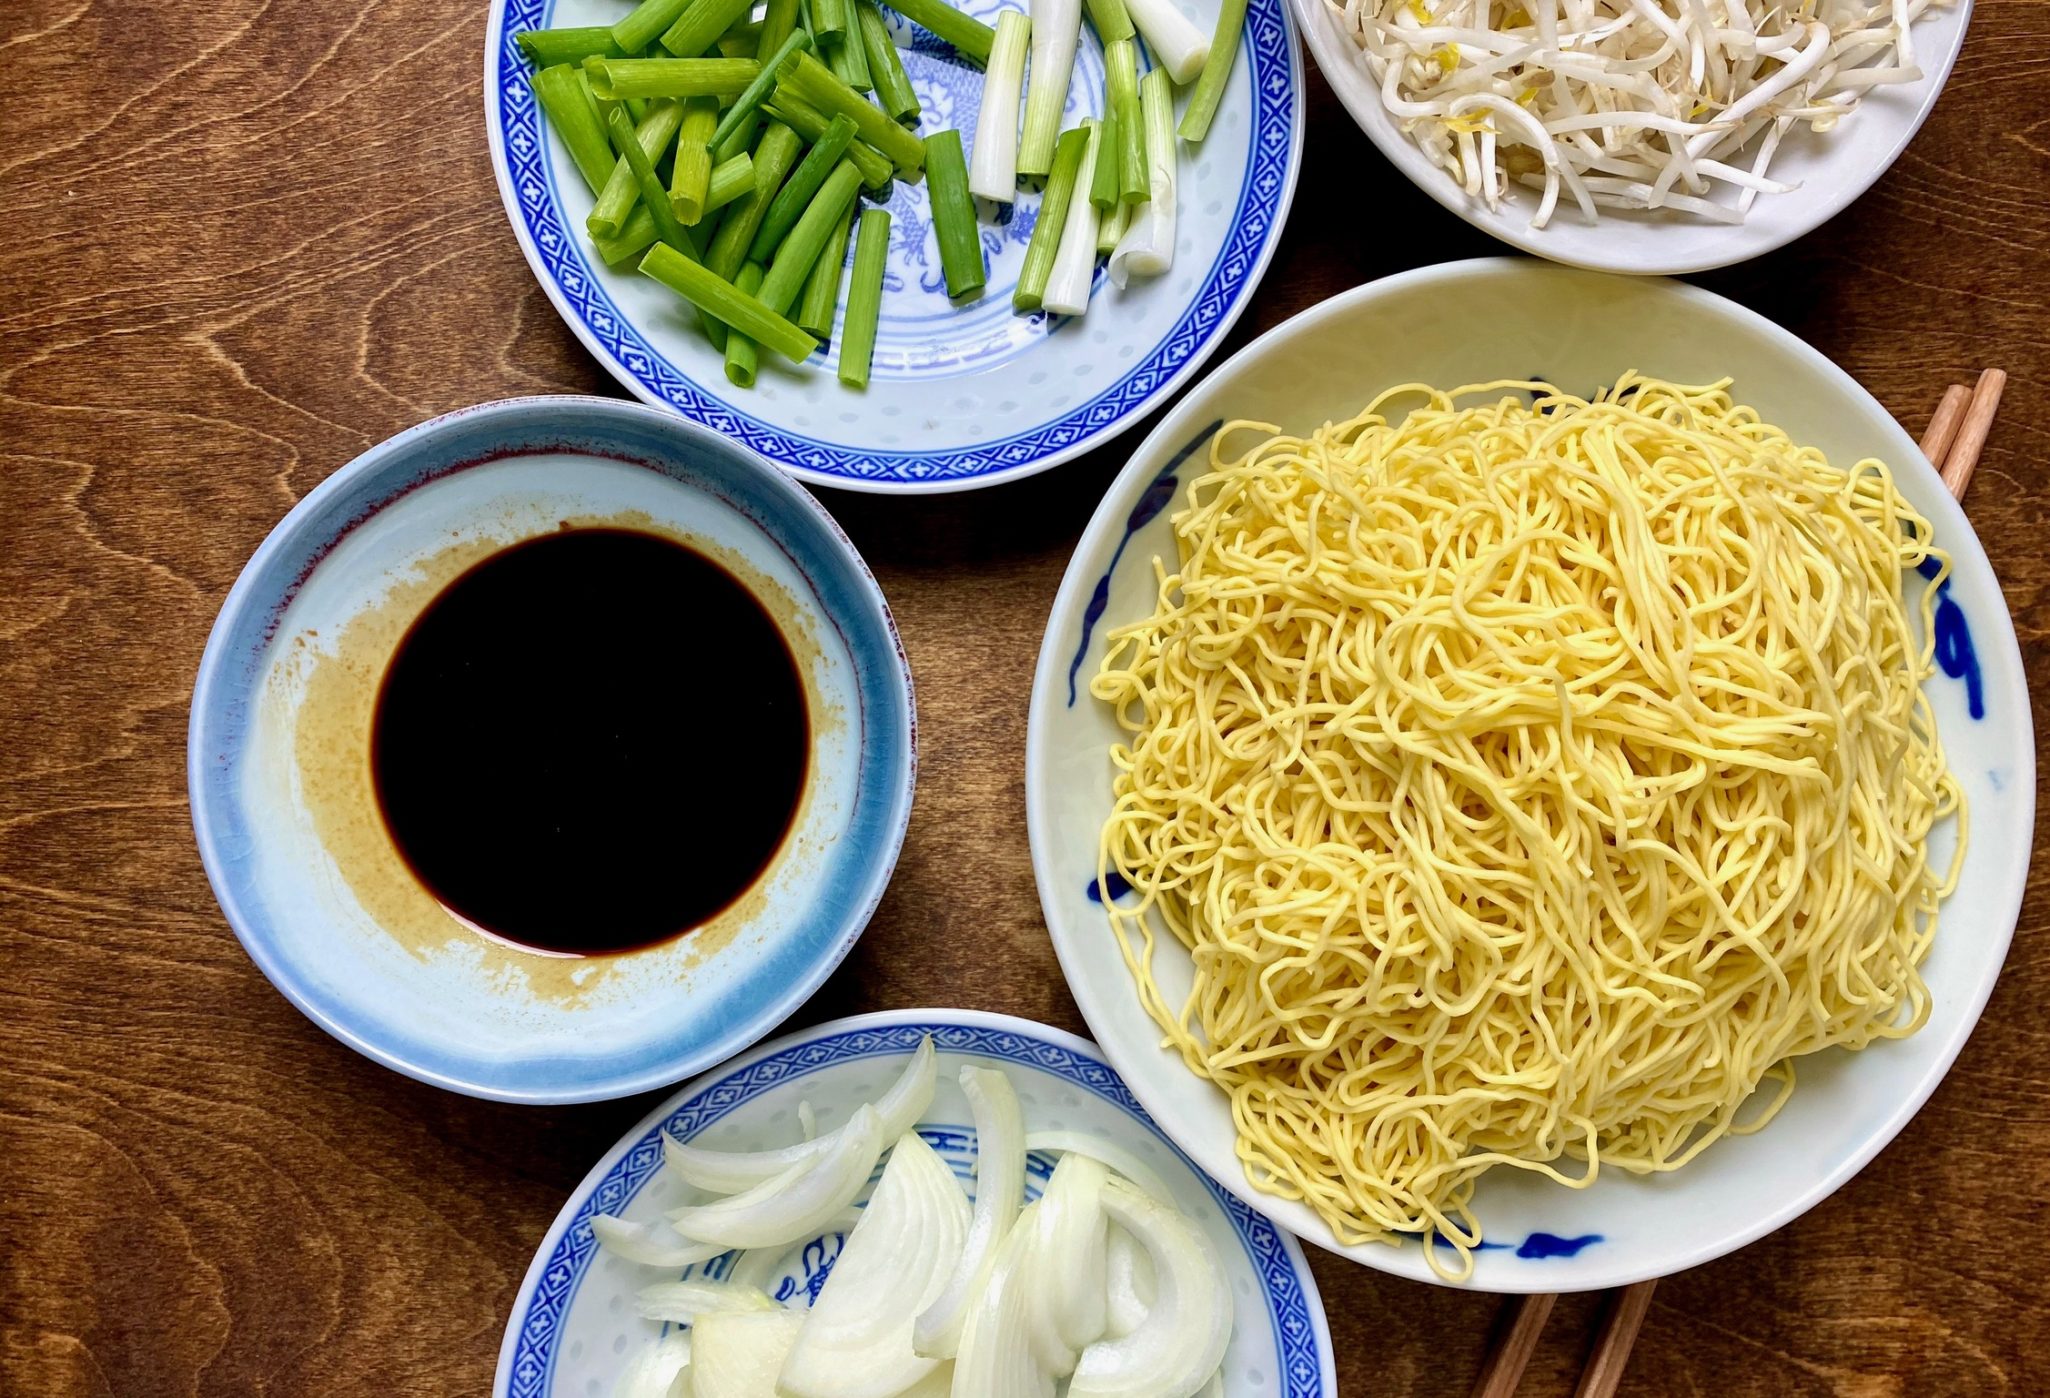
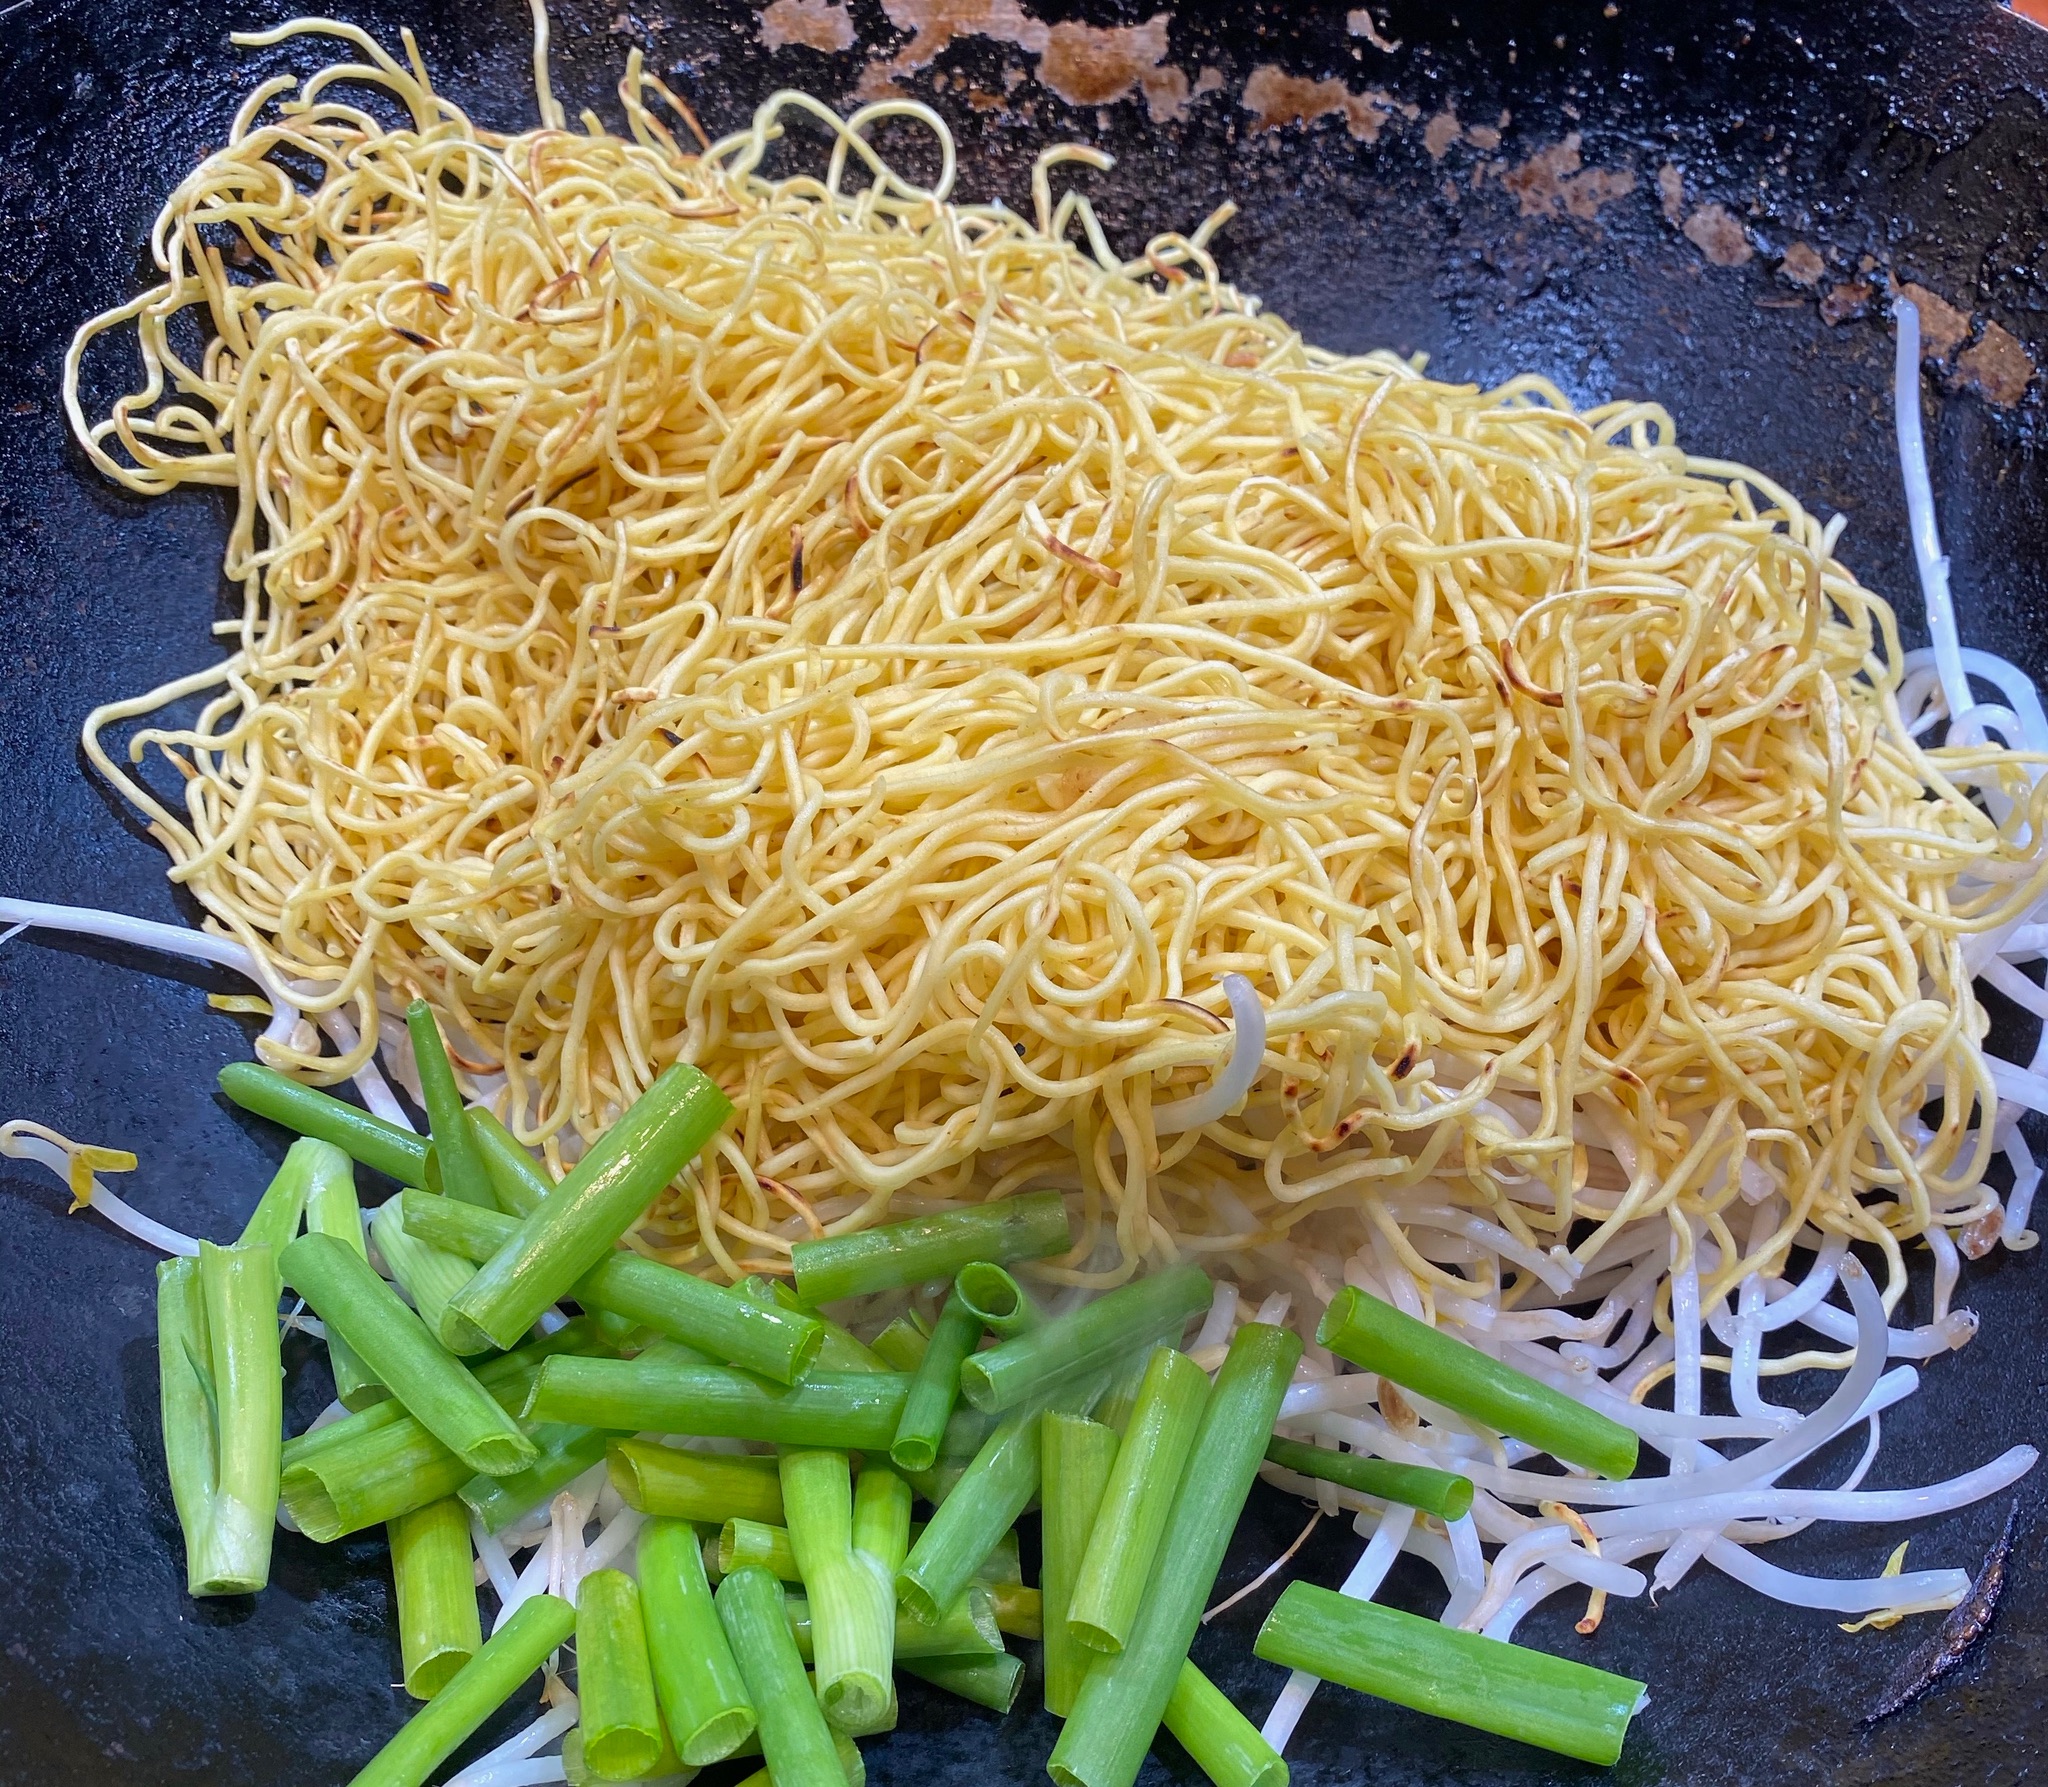
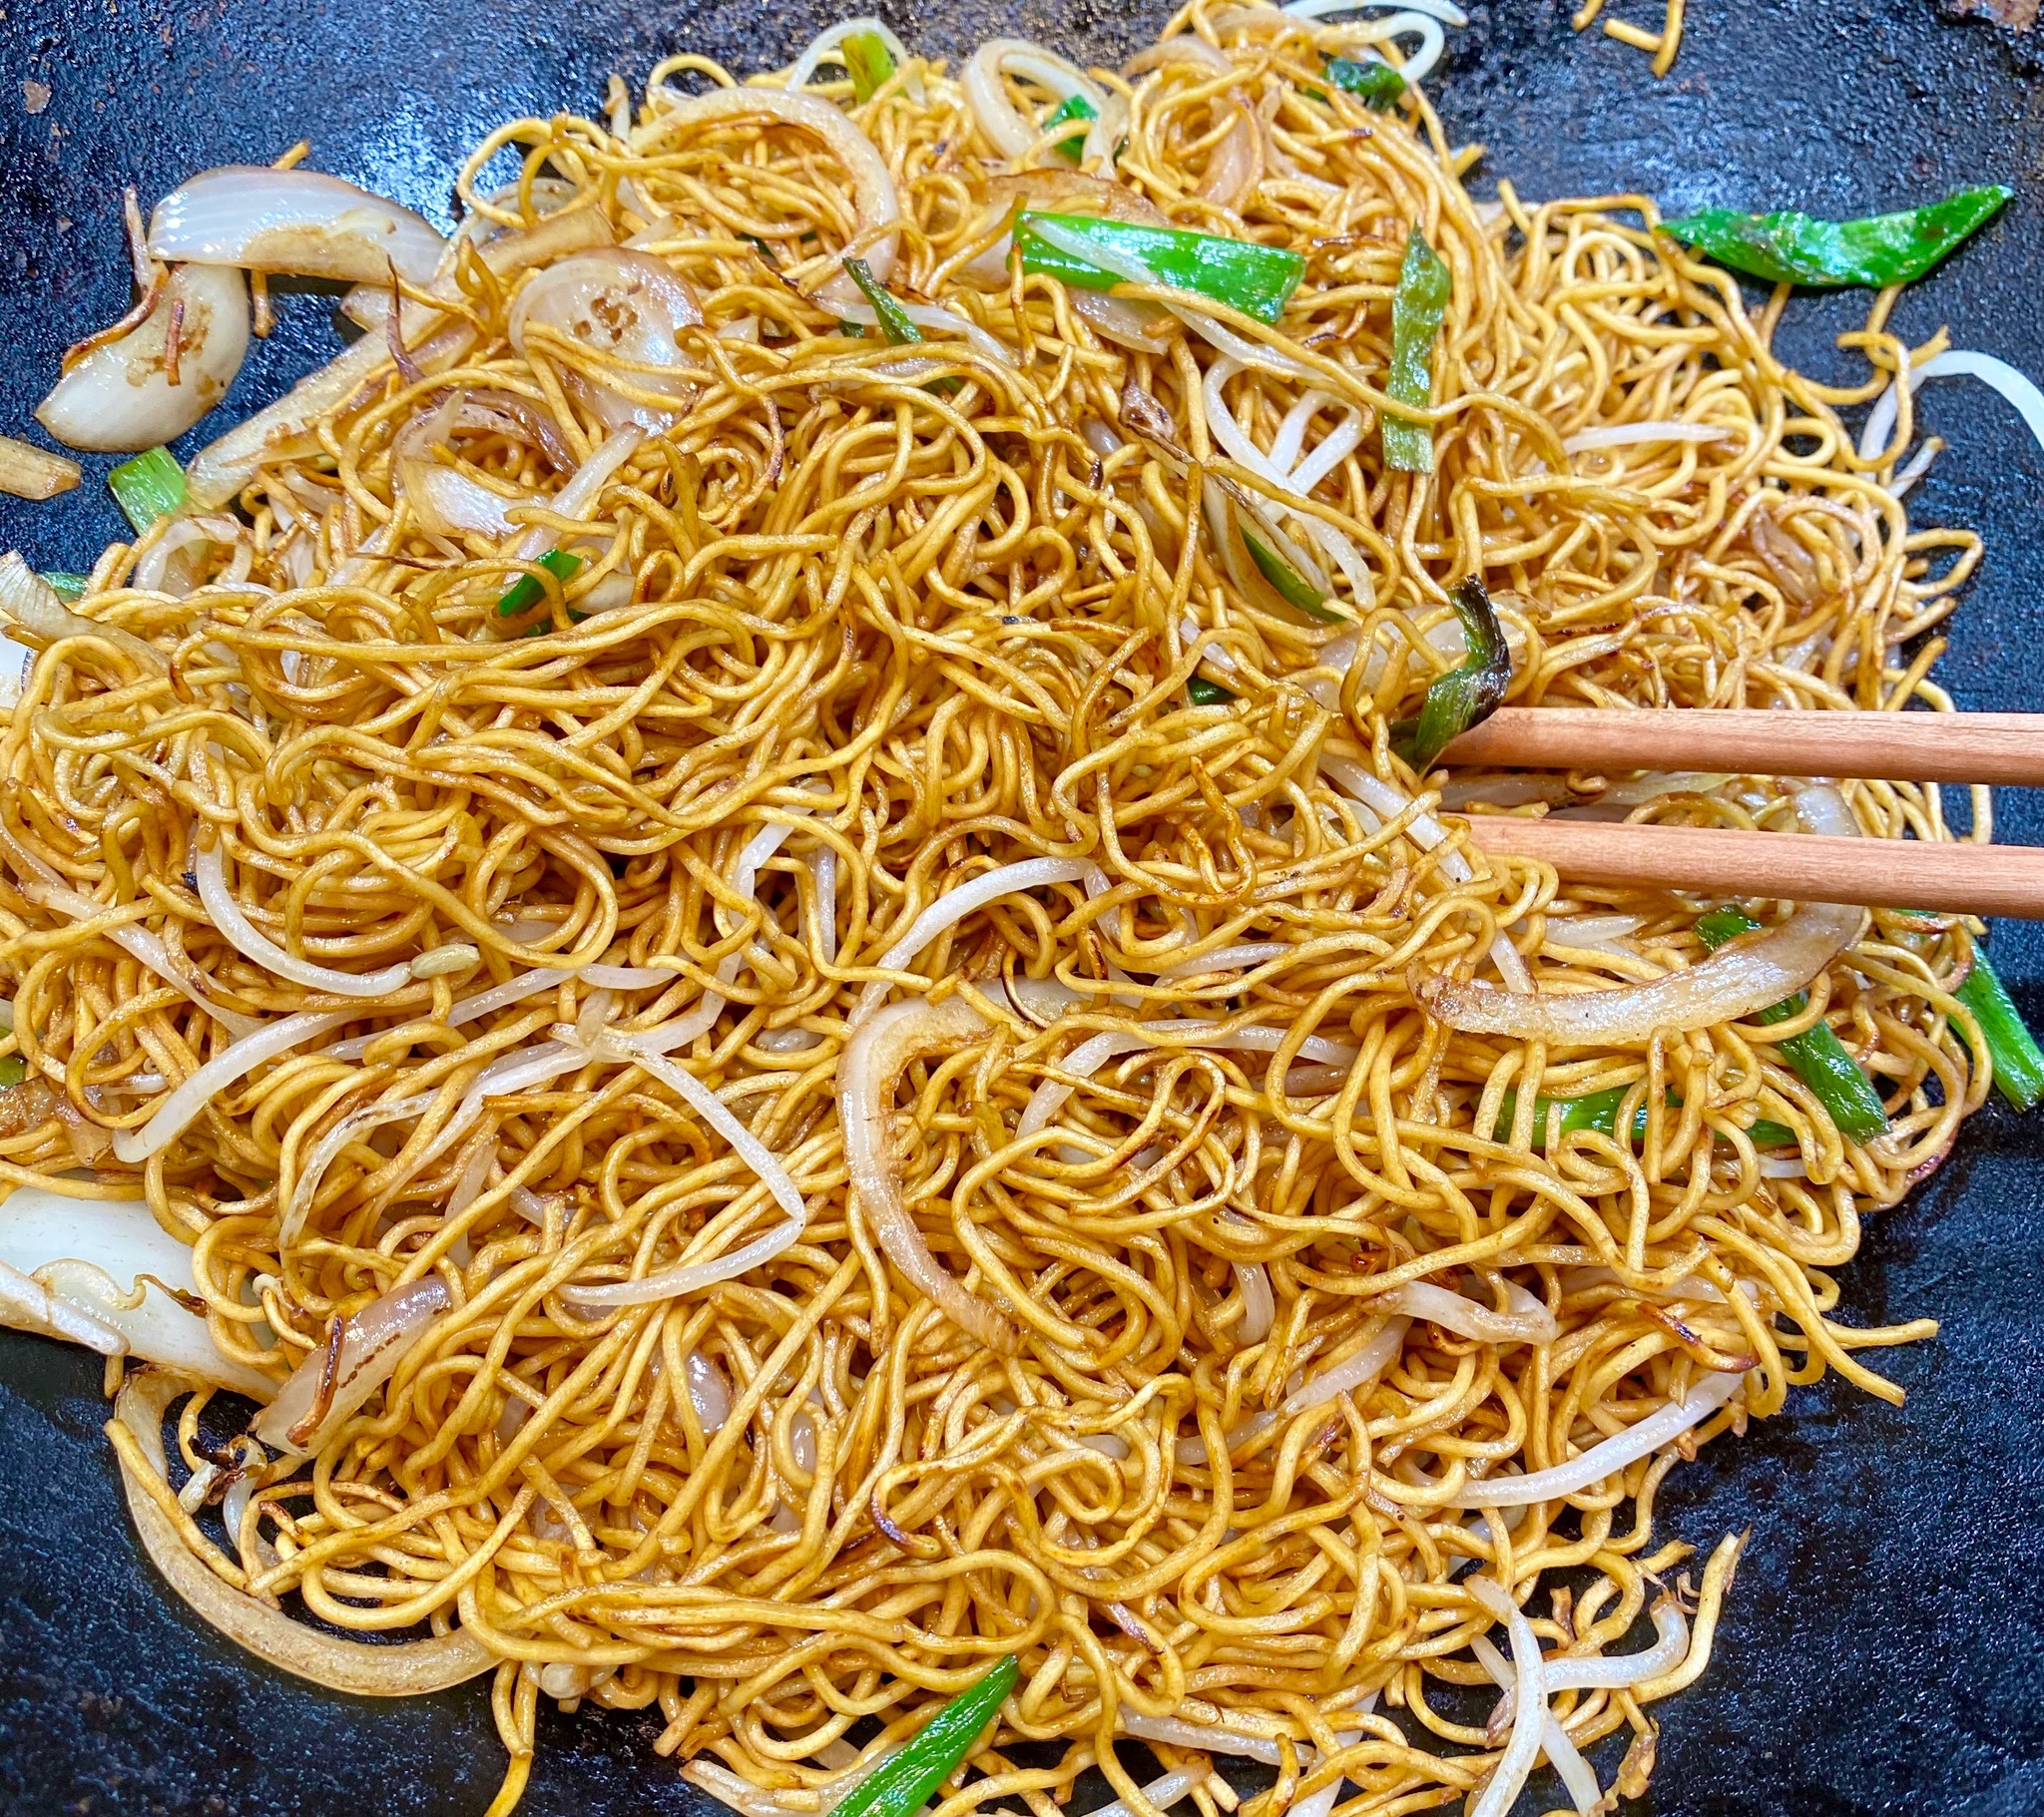
One of my favorite dishes, when we are out for dim sum, is Hong Kong Style Chow Mein or Soy Sauce Fried Noodles (豉油王炒麵). This is Cantonese soul food. Thin egg noodles fried with onions, scallions, and bean sprouts. It is deceptively simple. How does a dish with so few ingredients, taste so good? It’s the balance, skinny noodles dry-fried to retain their chew and texture; stir-fried onions for sweetness and texture, scallions for flavor and color, and last but not least, bean sprouts for textural crunch. There aren’t any big pieces of meat or greens that disrupt the balance of the dish. Everything is julienned or in slivers to compliment the noodles.
Like Yin and Yang, balanced and harmonious. It flies under the radar due to its simplicity and is the perfect side dish. These noodles are your bestie, your essential wingman, Goose to Maverick.
The seasonings are few, soy sauce, oyster sauce, a bit of sugar for balance, and that’s pretty much it. This means, start with great sauces, ones you like. My favorites? LKK oyster sauce, it is my go-to brand (Woman and Little Boy in a Boat). It’s the only oyster sauce I have in my pantry.
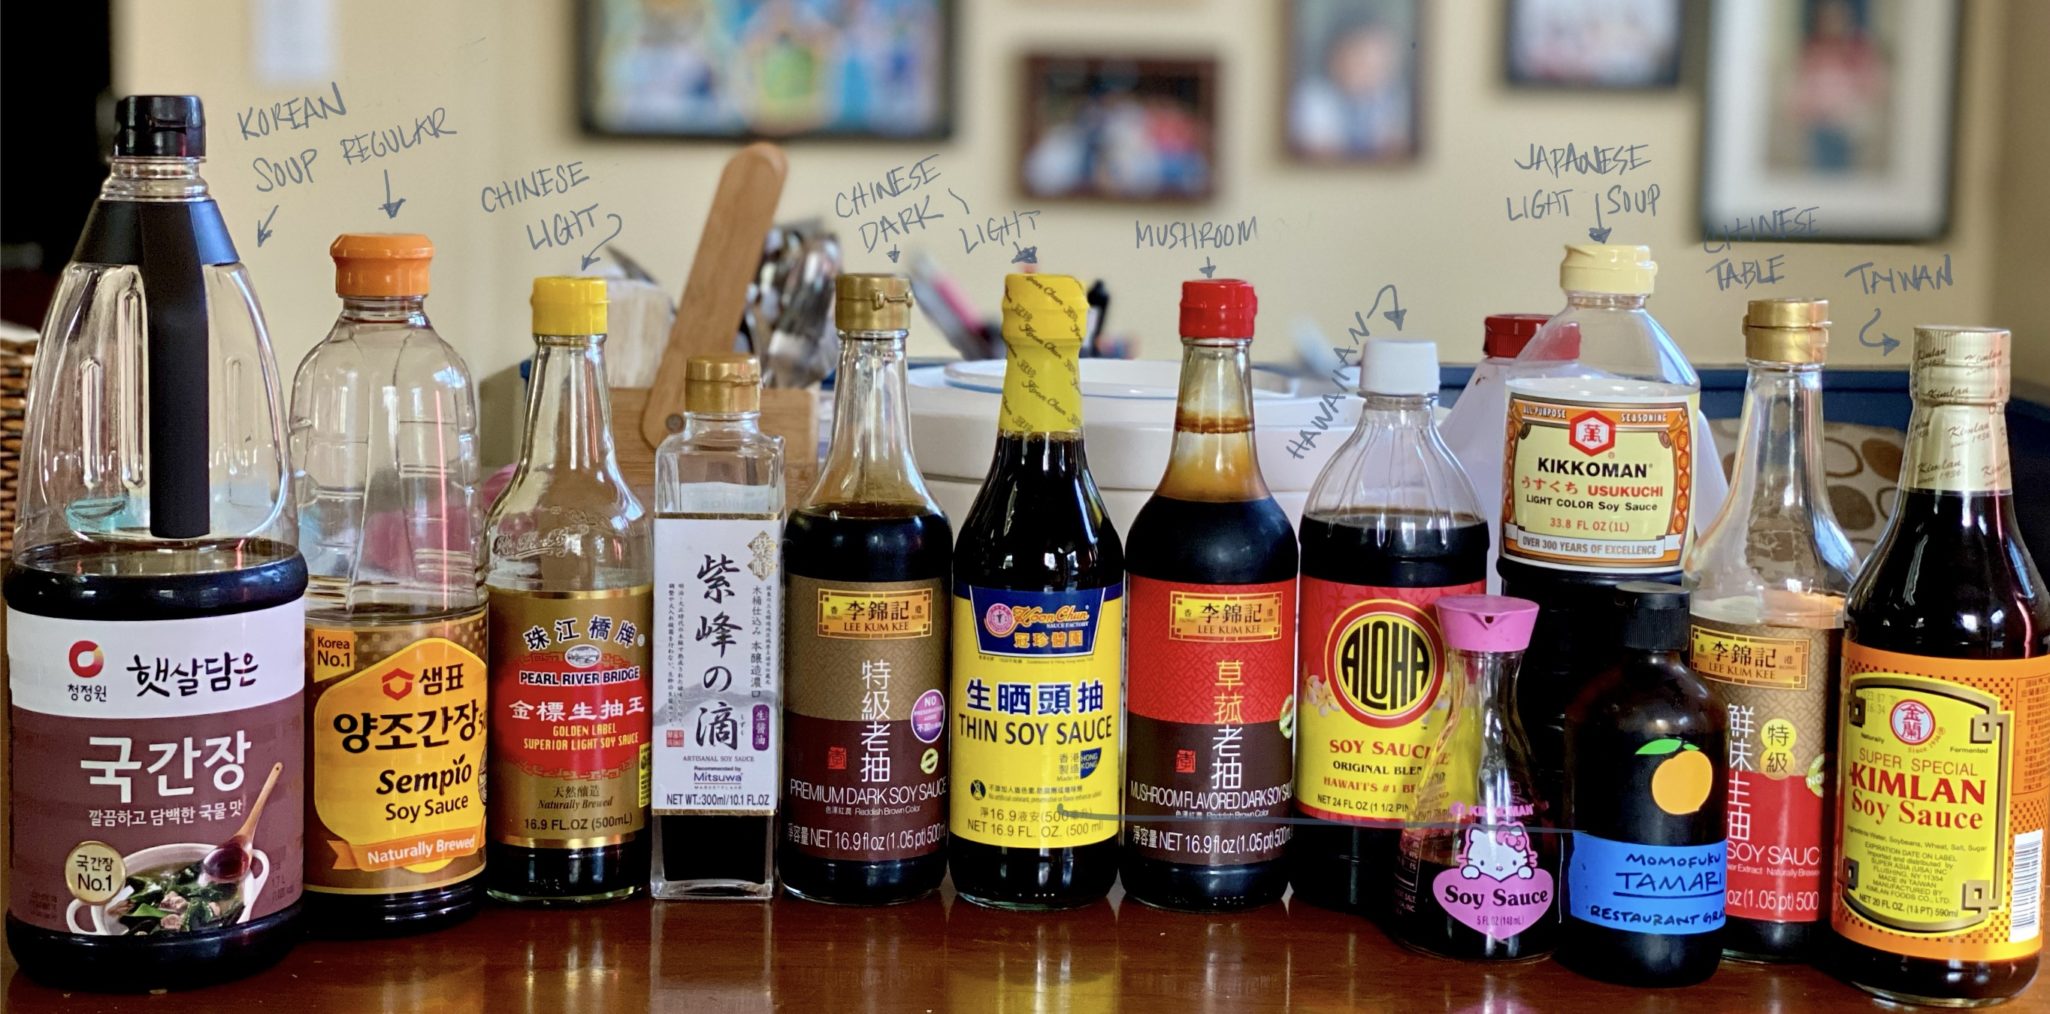
Soy Sauces are a different matter, there are so many. Different in style, use, and taste. Literally, I have over 12 different soy sauces, Chinese, Korean, Japanese, Taiwanese, and even Hawaiian.
SOY, Let’s Break It Down
In Cantonese cuisine, the dark soy sauce is actually not as salty as light soy sauce. Sugar or molasses is added to the base sauce for flavor, color and to balance the saltiness. It is used during marinating or cooking. Light Soy Sauce, is the first press of soybeans and is salty. It is the go-to sauce, to marinade, cook, and to use on the table, like salt. The soy sauce found on the table in Chinese restaurants is light soy sauce or often Kikkoman, which falls between light and dark soy sauce. A good all-purpose soy sauce. Koon Chun, a Hong Kong legacy company makes wonderful Light and Dark Soy Sauces (My Dad’s favorite)
For these noodles, it’s imperative you use soy sauces you like since it is a predominant flavor ingredient. This dish requires 2 different soy sauces, light soy (shēng chōu, 生抽) and dark soy (Lǎo chōu, 老抽). The literal translation is “new sauce” for light soy and “old sauce” for dark soy. The dark and light soy is most prevalent in Canton, southeast China (ME!).
My favorites for this dish are Pearl River Bridge Light Soy Sauce and LKK Dark Soy Sauce. A great alternative is Korean Soy Sauce. I would use Sempio 701 which has a briny, rich, savory taste with a hint of sweetness. The Soup Soy seen in the picture (end left) is light soy and used mainly when making soup. It provides salt and umami without coloring your stocks. I use Aloha Soy Sauce for my marinades for bbq and any Hawaiian recipe (I have lots, love Hawaiian food-onolicious)
The NOODS
The other half of the equation is the noodles in this dish, so pick the right one!
Choose noodles that are THIN, ie. Cantonese style or Hong Kong-style noodles. Preferably egg noodles. Fresh or dry (I like fresh), I repeat THIN noodles. Look for Fresh Steamed, or fresh Hong Kong or Cantonese-style noodles.
Don’t follow the cooking directions! You want to undercook these noodles so they don’t break or get mushy when frying.
To ensure you don’t overcook the noodles. Separate the noodles and place them in a colander over the sink. Pour boiling water over the noodles and let them drain and dry. Voila noodles ready for pan-frying. Alternatively, put the noodles in boiling water for no more than 30 seconds after it comes to a boil. Remove and drain well.
Better to undercook your noodles!!! Made with Lauhas a great video for making Hong Kong Style Noodles. This recipe is essentially his with a couple of tweaks and notes. Great site for down home Cantonese food from a pro!
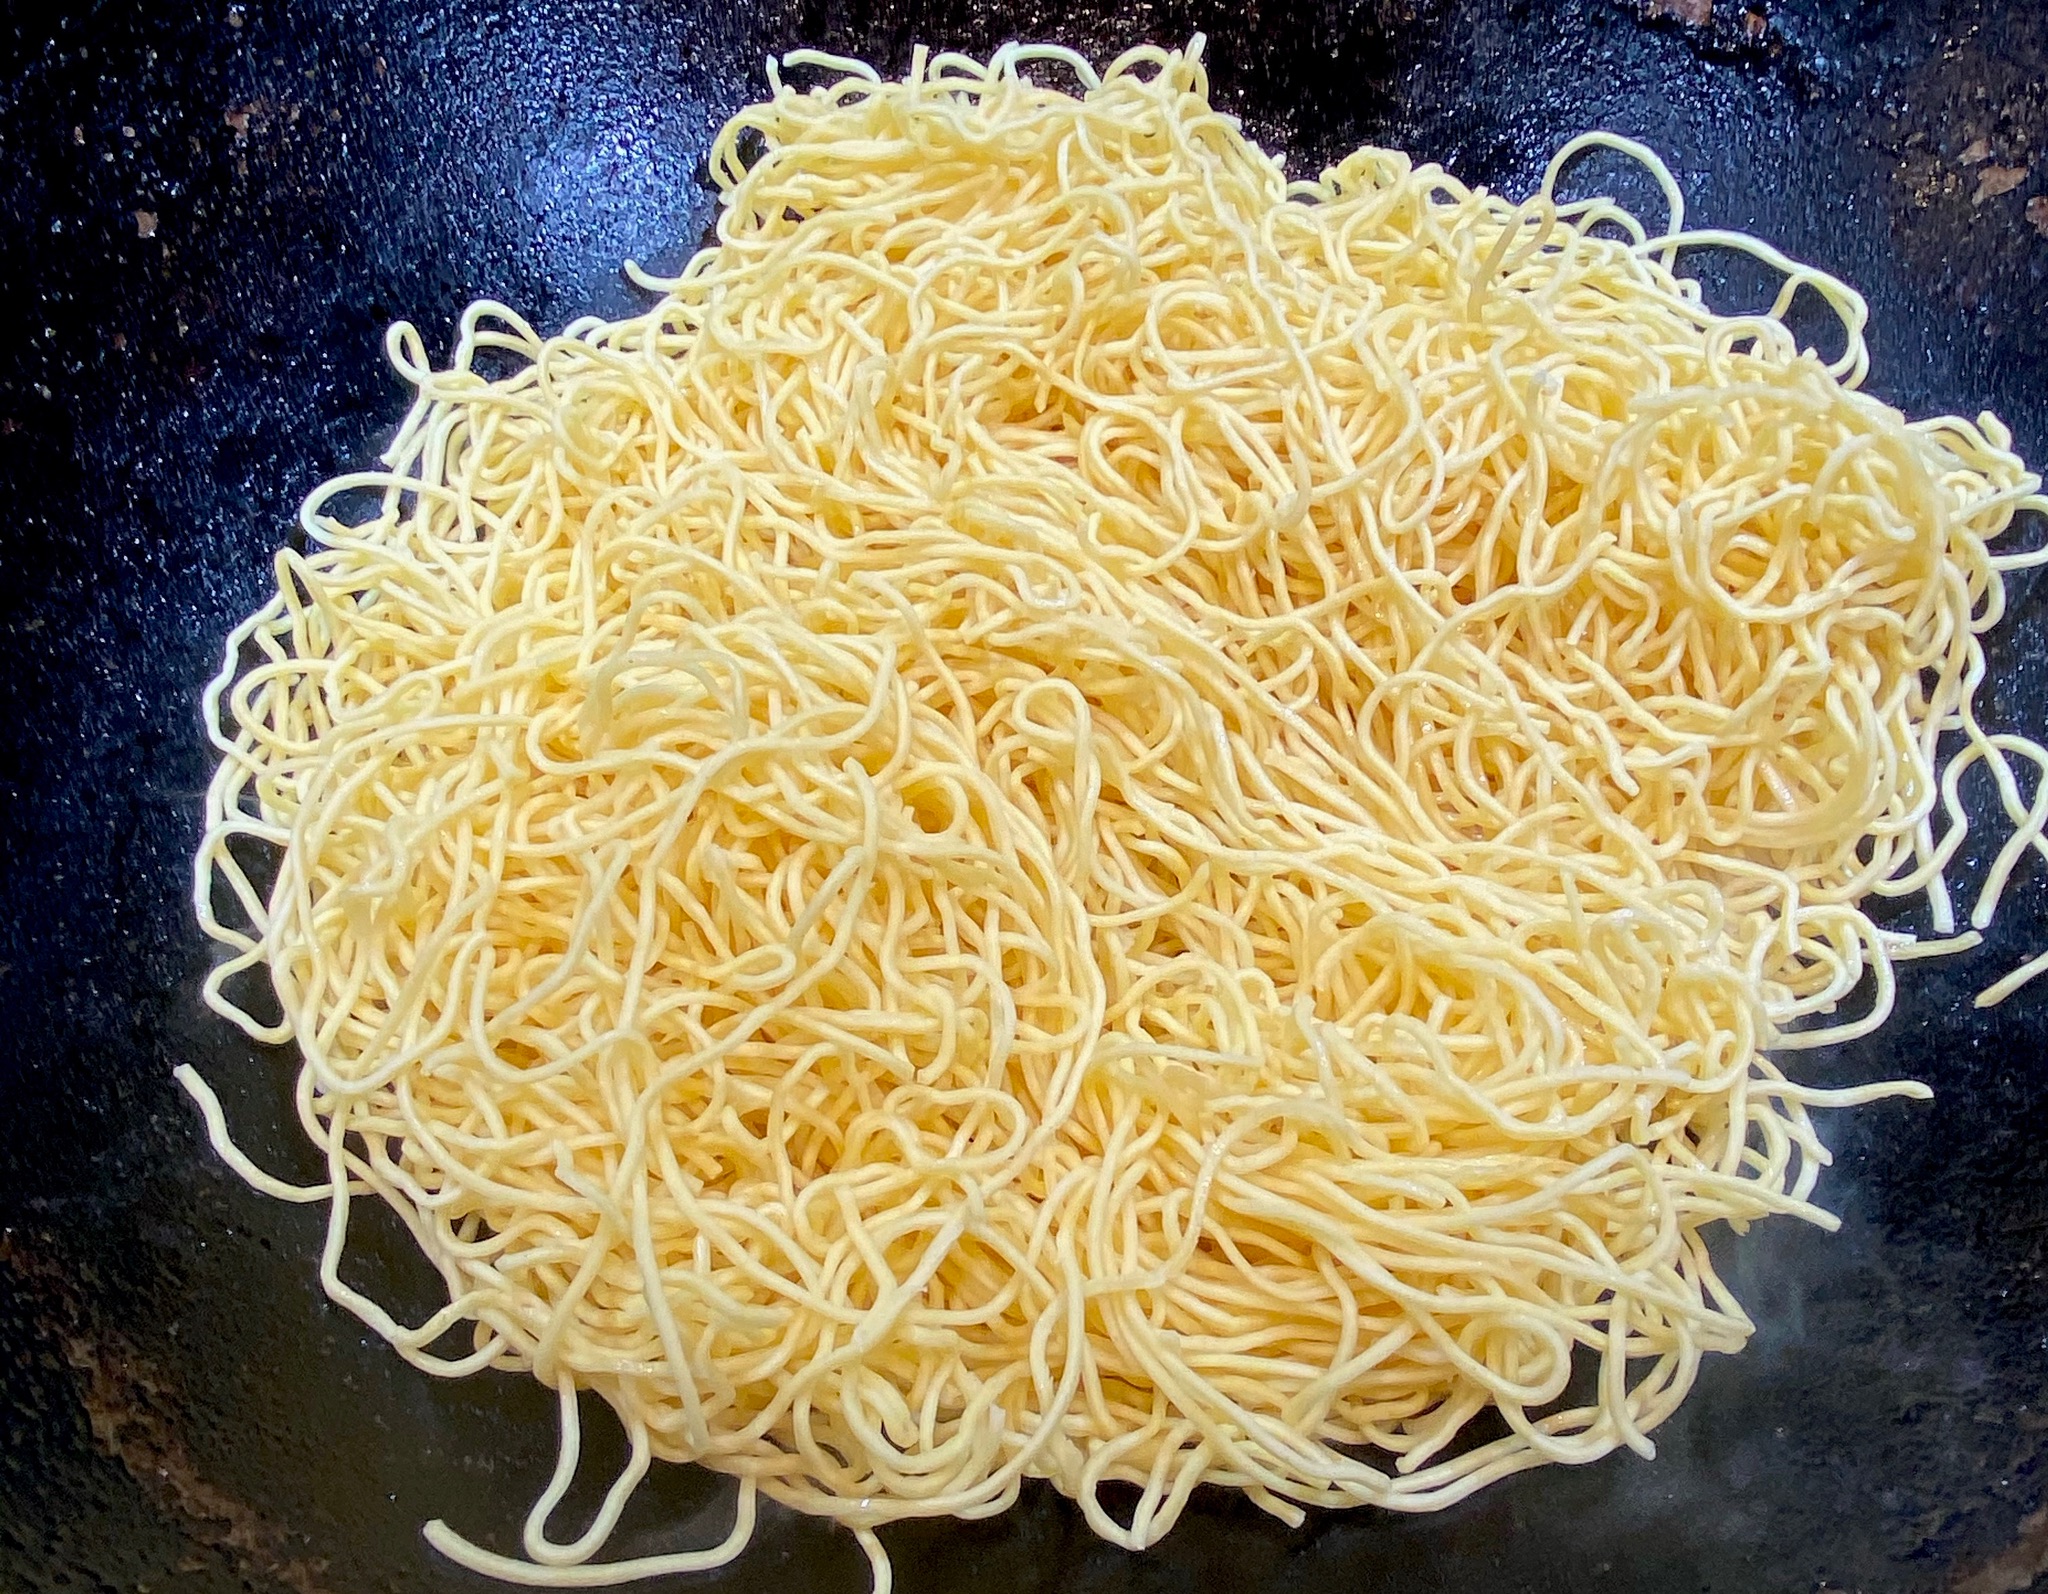
Once the wok is hot, add 1 tablespoon oil to pan, add noodles. On high heat, keep moving the noodles around to dry and crisp the noodles. Stir fry for 2 0r 3 minutes. Then flip the noodles over (big flip), drizzle another tablespoon of oil down the side of the wok or pan. Continue to fry and move the noodles around. The goal is a mix of both crisp and soft noodles. Add sprouts and onions to the wok and fry until heated through and a bit wilted. You want the sprouts to retain their crunch. Alternatively, you could quick-fry the green onions and sprouts separately and add them to the noodles with the yellow onions and scallion roots. If you really like the vegetables to stay crisp, fry the noodles and add sauce mixture before adding the vegetables.
These are my favorite, a classic, Soy Sauce Fried Noodles!
Classic noodle dish found in Dim Sum restaurants and Chinese delis. Simplicity perfected
Course Main Course, Side Dish
Cuisine Asian
Keyword Hong Kong style Noodles, Stir-fried Noodles
Prep Time 20 minutesminutes
Cook Time 10 minutesminutes
Ingredients
16ozHong Kong style pan fried noodles unsteamed or steamedI’m lazy I get steamed
1/2yellow onioncut into thin slices, lengthwise
5stalks green onion (or Chinese Chives)Cut into 1.5 inch pieces and then julienned.
6-8ozbean sproutsWashed and drained
3tbsppeanut oilor vegetable oil of choice
Sauce
1.5tbspdark soy sauce
1.5tbsplight soy sauce
1.5tbspoyster sauce
0.5tbspshaoxing wine
2tspsugar
1tbspwater
1tspsesame oilto taste
Instructions
Prep Noodles
Steam noodles, drain, cool. Please DON’T over cook your noodles!!! This is the takeaway.
For fresh, steamed noodles, bring pot of water to a boil. Drop in noodles (separated), bring the water back to a boil and take them out-pronto! Leave them in colander to drain and dry out a little.
If you're using dried noodles, cook according to the package's instructions, erring on the more al-dente side, and rinse with cold water afterwards to stop the cooking. Drain well.
Veggies
Cut green onions into about 1.5 inch pieces. Separate the light and the green sections. The light part will be cooked first with the yellow onion.
Cut yellow onion in half, and julienne half (thinly slice lengthwise)
Rinse and drain bean sprouts
Sauce
Combine soy sauces, oyster sauce, sugar, and water in a bowl, stir until the sugar dissolves. Set aside.
Frying Time
On high, heat wok, to around 350-400°F, basically smokin hot.
When the wok is hot, add oil (1 tbsp) and heat to 350-400°F. The oil should be "shimmering" - rippling, but not smoking. If it's smoking, the wok is too hot. Little wisps of smoke is okay.
Saute’ green onion whites and onions for about 1 minute and reserve.
Heat the wok again and add 1 T oil. Once the oil is shimmering, add the noodles.
Move the noodles around the pan gently. DO NOT flip them yet, move the noodles around so parts get crispy. Cook for about 3 minutes moving the noodles carefully.
Turn the top noodles over so the noodles are on the bottom, add 1 T oil along the perimeter of the pan to help develop a nice crisp. Let the noodles cook on this side for another 3 minutes, occasionally prodding and moving the noodles.
The noodles will not stick to the pan if they are not overcooked. Lifting the noodles as you fry helps release moisture.
Add bean sprouts and stir fry for 30-45 seconds. Use tongs or cooking chopsticks to help you move the noodles around. Place the noodles over the sprouts to help cook them. Better to undercook sprouts, you want to retain their crunch!
Add sautéed onion-green onion mixture and mix to incorporate and heat onions. No more than a minute.
Add sauce by pouring it in a steady stream all over the noodles and vegetables. Keep moving and lifting the noodles to coat with sauce and release any extra moisture.
Add sesame oil and continue to mix and separate the noodles for another 1-2 minutes. If the noodles seem to be getting a bit soft, take them off the heat. The oil does not need to cook.
Taste the noodles, season with salt and dark soy if the noodles are not dark enough. Add white pepper if you like.
Garnish julienned green onion shreds. Serve immediately.
Continuing my virtual traveling by cooking, I’m imagining myself in Taipei right now. I have not been back to Taiwan in ages and yet I find myself thinking about Taipei and my visit so long ago. Growing up in San Francisco the majority of Chinese are from Hong Kong and the Guangdong (Canton) region. I was fortunate enough in college to spend a summer in Taipei (yes, on the Taiwan Love Boat Trip). I sampled Shao Lung Bao, Oyster Egg Omelets, Popcorn Chicken, Beef Noodle Soup, and Red Bean Shaved Ice while wandering around the night markets. Everything was so delicious, different from Cantonese food, and yet familiar at the same time.
Bowl Food is Soul Food
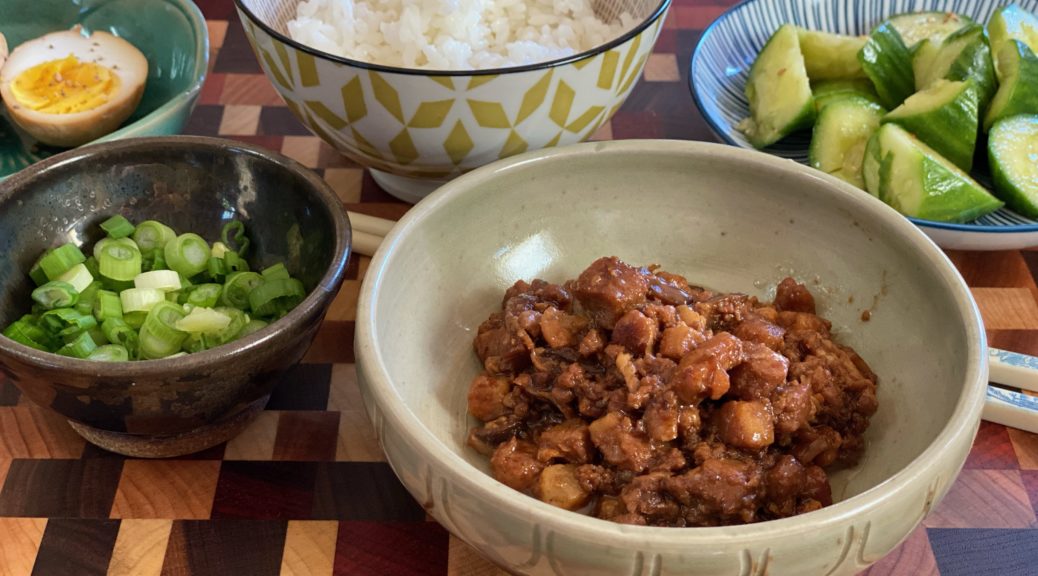
If you have followed 3jamigos, you know I have an obsession with bowl food and eating with a spoon. The Taiwanese dish Lu Rou Fan 滷肉飯 falls squarely in this category. In fact, this iconic dish was the basis for Taiwanese Turkey Rice, a favorite bowl I posted around Thanksgiving. Shreds of turkey garnished each bowl of Lu Rou Fan. People liked the turkey garnish so much, it got its own gig, Turkey Rice, the spin-off.
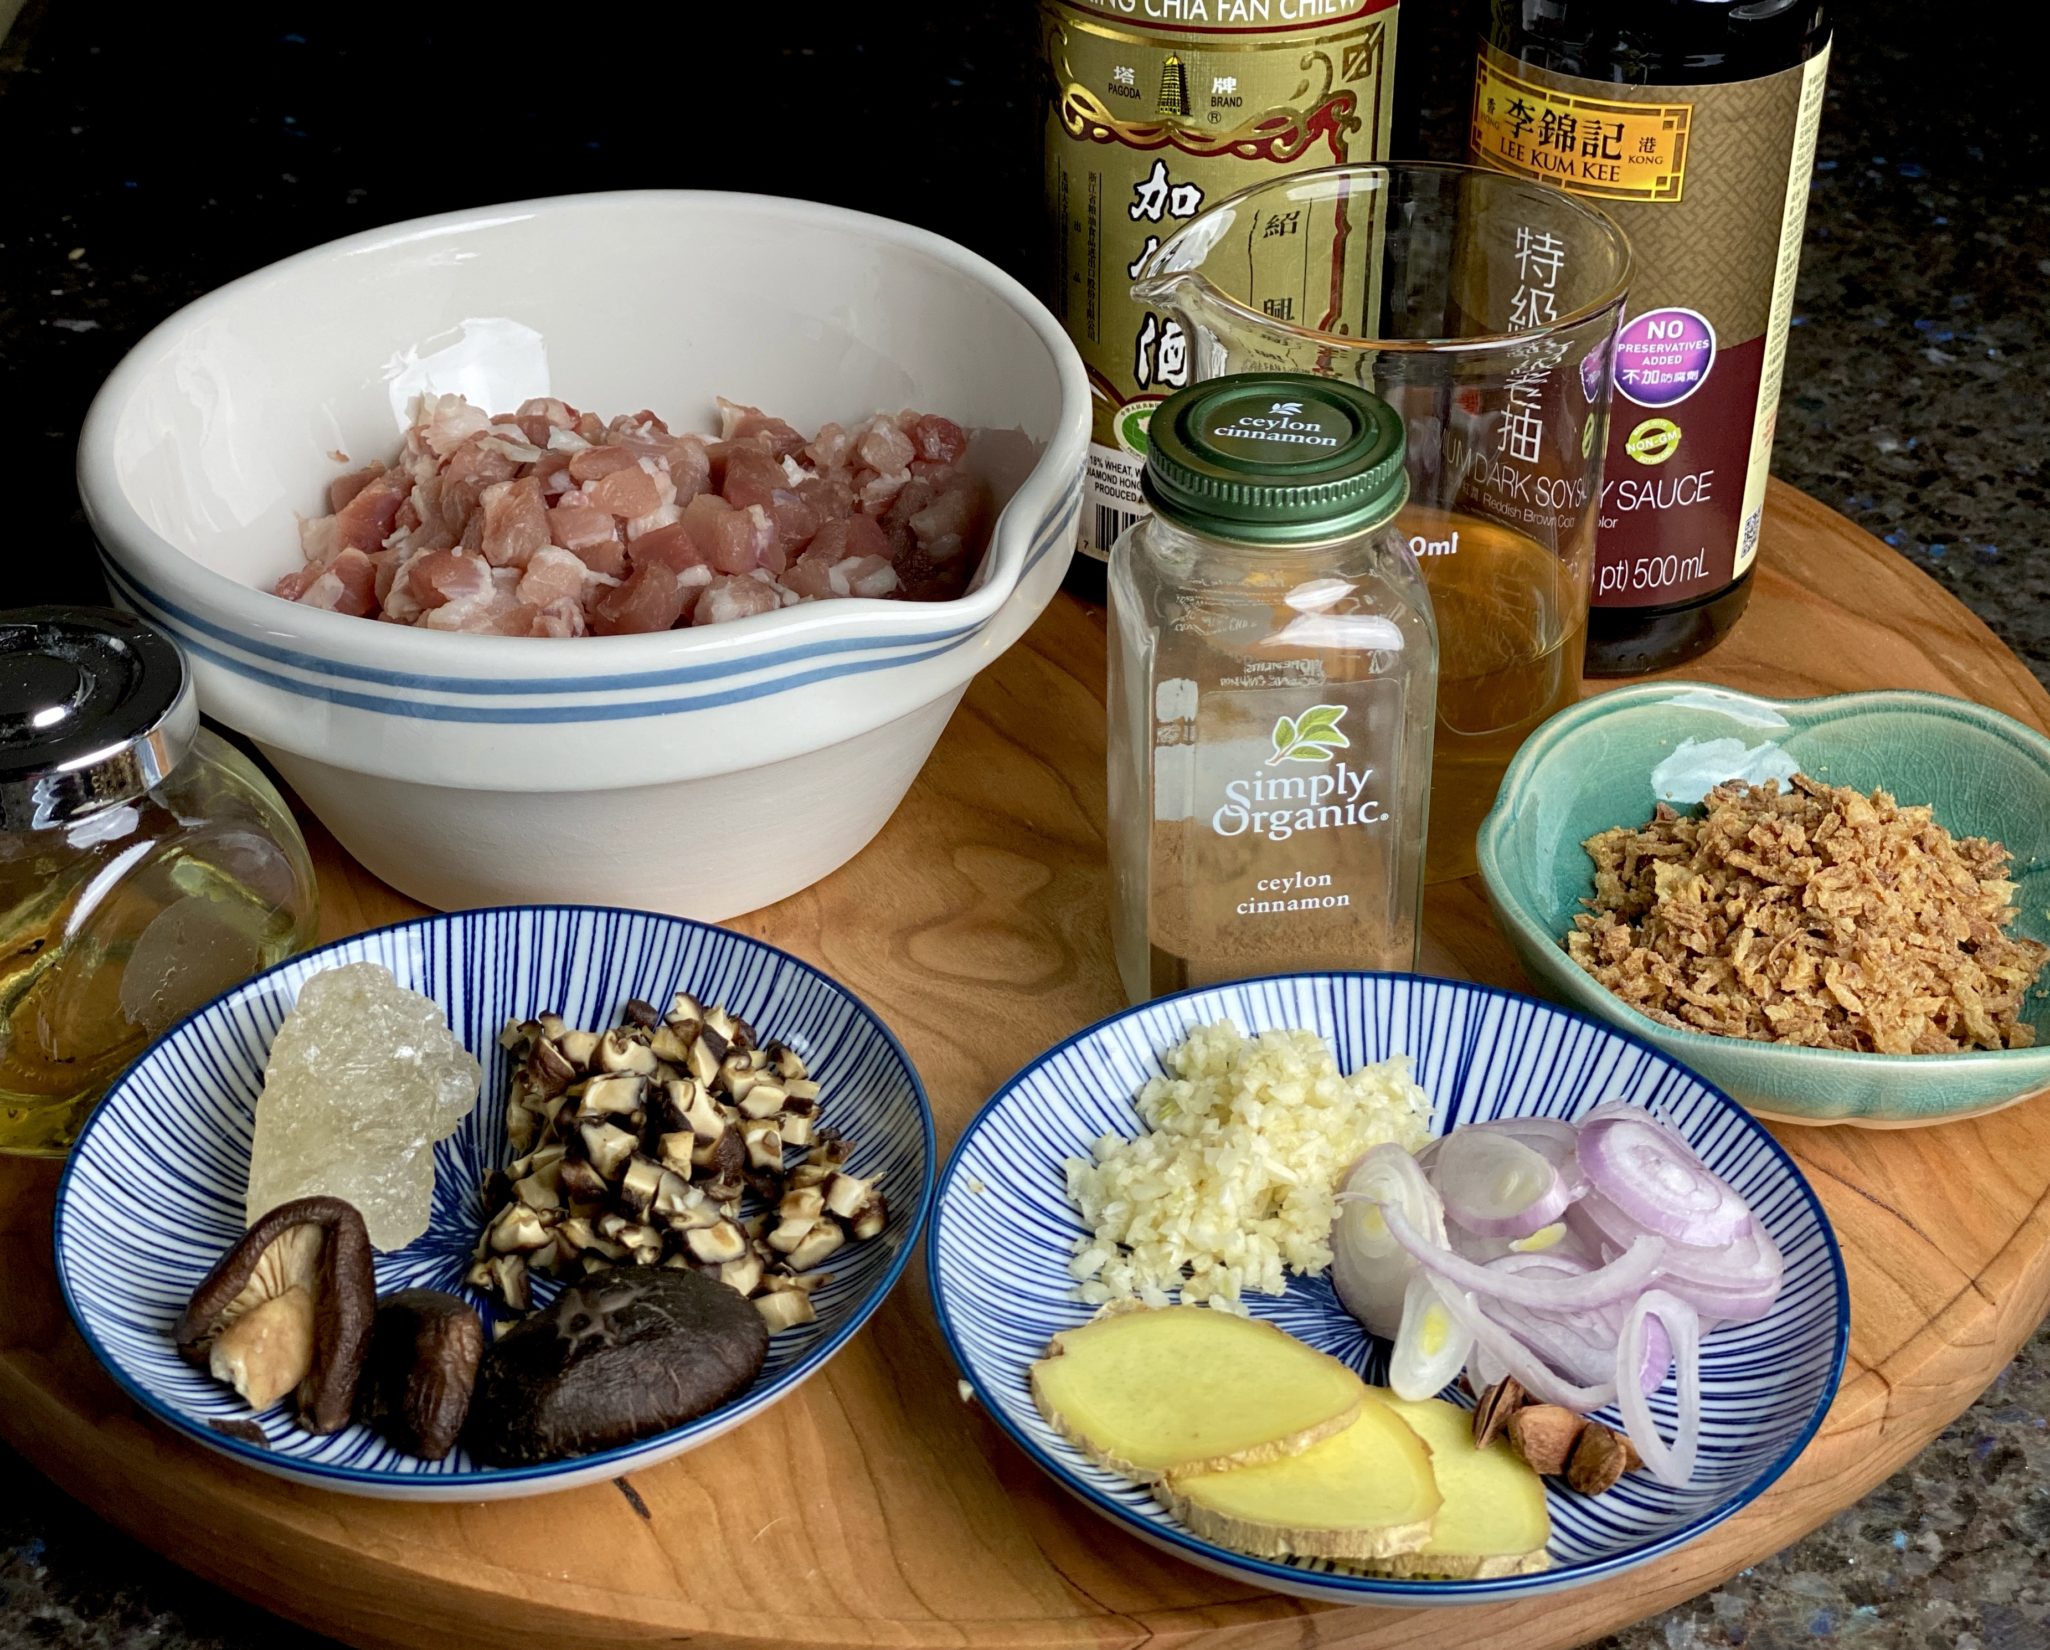
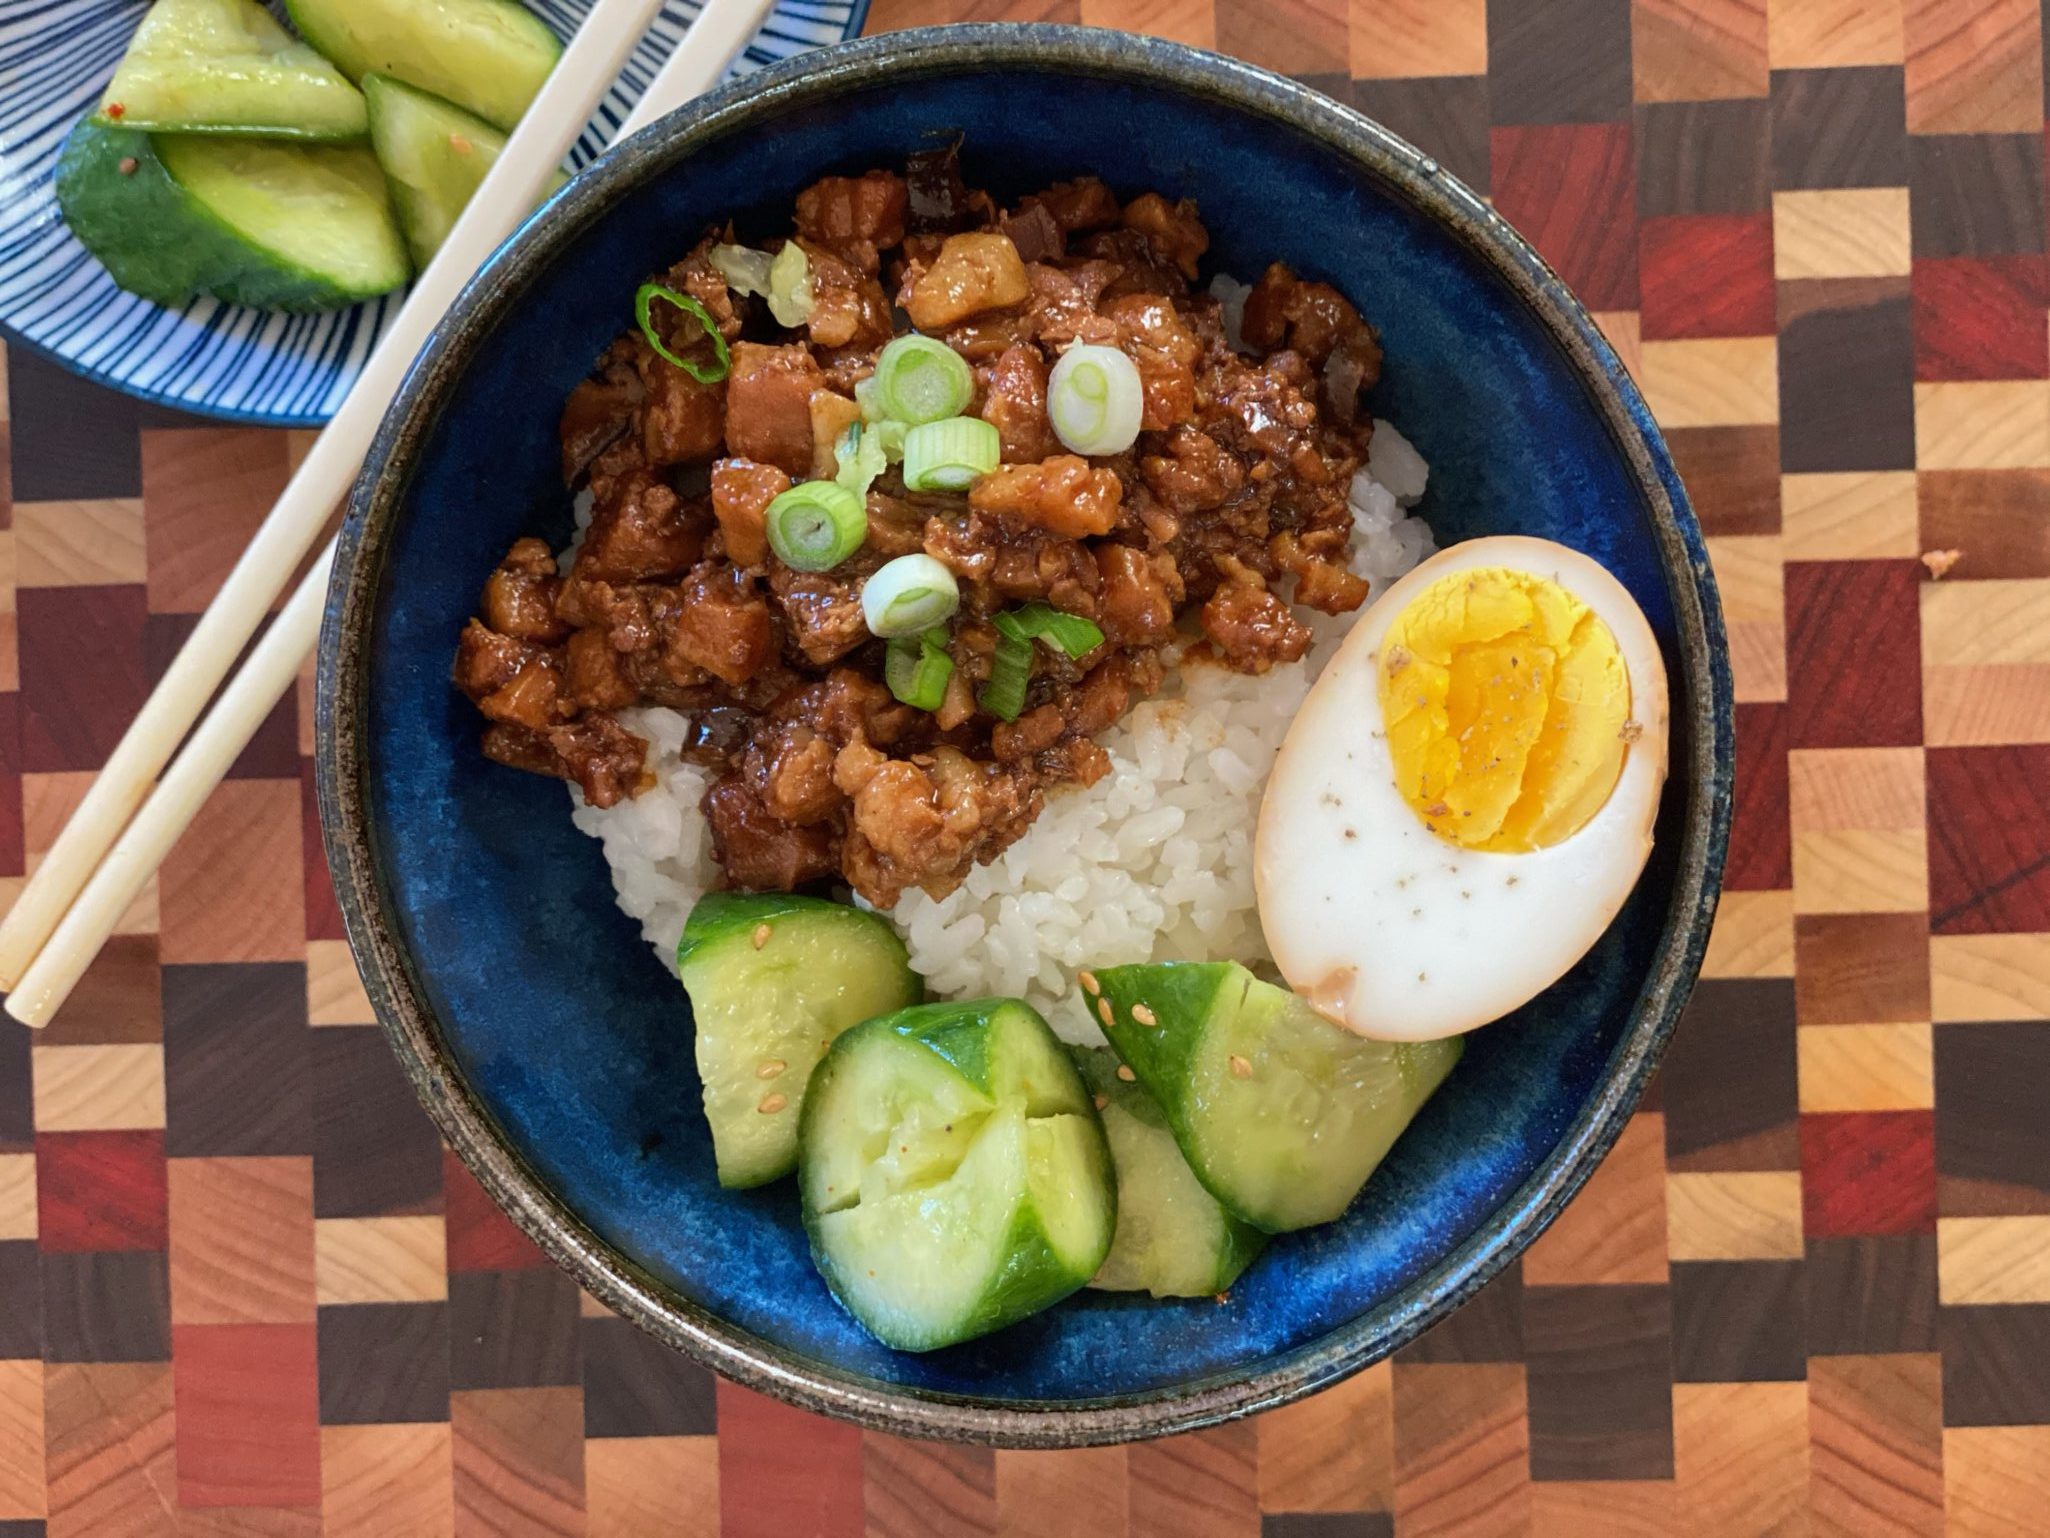
Back to Lu Rou Fan. Diced pork belly is braised in a soy sauce and sugar mixture seasoned with star anise, cinnamon, and aromatics like garlic, shallots, and ginger until it is melt-in-your-mouth tender. To serve, place a generous scoop of the braised pork, half of a hardboiled egg, and greens on top of steamed rice. Grab your spoon and dig in, bowl food is soul food.
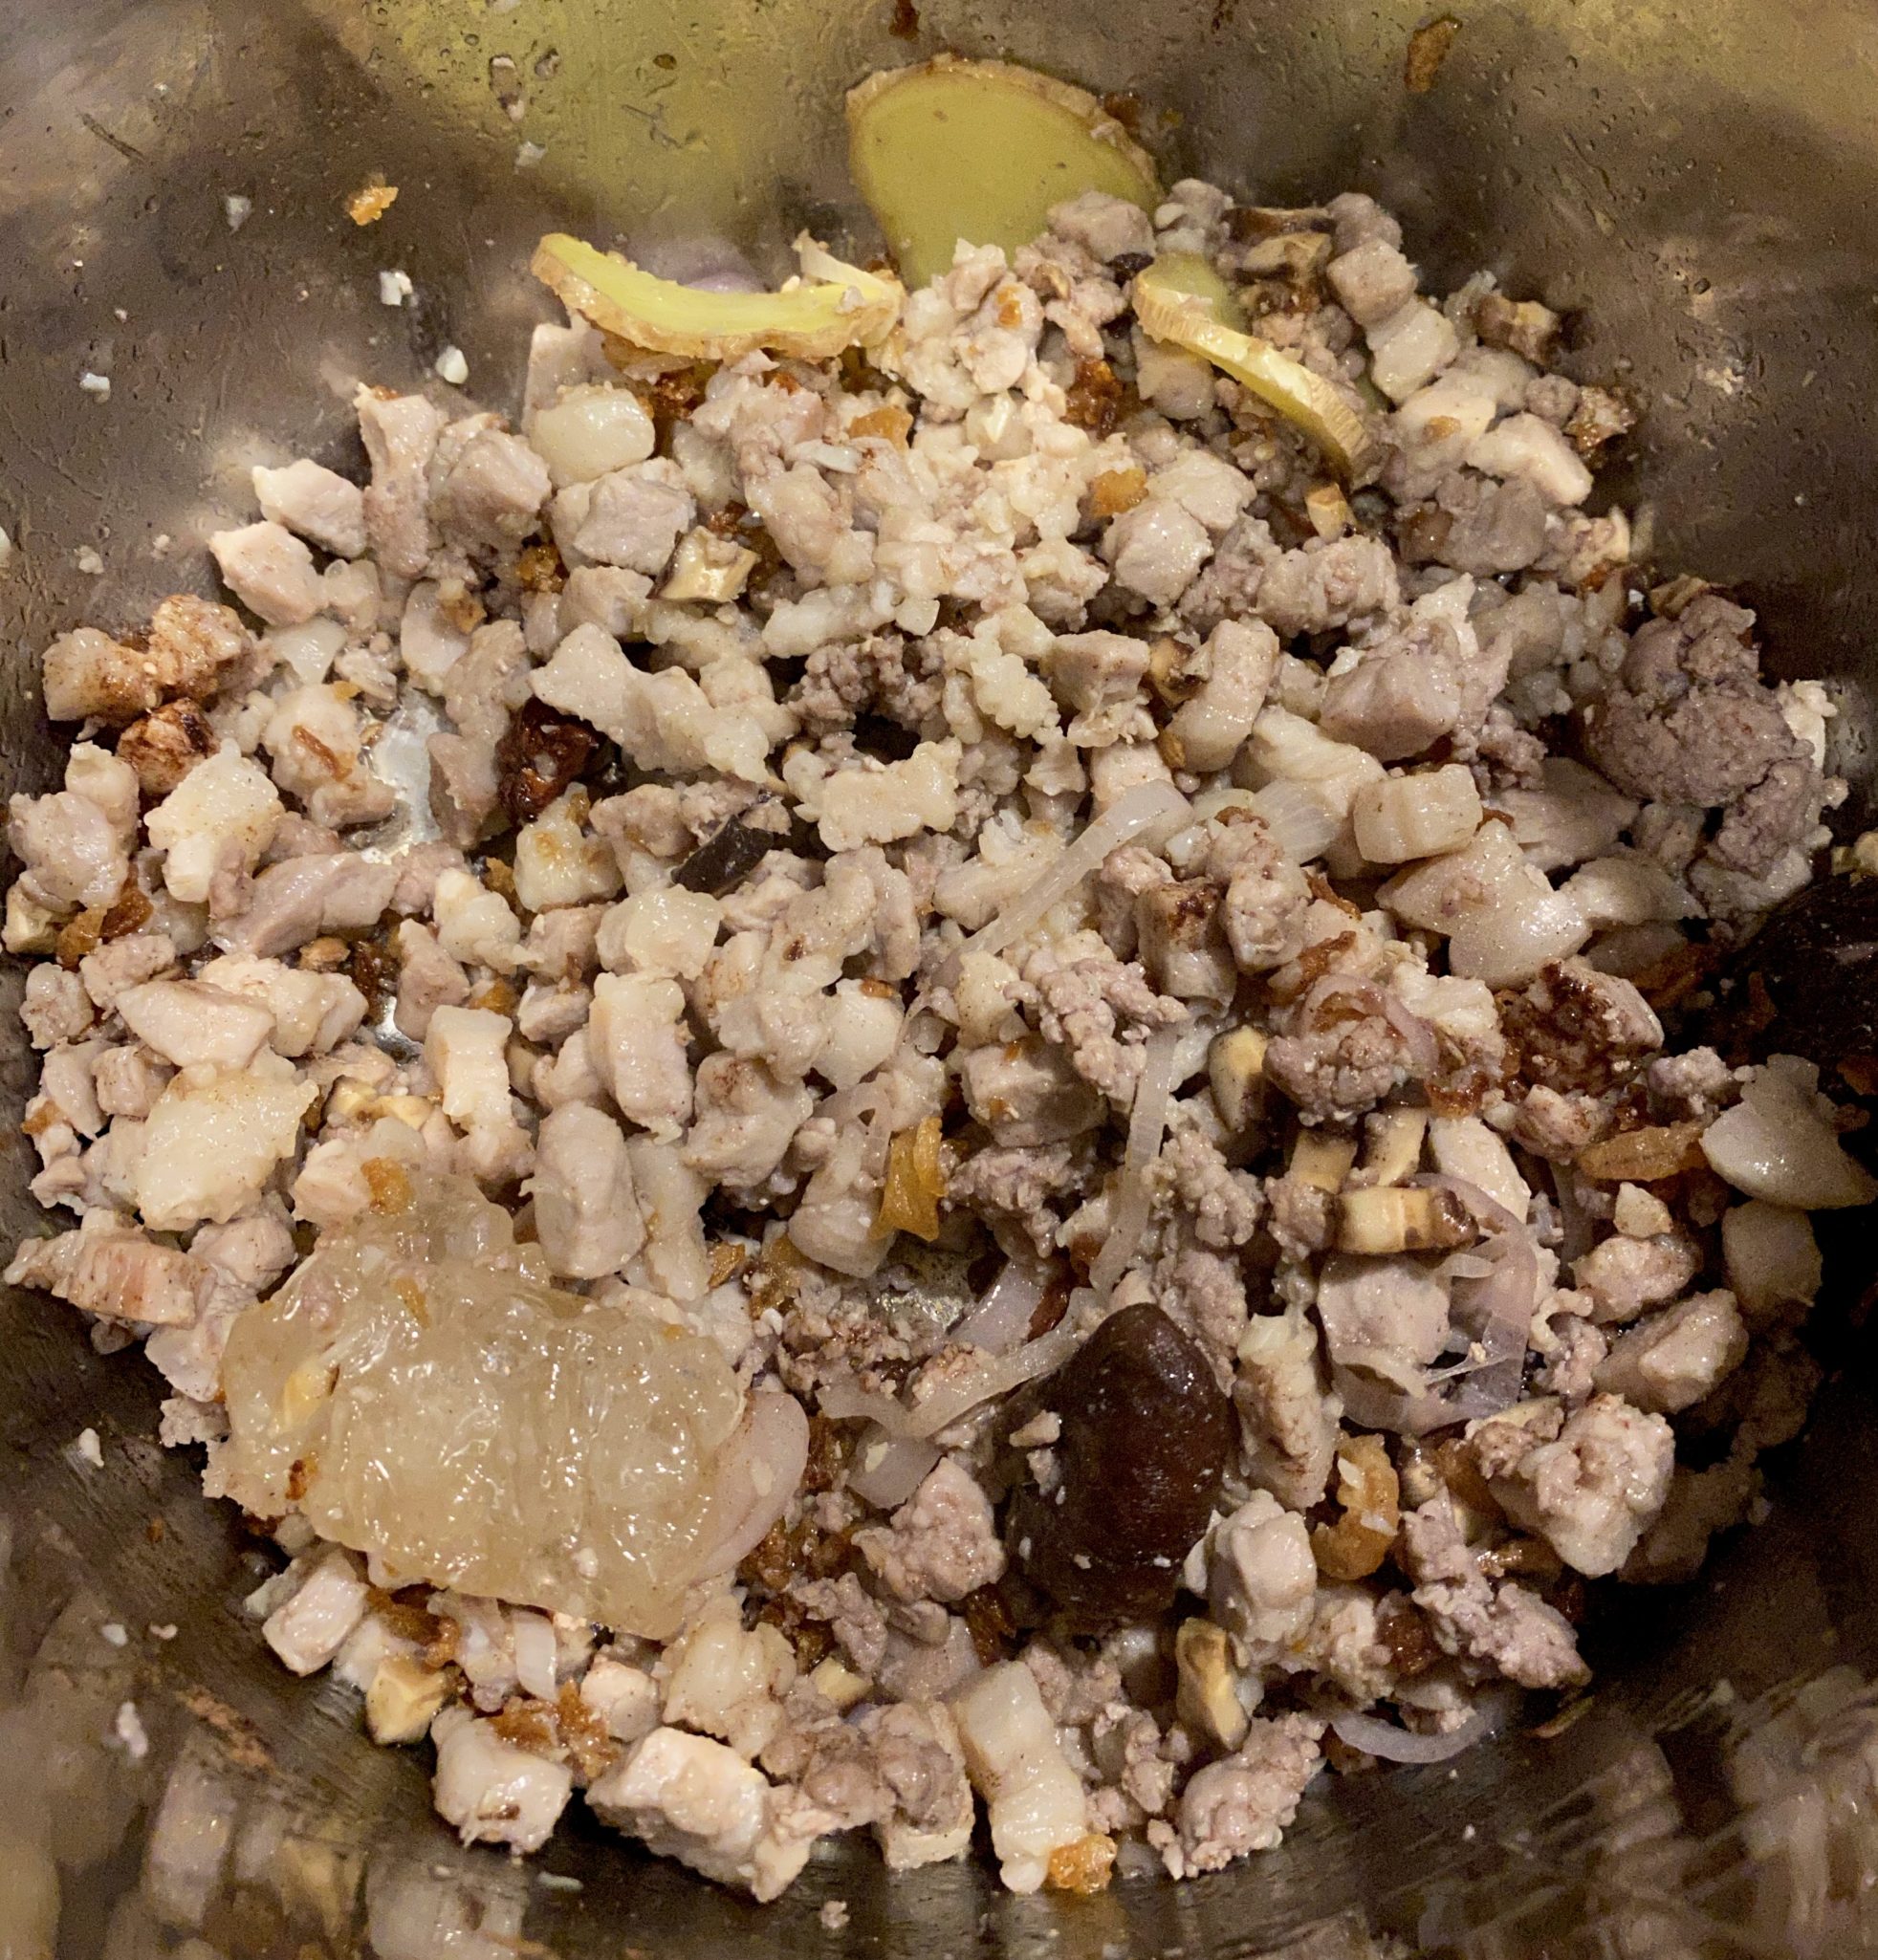
After surveying different sites for Lu Rou Fan, my version is a mash-up of recipes I found. The non-negotiables are pork, ginger, shallots, garlic, and a stock flavored with star anise, soy sauce, sugar, and rice wine. Start with pork belly cut into approximately 1/3 inch slices then diced. Thick slab pork belly can be found in most Asian grocery stores. I also add ground pork to the diced pork belly for a saucier texture, like a ragu’. Shiitake mushrooms are used to pump up the umami. Dried shrimp is also a flavor booster (it’s optional; if you decide to use it, soak and finely mince it before adding). I have mentioned my lack of affinity for star anise, so I use only one clove and add a cinnamon stick instead. If you like star anise feel free to use two. Last but not least…
Pull Out the Instant Pot!
The pressure cooker reduces the effort and time needed to make Lu Rou Fan, a win-win. Saute the pork, add the aromatics and liquid, and 30 minutes later, your Lu Rou Fan is ready for the finishing touches. How easy is that? Make this dish a day in advance to allow the flavors to meld and to chill the Lu Rou. Skim the solidified fat off before reheating and serving.
Finishing Touches
When the pressure cooker is done, release pressure and set the pot to saute’. Bring the pork mixture to a boil, and reduce to the desired consistency OR if the sauce is not thick enough, add a cornstarch-water mixture to thicken. You want lots of sauce to drizzle on your rice so do not reduce too much.
The star of this dish is the succulent, saucy pork belly dancing on the main stage of rice but there are supporting actors. Hard-boiled eggs often accompany Lu Rou Fan. Boil, peel, and place eggs in the pork sauce after it has finished pressure cooking. While the sauce thickens, the eggs will absorb the color and flavor of the pork. The eggs will be hard-boiled, so for those who have come to love six-minute ramen eggs, this ain’t it. Use soft-boiled instead of hard-boiled eggs to add to the sauce for a less-cooked egg. Or cook six-minute eggs ramen style and use this in place of the hard-boiled eggs. It’s your bowl of goodness, do what you want. Serve with greens such as seasoned cucumbers, or steamed bok choy or broccoli. Garnish with green onions and more fried shallots. YUMMY.
Another Soul Food Bowl, made a little quicker in an Instant Pot. Braised pork belly seasoned with soy sauce, garlic, ginger, star anise and shallots. Delicious over rice or noodles. Comfort food.
Course Main Course, Meat
Cuisine Asian
Keyword Lu Rou Fan, Taiwanese Pork Belly Rice
Prep Time 20 minutesminutes
Cook Time 45 minutesminutes
Equipment
Instant Pot
Ingredients
1lbskin-on pork belly diced into 1/3 inch pieces
1/4lbground pork
1tbspvegetable oilor shallot oil
3slicesginger
2tbspsshaoxing wine
2tbspsdark soy sauce
1tbspregular soy sauce
1/4cupfried shallots or onions
1shallot, finely diced
4clovesgarlicchopped (1.5 tbsp)
1star anise
2-3dried shiitake mushroomssoaked until mushrooms are softened, remove from water andnreserve soaking liquid, dice mushrooms
1tbspdried shrimpschopped OPTIONAL
1stick cinnamon or 1/2 tsp ground cinnamon
2tbsprock sugar or brown sugar (30gms rock sugar_
2/3cuphot water or reserved liquid from mushrooms
Soy sauce /salt to taste
fried shallots and green onionsgarnish
2eggshardboiled or cooked Ramen style
Instructions
Turn on the "sauté" function of the pressure cooker, press "adjust" once to switch to "more" for browning.
Once the oil is hot, add pork belly and give it a stir so that it's not sticking to the bottom. Saute' just until pork belly starts to brown, add ground pork. Let pork cook until it loses its pinkness and the liquid evaporates.
Add ginger, shallot, garlic, saute briefly before adding soy sauces, Shaoxing wine, cinnamon, star anise, rock sugar, shiitake mushrooms, and fried shallots. Mix it well and add reserved mushroom liquid or hot water. Cover with the lid.
Turn on the "manual" function, set the timer to 25 minutes. Allow 10 minutes before release of pressure and opening. Skim off the fatty oil from the top.
If the sauce seems too thin, turn on the "sauté" function, and "adjust" to "more" to thicken and darken the pork belly. Saute to desired sauce thickness and color. Season with light soy sauce or salt to taste. Alternatively, taste sauce after opening the pot. If it has enough flavor but is thin, mix 1 tbsp cornstarch with 2 tbsp water. Add to mixture and bring to a boil to thicken sauce.
Ladle the braised pork over rice with some sauce. Top with an egg* and greens of choice. Garnish with green onions and more fried shallots.
Egg
Generally, eggs are hardboiled, peeled and added during cooking..which makes a very hard-boiled egg. I like ramen eggs or runny eggs
Boil eggs to just past soft boiled stage. See post for link to ramen eggs. Have eggs peeled and ready to go when pork is finished cooking. Add to pork and allow to sit in sauce until you are ready to serve. Cut eggs in half and place 1/2 in each bowl of rice.
Notes
Use skin-on pork belly as the skin becomes tender, juicy and flavorful after absorbing all the flavors from spices and soy sauce. Use leaner ground pork (e.g. pork shoulder) as a substitute if the pork belly is too fatty. But really, you don’t need a ton on your rice. Reduce the cooking time accordingly.
Taiwan Turkey Rice, 嘉義火雞肉飯 Deliciousness in a Bowl
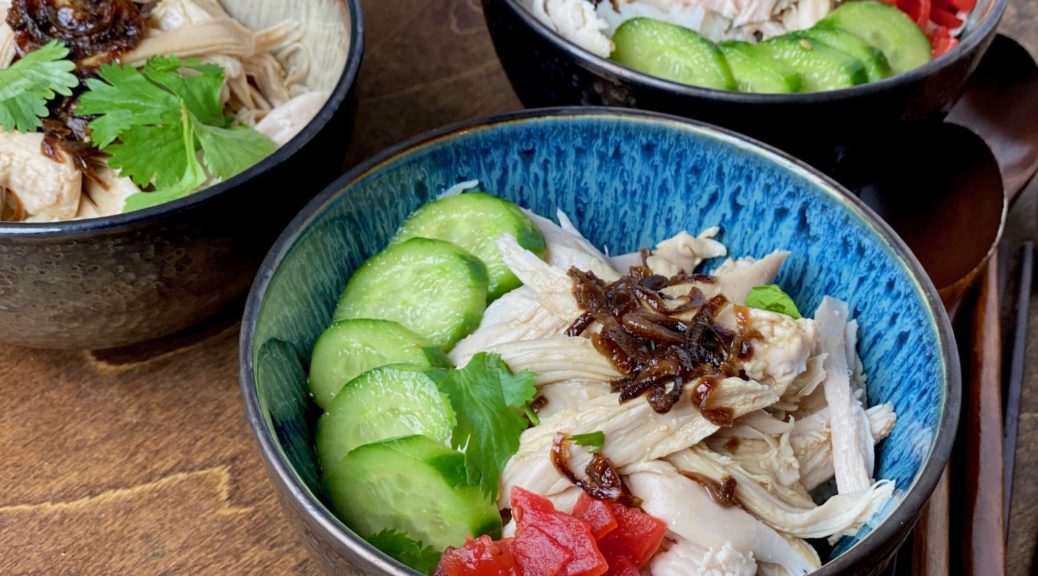
Only a couple of weeks have gone by since Thanksgiving and I have turkey on the brain, again! Not that I didn’t get my fill of turkey on Thanksgiving but this dish caught my eye as I was roaming around the food-sphere looking for Thanksgiving ideas, Taiwanese Turkey Rice. What? Maybe it’s like rice soup? Nope, it is a bowl filled with rice, topped with succulent shreds of turkey, dressed with a soy sauce, fried shallots, turkey dripping emulsion and served with Asian pickles. Damn, doesn’t that sound delicious?
SIGN ME UP NOW
I was drooling. If you have perused my IG or blog for recipes you may have noticed that I LOVE one bowl meals like soups and stews. My comfort zone is curled up on the couch, spoon in hand and a bowl in the other, filled with either rice or noodles topped with anything yummylicious…like THIS.
I did a bit of sleuthing for this dish. Turkey is not something you find in the Asian food vernacular. It turns out, Taiwanese Turkey Rice (嘉義火雞肉飯) hails from southern Taiwan, specifically Jia Yi. It is a super popular street food and turkeys are grown specifically for this dish. Originally the turkey was shredded as a garnish for the classic dish, Lu Rou Fan, 魯肉飯, Stewed Pork over Rice, but folks liked the turkey so much, they started making it without the Stewed Pork, thus Taiwanese Turkey Rice was born.
Turkey Rice is similar to Hainan Chicken Rice or Thai Chicken and Rice. The flavor profile of the sauce sets it apart though, oh yeah, and the turkey, but in a pinch you could use chicken for this dish. I decided to cook the turkey ala Hainan Chicken style. The turkey is poached so you end up with moist succulent meat plus the stock which serves as the basis for the sauce. There are a plethora of recipes out there right now that take advantage of turkey leftovers to make this dish including this one from Serious Eats, but I wanted the real deal so I started with uncooked turkey breast.
Two blogs jumped out and served as the basis for info and recipe for Taiwanese Turkey Rice, Choo Choo-ca-Chew and The Food Dictator. A wealth of information and great recipes.
The Turkey
I started with a turkey breast, well, half of a turkey breast and poached it, just like Hainan Chicken. The poaching liquid is seasoned with salt, ginger, scallion, rice wine and Better Than Bouillon Chicken Base (game changer). If you have a box of turkey stock from TJ’s, use that and water for a more flavorful stock. (I think their turkey stock is better than the chicken stock in a box.
When you buy your turkey make sure the skin is still attached*** Remove the skin at home and reserve. Drop the turkey into the boiling poaching liquid (ok, don’t just DROP it, gently place…to avoid 3rd degree burns). Bring the stock back to a boil and turn the heat down so the stock is simmering. Cover and let simmer for 10 minutes. Turn the flame off, NO PEEKING, and let the turkey sit for 25 minutes undisturbed. Think of it as a spa day for the turkey. Once it is done take it out of the pot, let it sit until it is cool enough to handle. Remove meat from bone and shred into bite size pieces. Reserve in bowl and cover to keep warm.
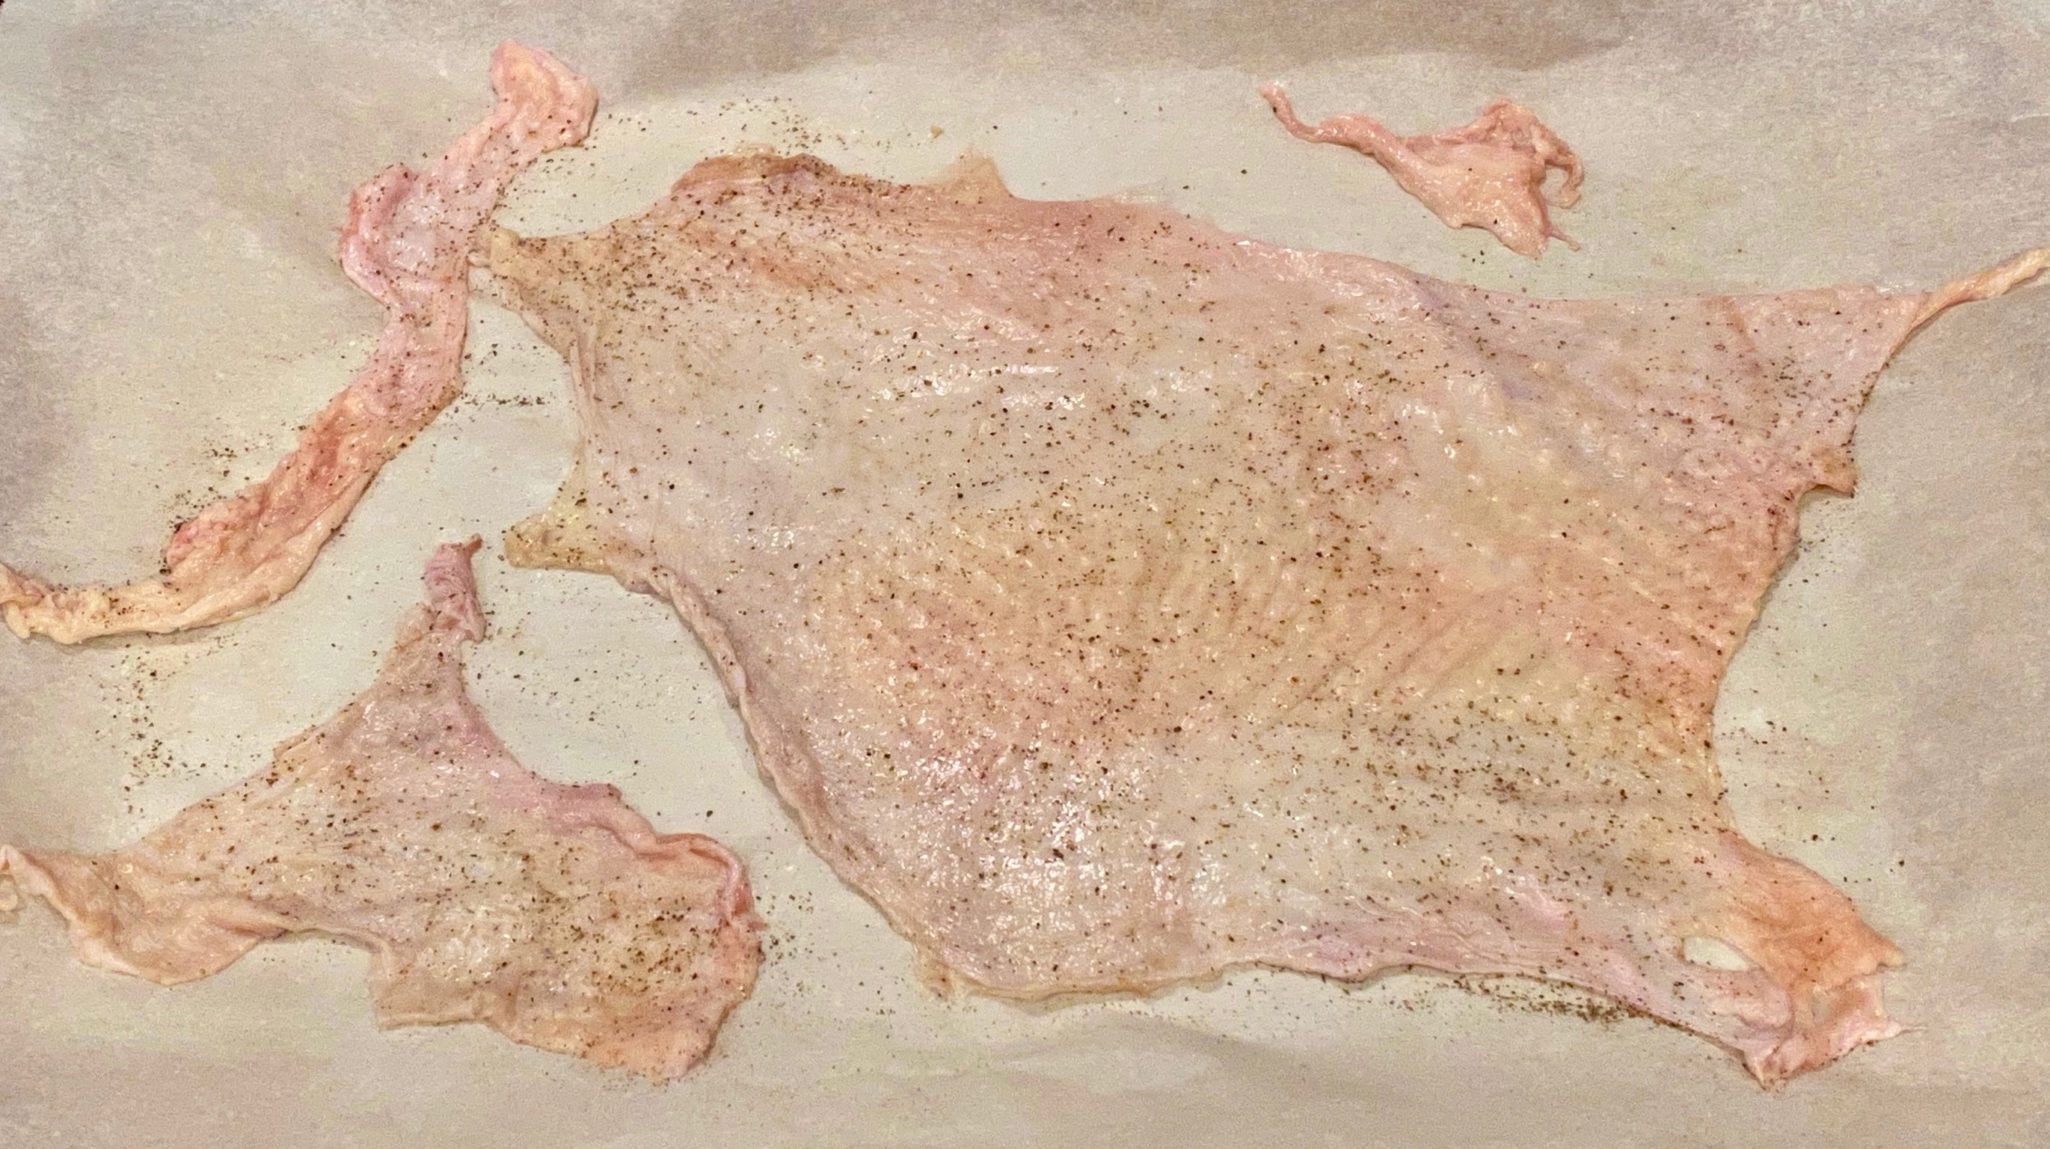
Gimme Some Skin***
A trip to Minneapolis, back before the time of COVID, we caved into Wes’s penchant for Caesar Salad at the Butcher & The Boar (sadly gone) one night for dinner. A few tweaks made their Caesar a standout. The Romaine lettuce was grilled, and in place of croutons, bits of chicken skin baked to a crispy golden finish adorned the salad. ㄹingerlicking good.
Crispy chicken skin (in this case turkey) is pretty quick and easy to make. Spread the skin out on a parchment lined rimmed baking sheet. Salt and pepper. Cover with a sheet of parchment and top with another baking sheet to keep the skin flat. Bake at 375 degrees for 20-25 minutes until skins are deep golden. You should have a nice puddle of oil from this, KEEP the oil.
The rendered oil is used in the sauce for the dish. The crispy skin is a bonus that I use as a garnish for turkey rice. It provides added crunch and flavor to the dish, its damn delish.
The Sauce
Hainan Chicken or Chinese Poached Chicken is served with a ginger, scallion, sauce with or without slices of chili. For Taiwanese Turkey Rice, the sauce is made with fried shallots, light soy sauce, a bit of sugar and the rendered oil from the turkey. It’s deceptively simple for a sauce that is so delicious. I buy a ton of shallots, thinly slice and fry them. The oil is kept in the fridge and the shallots in a jar on the counter.
Here is a detailed description on how to make fried shallots from Serious Eats. IN A PINCH, you can buy fried shallots at most Asian markets and avoid frying your own. IN A DOUBLE PINCH, TJ’s has fried crispy onions in a can during the holidays, (probably for the green bean casserole I hate) that make a pretty good substitute.
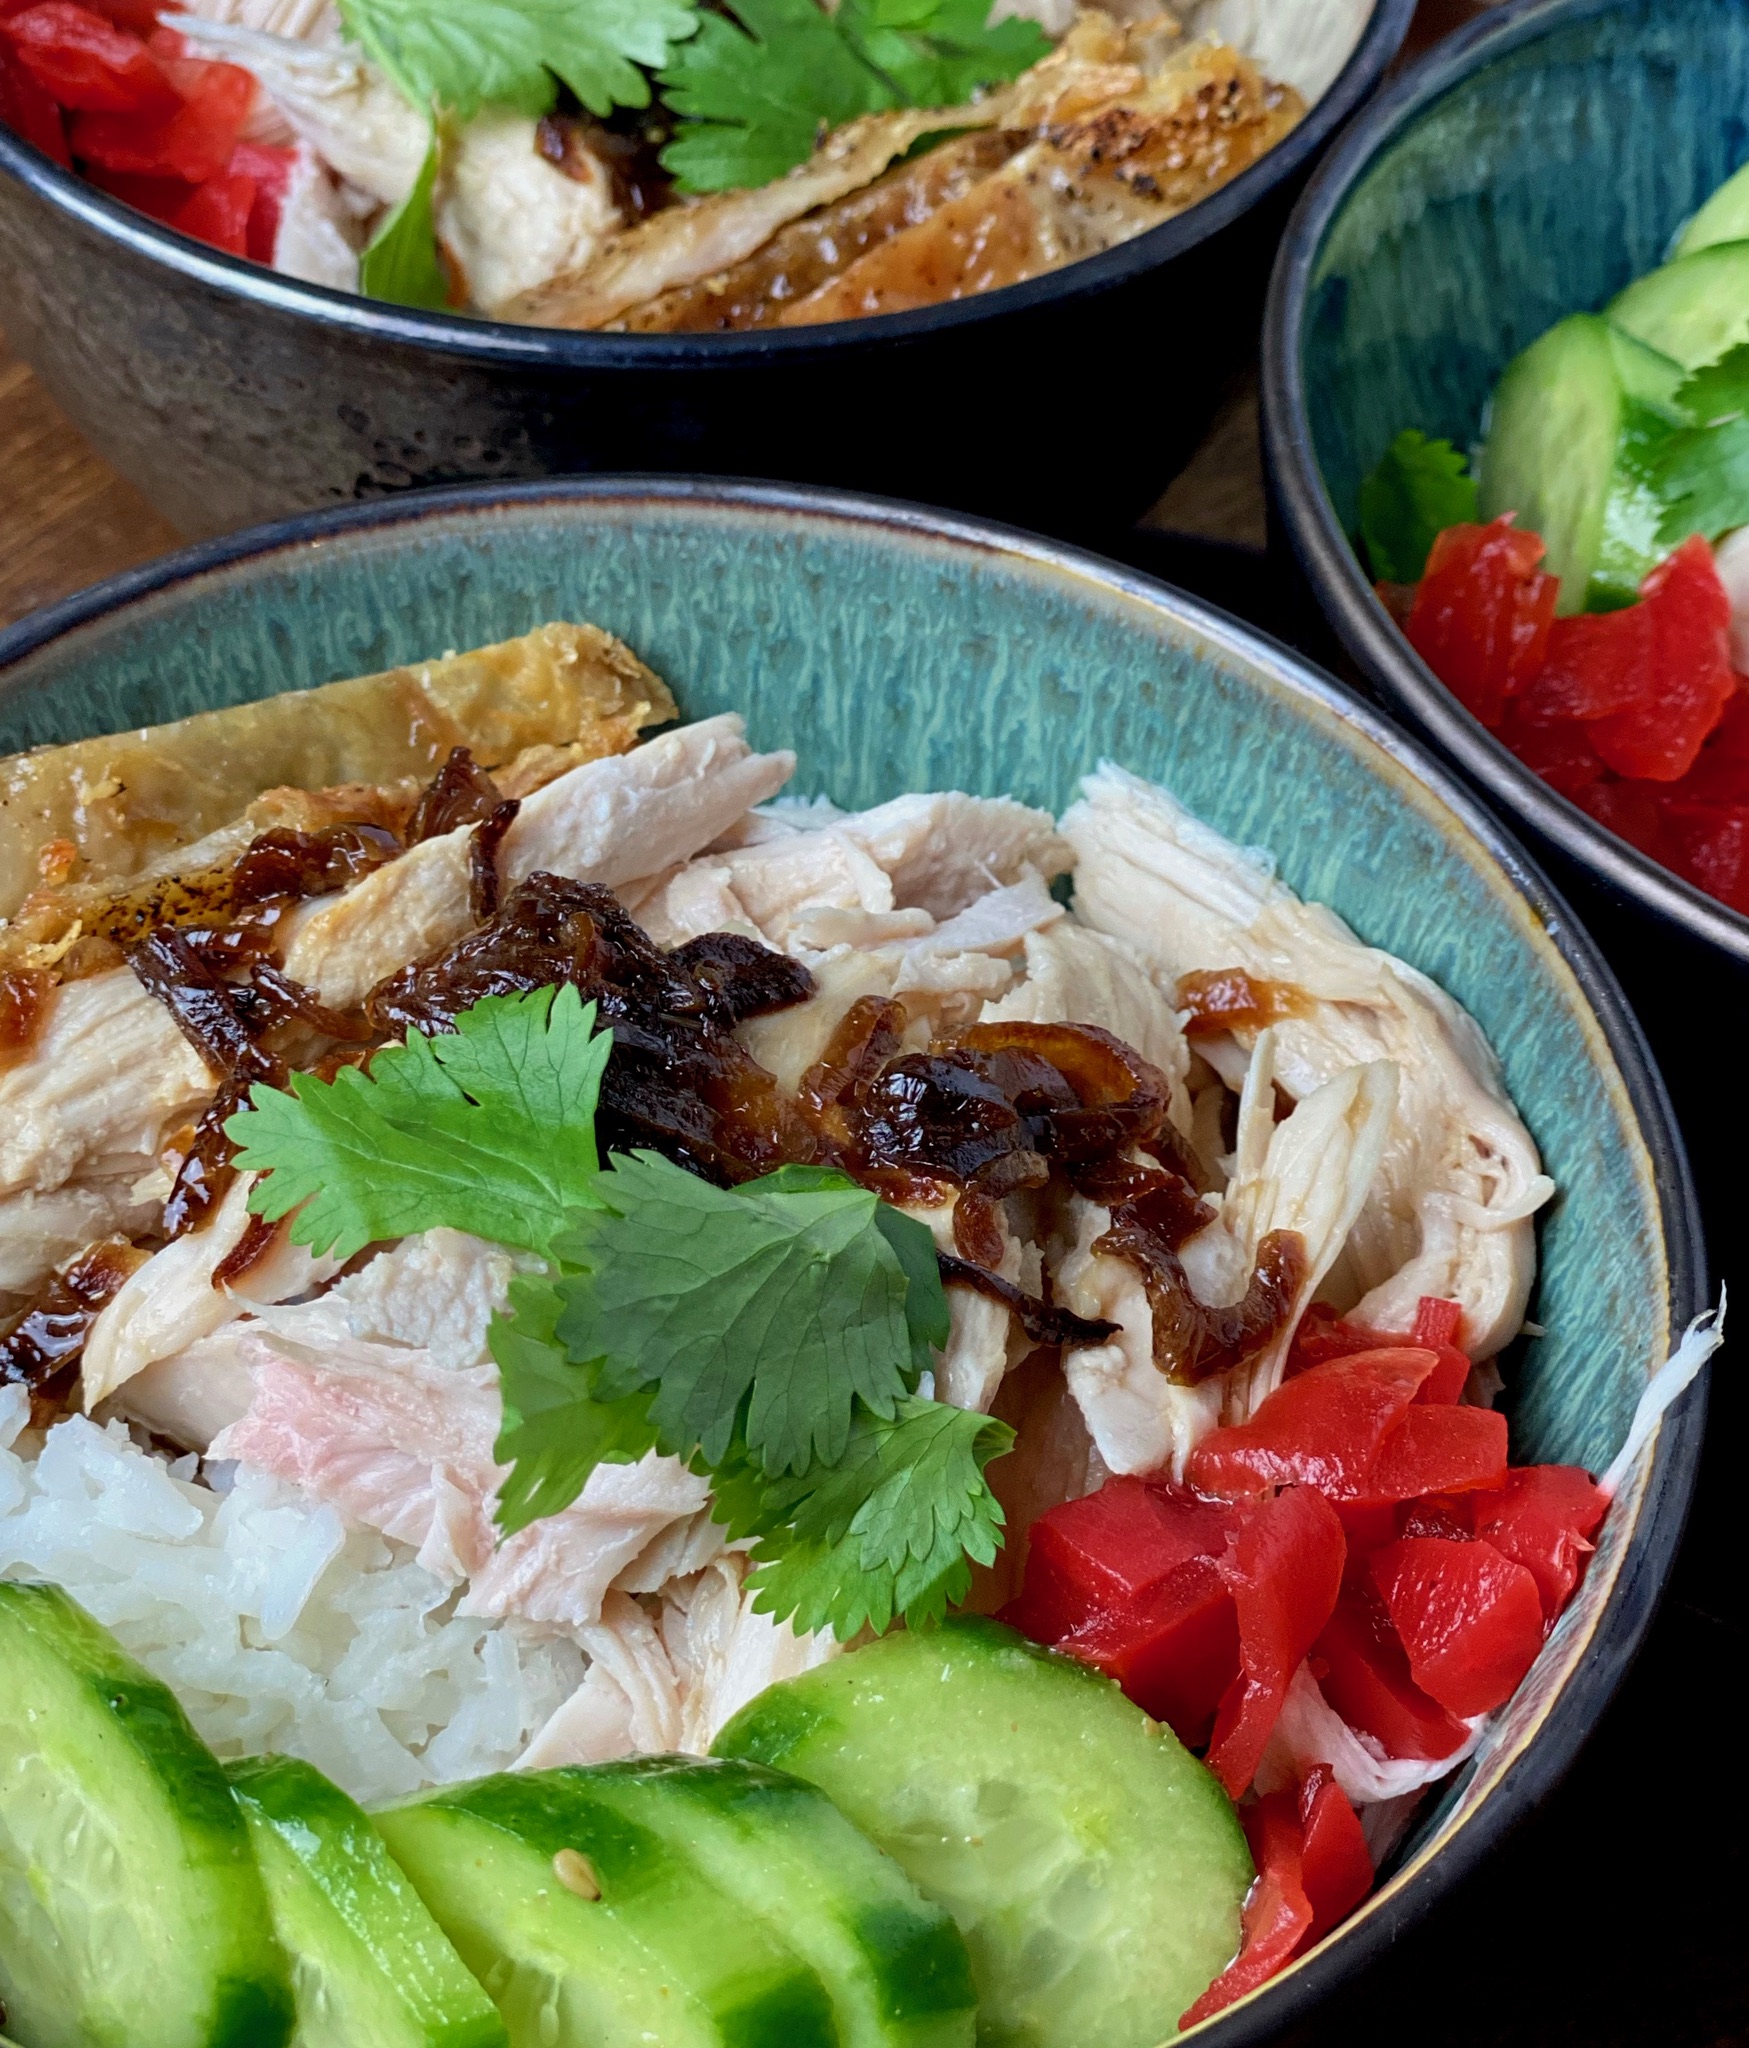
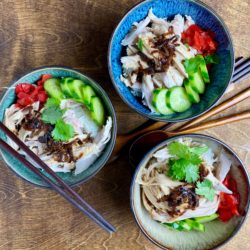
The Rice
Traditionally served over plain rice, you can bump it up by using the poaching liquid to cook the rice. Just reserve enough for the sauce. For the rice use any long grain or Jasmine Rice.
The Sides
Pickles are often served with Turkey Rice. I like pickled ginger, takuan (pickled Japanese radish), or Vinegared Chinese pickles. I love soft boiled eggs (like ramen eggs) and fresh cucumbers lightly dressedas sides. Garnish with scallions or cilantro. Lip-smackin’ good.
2CShredded Turkey*You can use Thanksgiving turkey leftovers
Poaching Liquid
WaterEnough water to cover turkey
2-3slicesginger
2scallions
1tspsalt
1/4cuprice wine
1tablespoonBetter Than Bouillion Chicken Base
SAUCE
3Shallots Thinly sliced
1-1/2TBspOil Lard, Vegetable Oil, Chicken Fat or Half and Half
3TBspSoy SauceLight Soy Sauce (Pearl Ridge is good)
1TBspSugar
3/4CChicken/Turkey Broth
RICE
2CRice Steam or cooked according to instruction. You can also use the chicken stock from boiling the chicken to cook rice if making from scratch. It really enhances the flavor
Instructions
Turkey
Start with just enough water to cover the turkey breast in a pot. Add ginger, scallions, rice wine, and stock base and bring to a boil. Add turkey and cook for 10mins then turn the heat off and let it sit in the pot for 25 mins or until cooked through. This method makes silky, tender, turkey.
Remove from pot, cool until you can handle and shred into small pieces. Cover and reserve.
The poaching liquid can be reduced by 20-30% to concentrate the flavor. Taste.
SAUCE
In a frying pan, heat up 1-1/2 TBsp of oil of your choice. I use 1/2 shallot oil and 1/2 rendered fat from turkey
Add the sliced shallots to the oil and fry until crispy golden. Remove shallots or you can leave them in the sauce. I like to remove them and sprinkle them on the finished bowl. Or go half and half.
Add the turkey stock, soy sauce, and sugar to the pan, careful the oil may splatter
Cook on high to slightly reduce the sauce.
The Bowl
Layer shredded turkey over steaming rice, pour amount ofsauce you want over the turkey.
Garnish with pickles, or green veggies, or cucumbers, fried shallots, scallions, soft boiled egg, or reserved crispy turkey skin.
Notes
Leftover holiday turkey can be used for this dish. Make sure you keep the pan drippings from the turkey and use this for the oil in the sauce. You can use turkey stock or water for the sauce.
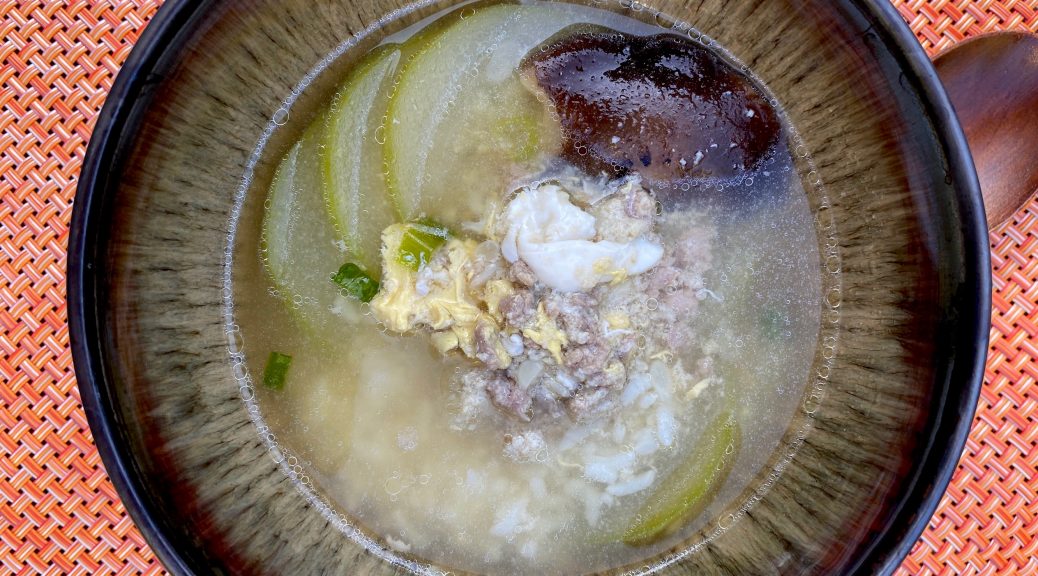
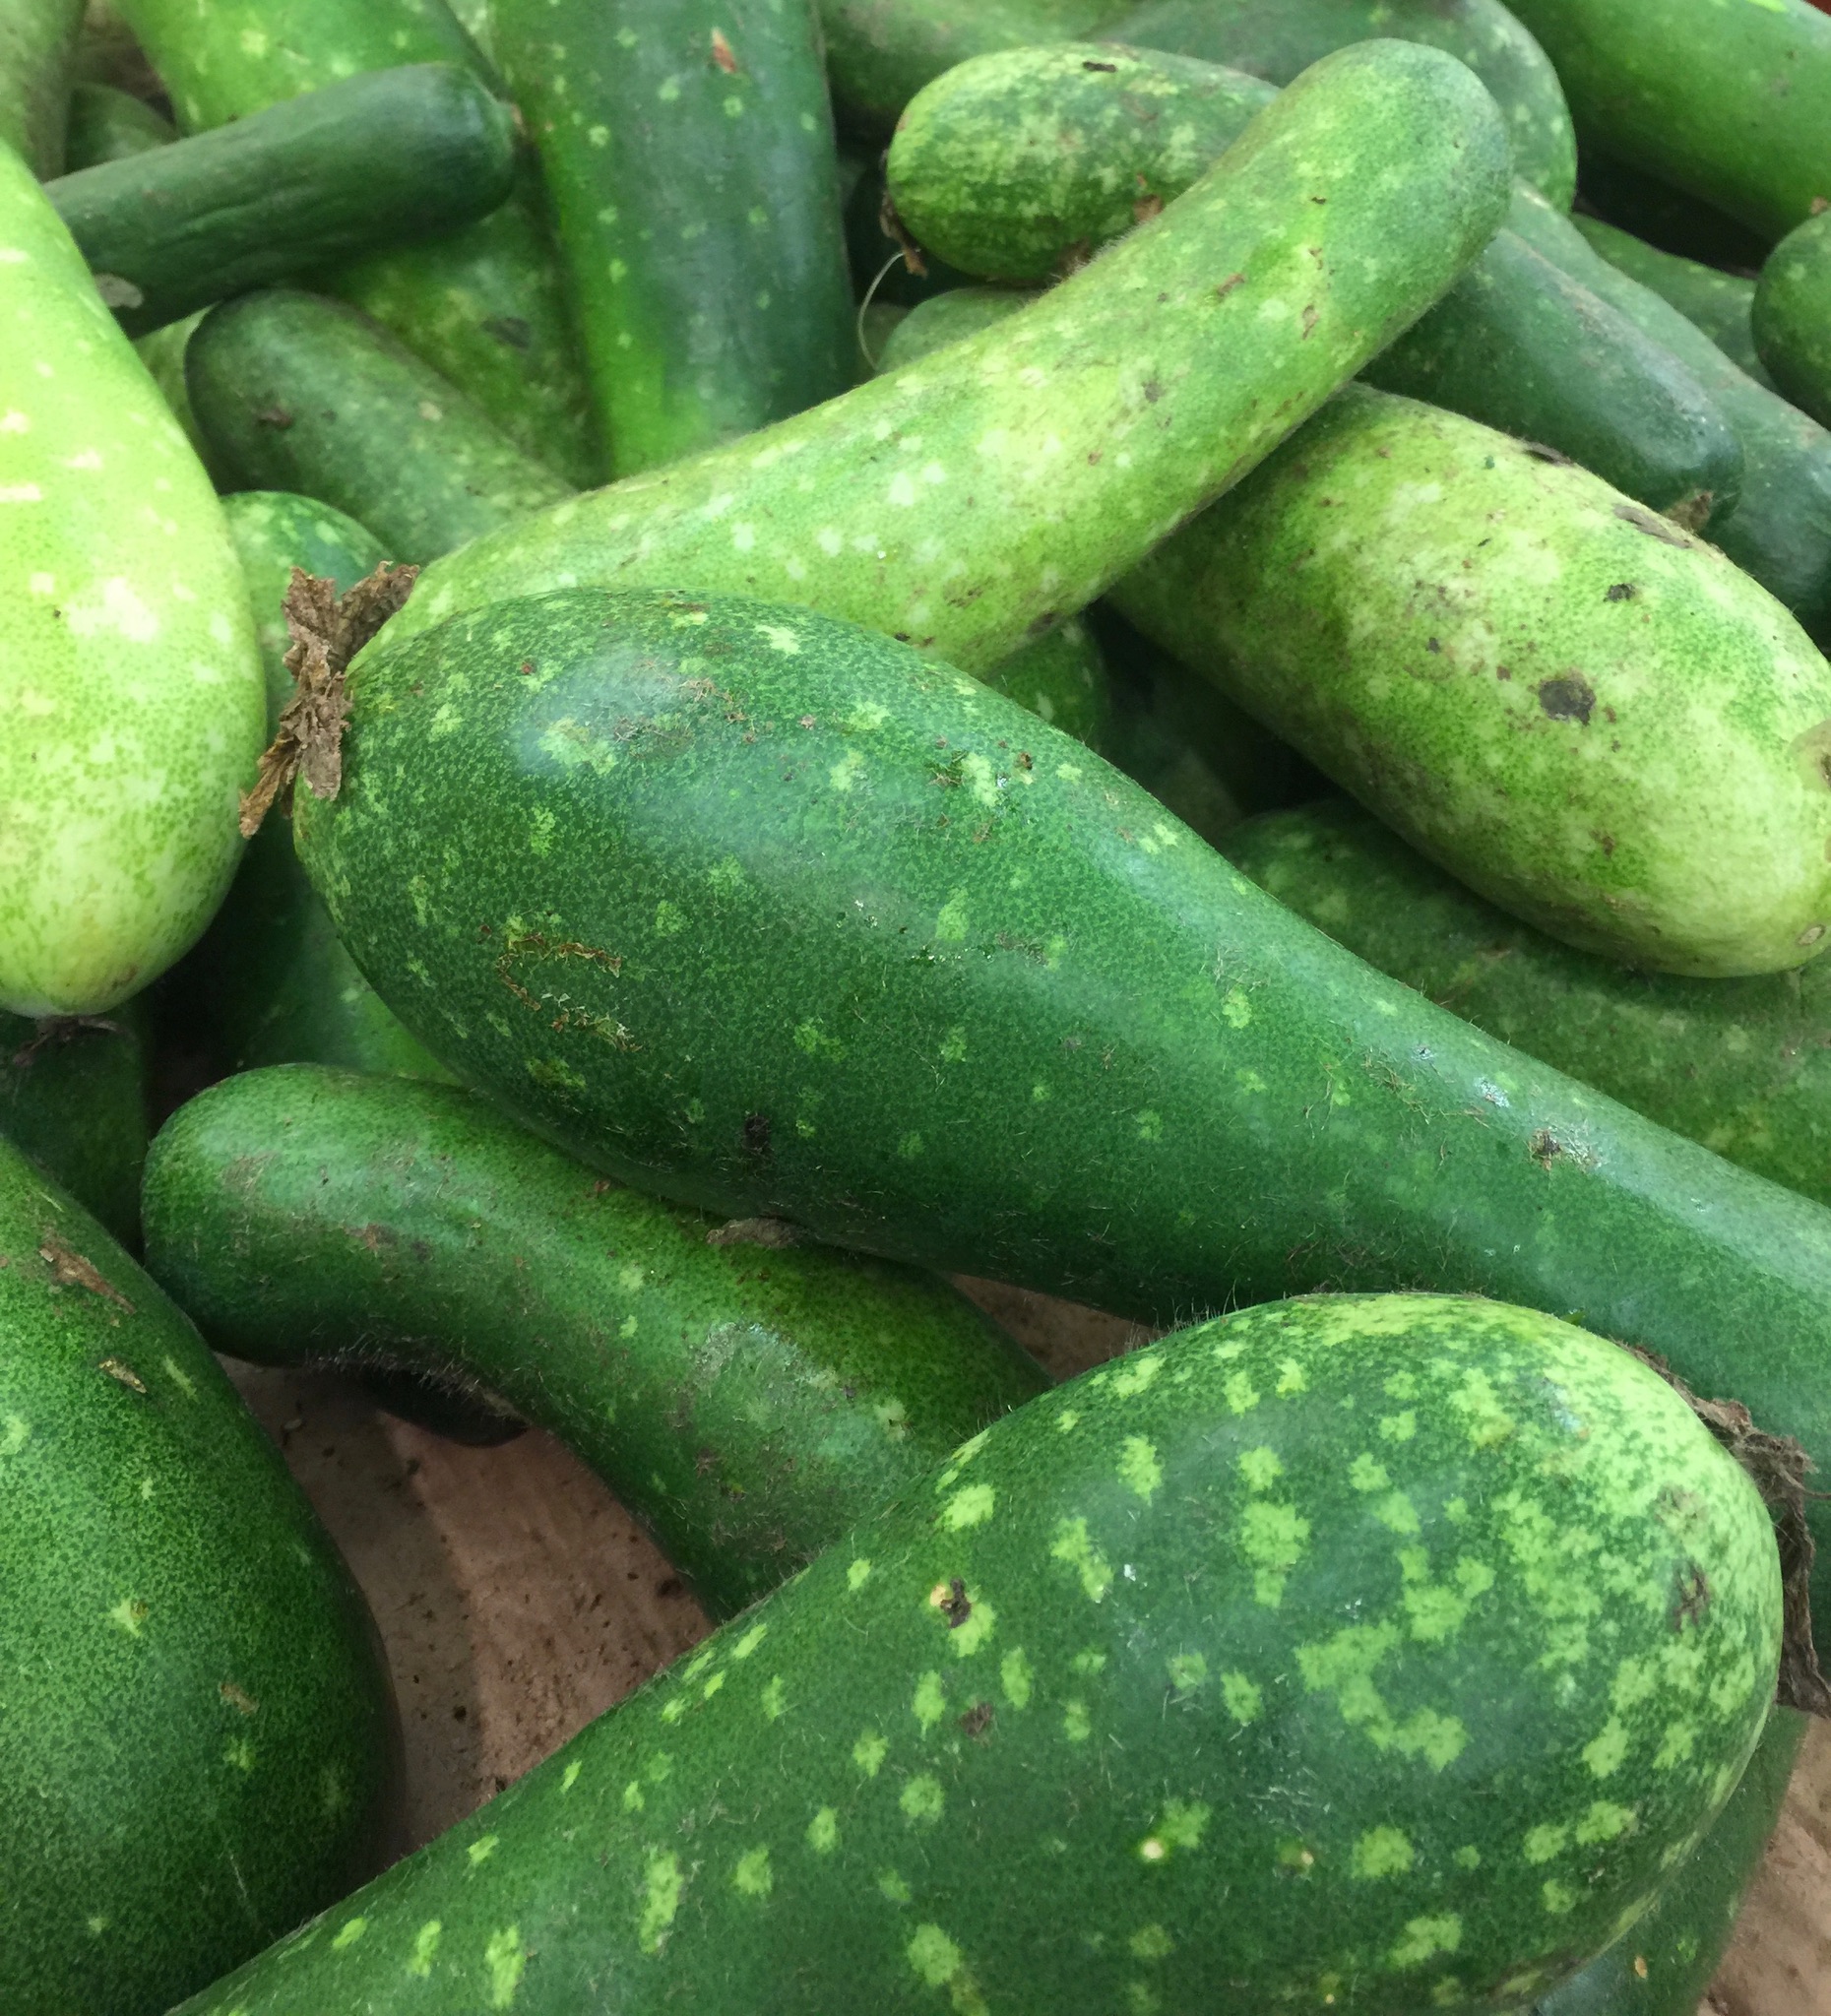
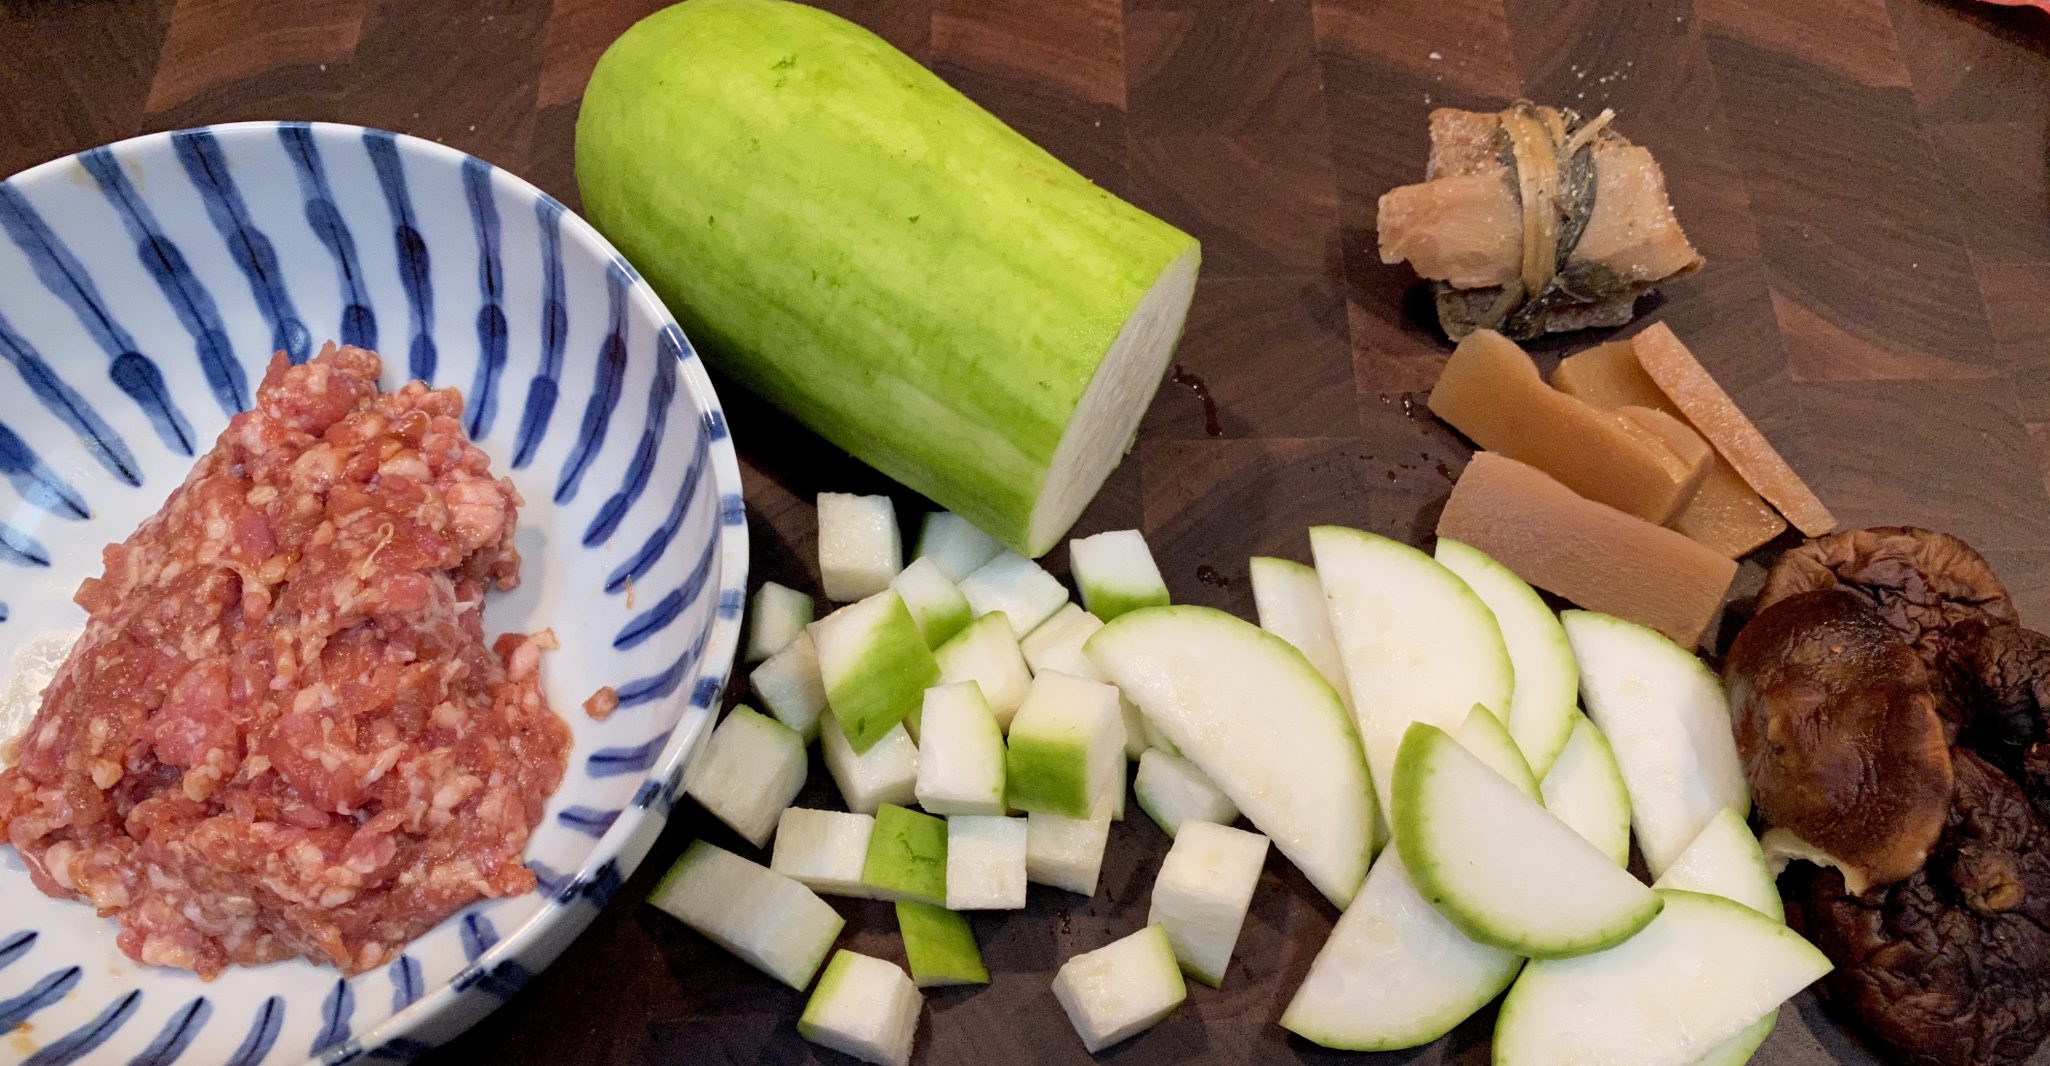
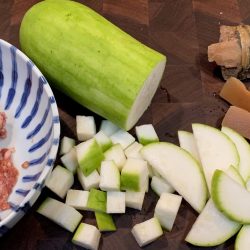
Now don’t freak over the term Fuzzy Squash or Melon. This squash does have a fuzzy exterior but it is scraped off before cooking. You are left with a sweet, mild, squash that is wonderful in soups, as a side dish with Chinese sausage and bean thread noodles, or stuffed with meat filling and steamed-my favorite, but for another post. We’re talking soup today.
But Let’s Start with Soup ABCs
We can break down Chinese Soups into two categories, quick soups and long, slow simmer soups. We tend to have quick soups on weekday workdays and save slow simmered soups (老火湯,) for the weekend. Both types are delicious of course. Many of the slow simmered soups are thought of as tonics. Various herbs are added for their health benefits. Valid? I’m not sure, I just know they are delicious and comforting. But if you ask my 90+-year-old mom, she would say she is living proof.
But This is About Quick and Easy
I learned how to make this soup from my Dad, the King of “dinner on the table in less than an hour”. To start, marinate ground pork for a couple of minutes (ok, more like 10-15min), then fry it with a couple of slices of ginger until it is no longer pink. Add water or chicken stock along with the rehydrated mushrooms and salted turnip and simmer for 10-15 minutes. Toss in the squash, bring to a boil, then lower the heat so the soup simmers for another 15 minutes or until the squash is translucent. Finish by adding the tofu, and egg and simmer for a couple of minutes to cook the egg. Taste for seasoning, add salt if needed. Garnish with scallions, and bada bing bada boom, ready to eat. My kids always throw rice into their bowls of soup, just like I did when I was a kid. This soup is a favorite, right after Corn Soup. This is down-home Cantonese soul food, da best.
Down home Cantonese Soup, Fuzzy Melon Soup is quick and easy
Course One dish meals, Soup
Cuisine Asian
Keyword Fuzzy Melon Soup, mo gwa tong
Prep Time 15 minutesminutes
Cook Time 15 minutesminutes
Ingredients
1fuzzy melonScraped and cut into slices, 1/4 inch thick
1salted turnipSeparate pieces, you will have a center chunk wrapped with a slice of root and leaves. Use 1 piece, either the slice, or leaves or the center chunk, rinse the piece you are going to use lightly with cold water to remove salt. Return remainder to bag for later use.
3dried shiitake mushroomsSoaked in hot water to soften (20 minutes)
8cupswater or 1:1 chicken stock:wateror add 1 heaping T Better Than Boullion Chicken base to water.
1-2 slices fresh gingerSmash slices with the flat of a cleaver or knife to help release flavors
1blocktofu (1/2 carton tofu) soft, medium, or firm, diced to 1/2-3/4 inch cubes if using firm tofu.
1egglightly beaten
1 stalkgreen oniondiced
2-3springscilantrogarnish
1tspsoy sauce
Marinade for Pork
3/4cupground pork
1tsprice wine
1tspoyster sauce
1/4tspsugar
1/4tspsalt and a dash of white pepper
Instructions
Combine marinade ingredients with ground pork. You can use chicken or turkey if you like. Let sit for 10-15 minutes
Scrape fuzzy melon with a knife to remove fuzz and top layer of melon. Once scraped it should still be light green in color. You can use a peeler but it will take more of the squash than necessary and the pale green layer will be removed. It's NBD. Cut melon in half lengthwise and then cut each half lengthwise to create quarters. Cut each quarter crosswise into ~1/4 inch thick slices. Set aside.
Heat 2 tsp of vegetable or peanut oil in a medium saucepan (3-4 qt). Add ginger and pork. Saute' until pork loses pinkness.
Add water/stock, mushrooms, and turnip to saucepan. Bring to a boil and lower heat to a low boil for 15 minutes. You can add soy sauce at this point or before tasting for salt in the next step.
Add squash to stock, bring back to a boil and immediately reduce heat again to a low boil. Cook until squash looks opaque rather than white and has softened but still retains its shape (about 10-15 minutes). Taste and season with salt if needed.
Add tofu and heat through. Once soup is hot again, lower heat to a gentle simmer or turn it off. Stir soup with chopsticks or spoon in one direction, add egg in a slow steady stream to create egg ribbons in soup (like egg drop soup). Or crack the egg into soup and let it poach without breaking the egg up. My dad always let me have the egg, lol. Daddy's little girl.
Garnish with green onions or cilantro, serve immediately.
Notes
Remove mushrooms from soup, thinly slice mushrooms and add them back to the soup. The egg is optional if you don't want to add it, fine. My dad would crack the egg into the soup and let it poach, the winner gets the egg (or whoever whined enough to get it).Salted Turnip-here is a link to a description of the one I use. Found in most Asian markets, in particular Chinese Markets
My favorite category for foods is not dessert. Nope, its soup. I LOVE soup. To the age-old question if you were stranded on a desert island and could only have three things…soup would most definitely be on my list.
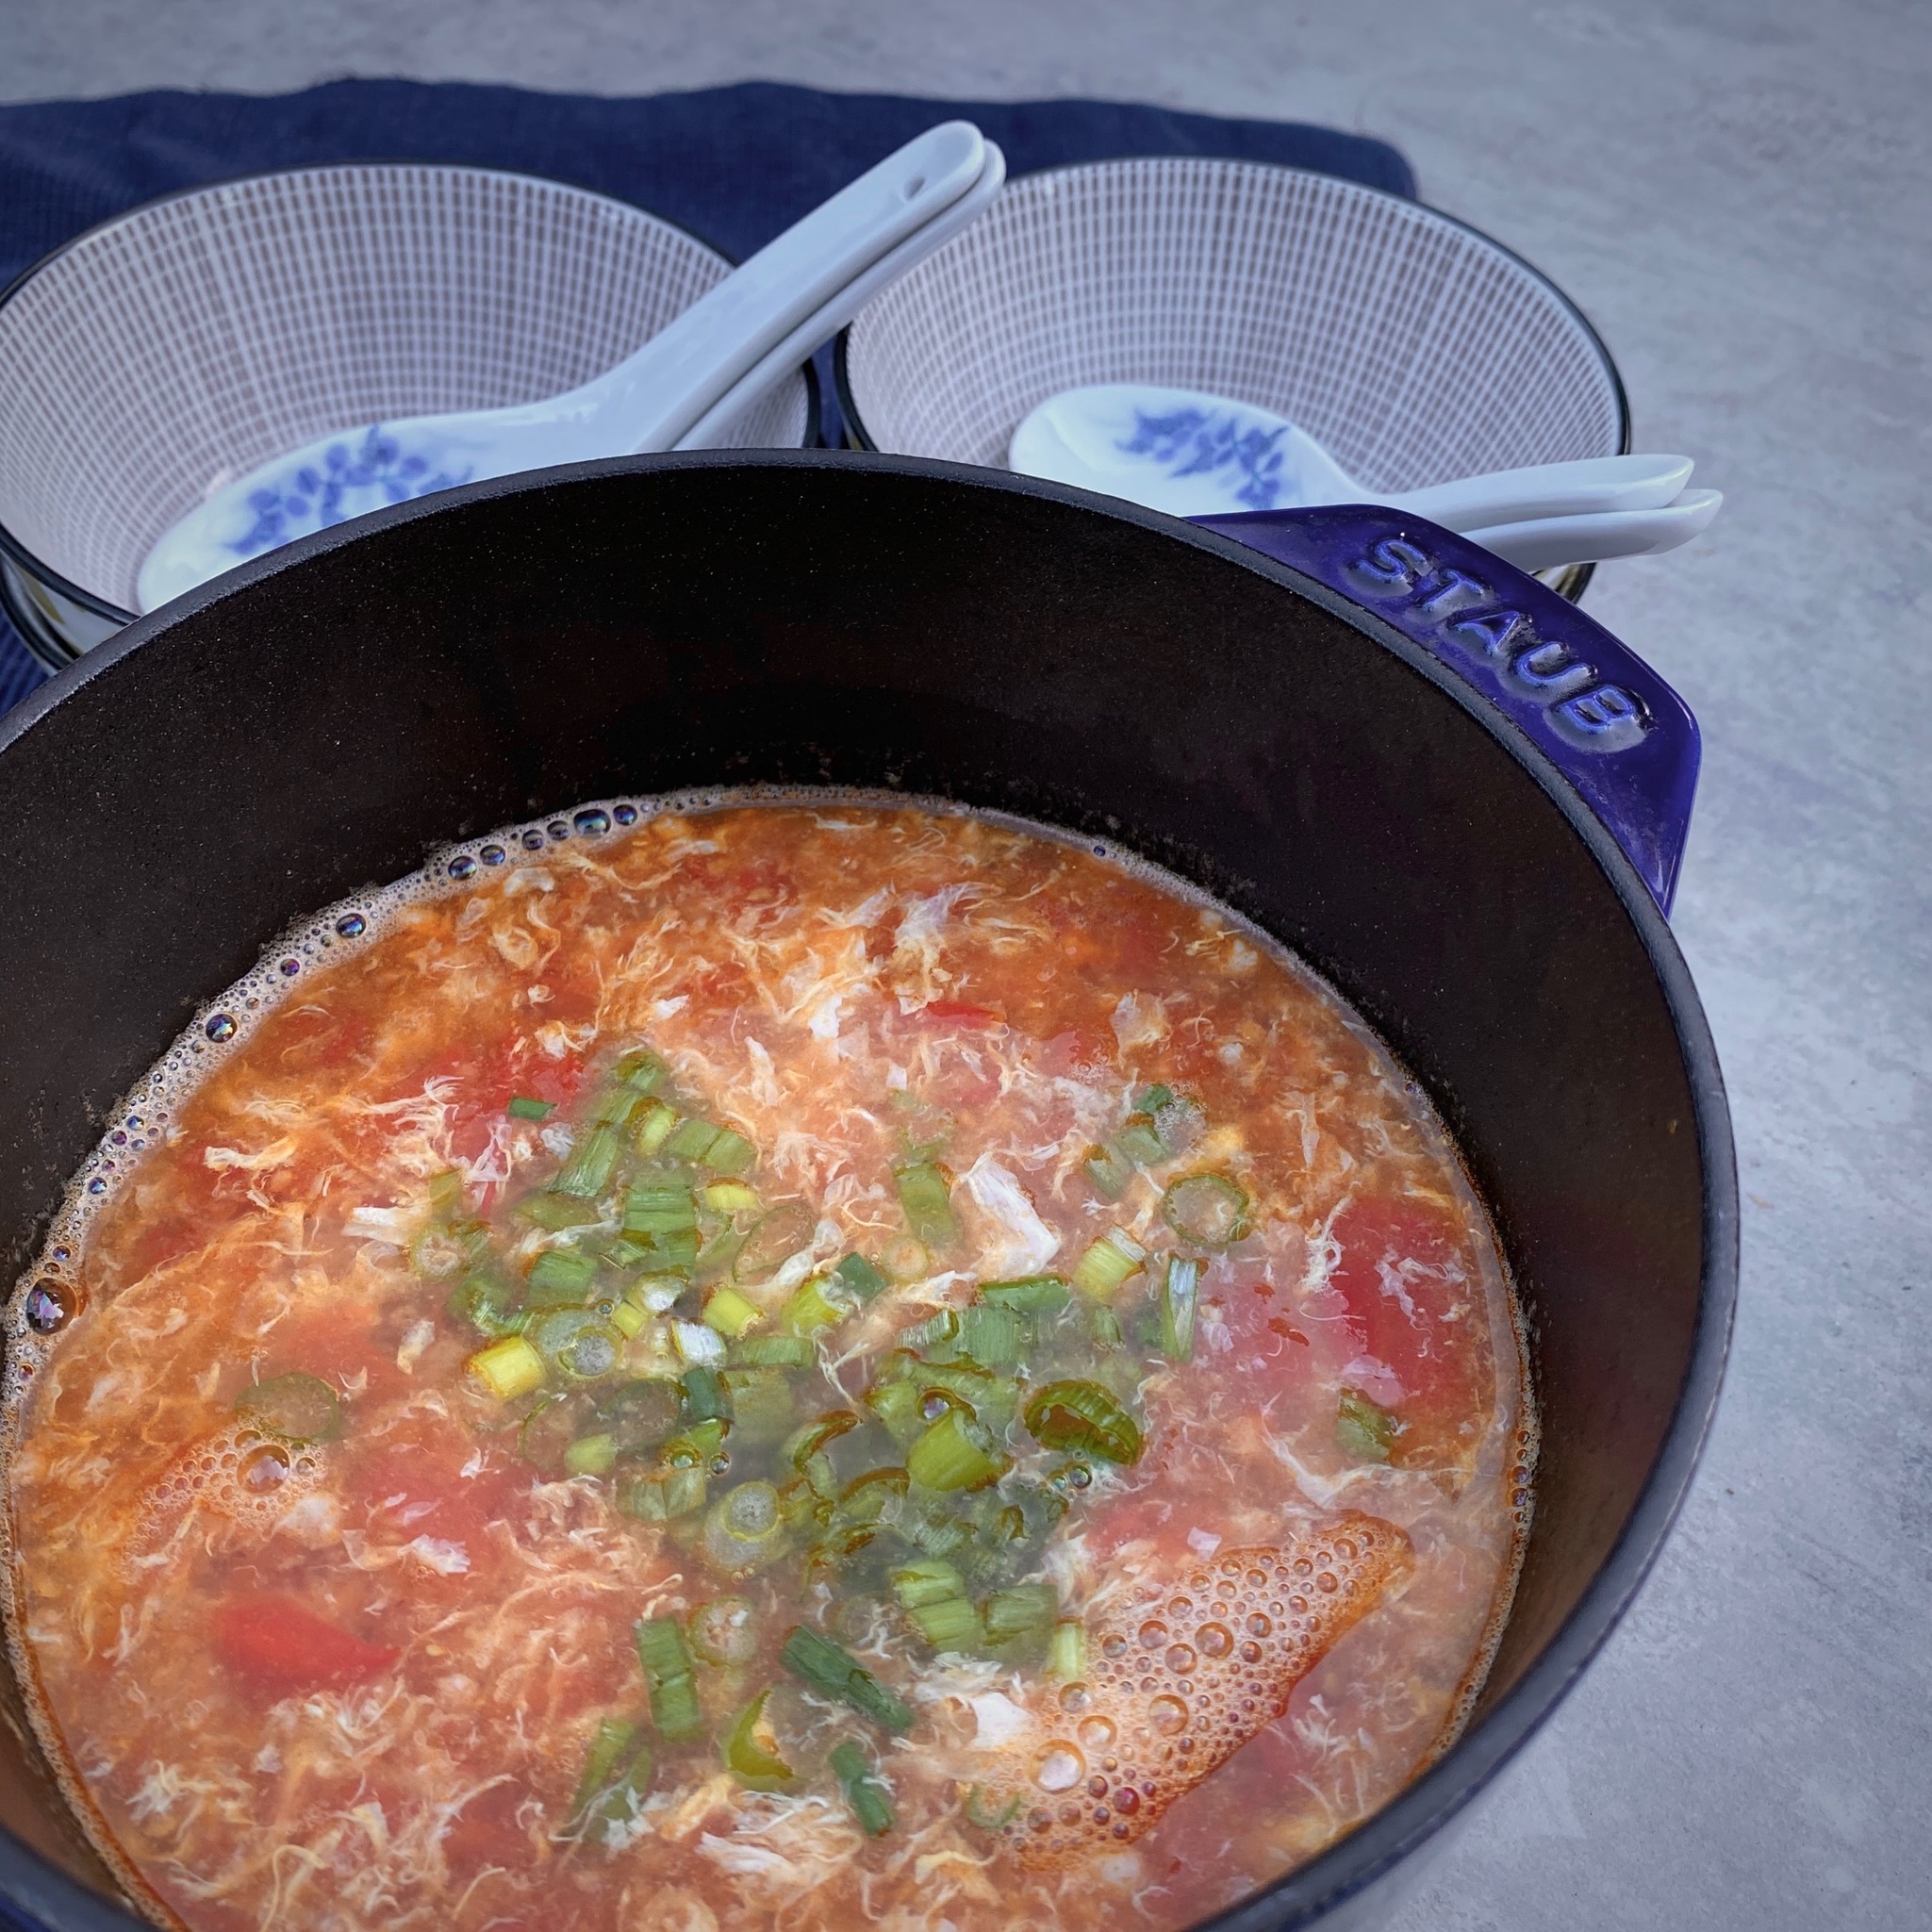
Growing up, my dad almost always made soup with dinner. Weeknight dinners meant a quick soup like Corn Soup or Egg Drop Soup. This is a twist on egg drop soup. With tomato season in full swing, this is the perfect time to make Tomato Egg Drop Soup.
I adapted a recipe I found on The Woks of Life, a fabulous blog/website for Asian recipes and stories. My version includes a bit of ground meat for flavor and texture because that’s how my Dad made it. The cornstarch slurry gives the soup a bit of body, you can leave it out if you wish. This is great as a noodle soup also. Delicious with rice noodles, and hand-pulled noodles.
The Key
The key to this recipe is not just great tomatoes, but how to create the egg ribbons in the soup. The direct translation of the name is actually Egg Flower Soup as the egg resembles a flower. When adding the egg, make sure the soup is on low heat so that the soup is at a gentle simmer. Add the egg in a slow steady stream as you swirl the soup in ONE DIRECTION with either chopsticks or a spoon. If you move your utensil in different directions you will not get the ribbons of egg. You can hold the soup at a gentle simmer, do not boil the soup as that can curdle the egg. Garnish with green onions or cilantro, I like both.
Try this quick and easy homey soup, I think you’ll like it.
A delicious quick and easy soup, Tomato Egg Drop Soup is a rift on the classic Egg Drop Soup
Course Soup
Cuisine Asian, cantonese
Keyword soup, Tomato Egg Drop Soup
Prep Time 15 minutesminutes
Cook Time 15 minutesminutes
Servings 4
Ingredients
2tablespoonsoil
10ouncestomatoes, peeled1 large or 3-4 small, about 280g; cut into small chunks
Stock
2cupschicken stock480 ml
1cupwater
Seasoning
2teaspoonslight soy sauceor soup soy sauce
1/2teaspoonsesame oil
1/4teaspoonwhite pepper
saltto taste
1eggbeaten
Thickener
1 1/2teaspoonscornstarch mixed with 2 tablespoons cold water or brothoptional
Garnish
1scallionfinely chopped
2tablespoonscilantrochopped, optional
Protein Option
1 TbspVegetable oil
1/2CupGround beef preferablycan substitute ground pork or chicken
Marinade
1TspSoy sauce regular or light
1TspOyster sauce
1TspRice wine
1slicefresh gingersmash to release flavor
1/4TspGranulated sugar
1/4TspSalt
dashWhite pepper
Instructions
Combine seasonings for meat mixture, mix with ground meat Let sit for 10 minutes. Heat 1 tablespoon oil in 3-4 qt pot over medium heat. Add ground beef and sauté’ just until meat loses pinkness. Remove from pot and reserve.
In the same pot, heat 2 T oil over medium-low heat. Add the tomato chunks and stir-fry for 5 minutes until the tomatoes are softened and fall apart.
Add chicken stock, water, seasonings, and salt to taste*. Bring to a boil, then lower the heat so soup is just at a simmer with the lid on. Allow soup to simmer for 10 minutes.
*Add meat, if using, with the stock and water. Bring back to a boil and immediately lower heat so soup is at a simmer. Taste soup and add salt or soy sauce if needed. Do add the sesame oil and ground pepper. Then allow soup to simmer for 10 minutes.
Beat the egg in a small bowl and set aside.
Make the cornstarch slurry in a small bowl. If the soup is for noodles omit cornstarch slurry. If serving as a soup, increase heat to medium and add cornstarch slurry to soup. Bring soup to a soft boil to allow the cornstarch to thicken the soup. Once it thickens turn the heat back down to low.
Pour a thin stream of egg into the soup. Let it sit for a couple of seconds just to set the egg a bit, then, with chopsticks or a spoon, gently swirl the soup in a whirlpool motion in one direction. This creates the ribbons of egg characteristic of egg drop soup.
Ladle soup into bowls and garnish with green onions and cilantro. Serve immediately
Notes
Blanch tomatoes in boiling water to remove the skin before cutting into quarters. Once added to soup the skin separates from the rest and you are left with fibrous skin in your soup. It's better to remove the skin despite being more work. Or remove skin when frying tomatoes. As tomatoes soften, use tongs to pull the skin off. Then add stock and water.
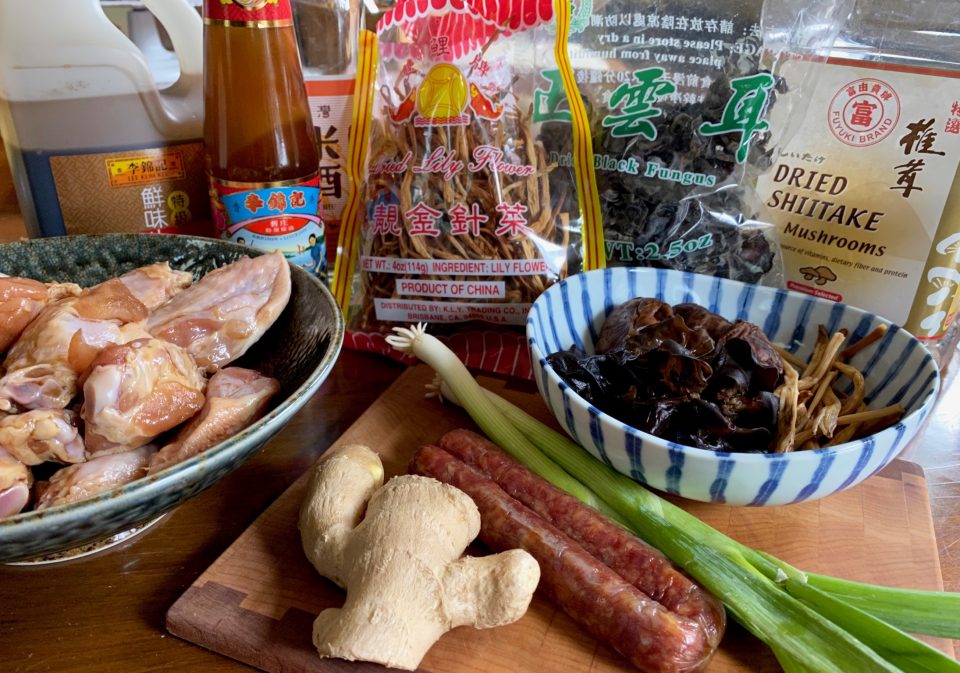
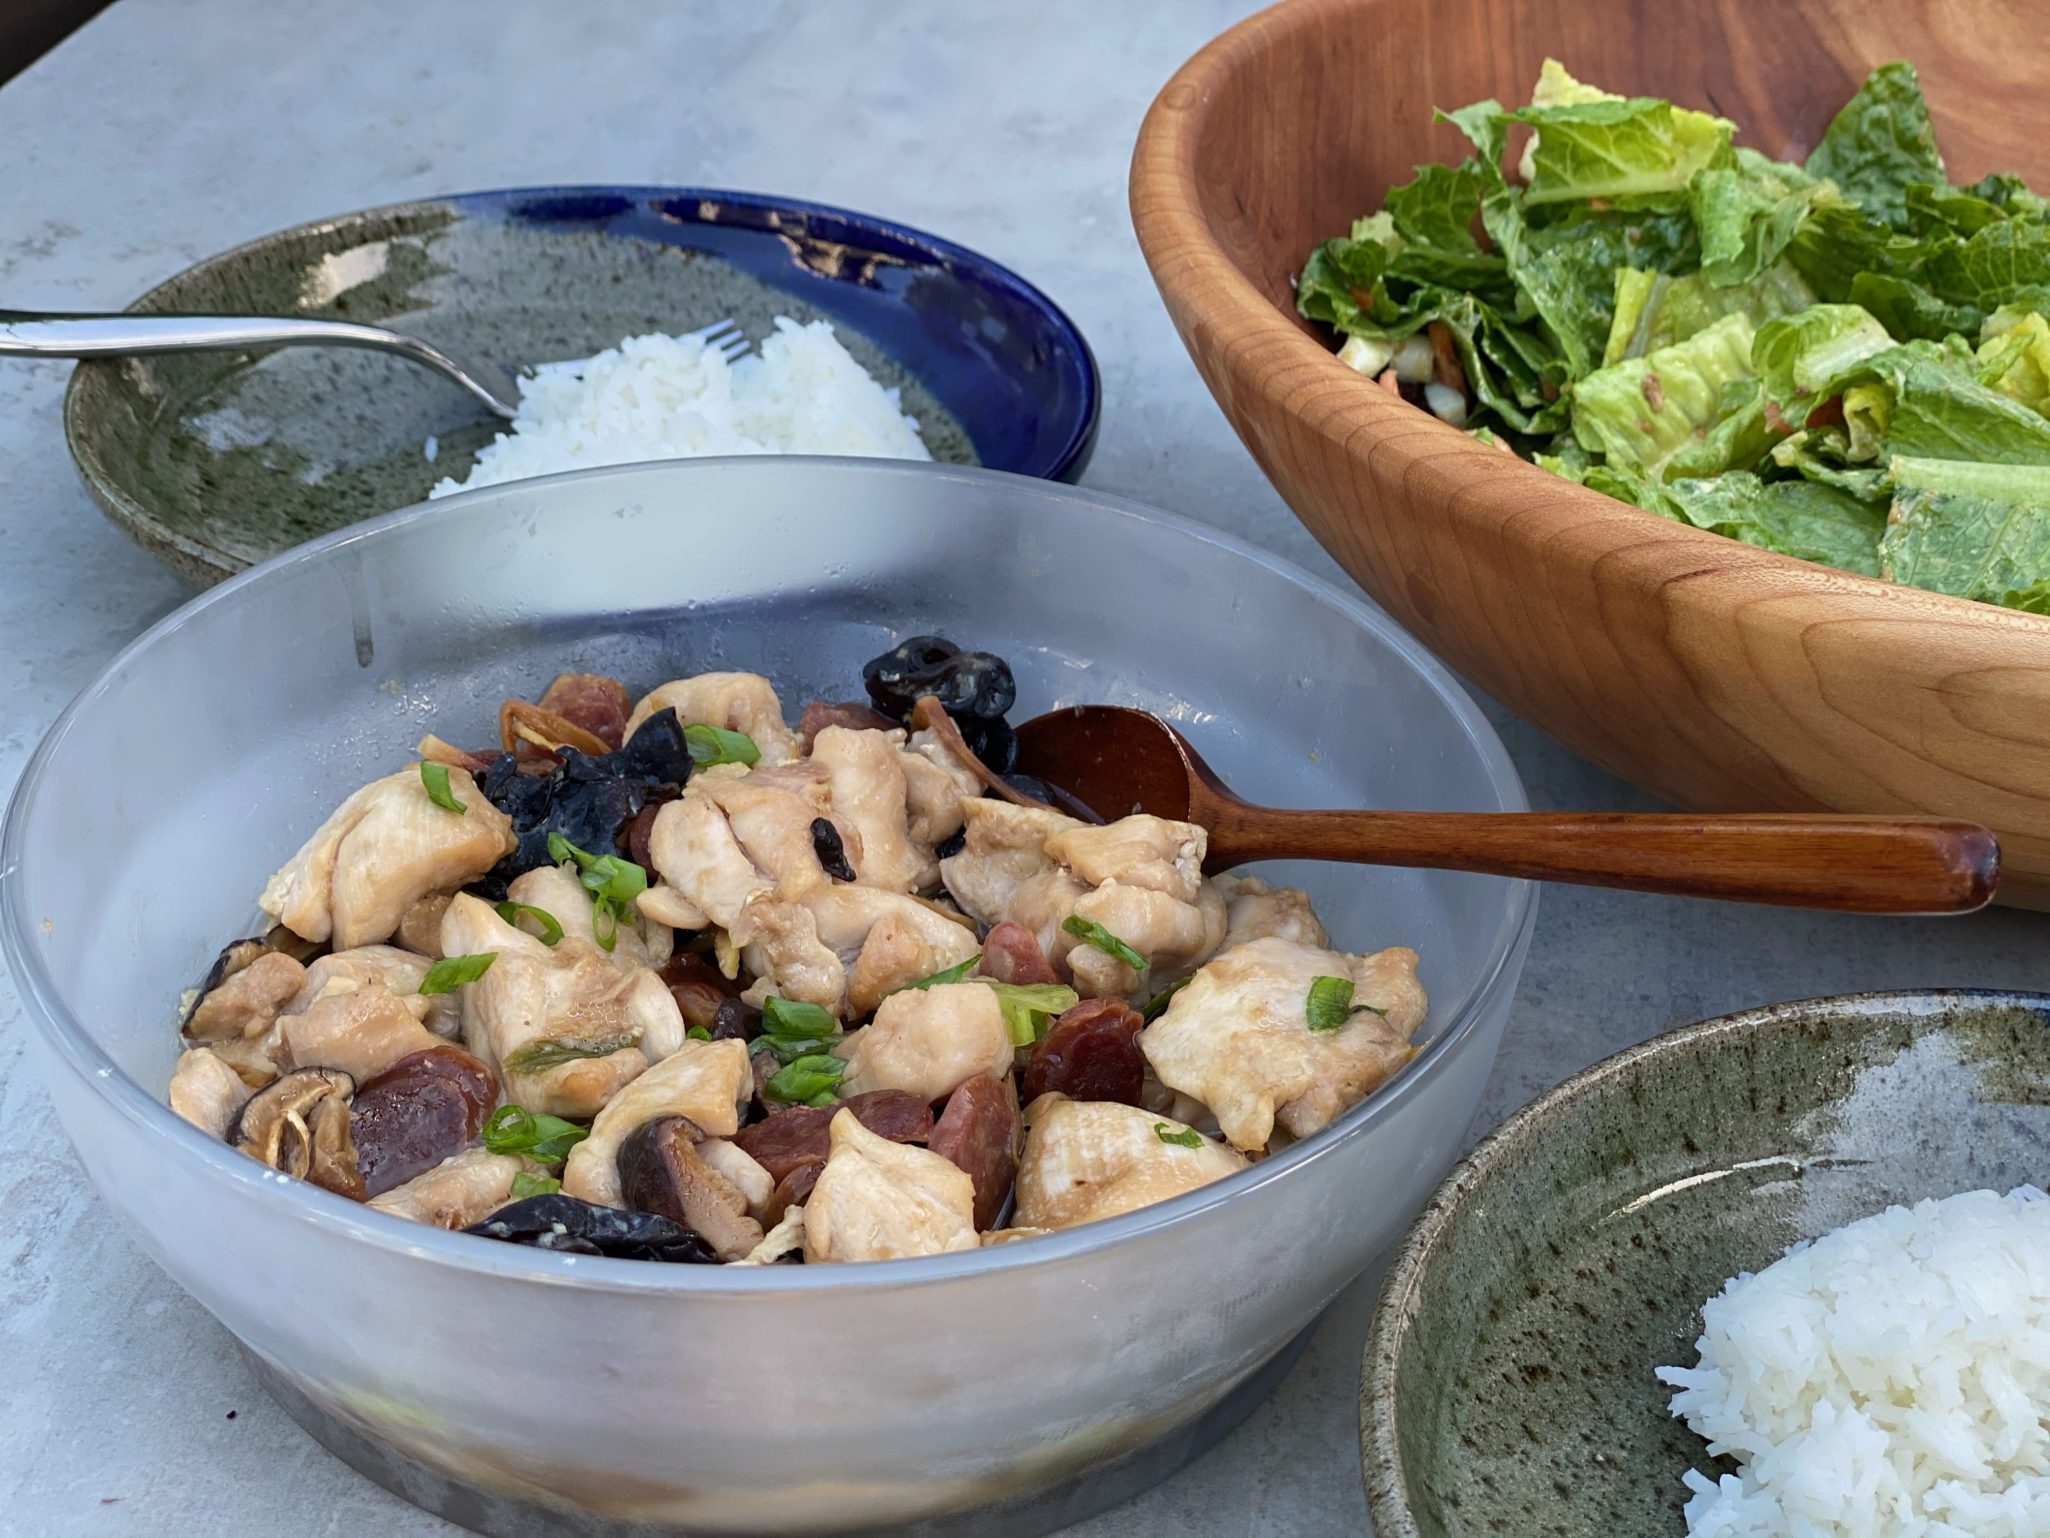
Asian Soul Food: Steamed Chicken with Chinese Sausage & Mushrooms
Dinner in the Time of COVID. I find myself not just cooking more but cooking more of the dishes I grew up eating. Favorite dishes that my father and grandfather cooked for us. We all need a little bit of comfort these days, ain’t that the truth.
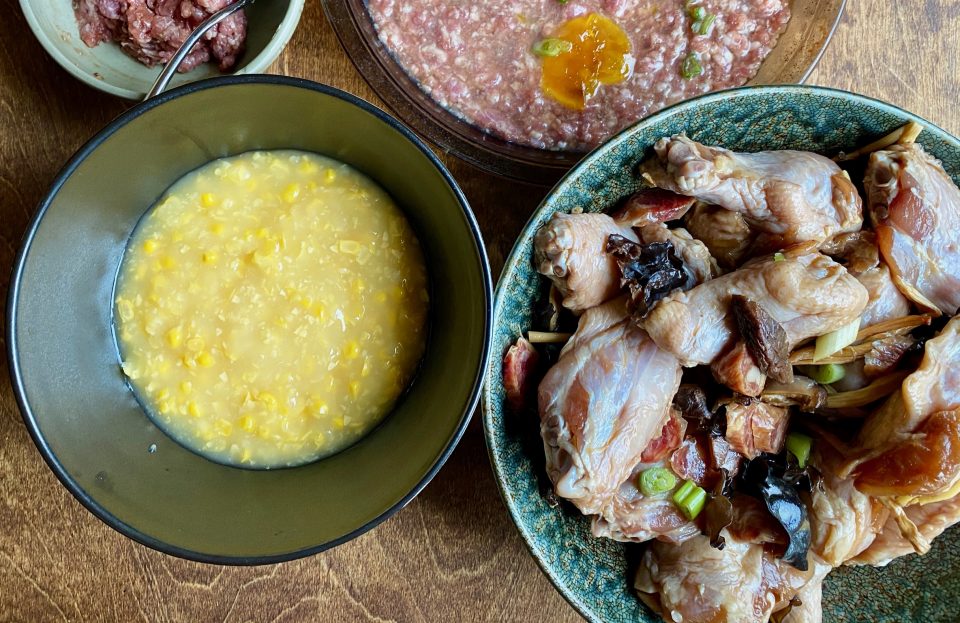
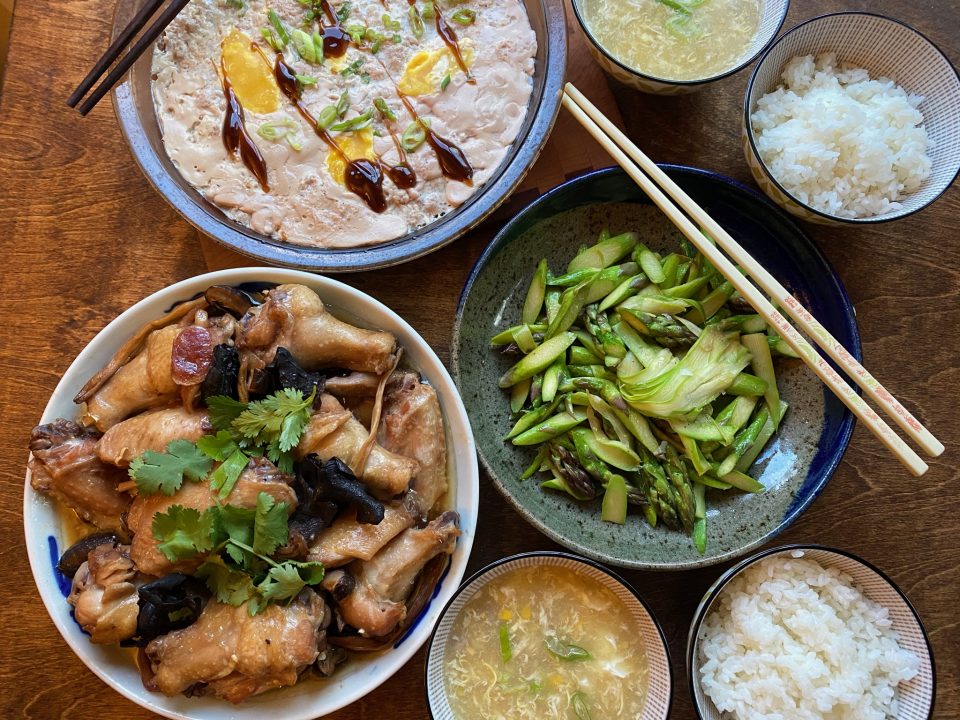
A favorite in our house is Steamed Chicken with Chinese Sausage and Mushrooms. This time it was part of a meal that is as down-home as it gets. We started with Kid-favorite Corn Soup, Steamed Pork with Salted Egg, and Sauteed Asparagus. I was exhausted from all the prep! How my Dad pulled off dinners like this nightly after a full day’s work, continues to amaze me.
The keys to Delicious Steamed Chicken with Chinese Sausage & Mushrooms
Use bone-in chicken if possible. The flavor is better when the meat is left on the bone…is there a scientific reason? Who knows, but I’m not about to buck my dad’s advice. But, don’t let that stop you from making this dish, by all means, if all you have is boneless chicken, use it. It will still be onolicious. I like to use wings, but any part of the chicken will work. Breast meat is a little trickier, it is less forgiving than dark meat and can overcook.
Chinese Sausage
Also known as Lop Cheung, a delicious sweet and slightly savory preserved meat that is found in tons of Chinese dishes. I love Lop Cheung, when I am craving an easy comfort dish, I’ll throw a couple on top of the rice right before turning on my rice cooker, as the rice cooks so do the Lop Cheung. You can find Lop Cheung at most Asian markets and at some of the larger supermarkets in the Bay Area. There are several different varieties including pork, pork & chicken, and pork & liver. Unless you grew up with Chinese Sausage, stay away from the liver one which is gamier and stronger in flavor. The meat is marinated, stuffed into casings, set to dry, and then kept cool. I still head to SF Chinatown to buy my Lop Cheung from Mow Lee or Wycen. Old School all the way.
I hope they survive COVID19.
Pre-cook stage
The Dried Stuff
Dried Shiitake or Black Mushrooms, Cloud Ears (Dried Fungus), and Lilly Buds or Golden Needles round out the dish. Soak the dry ingredients in warm water 15-30 minutes until soft. Each provides flavor and texture to the dish.
Shiitake MushroomsBack in the day, shiitakes only came in dried form. Nowadays you can get fresh shiitake mushrooms easily, they’re delicious BUT for the most part, in Chinese cooking we use the dried form. Why? Concentrated flavor. The flavor of the mushroom is intensified and that flavor is essential to the dish. Soak the mushrooms first, (keep the soaking liquid for stocks and soups), trim the stems that can be kind of woody, and slice into desired thickness.
Cloud Ears or Black Fungus is just another kind of mushroom. It doesn’t have a ton of its own flavor but adds texture, in the form of CRUNCH and absorbs the flavor of the marinade-YUM. After soaking, pinch the stem-tip off. The tip is where the stem connected to the tree, it’s a little crusty.
Lily budsadd an earthy flavor and texture. After soaking the lily buds, pinch or cut off the ends (it will look a little darker than the rest of the bud and tie a knot in the middle of each strand. Yeah, don’t know why, but I do it because my Dad told me to.
Don’t forget to add the green onions and cilantro at the end.
There you go, all the components to a down-home soul food dish.
Microwave Madness
Microwave directions
I bought microwave cookware, Anyday Cookware, on Dave Chang’s recommendation (Mr. Momofuku), boy, that guy can sell a product. Pros and cons? Pros-no steamer set up, no pan with water, hassle-free steam cooking, and one bowl cooking. Cooking time cut by more than half. Cons? Finding space to store new bowls plus a major hit on latte money, lol.
Anyways, follow the same steps until you get to the point of putting the dish* in the steamer. Instead, *put all your ingredients into a microwave cooking container and forget the steamer.
Cover, vent, and place your dish in the microwave. My microwave’s power output is 700watts (which is on the low side). For this dish, I use full power for about 8 minutes. You will have to adjust according to your microwave wattage. The Anyday site has an interactive basic guide that allows input of wattage to determine cooking power and time. In general, if your microwave wattage is higher, shorten the cooking time or reduce the power level and keep the same time. You will need to experiment a little with your microwave. I add 1-2 tablespoons of the saved mushroom liquid so I’ll have some sauce in the dish.
1.5poundschicken breast or combination of chicken pieces, bone-in cut into bite-sized pieces or chicken wings separated into drummettes and flats.
2Chinese sausagesthinly sliced on the diagonal
3-4black mushroomssoaked in warm water until soft and julienned
2TbspCloud earssoaked and root ends pinched off
12Lily budssoaked, ends pinched off and a knot tied in the middle, skip the knot tying if you want
1-2stalksgreen onions cut into 1-inch pieces, reserve some of the green part to finish the dish
1/4bunch cilantro for garnish
Marinade
1tsp.sugar
1/2tspsalt
1tablespoonsoy sauceAP Pref chinese LKK Premium Soy Sauce
1tablespoonoyster sauceLEE KUM KEE with the kid and mom in boat
1tablespoonShaoxing Wine or Chinese Rice Wine
2slicesginger julienned
2tspoilI like peanut oil, but any vegetable oil will work
2tspcornstarch
1/2-1tspsesame oiloptional, if you have it, definitely use it
1/4tspwhite pepper
Instructions
Combine ingredients for marinade.
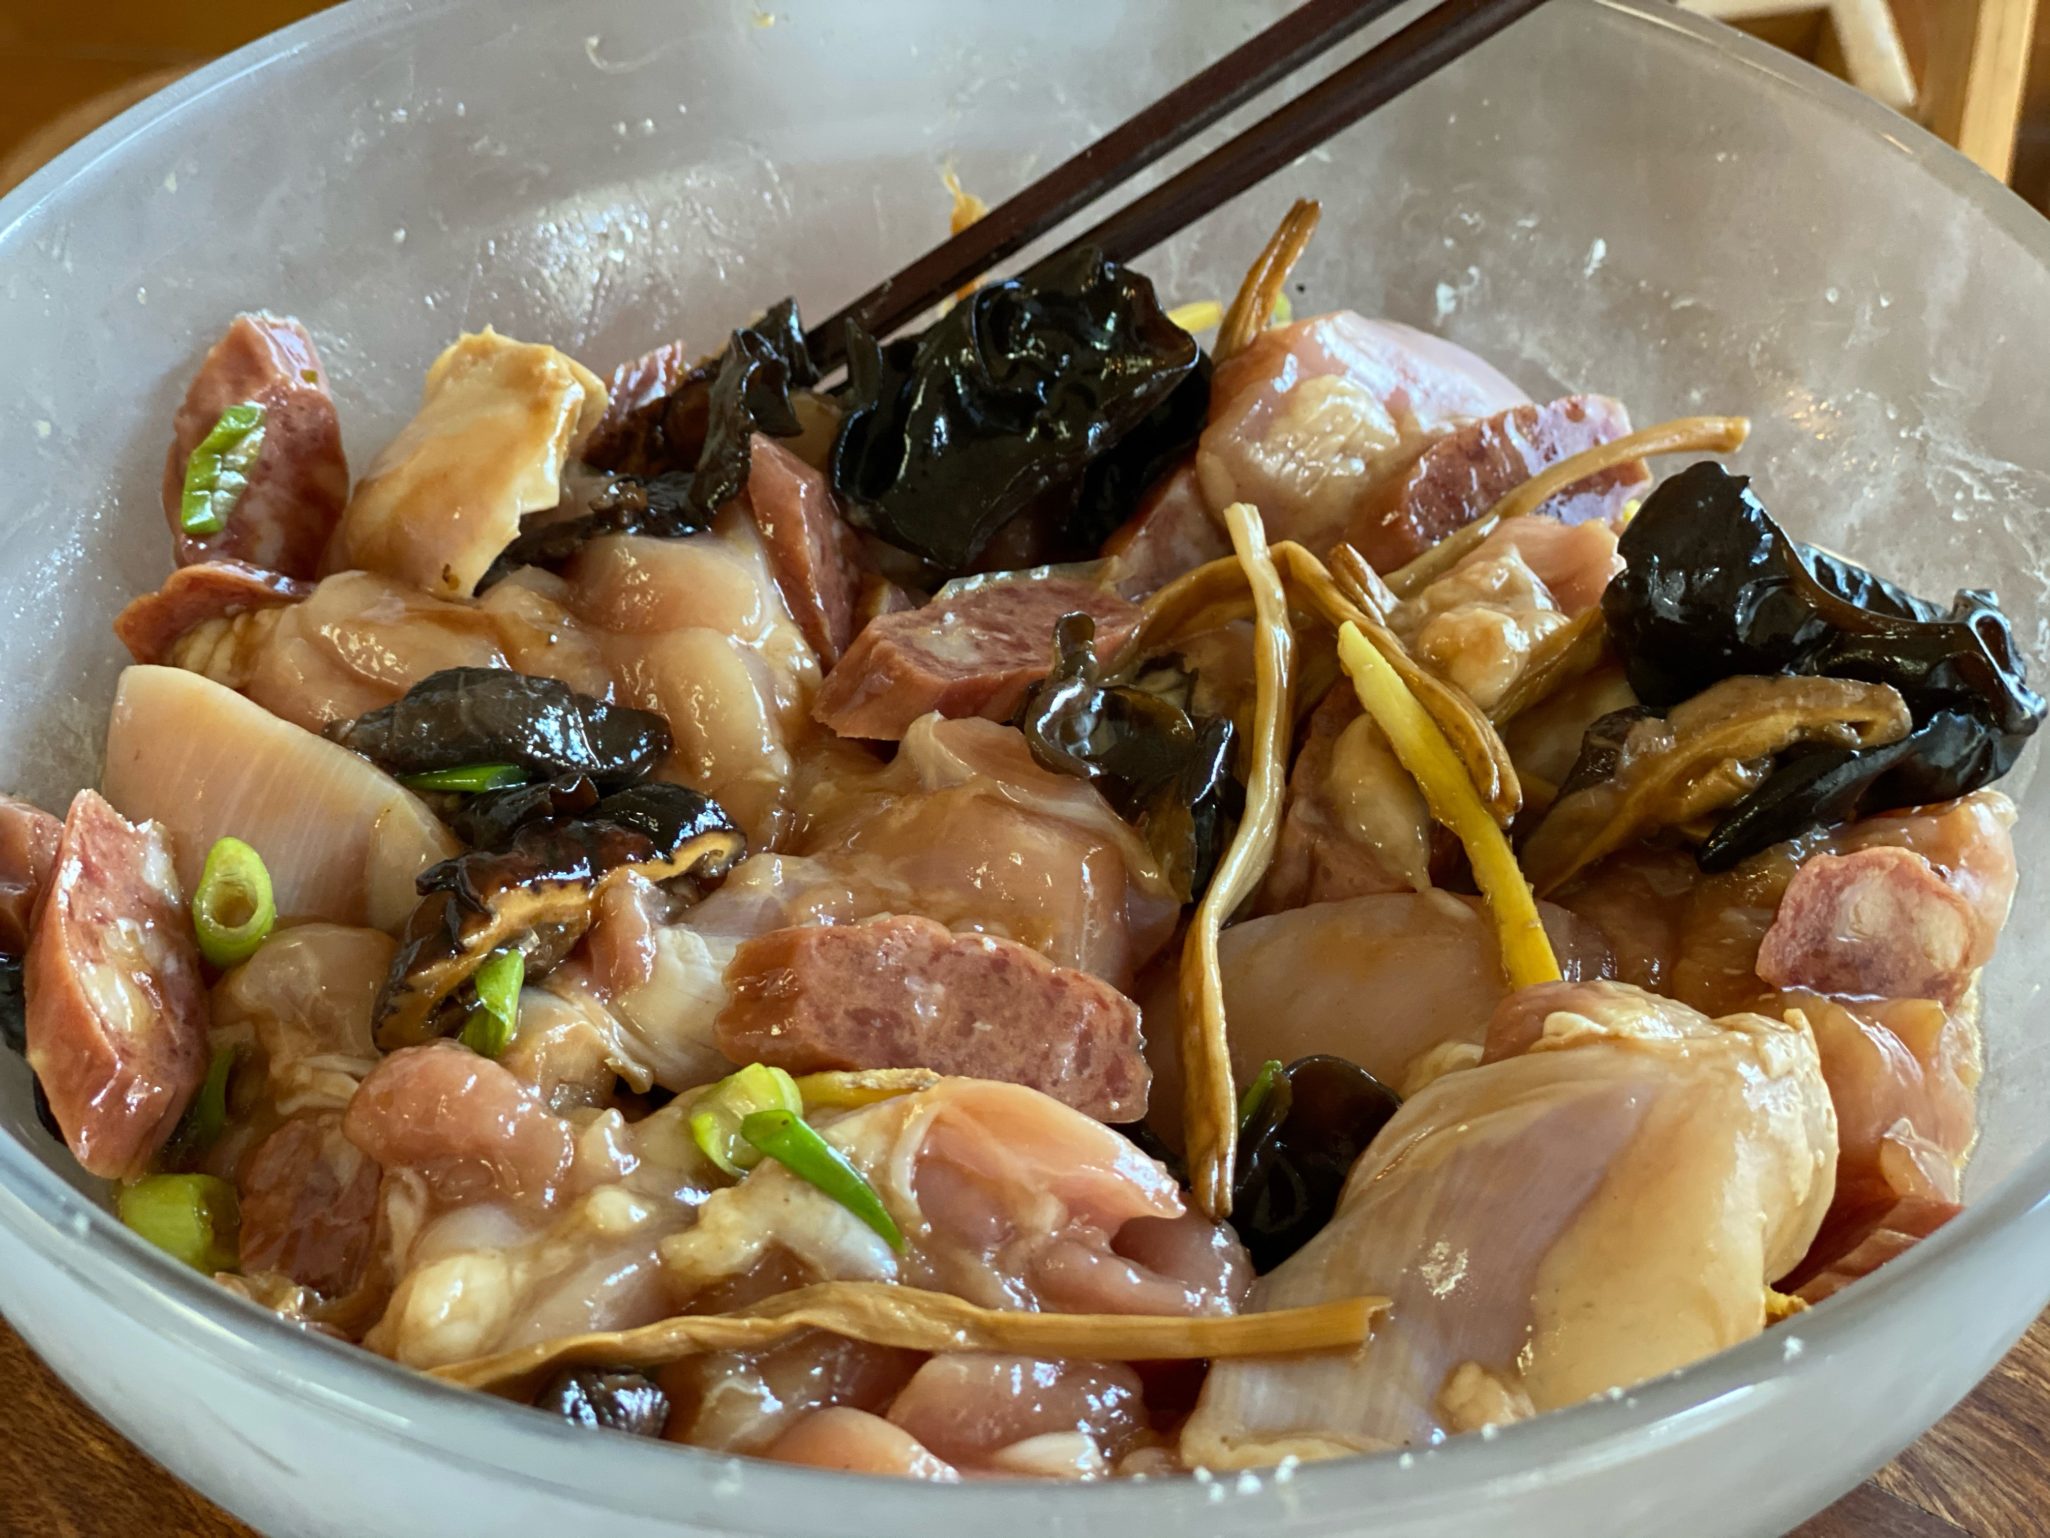
Add chicken, mushrooms, sausage, cloud ears and lily buds to marinade. Stir to combine well. Marinade for 15- 30 minutes. Place in a heatproof dish such as a shallow bowl or pie plate. Top with some of the diced green onions.
In a steamer or a stainless wok, set up steamer rack, fill with water up to but not touching the steamer rack. Place on heat and bring to boil.
Place chicken on steamer rack.
Steam for 25-30 minutes. Watch water level in pan, do not let it dry out.
Garnish with cilantro and extra green onions. Serve with plenty of rice.
Notes
If you don't have lily buds omit, don't make a special trip. You can also place the ingredients on rehydrated lotus leaves (usually used as a wrap. It imparts a nice flavor to the chicken.Other additions dried red dates 2-3 soaked and smashed. Add with mushrooms.


 Microwave Magic