Category: Recipes

Recipes I’ve tried and sometimes modified that I think you should try!

Nuts for Macadamia Shortbread (Cookies for Lahaina)

Nuts for Macadamia Shortbread (Cookies for Lahaina)

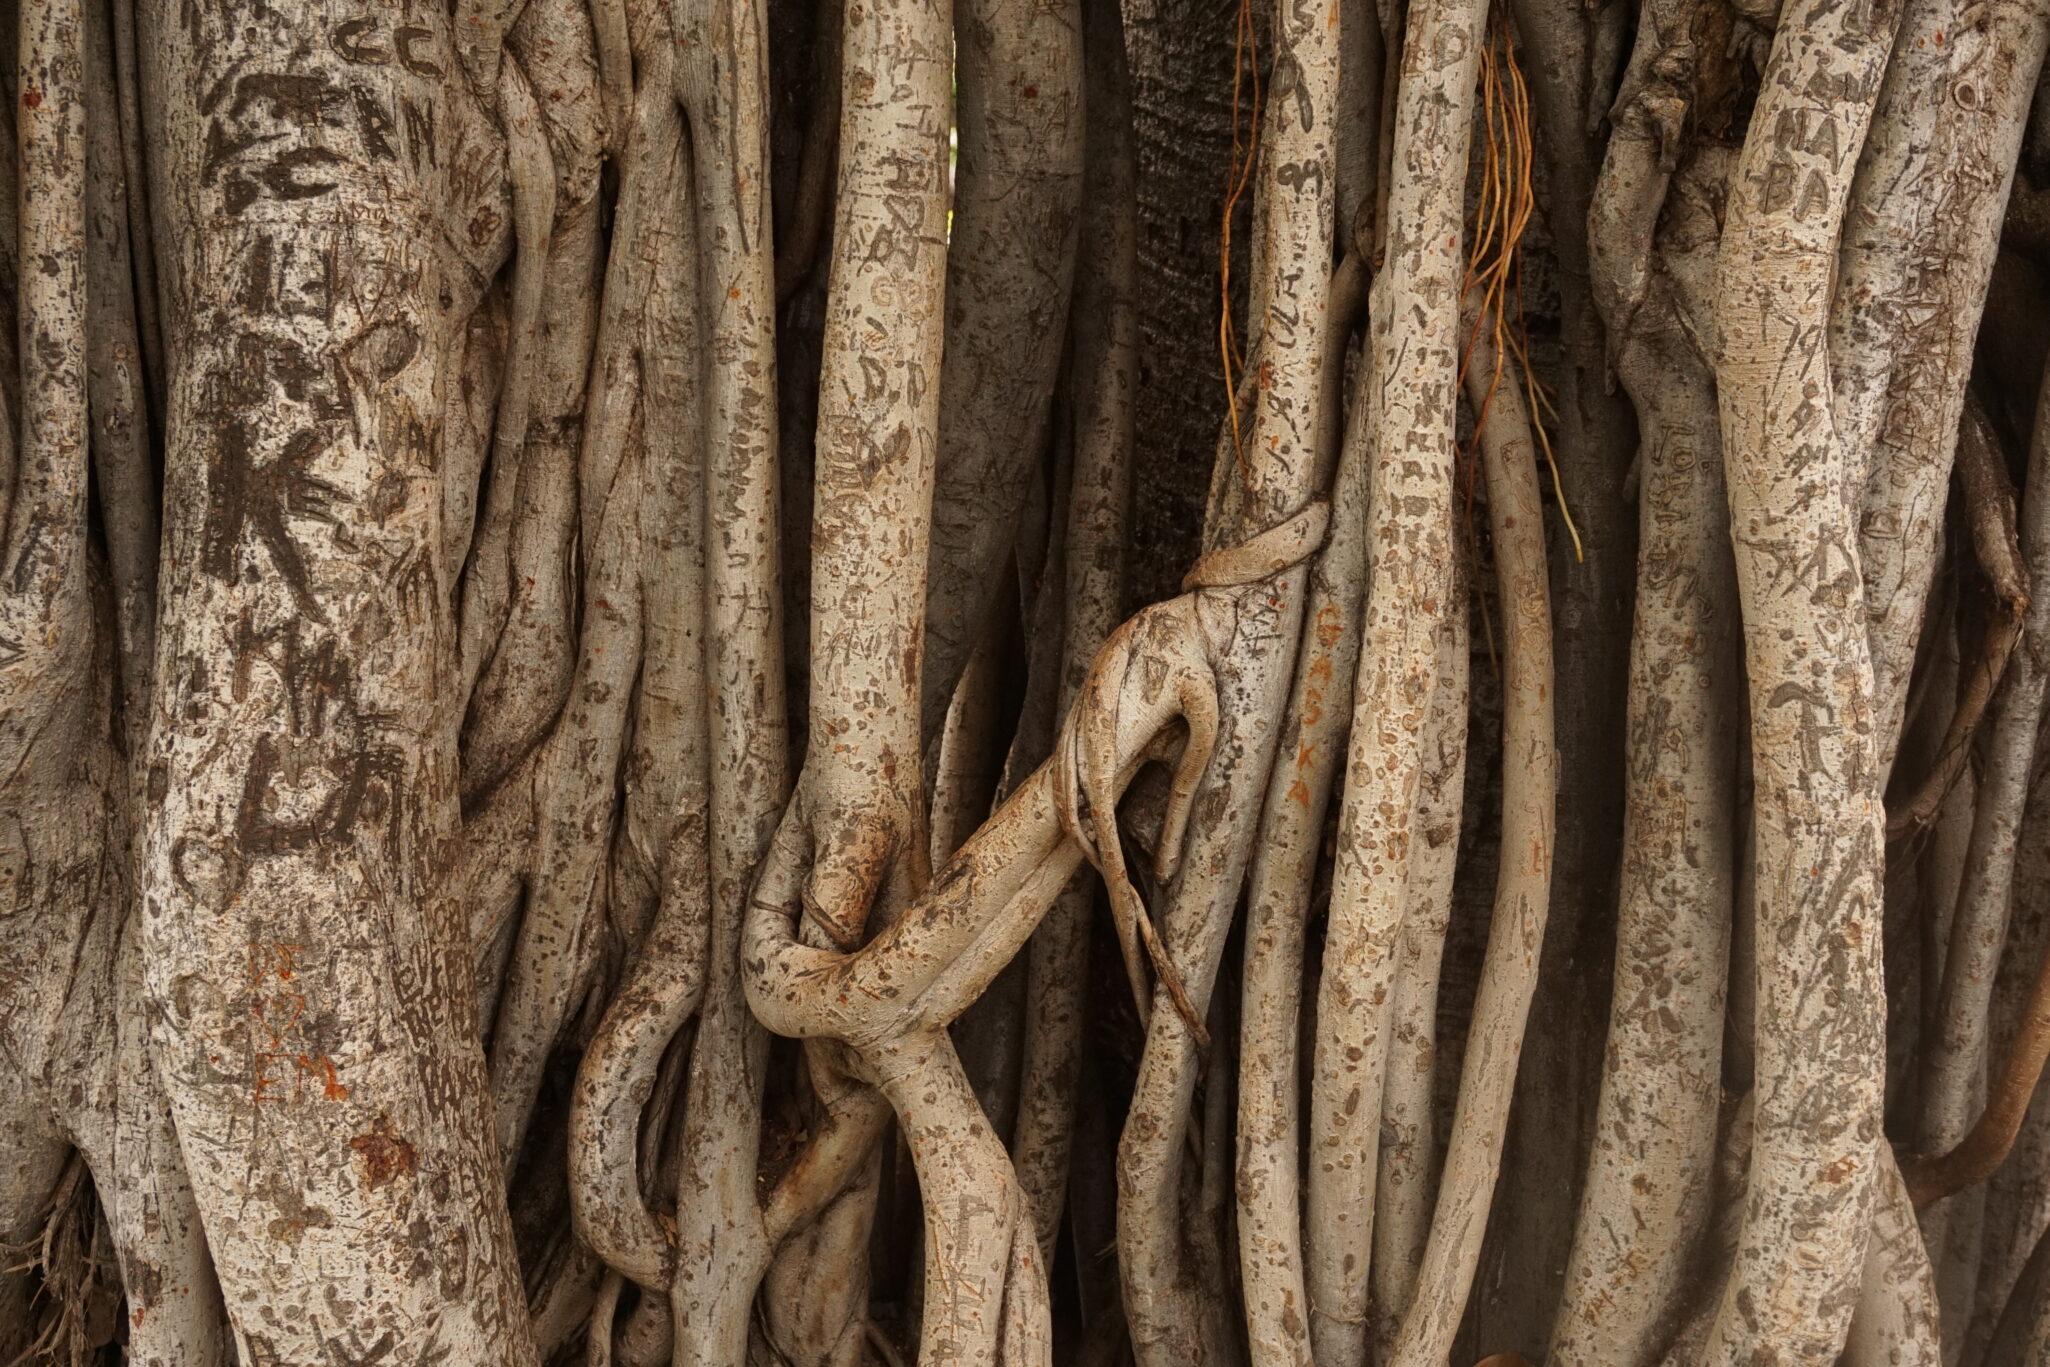
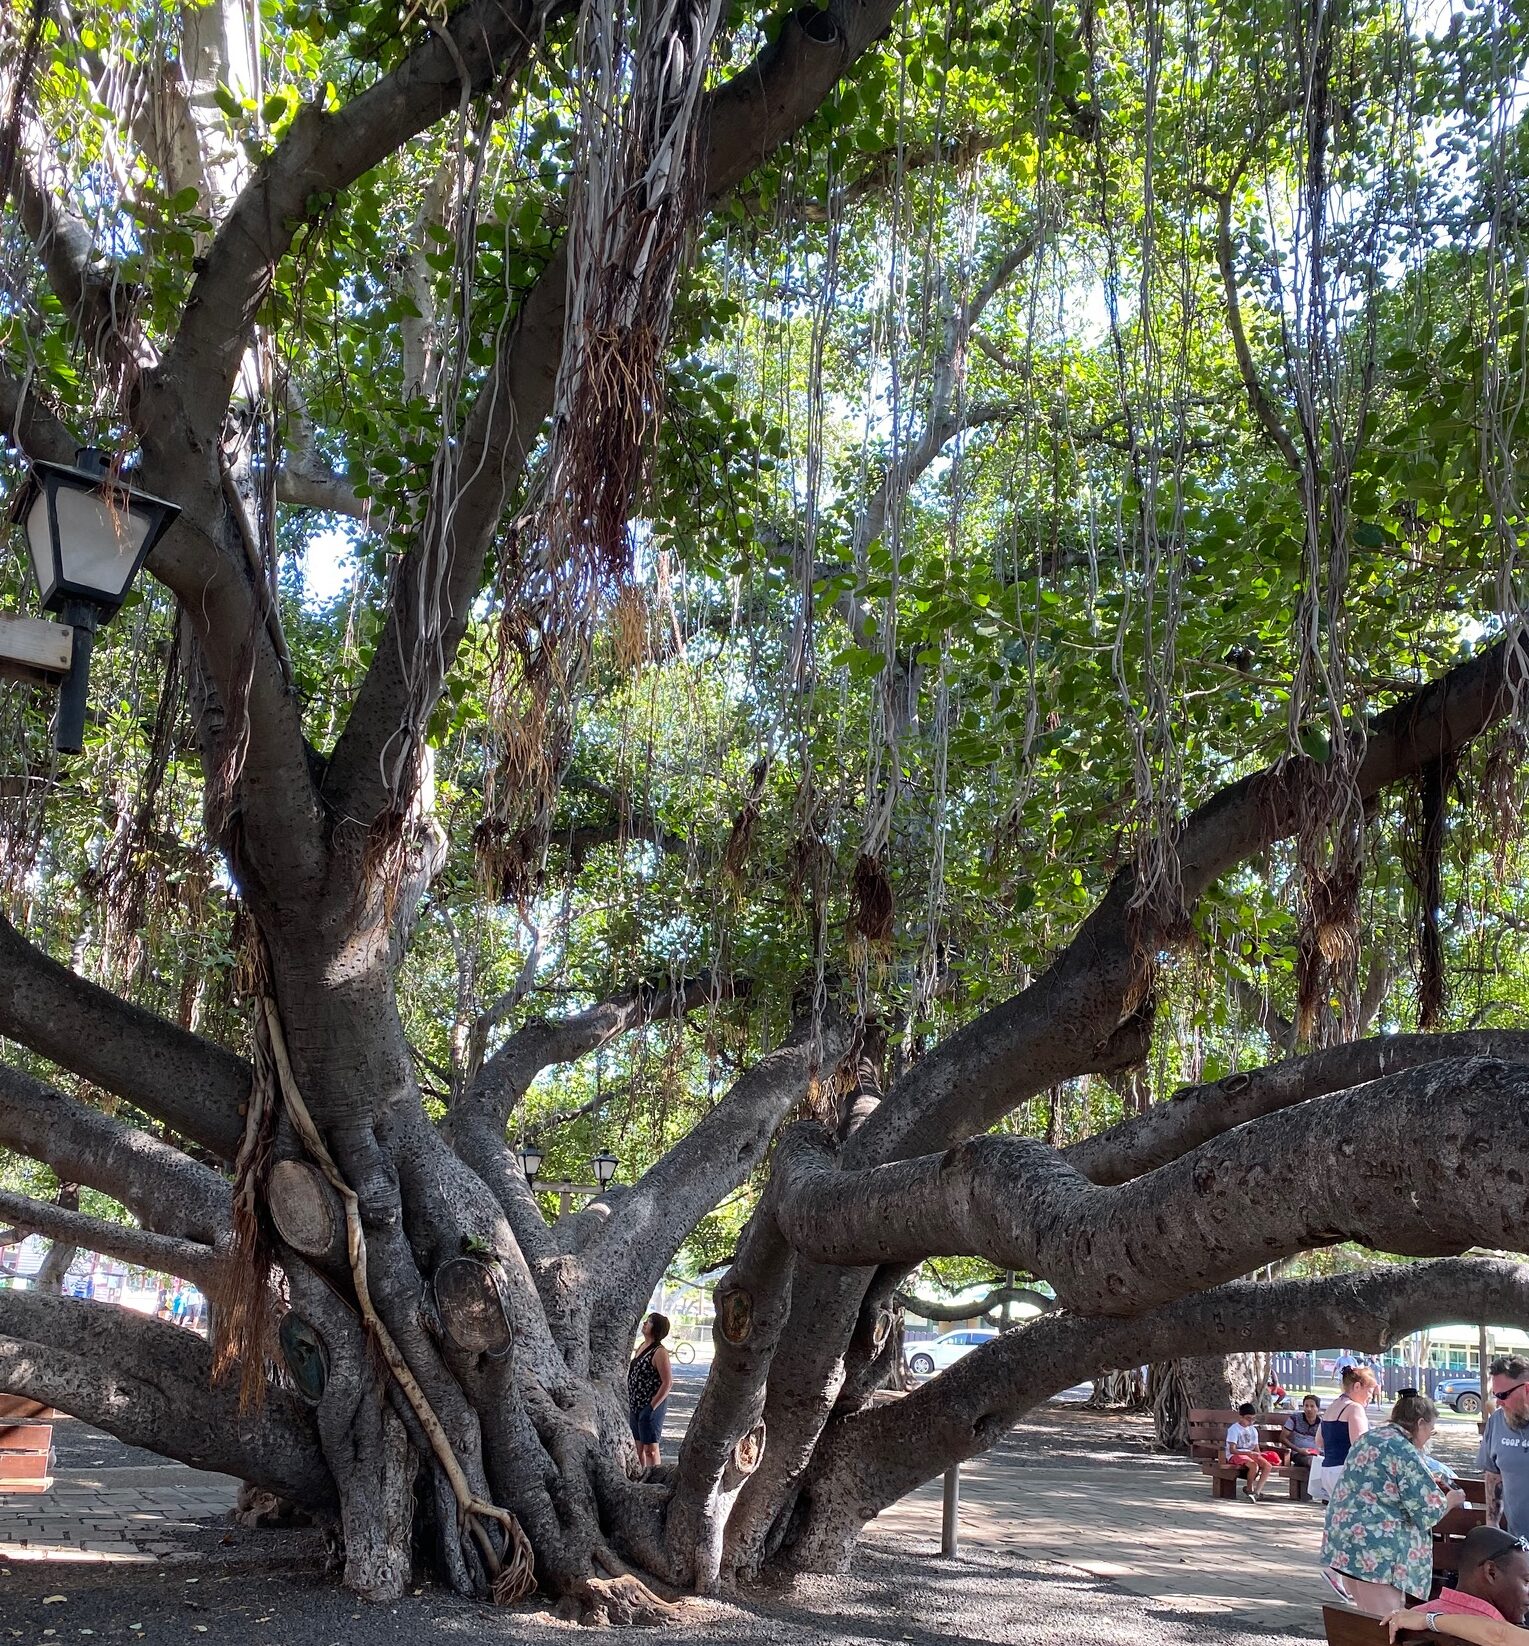
It sucks to feel helpless which is exactly how I felt while watching the coverage of the wildfires in Maui.  In a twisted way it brought back memories of a family trip to Maui right before COVID, to celebrate hubby’s birthday and retirement.  We spent his b-day in Lahaina.  We grabbed shaved ice at Ululani, strolled down Front Street, and took in the majesty and beauty of the ancient Banyan Tree in the heart of town.  The day ended with a scrumptious dinner at Lahaina Grill and a stroll on the beach.  The stark reality of the devastation in Lahaina jolted me out of my memories and morphed into a voice in my head, “how are you going to help, Deb”.

Today, in the midst of the ruins, that Banyan Tree is struggling to survive.  Arborists are hopeful that the tree will survive, emblematic of the resiliency of the people of Maui.

I resorted to what I do when I am sad or stressed and feeling helpless, I bake.  For a box of homemade goodies, I asked friends and family to donate any amount to either Chef Hui Maui Relief to help feed folks displaced by the fire, and to Hawaii Community Foundation/Maui Strong to provide immediate and long-term resources for recovery.

A Big Mahalo

We raised over 1,500 dollars which was split between the two organizations ❤️❤️❤️.  Thank you for your generosity and for giving me a reason to bake!   👏👏👏.  It is greatly appreciated.

The Box

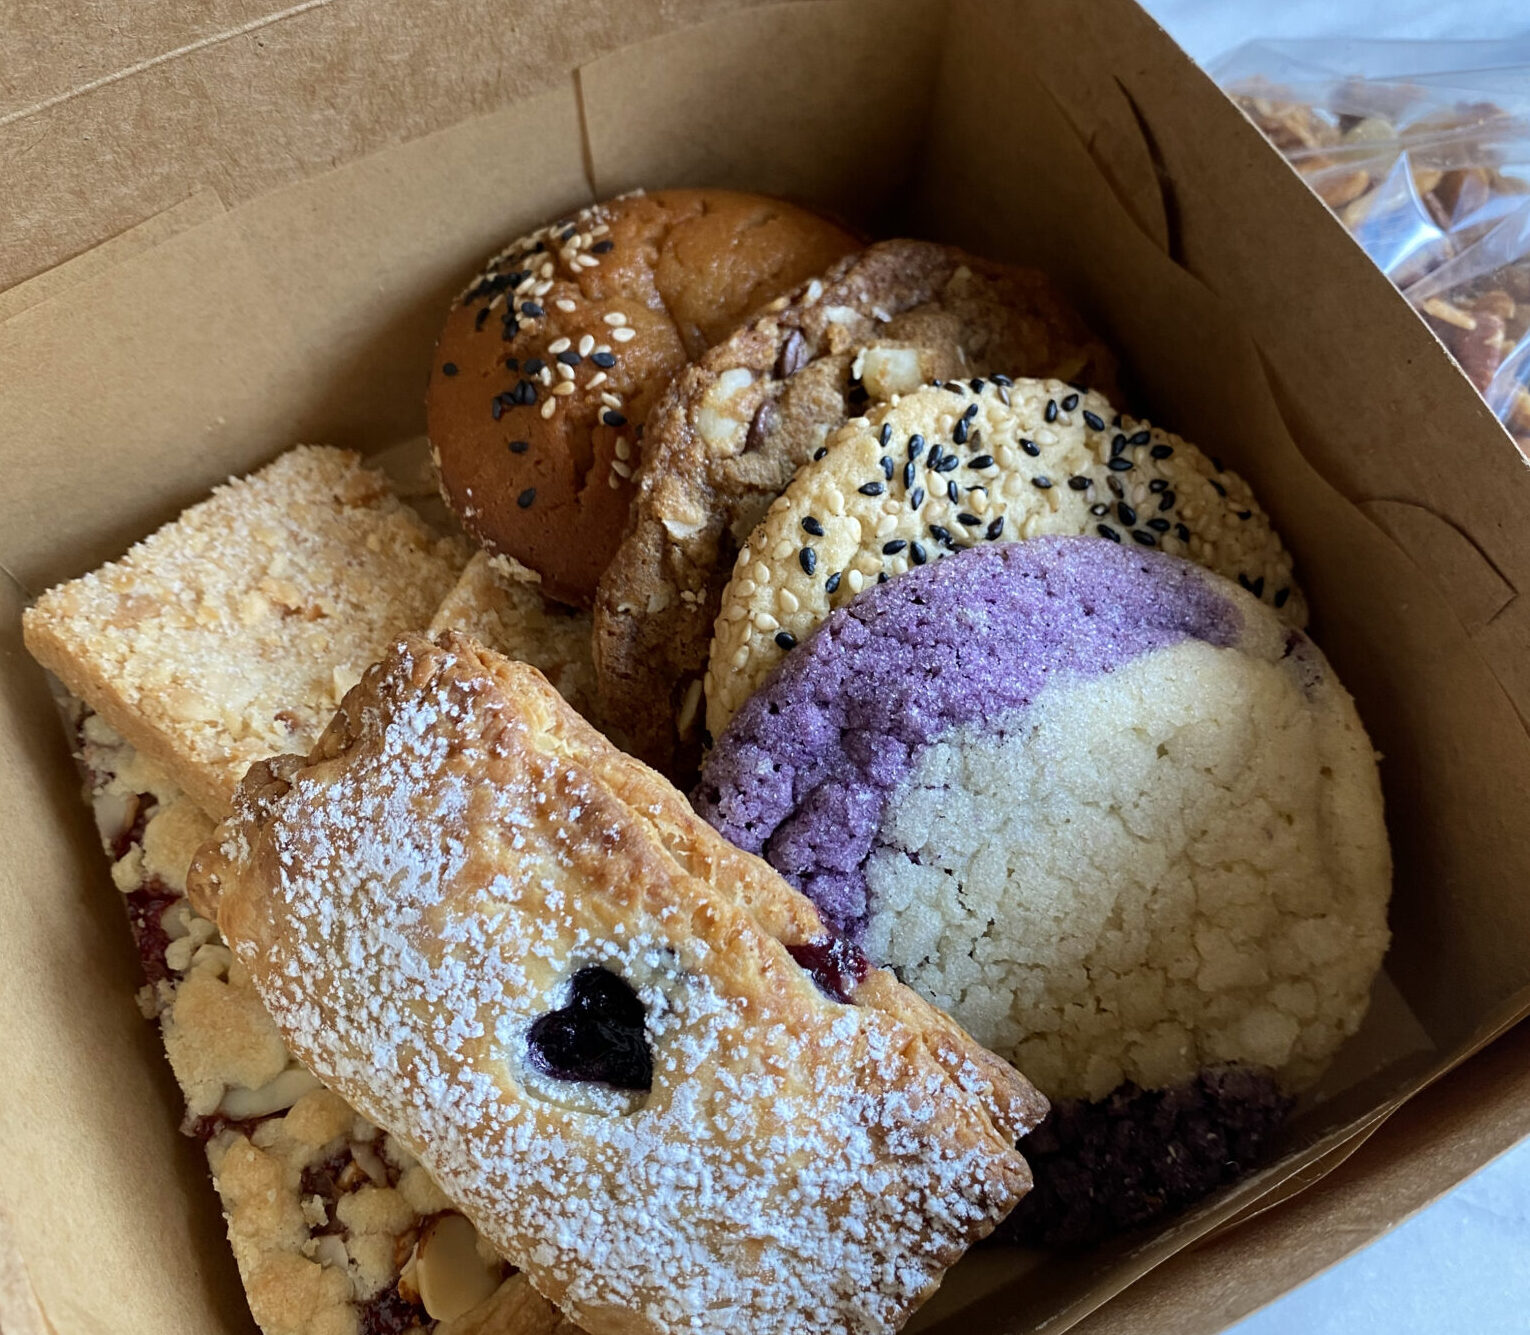
I wanted the box of cookies to feel connected to Maui in some small way.  I turned to cookbooks and blogs written by folks from Hawaii like Top Chef Sheldon Simeon and Alana Kysar. Sheldon has two restaurants on Maui, Tin Roof and Tiffany’s, and recently published his cookbook, Cook Real Hawai’i.  Alana is a blogger and the author of Aloha Kitchen Cookbook.  Her cookbook evokes the spirit of islands and her Butter Mochi recipe is amazing.  Find these books at Bookshop.org which supports independent bookstores.  I also culled recipes using my favorite tropical ingredients like pineapple, macadamia nuts, and coconut.  All of these baked goodies are on 3Jamigos or will be soon, promise.

Starting at the top right:
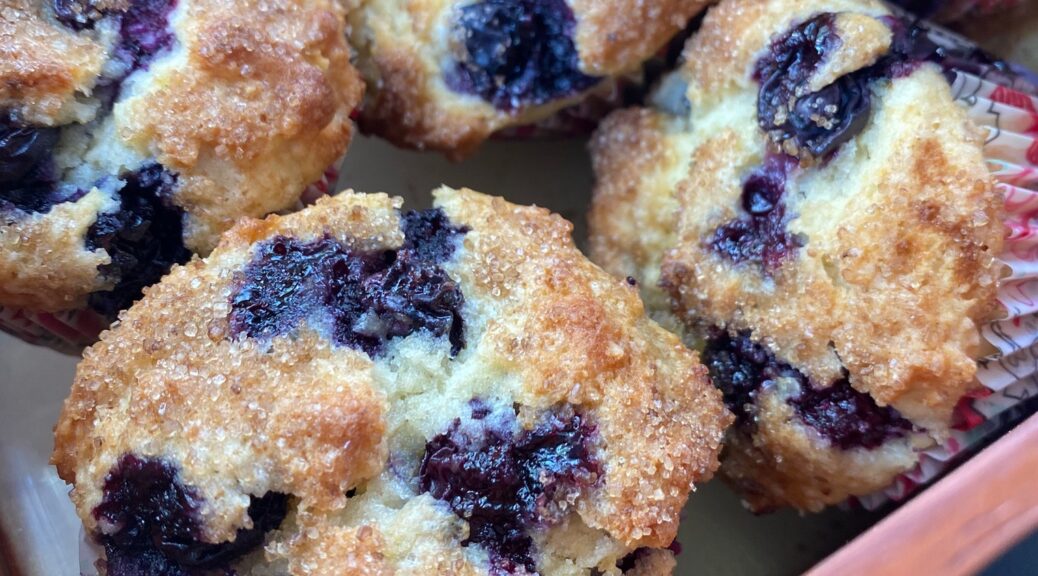
Travel Bites

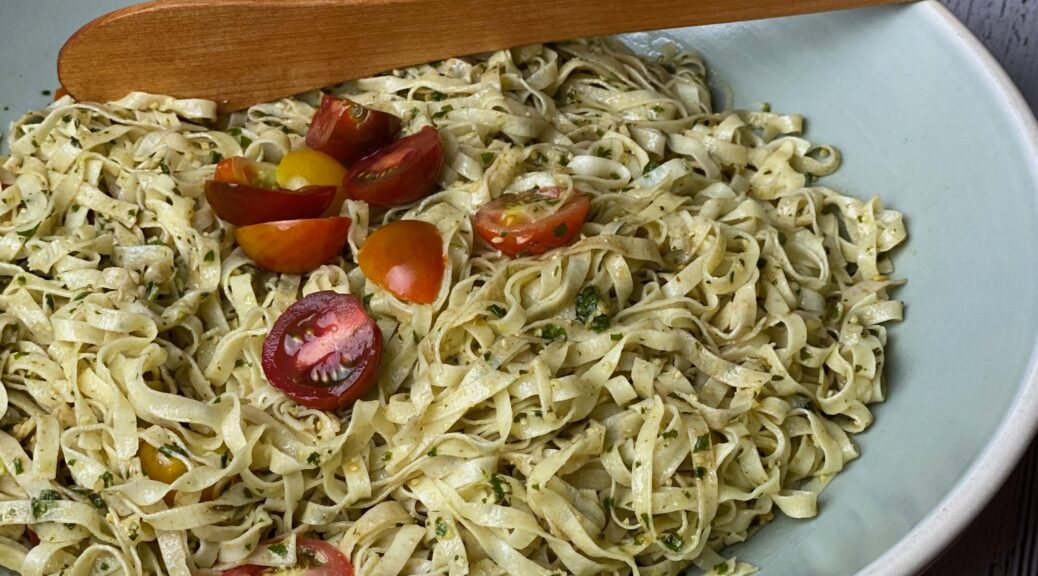
Shortbread is perfect for a box, they travel well, keep longer than drop cookies and just happen to be my favorite cookie.  I found the perfect recipe in Nick Malgeri’s Modern Baker.  Using your food processor to make these cookies really makes it quick and easy.  This is one bowl (albeit, a food processor bowl) territory.

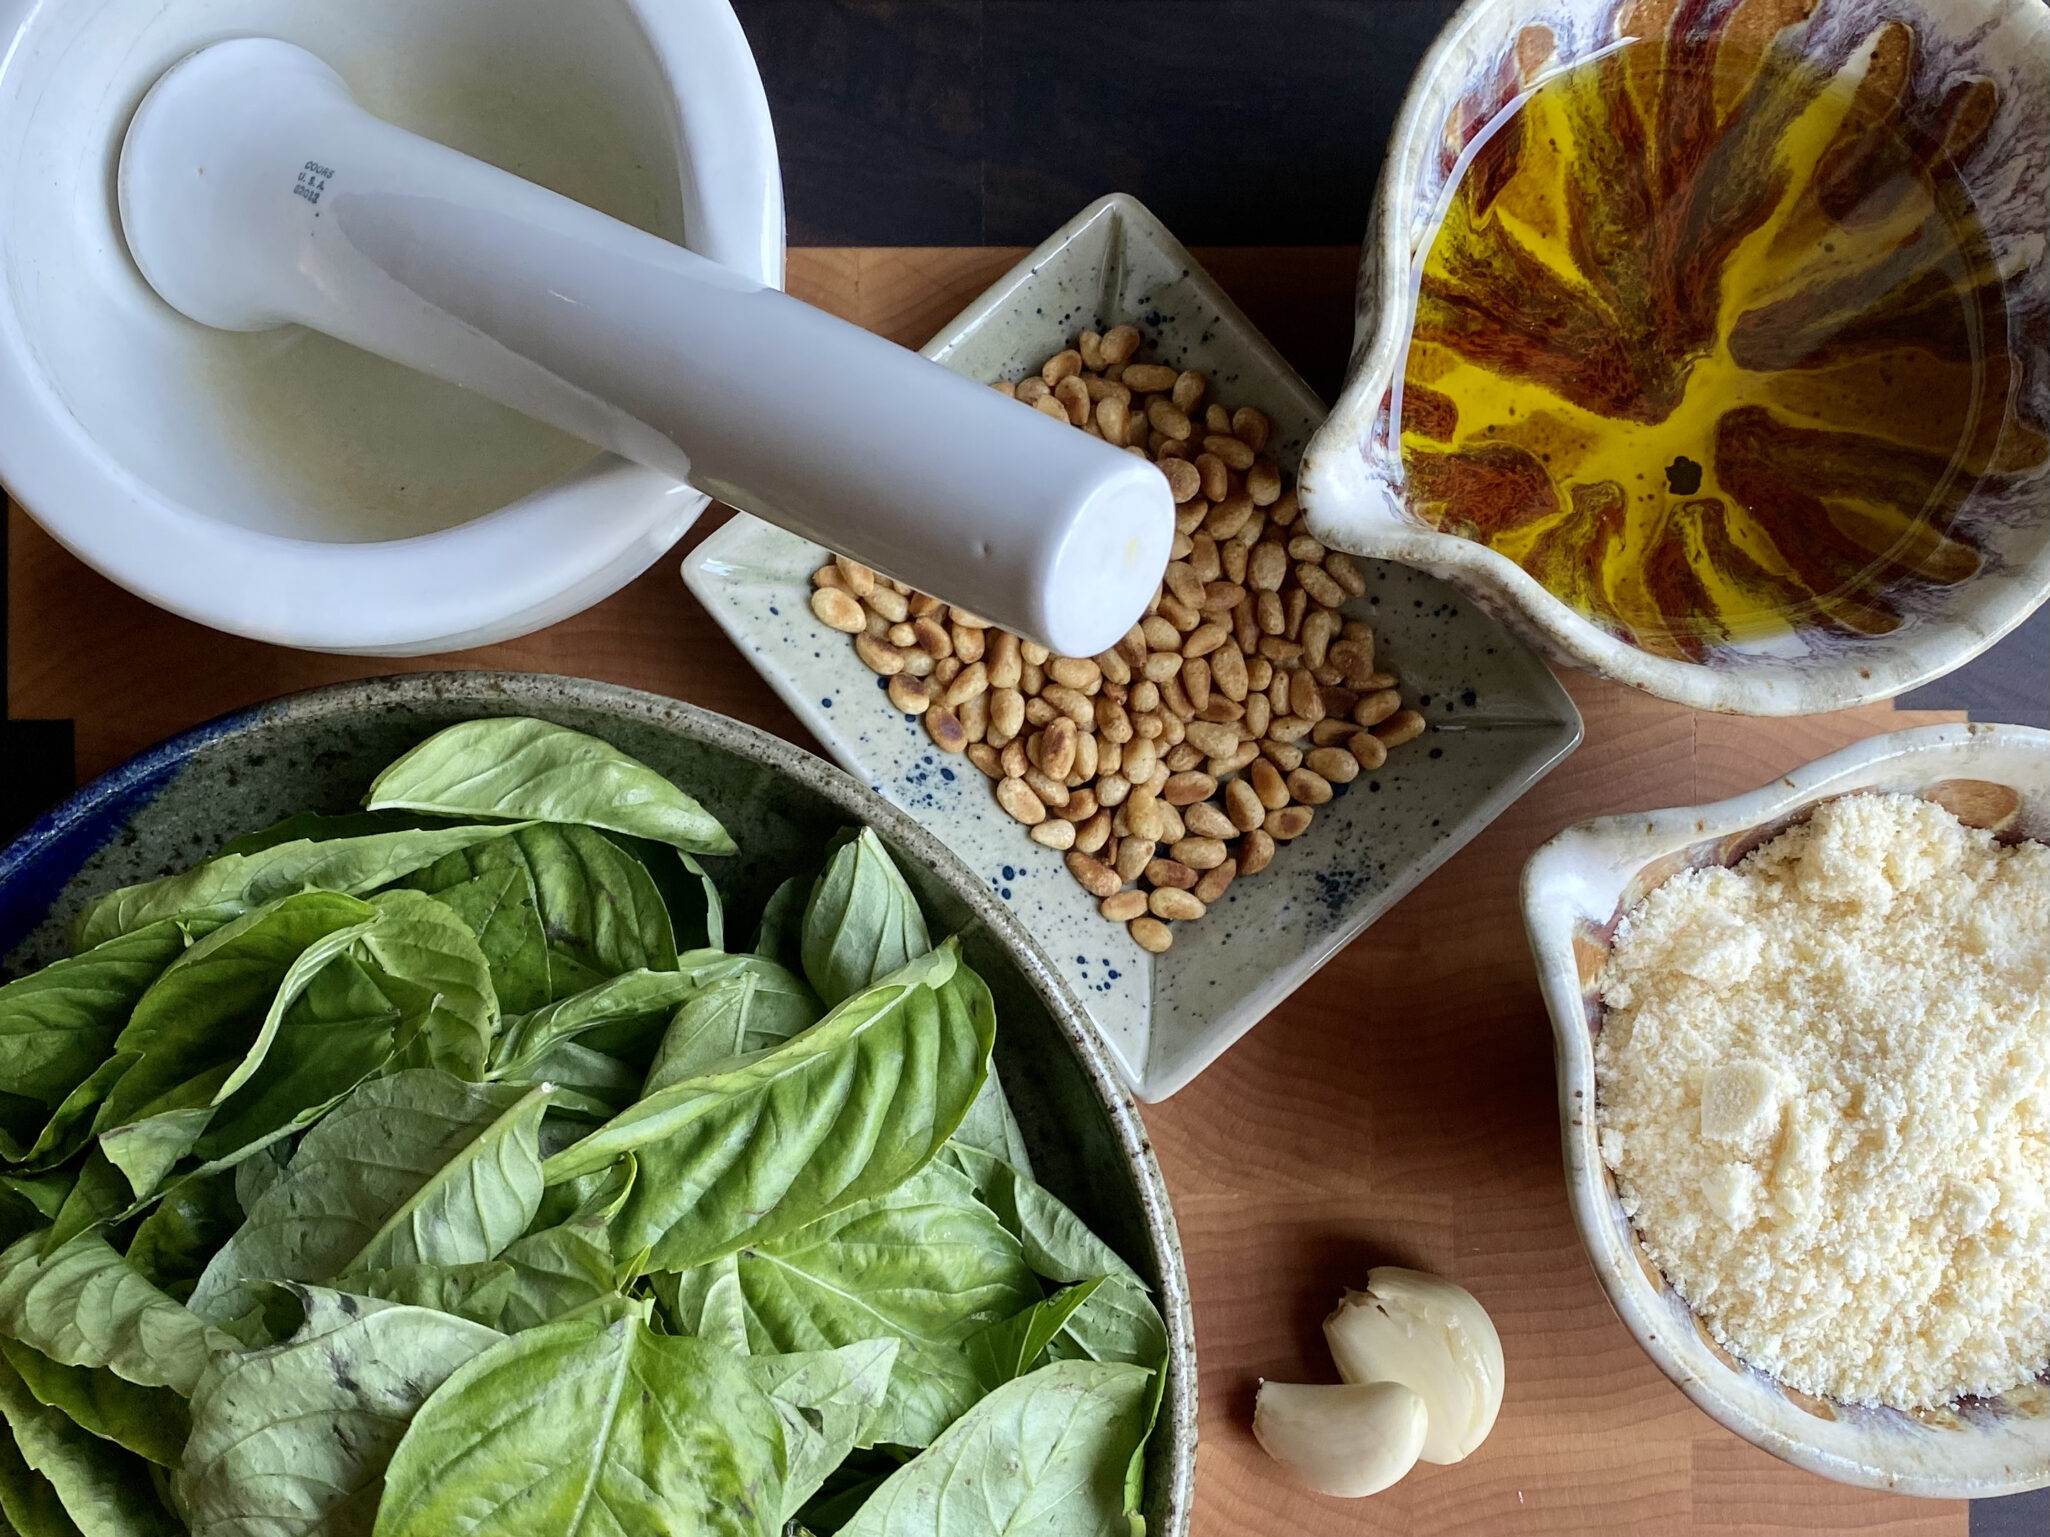
Process the nuts with the sugar until FINELY ground, add flour and baking powder, pulse to combine, add cold butter, and pulse until the dough is powdery then STOP.  Pour this mass into your prepared pan and press it down with a lightly floured flat glass or your hand.  Use a spray bottle to mist the dough with water which will help the nuts adhere to the dough.

Use either lightly salted or unsalted macadamia nuts.  I bought macadamias at Trader Joe’s, a bag of each, salted and unsalted. I used a 2:1 ratio of salted to unsalted nuts both in the cookie and on the top.  Cut the recipe in half and bake in an 8×8 pan as I did…cause I would eat the whole damn pan if given the chance.

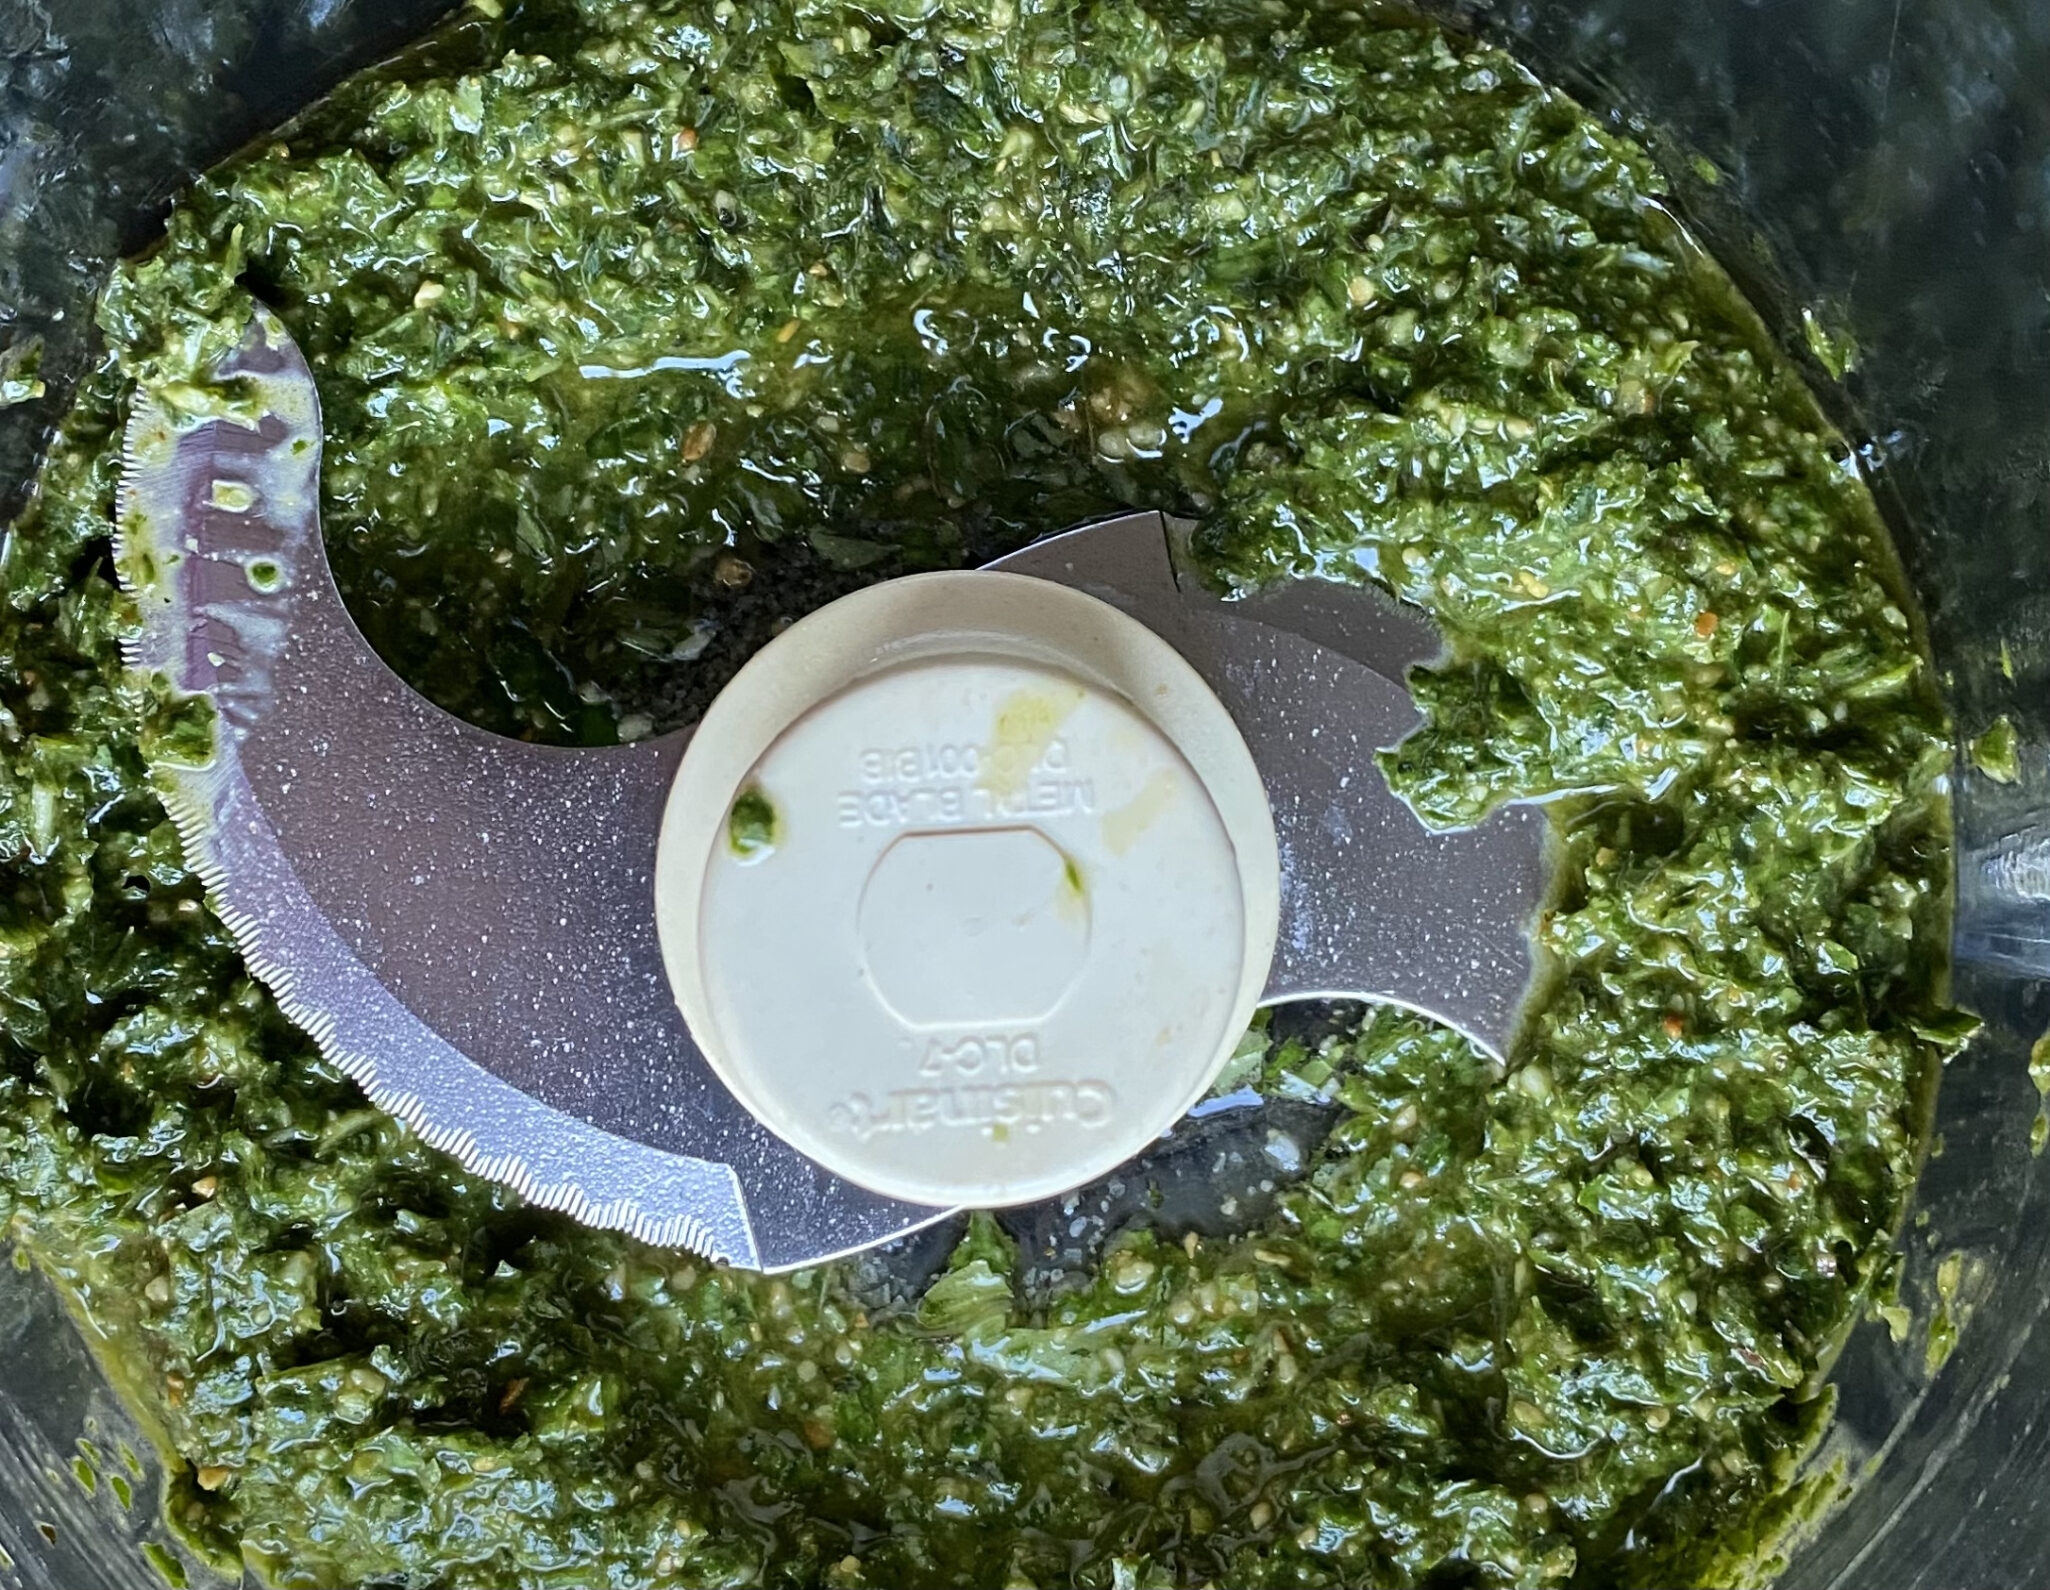
Grind nuts by pulsing in a food processor or chopping by hand.  You want the pieces fairly small, but not pulverized. The nuts provide both flavor and texture.  Line the pan with parchment.  The OG recipe calls for lifting the cookies out of the pan using the parchment but that’s pretty hard to do and not crack it.  I let them cool for a couple of minutes and then used a bench scraper to cut the still-warm shortbread into squares before removing them from the pan.  Easy-peasy.

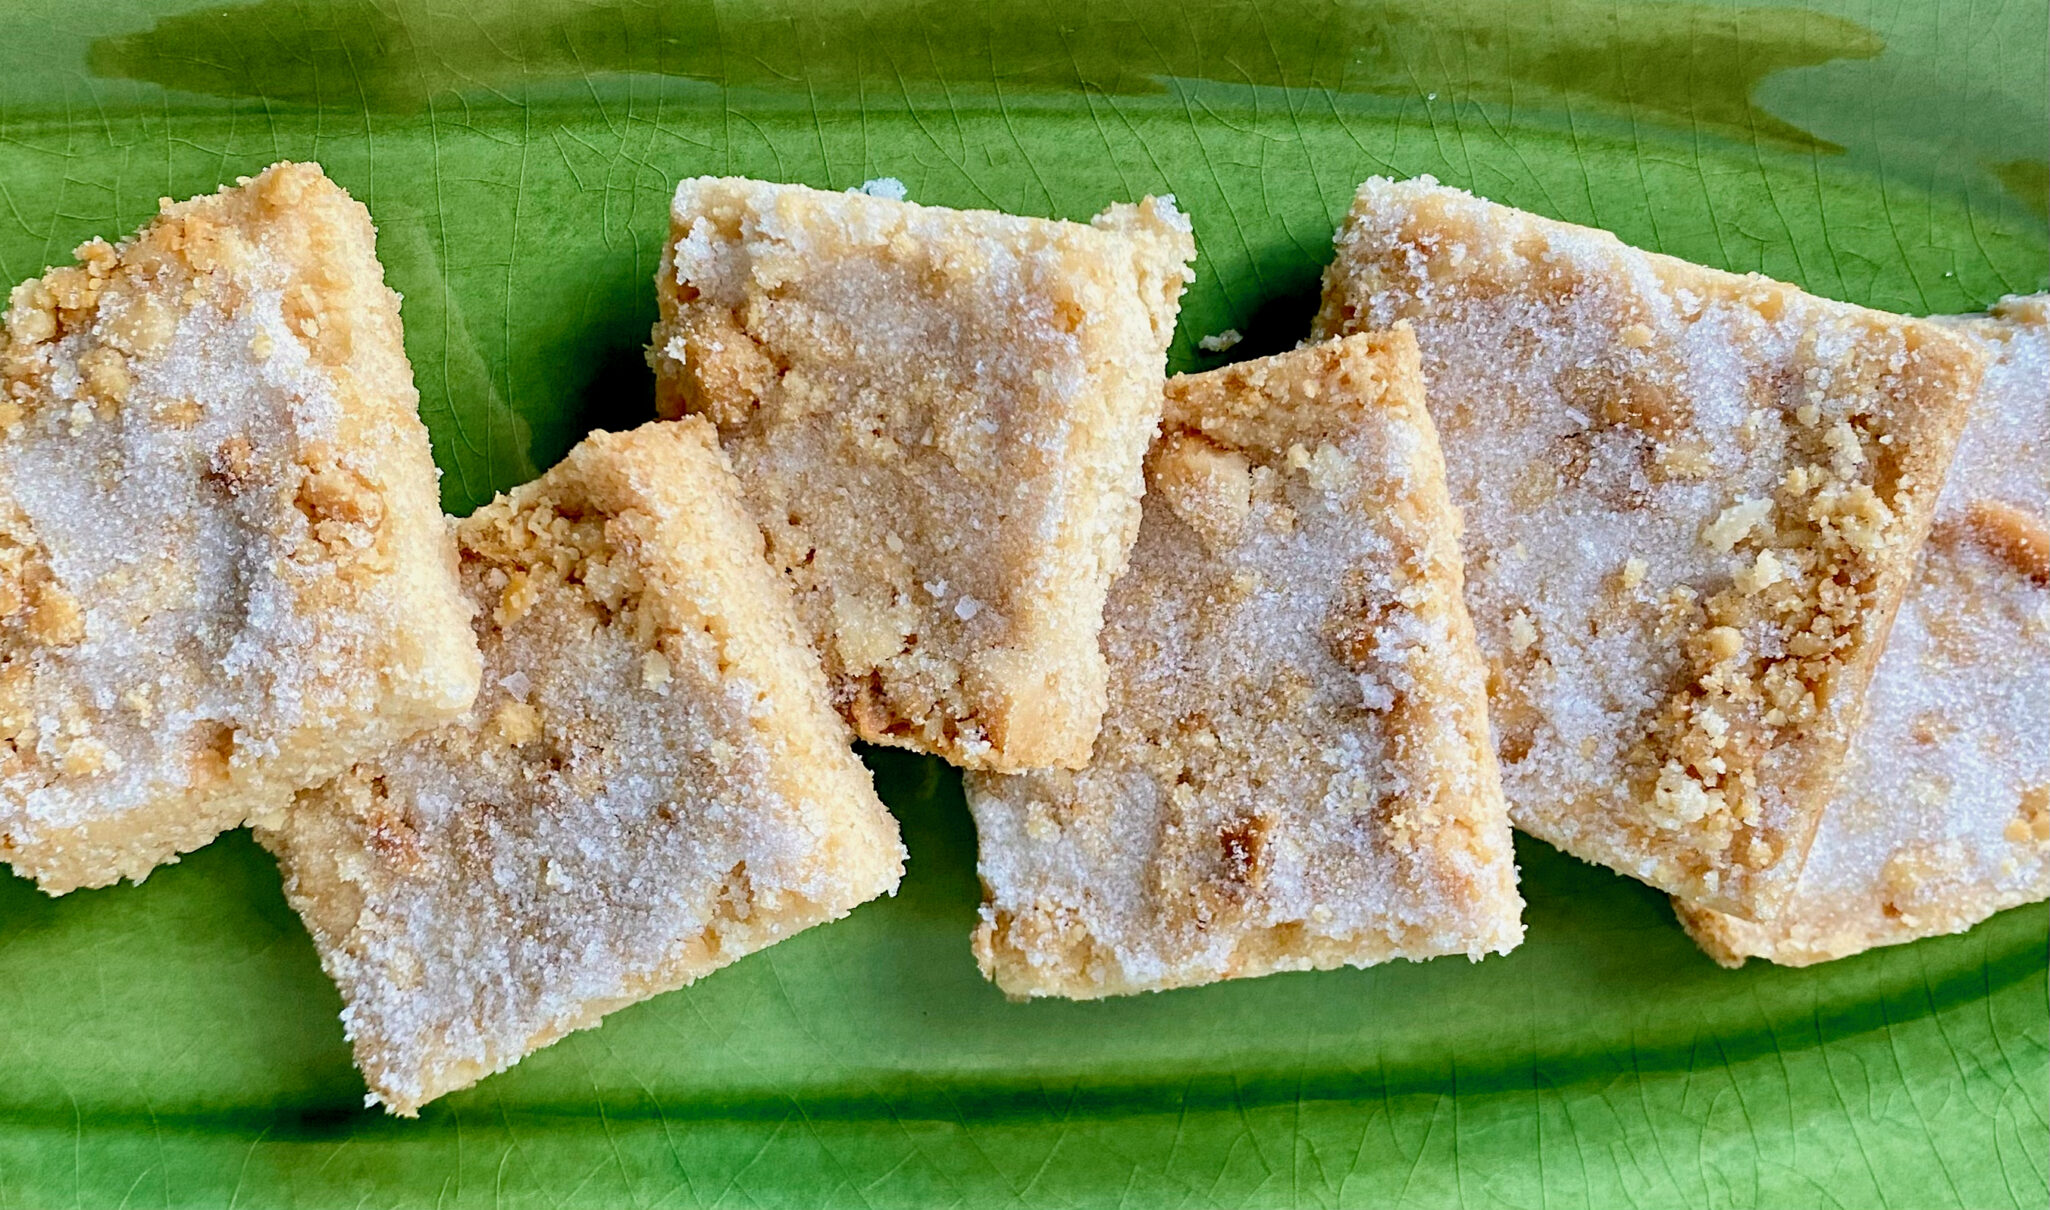
The finished cookie should be crispy.  If they aren’t, return the shortbread to the oven set at 300 degrees for 10-15 minutes.  I love these cookies, sweet, crispy, infused with macadamia nut flavor, and just delightful.

MACADAMIA SHORTBREAD

Adapted from Nick Malgeri Modern Baker, an easy, delicious Macadamia Shortbread. Buttery, nutty, crispy with a crunchy top of nuts and sugar. Simply divine.
Course Dessert
Cuisine American
Keyword butter, Crispy, macadamian nuts, Shortbread
Prep Time 20 minutes
Cook Time 30 minutes

Equipment

  • 1 food processor
  • 1 9x13 pan
  • parchment paper to line pan

Ingredients

Shortbread Base

  • 1/2 cup granulated sugar 100gm
  • 1-1/2 ounces unsalted or lightly salted macadamia nuts, chopped 42gm
  • 2-1/4 cups all-purpose flour 270gm
  • 1/2 teaspoon baking powder
  • 12 tablespoons cold unsalted butter, cut into tablespoon-size pieces 170gm

Topping

  • 1/3 cup granulated sugar 67gm
  • 3/4 cup unsalted or lightly salted macadamia nuts, finely chopped 111gm

Instructions

  • Preheat oven to 325°F. Line a 9″x 13″x 2″ baking pan with parchment paper or foil, leaving a couple of inches hanging over each short side. Butter the lining.
  • Combine 1/2 cup sugar and 1 & 1/2 ounces macadamias, (I use both salted and unsalted nuts in a 2:1 ratio) in a food processor. Pulse until finely ground. Add the flour and baking powder. Pulse until mixed. Add the butter and pulse until the mixture is combined and powdery.
  • Using a lightly floured, flat bottom glass or hands, press the dough firmly into the bottom of the prepared pan. Sprinkle the top of the dough with water. Sprinkle the finely chopped macadamias and then 1/3 cup sugar on top of the dough. Press firmly into the dough.
  • Bake for 30-35 minutes, or until the cookies are golden and firm.
  • While the cookies are still warm, use the overhanging lining to remove the cookies from the pan onto a cutting board. Cut into squares, using a sharp knife.
  • Let the cookies cool completely. They should become crisp as they cool. If they aren’t crisp after cooling, place them back in the pan and bake for 10-15 minutes at 300°F.

Pesto, Pesto, Which One is Besto? (The OG One or the Guilt Free One)

Pesto, Pesto, Which One is Besto? (The OG One or the Guilt Free One)

A favorite pasta dish in our house is Pesto with Linguine.  Years ago (I mean YEARS AGO), I clipped the LA Times winning Pesto recipe from their Basil Festival. The recipe was from the restaurant, Casa Monica, and has been my go-to Pesto ever since.  It starts with fresh basil leaves, garlic, pine nuts, Parmesan Cheeses, and olive oil, very traditional, but finishes with Pecorino Romano, fresh tomatoes, and a healthy (lol) dollop of butter.  Boom, Besto-Pesto.

Alas, as much as we love Pesto, it is tough on the waistline so when we have an itch for Pesto, we turn to the Minimalist Baker and their version of Pesto. Water stands in for much of the oil and nutritional yeast replaces the cheese.  It’s tasty enough to satisfy your Pesto craving and it’s guilt-free.

Let’s Start at the Very Beginning- OG Pesto

Traditionally, Pesto is made with mortar and pestle.  Take the path of least resistance and use a food processor or blender.  It makes quick work of Pesto making.

Pesto is not only great on pasta, but drizzled on fresh tomatoes and mozzarella, as a sauce on chicken or fish,  or blended with mayo for a sandwich spread.

Calorie Worthy…occasionally.  After a long hike, bike ride or walk-go for it!

CASA MONICA PESTO

LA Times Basil Festival
Course dinner, pasta
Cuisine Italian
Keyword Angel hair pasta, italian, linguine, Pesto, recipe
Prep Time 20 minutes
Cook Time 20 minutes
Servings 6 servings

Ingredients

Pesto Sauce

  • 2 cups packed basil
  • 2 cloves garlic crushed
  • 2 tablespoons lightly toasted pine nuts
  • 1/2 cup extra virgin olive oil
  • 1 teaspoon salt
  • 1/2 cup freshly grated parmesan cheese Grate cheese in food processor
  • 2 tablespoons freshly grated romano cheese Grate cheese in food processor
  • 3 tablespoons softened butter

Pasta & Finishing Touches

  • 3-4 medium tomatoes peeled and seeded
  • 1 pound linguine
  • 1 tablespoon butter

Instructions

Making the Pesto

  • Toast pine nuts in a small dry skillet over medium heat. Set aside to cool.
  • Place garlic, pine nuts and salt in food processor bowl, pulse a couple of times. With processor running add olive oil. Once the garlic and nuts are minced, add basil. Process until the basil leaves are finely minced but do not overprocess as the leaves will darken.
  • Beat in cheeses by hand, then butter.
  • Mince tomatoes very fine with a sharp knife. Tomatoes should not be pureed or mashed.

Making the Pasta

  • Cook linguine in boiling salted water until tender but firm as directed.
  • Drain noodles, reserving some of the pasta water. Add a small amount of butter to pasta. For each serving, add some tomatoes to the linguine, then add pesto, mix quickly and serve at once.
  • Makes about 1 1/2 cups sauce. Approximately 6-8 servings.

Notes

To store:  Place pesto in a small container and cover with a thin layer of olive oil to prevent oxidation.
To make Pesto Pasta Salad- add pesto to pasta to taste. Add toasted pinenuts, cherry tomatoes and poached chicken and /or corn kernels.

The Lean and Mean Pesto

A guilt-free stand-in for Pesto.  Fits the bill when you are counting calories!

Vegan Pesto

A delightful vegan pesto adapted from Minimalist Baker. Use it just like traditional pesto!
Course Sauce
Cuisine Italian, vegan
Keyword basil, easy recipe, Pesto, pine nuts, sauce, vegan, Vegan pesto
Prep Time 10 minutes

Equipment

  • 1 food processor You could use a mortar and pestle

Ingredients

  • 2 cups packed fresh basil leaves
  • 3 Tbsp toasted pine nuts Can substitute walnuts
  • 3 large cloves garlic peeled
  • 2 Tbsp lemon juice
  • 3-4 Tbsp nutritional yeast
  • 1/4 tsp sea salt plus more to taste
  • 2-3 Tbsp extra virgin olive oil*
  • 3-6 Tbsp water plus more as needed

Instructions

  • To a food processor or small blender, add the nuts, garlic, lemon juice, nutritional yeast, and sea salt and pulse to mince nuts and garlic. Add basil leaves to bowl. With the machine running, stream half of the olive oil. Stop the machine and scrape down the side of the bowl. Stream the remaining olive oil. You should have a nice paste. Try to use the pulse button to avoid over-processing.
  • Then add 1 Tbsp (15 ml) water at a time until the desired consistency is reached - a thick but pourable sauce. Use the pulse function on your processor to avoid over-processing the basil.
  • Taste and adjust flavor as needed, adding more nutritional yeast for cheesy flavor, or salt if it needs it.

Notes

Adjust the amount of nuts or garlic to taste.  Like a garlicky pesto, use more garlic.
Store leftovers covered in the refrigerator for up to 1 week. After that, pour remainder into ice cube molds, freeze, and store for up to 1 month or more.
Use this sauce as you would a traditional pesto with pasta, add to mayo for a Sammie spread, or thin it and drizzle on veggies.
Corn, Tomato, & Avocado Salad (Summer Fun)

Corn, Tomato, & Avocado Salad (Summer Fun)

Every weekend I look forward to going to our local farmer’s market.  Well, except for when I have to schlep everything I couldn’t resist getting, back to my car.  For example, today my Sherpa trip included 6 ears of fresh, sweet corn on the cob (corn is heavy-who knew?), a sun-kissed orange honeydew, a bushel of peaches and nectarines (well, it felt like a bushel), some gorgeous deep purple eggplants, vine-ripened, ginormous heirloom tomatoes for sammies, ruby-red strawberries and sweet-tart blackberries. Yep, all in a day at the market.

Why so many ears of corn?  Last week, a friend brought this Corn Salad to an end-of-summer dinner and all I could think of was making a vat for myself (yes, vat).  In addition, my favorite fresh corn recipe is Elote Corn, or Mexican Street Corn. Corn on the cob, grilled, slathered with mayonnaise, sprinkled with chile powder or Tajin, Cotija Cheese, and finished with a squeeze of lime.  If Kevin Costner had an Elote stand on the third baseline in Field of Dreams, they wouldn’t even have had to play baseball.  Just shuck that corn cause “If you grill it, they will come.”  I needed a lot of corn if I was going to enjoy both dishes this week.

Summer Salad Fun

This Corn, Avocado, and Tomato Salad comes in a close second to Elote Corn.  The crunchy corn, creamy avocado, and sweet, tart tomatoes all work together.   You could make it with frozen corn but save that for a cold winter day when you need a bit of sunshine and fresh corn is nowhere in sight.

Cook the corn as you like.  Throw the cobs on the grill, or boil them for a couple of minutes.  My method involves microwaving the corn for about 2-3 minutes, husk on, removing the husk, and charring the corn over an open flame.  Cool the corn then cut the kernels off the cob.

The rest is easy, toss all the ingredients in a bowl, add the dressing, and gently mix.  Let the dressed salad sit for 15 minutes.  Garnish with cilantro leaves and scallions and serve.  The salad goes well with ANYTHING if you ask me.  Perfect for a potluck, block party, or summer barbecue.

Make this salad your own.  Add red bell peppers or cucumbers for crunch.  Change the flavor profile by adding different spices or cheeses like Cotija or Feta.  Enjoy!

Corn, Tomato and Avocado Salad

Perfect for summer bbqs and potlucks! Corn, Tomato & Avocado Salad
Course Appetizer, Salad
Cuisine American
Keyword avocado, cherry tomatoes, Corn on the cob, corn, tomato, & avocado salad, lime
Prep Time 20 minutes
Servings 4 servings

Ingredients

For the Salad

  • 3-4 ears fresh corn approximately 3 cups. You can use frozen corn off-season
  • 1 ripe avocado diced
  • 1 cup cherry tomatoes halved
  • 1/4 cup red onion finely chopped or thinly sliced
  • 1/4 cup fresh cilantro plus some for garnish chopped

For the Dressing

  • 2-3 tablespoons of lime juice 1-2 limes
  • 3 tablespoons olive oil
  • 2 cloves garlic minced
  • 1/2 teaspoon cumin

or instead of Cumin

  • 1 teaspoon Tajin seasoning adjust to taste
  • Salt and pepper to taste

Options!!!

  • 1/4 cup red bell pepper, de-veined, de-seeded, diced
  • 1/4 cup cucumber, de-seeded, diced
  • 1/2 jalapeno deveined, deseeded, finely diced
  • 1/4 cup Cotija cheese, crumbled
  • 1-2 stalks green onions, chopped for garnish

Instructions

For the Corn:

  • You can cook the corn however you like boil, grill or microwave. My method: Microwave corn, husk on for 3-3.5 minutes. When cool enough, shuck the corn. To char the corn, microwave for 2.5-3 minutes, shuck, and then using metal tongs, hold over open flame, rotating the corn until it is charred to your liking. It is not necessary to char, I like the added color and hint of smokiness.

For the Salad:

  • In a large bowl, combine the cooked and cooled corn, diced avocado, halved cherry tomatoes, finely chopped red onion, and chopped cilantro.
  • If you add red bell pepper or cucumbers, increase the amount of dressing to taste
  • In a small bowl, whisk together the lime juice, olive oil, garlic, cumin or Tajin seasoning, salt, and pepper until well combined.
  • Pour the dressing over the salad and gently toss to coat all the ingredients with the dressing.
  • Taste and adjust the seasoning if needed. Add more seasoning, lime juice, salt, or pepper according to your preference.
  • Let the salad sit for about 10-15 minutes before serving to allow the flavors to meld.
  • Serve the salad chilled or at room temperature.
Baba Ghanoush (Roasted Eggplant Dip)

Baba Ghanoush (Roasted Eggplant Dip)

Right up there with Hummus, this eggplant dip is made with Tahini, garlic, lemon juice, parsley, and olive oil, and seasoned with cumin and smoked paprika. Eggplant contributes a lightness and creaminess different than chickpeas.  The smoked paprika and cumin add another level of smokiness, so delicious.  I adapted the recipe from Cookie + Kate, a wonderful blog filled with tips and great user-friendly veggie recipes.  This is definitely one of them.

Start with 2 medium globe eggplants and roast them, halved on a sheet pan until soft and charred.  The char gives the dip that nice smokey flavor.  This is by far the most timing consuming part of the recipe.  Luckily, there’s a hack for this below🧑🏻‍🍳.  Finishing the Baba Ghanoush is just a matter of stirring Tahini, lemon juice, olive oil, and seasonings into the eggplant-easy peasy. Tahini, a sesame seed paste, is a mainstay in Middle Eastern and Mediterranean Cuisine.  You can find Tahini in most supermarkets, TJ’s, or online.  Add a touch of cumin for earthiness and sprinkle it with either smoked paprika or sumac before serving.

Cheaters Sometimes Win

I have a confession, I don’t always have time to roast eggplants to make Baba Ghanoush.  Nope, sometimes I skip this and reach for the jar of grilled eggplant by Sadaf or Sera that I always keep on hand.  If you are in the South Bay (San Jose-Campbell area) a great store for Middle Eastern groceries is International Food Bazaar on Union.  It’s just grilled eggplant so it has the smokiness from the char and some citric acid for preserving.  Use approximately 1-1/2 cups, which is roughly equivalent to the roasted fresh eggplant.  Place the eggplant in a strainer for 15-30 minutes to drain the excess liquid.  It’s convenient and pretty darn yummy.  The jarred eggplant is pretty chunky so I use a food processor to make it.  Pulse ingredients, you don’t want to end up with a puree, pulsing allows for textural contrast.  Additionally, the dip can be made by hand, use a whisk or a fork to whip the ingredients to break up the larger pieces of eggplant.

Baba Ganoush

Baba ganoush made with oven-roasted eggplant, tahini, olive oil, lemon juice, and garlic! Adapted from Cookie + Kate
Course Appetizer, Munchie
Cuisine Middle Eastern
Keyword 3jamigos.com, baba ganoush, Cookie + Kate, eggplant
Prep Time 15 minutes

Ingredients

Use either fresh eggplant OR jarred eggplant (quick and easy)

  • 2 pounds Italian eggplants* about 2 small-to-medium eggplants*
  • 1-1/2 cups Jarred Grilled Eggplant I have used the brand Sadaf, available and most Middle Eastern stores.

Seasoning

  • 2 medium cloves of garlic pressed or minced
  • 2 tablespoons lemon juice more if necessary
  • ¼ cup tahini
  • ¼ cup extra-virgin olive oil plus more for brushing the eggplant and garnish
  • 2 tablespoons chopped fresh flat-leaf parsley plus extra for garnish
  • ¾ teaspoon salt to taste
  • 1/4-1/2 teaspoon ground cumin I LOVE Cumin, use to taste
  • Pinch of smoked paprika for garnish, or Sumac which will give it a touch of tartness

Instructions

Raw Eggplant Recipe

  • Preheat the oven to 450 degrees Fahrenheit with a rack in the upper third of the oven. Line a large, rimmed baking sheet with parchment paper to prevent the eggplant from sticking to the pan. Halve the eggplants lengthwise and brush the cut sides lightly with olive oil. Place them in the prepared pan with the halved sides down.
  • Roast the eggplant until the interior is very tender throughout and the skin is collapsing, about 35 to 40 minutes (this might take longer if you are using 1 large eggplant). Set the eggplant aside to cool for a few minutes. Flip the eggplants over and scoop out the flesh with a large spoon, leaving the skin behind.
  • Place a mesh strainer over a mixing bowl, then transfer the flesh to the strainer and discard the skins. Pick out any stray bits of eggplant skin and discard. You want to remove as much moisture from the eggplant here as possible, so let the eggplant rest for a 15-30 minutes and shake/stir the eggplant to release some more moisture.
  • Discard all of the eggplant drippings, drain and wipe out the bowl, and dump the eggplant into the bowl.

Jarred Eggplant

  • I cannot tell a lie, I will use jarred grilled eggplant in a pinch (or not) available in Middle Eastern stores. (In San Jose-International Bazaar) Use approximately 1-1/2 cups of the jarred eggplant. Drain eggplant just like the roasted eggplant and proceed.

Directions for both roasted eggplant or jarred

  • Add the garlic and lemon juice to the eggplant and stir vigorously with a fork until the eggplant breaks down. Add the tahini to the bowl and stir until it’s incorporated. While stirring, slowly drizzle in the olive oil. Continue stirring until the mixture is pale and creamy, and use your fork to break up any particularly long strings of eggplant. Once again, I take the path of least resistance and add ingredients to a food processor and PULSE to blend. You don't want to puree but leave a bit of chunkiness.
  • Stir in the parsley, salt and cumin. Season to taste with more salt (I usually add another ¼ teaspoon) and more lemon juice, if you’d like a more tart flavor.
  • Transfer the baba ganoush to a serving bowl and lightly drizzle olive oil on top. Lastly, sprinkle parsley and smoked paprika on top. Serve with accompaniments of your choice such as pita bread, carrots and cucumbers. It’s also great on sandwiches!

Notes

Serving suggestions: warmed or toasted pita wedges, carrot sticks, bell pepper strips, cucumber slices, etc.
Cook Mode Prevent your screen from going dark
Blueberry Muffins-Humming a New Tune

Blueberry Muffins-Humming a New Tune

Now don’t get me wrong, I have not just been getting tomatoes at the Farmer’s Market.  Nope, my first stop is the blueberry stand.  I love those little blue gems and find myself throwing them in salads, eating them out of hand, and feeding them to Moose (Jamie’s dog, not actual moose).  But my favorite thing?  Making blueberry pastries like snacking cakes, hand pies, cobblers and of course MUFFINS!  A couple of weeks ago I made Smitten Kitchen’s Blueberry Muffins, easy and pretty darn tasty BUT I just found another recipe that I LOVE.  From the blog, Hummingbird High by Michelle Lopez, Levain Bakery Blueberry Muffins.  Bursting with blueberries, tender, and a bit cakier in texture, fine crumbed with a fantastic crunchy top, to die for.

If her version of Levain Bakery’s Blueberry Muffin is any indication of the scrumptiousness of Levain Bakery’s pastries-I am making a beeline there when I am in New York (which will be soon since I now have a kid living there-oh happy day).  I hear they have a decent Chocolate Chip Cookie too, lol.  This muffin is so good it prompted me to pull out her cookbook (of course I have it-Silly), Weeknight Baking to try more of her recipes.  Her recipes are easy to follow and provide detailed information even a novice baker will be successful.

Beat butter and sugar until light and fluffy

Pros and Cons

The Smitten Kitchen muffin gets the nod for quick and easy.  Melt butter and stir all the ingredients together.  How simple is that?  While good right after they come out of the oven, they tend to fall off the scrumptious curve quickly.  SK’s suggestion is to split, toast and butter the next day, I agree.

The batter is not as stiff or thick as SK’s batter but dense enough so the blueberries do not sink to the bottom.

The homage to Levain Bakery’s is absolutely delicious.  Moist, bursting with blueberries, and tender from the addition of almond flour.  The top is crunchy from the generous sprinkling of sugar which you can up by using raw sugar.  Crispy edges with a classic pointy dome, it is one impressive muffin.  But, it is a bit more work than the SK version.  Butter is creamed with sugar and the batter should rest an hour before baking.  So if you are looking for a freshly baked morning treat..get up early for this blueberry bad boy.  The cake part of the muffin holds up well but the top loses its crunch after a day.  I use paper liners because…well, I’m lazy.  The original recipe does not use paper and notes that it changes the outside texture.  What are ya gonna do? 🤷🏻‍♀️

I’m keeping both muffin recipes in my repertoire, a quick fix muffin and the out to impress late morning Sunday Brunch muffin. After all, you should always be prepared!  Make either of these recipes, guaranteed to chase away the blues-berries.

Mine did not have the super domed peak but that may be because I did not fill the muffin tin as much as Hummingbird High’s.  I ended up with 11 muffins.  Fill for 9 to get the domed top.  But they’re still “purdy” and tasty.

Levain Bakery Blueberry Muffins

From Hummingbird High, fabulous blueberry muffins, her take on NYC's Levain Bakery
Course Breakfast, Dessert
Cuisine American
Keyword Blueberry Muffins, Hummingbird High, Levain Bakery
Prep Time 1 hour 20 minutes
Cook Time 30 minutes
Servings 9 servings

Ingredients

Dry Ingredients

  • 2 cups all-purpose flour 9 ounces or 255 grams
  • ½ cup almond meal or almond flour 1.75 ounces or 50 grams
  • 2 teaspoons baking powder
  • ½ teaspoon kosher salt

Wet Ingredients

  • ½ cup whole milk, at room temperature 4 ounces or 113 grams
  • 1 teaspoon pure vanilla extract
  • 1 cup granulated sugar 7 ounces or 198 grams
  • ½ cup unsalted butter, at room temperature 4 ounces or 113 grams
  • 2 large eggs at room temperature
  • 2 ½ cups fresh blueberries, at room temperature 13 ounces or 369 grams
  • For the Garnish
  • 9 teaspoons granulated sugar If you want more crunch use raw or turbinado sugar

Instructions

  • In a medium bowl, whisk together the flour, almond meal, baking powder, and salt. Set aside.
  • In a small liquid measuring cup, whisk together the milk and the vanilla. Set aside.
  • In the bowl of a stand mixer fitted with the paddle attachment, combine the sugar and butter. Beat on medium-high until light, fluffy, and doubled in volume, 2 to 3 minutes, using a rubber spatula to scrape down the bottom and sides of the bowl as necessary.
  • Reduce the mixer to low and add the eggs one at a time, adding the next egg only after the previous one is fully incorporated, scraping down the bottom and sides of the bowl after each addition.
  • With the mixer still on low, add the dry ingredients in three equal parts, alternating with the wet ingredients in two parts. Start & end with the flour mixture. Beat until just combined, then scrape down the bottom and sides of the bowl once more then beat on low for an additional 30 seconds.
  • Take ½ cup of the blueberries and crush them with your hands so they are juicy; add to the batter and increase the mixer speed to high for 5 to 10 seconds to break up the berries to release their juices a bit more.
  • Reduce the mixer to low and add the rest of the berries, mixing until incorporated evenly throughout the batter, another 30 seconds.
  • Rest the batter. Cover the bowl with plastic wrap and let the batter rest at room temperature for 1 hour.
  • While the batter is resting, position a rack in the center of the oven and preheat the oven to 400℉ using the convect setting (if possible).
  • Prepare two muffin tins by spraying the inside and border of every other cavity in the muffin tin generously with cooking spray. I have USA pans that are non-stick, so I didn't to spray and the muffins were easy t remove.
  • Use a 1-Tablespoon or 3-Tablespoon cookie dough scoop to fill each sprayed cavity with 6 tablespoons of the batter. It will be a ot of batter in each. The first muffin tin will have six cavities filled, whereas the second muffin will have three cavities filled.
  • For the second muffin tin, pour water into every other cavity to mimic the placement of the batter in the first muffin tin. Sprinkle the top of each cavity, aiming for the batter and avoiding the pan, with 1 teaspoon of granulated sugar each. Don't skimp! It helps the top form.
  • Bake each muffin tin for 18 to 22 minutes, or until the muffins are domed and golden brown around the edges. A skewer inserted into the center of a muffin should come out with a few crumbs attached.
  • Cool the muffins in their muffin tin on a wire rack for 15 minutes, then use an offset spatula to run underneath the edges of the blueberry muffin tops to prevent them from sticking in the pan. Be careful to just run the offset spatula under the edges—you don't want to accidentally cut into the muffin bottom and decapitate the muffin from its top!
  • After unsticking the muffin tops, keep cooling the muffins in the tins completely to room temperature. DO NOT TRY AND TURN THE MUFFINS OUT WHILE THEY ARE STILL WARM. Because these muffins are so top-heavy, you'll run the risk of accidentally pulling the tops and bottoms apart if the cake is still warm! Wait until they are cooled completely before turning them out of the pan. Run the offset spatula underneath each muffin top once more and gently tilt the muffin upwards to turn it out of the pan.
  • Serve and store. Serve at room temperature. The muffins are best on the day that they're made, but can be individually wrapped in plastic and stored at room temperature for up to 2 days.
Crying Tiger Beef (Grillin’ and Chillin’)

Crying Tiger Beef (Grillin’ and Chillin’)

A reel for Crying Tiger Beef had me salivating until I read the words “recipe coming soon”.  Nooo, it looked so yummy I wanted to try it immediately.  But, I understand. How many times have I posted a dish on IG or FB with the same caveat?  Coming soon.  So I turned to a tried and true cookbook, Simple Thai Food: Classic Recipes from the Thai Home Kitchen by Leela Punyaratabandhu, and found her recipe for Crying Tiger Beef.  It’s a great book for a “Thai food is not in my wheelhouse but I love it” person, like ME.  Her recipe for Pad Thai is my go-to.

Tomatolly Off on a Thai-gent

The dipping sauce for  Crying Tiger Beef in Simple Thai is a variant.  Instead of the traditional one made with toasted rice and tamarind, this one has roasted cherry tomatoes.  Since tomato season is upon us and I am a tomato FREAK, this was a no-brainer.  Glad I did, it’s delicious.  I will include both recipes for you to try.  I expect a report on which version reigns supreme in your house.

Where’s the Beef?

The marinade and sauce work with different cuts of beef.  Wanna get fancy? Ribeye or NY strip steaks.  A quick weeknight meal, flank steak, or skirt steak gets the 👍.  Flanken-style short ribs would work well also.

I opted for the family-friendly flank steak, lean but flavorful and a great cut to barbecue.  First, marinate your flank steak in a simple blend of oyster sauce, soy sauce, and oil.  It’s amazing how it flavors the meat.  I have both Chinese and Thai oyster sauce.  I used the Thai version but the Chinese Oyster Sauce by LKK, with the lady and kid in a boat would be perfect and you really don’t need to go out and get Thai oyster sauce which will be much harder to find.  You (West Coast peeps) can find LKK at major grocery chains, Costco, and most Asian grocery stores.

Sauce Me Up

As your meat marinates, make your sauce.  Broil tomatoes, garlic, and shallots until soft with charred spots.  Transfer tomato mixture to a food processor or mortar and pestle (shades of being a pharmacist).  Pulse or pound until the mixture becomes a chunky sauce.  Don’t purée!  Pour the sauce into a bowl and add fish sauce, lime juice, chili flakes (to desired heat level!!), sugar and cilantro. I absolutely love this sauce, so much umami.  I generally double the sauce recipe, it’s that good.

Palm Sugar-feel free to use brown sugar if you don’t have palm sugar.  But if you want to, palm sugar comes in little squares or egg-shaped pieces, very dense.  My recommendation would be to pulverize those little suckers (very cathartic) before using it.  It would take forever and a day to melt.  You’re welcome.

Crying Tiger Beef with Roasted Tomato Sauce

Easy and delicious Thai dish, Crying Tiger Beef. Grilled steak is topped with a spicy sauce made with roasted tomatoes, shallots, and garlic and seasoned with lime juice, fish sauce, red onions, and cilantro.
Course bbq, dinner, main dish
Cuisine Asian, Thai
Keyword cherry tomatoes, Crying Tiger Beef, grilled beef, pad thai
Prep Time 5 minutes
Cook Time 20 minutes

Ingredients

Marinade

  • 1 tablespoons neutral oil
  • 1 tablespoon soy sauce
  • 1 tablespoon oyster sauce
  • 1/2 teaspoon ground white or black pepper
  • 1 flank steak, about 1 ⅔ pounds total This recipe works with steaks too. So if it is date night...2 nice ribeyes would be perfect!

Dipping Sauce

  • 4 ounces cherry tomatoes
  • 1 large shallot (1 oz) halved
  • 3 large garlic cloves
  • 1 tablespoon fish sauce
  • 1 tablespoons fresh lime juice
  • 1 tablespoon red pepper flakes I have never used over 1 teaspoon!
  • 1/2 teaspoon packed light brown sugar or palm sugar
  • 2 tablespoons coarsely chopped cilantro leaves and stems

Garnish

  • 1 tbsp Glutinous or sticky rice, raw optional, but recommended
  • Handful cilantro sprigs coarsely chopped, for garnish
  • sliced cucumbers and tomatoes

Instructions

  • For the beef, in a wide bowl or square pan, stir together the oil, soy sauce, oyster sauce, and pepper. Add the beef and turn to coat all sides.
  • Prepare a medium-high fire in a charcoal grill or preheat a gas grill to medium on one half and medium-hot on the other half. Heat source shold be indirect. Place flank steak in center of grill. Grill about 4 minutes a side for medium rare. Remove from heat. Let meat rest about 5 minutes before slicing.
  • Slice beef against the grain into 1/4-1/2 inch slices then arrange on a serving platter. Sprinkle with the ground toasted rice (optional) and garnish with the cilantro. Serve with the sauce.

Sauce

  • Place tomatoes, unpeeled shallots, and garlic on a small sheet pan and broil, turning often until charred and squishy. This should take about 7-10 minutes.
  • While the beef rests, finish the sauce. Using a mortar and pestle or bowl and a fork, smush the shallots and garlic into a rough paste. Add the tomatoes, blend to form a chunky sauce. Don't puree the tomatoes. Transfer to a serving bowl and stir in the fish sauce, lime juice, pepper flakes, sugar, and chopped cilantro. The sauce should have the consistency of a chunky salsa. Let it sit a few minutes, then taste; add more lime juice, fish sauce, and pepper flakes, if needed. The sauce should taste primarily sour and spicy and then salty with, with a hint of sweetness.
  • You could make this in a food processor, just don't overprocess the sauce! Use the pulse button only to avoid this.

Toasted Rice Powder

  • Place raw glutinous rice in a small skillet over medium-low heat. Swirl pan continuously until rice is golden brown and has a nutty aroma. This will take about 10-15 minutes. Remove from heat and pour into a mortar or small bowl. Set it aside to cool. Once cooled, grind in the mortar or in a small food processor, until rice becomes a powder.
  • Sprinkle this on your meat right before serving.

The traditional sauce is delicious too. It’s a little more difficult finding tamarind.

Tamarind is tangy and adds a sweet and sour flavor profile. You can find it as a paste or pulp to make a paste. Get the paste for convenience.  The other component is toasted sweet rice powder.  You can probably buy this but I always have sweet rice (glutinous rice aka sticky rice) on hand. The raw rice can be toasted on the stovetop and ground in a mortar and pestle or spice grinder.

Crying Tiger Beef with Tamarind Sauce

Course bbq, dinner, lunch
Cuisine Thai
Keyword Crying Tiger Beef, Thai

Ingredients

Marinade for Beef

  • 1 tbsp oyster sauce
  • 1 tbsp fish sauce
  • 1 tsp brown sugar
  • 2 x 200g 7 oz ribeye steaks (or any other steak cut you prefer)
  • vegetable oil for brushing
  • steamed rice or sticky rice to serve

Spicy Dipping Sauce-Nahm Jim Jaew

  • 2 tsp raw glutinous rice also known as sticky rice
  • 1 tbsp tamarind concentrate
  • 3 tbsp fish sauce
  • 1 tbsp lime juice
  • 1 tbsp brown sugar
  • 1 tbsp chilli flakes
  • 1 small red shallot sliced into fine wedges
  • 2 tsp finely chopped coriander cilantro

Instructions

  • Combine the oyster sauce, fish sauce and brown sugar. Pour the mixture over the steaks and use your fingers to massage the marinade all over the steak pieces. Allow to marinate while you prepare the remaining ingredients.
  • For the spicy dipping sauce, toast the rice in a dry frying pan over high heat until golden brown and fragrant (it should smell like popcorn). Use a mortar and pestle or a spice grinder to grind to a fine powder. In a bowl, combine the tamarind, fish sauce, lime juice, sugar, chilli flakes and toasted rice powder. Mix until well combined. Then stir through the shallot and coriander. Transfer to a small serving bowl and set aside until ready to serve.
  • Heat a large heavy-based frying pan over high heat. Brush with oil. When hot, add the steaks and cook for 2-3 minutes, turning the steaks every so often until you get a nice charred colour. Then turn the heat to low and continue cooking (and flipping the steaks) for another 2-3 minutes (for medium rare) or until cooked to your liking. Before slicing, transfer to a cutting board and allow to rest for 3 minutes.
Tomato Egg Fried Rice & the Fishy Bits

Tomato Egg Fried Rice & the Fishy Bits

A couple of weeks ago I was reading a post from the Woks of Life, a lovely blog on Asian cooking. Their post was on a classic Chinese dish, Salted Fish Fried Rice.  Salted Fish is a Cantonese ingredient made from white fish like croaker, salted and air-dried.  This process concentrates the flavor of the fish, it’s salty, fish-forward, and well, kinda funky in a good way.  Their twist was to substitute anchovies for the salted fish (hom yu, 鹹魚).  My first thought was “Yum, I gotta try this, I think I have anchovies in my pantry”.

They also have a cookbook out and it’s gorgeous.  If you need (who doesn’t)  a cookbook that covers Chinese cuisine for the novice to seasoned cook, Woks of Life fits the bill. You can order it from Books, Inc. or in the Bay Area, from Omnivore Books which has signed copies.

Dad and Gung Gung 1940s

Tales of My Grandfather

As I read their post, memories of my grandfather bubbled to the surface.  He lived in an SRO (single room only) in the heart of Chinatown above Sun Tai Sam Yuen Restaurant.  It was convenient and comfortable for him.  A line cook at Original Joe’s and at the Fairmont’s Tonga Room he walked to work from Chinatown.  His neighbors, Cantonese men of similar age, had migrated to Gum San (San Francisco) looking for work.

Read More Read More

Smittened by Blueberry Muffins

Smittened by Blueberry Muffins

The last few weeks our favorite blueberry vendor has been at the local farmer’s market.  These sweet, plump, juicy nuggets have made their way into salads, breakfast yogurt with granola, or popped straight into my mouth like candy.  My bounty of blueberries had me delving into the archives for blueberry recipes. Favorites like Blueberry Hand PiesBlueberry Boy Bait Cake, Cornbread Cake with Blueberry Balsamic Glaze (delish), and Vivian Howard’s decadent  Blueberry Cobbler with a Cornmeal-Sugar Cookie Crust will definitely make an appearance this summer.

This past Sunday was their last day for the season so I went crazy and bought a boatload of berries.  I got home and thought, I have quite a few blueberry recipes but not one for blueberry muffins!  What’s with that?  As if reading my mind, what should pop up on Instagram? Smitten Kitchen’s Perfect Blueberry Muffins.  Yep, perfect timing.

Berry Easy and Berry Delicious

Smitten Kitchen’s Blueberry muffins are quick, easy to make, and berry-licious.  The recipe starts with melted butter, no creaming of butter and sugar.   This is one-bowl baking territory.  Add sugar, sour cream, egg, and lemon zest to the melted butter and whisk to combine.  I also add a touch of vanilla extract to the wet ingredients. Cause that’s how I roll.  Next, add baking powder, baking soda, and salt to the mixture, and stir to combine. Finally, fold in the flour and blueberries.  Reserve some of the berries to stick on top of the batter after you have filled the muffin tin.  The berries on top highlight the muffin, just a nice visual.

The batter is fairly stiff, like a soft dough.  This helps keep the blueberries from sinking, genius.  Sprinkle the muffin batter with raw sugar or the crumb topping before baking.  The raw sugar topping adds some sweetness and a whole lot of crunchiness to the muffins while the crumb topping is sweet and buttery with a hint of cinnamon and a softer texture.  My family is in the crumble camp, both add a nice finish to the muffins.

That’s how the muffin crumbles…

Blueberries are definitely freezer-friendly.  Extra berries can be tossed into storage containers or Ziploc bags and stored in the freezer for approximately 10 months (this according to the National Blueberry Council, lol) Ahh blueberries in the off-season, life is good, berries any time of the year.

Blueberry Muffins

Adapted from Smitten Kitchen's Perfect Blueberry Muffins
Course Breakfast, Brunch, Muffins
Cuisine American
Keyword Blueberry Muffins
Prep Time 15 minutes
Cook Time 40 minutes
Servings 9 muffins

Ingredients

Dough

  • 5 tablespoons unsalted butter 70 grams
  • 1/2 cup granulated sugar 3 1/2 ounces or 100 grams
  • Finely grated zest from 1/2 a lemon or orange would be good too
  • 3/4 cup sour cream or full fat yogurt but Sour Cream is preferred
  • 1 large egg
  • 1 teaspoon vanilla extract optional
  • 1 1/2 teaspoons baking powder 7 grams
  • 1/4 teaspoon baking soda
  • 1/4 teaspoon fine sea or table salt
  • 1 1/2 cups all-purpose flour 195 grams
  • 1 1/4 cups blueberries, fresh or frozen (no need to defrost) SK recommends 1-1/4 to 1-1/2 cup of berries. I think 1-1/4 cups is plenty. Reserve some berries to add to the top of the batter after filling the muffin tin.
  • 3 tablespoons turbinado sugar in the raw sugar

Crumb topping:

  • 1/4 cup all-purpose flour
  • 1/4 cup granulated sugar or brown sugar I like to do half and half
  • 2-3 tablespoons unsalted butter slightly melted
  • 1/4 teaspoon salt
  • 1/4 teaspoon ground cinnamon optional
  • 1 tablespoon chopped nuts optional

Instructions

For the Muffins:

  • Heat oven to 375°F. Line a muffin tin with 9 paper liners or spray each cup with a nonstick spray.
  • Melt butter in the bottom of a large bowl and whisk in sugar, zest, sour cream or yogurt, and egg, until smooth and vanilla if using. Whisk in baking powder, baking soda and, salt until fully combined, then lightly fold in flour and berries. Batter will be very thick, like cookie dough.
  • Divide between prepared muffin cups, press a couple of the reserved blueberries into the top of the batter, and sprinkle each with 1 teaspoon turbinado sugar, which will seem over-the-top but will be the perfect crunchy top. Bake for 25 to 30 minutes, until tops are golden and a tester inserted into the center of muffins comes out clean (you know, except for blueberry goo). Let cool in pan for 10 minutes then the rest of the way on a rack.

For the Crumb Topping: (optional)

  • In a medium bowl, combine the flour and sugar. Add cinnamon, if desired. Slowly drizzle the butter into the bowl while stirring the crumbs with a fork. I like to start with 1.5-2 Tablespoons and add more as needed until the crumbs form. Do not over-mix (you do not want this to become like a dough).
  • Place in freezer while making muffins remove from freezer and break it up using Sprinkle across muffins, quick breads, or pie.
Eric Kim’s Grape Tomato “Quick Kimchi” (Rock-Paper-Scissors)

Eric Kim’s Grape Tomato “Quick Kimchi” (Rock-Paper-Scissors)

Every Sunday I meet up with friends for coffee then we walk to our local farmer’s market to stock up for the week.  Every year, like clockwork, when summer is upon us, the following conversation takes place between us…

While Walking Back From the Market…

She who shall not be named Person #1 So, who is going to buy the Granny Cart?  I can’t lug any more melons, corn, and peaches.  We need wheels.  I feel like a Sherpa and my shoulder hurts.

She who shall not be named Person #2  Aren’t you the one on Medicare already?  You should get it.

She who shall not be named Person #3 But you’re the one with the watermelon, half flat of strawberries, and 6 ears of corn!

She who shall not be named Person #1 Wait a minute, you’re the one with grandkids, you get it.

She who shall not be named Person #2 I’m the youngest, I’m not getting it.

Needless to say, due to vanity, we are still schlepping our haul in multiple tote bags, occasionally stopping for a breather.  This Sunday may have been the breaking point, none of us could resist, so much amazing fruit right now. We loaded up on berries, peaches (Biscuit Berry Peach Cobbler), cantaloupes, (Melon, Prosciutto & Mozzarella with Basil Oil), and watermelons, (Watermelon and Tomato Salad).  Somebody has to bite the bullet and get that cart!

Tomatoes Are Coming…Update They’re Here!

And I bought my first baskets of cherry tomatoes of the season today.  One of my favorite dishes, especially with the 90-degree weather we are having, is Eric Kim’s Grape Tomato Quick Kimchi.  I’m staying away from the stove as much as possible and this dish fits the bill. It’s the perfect way to enjoy those lovely tomatoes.

Side Dish Today…Lunch Tomorrow

Simple to make, the time-consuming part is salting and allowing the tomatoes to drain.  Use any variety of cherry tomatoes.  The dressing consists of vinegar, fish sauce, sugar, and Gochugaru.  Red Boat or Three Crabs, are good choices for fish sauce.   Either can be found in any Asian store.  Gochugaru is Korean chili powder that can also be found in most Asian stores.  Your best bet would be a Korean market or online.  If you can’t find it feel free to substitute with chili flakes (1/4 tsp or to taste) or Aleppo pepper powder (1:1).  Toasted sesame oil provides a nutty, sweet finish to the dressing.

Serve it as a salad or side dish, like Banchan, it goes well with any kind of meal.  I make a big batch so I have extra for an easy lunch the next day. Just cook up some pasta, either ramen noodles or Angel Hair pasta, and toss it with the leftover tomatoes and sauce.  The pasta warms the tomatoes and picks up the flavors of the dressing, it’s delicious.

With tomatoes coming into season now and the weather warming up, this easy-to-make dish is perfect.

Grape Tomato ‘Quick Kimchi’

Eric Kim's Quick Tomato Kimchi. Refreshing, easy to prepare banchan using fresh cherry tomatoes is the perfect summer dish
Course Appetizer
Cuisine Korean-American
Keyword Banchan, cherry tomatoes, Cold Noodles with Tomatoes, grape tomatoes
Prep Time 30 minutes
Cook Time 5 minutes

Ingredients

Tomatoes

  • 1 pound grape tomatoes (or any ripe cherry tomato) about 2 to 3 cups, halved lengthwise
  • 1 teaspoon kosher salt

Banchan Dressing

  • 2 tablespoons white distilled vinegar substitute with rice vinegar
  • ½ teaspoon finely grated garlic
  • 1 tablespoon plus 1 teaspoon sesame oil Toasted sesame oil like Kadoya
  • 1 tablespoon gochugaru powder of flakes
  • 2 teaspoons fish sauce
  • 1 teaspoon granulated sugar

Garnish

  • Thinly sliced scallions chopped chives, or cilantro or flat-leaf parsley leaves for garnish (optional)

Instructions

  • In a medium bowl, toss the tomatoes with the salt, transfer to a colander, and let drain about 30 minutes. In the same bowl, add vinegar and garlic and set aside.
  • After 30 minutes, add the sesame oil, gochugaru, fish sauce and sugar to bowl with the vinegar and garlic and whisk to combine. Pat the tomatoes dry, then add the tomatoes to the dressing and toss until well coated.
  • Garnish with the optional herbs before serving. This is best eaten right away, but can be refrigerated for up to 24 hours.
  • Make this for banchan for dinner and use any remaining as a pasta sauce the next day. It is delicious with somen noodles. Cook as directed. Add tomatoes to hot noods and mix. Serve immediately.