Tag: crispy

Cast Iron Pan Pizza-Living on the Edge

Cast Iron Pan Pizza-Living on the Edge

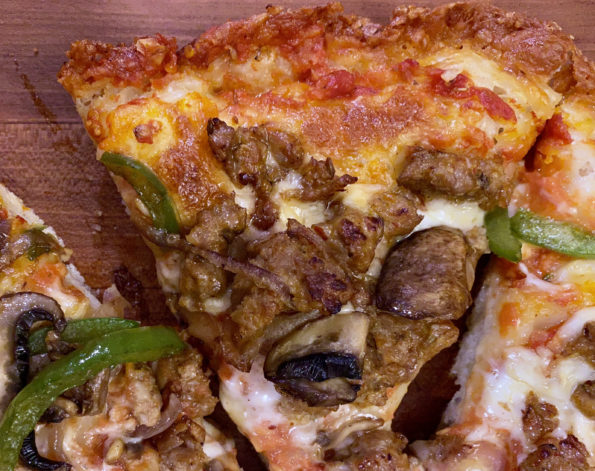
A couple of years ago King Arthur Baking’s Recipe of the Year was Crispy Cheesy Pan Pizza.  Not surprisingly it was delicious.  It became our go-to pan pizza.  But a recipe from Cook’s Illustrated made me stray from the tried and true one.  Don’t laugh, it wasn’t actually the recipe that prompted me to try it,  but my brand spanking new Stargazer Cast Iron Pan.

Dough Meets Edge

What caught my eye, besides “bake in your cast iron pan”, was the copious amounts of cheese (I used a combo of Jack and Cheddar) intentionally sprinkled on the edge of where the dough meets the skillet side.  You end up with this crispy, cheesy, addicting, crunchy layer on your pizza crust.  Think Frico finish to your pizza edge. So good.

Look Ma, no hands!

Got Time?

Ok, like King Arthur’s recipe, this is a no-knead dough, which means, instead of kneading, you have to patiently wait for your dough to develop.  Time instead of muscle for the gluten to develop and for the air bubbles to form to make banging pizza dough.  First, start the day before you want to have pizza.  Make the dough, place it on a pie plate, cover it, put it in your fridge and fuggedaboudit12 to 24 hours later it’s time to put your pizza together.  I start my dough at about 2 pm the day before I want to have pizza.

Pizza Day

Next, about 2 hours before serving pull that bad boi out of the fridge. It needs a couple of finishing touches.  While it is sitting there looking pretty, make the sauce, which is super easy.  You don’t even have to cook it.  The recipe calls for using 1/2 the sauce on the pizza. HELLO?  What am I supposed to do with the other half?  I like sauce, I used all of it on my pizza.  I leave it to you.  But if you want to skimp (lol), save the rest for another pizza.

Extra Extra, It’s All About It

The OG recipe is dough, sauce, and cheese, which is yummy…but that doesn’t mean you have to follow it…go ahead, go crazy, EXTRAS.  Keep it veggie-centric and add peppers, onions, or mushrooms.  Sauteed any of them and place on pizza in this order, crust, 1/3 cheese, sauce, extras, remaining cheese.  Carnivores, feel free to add sausage or pepperoni, pre-cooked. I saved some of my extras for the top, just so everyone knows what they are getting on their pizza.

Typical of Cook’s Illustrated, they go the extra mile, in this case, the crispy crust mile.  Check the bottom of the crust after baking, if it needs a little more crisping, throw that brand spanking new cast iron pan on the stove.  Yep, super crispy crust.

This is a pretty darn good pizza, especially if you like crunchy bits of cheese, glorious cheese.

Start today, pizza tomorrow

Whaddaya Waiting For?

Cast Iron Pan Pizza

From Cooks Illustrated Deep Dish Pizza with crispy edges
Course Breads, Main Course, One dish meals, Pie
Cuisine American
Keyword Cast iron pan, Crispy Cheese Pan Pizza, no knead dough
Prep Time 40 minutes
Cook Time 30 minutes
Rest Time 1 day 2 hours

Equipment

  • 1 10 inch cast iron pan

Ingredients

Dough

  • 2 cups bread Flour ; 11 ounces
  • 1 teaspoon Salt
  • 1 teaspoon Yeast ; instant or rapid rise
  • 1 cup Water 105 - 110 degrees

The Sauce

  • 1 can Whole Peeled Tomatoes ; 14.5 ounces
  • 1 teaspoon Extra virgin olive oil
  • 1 clove Garlic ; minced
  • 1/4 teaspoon Sugar
  • 1/4 teaspoon Salt
  • 1/4 teaspoon Oregano
  • 1 pinch Red pepper flakes

Putting It Together

  • 1 tablespoon Extra virgin olive oil
  • 4 ounces Monterey jack cheese ; shredded 1 cup
  • 7 ounces Whole milk mozzarella cheese ; shredded 1 3/4 cup

The Extras

  • 1 cup Mushrooms of choice! Saute' mushrooms and toss em' on your pizza in between the sauce and cheese
  • 1 cup sauteed Italian sausage, pepperoni, or whatever you like for protein TOTALLY OPTIONAL
  • 1/2 cup diced sweet onions, bell peppers, your choice

Instructions

  • For the dough Start the day before!!!
  • Using a wooden spoon or spatula, stir flour, salt, and yeast together in bowl. Add warm water and mix until most of flour is moistened. Using your hands, knead dough in bowl until dough forms sticky ball, about 1 minute. Spray 9 inch pie plate or cake pan with oil spray. Transfer dough to prepared plate and press into7 - 8 inch disk. Spray top of dough with oil spray. Cover tightly with plastic wrap and refrigerate for 12 - 24 hours.
  • For the Sauce (so easy, no cooking. Ok, or use your favorite marinara, it’s okay)
  • Place tomatoes in fine-mesh strainer and crush with your hands. Drain well, then transfer to food processor. Add oil, garlic, sugar, salt oregano and pepper flakes and process until smooth, about 30 seconds.
  • For Pizza (You will need to start 2.5 hours before eating time)
  • Two hours before baking, remove dough for refrigerator and let sit at room temperature for 30 minutes. Coat bottom of 12 inch cast-iron skillet with oil. Transfer dough to prepared skillet and use your fingers to flatten dough until it is 1/8 inch from edge of skillet. Cover tightly with plastic wrap and let rest until slightly puffy, about 1.5 hours.
  • Thirty minutes before baking, adjust oven rack to lowest position and heat oven to 400 degrees. Spread 1/2 cup sauce evenly over top of dough. Sprinkle Monterey Jack evenly over the border. Press Monterey Jack into side of skillet, forming 1/2 to 3/4 inch tall wall. (Not all cheese will stick to side of skillet). Evenly sprinkle mozzarella over sauce. Bake until cheese at edge of skillet is well browned, 25 - 30 minutes.
  • Transfer skillet to stovetop and let sit until sizzling stops, about 3 minutes. Run butter knife around rim of skillet to loosen pizza. Using thin metal spatula, gently lift edge of pizza and peek at underside to assess browning. Cook pizza over medium heat until bottom crust is browned, 2 - 5 minutes. Using two spatulas, transfer pizza to wire rack and let cool for ten minutes.
Grandma’s Chocolate Chip Cookies-Take Two

Grandma’s Chocolate Chip Cookies-Take Two

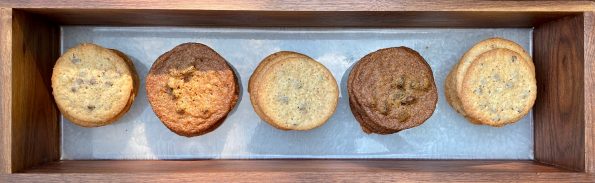
The search continues for a thin, crispy chocolate chip cookie just like my grandmother use to make.  My first try was a Tate’s Chocolate Chip Cookie facsimile by that guru of American desserts, Stella Parks.  While absolutely scrumptious-buttery, caramelized, slightly chewy in the middle with crispy edges, they just weren’t my grandma’s cookies. So…

I took a different tack

I googled, buttery, crispy, thin cookies, leaving out the chocolate chips.  Surfing the Pinterest pics that popped up, I came across a photo for Crisp Almond Cookies from Chocolate, Chocolate, and More.  It looked promising.  The cookies were thin with golden edges and a light, flat, center.  They looked a whole lot like my Pau Pau’s cookies but without the chocolate.

So I made the recipe for Crisp Almond Cookies and added mini chocolate chips to the dough.  The recipe is straight forward, classic cookie making protocol.  Cream the butter and sugar, add eggs, dry ingredients, nuts and finally fold in chocolate.  Tips for this particular recipe include soft butter (not melting) and room temperature eggs since you want the cookies to spread.  Once again I used a tablespoon ice cream scoop to portion out the dough leaving 2-3 inches between each scoop.

The Grandma Test

These cookies looked a lot more like my grandma’s cookies.  These were crisper than Stella’s and buttery, without the caramelization.  (My test group actually LOVED the caramel flavors of the Stella Park cookies) I think the inclusion of almonds lightened the cookie and make it less chewy and a touch crisper, again more like Grandma’s.  I liked them a lot, definitely getting closer to ground zero for Pau Pau’s cookie.  I will try it with walnuts next time since that is the nut she used in her recipe. I don’t think it will change the texture but may add that characteristic walnut flavor.  The use of baking powder instead of baking soda also reduces browning.  It didn’t make these cookies cakey, which you might expect.

I arbitrarily added 1 cup of mini-chips to the dough.  I didn’t want to overwhelm the cookies with chocolate.  I ended up with more than 3 chips a cookie but I think Grandma would be okay with a bit more chocolate.  I would not put more chocolate.  In fact, I might decrease the amount to 3/4 cup in the spirit of her cookies.  You could substitute a good quality chocolate sprinkle instead, a suggestion from my kid- the Sprinkle Cookie King.  The recipe makes quite a few cookies but luckily you can easily half the recipe.

Crisp Almond Cookies with Chocolate Chips

I took a recipe for Crisp Almond Cookies and added Chocolate Chips! Buttery, crisp with a hit of chocolate, a delicious combination.
Course cookies
Cuisine American
Keyword Crisp Almond Cookies with Chocolate Chips
Prep Time 15 minutes
Cook Time 10 minutes

Ingredients

  • 1 1/2 cups butter softened (337 g) (salted butter)
  • 1 cup light brown sugar 200 g
  • 1 cup granulated sugar 200 g
  • 2 large eggs room temp
  • 2 teaspoons vanilla extract 10 ml
  • 2 1/4 cups all-purpose flour 280 g Use a moderate protein flour like Gold Medal
  • 1 teaspoon baking powder 4 g
  • 1/8 teaspoon salt 0.7 g If using unsalted butter increase salt to 1/2 teaspoon
  • 1 cup finely chopped almonds 112 g
  • 1 cup mini chocolate chips sub good quality chocolate sprinkles

Instructions

  • Cream together butter and sugars, until light and fluffy, about 5 minutes.
  • Add in eggs and vanilla and beat again.
  • Combine flour, baking powder and salt. Add flour mixture to dough, one third at a time until all added. Stir in almonds.
  • Fold in chocolate chips
  • Using a small cookie scoop (1 tablespoon), place dough on a parchment-lined baking sheet three inches apart (these cookies spread.) Bake in a preheated 350-degree oven for 8-9 minutes. Until edges turn golden. Let cool on baking sheet for 5 minutes before removing to racks to cool completely.

Notes

Recipe is easily halved.  If you are looking for a crisp almond cookie, buttery and sweet, just leave out the chips!

The search continues…but we are headed in the right direction.