Tag: #comfortfood

A Dish For All Seasons (Bread Pudding)

A Dish For All Seasons (Bread Pudding)

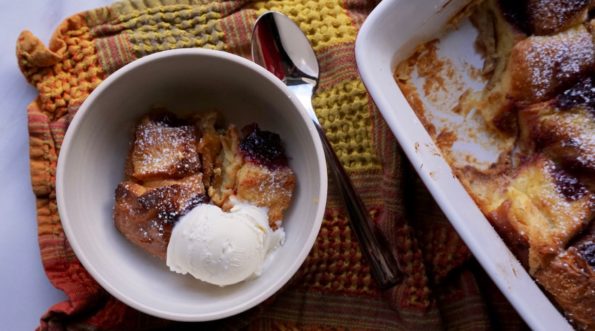
The What

I LOVE bread pudding.  Sweet or savory, made with almost any kind of bread-from bagels to brioche, enveloped in a custard of eggs and milk, the epitome of comfort food.  Each spoonful is a revelation, crispy, crunchy outside and meltingly soft custard-like inside, YUM, it’s so good.

The Why

I’m guessing bread pudding was born out of economics, a way to not waste day-old bread. Who was that frugal genius?  It’s everything a dish should be-comforting, multi-textured, versatile, simple, and most of all amazingly delicious.

The Who

My favorite recipe is a mash-up of a Mark Bittman recipe in The New York Times and one from Bon Appetit, Apple-Raisin Bread Pudding.  That’s the beauty of bread pudding, it lends itself well to additions and changes.  Play with this recipe and make it your own.  I even have a rift for a Tres Leches Bread Pudding, yep, so many variations, so little time.

The How

It’s super versatile, I have used french bread, challah, brioche, or ciabatta.  If I want a richer dish I replace part of the milk with half-half (25-50%) or add 1-2 additional eggs for a more custard-like pudding.  I have added apples in the fall, berries, or peaches in the summer, dried fruit when my fruit basket is empty or folded in homemade preserves …  For you chocoholics, throw in a handful of chocolate chips.  You get the picture, this is a slam dunk.  For Thanksgiving,  a savory bread pudding with mushrooms, peppers, and Parmesan will grace our table, it has become an annual holiday tradition.

Toast the cubes in the oven at 350 degrees for 7-10 minutes

The Pay-Off

My kids would clean their rooms and do their chores for bread pudding, especially if I added a scoop of vanilla ice cream on top. Yep, a fam-favorite for many reasons.

Adapted from Simple Bread Pudding by Mark Bittman

Who doesn't love a simple, comforting dessert-bread pudding!
Course Breakfast, Dessert
Cuisine American
Keyword bread., eggs, Simple Bread Pudding
Prep Time 10 minutes
Cook Time 35 minutes
Total Time 45 minutes

Ingredients

  • 2 cups milk replace 1/2 with half-half for a richer pudding
  • 2 tablespoons unsalted butter (1/4 stick) more for greasing pan
  • 1/2 cup sugar for a sweeter pudding use 3/4 cup
  • 1 teaspoon vanilla extract
  • Pinch salt
  • 1/2 loaf sweet egg bread like challah or brioche cut into 1.5-2-inch cubes (about 5 to 6 cups)
  • 2 eggs, beatened Like itt custardy? Add an extra egg

Optional Fruit Add-Ins Replace 1/2 cup of bread with any of the following

  • 1 apple peeled and cored, cut into 1/2 inch dice. Granny Smith for tart, Golden Delicious for sweet.
  • 1 cup fresh blueberries

Instructions

  • Heat oven to 350 degrees.
  • Butter a 2-quart baking dish and fill it with cubed bread (8x8 or 9x9 square pan will work)
  • Toast cubed bread pieces in 350 degrees oven for 10 minutes. This is an optional step. If you do toast bread, definitely soak the cubes before baking.
  • In a small saucepan over low heat, warm milk, butter, vanilla, sugar and salt. Continue cooking just until butter melts; cool.
  • Add eggs to cooled milk mixture and whisk; pour mixture over bread. Let sit for abot 30 minutes so the bread can soak up the egg mixture. This makes a more custard like pudding.
  • Bake for 30 to 45 minutes, or until custard is set but still a little wobbly and edges of bread have browned. Serve warm or at room temperature.

Tweaks

  • Like cinnamon add 1/4 teaspoon to egg mixture.
  • In place of fruit use 1/4-1/2 cup jam or preserves, dot pudding, distributing evenly
  • Sprinkle bread pudding with cinnamon before baking. For a crunchy top, sprinkle top with 2 tablespoons cinnamon sugar before baking. (To make your own cinnamon sugar, combine 1/2 cup granulated sugar with 2 T cinnamon)
  • Golden raisins work well in this bread pudding too!
Focaccia: The Deb Breadbake Trio-Take Three

Focaccia: The Deb Breadbake Trio-Take Three

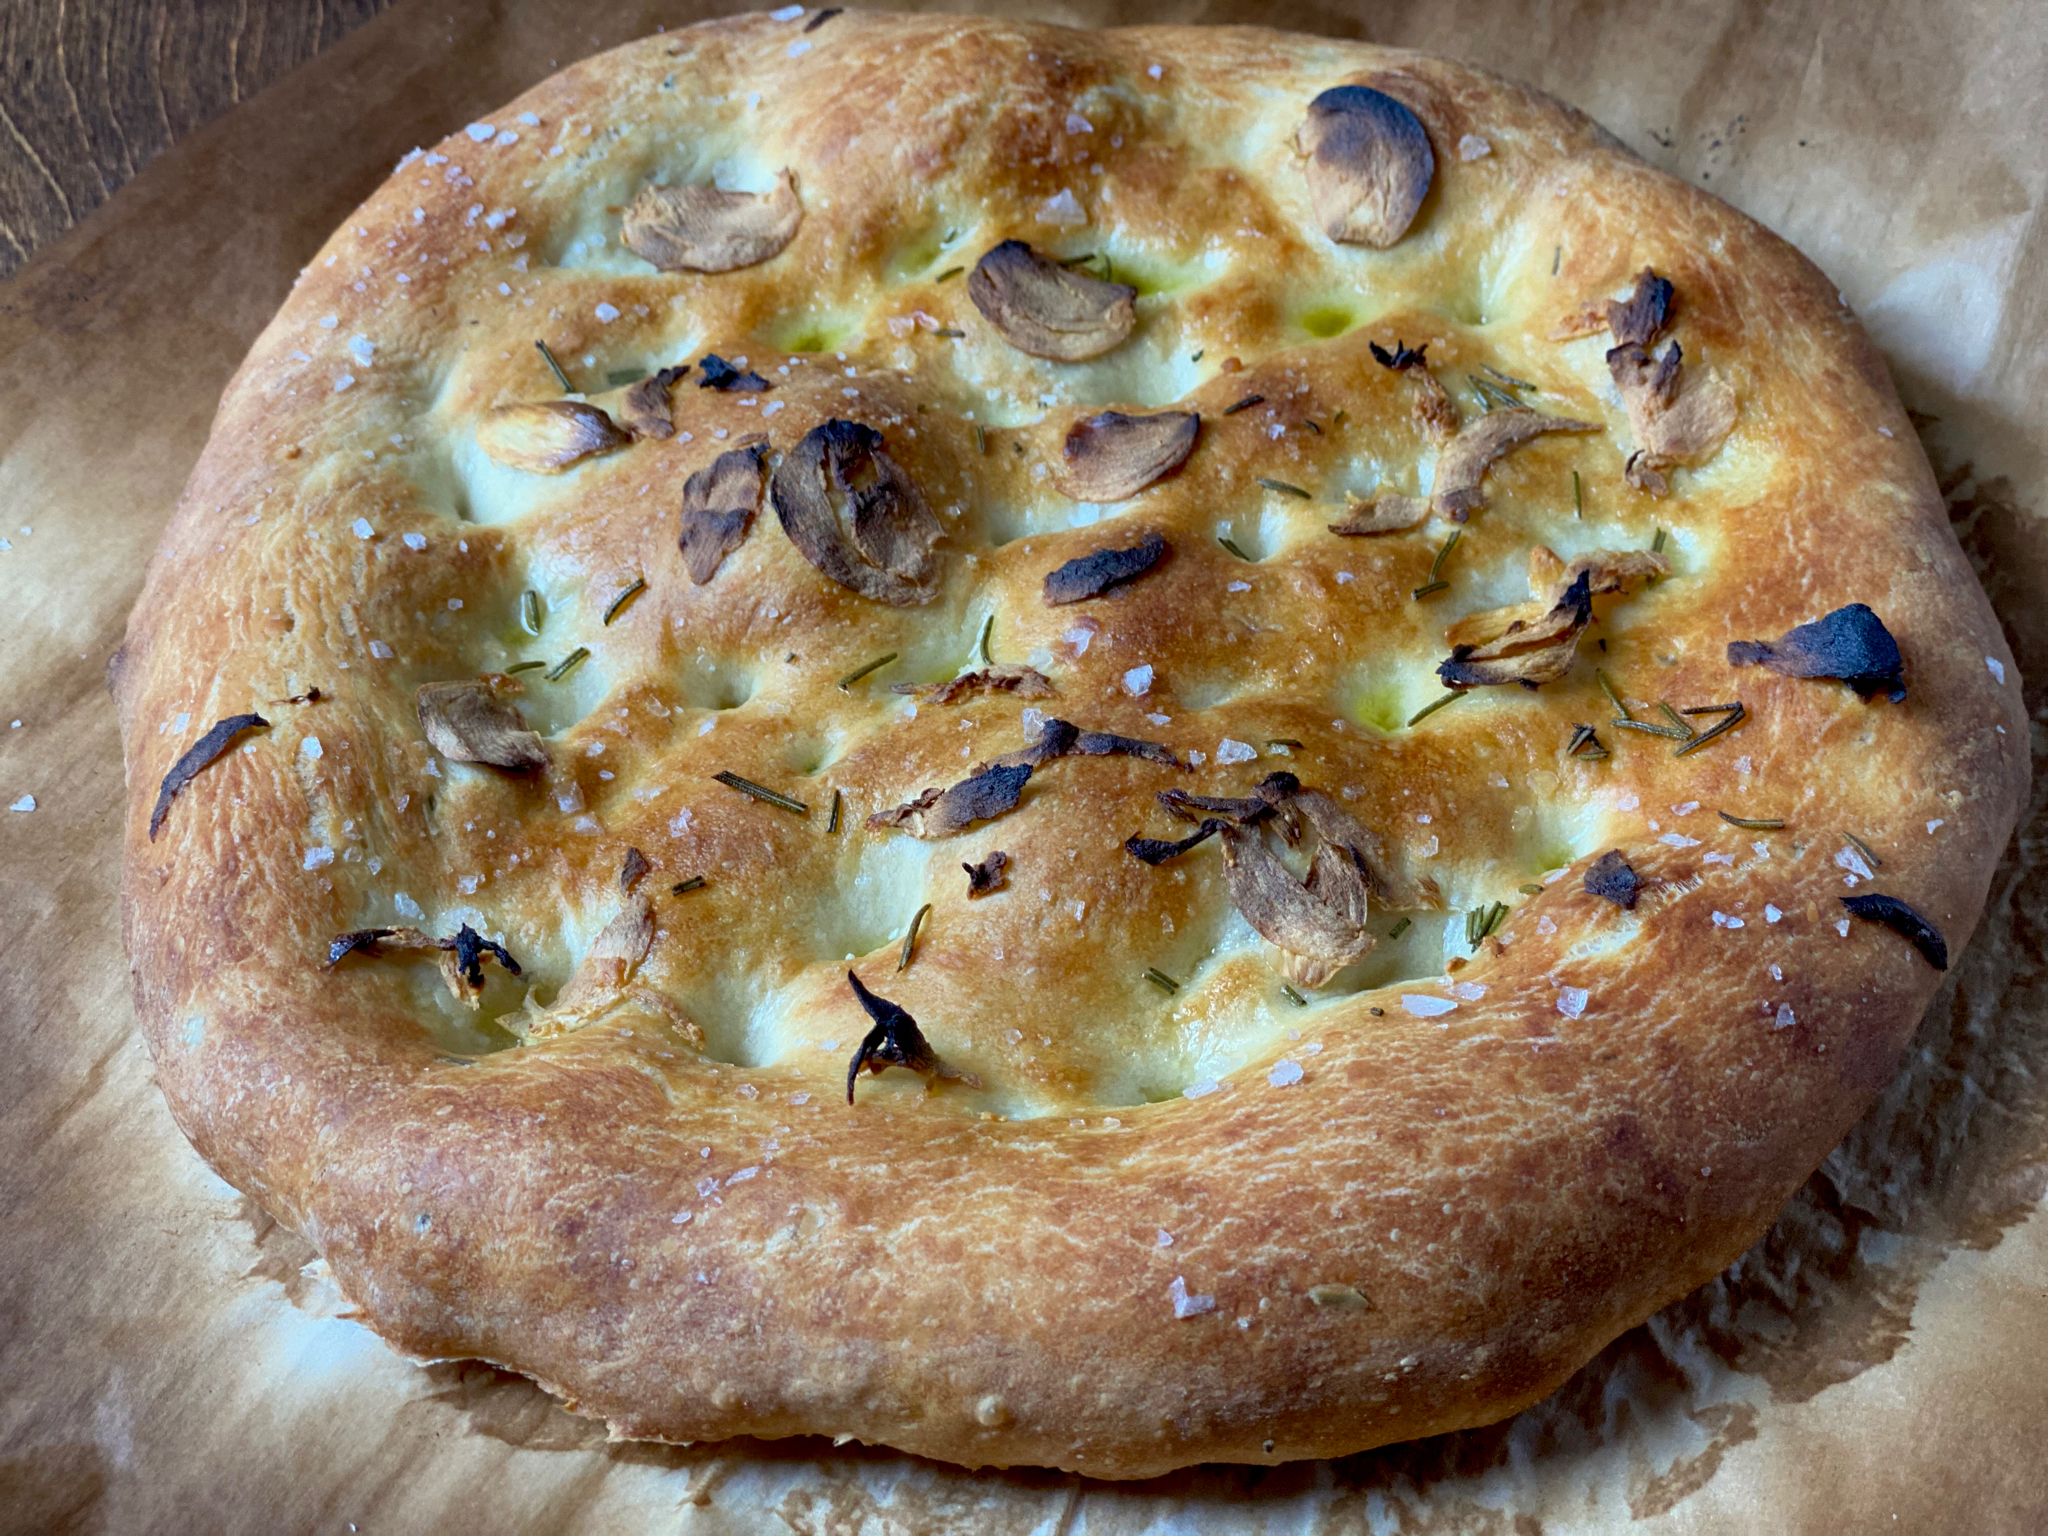
Yes. In the Time of COVID, where the staple shelves at the supermarket look like a scene out of Mad Max, I still have flour and yeast.  Now don’t get your Hot Crossed Buns in a bunch, in all fairness, I normally have lots of flour and yeast on hand.  I love to bake.  Although, after 3 batches of Focaccia, I find myself perusing my King Arthur Flour wishlist to see if yeast or flour have made it back on their virtual shelves.  Bread has become an obsession for me and so many others.  The result of staying home and harkening to a simpler time.

The trio of Focaccia I tried were all pretty good but one stood out, Serious Eats No-Knead Olive-Rosemary Focaccia with Pistachios.  But they’re all excellent.  I’ve included links to the two “runner-ups” since they are both totally worth making.  My favorite is the finale of this post along with the full recipe.  Enjoy!

Foccacia Number One

From Kitchn, a recipe for No-Knead Focaccia that takes the least amount of time of the three we tried.  It does start with a food processor which makes quick work of making the dough.  The dough needs to sit for only 2-3 hours before spreading the dough in a 10-inch iron skillet, letting it rest for 30-40 minutes before baking.

I put the dough in the fridge overnight before proceeding.  The dough did not rise as much as expected, operator error?  Overzealous pressing it into the skillet?  Too long in the fridge?  Dense and chewy, reminiscent of pizza crust with a nice flavor from the garlic and rosemary.  I’d like to try this recipe again, wondering if I had compressed it too much or inadvertently used water that was too hot.  If it didn’t rise any more I’d just use it to make mindbogglingly good pizza.  Oh, and my skillet is probably wider than the classic 10″ inch iron skillet, did I pat down my dough too much?  My inquiring mind wants to know.

Guess I’ll have to bake more Focaccia


Focaccia Number Two

Back In the day, Jenny Jones was a singer, comedian and talk show host…now she does cooking and baking videos from home.  Go figure. How I stumbled upon her site, I don’t know, but her No-Knead Focaccia Bread is pretty darn good.  Easy to make, the end result leans towards a pizza-like consistency, chewy inside with nice air bubbles with an exterior that was a wonderful toasty brown and so crispy.  She describes her Focaccia aptly, “This is no ordinary focaccia. It’s not the soft kind that you bake in a pan. This is focaccia the way I like it: thin and crispy. It’s like a slice of pizza without the pizza stuff”  The search was still on for that soft, pillowy texture of classic Focaccia.  Still, this was so good, I’d make it again in a heartbeat (if it wasn’t for my hipspread, lol)  You will need a pizza stone or steel to bake this on.

Above is what the dough looks like after resting in the bowl.  It doubled in size.

Below is after tucking (folding) the dough under a couple of times

The finished Focaccia! Airy and springy and soft inside, crispy and chewy on the outside, it’s delicious.

And the winner is…Serious Eats No-Knead Olive Rosemary Focaccia with Pistachios

I think we have found a Focaccia recipe that my entire quarantined family likes!  Serious Eats Focaccia by Kenji-Alt Lopez has that soft, pillowy texture inside like traditional Focaccia and a nice crispy outside.  With that first bite, we were all nodding our heads-this is it!  Not a moment too soon as my bread flour supply is dangerously low.

Start the day BEFORE you want bread on the table, like all no-knead bread, time takes the place of kneading.  We did not use olives or pistachios.  Quarantine forces improvisation, instead, we used cherry tomatoes, garlic, red onions, and rosemary from our herb box.  A tasty combination.  Feel free to add your own toppings! #Lunchleftovers found me making Ottolenghi’s Charred Tomatoes with Labneh to dip into with my focaccia-absofrigginlutely delish.

This is the Serious Eats dough after resting 12 hours, at most, it tripled in size but more like two and half times (pure eyeball measurement).  My bowl was plenty big enough.  I thought it would rise more and was a bit worried, but the Focaccia turned out beautifully.  Sorry, I will not doubt the master Kenji Alt-Lope again!


Olive Rosemary Focaccia with Pistachios

Delicious, easy to make No-Knead Focaccia from Serious Eats
Course Breads
Cuisine American, Italian
Keyword Homemade No-knead focaccia
Prep Time 15 minutes
12 hours
Servings 10

Equipment

  • iron skillet

Ingredients

  • 500 grams all-purpose or bread flour 17 1/2 ounces, about 3 1/4 cups, prefer bread flour
  • 15 grams kosher salt .5 ounces, about 1 tablespoon Diamond brand) reduce by a third if using Mortons
  • 4 grams instant yeast .15 ounces, about 1 teaspoon
  • 325 grams water 11 1/2 ounces, about 1 1/2 cups minus 1 tablespoon
  • 1/4 cup extra-virgin olive oil divided
  • 4 ounces pitted green olives sliced
  • 1/4 cup roasted pistachios roughly chopped or lightly pounded in a mortar and pestle
  • 2 tablespoons fresh rosemary leaves very roughly chopped
  • Coarse sea salt

Alternate Toppings

  • thinly sliced red onion
  • fresh thyme leaves
  • cherry tomatoes, halved
  • garlic, slivers

Instructions

  • Place flour, salt, yeast, and water in a large bowl. Mix with hands or a wooden spoon until no dry flour remains. The bowl should be at least 4 times the volume of the dough to account for rising.
  • Cover bowl tightly with plastic wrap, making sure that edges are well-sealed, then let rest on the countertop for at least 8 hours and up to 24 hours. Dough should rise dramatically and fill bowl, although mine did not rise that dramatically, it spread more than rise.
  • Sprinkle the top of the dough lightly with flour, then transfer it to a lightly-floured work surface. With well-floured hands, form into a ball by tucking the dough underneath itself.
  • Pour half of oil (1/8 cup)in the bottom of a 12-inch cast iron skillet or large cake pan (your Le Creuset or Staub pan would be perfect)Transfer dough to pan, turn to coat in oil, and position seam-side-down. Using a flat palm, press the dough around the skillet, flattening it slightly and spreading oil around the entire bottom and edges of the pan.
  • Cover tightly with plastic wrap and let the dough stand at room temperature for 2 hours. After the first hour, adjust an oven rack to the middle position and preheat oven to 550°F. My oven only goes to 500 degrees, this works fine. It actually baked in about the same amount of time, but you may need to go at least the full 24 minutes at 500 degrees.
  • At the end of the 2 hours, dough should mostly fill the skillet up to the edge. Use your fingertips to press it around until it fills every corner, popping any large bubbles that appear. Lift up one edge of the dough to let any air bubbles underneath escape and repeat, moving around the dough until there are no air bubbles left underneath and the dough is evenly spread around the skillet.
  • Spread olives and pistachios or your choice of toppings, over the surface of the dough and press down on them with your fingertips to embed slightly. Drizzle with remaining olive oil. Sprinkle with rosemary and coarse salt.
  • Transfer skillet to oven and bake until top is golden toasty brown and bottom is golden brown and crisp when you peek underneath, 16 to 24 minutes. Using a thin spatula, loosen focaccia and peek underneath.
  • Transfer to a cutting board, allow to cool slightly, slice, and serve. Serve with cheesy butter or Ottolenghis tomatoes and Labneh, so good.
  • Extra bread can be stored in a brown paper bag at room temperature for up to 2 days. Reheat in a 300°F oven for about 10 minutes.
Snickerdoodles (Alice in Cookiewonderland)

Snickerdoodles (Alice in Cookiewonderland)

It has been 1610 days since I sat down and penned my inaugural post, Jamigos 2.0 to launch 3jamigos.  As I reflect on that number all I can think is WHAT TOOK ME SO LONG TO INCLUDE MY FAVORITE COOKIE?  I mean, sheesh, of the 100 cookie recipes I have posted, it doesn’t include my all-time favorite non-shortbread cookie (notice how I slipped in that qualifier, shortbread=cookie perfection).  Unbelievable, and how did I discover this faux pas?

I was tasked with making cookies for an End of Summer Party for our political action group (sanity saver).   I automatically went to my blog and typed in S N I C K E R D O O D L E S in the search box and waited, NOTHING popped up.  A quick search of my cookie index revealed, what the heck, no Snickerdoodles.

Are you kidding?

I’ve never posted Snickerdoodles on my blog?  Hellooo, time to fix that.  I got busy, made a batch for the meeting, snitched a couple to have with an ice-cold glass of milk, and sat down to write this post.

EVERYONE needs a scrumptious recipe for Snickerdoodles.  Buttery, sweet and spicy, crispy edges, soft chewy center,  finished with cinnamon sugar.  The quintessential cookie.  My favorite recipe comes from the cookie maven, Alice Medrich.  Unlike other recipes I have seen, hers are made with just butter. Yep, no shortening in these bad-boy bites of sweet cinnamon bliss.  The recipe is from her small but mighty book, Cookies and Brownies, long out of print but available on the secondary market. The book is worth getting just for this and her Lemon Bar recipe. Well written with easy-to-follow directions, it’s a keeper.  My copy is frayed and tattered, well worn from use.

Cream butter and sugar together to smooth but NOT fluffy.  Add eggs, beat until blended.

Add flour and stir just until combined.  Don’t overmix.  The mixing changes the consistency of the cookie.  Fluffy butter-sugar mixture gives a cakier cookie, go for smooth and creamy.  After adding the flour mixture do not beat the dough too much or you will end up with a tough cookie.

Gather dough into a disc, shape doesn’t matter.  Keep the thickness to about an inch.  This will make it easier to scoop and form the cookies after chilling.

After chilling the dough,  use a 1 tablespoon ice cream scoop (#70) to form balls.  Shape the scoops into smooth balls and roll in cinnamon sugar.  Use a good quality cinnamon, like Penzey’s . This is a great cookie to make with the kids or grandkids, never met a kid that didn’t like to roll balls of cookie dough in copious amounts of cinnamon sugar all the while licking their fingers.

The one tablespoon scoop yields a cookie about 2 inch in diameter.  All well and good, BUT, the smaller you make the cookie the harder it is to end up with a cookie that has crisp edges and a soft center.  If that is what you are looking for, try making bigger cookies. Increase your baking time by a couple of minutes.

Bake cookies 8-10 minutes until the edges are golden brown.  I like the centers soft, if you like crunchy cookies, bake them a bit longer.  How long?  Don’t know, I don’t like them that way.

Snicker Doodles

Course cookies
Cuisine American
Keyword Snickerdoodles
Prep Time 20 minutes
Cook Time 10 minutes

Equipment

  • Cookie sheets, lined with parchment paper or greased

Ingredients

  • 3 cups unbleached all-purpose flour (13.5 ounces)
  • 2 teaspoons cream of tartar
  • 1 teaspoon baking soda
  • ½ teaspoon salt
  • ½ pound unsalted butter, softened (2 sticks)
  • cups sugar 10.5 ounces
  • 2 large eggs
  • 2 teaspoons ground cinnamon
  • 2 tablespoons granulated sugar

Instructions

  • Preheat the oven to 400° Position rack in the middle of the oven.
  • Combine the flour, cream of tartar, baking soda, and salt in a bowl and mix thoroughly with a whisk or fork.
  • In a medium mixing bowl with an electric mixer, beat the butter with the 1½ cups sugar until smooth and creamy, not fluffy. Beat in the eggs just until blended. Add the flour mixture and stir or beat on low speed just until incorporated. Gather the dough into a disc and wrap in plastic wrap. Refrigerate until firm, at least 30 minutes.
  • Mix the remaining 2 tablespoons sugar and the cinnamon in a small bowl. Form level tablespoons of dough with an ice cream scoop, into 1-inch balls. Roll the balls in the cinnamon sugar and place 2 inches apart on the lined or ungreased cookie sheets.
  • Bake for 8 to 11 minutes, until the cookies puff and begin to settle down. To create crevices, when cookies puff, tap cookie sheet on rack. This causes the cookie to sink, creating crinkles. Rotate the cookie sheet from front to back halfway through the baking time to ensure even baking. Bake until the edges are golden. Remove from oven and allow to cool for a couple of minutes. Remove cookies with a spatula to a wire rack. Don't let them cool completely or the cookies will stick to the sheet. I bake on ungreased sheets to minimize spreading.
  • Cool the cookies completely before stacking or storing. May be kept in an airtight container for several days.
A Tale of Two Pancakes and Sushi

A Tale of Two Pancakes and Sushi

Nothing beats coming home.  Though we had a blast on our trip to Korea and Japan, it always feels good to open the front door, drop the bags and sleep in my OWN bed!  Aaaaahhhh, bliss.

What else is nice, hmmmmmm

HOME COOKING

Yep, time to get back in my kitchen and make a mess.  I envisioned our first day back, a big pot of rice soup (congee), kick up our feet, and flip on the telly to catch up with the Warriors and Sharks.

But before going home we spent our last day in Japan running around Osaka looking for early morning sushi, soufflé pancakes and Michelin starred Instant Ramen.  We went 2 for 3, couldn’t find the Instant Ramen which was just as well since I couldn’t fit much more in my suitcase anyway.

Breakfast of Champions

At 6:30 am we found ourselves sitting in a small sushi place at the Osaka Fish Market, Endo Sushi.  Surprisingly, we were not alone nor the first ones there.  To make it easy, there is a set menu of sushi flights.  Each flight focus was different, shellfish, fish, tuna.  Fresh and delicious we ordered a set each, then another, then another to share.  Not a bad way to start the day.

My Happy Place

From there we headed back to town.  It was only 8:30.  Yes, enough time to find soufflé pancakes, the current rage.  So we head to Happy Pancake which doesn’t open until 10AM.  First in line baby, uh-huh.  The perks of getting up early.

Happy Pancakes with butter and syrup.  Number two on the bucket list, checked off.

Light, fluffy, souffle-like, and EGGY.  Now, this might be your cup of tea…but for me, they were just way too eggy tasting, reminded me of a French omelet.  Y’all, if I wanted eggs, I would have ordered eggs. I hear there is a joint in Stonestown in San Francisco, and after a three-hour wait, you can try them…Me?  Nah.  I want real pancakes.

When we finally made it home, top on my breakfast bucket list (or due to my screwed up time-clock, dinner bucket list), PANCAKES of course.  I pulled out my current favorite cookbook, A Common Table by Cynthia Chen McTernan of the blog Two Red Bowls and flipped to her recipe for Buttermilk Mochi Pancakes.

Her little tweak is genius.  Using half all-purpose flour and half sweet rice flour, you end up with a light fluffy pancake with a nice, subtle, chew or elasticity and a tiny hint of that rice/mochi flavor.  It’s not eggy.  It’s pancakey!  I love it.  It’s delicious.  If you are a fan of the latest rage..mochi donuts and muffins, you’ll love these griddlecakes.

It’s an easy batter to whip up.  I did stray from the recipe a bit.  I decided to whip the egg white and gently fold it into batter.  The recipe calls for just adding in the unbeaten egg white, but whipping the whites hopefully, adds air and lightness to the batter so I took the extra step.

Mix wet ingredients with dry ingredients just to incorporate.
Whip egg white  until soft peaks and gently fold into batter
CHEAT tip: Use an ice cream scoop to dole out the batter.
If you use a non-stick pan, you won’t need oil or butter on your pan.

These babies are so badass.  You need to try them.  If you don’t have sweet rice flour, use 100% AP flour, you’ll get perfectly respectable traditional pancakes but really, get yourself some sweet rice flour.  You’ll thank me, plus you now have rice flour to make her delicious Peanut Butter Mochi.

Buttermilk Mochi Pancakes

Course Breakfast
Cuisine American
Keyword Butttermilk Mochi Pancakes
Prep Time 15 minutes
Cook Time 10 minutes
20 minutes
Servings 3

Ingredients

  • 1/2 cup 63gm all-purpose flour
  • 1/2 cup 70gm sweet rice flour like Mochiko Blue Star
  • 1 tablespoon sugar
  • 1 teaspoon baking powder
  • 1/2 teaspoon baking soda
  • 1/4 teaspoon salt
  • 1 large egg separated
  • 1/2 cup Greek yogurt whole yogurt
  • 1/2 cup milk of your choice I used 2%, I also warmed the milk before combining milk, butter and egg
  • 2 tablespoons unsalted butter melted and cooled, plus more for the pan and for serving
  • maple syrup or syrup of your choice for serving

Instructions

  • In a medium bowl, whisk together the flours, sugar, baking powder, baking soda, and salt.
  • Separate egg, reserve egg yolk in small bowl. Place egg white in a medium small bowl and whisk until soft peaks are formed.
  • Add the egg yolk, yogurt, milk, and melted butter, and stir until just incorporated.
  • Gently fold egg white into batter.
  • Heat a 10-inch or 12-inch cast-iron or nonstick skillet over medium flame until a drop of water sizzles when it hits the pan. Lightly grease the skillet with butter (or flavorless vegetable oil), or if using a non-stick pan, forego greasing.
  • Use a measuring cup or a large ice cream scoop to drop 1/4 cup batter onto the pan.
  • When the edges of the pancake look dry and bubbles begin to form in the center, approximately 2 minutes, flip and cook on the second side until lightly golden, 1 to 2 more minutes.
  • Remove to a plate and repeat with the remaining batter. If desired, use an ovenproof plate (or a metal rack on a baking sheeand place the finished pancakes in the oven on its lowest heat setting to keep them warm while you cook the rest.
  • Serve immediately, with butter and maple syrup.

Notes

Add rice flour to your pancakes for a delightful twist! The rice flour adds a bit of elasticity and flavor while the pancake is still tender and fluffy. The best of both worlds for these mochi pancakes!
Two Pho-One Deal (Pho Ga Noodle Soup & Chicken Noodle Salad)

Two Pho-One Deal (Pho Ga Noodle Soup & Chicken Noodle Salad)

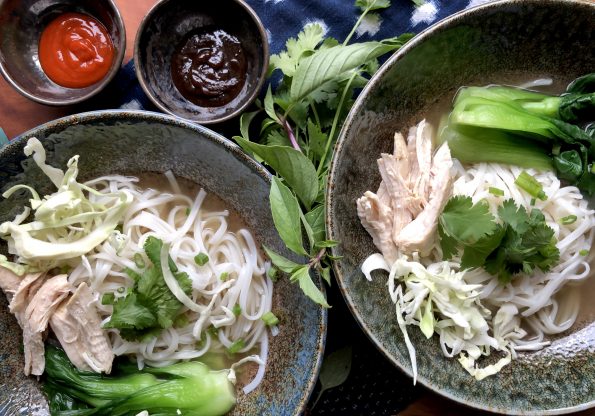
Last week I posted a teaser on Instagram and FB of a really quick version of Pho Ga, Vietnamese chicken rice noodle soup. “In less than an hour, you will be sitting down to a steaming hot, delicious bowl of noodles. Recipe post tonight!”

Sorry, stuff happens and I am a procrastinator by nature.  Tonight is NOW, finally (my humble opinion, worth the wait).

I found the recipe for the quick and easy Pho in the Los Angeles Times.  I LOVE that paper.  When I lived in LA I religiously read the Wednesday Food Section (sometimes the front page but never the sports page-my dislike for the Dodgers never waned).  Some of my favorite recipes and stalwarts in my repertoire are from the LA Times.  I’m adding not only this Pho Ga Soup but a little gem that was tagged onto the end, a delicious chicken noodle salad, Phở Gà Trộn, made from the same ingredients, soooo good.  I almost like it more than the Pho Ga.  You can find the recipe and notes for Pho Ga Tron HERE.  Both recipes are from Andrea Nguyen, Asian cookbook author extraordinaire.

Back to the Pho Ga.  Aside from going out to your favorite hole in the wall for pho, making pho at home is a weekend project. Making it after a long commute, on a weekday, ridiculous!  But a couple of shortcuts and whaddya know…nothing better than a delicious bowl of noodles after a horrendous commute.

Shhhh…The secret is to start with pre-made broth.  If you have homemade-grrrrreat, if not, low sodium canned or boxed broth works well. Toasted coriander seeds, green onions, and ginger are added to the broth along with chicken, cilantro stems and salt. While the broth simmers for about 20 minutes, prep your noodles and garnishes.  Boom, you have just doctored stock into a perfectly respectable, delicious, chicken soup for pho.  For garnishes, I usually have cilantro, mint, green onions or Thai basil and limes on the table.  Don’t forget to put out the Siracha and Hoisin Sauce!

Quick Chicken Pho (phở gà nhanh)

Course Main Course, Soup
Cuisine Asian
Keyword Pho Ga
Prep Time 10 minutes
Cook Time 25 minutes
Total Time 35 minutes

Ingredients

  • 3⁄4 inch piece ginger
  • 2 medium-large green onions
  • 1 bunch cilantro sprigs
  • 1 1⁄2 teaspoons coriander seeds
  • 1 whole clove
  • 3 1⁄2 to 4 cups low-sodium chicken broth
  • 2 cups water
  • 2 6- to 8-ounce boneless, skinless chicken breast or thigh reserve one for noodle salad
  • 1⁄2 teaspoon fine sea salt
  • 5 ounces dried narrow flat rice noodles such as banh pho, rice stick or pad Thai noodles
  • 2 to 3 teaspoons fish sauce
  • 1⁄2 teaspoon organic sugar or 1 teaspoon maple syrup (optional)
  • Pepper optional
  • 1/4 thinly sliced red onion optional for broth
  • 2-3 dried shiitake mushrooms optional for broth

Garnishes

  • sliced green onions
  • chopped cilantro
  • Thai basil leaves leave on stem
  • fresh mint leave on stem
  • bean sprouts
  • lime wedges

Instructions

  • Peel then slice the ginger into 4 or 5 coins. Smack with the flat side of a knife or meat mallet and set aside. Thinly slice the green parts of the green onion to yield 2 to 3 tablespoons, and set aside to use as a garnish. Cut the leftover sections into 2- to 3-inch lengths, bruise, then add to the ginger.
  • Coarsely chop the leafy tops of the cilantro to yield 2 tablespoons; set aside to use as a garnish. Set the remaining cilantro sprigs aside.
  • In a 3- to 4-quart pot, toast the coriander seeds and clove over medium heat until fragrant, 1 to 2 minutes. Add the ginger and bruised green onion sections. Stir until aromatic, about 30 seconds.
  • Remove the pot from heat for about 15 seconds to briefly cool, then pour in the broth. Add the water, cilantro sprigs, chicken, and salt. (optional, add mushrooms and red onions) Bring to a boil over high heat, then immediately then lower the heat to gently simmer for 20-25 minutes.
  • While the broth simmers, soak the rice noodles in hot water until pliable and opaque. Drain, rinse, and set aside.  Test your noodles, they should be soft and pliable but still have a slight bite.
  • After 10-12 minutes of simmering, the chicken should be firm and cooked through (press on it and it should slightly yield). Transfer the chicken to a bowl, flush with cold water to stop the cooking, then drain. Set the chicken aside until cool enough to handle, then shred into bite-size pieces. You will only need 1 chicken breast for the soup.  Reserve second one for noodle salad. If you don't plan on making the salad, use only 1 piece of chicken. 
  • When the broth is done simmering, strain it through a fine-mesh strainer into a medium pot.  Discard the solids. You should have about 4 cups broth. Season with fish sauce and sugar, if needed, to create a strong savory-sweet note. If using red onion you may not need sugar.
  • Bring the strained broth to a boil over high heat. Put the noodles in a noodle strainer or mesh sieve and dunk in the hot broth to heat and soften, 5 to 60 seconds. Lift the noodles from the pot and divide between the 2 bowls.
  • Reduce the heat to keep the broth hot while you arrange the chicken on top of the noodles and garnish with the chopped green onion, cilantro, and a sprinkling of pepper. Taste for seasoning. Return the broth to a boil and ladle into the bowls.
  • Extra broth can be refrigerated or frozen. You will need 1/2 cup of broth for the noodle salad.

Notes

Each serving: Calories 457; Protein 33 grams; Carbohydrates 70 grams; Fiber 2 grams; Fat 6 grams; Saturated fat 1 gram; Cholesterol 72 mg; Sugar 2 grams; Sodium 1,363 mg


Tryin’ to Squash A Cold! (Instant Pot Butternut Squash Soup)

Tryin’ to Squash A Cold! (Instant Pot Butternut Squash Soup)

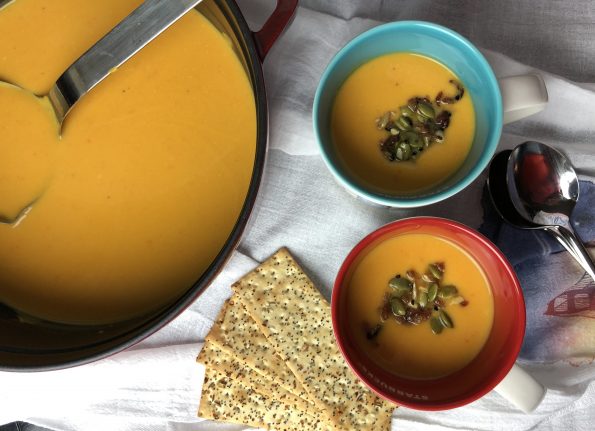
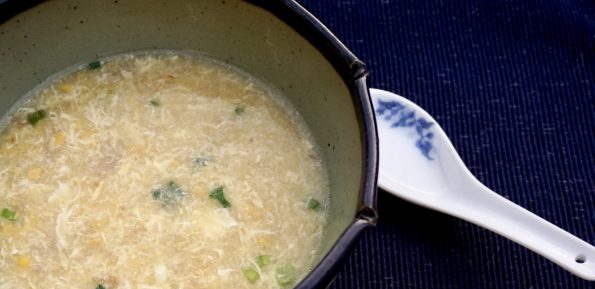
How does that old adage go? Feed a cold, starve a fever?  The thought crossed my mind as I was miserably lying in bed, achy, congested, and generally feeling like crap.  Thank goodness for laptops and search engines…I found a Scientific America article that addressed this very proverb and whaddya know, going all Mythbuster, Scientific America, not only debunked it, but concluded it really should be “Feed a cold, FEED a fever”.  Yeah baby, I love science.

What is the perfect antidote when it is cold, when you are sick, when you crave comfort, but you are too tired to fuss?  SOUP.  Am I right?  Yep, bowl therapy to the rescue.  It didn’t take long to find a soup that fit the bill.  From the blog Creative Bites, Pressure Cooker Creamy Butternut Squash Soup.  Lucky for me I had bought a butternut squash at the market and had all of the ingredients handy.  “Kold karma” pointed me to this quick (thanks to my Instant Pot) and easy, delicious soup.

Here’s the HARD part.  The PREP.  Yeah, no getting around peeling that butternut squash and dicing ALL THOSE vegetables.  Well,  I suppose you could buy pre-cut squash, diced onions and minced garlic, but that’s your call. It’s part of cooking therapy for me.

Butternut Squash soup Prep

NOW, the EASY part.  Prep was 90% of the game.  You’re now sitting pretty on 3rd base ready to score, just a mere minutes from homebowl. Get it?  I love the apples and red bell pepper, they add a nice sweetness.   Saute the veggies in your Instant Pot.  It’s important when you add the stock, really stir the bottom of pot to release all those bits of saute goodness.   The pot is very sensitive to bits stuck on the bottom and will turn off as a safety precaution if the bottom isn’t clean.  Add the stock, seal the pot, and then set the timer for 5 MINUTES.  Yep, five minutes and quick release at the end.  With the time it takes to come to pressure, you’re still only looking at 15 minutes of cooking time.  Not bad.

I used an immersion blender in the pot to puree the soup.  There are a lot of comments online about how it doesn’t work as well as a blender.  BUTTERNUTS.  Not creamy enough?  Throw the immersion stick back in and blend some more.  I’m willing to sacrifice a bit of creaminess (though I don’t think I am) to do this, as oppose to pouring HOT soup, in batches, into my blender.  I’m saving my blender for smoothies and Margaritas.

Butternut Squash Soup in Mugs

Go ahead and play around with this soup recipe. It’s very forgiving.  Got thyme?  Substitute for sage.  Got time?  Skip the Instant Pot, roast the vegetables instead.  See the prepped veggies above? Throw it all in a roasting pan, give it a good swig of olive oil, toss, salt and pepper and roast at 425 for about an hour).  The vegetables caramelize in the oven and add a sweetness to the soup that’s “souper” yummy.  Creative bites calls for goat cheese or cream cheese.  I like cream cheese because it adds a whole lot of mouth feel and just a slight tanginess.  You could probably use sour cream, creme fraiche or even just a touch of heavy whipping cream instead.  This would lighten the soup but you might lose that creaminess.

FINISH WITH TOPPING MADNESS.  Once your soup is done, garnish with ANYTHING your little heart desires.  Toasted nuts or pepitas, bacon, sliced apples, or more BACON, croutons.  Did I mention bacon?  I was sent a mix of nuts as a soup topping by my Food52 Holiday Gift Swap buddy- it was perfect.

Creamy Butternut Squash Soup Instant Pot

Course Soup
Cuisine American
Keyword butternut squash
Prep Time 15 minutes
Cook Time 15 minutes
Total Time 30 minutes

Ingredients

  • 1 Tbsp. olive oil
  • 1 large yellow onion diced
  • 1 red bell pepper chopped
  • 2 tsp. diced garlic
  • 1 tsp. fresh ground ginger
  • 2 lb. butternut squash peeled and cubed 1 medium squash
  • 1 medium apple peeled cored and chopped
  • 1 tsp. sage Substitute thyme or curry powder
  • 1/8 tsp. chili powder
  • 1/4 tsp. sea salt
  • 3 c. chicken stock I used additional cup to thin down the soup a bit
  • 3 oz. cream cheese Sub goat cheese
  • 1/3 c. Parmesan cheese
  • Salted Pepitas for garnish Or anything you like, like BACON BITS, spicy nuts, chives, sliced apple, sautéed wild mushrooms...
  • 1 Tbsp Brown sugar, optional To add roasted squash’s sweetness

Instructions

  • Turn on the Saute function on Instant Pot. Add the olive oil, onions and bell pepper. Saute on high for 4 minutes. Add the garlic and ginger and cook for 1 minute. Add the cubed squash, apple, sage, chili powder, sea salt and chicken stock.
  • Place the lid on your Instant Pot and move the knob to seal. Cook on high pressure for 5 minutes and do a quick release of the pressure.
  • Using an immersion blender in the Instant Pot, puree the mixture. Add the cream cheese and Parmesan, stir to melt and continue to puree until very smooth.
  • Garnish and serve.
Instant Pot Easy Jook (Rice Soup) Soul Food Breakfast

Instant Pot Easy Jook (Rice Soup) Soul Food Breakfast

Last weekend Jamie played her version of NYT’s 36 Hours. We picked her up at the airport (SFO NOT SJC, grrrr) at 1:00 am Friday night (ok Saturday morning, delays) and dropped her off Sunday at 11:00 AM.  Her first words upon seeing her bleary-eyed parents? DID YOU BRING MY SUSHI WITH YOU?  I AM STARVING!  Lucky we like her.

Happy Hour Any Hour

With Jamie coming home, the call went out for a happy hour, which, due to schedules, morphed into a Saturday morning breakfast happy hour.  Any time of day is Happy Hour when it involves friends, food, and fun.  It just means tweaking the menu that’s all. We decided on a bowl of fresh strawberries and summer peaches, Belgium Waffles, candied bacon, Jule’s Granola and yogurt.  Jamie chimed in with “I want Jook (rice soup) too”  Rice Soup is soul food, comfort food, each bite reminds one of being home.  With its addition and the various toppings like shredded chicken, assorted sweet and salty pickles, and slivers of green onions to go along, our breakfast menu was complete.

A small stumbling block to this plan, who was going to make Jook (Rice Soup) in the morning? Ugh, the last thing I wanted to do was get up early after a late-night airport pickup.  Then it hit me, hello…you have an INSTANT POT, Deb.  A quick Google search yielded plenty of recipes so I decided on a mash-up of my Dad’s Jook and a couple of Instant Pot recipes I found online.  Yay, I’ll get forty winks and have rice soup ready for breakfast.

Jook in an Instant Pot is so stupid easy it’s a crime.  Saute a couple of slices of ginger in the Instant Pot add the washed rice, give it a few good stirs, add skinned chicken drumsticks, fill the pot with water and seasonings, seal it and set the timer for 20 minutes. That’s it.  Jook Time.  If you have chicken stock, use it for an extra rich and flavorful soup.

I have a confession, if I don’t have homemade stock or even low-sodium commercial chicken broth, I’ll add a tablespoon of a chicken stock base such as Better Than Boullion, or Chicken Powder by LKK or Knorr (a Chinese kitchen staple) just to kick it up a notch.  It’s not necessary but it will add some depth of flavor.  The soup will look thin when you first take off the lid.  Stir it a couple of times to combine the rice and stock, hit the saute’ function, and bring it to a boil. Cook for an additional 5-10 minutes or until the Jook is the consistency you want.

*Notes from a Thanksgiving Table

My favorite post-Thanksgiving meals aka “What to do with your leftovers”.

Turkey Rice Soup (Congee or Jook)

DON’T THROW AWAY THE BONES AND CARCASS. 

Get out your stockpot (or any really, really big pot).  Throw the carcass, wings, drumsticks (sans stuffing) in and fill with water. Add a smashed chunk of ginger (2-inch piece) 1/2 cup of rice wine, a bunch of scallions, a large pinch of salt and bring it to a boil.  Once it boils, reduce heat to a nice energetic simmer.  Cover and fuggetaboutit for a couple of hours.  You will end up with liquid gold to make any delicious soup you want.  For a non-Asian bent, omit ginger and scallions and throw in carrots, celery, yellow onions instead.  But honestly, it doesn’t matter, you could make jook with either stock.

I do make the stock separately so that I can strain the stock and remove all those little nasty bone fragments and seasoning vegetables.  They have all done their job and can now exit stage left.

The stock will keep in the fridge for about a week or longer in the freezer.

Now go back to the top or to the bottom for the recipe on how to make jook….you’ll thank me, so so good.

Hello….Turkey Sammies a la Dagwood style which means all your Thanksgiving leftovers in between two slices of bread.  Yep, turkey, stuffing, cranberry sauce, gravy, and a couple of slices of cheese from the appetizer plate.  Don’t forget the leftover greens from the salad no one ate because WHO eats salad on Thanksgiving-puulease.  Oh man-so good.

Instant Pot Chicken Congee Recipe (Jook)

Jook or congee, the ultimate comfort food, when its cold outside, when you have a cold, anytime.
Course Soup
Cuisine Asian, Asian-American
Prep Time 10 minutes
Cook Time 20 minutes
Total Time 45 minutes
Calories 140kcal

Ingredients

For the Soup:

  • 1 cup long grain Jasmine rice honestly you can use any kind of rice, long, medium or short grain
  • 1.5 Tsp vegetable oil
  • 3 Slices thinly sliced fresh ginger size of quarters
  • 1 tsp salt
  • 3-4 skinless chicken drumsticks or thighs or 2 whole chicken legs, can also add pork such as pork butt 2-3 2 inch pieces
  • 8 to 10 cups water, fill to the 10-cup mark on your IP or use stock and water 1:1
  • 1/8 cup rice wine
  • 1 tbsp Better Than Bouillon (optional) Skip if you are starting with stock

At the Finish Line

  • 2 tsp sesame oil toasted, Asian sesame oil
  • 1/3-1/2 cup scallions-sliced on the bias garnish
  • 1/8 Cup finely shredded fresh ginger garnish
  • Salt and pepper to taste preferably white pepper

Instructions

  • Wash rice. Add the rice to a bowl, and add enough water to cover the rice. Swirl the rice around. Drain and repeat a few times until the water is clear. Let drain and dry.
  • Turn on Instant Pot with Saute function.  When hot, add 1 -1/2 teaspoon vegetable oil and ginger.  Saute for 30 seconds, add rice and 1 teaspoon salt.  Stir to coat rice with oil approximately 1 minute.
  • Add chicken pieces, bouillon, and rice wine to the pot . **If you are in a rush or feeling lazy, skip sauteing the rice and ginger.  Just throw them into the pot, fill with enough water until it reaches the 10 cup mark in the Instant Pot.
  • Turn off saute, close the lid and make sure the knob is on "Sealing". Choose the "Porridge" button and set the time to 20 minutes.
  • While congee is cooking, shred ginger and slice scallions and place in small bowls for serving.
  • When the time is up on the timer, turn the Instant Pot off. Wait 15 minutes natural release before turning the knob from 'Sealing' to 'Venting'. Rice soup tends to splatter a lot, do not do a quick release.
  • Remove the chicken from the pot, when it is cool enough to handle, shred the meat and discard the bones. If the jook seems thin, turn saute' function on (without the lid on) and cook until desired consistency.  If it is too thick, add water or broth.
  • Add the chicken back into the congee or put it in a bowl and let folks add at the table. Taste, add salt if necessary.
  • Ladle into bowls and top with desired amount of ginger, white pepper, sesame oil and scallions. Let folks add their own.

Toppings and Fixins'

  • My Dad's Jook calls for potatoes, I love them in my soup. Any kind of potato will work, peeled and quartered for large potatoes. Add at the same time as the chicken when making the soup.
  • For meatballs, follow instructions under Dad's Jook. This can be added at the end after pressure cooking.  Remove lid and press saute function.  When the rice soup comes to a boil, add meatballs and cook until done 2-3 minutes.
  • Additional toppings include cilantro leaves, fried garlic slivers, shredded fresh ginger, salted peanuts, shredded lettuce (iceberg works well)...the list goes on. Anything you eat with rice can be added.  NO Rules!
Missing Anthony Bourdain (Roast Chicken)

Missing Anthony Bourdain (Roast Chicken)

I admit to being a foodie.  I love to cook, I love to eat out at restaurants, I love to dissect everything I eat.  When I travel I hunt out the local favorites, my philosophy, eat where the locals eat. Hot chicken in Nashville, BBQ in Austin, Tacos in Los Angeles, Lox and Bagels in NYC, my bucket list goes on and on.  I drove four hours for pie for Pete’s sake. My favorite movies include Chef and Tampopo. I binge watch Japanese & Korean dramas on Netflix like Samurai Gourmet and Let’s Eat-Must See Foodie TV, and re-watch episodes of Chef’s Table over and over again.

Parts Known and Loved

Sunday evening CNN’s Parts Unknown is appointment TV for me.  My foodie world was rocked last week when Anthony Bourdain committed suicide.  Parts Unknown was unique. Not content with showing places through rose-colored glasses, the show found the edgy parts, counter-culture, fringe elements or disenfranchised.  He didn’t shy away from talking about politics, injustice, or controversial topics.  But his approach was disarming, ask the hard questions over a shared meal and drinks and be genuinely interested in the answers.  His journeys strove to capture the heart and soul of each place he visited, to tell a story.  My favorite episodes? Hanoi with President Obama, Koreatown and Eastside episodes in Los Angeles, Iran, and Shanghai, I traveled vicariously through his show.

When his book, Appetites came out, I eagerly snatched up a copy.  I loved just flipping through it. I read, laughed and savored his storytelling and irreverence.  His recipes screamed, “this is the stuff I like to eat and share with family and friends, I don’t give a shit if you like it or not”  Now, I felt I had to cook out of it, my own tribute to Mr. Bourdain and personal catharsis.

I made his Roast Chicken, it just seemed like a good starting point.

The recipe is loosely written (is that code for poorly edited? You be the judge).  A 2-1/2 pound chicken?  I used a 4-1/2 pound chicken which worked fine.  I placed the chicken on a bed of chopped carrots, onions, leeks, garlic, and celery to roast just like the photo in his book despite the fact that the recipe does not call for veggies. Does it make a difference?  Don’t know, but I have a sneaking suspicion it would be fine either way.

It was simple, delicious, the perfect comfort food to soothe the soul and mend the heart.

Roast Chicken Anthony Bourdain

Roast Chicken by Anthony Bourdain

Roast chicken by Anthony Bourdain, to soothe the soul and mend your heart.
Course comfort food, dinner
Cuisine American
Keyword anthony bourdain, roast chicken, Soul Food
Prep Time 20 minutes
Cook Time 1 hour 10 minutes
Servings 4 servings

Ingredients

  • 1 best-quality chicken about 2 1/2 pounds, preferably organic (ok, my chicken was 4-1/2 pounds) where you get a 21/2 pound chicken 🤷🏻‍♀️
  • Sea salt to taste
  • Crushed black peppercorns to taste
  • 4 tablespoons 1/2 stick unsalted butter
  • 10 sprigs fresh thyme
  • 1 fresh bay leaf
  • 1/2 lemon cut into 4 wedges
  • 1 cup dry white wine
  • Juice of 1 lemon about 2 tablespoons
  • 1 1/2 cups chicken stock
  • 1/4 cup finely chopped fresh parsley
  • Freshly ground black pepper to taste

Instructions

  • Preheat the oven to 450˚F.
  • Rub the bird inside and out with salt and crushed peppercorns.
  • Stuff a 1/2-tablespoon pat of butter under the skin of each side of the breast, and under the skin of each thigh.
  • Stuff the thyme, bay leaf, and lemon wedges into the chicken’s cavity.
  • Use the tip of a paring knife to poke a small hole in the skin just below each of the chicken’s legs, and tuck each leg carefully into that hole. (You may also truss the chicken with butcher’s twine if you know how, but this is much simpler.)
  • Place the chicken in a flame-proof roasting pan* and roast for 30 to 40 minutes, rotating the pan, moving it to different parts of the oven to account for hot spots, and basting the bird two or three times with a bulb-top baster or long-handled metal spoon.
  • *Place chicken on a bed of chopped vegetables including carrots, onions, celery and garlic.
  • Reduce the oven’s heat to 300˚F and continue to roast, basting frequently, for another 30 to 40 minutes or until the bird is done: When you poke the fat part of the thigh with the paring knife, the juices should run clear.
  • Remove the bird from the oven, let it rest 15 minutes, then remove the breasts and legs from the carcass, reserving everything. Use a ladle to skim off and discard as much surface fat from the pan juices as possible.
  • Place the roasting pan on the stovetop over high heat and stir in the wine and lemon juice, scraping the bottom of the pan with a wooden spoon to dislodge and dissolve the browned bits. Bring this mixture to a boil and cook until it is reduced by half. Stir in the stock with the wooden spoon, bring to a boil, and reduce again by half. Remove from the heat and strain this sauce through a sieve into a medium, heavy-bottom saucepan over medium heat. Whisk in the remaining 2 tablespoons butter, a tablespoon at a time, until the sauce is thick and glossy. Fold in the parsley and adjust the seasoning with salt and pepper as necessary.
  • Serve the chicken—half of the breast plus a drumstick or a thigh per person—with the sauce ladled over, and any remaining sauce in a sauceboat on the table.
  • Appetites
Corn Soup (玉米湯) Chinese Soul Food

Corn Soup (玉米湯) Chinese Soul Food

Though I was only gone for 4 days, I’m glad I am back. Even paradise doesn’t compare to home.  As much as I like trying new restaurants and not having to do dishes, I love getting in the kitchen and cooking.  My go-to “I’m home!!” meal?  SOUP. The ultimate comfort food that tells me I’m back where I belong.

Our plane touched down in the evening so a long-simmered pot of soup was not in the cards. I needed something quick, easy and yummy. I looked in the pantry and fridge to see what I could rustle up and what do you know, perched front and center on the shelf, a can of Del Monte Creamed Corn.  A sign, obviously.

Does It Sound Corny?

What? I thought you were making soup Deb? I am, trust me. Chinese Style Corn Soup starts with a can of creamed corn. It’s the secret weapon to a quick and delicious soup.  My kids love it, hands down one of their favorite soups.  It’s sweet and savory, made with corn, seasoned ground pork, (you could use chicken or turkey) and egg.  Best way to enjoy it?  Ladle the soup over rice, stir to combine, and eat it piping hot with a big ole’ spoon-this is soul food, bowl food.

I learned how to make corn soup from my mom and if you have read my blog, you know my Mom did not cook much.  It was my Dad’s domain, but she makes a mean corn soup.  If you peruse the menu of any legit (lol) Chinese restaurant, you will find Corn Soup. THAT’S HOW YUMMY IT IS.

Chinese Corn Soup

Max Flavor, Min Effort

My mom started with just a pot of water.  I cheat and start with chicken stock, homemade or a commercially available low salt chicken stock, this adds another level of cheating, I mean flavor.  Quick soups generally start with minced or thin strips of pork, chicken or beef. This extracts the maximum amount of flavor in a minimum amount of time. The meat is marinated for a couple of minutes in soy sauce, rice wine, salt, and sugar then sautéed briefly before adding the water or stock. Cook over medium heat to keep the soup at a nice rolling boil (not crazy boil) for 15-20 minutes. Add the creamed corn, cook for another few minutes and voila’ ALMOST DONE (gotcha).

The last step, whisk a barely beaten egg into the soup. This adds flavor and body to the soup. It’s very similar to egg drop soup. It’s important to remember never boil the soup after adding the egg. You want the eggs to have wispy strand look. I actually turn the heat off when whisking in the egg. Whisk the soup continuously so the egg doesn’t sit and clump or curdle. NO BUENO.

If you like a thicker soup consider adding cornstarch to both the soup and the eggs before adding it to the soup.  A trick from Serious Eats-For tender shards of egg, blend 1 teaspoon of cornstarch into the eggs before adding them to the soup. I am old school, I just add the barely beaten egg to the soup, the yolk thickens it and the whites turn into wispy tendrils in the soup-just like my mom’s.

Soul Food: Chinese Corn Soup

An easy delicious soup that starts with canned corn!
Course soul food, Soup
Cuisine Asian, Asian-American
Keyword Cantonese cooking, Corn, soup
Prep Time 15 minutes
Cook Time 15 minutes

Ingredients

  • 14.5 ounce can of creamed style corn Del Monte is my go-to
  • 1/2 cup ground pork or thinly sliced pork

Marinade for Pork

  • 1 tsp soy sauce
  • 1 tsp oyster sauce
  • 1-1/2 tsp rice wine
  • dash of white pepper
  • 1/4 tsp salt and sugar

To finish the Soup

  • 3-4 cups water or low sodium chicken broth or half and half water & broth
  • 1-2 eggs
  • 1 green onion sliced on the diagonal
  • salt and pepper to taste

Instructions

  • Combine marinade ingredients with pork in a small bowl, set aside, let it sit for 10-15 minutes.
  • Heat 1 T oil in a 3-4 quart saucepan. When oil is hot, add ginger and cook for 1 minute to flavor the oil.
  • Add pork to pot and sauté until it is no longer pink.
  • Add water and/or stock and bring to a boil, immediately lower heat to a simmer for 10-15 minutes.
  • Add creamed corn. Bring to a boil and turn down heat to low. Simmer for 5 minutes.
  • As the soup simmers, break eggs into a small bowl. Lightly beat, no need for the eggs to be completely blended.
  • Turn heat off or set to very low and add eggs to soup in a steady stream, all the while stirring the soup with a fork or chopsticks in one direction. If the flame is too high the egg will curdle!
  • Season with salt and white pepper to taste. Garnish with green onions.

Options:

  • 1 tsp sesame oil
  • ¼ - ½ cup corn kernels ( I use frozen) add with canned creamed corn
  • Substitute ground chicken or turkey for pork

For a thicker soup:

  • Mix ½ tablespoon of cornstarch with 1 tablespoon water or stock. Add this slurry to the soup, heat until soup thickens. Turn heat down and add egg. I find if you use 2 eggs in this soup this will create enough body in the soup such that cornstarch is not necessary.