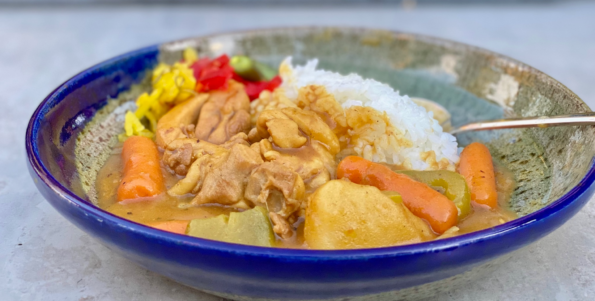
Category: Japanese

Chicken Wings and Daikon Nimono + TV for Rainy Days

Chicken Wings and Daikon Nimono + TV for Rainy Days

It’s raining once again in California.  Which is the best excuse to stay home (in sweats), watch a lot of TV, bake and cook.  I started the weekend on a carb bender.  First, I made No-Knead Focaccia from Bon Appetit, it gets a big thumbs up, pillowy, springy, and delicious.  Caveat:  You will have to start a day earlier for said focaccia, 8 hours of resting time. Then I started on Kristina Cho’s Milk Bread from Mooncakes and Milk Bread, also extremely delicious.  Think of it as the Asian version of Brioche, slightly sweet, buttery, rich, and soft.

THEN, I needed a Bake Break

Well, actually, my hips needed a break.  The combination of being a couch potato and baking is to say the least, lethal.  I had to pick one, couch or carbs. Couch won.  Mainly because I started watching a cute, sweet Japanese show on Netflix called Makanai:  Cooking for the Maiko House. In a nutshell, two BFFs go off to Kyoto to become geishas.  One is a total washout but a fabulous cook (thanks to her grandmother) and becomes the Makanai or resident chef for the geisha house.  A role usually held by an older woman.  In each episode, she makes something yummy, often a comforting, homestyle dish.

Well, you can’t sit there watching without a bowl of something delicious.  The cold, wet, weather and The Makanai put me in the mood for Nimono.  Nimono, a family-style dish usually contains protein, vegetables, or tofu that are simmered in seasoned dashi (stock).  I scoured my fridge and found chicken wings and daikon (radish) perfect for nimono.

Start by browning the wings.  I got fancy and grilled them, don’t bother, one more pan to clean. Then add your dashi, seasonings, and sliced daikon and bring to a boil. Cover the nimono with a piece of parchment.  This keeps everything submerged so it cooks evenly.  Then lower the heat and simmer for 15-20 minutes or until the daikon is soft.  Pierce daikon with a knife to test.  Korean radish would work well also.

Meanwhile, as chicken and daikon are simmering, make your eggs.  Use the ramen egg recipe for a soft center yolk.  Cool the eggs and peel.  Place eggs in cold water to chill (so it doesn’t overcook when you put it in the Nimono).

When the radish is soft, Place eggs in Nimono.  Try to submerge them so they absorb some of the flavor of the broth.  Simmer additional 5 minutes.

Garnish with green onions, and or sesame seeds.  Serve with rice, in front of the telly, watching Makanai, or Midnight Diner, or Julie and Julia…

Chicken Wings and Daikon Nimono and Netflix

Simple and quick Japanese braised dish of chicken wings and radish
Course One dish meals
Cuisine Asian, Japanese
Keyword Chicken, daikon, ninono, one pot meal
Prep Time 15 minutes
Cook Time 20 minutes

Ingredients

  • 6-8 Ounce Daikon radish can use Korean radish cut into 1/2 inch rounds
  • 4 Eggs boiled till the yolk is still jammy, see ramen eggs post
  • 8-12 Chickin wings
  • 1 Clove Garlic
  • 2 tsp Instant Japanese soup stock (you will need 1 cup of dashi) or make dashi with packet or Shiro dashi
  • 2 tbsp Sugar
  • 1 tbsp Soy sauce if using dashi packet, increase to 2 T
  • 4 Tbsp Sake
  • 2 Tbsp Mirin

Options

  • Add mushrooms or sliced carrots with daikon if you like

Instructions

  • Make dashi and set aside. You can use the powder Hondashi, or dashi bags, or Shiro Dashi concentrate. For concentrate dilute 1:12 Make 1-1.5 cups
  • Peel and cut the daikon into 1/2 inch slices. Set aside.
  • Sauté the chicken wings approximately 2 minutes a side in a 3-4 quart saucepan. They should be light brown.
  • Add dashi to pot followed by soy sauce, mirin and sake. Add daikon on top. Bring to a boil then lower heat to a simmer. Use an otoshibuta (dropped or parchment lid) while simmering although you can forego this step. Simmer for 15-20 minutes or until radish is soft when pierced with a knife.
  • While chicken is simmering, make ramen eggs or hard boil the eggs just until the yolk is barely set. Peel and place eggs in an ice bath. When nimono is done, add peeled eggs to it and let it simmer another 5 minutes. Make sure the eggs are submerged in the broth.
  • Ladle the Nikon into bowls, garnish with green onions and sesame seeds. Serve with rice and a half or whole egg per person. It's worthwhile making nimono in advance, since it tastes better the next day. Or just make a larger quantity to keep. Reheat before eating at home, or reheat then let cool down again if using for bento. Can be stored in the fridge for 2-3 days.
Mille-Feuille Nabe Blooming Delish!

Mille-Feuille Nabe Blooming Delish!

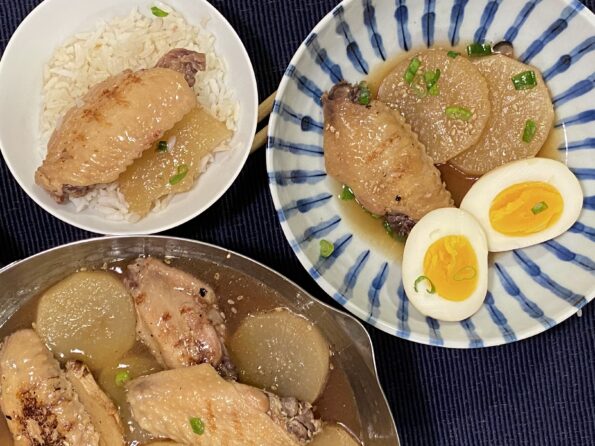
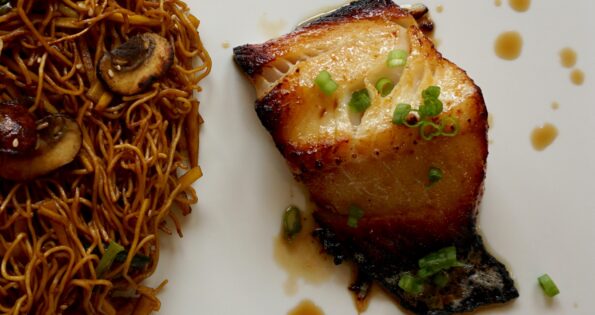
I’m sure I saw this on TikTok or an IG Reel.  It looked so delicious I knew I was going to make it, if not today, definitely tomorrow.  Jackpot, making it today, why?  As most of you know I stop at grocery stores so often I should be classified as a professional food shopper.  The beauty of being a “pro”, I generally have the ingredients for any dish found on the internet, lol. This is a perfect example, a quick perusal of my kitchen and I was in business.

Thinly sliced pork – check. From Asian Market. I always keep some in the freezer, ALWAYS.

Napa Cabbage – check. Picked up a head at the Hankook Market last weekend, cause you never know when you might need some cabbage…

Mushrooms – check. My fridge qualifies as a certified mushroom farm most days.

Dashi or Broth – check. I pulled my bottle of Shiro Dashi from the fridge. Literally concentrated dashi that you dilute with water, VERY good, stupid easy. For a detailed run down check out Guide to Shiro Dashi

OR I can make Dashi with packets from Japan that I keep squirreled away in my pantry.  Again, VERY good,  a bit more work than Shiro Dashi, still super easy.

I won’t go into making my own Dashi cause that would defeat the dinner in a few minutes mantra.

Korean radish – check.  You don’t need it, I just happen to have some so why not?

Staples – check.  Green onions, sesame seeds, soy sauce S&P…Hello? Would not be caught dead without any of these.

Pot- check. Y’all know I didn’t have to list this but I wanted to mention the tiny Donabe I bought at the MANRESA fire sale.  It gives me JOY.  I also used my gorgeous Staub pot for the family-sized version.

So that’s it, all you need to make this scrumptious, perfect when it is cold and wet outside, quick and easy dish.

Let’s Goooooo!

This is super easy, TRUST ME.  Have I ever steered you wrong?  Start with your Napa Cabbage, wash and separate the leaves.  You only need 1 head of cabbage and you won’t use all of it, unless you are feeding a cast of thousands, then you’re on your own.

Take out your thinly sliced pork, I’m sure this would work with beef also. Use any protein cut for Shabu Shabu or Hot Pot.  I know you are thinking, 🤔, can I use bacon?  My inclination is no, as much as I love bacon, the flavor may be too much and too salty for this Nabe.  But if you are feeling bold, try it.  Definitely REPORT BACK to me!

Layer the pork on the Napa Cabbage, covering most of the leaf. Continue layering until you have a stack of 3-4 leaves.  Cut crosswise into 3-4 sections, and try to match it up with your pot.  Each section should be about 2-2.5 inches in height. Definitely not taller as you will need to cover the pot when cooking.  Continue circling the pot with the sections until you reach the center.  I finished with slices of Korean radish surrounding a bouquet of mushrooms smack dab in the middle, totally optional.  But so good.

To finish, add dashi to barely cover the cabbage, cover, and cook.  Cook for 10-15 minutes, the beauty of thinly sliced meats and veggies.  Dinner is served! BACK to the dashi.  Dashi is a fish-based stock, used in many yummy Japanese dishes.  There are ka-zillions of ways to make dashi.  Skip the traditional and time-consuming options.  I use Shiro-dashi alot.  It is a seasoned concentrated fish stock that comes in a bottle.  Dilute Shiro-dashi 10-12 fold for soups and casseroles, EASY PEASY.  The other way is using dashi packets, kind of like tea bags.  Drop it into the water, let it sit to infuse the flavor from the packets, and presto dunzo.

CAVEAT: The Shiro Dashi is seasoned with salt and sugar while the dashi packets just impart the fish flavor.  You will need to add salt or soy if using the dashi packets.

That’s it!  Serve it up with bowls of hot, steaming rice, maybe fry an egg or if you have Mayak Eggs or Ramen Eggs yum. So damn delicious it is criminal.  Or use the flavorful broth on a lovely bowl of noodles, udon noodles would be delicious.

A Picture is Worth a Thousand Words…check out my Instagram for a reel on Mille-Feuille Nabe!

Mille-Feuille Nabe

Japanese Hotpot with Napa Cabbage and thinly sliced pork belly arranged in layers in a donabe of casserole. Dashi serves as the cooking broth that turns this into a lovely dish perfect for cold weather.
Course dinner, Main Course, One dish meals
Cuisine Asian, Japanese
Keyword Mille-feuille, napa cabbage, Pork Belly, soup
Prep Time 15 minutes
Cook Time 15 minutes

Equipment

  • 1 donabe If you have one, but any casserole type pot will do.

Ingredients

Main Ingredients

  • 1 napa cabbage medium size should do
  • 1-1½ lb Thinly sliced pork belly smaller the pot the less you will need
  • 1 bunch of mushrooms like enoki or shiimeji optional
  • Korean Radish or Daikon, thinly sliced optional

Dashi

  • 1 knob ginger 1 inch, 2.5 cm
  • 5 cups dashi See post for dashi options!
  • 2 Tbsp sake cut in half or omit if using Shiro Dashi
  • 1 Tbsp soy sauce cut in half or omit if using Shiro Dashi
  • ½ tsp kosher salt Diamond Crystal; use half for table salt

Finishing Touches

  • green onions, diced for garnish
  • Chili oil or Shichim Togarashi at the table
  • Rice to serve with hot pot or boil some noodles to have with the flavorful broth!
  • Any kind of eggs-Ramen, Mayak or raw that you crack and cook in the broth

Instructions

  • Remove leaves carefully from the base, wash and drain well. Don’t throw away any leaves that naturally came off while rinsing. We’ll use these leaves later on. If you happen to get a ginormous cabbage cut in half or quarters lengthwise. I usually buy small ones so I use the whole leaf. Pat them dry before next step.
  • Layer the pork belly and napa cabbage by placing one slice between each of the leaves. Cover leaves with pork belly, trim if necessary to fit. Repeat 3-4 times depending on size of pot.
  • Cut each napa cabbage wedge into 3-4 pieces each about 2 to 2½ inches (5-6 cm) long. Each section should not be taller than your cooking pot. Try to keep the layers of napa cabbage and pork belly neatly stacked as you slice.
  • Next, start stacking the ingredients in a donabe, hot pot, or regular 10-inch pot. I used a shallow Staub pot with the grill top. Turn the stacks on their side as you pack them so the pink and green layers are visible. Start from the outer edges of the pot and work your way toward the center. Place the thicker cabbage leaves near the outside edge and the tender leaves in the center. Make sure that you pack the pot tightly as the layers will become loose once the ingredients start to cook.
  • If you don’t have enough layers to pack the pot tightly, consider using a smaller pot or place other ingredients in the center. I Like to stuff enoki mushrooms or shimeji mushrooms in the center. Or use slices of radish to surround the mushrooms.
  • Make you dashi. Don’t reduce the salt If you are using dashi from packets since the napa cabbage will release liquid during cooking and dilute the soup. If using Shiro Dashi that is seasoned omit half the soy sauce and sake. Taste your broth, it should not be too salty.
  • Pour the broth into the pot with the napa cabbage and pork belly. Start cooking on high heat. Once boiling, skim off the foam and fat on the surface using a fine-mesh skimmer. Then, reduce the heat to medium low and cook covered until the napa cabbage is tender and the pork belly is cooked through, roughly 8-10 minutes.

Garnish

  • Garnish with chopped green onion/scallion, have shichimi togarashi (Japanese seven spice) on table or sprinkle on top of dish. Serve while hot with rice or boil up some noodles to serve in the delicious broth!
    I like adding a ramen egg or a Mayak egg t round it out.
Back to My Lotus ROOTS (Renkon No Kinpira)


Back to My Lotus ROOTS (Renkon No Kinpira)


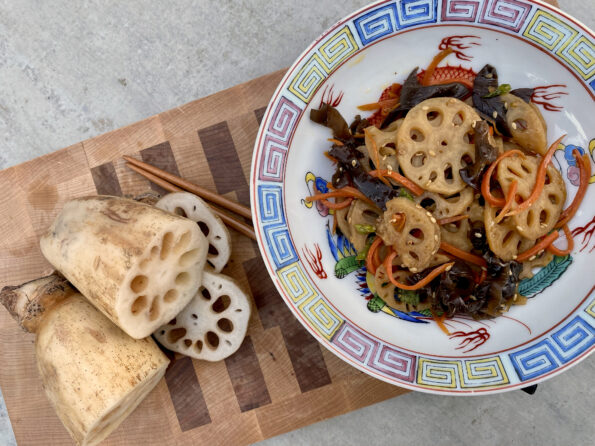
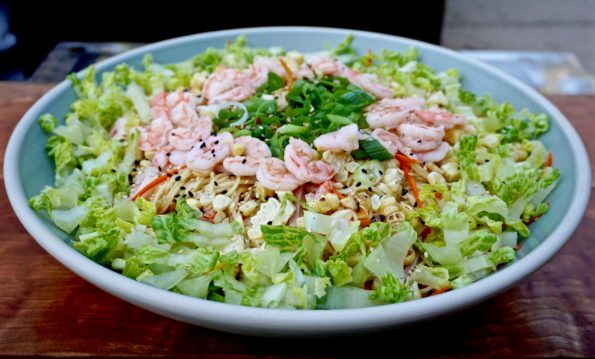
We are always looking for ways to increase our veggie intake.  Part of the problem is our everyday veggies are BORING.  Let me clarify, Veggies aren’t boring, it’s our method of prep.  We should be arrested for vegetable prep neglect and indifference.  We often find ourselves nuking frozen corn or mixed veggies as we sit down to eat. Veggies are a sad afterthought.

No More

Expanding our veggie-verse has become a priority.  What we have discovered are the veggie-centric dishes such as Chinese Cucumbers, Indian Dal, Aloo Gobi, Korean Banchan,  or Japanese Tsukemono.  Make batches ahead of time so dinner on a busy night means pulling out the Tupperware from the fridge.  Win-win!

One of my favorites is Kinpira Renkon or Stir-fry lotus root.  Make a batch and store it in the fridge.  Super simple to make and a delicious accompaniment to rice.  I tweaked the recipe to include carrots and cloud ears (black cloud mushrooms).  Look for fresh lotus root in Asian supermarkets, it is mild in flavor, crunchy, and delish.   It also comes vacuum-packed, sliced, and ready to use.  If you can’t find it, Jicama might work.

Slice the lotus root and place it in water with a touch of vinegar.  Julienne the carrots, and soften the cloud ear mushrooms in warm water.  That’s it. The veggies are then sauteed’ in soy sauce, Mirin (cooking wine), and sesame oil.  Easy peasy.

Enjoy!

Simmered Lotus Root (Renkon no kinpira)


An easy Japanese stir fry veggie dish
Course Appetizer, Side Dish
Cuisine Asian, Asian-American, Japanese
Keyword black fungus, Carrots, Kimpira, lotus root
Prep Time 15 minutes
Cook Time 5 minutes

Ingredients

The Star

  • 2-2.5 cups lotus root peeled and thinly sliced
  • 2 Cups water or enough water to cover lotus root
  • 2 Tsp vinegar

The Supporting Cast

  • 1/2 cup carrots julienned
  • 1 T dried cloud ear mushrooms Once soaked will yield about 1/3 cup
  • 1 tbsp toasted sesame oil
  • 1 tbsp vegetable oil
  • 2 tbsp mirin
  • 2 tbsp soy sauce or tamari

To Finish:

  • 1 tsp toasted sesame seeds
  • dash of chili flakes or 1 small fresh chili pepper, thinly sliced, for milder version de-seed and de-vein pepper optional (shichimi togarashi is recommended)
  • 1 stalk green onion, diced optional

Instructions

  • Soak the lotus slices in cold water and vinegar for 10 minutes and drain and rinse a couple of times.
  • In a large saucepan over high heat, warm both oils. Once hot, add the lotus root slices and cook until they become soft, 4-5 minutes. Add carrots halfway through cooking time. Stir in the mirin, soy sauce/tamari and reduce heat to low. Add cloud ears when you add the sauce ingredients to pan.
  • Simmer until the marinade has almost disappeared.
  • Remove from heat, sprinkle with sesame seeds and shichimi togarashi prior to serving.

Notes

Simmered Lotus Root (Renkon no kimpira)

Alternate recipe

Instructions

  • Peel and rinse the lotus root. Cut it in half and then thinly slice about 4-6mm thickness. Add the vinegar to the water and soak the lotus root in the vinegary water for about 3 minutes.
  • Julienned carrots and black fungus. Set aside.
  • De-seed and finely chop the chili pepper or slice into thin rings.
  • Heat sesame oil over medium heat and stir fry the lotus root. Once almost finished cooking (about 75% and starting to look more translucent), add the sake, mirin and sugar. Cook for about 2 minutes or until liquid is mostly evaporated. Add the soy sauce and fry for 1 minute, or until most of the sauce is soaked up. Lastly toss in the chili pepper and sesame seeds. Remove from burner, serve and enjoy!
(Hiyashi Chuka – Ramen Salad) Swept Away By A Summer Ramence Summer Madness #2

(Hiyashi Chuka – Ramen Salad) Swept Away By A Summer Ramence Summer Madness #2

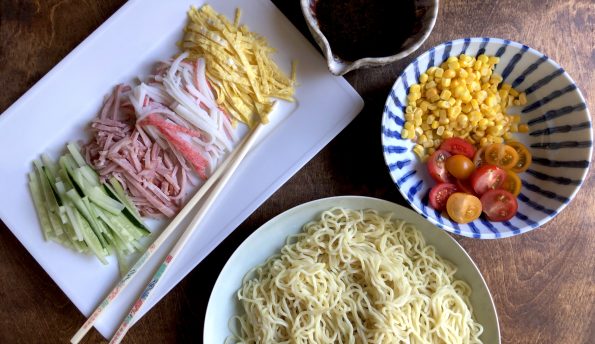
TAs temps edged upward this past week, I began thinking about cold noodle dishes to counter the heat. One of our favorite ramen joints in San Jose features a summer noodle salad that the hubster loves. This prompted me to think it was time to add a cold ramen dish to my repertoire.  I perused one of my favorite sites, Just One Cookbook, and found a classic Japanese cold ramen dish, Hiyashi Chuka.  Bingo, I was off to the races.  At first glance, it seemed very similar to my Somen SaladThe dressing has soy sauce, sesame oil, sugar, and rice vinegar, for instance.  A big difference is Hiyashi Chuka starts with a thicker, more substantial ramen noodle.

Summer Ramence

The dish is eye-candy, the noodles are hidden by a colorful palette of toppings including julienned pale green cucumbers, orange-tinged crab leg, slivers of green onions, pink honey ham and shreds of fried egg.  Cold noodle salads like this refreshing and delicious Hiyashi Chuka are perfect for summer potlucks, picnics and pool parties.  I hope you will add it to your summer rotation.

The Skinny on Noods

Both fresh or dried noodles work in this dish.  I like using fresh ramen or lo mein. If you can get a hold of ramen noodles by Sun Co. from Hawaii, get it. This brand supplies the bulk of ramen houses in the US. and has a really nice chew or consistency.  In a pinch, you could use linguine or spaghetti but my first choice would be an Asian noodle. If you are gluten-free, rice or yam noodles would be a good substitute.  Confused about the multitude of Asian noodles out there? Here is a great Asian noodle primer from Serious Eats.

Dressing It Up

The dressing is on the sweet side so I would start with two tablespoons of sugar, taste and add more if desired.  You can use Ponzu, a citrus soy sauce, instead of soy sauce. Toppings can be ANYTHING you like or have on hand.  Keep in mind you want the play between sweet and salty, crunchy and soft. I like cucumbers, honey ham, imitation crab, egg, corn, and tomatoes. Don’t like imitation crab?  Use bay shrimp or splurge on real crab.  You can substitute honey turkey, shredded chicken (leftover soy sauce chicken would work really well) or char sir (bbq pork) for the ham. I leave out the lettuce sometimes or substitute shredded cabbage.  I love a good sprinkling of chopped scallions and cilantro.  Oishii!

HIYASHI CHUKA (COLD RAMEN)

A delicious, refreshing cold noodle salad that is perfect for summer!
Course Main Course, Salad
Cuisine Asian
Keyword japanese, Noodle, Ramen, Salad, sesame
Prep Time 45 minutes
Cook Time 10 minutes
Servings 8 Servings

Ingredients

Dressing

  • 6 Tbsp soy sauce Any all purpose soy like Kikkoman will work, or substitute half with Ponzu for a hint of citrus
  • 4 Tbsp sugar Adjust to taste! Start with 2 tablespoons
  • 3 Tbsp rice vinegar
  • 2 Tbsp sesame oil
  • 2 Tbsp water
  • 1 Tbsp white sesame seeds roasted/toasted
  • ¼ tsp ginger grated
  • ½-1 tsp la-yu, optional Japanese chili oil

Egg crepe, shredded

  • 2 large eggs beaten
  • 2 tsp sugar
  • ¼ tsp salt kosher or sea salt; use half if using table salt
  • neutral flavor oil vegetable, canola, etc

Toppings

  • 1/4-1/2 pound Bay shrimp
  • 1 Persian/Japanese cucumbers or 1/3 English cucumber, julienned
  • 1 iceberg lettuce shredded, or use romaine lettuce
  • ½ Tomato cut into wedges, or cherry tomatoes quartered
  • 3-4 slices Honey Ham Sub bbq pork, or honey turkey, Canadian bacon, julienned
  • 4-6 imitation crab meat kanikam or splurge and use real crab, or fish cake, shredded or julienned
  • 1/2 cup Kaiware radish sprouts or green onions, chopped

Other toppings

  • Poached chicken or leftover soy sauce chicken shredded, in place of ham
  • Julienned carrots
  • dried wakame seaweed
  • shredded nori seaweed kizami nori

Noodles

  • 2 package fresh ramen noodles 12 ounces each substitute dry ramen noodles, or Lo-mien

Garnish

  • 1 Tbsp white sesame seeds roasted/toasted
  • Japanese karashi hot mustard optional
  • pickled red ginger beni shoga or kizami beni shoga, optional

Instructions

  • Combine dressing ingredients in a medium bowl and whisk together. Set aside or if made in advance, store in fridge.
  • For eggs, make thin egg crepes and cut it into thin strips. Heat oil in non-stick pan over medium heat. Pour the egg mixture into the pan, tilt & swirl pan to distribute egg. Like making a crepe. Cook until set and flip egg over. You will have a few brown spots, but should be predominantly yellow. Slide crepe onto a plate and reserve. When it is cool enough you can roll the egg crepe up and cut it into thin strips.
  • You can use large prawns if you like, but I like using bay shrimp which generally come precooked. Easy peasy.
  • Cut all the topping ingredients as directed.
  • For the noodles, bring a pot of water to a boil and add the noodles. Separate the noodles before dropping into water. Cook according to package directions. Drain the water and rinse the noodles to remove starch. Allow noodles to cool completely. Chill in fridge if desire. Place noodles in a serving bowl and mix half of dressing into noodles.
  • Place all the toppings and pour the remaining dressing on salad before serving. Serve with karashi hot mustard and pickled ginger on the side, if desired. Refer to pics, ingredients are usually arranged in a radial pattern on top of the noodles.
Muffin been the Mochi that Caught My Eye (Butter Mochi Muffins)

Muffin been the Mochi that Caught My Eye (Butter Mochi Muffins)

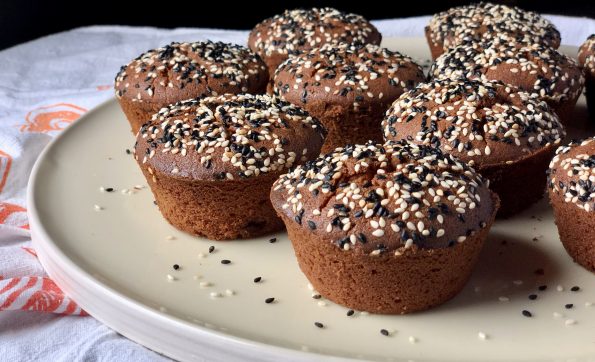
Always searching for new and different treats, I came across an article that spotlighted Third Culture Bakery in Berkeley.  The baker is an alum of Cal (Go Bears) who chose food over toxicology (good choice) and thus Mochi Muffins made with sweet rice flour were put on the map.  Though I haven’t made it to Berkeley to try one, I found a couple of recipes online that sounded scrumptious, so it was off to the rices!  Update: I just posted a new mochi muffin recipe, Mango Mochi Muffins made with mango tea and freeze-dried mangos!  It’s small-batch baking, only 8 regular size delicious muffins.

My Sweet Rice, Oh My Rice

For the uninitiated, mochi (sweet rice flour) is a cornerstone of Asian treats.  Sweet rice is PULVERIZED into flour to which water and flavorings are added.  It ends up looking like the BLOB, really.  It can be flavored, baked, steamed, fried and made into countless delicious treats both sweet and savory.  During New Year’s, Japanese families gather to pound mochi in a tradition called Mochitsuki. Just for your viewing pleasure here is Mitsuo Nakatani, Japanese Mochi Master.  Enjoy

Traditional mochi starts with steamed rice and is pounded and shaped into sweet or savory rice cakes.  Mochi muffins and Hawaiian Butter Mochi start with sweet rice flour, mixed with liquids, and baked.  Since I don’t foresee any of us pounding mochi, let’s make muffins and Hawaiian Mochi. Infinitely easier and pretty darn tasty.

Back on the Muffin Trail

If you have ever had Manju from Shuei-Do Sweet Shop in Japantown in San Jose, or Butter Mochi from Hawaii and liked it…you’re going to love these.  If you haven’t had mochi, this is a good introduction.  Not quite as gooey as Manju and definitely not cakey like a muffin, it’s a delicious hybrid of the two.  A touch of sweetness, crispy on the outside, dense and chewy on the inside, and crunchy from the generous sprinkle of sesame seeds on top.  It’s different but delicious.  If that wasn’t enough, they are GLUTEN-FREE.  You’re welcome.

Rice, Rice, Baby

The most important item in the pic is the Mochiko Sweet Rice Flour by Koda Farms.  This is the go-to brand.  You can definitely find it in any Asian store (along with the sesame seeds), and if you’re lucky, at some of your larger local markets.  Take a walk down the international/ethnic food aisle.

I found quite a few recipes for Mochi Muffins online and finally settled on one from a beautiful blog called Snixy Kitchen.  Her batch made 12 muffins, which made her recipe the frontrunner as most made 24.  As yummy as they are, what am I going to do with 24 muffins?!

Mochi muffin batter

The batter comes together in a snap:  melted butter, coconut milk, egg, brown sugar, and rice flour.  Stir together and pour into a muffin tin.  Boom, done.  My batter was thicker than some of the posts I’ve seen.  This may account for the slight dome mine had.  I also found a recipe from Saimin Noshrat in the NYT.  I think I may try a couple of her tweaks the next time I make these.  Trust me, there will be a next time.  I will use light brown sugar, substitute evaporated milk for some of the coconut milk, and brown my butter.  Not to worry, a full report will follow.  Hmmm, can’t wait to make another batch.

The longer you leave these in the oven, the less gooey and more cake-like they will be.  The first batch was baked for 60 minutes.  I think I should have pulled them out sooner, I like gooey.  Now I check at 40 minutes and pull them out around 45 minutes.  To test them, use a knife to poke the center of a muffin.  It should come out fairly clean with a bit of crumb.

More Mochi Madness

After making these muffins if you like the chewiness, definitely try the Hawaiian Butter Mochi Muffins, inspired by Aloha Kitchen by Alana Kysar.  A little less flour and a bit more liquid kick up the gooey, buttery, lusciousness of these bites.  Bake them in a muffin tin for crispy edges.  I ADORE both of these muffins.

These are soooo good, a little more squishy, very buttery, topped with shredded coconut.

Also check out Peanut Butter Mochi from A Common Table by Cynthia Chen McTernan. Delish! LOVE, love, LOVE

If you would like to try traditional Japanese Mochi, here are my recommendations:  Fugetsu-Do in Little Tokyo in LA, the oldest family-owned Japanese Shop in the US, Shuei Do Manju Shop in San Jose, and in my hometown of SF, Benkyodo Company in Japantown (now closed😢😢😢 )All family-owned artisan shops.

Mochi Muffins
Print Pin
4.50 from 18 votes

Butter Mochi Muffins

Course Dessert
Cuisine Asian-American
Keyword coconut milk, Gluten free, mochi muffin
Prep Time 15 minutes
Cook Time 45 minutes

Ingredients

  • 1/4 cup (2 ounces )unsalted butter, melted and cooled, plus more for greasing pans sub brown-butter
  • 2 cups (320 grams) mochiko sweet rice flour Koda Farms
  • 1 cup (200 grams) organic dark brown sugar* light or dark brown sugar will work
  • 2 teaspoons baking powder
  • 1/2 teaspoon kosher salt 1/4 tsp sea salt
  • 1 13 ounce can full-fat coconut milk Sub evaporated milk, half to all
  • 2 large eggs room temperature
  • teaspoons vanilla extract
  • 1 teaspoon molasses optional, added for flavor or use Golden Syrup or honey
  • tablespoons each black and toasted sesame seeds, for garnish

Instructions

  • Preheat oven to 350°F and place the oven rack in the middle of the oven.
  • Grease the sides and top of a 12-cup muffin tin well with soft butter.
  • In a medium bowl, whisk together the sweet rice flour, brown sugar, baking powder, and salt.
  • In the bowl of a stand mixer fitted with the whisk attachment or a large mixing bowl, whisk together the melted butter, coconut milk, eggs, vanilla, and molasses.
  • With the mixer on low speed, slowly add the dry ingredients to the wet ingredients and mix until completely combined.
  • Divide the batter among the prepared muffin tin, filling each cup all the way to the top.
  • Sprinkle the tops with black and white sesame seeds.
  • Bake 45-50 minutes until the top is brown and crispy and the muffin springs back when poked with a finger.  Bake for less time. for muffins that are chewier and less cakey. Muffins are done when a skewer comes out relatively clean and the tops are brown.
  • Let cool 10 minutes in the pan, then transfer to a wire rack to cool completely.
  • Store in an airtight container for up to 3 days.  Can be frozen and thawed at room temp.

Notes

Organic dark brown sugar is richer and more caramel-y than conventional, but you can use regular brown sugar.
Any muffin tin will do, but for ultimate crispy exterior, use a dark non-stick muffin tin.
If using a light muffin tin, you may have to bake the muffins a little bit longer.
If keeping them for longer, they'll lose their crispiness after a day or two in storage, put them in the oven for a few minutes to crisp again before eating.

Butter Mochi Muffins

Miso Black Cod (A Fable About Sablefish)

Miso Black Cod (A Fable About Sablefish)

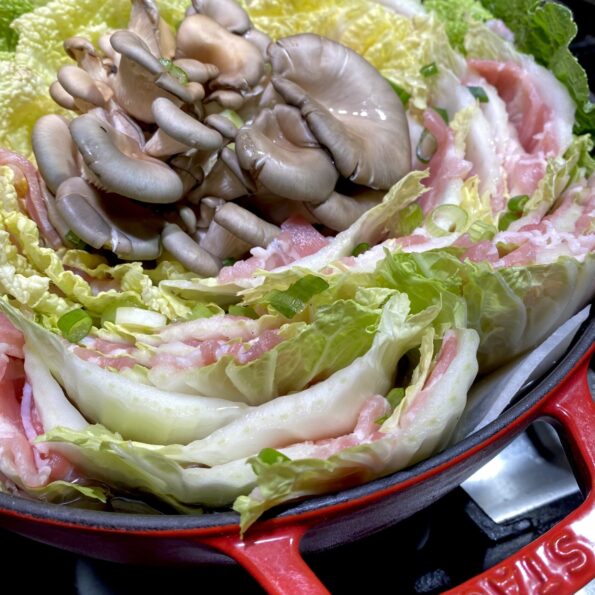
Surprised? Forehead slap in disbelief that this is not another sugar-filled dessert recipe?  I know, me too!  But this dish is so yummy and so simple I just had to pass it along.

Lately, I have been going to Whole Foods to shop for my seafood and meat.  Why?  Partially out of environmental guilt and I know this is going to sound awful because it is much easier on the pocketbook when it is just Wes and me.  If you know my kids, you know what I mean.  While Wes and I are feasting on sushi or a beautiful piece of grilled salmon my kids are eating dorm food or cold pizza.  I’m not that cold-hearted though, they pick where and what they want to eat whenever they come home or if we go to visit them, it’s definitely no-holds barred.

DSC04410

While perusing the seafood selection at WF I came across some black cod also known as sablefish.  I first tasted this lovely fish at a Chinese restaurant, Hong Kong Lounge, in the City and was absolutely floored.  I was at a banquet and looking forward to the whole fish steamed with ginger and onions topped with soy sauce to finish the meal when…

What?

Instead out from the kitchen comes this little chunk of fish, no head, no tail, unceremoniously plopped on a platter unadorned with any of the usual trappings.  The outside had a nice toasty brown glaze, my guess, it had been roasted.   Didn’t look like much but supposedly their signature dish.  I took a piece and popped it in my mouth…..BAM! WOW! Flavor explosion, sweet, salty, and smokey all at once, and the texture-oh my, buttery, silky, fatty..holy mackerel, it was DELICIOUS!  I raved about it all the way home, an hour’s drive from the City to Los Gatos. Miso Black Cod

More upside, this fish is on the Monterey Bay Aquarium’s Seafood Watch sustainable fish list and it is loaded with alpha omega fatty acids…woohoo, I think we have a winner.

For the sake of transparency, though not unique to black cod…if you can cook it on your grill outside, do it. If not, I hope you have air fresheners and good ventilation in your kitchen or all the neighborhood cats will be hanging out at your house.  But that’s fish for you. Oh, and it will set you back a pretty penny but oh so worth it.

Nobu Knows

I immediately bought a piece (yes, one piece, just me and Wes) and googled recipes for Black Cod.  The first recipe that jumped off the screen was Nobu’s Miso Roasted Black Cod.  His recipe has been shared so many times I’m sure it has rock-star status on Pinterest.  It’s simple to prepare and just takes a couple of minutes to assemble.  Yep, stupid easy! Make the marinade, toss it and the fish in a zip-loc bag, and let it sit luxuriating in the miso for 24-48 hours.

The marinade is all of 4 ingredients. White miso paste, Mirin (Japanese cooking wine), Sake (Japanese rice wine), and sugar.  That’s it, folks.  You can embellish if you want.  A touch of Ponzu (citrus soy sauce), a dash of sesame oil, or a smidgen of grated fresh ginger would go well.  This first time I stuck to the recipe and it was delicious but I’m sure I will experiment. It’s how I roll.

If you like fish, run, don’t walk to your nearest seafood purveyor or Whole Foods, and pick up some Black Cod. So good.  Serve with a bowl of rice or with Hong Kong Style Soy Sauce Noodles (pictured).  Delish.

A Fable of Sablefish (Miso Black Cod)

Easy and delicious roasted black cod!
Course Main Course
Cuisine Asian
Keyword Black Cod, Miso, Sablefish
Prep Time 10 minutes
Cook Time 15 minutes
Total Time 25 minutes

Ingredients

  • 2 tablspoons sake
  • 2 tablespoons mirin
  • 2 tablespoons white miso paste
  • 1.5 tablespoons sugar
  • 2 black cod fillets about 1/2 pound each
  • 1 scallion chopped for garnish

Instructions

  • Bring the mirin and sake to a boil in a small non-reactive saucepan over high heat. Reduce heat and add miso, stir to dissolve the miso. Add sugar, increase heat and continue to cook until sugar is completely dissolved. Set aside to cool.
  • If the plan is to use your oven, you can take the skin off the fish. If grilling leave it on to help keep the fish together.
  • Once cooled, spread the marinade on the fish evenly. Cover tightly or seal it in ziplock bag. Let it sit for 24-48 hours
  • Before cooking, wipe excess marinade off of fish
  • To cook: Preheat oven to 400 degrees or outdoor grill.
  • Oven method: Roast at 400 degrees for 8-10 minutes. Finish fish by broiling a couple of minutes to hear the edges and brown the outside.
  • You can also panfry the fish first to brown and create those crispy edges before finishing the fish in the oven for 7-10 minutes or until fish flakes.
  • Grill method: Place fish skin side up on grill and cook on indirect heat for 8-10 minutes.
  • Garnish with green onions and serve with pickled ginger if you like.

Notes

You can use any firm fish with this marinade and method, salmon, bass or halibut would also work.


Super Summer Somen Salad (Cold Noodle Salad)

Super Summer Somen Salad (Cold Noodle Salad)

During the summer I find this thought running through my brain quite often..” hmmm, it sure is hot, what should we do for dinner? definitely not turning on the oven or standing over a hot stove. I just want something light and refreshing and satisfying”.

LOOK! Up in the sky..ok, not up in the sky just whirling in my brain, it’s a salad! It’s pasta!  NO, IT’S, (music building to a crescendo)… SUPER-SOMEN SALAD!

DSC04266

It’s patently obvious that the summer heat is getting to me…

It’s likely I asked for this recipe at a potluck or found it in a Japanese/Hawaiian Community cookbook, I actually don’t remember.  This is my go-to hot weather dish for potlucks, block parties, and impromptu get-togethers.  You can make it ahead of time (although it doesn’t take a ton of time), vary the toppings (which are limited only by your imagination) and it’s incredibly easy.   It’s cool and refreshing, crisp, light, yet substantial.

Over the years I have modified the recipe, tweaked the dressing by adding a bit more soy sauce and sesame oil to intensify the flavor. Substituted Ponzu (citrus soy sauce) and added different vegetables for flavor and texture.  Try capellini pasta in place of somen noodles (sshh, don’t tell my Hawaiian Auntie Lil, she’d slap me upside my head if she knew I was using Italian pasta!) and glamourized it by adding fresh bay shrimp or crab.  Play with the ingredients and make it your own.  Because I like a lot of additions, double the dressing recipe.  Add to taste.  A single recipe will not be enough.

Summer Cold Noodle Salad- Somen Salad

Somen Salad perfect for hot summer days. This cold pasta salad is loaded with veggies, and flavored with a soy-vinegar dressing, it's delicious!
Course noodles, Salad
Cuisine Asian-American
Keyword hawaiian, pasta salad, somen
Prep Time 30 minutes
Cook Time 10 minutes

Ingredients

Original Recipe: Tweaks in parenthesis:

  • 1 Lb. Somen, Boiled or substitute 1 pound capellini, cooked al dente according to pkg
  • Iceberg Letttuce, Shredded Sub romaine lettuce, shredded (1 1/2 cups)
  • Ham Or Char Siu, Julienned Use a sweet ham, maple or honey baked
  • 2 Eggs, fried and julienned (like a crepe)
  • 1 pkg Kamaboko (Japanese fishcake), julienned Subtitute 1/3 pound cooked bay shrimp or crab
  • 2 Stalks Green Onion, diced
  • 1/2 cup corn kernels frozen, thaw and drain
  • 1 cup Carrots and/or cucumbers julienned
  • cilantro garnish

Dressing:

  • 2 Tablespoons Sesame Seeds
  • 2 Tablespoons Sugar
  • 1/2 -1 Teaspoon Salt
  • 1/4 Cup Cooking Oil
  • 3 Tablespoons Rice Vinegar

Variations

  • 1 Tablespoon Sesame Oil
  • 1-2 Tablespoons Shoyu Can sustitute Ponzu for half if you want
  • 1/2 tsp freshly ground black pepper

Instructions

Dressing

  • Combine all the ingredients and half of the salt in a jar or sealable container.
  • Shake well to make sure the sugar is dissolved. Start with half the salt, especially if you add the variations, which I always do, taste to see if additional salt is required.
  • Don't skip the sesame oil, it adds alot of flavor.
  • Double the dressing, a single recipe is not enough. Add half of dressing composing salad. Add remainder when serving salad. Reserve about a third of the remainng dressing, taste the salad before adding.
  • The dressing can be make ahead.

Salad

  • Cook pasta as directed on the package for al dente noodles. Somen is very thin and easy to overcook so keep a close watch. Rinse and drain well.
  • Place the noodles on the bottom of a large service bowl. Toss the noodles with (~1/2) of the dressing before topping with the veggies and protein.
  • Place julienned vegetables and corn on top of the noodles, than the egg and ham in concentric circles followed with the shrimp and green onions in the center. Contrast the colors for appeal. Shredded lettuce should be on outer edge of bowl.
  • Garnish the top with additional sesame seeds and cilantro.
  • Just before serving add the rest of dressing, toss well and serve.

Notes

The original recipe did not contain any of the variations in the dressing.  I always add them.  Just wanted to leave the original intact.
If making the salad ahead of time, add the lettuce last so it retains its crispness.