Tag: microwave

Lemon Curd, So Nukalicious!

Lemon Curd, So Nukalicious!

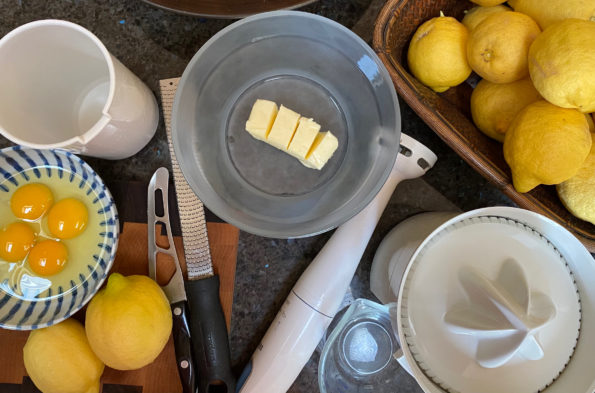
When Tree Gives You Lemons…..Make Lemon Curd!

Outside my kitchen window grows one of my few garden successes,  a lemon tree.  While Meyer Lemon trees are ubiquitous here, I have a beautiful Eureka Lemon tree that despite me, produces a ton of lemons year-round.  I actually fertilized it this year…I now have a gazillion of lemons.  As I stare at my bowl of overflowing lemons this question comes to mind, what do I do with all these lemons?

Lucky for me, I found Melissa Clark’s Lemon Curd recipe on NYT Cooking.  Not only did I make a dent in my lemon stash (albeit, a tiny dent) but the recipe calls for making the curd in the microwave, super easy. Win-win.  Is it less time and work than the conventional doubler-boiler, on the stove process?  Not by much, but I do like the one bowl,  incremental cooking and intermittent stirring with the microwave recipe. You don’t have to stand over the stove constantly stirring.

Microwave Mania

I have a 600-watt microwave, the LOW end of the microwave power spectrum (hey, I got it to reheat leftovers, don’t judge me).  This is my process.  Combine the ingredients using a blender or stick blender and pour blended ingredients into a microwave bowl (like a Cook Anyday bowl!).

The OG recipe directions-microwave at full power in 1-minute increments, stirring between each minute.  When it starts to thicken, reduce power to 70% and microwave in 30-second intervals, once again whisking between intervals.

What I did-I started at full power but lengthened the first increment to 2 minutes before taking it out to whisk for the first time (low wattage adjustment).  At the 5 minute mark, the curd was still pretty thin, I added one more full power minute before reducing the power to 70%.  My lemon curd took another 2-1/2 minutes at 70%, 1 min increment for the first minute, and then 30-second increments, stirring each time.  The curd will thicken more as it cools. The cooking process  is done when the curd reaches a temperature of 180 with a thermometer or when it coats a spoon or spatula.

Moral of the Story

Adjust times according to your microwave and whisk well!

The Lemon Curd is silky smooth, luscious, and lemony.  I used 3/4 cup of sugar and it was fairly tart, if you like it sweeter use one cup of sugar.  Different fruits such as passionfruit or grapefruit would work well with this recipe too!

Easy Lemon Curd

Delicious lemon curd made in the microwave from Melissa Clark and NYT Cooking!
Course Breakfast, Dessert
Cuisine American
Keyword lemon, lemon curd
Prep Time 5 minutes
Cook Time 10 minutes

Ingredients

  • ½ cup (113 grams unsalted butter) 1 stick
  • 2 teaspoons finely grated lemon zest
  • 1 cup (240 milliliters) freshly squeezed lemon juice from 4 to 6 lemons
  • ¾ cup to 1 cup (150 grams to 200 grams) granulated sugar
  • 3 large eggs
  • 1 egg yolk
  • Pinch of salt

Instructions

  • Put the butter in a large (at least 6 cup) microwave-safe glass bowl or measuring cup. Cover bowl and set your microwave on 50 percent power, melt the butter. (~1 to 1 1/2 minutes).
  • Pour butter into a blender and add lemon zest, juice, sugar, eggs, egg yolk and salt. Blend until smooth. You can also use a stick blender. Pour mixture back into the same glass bowl you melted the butter in.
  • Microwave mixture, on full power, in 1-minute intervals for 5 minutes. Whisk furiously between intervals, especially around the edges of the bowl. It should start to thicken. (If it looks like it’s starting to thicken before 5 minutes, stop and continue to the next step; microwaves can vary.) See post for details.
  • Reduce power to 70 percent and continue to microwave for another 1 to 2 minutes, stopping to whisk every 30 seconds until the curd thickens enough to coat the back of a spoon. (It will continue to thicken as it chills.) An instant-read thermometer should register 180 degrees (yet another reason to get a thermometer)
  • Whisk well. If you think there are any coagulated bits of egg, strain curd through a fine-mesh sieve into a clean bowl. Or if it looks smooth, you can leave it in its current bowl. Press a piece of plastic wrap against the surface to create an airtight seal and let the curd cool to room temperature. Refrigerate until cold, at least 3 hours.
  • Enjoy! Pair your curd with fresh berries, scones, or fold it into whipped cream for cake filling. Eat it off a teaspoon!
Asian Soul Food: Steamed Chicken with Chinese Sausage & Mushrooms

Asian Soul Food: Steamed Chicken with Chinese Sausage & Mushrooms

Dinner in the Time of COVID.  I find myself not just cooking more but cooking more of the dishes I grew up eating.  Favorite dishes that my father and grandfather cooked for us.  We all need a little bit of comfort these days, ain’t that the truth.

A favorite in our house is Steamed Chicken with Chinese Sausage and Mushrooms.  This time it was part of a meal that is as down-home as it gets.  We started with Kid-favorite Corn Soup Steamed Pork with Salted Egg, and Sauteed AsparagusI was exhausted from all the prep!  How my Dad pulled off dinners like this nightly after a full day’s work, continues to amaze me.

The keys to Delicious Steamed Chicken with Chinese Sausage & Mushrooms

Use bone-in chicken if possible.  The flavor is better when the meat is left on the bone…is there a scientific reason? Who knows, but I’m not about to buck my dad’s advice.  But, don’t let that stop you from making this dish, by all means, if all you have is boneless chicken, use it.  It will still be onolicious.  I like to use wings, but any part of the chicken will work.  Breast meat is a little trickier, it is less forgiving than dark meat and can overcook. 

Chinese Sausage

Also known as Lop Cheung, a delicious sweet and slightly savory preserved meat that is found in tons of Chinese dishes.  I love Lop Cheung, when I am craving an easy comfort dish, I’ll throw a couple on top of the rice right before turning on my rice cooker, as the rice cooks so do the Lop Cheung.    You can find Lop Cheung at most Asian markets and at some of the larger supermarkets in the Bay Area.  There are several different varieties including pork, pork & chicken, and pork & liver.  Unless you grew up with Chinese Sausage, stay away from the liver one which is gamier and stronger in flavor.  The meat is marinated, stuffed into casings, set to dry, and then kept cool.  I still head to SF Chinatown to buy my Lop Cheung from Mow Lee or Wycen.   Old School all the way.

I hope they survive COVID19.  

Pre-cook stage

The Dried Stuff

Dried Shiitake or Black Mushrooms, Cloud Ears (Dried Fungus), and Lilly Buds or Golden Needles round out the dish.  Soak the dry ingredients in warm water 15-30 minutes until soft.  Each provides flavor and texture to the dish.

Shiitake Mushrooms  Back in the day, shiitakes only came in dried form.  Nowadays you can get fresh shiitake mushrooms easily, they’re delicious BUT for the most part, in Chinese cooking we use the dried form.  Why? Concentrated flavor.  The flavor of the mushroom is intensified and that flavor is essential to the dish.  Soak the mushrooms first, (keep the soaking liquid for stocks and soups), trim the stems that can be kind of woody, and slice into desired thickness.

Cloud Ears or Black Fungus is just another kind of mushroom.  It doesn’t have a ton of its own flavor but adds texture, in the form of CRUNCH and absorbs the flavor of the marinade-YUM.  After soaking, pinch the stem-tip off.  The tip is where the stem connected to the tree, it’s a little crusty.  

Lily buds add an earthy flavor and texture.  After soaking the lily buds, pinch or cut off the ends (it will look a little darker than the rest of the bud and tie a knot in the middle of each strand.  Yeah, don’t know why, but I do it because my Dad told me to.

Don’t forget to add the green onions and cilantro at the end.

There you go, all the components to a down-home soul food dish.  

Microwave Madness 

Microwave directions

I bought microwave cookware, Anyday Cookware, on Dave Chang’s recommendation (Mr. Momofuku), boy, that guy can sell a product.  Pros and cons? Pros-no steamer set up, no pan with water, hassle-free steam cooking, and one bowl cooking. Cooking time cut by more than half.  Cons?  Finding space to store new bowls plus a major hit on latte money, lol.

Anyways, follow the same steps until you get to the point of putting the dish* in the steamer.  Instead, *put all your ingredients into a microwave cooking container and forget the steamer. 

Cover, vent, and place your dish in the microwave.  My microwave’s power output is 700watts (which is on the low side).  For this dish, I use full power for about 8 minutes.  You will have to adjust according to your microwave wattage.  The Anyday site has an interactive basic guide that allows input of wattage to determine cooking power and time.  In general, if your microwave wattage is higher, shorten the cooking time or reduce the power level and keep the same time.  You will need to experiment a little with your microwave.  I add 1-2 tablespoons of the saved mushroom liquid so I’ll have some sauce in the dish.

Steamed Chicken with Lop Cheung and Mushrooms

Course Main Course
Cuisine Asian
Keyword Steamed Chicken
Prep Time 20 minutes
Cook Time 30 minutes

Ingredients

  • 1.5 pounds chicken breast or combination of chicken pieces, bone-in cut into bite-sized pieces or chicken wings separated into drummettes and flats.
  • 2 Chinese sausages thinly sliced on the diagonal
  • 3-4 black mushrooms soaked in warm water until soft and julienned
  • 2 Tbsp Cloud ears soaked and root ends pinched off
  • 12 Lily buds soaked, ends pinched off and a knot tied in the middle, skip the knot tying if you want
  • 1-2 stalks green onions cut into 1-inch pieces, reserve some of the green part to finish the dish
  • 1/4 bunch cilantro for garnish

Marinade

  • 1 tsp. sugar
  • 1/2 tsp salt
  • 1 tablespoon soy sauce AP Pref chinese LKK Premium Soy Sauce
  • 1 tablespoon oyster sauce LEE KUM KEE with the kid and mom in boat
  • 1 tablespoon Shaoxing Wine or Chinese Rice Wine
  • 2 slices ginger julienned
  • 2 tsp oil I like peanut oil, but any vegetable oil will work
  • 2 tsp cornstarch
  • 1/2-1 tsp sesame oil optional, if you have it, definitely use it
  • 1/4 tsp white pepper

Instructions

  • Combine ingredients for marinade.
  • Add chicken, mushrooms, sausage, cloud ears and lily buds to marinade. Stir to combine well. Marinade for 15- 30 minutes. Place in a heatproof dish such as a shallow bowl or pie plate. Top with some of the diced green onions.
  • In a steamer or a stainless wok, set up steamer rack, fill with water up to but not touching the steamer rack. Place on heat and bring to boil.
  • Place chicken on steamer rack.
  • Steam for 25-30 minutes. Watch water level in pan, do not let it dry out.
  • Garnish with cilantro and extra green onions. Serve with plenty of rice.

Notes

If you don't have lily buds omit, don't make a special trip.  You can also place the ingredients on rehydrated lotus leaves (usually used as a wrap.  It imparts a nice flavor to the chicken.
Other additions dried red dates 2-3 soaked and smashed.  Add with mushrooms.