Tag: cheesy

Cast Iron Pan Pizza-Living on the Edge

Cast Iron Pan Pizza-Living on the Edge

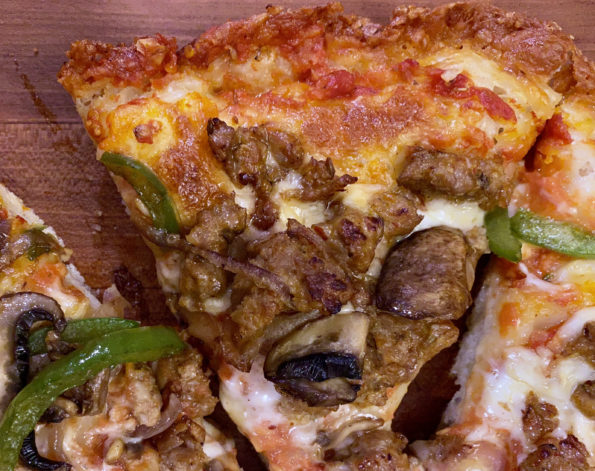
A couple of years ago King Arthur Baking’s Recipe of the Year was Crispy Cheesy Pan Pizza.  Not surprisingly it was delicious.  It became our go-to pan pizza.  But a recipe from Cook’s Illustrated made me stray from the tried and true one.  Don’t laugh, it wasn’t actually the recipe that prompted me to try it,  but my brand spanking new Stargazer Cast Iron Pan.

Dough Meets Edge

What caught my eye, besides “bake in your cast iron pan”, was the copious amounts of cheese (I used a combo of Jack and Cheddar) intentionally sprinkled on the edge of where the dough meets the skillet side.  You end up with this crispy, cheesy, addicting, crunchy layer on your pizza crust.  Think Frico finish to your pizza edge. So good.

Look Ma, no hands!

Got Time?

Ok, like King Arthur’s recipe, this is a no-knead dough, which means, instead of kneading, you have to patiently wait for your dough to develop.  Time instead of muscle for the gluten to develop and for the air bubbles to form to make banging pizza dough.  First, start the day before you want to have pizza.  Make the dough, place it on a pie plate, cover it, put it in your fridge and fuggedaboudit12 to 24 hours later it’s time to put your pizza together.  I start my dough at about 2 pm the day before I want to have pizza.

Pizza Day

Next, about 2 hours before serving pull that bad boi out of the fridge. It needs a couple of finishing touches.  While it is sitting there looking pretty, make the sauce, which is super easy.  You don’t even have to cook it.  The recipe calls for using 1/2 the sauce on the pizza. HELLO?  What am I supposed to do with the other half?  I like sauce, I used all of it on my pizza.  I leave it to you.  But if you want to skimp (lol), save the rest for another pizza.

Extra Extra, It’s All About It

The OG recipe is dough, sauce, and cheese, which is yummy…but that doesn’t mean you have to follow it…go ahead, go crazy, EXTRAS.  Keep it veggie-centric and add peppers, onions, or mushrooms.  Sauteed any of them and place on pizza in this order, crust, 1/3 cheese, sauce, extras, remaining cheese.  Carnivores, feel free to add sausage or pepperoni, pre-cooked. I saved some of my extras for the top, just so everyone knows what they are getting on their pizza.

Typical of Cook’s Illustrated, they go the extra mile, in this case, the crispy crust mile.  Check the bottom of the crust after baking, if it needs a little more crisping, throw that brand spanking new cast iron pan on the stove.  Yep, super crispy crust.

This is a pretty darn good pizza, especially if you like crunchy bits of cheese, glorious cheese.

Start today, pizza tomorrow

Whaddaya Waiting For?

Cast Iron Pan Pizza

From Cooks Illustrated Deep Dish Pizza with crispy edges
Course Breads, Main Course, One dish meals, Pie
Cuisine American
Keyword Cast iron pan, Crispy Cheese Pan Pizza, no knead dough
Prep Time 40 minutes
Cook Time 30 minutes
Rest Time 1 day 2 hours

Equipment

  • 1 10 inch cast iron pan

Ingredients

Dough

  • 2 cups bread Flour ; 11 ounces
  • 1 teaspoon Salt
  • 1 teaspoon Yeast ; instant or rapid rise
  • 1 cup Water 105 - 110 degrees

The Sauce

  • 1 can Whole Peeled Tomatoes ; 14.5 ounces
  • 1 teaspoon Extra virgin olive oil
  • 1 clove Garlic ; minced
  • 1/4 teaspoon Sugar
  • 1/4 teaspoon Salt
  • 1/4 teaspoon Oregano
  • 1 pinch Red pepper flakes

Putting It Together

  • 1 tablespoon Extra virgin olive oil
  • 4 ounces Monterey jack cheese ; shredded 1 cup
  • 7 ounces Whole milk mozzarella cheese ; shredded 1 3/4 cup

The Extras

  • 1 cup Mushrooms of choice! Saute' mushrooms and toss em' on your pizza in between the sauce and cheese
  • 1 cup sauteed Italian sausage, pepperoni, or whatever you like for protein TOTALLY OPTIONAL
  • 1/2 cup diced sweet onions, bell peppers, your choice

Instructions

  • For the dough Start the day before!!!
  • Using a wooden spoon or spatula, stir flour, salt, and yeast together in bowl. Add warm water and mix until most of flour is moistened. Using your hands, knead dough in bowl until dough forms sticky ball, about 1 minute. Spray 9 inch pie plate or cake pan with oil spray. Transfer dough to prepared plate and press into7 - 8 inch disk. Spray top of dough with oil spray. Cover tightly with plastic wrap and refrigerate for 12 - 24 hours.
  • For the Sauce (so easy, no cooking. Ok, or use your favorite marinara, it’s okay)
  • Place tomatoes in fine-mesh strainer and crush with your hands. Drain well, then transfer to food processor. Add oil, garlic, sugar, salt oregano and pepper flakes and process until smooth, about 30 seconds.
  • For Pizza (You will need to start 2.5 hours before eating time)
  • Two hours before baking, remove dough for refrigerator and let sit at room temperature for 30 minutes. Coat bottom of 12 inch cast-iron skillet with oil. Transfer dough to prepared skillet and use your fingers to flatten dough until it is 1/8 inch from edge of skillet. Cover tightly with plastic wrap and let rest until slightly puffy, about 1.5 hours.
  • Thirty minutes before baking, adjust oven rack to lowest position and heat oven to 400 degrees. Spread 1/2 cup sauce evenly over top of dough. Sprinkle Monterey Jack evenly over the border. Press Monterey Jack into side of skillet, forming 1/2 to 3/4 inch tall wall. (Not all cheese will stick to side of skillet). Evenly sprinkle mozzarella over sauce. Bake until cheese at edge of skillet is well browned, 25 - 30 minutes.
  • Transfer skillet to stovetop and let sit until sizzling stops, about 3 minutes. Run butter knife around rim of skillet to loosen pizza. Using thin metal spatula, gently lift edge of pizza and peek at underside to assess browning. Cook pizza over medium heat until bottom crust is browned, 2 - 5 minutes. Using two spatulas, transfer pizza to wire rack and let cool for ten minutes.
Cheesy Corn, Are You Ready for Some Football Food?

Cheesy Corn, Are You Ready for Some Football Food?

I love the fall season. Aside from all things pumpkin and apples, I start thinking about foods that go hand in hand with watching football.  My dad was a sport’s junkie and he definitely passed the sports-watching gene to my brother and me.  He also liked to cook.  Every Sunday he would have a big pot of Rice Soup or Congee simmering just for the 49er game. I’m not sure what I looked forward to more, the Rice Soup (Instant Pot) filled with bits of chicken, potatoes, tiny pork meatballs, topped with green onions and cilantro, or the football game.  

Football Food

In addition to the soup, football watching requires yummy totally bad for you snack food and I just discovered one that would fit in perfectly with a sport-watching spread.  One of my favorite cookbooks this year, A Common Table, has a popular Korean snack that must have been created to go with beer and fried chicken and therefore football.  Korean Cheesy Corn. Yep, the best thing since sliced bread. Okay, I’m kidding but it is good and stupid easy.

Start with fresh corn from the Farmer’s Market.  It is so good right now.  Frozen corn or canned corn (lots of Korean recipes start with canned corn) would work, but, come on, go fresh and support your local farms.

And now a public service announcement, a video on how to take corn off the cob from Saveur using a bundt pan! It works like a charm!

From here on in it’s a downhill slide.  Stir-fry corn in oil or butter until it is soft.  Combine corn with mayonnaise and place in an ovenproof dish. I use Kewpie Mayo which is slightly sweet but use whatever mayo (better be Best Foods) you have in the fridge.  Sprinkle a crap ton of Mozarella cheese on the corn and bake at 500 until the cheese is browned, gooey and melty. So delicious.  Versions of Korean Cheesy Corn add sugar.  If your corn is sweet you won’t need to, but if you like it sweeter add 1-2 teaspoons of sugar.  If you use Best Foods or Hellman’s add 1 tsp of sugar.

The corn, mozzarella, mayo, green onions, and cilantro are the basic ingredients for this yummy super easy dish.  Of course, you can go CRAZY and add extra fixings to bring it to a whole new level.  A bucket list of add-ons includes bell pepper, red onion, jalapeno peppers, or crumble in bacon (cuz everything is better with bacon).   You can also add cut-up rice cakes cause what’s a few more calories in a totally not-on-your diet dish.

Ready set, dig in!

Korean Cheesy Corn

Delicious, decadent and easy. Korean Cheesy Corn a popular Korean dish. Perfect as a side dish or snack.
Course Side Dish
Cuisine Asian
Keyword cheese, Corn, Korean, Korean Cheesy Corn, snack
Prep Time 15 minutes
Cook Time 5 minutes
Servings 4 servings

Ingredients

  • 1-1/2 cups fresh corn about 2 ears, canned or frozen can be used
  • 2 tbsp mayonnaise, preferably Kewpie add 1-2 teaspoons sugar if using regular mayo
  • 1 tbsp unsalted butter or vegetable oil
  • 1/4 tsp salt
  • 1/4 tsp fresh ground pepper
  • 1/2 cup shredded mozzarella or more if you are a cheese freak. Additional 1/4 cup stirred into corn with mayo.
  • 1/4 cup sliced green onions
  • 1/4 cup cilantro coarsely chopped
  • 1/8-1/4 cup additions ie. bell pepper, diced red onions, bacon, optional

Instructions

  • Preheat oven to 500 degrees
  • In a large non-stick skillet, heat butter or oil. Over medium heat, add corn and if using bell peppers, jalapeno or onions. Cook, stirring frequently until soft about 4-5 minutes. Season with the salt and pepper.
  • Transfer corn to an ovenproof dish, stir in mayo and sugar if using.
  • Sprinkle cheese evenly over the surface and bake for 5-7 minutes until cheese is melted, bubbling and starts to brown. Like a pizza!
  • Garnish with green onions and cilantro and serve immediately.