Category: Instant Pot

Potato Leek-i-ty Split Soup (Instant Pot Potato Leek Soup)

Potato Leek-i-ty Split Soup (Instant Pot Potato Leek Soup)

I love Potato Leek Soup. If you dig into the 3jamigos archive this soup pops up a couple of times.  This is my go-to soup.  In the winter, I make a hearty, rustic version with lots of potatoes, smokey bacon, and heavy cream, perfect for a chilly evening.  The summer version is lightened with a bit more stock and light cream, pureed so it is silky smooth, and served at room temperature. Both are crazy delicious and proof of the “Versatility of Vichyssoise”.


The hubs called me at work one afternoon last week with that age old question, “What’s for dinner?”. With my long commute, I knew it had to something quick and easy. A salad? stir fry? Quick pasta dish? As ideas popped up in my brain (including restaurant names), I heard Wes say, how about potato leek soup?

Crusty French bread, glass of wine, bowl of soup..I was all in.  But, silly, soup takes awhile…wait, hmmm.

Enter the Instant Pot.  I have made other soups in my IP.  Why not?  A quick Google search landed on quite a few recipes for Potato Leek in an Instant Pot. Why didn’t I think of this before?

Dinner is served

I saute’ the vegetables in the Instant Pot, added the stock, set the timer to 7 minutes and forgot about it until I heard the beep-beep-beep.  Finish with cream and garnish…DONE.  How easy is that?  Ahhh dinner on the table in less than an hour and only 1 pot to clean.  Perfect.

Instant Pot Potato Leek Soup

A delicious, quick and easy recipe for Potato Leek Soup made in your pressure cooker
Course Soup
Cuisine French
Keyword Instant Pot, Potato Leek Soup
Prep Time 15 minutes
Cook Time 15 minutes
Resting time 10 minutes
Total Time 30 minutes
Calories 244kcal

Ingredients

  • 1 Tbsp Olive Oil
  • 2 Tbsp Butter
  • 3 large Leeks white part only, cleaned and sliced into rounds(1/8")
  • 1 yellow onion diced
  • 2 cloves Garlic minced
  • 2 Tbsp Flour
  • 5-6 cups Chicken Broth
  • 1 Bay Leaf
  • 1 tsp Salt
  • 1/4 tsp White Pepper
  • 1 lb Gold Potatoes (4-5 spuds if using Yukon Gold, 3 russets) peeled and diced
  • 1/2 cup heavy cream or half and half
  • Garnish
  • Chopped Chives
  • Sour Cream
  • Anything your little heart desires

Instructions

  • Press the Sauté button on the Instant Pot. When hot, add the oil and butter.
  • Add the onion. Cook until soft, stirring occasionally, approximately 5 minutes. Try not to let it brown. Add leeks, cook for additional 3-4 minutes until the leeks are soft.
  • Add garlic and cook for about 30 seconds, until fragrant, stirring frequently.
  • Sprinkle the flour over the onion-leeks mixture and stir. Cook for a minute to get the raw taste out of the flour.
  • Stir in the broth. Be sure to dissolve the flour and scrape the bottom of the pot. The Instant Pot senses particles on the bottom and will shut off to prevent burning.
  • Add the bay leaf, salt, pepper, and the potatoes. Stir.
  • Put the lid on the pot and set the steam release knob to the Sealing position.
  • Press the Manual (or Pressure Cook) button, and the + or - button to choose 7 minutes. then forget about it until the timer goes off.
  • When the cooking cycle has ended, let the pot naturally release pressure for 10 minutes. Then manually release the remaining steam.
  • 10. When the pin in the lid drops, open it and stir the soup. Remove the bay leaf. Then use an immersion blender to puree it. If you don't have an immersion blender, you can use a blender, pureeing the soup in small batches very carefully.
  • 11. Stir in the cream or half and half.
  • 12. Taste and adjust salt, if needed.

Garnish with chopped chives, sour cream, bacon...just about anything you like, corn, shrimp, crab.

    Notes

    Blend soup just a bit leaving chunks of potatoes for a more rustic soup. Blend until completely smooth for a classic version.  Reserve part of the soup, before adding the cream, to freeze for a rainy day.  Rainy day instructions-heat soup slowly and add cream once it is warmed.  
    This soup serves as a wonderful base for a vegetable soup.  Add chopped spinach at the end and heat and stir occasionally until spinach wilts.   
    Use clam juice as part of the stock for a seafood twist.  Garnish with shrimp or crab. yummos.
    Rainy Day Eats: Braised Pork Belly ala Instant Pot

    Rainy Day Eats: Braised Pork Belly ala Instant Pot

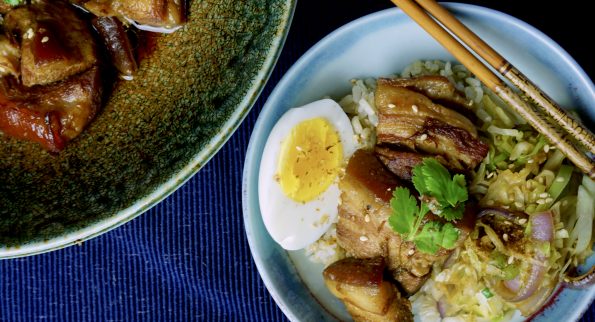
    I am a sucker for rice bowls and noodle soups, especially when the weather turns cold and dreary. There is something comforting about eating out of a bowl. I love sitting by the window watching the falling rain and listening to the blustering wind while holding a bowl of deliciousness.  My Dad’s stew, my Mom’s won ton soup, spicy Thai curry or gooey mac and cheese all come to mind.

    Yep, living life one bowl at a time.

    Japanese braised pork belly, Buta Kakuni falls neatly into this scenario.  Simmered in soy sauce, sake and sugar, the pork becomes so tender it melts in your mouth and has that sweet salty flavor that I love.  It is rich and flavorful, so a little goes a long way.  Grab a good sized bowl, add a big scoop of steamy hot rice, lay 2-3 pieces of the pork on top and drizzle the braising liquid over it.  Serve with a ramen style soft boiled egg and vegetables.  Yep, a bowl of rockin’ goodness.

    Normally, this dish takes a couple of hours to make, but thanks to the Instantpot, you’ll be sitting down to eat in less than an hour.

    pork belly ingredients

    This recipe is adapted from the blog Just One Cookbook, another favorite for Asian recipes. Slab pork belly can be found in most Asian markets or ask your butcher to save you a piece.  If time is tight, you can forego browning the pork, but I think it does add flavor and color.  Reduce the Mirin to 1/4 cup and increase the sake to 1/2 cup to cut the sweetness. The recipe calls for adding soft boiled eggs to the pork to finish cooking.  Instead, cool the braising liquid and put the peeled soft boiled eggs in to seep overnight a la ramen style eggs. Love oozy runny egg yolks.  Feel free to follow the recipe or try Serious Eats’s recipe for ramen eggs, both are delicious!

    This is classic comfort food.  I stir-fried some shredded cabbage and onions with the braising liquid as an accompaniment.  Another option is a super simple Asian Cucumber Salad. The crisp cucumbers provide a nice contrast to the soft pork. Plus, it’s nice to get some veggies in for a “well-rounded” bowl.

    Enjoy!

    PRESSURE COOKER PORK BELLY (KAKUNI)

    Braised Pork Belly in a fraction of the time with an Instant Pot.  Delicious with a bowl of rice or ramen. 
    Course Main Course
    Cuisine Asian
    Keyword Instant Pot, Pork Belly

    Equipment

    • Instant Pot or pressure cooker

    Ingredients

    • 3 green onions/scallions use only the green parts
    • 1 inch ginger
    • 1 Tbsp neutral flavor oil vegetable or canola
    • 2 lb pork belly block 2 lb = 907 g
    • Water for cooking pork belly
    • 4 soft/hard boiled eggs See Notes
    • Shichimi Togarashi Japanese seven spice (for taste, optional)
    • Chinese Mustard

    Seasonings

    • 1/2 cup sake 1/2 cup = 120 ml
    • ½ cup water ½ cup = 120 ml
    • 1/4 cup mirin 1/4 cup = 60 ml
    • ½ cup soy sauce ½ cup = 120 ml
    • ¼ cup sugar ¼ cup = 50 g

    Instructions

    • Cut pork into 1-inch pieces
    • Peel and cut ginger into slices.  Using the green part only, cut scallions into 2 inch segments
    • Switch Instant Pot to Saute' function and add oil to pot.  When the oil is hot, add pork and brown (3-5 minutes).  Add water to pot to cover the pork.  Add green onions and ginger to pot.
    • Cover Instant Pot and seal, make sure the knob is set to sealing.  Cancel saute' function and set function on stew/meat (35 minutes)
    • When the pork is finished, carefully vent to quick release pressure.  Drain pork.  Add seasoning ingredients to the Instant Pot and return pork to pot.  Add soft boiled eggs to pot unless seasoning them separately.  See notes.
    • Seal and set pot on stew/meat function and set time to 10 minutes.  When finished, quick release vent pot.  
    • Remove pork and eggs from pot. Taste the seasoning liquid, if it seems to dilute, set pot on saute' and reduce.  Reserve sauce for serving.
    • Serve pork and eggs over rice or ramen. Garnish with Shichimi Togarashi.  Drizzle sauce over rice and serve with mustard. Enjoy.

    Notes

    If you don't have Mirin, increase Sake to 3/4 cup and add 1 tablespoon sugar.  If you like a soft runny egg, do not put it in the Instant Pot to cook.  Cook your eggs separately. You can cool the cooking liquid and place the peeled soft boiled eggs in the liquid to seep for a couple of hours or overnight.  You do not have to seep the eggs.  You can serve the eggs in your rice bowl drizzled with the cooking liquid and sprinkled with seaweed seasonings (furikake) if you want.
     

    It’s Raining, It’s Pouring the Instant Pot is Not Snoring, it’s Cooking Pot Roast

    It’s Raining, It’s Pouring the Instant Pot is Not Snoring, it’s Cooking Pot Roast

    It’s chilly, it’s raining, it’s just downright dreary.  How to combat this scenario?

    Couch potato:  Snuggle on the couch and watch a movie or read a book. What, couch too far? Ok, stay in bed with a good book and a cup of tea.

    Kitchen Diva: It’s the holidays, you’re supposed to be filling the house with the aroma of butter, cinnamon, sugar and all things delicious.  Let’s get ready to BBAAAKKKKEEEEE.

    Outdoor Warrior:  Put on those stomping boots and raingear and hit those puddles!

    Ok, I’m only feeling Option 1 or 2.

    So, I decided on doing a combo, I spent the day baking cookies, cruising the internet and watching Netflix.  Right around 5pm my stomach grumbled and sent a signal to my brain “what’s for dinner?”

    Here is the criteria for today’s dinner:  it should be easy to make, comforting and of course delicious. I pull out my Instant Pot, check off easy.  Take out the chuck roast I had bought the day before, check off comforting. Rummage through my crisper and pantry and pull out onions, carrots, potatoes, check off delicious.

    Yep, pot roast on a rainy, dreary day…sounds like a plan, Stan. Sitting down at 6:30 to dinner.  Yahoo, thanks Instant Pot.

    Instant Pot Pot Roast

    What’s better than pot roast for dinner? Pot roast the next day!

    Pot Roast a la Instant Pot

    Decide at 5pm to have Pot Roast for dinner. I know, what am I thinking? Pull out the Instant Pot and damn, by 6:30 I'm sitting down to a delicious bowl of meltingly tender chunks of beef, carrots, and potatoes over steaming hot white rice.  Adapted from Damn Delicious.
    Course Main Course
    Cuisine American
    Prep Time 10 minutes
    Cook Time 1 hour
    Total Time 1 hour 10 minutes
    Servings 4 people

    Ingredients

    • 1 3-pound chuck roast
    • Kosher salt and freshly ground black pepper to taste
    • 1 1/2 tablespoons canola oil
    • 1 yellow onion chopped
    • 3 cloves garlic minced
    • 2 tablespoons tomato paste
    • 1/4 cup dry red wine
    • 3 cups beef stock
    • 2 teaspoons Worcestershire sauce
    • 4 sprigs fresh thyme
    • 1 sprig fresh rosemary
    • 2 bay leaves
    • 1 1/2 pounds baby red potatoes
    • 4 large carrots cut diagonally into 2-inch pieces
    • 1/2 pound fresh assorted mushrooms sliced, optional
    • 2 1/2 tablespoons cornstarch
    • 1-2 tablespoons soy sauce or fish sauce optional kicks up the flavor, check for saltiness before adding

    Instructions

    • Set a 6-qt Instant Pot® to the high saute setting.
    • Season beef with 1 1/2 teaspoons salt and 1 teaspoon black pepper. Heat oil; add beef and cook until evenly browned, about 2-3 minutes per side; set aside.
    • Add onion, and cook, stirring frequently, until translucent, about 2-3 minutes. Stir in garlic and tomato paste until fragrant, about 1 minute.
    • Stir in red wine, scraping any browned bits from the bottom of the pot.
    • Stir in beef stock, Worcestershire, thyme, rosemary, bay leaves, potatoes, carrots and mushrooms. Top with beef. Select manual setting; adjust pressure to high, and set time for 60 minutes. When finished cooking, quick-release pressure according to manufacturer’s directions.
    • Remove beef, potatoes and carrots from the Instant Pot®; shred beef, using two forks.
    • In a small bowl, whisk together cornstarch and 1/4 cup cold water; set aside.
    • Select high sauté setting. Bring to a boil; stir in cornstarch mixture and cook, stirring frequently, until slightly thickened, about 2-3 minutes. If the mixture is too thick, add more beef stock as needed until desired consistency is reached.  If using mushrooms, sauce may be a bit thin, reduce before adding cornstarch slurry.
    • Serve beef, potatoes and carrots with juices immediately accompanied by rice or buttered noodles or a nice crusty bread to sop up the sauce.


    Instant Pot White Chicken Chili? Yes We CAN!

    Instant Pot White Chicken Chili? Yes We CAN!

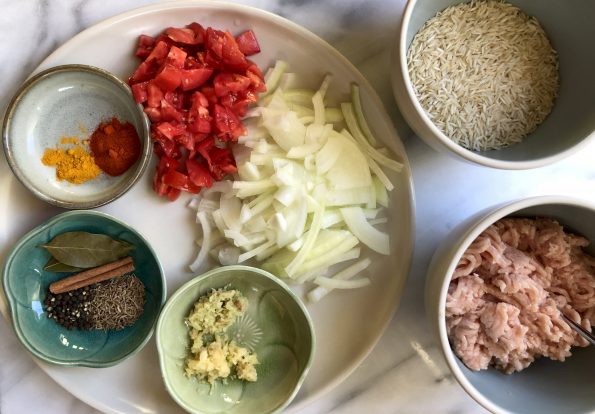
    Ramping up for the holidays?  Here is a recipe that is easy, delicious and thanks to your handy dandy Instant Pot, ready in minutes.  You will need, first and foremost, a can opener.  Yep, a can opener, indispensable. You’ll also need, chicken, white beans (can), chicken stock or broth (can), roasted peppers (can), corn (yes, a can) and spices. Everything except the chicken, you’ll need a can opener.  Stupid easy.

    I couldn’t let sleeping dogs lie, the original recipe from the blog Eat.Drink.Love. calls for onion powder and garlic powder.  I decided to use chopped onions and garlic cloves instead.  It adds a couple of minutes, but I like the texture and flavor of the onions and garlic.  Feel free to stick with the original if you like.

    This really is quick and easy, perfect for a busy weekday night.  Ready in minutes, good the next day, and very kid friendly.

    The recipe calls for chicken breast, you can use thighs instead if you prefer dark meat.  Any white bean will work, Kidney, Great Northern, Navy or Cannellini.  The recipe calls for a can of corn, which I misread and thought it was a can of creamed corn. I went with it and I actually liked it.  It adds a bit of sweetness and creaminess to the chili.  Consider decreasing the broth if you use creamed corn.  I also added a finely diced jalapeño pepper to give the chili an extra kick.  If the sauce seems a bit thin at the end, remove chicken and continue to cook sauce on saute’ function to reduce to desired thickness then add the shredded chicken back to the pot.

    Between you and me, I love eating chili over macaroni or rice.   From Epicurious, favorite ways to eat chili.

    INSTANT POT WHITE CHICKEN CHILI

    Course Main Course
    Cuisine American
    Keyword White Chicken Chili
    Prep Time 15 minutes
    Cook Time 20 minutes
    Total Time 35 minutes
    Servings 4

    Ingredients

    • 1 1/2 pounds boneless skinless chicken breasts halved lengthwise
    • 2 15-ounce cans white navy beans rinsed and drained
    • 1 15-ounce canned corn, drained or 1 15 ounce canned creamed corn + 1 cup frozen corn
    • 1 4-ounce can roasted diced green chiles
    • 2 cups low sodium chicken broth 1-1/2 cups if using creamed corn
    • 3 teaspoons ground cumin
    • 2 teaspoons chili powder
    • 1/2 teaspoon garlic powder*
    • 1/2 teaspoon onion powder*
    • 1 teaspoon kosher salt

    *Substitute 1 chopped yellow onion and 4 cloves of garlic finely chopped

    • 1 jalapeno pepper seeded and veined, finely diced (optional)

    Toppings

    • shredded cheddar or jack cheese
    • diced avocado
    • sour cream
    • cilantro or sliced green onions

    Instructions

    • *If using onions and garlic, on saute', add 1 tablespoon oil to Instant Pot. Add onions and garlic and saute' until soft. Proceed with recipe, omit garlic powder and onion powder
    • Place the chicken into the pressure cooker.
    • Pour in the beans, corn, chiles, and the broth. Then stir in the seasonings*
    • Cover with the lid and set valve to sealing position.
    • Cook on poultry setting for 15 minutes followed by a quick pressure release.
    • Shred the chicken with a fork and serve with desired toppings.
    • Can add additional seasonings if desired.
    • Garnish with toppings, serve immediately

    Instant Pot Easy Kheema Pulao (Spicy Indian Rice Dish)

    Instant Pot Easy Kheema Pulao (Spicy Indian Rice Dish)

    Sometimes other events dominate your life for a bit…but I’m back!

    After weeks of knocking on doors to get out the vote, I was ready for some downtime.  I drove home from Bakersfield (four hours each way, ugh) and wanted to chill and enjoy some home cooked food.  As yummy as it is, (Wo)”Man”(me) cannot live on taqueria fare alone. I arrived home right around the dinner hour so I needed something quick and easy to make, but still comforting and delicious. I pulled out my Instant Pot, clicked on Ministry of Curry “Kheema Pulao” (think Indian version of a mixed rice dish) in my saved links, and voila’ 40 minutes later I was curled up on the couch, watching my favorite K-drama (Goblin), spooning hot, spicy pulao into my mouth.  Ahhh, my reward for doing my part to save Democracy…and that’s all I will say about that (thanks, Forrest).

    Kheema Pulao

    I love Biryani, a spicy Indian Rice dish that is both complex in flavor and in preparation. That means going to a restaurant and letting them make it for me. My job is to enjoy every bite. On the other hand, pulao is a simple version of a biryani, easily made at home and delicious.  Vegetables, ground meat, aromatics, and spices are sauteed, then rice is added along with water or stock. A touch of sweetness from the cinnamon and onions, spicy from the ginger, garlic, and chili, then finished with cilantro and lime.  Welcome to Flavortown.  So good.

    Kheema means minced or ground, in this recipe, ground chicken is used but you could use turkey or beef.  The flavors are infused into the meat and the ground chicken cooks quickly, win-win.  The rate-limiting step would be the time it takes for the rice to cook which, ta-da, is shortened by using your Instant Pot, PLUS the entire dish is done in one pot…no muss, no fuss, I’m doing the happy dance now.

    Saute’ ingredients in the pot.


    Add liquid and rice, cover, seal, set for 5 minutes, wait 5 minutes then quick release and done.  How easy is that?

    Kheema Pulao finish

    Garnish with cilantro and lime to make it pretty.

    Add this to your things to make in my Instant Pot.  Really.

    Kheema Pulao

    A one pot meal made with long grain basmati rice cooked with ground chicken and a host of aromatics ginger, garlic, onions, bay leaves, black pepper, cumin seeds and cinnamon.  A flavor explosion. Adapted from Ministry of Curry
    Course Main Course
    Cuisine Indian
    Keyword Kheema Pulao
    Prep Time 15 minutes
    Cook Time 30 minutes
    Total Time 45 minutes
    Servings 4 people
    Calories 422kcal

    Ingredients

    • 2 tablespoons ghee
    • 1 teaspoon shah jeera or cumin seeds
    • ½ teaspoon black peppercorns
    • 2 inch cinnamon stick
    • 2 bay leaves
    • 1 medium onion thinly sliced
    • 1 teaspoon ginger grated
    • 1 teaspoon garlic grated
    • 1 pound ground chicken can use , beef or turkey
    • 1 tomato, diced
    • 1 teaspoon red chili powder
    • ¼ teaspoon turmeric
    • Handful of mint leaves chopped
    • 2 teaspoon kosher salt
    • 1 cup long grain Basmati rice
    • 1 ½ cups water

    Garnish

    • 1 lime
    • ½ cup cilantro chopped
    • 1 teaspoon black pepper freshly ground

    Instructions

    • Set the Instant Pot to sauté(more) mode and heat ghee. Add cumin seeds, black peppercorn, cinnamon and bay leaves. Saute for 30 seconds.
    • Add onions and sauté for 5-8 minutes or until the onions start to brown. Add ginger, garlic and chicken. Sauté, breaking the chicken and browning it for a minute. Add tomatoes, red chili powder, turmeric, mint leaves, and salt. Mix well.
    • Add rice and water. Gently mix making sure all the rice is under the liquids. Close the Instant Pot lid with pressure valve to sealing. Cook on Manual /Pressure cook (Hi) 5 mins with 5 min NPR.
    • Open the Instant Pot and gently fluff the top rice (Note, if the rice looks uncooked on the top, just mix it with the rice under and close the Instant Pot for 5 minutes)
    • If rice seems a little wet, let it sit for a couple of minutes, top open.
    • Add lime juice, cilantro and black pepper. Turn the Instant Pot off and take the insert out so the rice does not overcook or get mushy. Enjoy hot.
    Instant Pot Easy Jook (Rice Soup) Soul Food Breakfast

    Instant Pot Easy Jook (Rice Soup) Soul Food Breakfast

    Last weekend Jamie played her version of NYT’s 36 Hours. We picked her up at the airport (SFO NOT SJC, grrrr) at 1:00 am Friday night (ok Saturday morning, delays) and dropped her off Sunday at 11:00 AM.  Her first words upon seeing her bleary-eyed parents? DID YOU BRING MY SUSHI WITH YOU?  I AM STARVING!  Lucky we like her.

    Happy Hour Any Hour

    With Jamie coming home, the call went out for a happy hour, which, due to schedules, morphed into a Saturday morning breakfast happy hour.  Any time of day is Happy Hour when it involves friends, food, and fun.  It just means tweaking the menu that’s all. We decided on a bowl of fresh strawberries and summer peaches, Belgium Waffles, candied bacon, Jule’s Granola and yogurt.  Jamie chimed in with “I want Jook (rice soup) too”  Rice Soup is soul food, comfort food, each bite reminds one of being home.  With its addition and the various toppings like shredded chicken, assorted sweet and salty pickles, and slivers of green onions to go along, our breakfast menu was complete.

    A small stumbling block to this plan, who was going to make Jook (Rice Soup) in the morning? Ugh, the last thing I wanted to do was get up early after a late-night airport pickup.  Then it hit me, hello…you have an INSTANT POT, Deb.  A quick Google search yielded plenty of recipes so I decided on a mash-up of my Dad’s Jook and a couple of Instant Pot recipes I found online.  Yay, I’ll get forty winks and have rice soup ready for breakfast.

    Jook in an Instant Pot is so stupid easy it’s a crime.  Saute a couple of slices of ginger in the Instant Pot add the washed rice, give it a few good stirs, add skinned chicken drumsticks, fill the pot with water and seasonings, seal it and set the timer for 20 minutes. That’s it.  Jook Time.  If you have chicken stock, use it for an extra rich and flavorful soup.

    I have a confession, if I don’t have homemade stock or even low-sodium commercial chicken broth, I’ll add a tablespoon of a chicken stock base such as Better Than Boullion, or Chicken Powder by LKK or Knorr (a Chinese kitchen staple) just to kick it up a notch.  It’s not necessary but it will add some depth of flavor.  The soup will look thin when you first take off the lid.  Stir it a couple of times to combine the rice and stock, hit the saute’ function, and bring it to a boil. Cook for an additional 5-10 minutes or until the Jook is the consistency you want.

    *Notes from a Thanksgiving Table

    My favorite post-Thanksgiving meals aka “What to do with your leftovers”.

    Turkey Rice Soup (Congee or Jook)

    DON’T THROW AWAY THE BONES AND CARCASS. 

    Get out your stockpot (or any really, really big pot).  Throw the carcass, wings, drumsticks (sans stuffing) in and fill with water. Add a smashed chunk of ginger (2-inch piece) 1/2 cup of rice wine, a bunch of scallions, a large pinch of salt and bring it to a boil.  Once it boils, reduce heat to a nice energetic simmer.  Cover and fuggetaboutit for a couple of hours.  You will end up with liquid gold to make any delicious soup you want.  For a non-Asian bent, omit ginger and scallions and throw in carrots, celery, yellow onions instead.  But honestly, it doesn’t matter, you could make jook with either stock.

    I do make the stock separately so that I can strain the stock and remove all those little nasty bone fragments and seasoning vegetables.  They have all done their job and can now exit stage left.

    The stock will keep in the fridge for about a week or longer in the freezer.

    Now go back to the top or to the bottom for the recipe on how to make jook….you’ll thank me, so so good.

    Hello….Turkey Sammies a la Dagwood style which means all your Thanksgiving leftovers in between two slices of bread.  Yep, turkey, stuffing, cranberry sauce, gravy, and a couple of slices of cheese from the appetizer plate.  Don’t forget the leftover greens from the salad no one ate because WHO eats salad on Thanksgiving-puulease.  Oh man-so good.

    Instant Pot Chicken Congee Recipe (Jook)

    Jook or congee, the ultimate comfort food, when its cold outside, when you have a cold, anytime.
    Course Soup
    Cuisine Asian, Asian-American
    Prep Time 10 minutes
    Cook Time 20 minutes
    Total Time 45 minutes
    Calories 140kcal

    Ingredients

    For the Soup:

    • 1 cup long grain Jasmine rice honestly you can use any kind of rice, long, medium or short grain
    • 1.5 Tsp vegetable oil
    • 3 Slices thinly sliced fresh ginger size of quarters
    • 1 tsp salt
    • 3-4 skinless chicken drumsticks or thighs or 2 whole chicken legs, can also add pork such as pork butt 2-3 2 inch pieces
    • 8 to 10 cups water, fill to the 10-cup mark on your IP or use stock and water 1:1
    • 1/8 cup rice wine
    • 1 tbsp Better Than Bouillon (optional) Skip if you are starting with stock

    At the Finish Line

    • 2 tsp sesame oil toasted, Asian sesame oil
    • 1/3-1/2 cup scallions-sliced on the bias garnish
    • 1/8 Cup finely shredded fresh ginger garnish
    • Salt and pepper to taste preferably white pepper

    Instructions

    • Wash rice. Add the rice to a bowl, and add enough water to cover the rice. Swirl the rice around. Drain and repeat a few times until the water is clear. Let drain and dry.
    • Turn on Instant Pot with Saute function.  When hot, add 1 -1/2 teaspoon vegetable oil and ginger.  Saute for 30 seconds, add rice and 1 teaspoon salt.  Stir to coat rice with oil approximately 1 minute.
    • Add chicken pieces, bouillon, and rice wine to the pot . **If you are in a rush or feeling lazy, skip sauteing the rice and ginger.  Just throw them into the pot, fill with enough water until it reaches the 10 cup mark in the Instant Pot.
    • Turn off saute, close the lid and make sure the knob is on "Sealing". Choose the "Porridge" button and set the time to 20 minutes.
    • While congee is cooking, shred ginger and slice scallions and place in small bowls for serving.
    • When the time is up on the timer, turn the Instant Pot off. Wait 15 minutes natural release before turning the knob from 'Sealing' to 'Venting'. Rice soup tends to splatter a lot, do not do a quick release.
    • Remove the chicken from the pot, when it is cool enough to handle, shred the meat and discard the bones. If the jook seems thin, turn saute' function on (without the lid on) and cook until desired consistency.  If it is too thick, add water or broth.
    • Add the chicken back into the congee or put it in a bowl and let folks add at the table. Taste, add salt if necessary.
    • Ladle into bowls and top with desired amount of ginger, white pepper, sesame oil and scallions. Let folks add their own.

    Toppings and Fixins'

    • My Dad's Jook calls for potatoes, I love them in my soup. Any kind of potato will work, peeled and quartered for large potatoes. Add at the same time as the chicken when making the soup.
    • For meatballs, follow instructions under Dad's Jook. This can be added at the end after pressure cooking.  Remove lid and press saute function.  When the rice soup comes to a boil, add meatballs and cook until done 2-3 minutes.
    • Additional toppings include cilantro leaves, fried garlic slivers, shredded fresh ginger, salted peanuts, shredded lettuce (iceberg works well)...the list goes on. Anything you eat with rice can be added.  NO Rules!
    Fast, Flavorful, Pho-tastic(Instant Pot Pho Ga, Vietnamese Chicken Noodle Soup )

    Fast, Flavorful, Pho-tastic(Instant Pot Pho Ga, Vietnamese Chicken Noodle Soup )

    I can’t think of anything more comforting than a steaming bowl of noodle soup.   If marooned on an island, what would you eat and what 3 books would you want to have with you.  My response would be immediate, a no-brainer, noodle soup.  The caveat being noodle soup would include Pho, Ramen, Udon, Won Ton Noodle Soup, Guksu, Laksa….  and one of my 3 books would be Andrea Nguyen’s The Pho Cookbook.

    I have always wanted to try my hand at making Pho. But the stock for this popular Vietnamese Noodle Soup is a labor of love.  Hours of simmering on the stove coaxing the flavors out of chicken, beef, and aromatics like ginger, onions, and cilantro. Intimidating to say the least.  Andrea’s recipe for Pho Ga (Chicken Pho) made in a pressure cooker was the “kick in the pants” I needed.  Pho in less than an hour?  I immediately headed to the store for ingredients. Slurp City here I come. Thanks to Andrea Nguyen and Instant Pot, I was about to make Pho in a fraction of the time.  Ms. Nguyen has written quite a few cookbooks on the cuisine of Vietnam and I snapped up her ode to soup noodles after an interview on KQED.

    Instant Pot Pho Ga

    This makes homemade Pho eminently doable. One pot cooking, woohoo.  Increase the cooking time if you have an Instant Pot.  It works at a slightly lower pressure (11.5psi) than a conventional pressure cooker.   Remove the cilantro and ginger after the cooking process as both herbs continue to flavor the stock and may overpower the flavor of the broth. Modify the natural pressure release by letting your Instant Pot sit for 5 minutes before venting and opening. Once you remove the chicken, place it in a cold water bath.  This keeps the chicken tender and moist. If you like your chicken a bit more done, leave it in the pot for about 15 minutes before removing. The chicken can be shredded or sliced whatever your preference.

    With your broth done, your noodles softened.  It is now Topping Time!  Toppings, toppings, toppings galore. You can be traditional and top your pho with basil, mint, and bean sprouts or you can keep going and add ABSOLUTELY ANYTHING YOU WANT.  I didn’t have bean sprouts so I used shredded carrots and cabbage. Thinly sliced red onions add a nice bite.  Delicious.  Mushrooms, let those fungus fly..into your bowl.  Condiments include Siracha for spice, Hoisin for a bit of sweetness and a squeeze of lime.  S cubed-sweet, salty, spicy and so good!

    Now you and I can make our own bowls of deliciousness.

    Instant Pot Pho Ga

    Fast, Flavorful, Pho-tastic (Instant Pot Pho Ga)

    A faster and simpler way to make a tasty bowl of Pho!
    Course comfort food, noodles, one bowl meal, Soup
    Cuisine Asian, Vietnamese
    Keyword Chicken, Pho, Pho Ga, rice noodles, soup
    Prep Time 15 minutes
    Cook Time 1 hour 45 minutes

    Equipment

    • 1 Pressure Cooker or Instant Pot

    Ingredients

    BROTH

    • 1 whole chicken 4 lbs.
    • 1 rounded tbsp. coriander seeds
    • 3 whole cloves
    • 1 medium yellow onion peeled, halved, and sliced 1/2 in. thick
    • 1 3- in. piece ginger peeled and thickly sliced
    • 1 small Fuji apple peeled, cored, and cut into thumbnail-size chunks
    • 1/2 cup coarsely chopped cilantro sprigs
    • 2 1/4 tsp fine sea salt
    • 1 1/2 tbsp fish sauce
    • 1 tsp About. organic sugar* or 2 tsp. maple syrup if needed to round out flavor

    Noods and Bowls

    • 10 ounce dried narrow flat rice noodles*
    • About half of cooked chicken from the broth
    • 1/2 small red onion halved lengthwise, then thinly sliced and soaked in water 10 minutes
    • 1/4 cup thinly sliced green onion green parts only
    • 1/4 cup chopped fresh cilantro leaves
    • white or black pepper

    Garnishes & Condiments

    • Vietnamese Herb Garnish Plate
    • Vietnamese Ginger Dipping Sauce
    • Siracha Sauce, Hoisin Sauce, lime wedges

    Instructions

    • Make broth: Rinse chicken and set aside to drain. Put coriander seeds and cloves in a dry 6- to 8-qt. pressure cooker. Over medium heat, toast until fragrant, shaking, several minutes. Add onion and ginger and cook, stirring, until browned on edges, 2 to 3 minutes.
    • Add 4 cups water, then the chicken, breast side up. Add apple, cilantro, salt, and another 4 cups water. Lock the lid in place.
    • Following your cooker's instructions, bring to low pressure (8 psi) over high heat. Lower heat to maintain pressure. Cook 15 minutes, or a few minutes longer if your cooker's low setting is less than 8 psi. If your cooker has only a high-pressure (15 psi) setting, cook 12 minutes. The Instant Pot setting is approximately 12 psi so I increased the time to 14 minutes. If you like your chicken falling off the bone leave the chicken in the Instant Pot for 20 minutes before pressure release. I waited 5 minutes and then did a quick release. The chicken was tender much like white cut chicken.
    • Transfer the chicken to a bowl; if parts fall off in transit, don’t worry. Add cold water to cover the chicken and soak for 10 minutes to cool and prevent drying. Pour off the water, partially cover, and set the chicken aside to cool.
    • Skim some fat from the broth before straining it through a muslin-lined mesh strainer positioned over a medium pot. Discard the solids. You should have about 8 cups. Taste and season the broth with the fish sauce, extra salt, and perhaps a bit of sugar.
    • Use a knife to remove the breast halves and legs from the chicken. Set aside half of the chicken for another use. Reserve the remaining chicken for pho bowl assembly.

    Prep and assemble the bowls

    • About 30 minutes before serving, ready the ingredients for the bowls. Soak the noodles in hot tap water until pliable and opaque. Drain, rinse, and drain well.
    • Step 7
    • Cut or tear the chicken breast and leg into pieces about 1⁄4 inch thick. Place the onion, green onion, and cilantro in separate bowls and line them up with the noodles, chicken, and pepper for a pho assembly line.
    • Bring the broth to a simmer over medium heat as you are assembling the bowls. At the same time, fill a pot with water and bring to a rolling boil for the noodles.
    • For each bowl, use a noodle strainer or mesh sieve to dunk a portion of the noodles in the boiling water. When the noodles are soft, 5 to 60 seconds, pull the strainer from the water, shaking it to drain excess water back into the pot. Empty the noodles into a bowl.
    • Top with chicken, then garnish with onion, green onion, cilantro, and pepper and any toppings you want.
    • Check the broth flavor once more, raise the heat, and bring it to a boil. Ladle about 2 cups broth into each bowl. Enjoy immediately.
    Huli Today Gone To Maui (Instant Pot Huli Huli Chicken)

    Huli Today Gone To Maui (Instant Pot Huli Huli Chicken)

    So excited, going to Maui next week! Just a quick jaunt for a friend’s big birthday (I won’t divulge which big B-day). I have not been to Maui in a very long time. I was about to graduate from pharmacy school the last time I visited, a lifetime ago.  Needless to say, there was a lot of plate-lunch and MacDonald’s Saimin on that trip. Won’t be doing that this time. Nope.  Well, maybe for nostalgia’s sake…maybe just one 2-scoop plate lunch.

    With Hawaii on the brain, I was looking for a quick easy meal one night after a long, frustrating, commute home from work. (2 hours to drive 25 miles,  auugh). Wes had pulled out some chicken thighs and it was up to me to figure out what to do with them. Too cold and too late to barbecue, I was stymied when, “Look! On the Counter! It’s a Coffeemaker! It’s a toaster-oven!

    No, it’s an INSTANT POT!”
    A quick perusal online and what should pop-up? Huli Huli Chicken. I don’t think Hawaiian was one of my Google words but I’m going with it. Normally Huli Huli Chicken is grilled, but that calls for marinating the chicken for a couple of hours and then firing up the grill. We would be eating at midnight.  I opted for the Instant Pot recipe.

    STUPID EASY

    That’s all I can say. Soy sauce, pineapple juice, catsup, fresh grated ginger and garlic, brown sugar, and broth. Throw it into the pot, submerge the chicken thighs in all that deliciousness and set it for 10 minutes. Then, let the pot do its thang and use natural release for 10 minutes.

    Remove the chicken and pop it under the broiler to crisp up the outside. While the chicken is getting a Hawaiian tan ok, char, in the oven, add a cornstarch slurry to the sauce in the IP to thicken, DONE. Dinner is served.  You could spice up the marinade by adding a touch of Siracha Sauce or lemon juice for a bit of tartness.  Your call.

    The Instant Pot version is an adaptation.  Huli Huli chicken is a barbecue recipe.  Skip the broth and use the remaining ingredients to marinade the chicken for a minimum of several hours. Then throw the chicken on the grill. Reserve some marinade to make the sauce and use the rest to brush on the chicken while grilling. Which you could definitely do….if you had time.  Instead, by cooking the chicken in the sauce a la Instant Pot you have dinner on the table in a fraction of the time!  HOW cool is that?

    A glass of wine, a side of rice, and a salad, and my commute fading from memory.  My mood definitely took an upswing.  I took my first bite of chicken, pineapple-ly sweet, balanced with the saltiness of the soy, and finished with a garlicky-ginger bite.  Jumped up and did a short hula-hip check on the hubs.  Ono-licious.

    Instant Pot Huli Huli Chicken
    Serve on a bed of rice, perfect for a weekday meal.

    Huli Huli Chicken

    Huli Huli Chicken an island favorite tweaked for a quick and easy meal. Instead of grilling chicken marinaded in a pineapple-soy marinade, the chicken and marinade components go in the Instant Pot.
    Course chicken, dinner, Main Course
    Cuisine Asian-American, Hawaiian
    Keyword Carnitas in an Instant Pot, Huli Huli Chicken
    Prep Time 15 minutes
    Cook Time 17 minutes
    Servings 6 servings

    Equipment

    • 1 Instant Pot

    Ingredients

    Da Main Ingredient

    • 6 bone in chicken thighs ..you can use boneless, skinless thighs approximately 2 pounds

    Instant Pot Marinade

    • 1 cup pineapple juice
    • ½ cup Shoyu or ponzu sauce
    • ½ cup brown sugar
    • cup ketchup
    • ¼ cup chicken broth or dry sherry
    • 2 teaspoons fresh grated ginger root
    • teaspoons minced garlic

    Thickener

    • Cornstarch Slurry 1T cornstarch + 2 T cold water

    Garnish

    • 4-5 stalks green onions sliced at an angle for garnish
    • Roasted sesame seeds

    Instructions

    • In your IP Pot, whisk together pineapple juice, soy sauce, brown sugar, ketchup, chicken broth, ginger and garlic
    • Add chicken to the pot.
    • Close and seal your pot. Set your pot to Poultry, Pressure Cook or Manual for 11 minutes and allow a 10 minute NPR
    • Remove and place your chicken on a jelly roll pan lined with foil.
    • Set your pot to sauté, when the sauce begins to boil add the cornstarch slurry a little at a time until the desired consistency is reached.
    • Baste the thickened sauce over the chicken
    • Set your oven to broil.
    • Broil the chicken for 5 to 7 minutes or until some of the sauce caramelizes.
    • You could also put them on the grill...baste often
    • Transfer chicken to a serving dish and garnish with green onion
    NOM-NOM-licious Chicken and Gravy (Instant Pot Chicken and Gravy)

    NOM-NOM-licious Chicken and Gravy (Instant Pot Chicken and Gravy)

    AN HOUR AND A HALF commute home from work left me cranky and hungry.  I slammed my stuff down on the kitchen table and headed to the fridge, yanked the door open and searched for something quick to make for dinner.  I found a whole chicken I had bought the day before and thought ugh, that will take a while…I WANT TO EAT NOW.  Lightbulb moment, I remembered I had saved an Instant Pot recipe for Chicken and Gravy from NOM NOM Paleo.  Quick and easy, the perfect solution for my dinner dilemma. Though not a strict Paleo diet follower, I do like the NOM NOM cookbook and blog and I have an affinity for the NOM NOM author (plus I love saying NOM NOM).  Like me, she is a pharmacist by trade, a fellow drug pusher-legit ones, lol.  There is a natural crossover between being a pharmacist and being a cook or baker.  Numbers, measurements, proportions, being a bit OCD- all part of both professions.

    A few easy steps and dinner is on the table in 44 minutes and 37 seconds at most.  See, pharmaceutical precision.  While the chicken is cooking, make some rice or egg noodles to go along or if you want to keep this a paleo meal, make cauliflower rice or potatoes (Po-ta-toes! Boil them, mash them, stick them in a stew. Lovely big golden chips with a nice piece of fried fish-that line pops in my head every time). The sauce is so yummy you will want something to soak up every drop.

    The recipe calls for browning the chicken in your pressure cooker, taking it out and sautéing onions, garlic and a bit of tomato paste, putting the chicken back in the pot, on top of the onions, adding a bit of broth and setting the pot timer to 20 minutes cooking.  Yep, that’s it.

    Saute onions and garlic until soft.

    Add tomato paste and broth to pot. Place a wire rack on top to hold the chicken.  You can add a bit of herb for additional flavors such as a sprig of thyme, oregano or rosemary. Just to kick it up a bit.

    After removing the chicken (and fresh herb sprigs), use a hand blender to puree the onion-garlic mixture which becomes the luscious gravy-yum yum. The original recipe calls for thickening the sauce but I didn’t bother.  I wanted to dig in!  So delicious!!!!!

    Dinner is served and definitely elevated my mood, happy, happy, happy.

    NOM-NOM-licious Chicken and Gravy

    Ingredients

    • Adapted from Nom Nom Paleo
    • 1 4-pound organic chicken (a bigger chicken won’t fit in a 6-quart Instant Pot)
    • 1.5-2 teaspoons kosher salt if using table salt, cut amount to 1 teaspoon
    • ¼ teaspoon freshly ground black pepper
    • 2 tablespoons of ghee or vegetable oil divided
    • 2 large yellow onions diced (or use 1 yellow, 1 red)
    • 6 garlic cloves peeled
    • 2 teaspoons tomato paste
    • ½ cup chicken stock
    • 1 tablespoon cornstarch mixed with 2 T water

    Instructions

    • Sprinkle 2 teaspoons salt and ¼ teaspoon pepper all over the chicken, inside and out. Tuck the wings behind the back.
    • Add 1 tablespoon of ghee or oil to the pressure cooker, press “Sauté” function on your electric pressure cooker.
    • When the fat is shimmering, sear the chicken breast-side down in the center of the pot for approximately 5 minutes or until lightly browned.
    • Flip the bird breast-side up. Cook for another 5 minutes or until browned on the back. Don’t worry if the skin sticks and tears—the skin won’t be crispy when you’re done cooking anyway. You’re just browning the skin to deepen the flavor of the gravy.
    • Transfer the chicken to a plate and add the remaining tablespoon of ghee or oil to the pot. Once it is heated, toss in the chopped onions, 6 garlic cloves, and a sprinkle of salt.
    • Cook for 1 to 2 minutes or until softened.
    • Stir in 2 teaspoons tomato paste and cook for about 30 seconds.
    • Turn off the sauté function. Pour in ½ cup broth, scraping up any browned bits.
    • Add steamer insert to the bottom of the pressure cooker, and lay the bird on top of it, breast-side up. Cover and pressure-cook on high for 20 minutes).
    • Turn off the electric pressure cooker, and immediately release the pressure manually. Open the lid and transfer the chicken to a plate or carving board. Tent the cooked bird with foil, and rest it for 10 minutes.
    • Use an immersion blender to purée the contents of the insert to make a smooth gravy. Season to taste with salt and pepper.
    • If you want to thicken the gravy, mix 1 tablespoon cornstarch with 2 tablespoons water. Then, turn on the sauté function and bring the contents to a simmer. Stir in the arrowroot powder slurry and cook until thickened.
    • Carve the chicken and top with gravy. Garnish with parsley if desired.
    • Make sure to have a ginormous bowl of rice or buttered noodles to serve along side..just for the extra gravy!