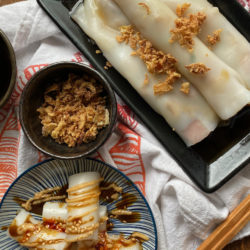
Cheng Fun
A favorite dim sum dish, steamed rice noodles filled with bbq pork, shrimp or minced beef, served with sweet soy sauce. Made easy in the microwave!
Ingredients
Batter
- 1 cup rice flour 140g
- 1/2 cup potato starch 90g
- 1/2 cup tapioca starch/flour 70g
- 1 tablespoon sugar
- 1/2 teaspoon salt
- 1 tablespoon canola or vegetable oil plus more for brushing
- 2 cups room temperature water 470ml
- 2 cups just boiled water 470ml
Adds-ins
- 3 tablespoons thinly sliced scallions
- 3 tablespoons chopped cilantro
Toppings
- red pepper flakes
- toasted sesame seeds
- chili oil
Sweetened Cheung Fun Soy Sauce
- 2-2.5 Tbsp light soy sauce adjust to taste
- 1/4 cup water
- 1½ tsp sugar
- ¼ tsp chicken powder
- ¼ tsp sesame oil
Hoisin Sauce
- 0.5 T regular soy sauce or dark soy reduce agave to 1/2 t if using dark soy
- 1.5 T Hoisin Sauce
- 0.5 T Sesame oil
- 1-2 T water
- 1 t Agave syrup or sugar
Peanut Sauce
- 1 tbsp peanut butter 1 generous tablespoon
- 2 T water
- 1/2 t agave or sugar
- 1/2 t sesame oil or chili sesame oil
Cheong Fun Sauce Simplified (variation of Sweetened Cheung Fun Soy Sauce)
- 1/2 cup hot water
- 2 tablespoons sugar
- 3 tablespoons soy sauce
- 1/2 teaspoon sesame oil.
Instructions
Batter
- Whisk together all the flours, sugar, and salt in a mixing bowl. Add 1 tablespoon of oil and 2 cups of room temperature water to the batter and stir to combine. Some of the flour will clump up. Don’t worry–keep stirring and the flour will loosen eventually.
- Gradually add the boiled water to the batter. Pour the water in a steady stream with one hand and stir the batter with the other hand. Place a towel underneath the bowl to steady it while you pour and stir.
- Set the batter aside. The flour will settle to the bottom in just a few minutes. Make sure to stir the batter before each time you are ready to pour a sheet of cheung fun.
MIcrowave directions:
- 1 9x6 or 8x8 glass pyrex dish
- Rectangular Pyrex ~9x6 glass container, 8x8 glass container or Large shallow Cook Anyday Bowl
- Brush bottom and 1/4 inch up sides of glass container or pan with vegetable oil. Stir batter and pour approximately 1/3 cup of batter into Pyrex pan. Loosely cover with lid. Place in microwave and set time for 2 minutes and 10 seconds, full power. (For reference microwave I have is ~700 watts, the low end of power for a microwave)
- Set up a pan with cold water large enough to fit Pyrex container you are using to microwave.
- When cooking is complete, remove from microwave and immediately place in pan of cold water. Allow pan to sit for a couple of minutes to cool. The rice noodle sheet should look transparent with a couple of bubbles. If there are opaque spots where it still looks white, microwave for additional 15-20 seconds.
- Remove container from water bath. Using a bench scraper, run it around the edge of the noodle to loosen. Starting from the edge (short or long) nearest to you, use a bench scraper or spatula, lift and roll the rice noodle away from you. Keep lifting and rolling. Divide the rice noodle roll in to the length desired. For Ji Cheung Fun the pieces are approximately 2 to 2.5 inches in length.
- For filled Cheung Fun: Pour batter into dish, scatter a line of filling at about 1/3 line of batter in the pan , from the edge you will begin to roll. See video.
Fillings
- Go crazy, rice noodles are very neutral and will compliment almost anything you pair with it.
- Have approximately 1/2 pound of filling for this recipe. But if you come up short, make non-filled noods, cut them up for nice big bowl soup.
Shrimp
- Use medium sized shrimp, peel and deveined. Toss the cleaned shrimp with 2 tablespoons water, 1/2 teaspoon sugar and 1/8 teaspoon baking soda. After the shrimp have been coated, cover and refrigerate for 2 hours. After 2 hours, rinse the shrimp under a gentle stream of cold running water for 5 minutes to wash away the sugar and baking soda and pat thoroughly dry with a paper towel. This step is sort of optional. The texture is greatly improved but your prep time is increased. But, if you want snappy shrimp-just do it. This is from Woks of Life, boss site.
- Marinate the shrimp with 1/4 teaspoon sesame oil, a pinch of salt, 1/2 teaspoon cornstarch, and 1/4 teaspoon ground white pepper. Cover and return to the refrigerator while you prepare the rest of the ingredients.
- Pre-cook your shrimp so they will be ready when you make your noods. Lay the shrimp out in a single layer in a microwaveble dish, the shallow Anyday Bowl works, cover and microwave on full power for 4 - 5 minutes until the shrimp are opague, pink and cooked through. AS always, adjust time for your microwave. These numbers are for my 700 watt Spacesaver, adjust accordingly.
Other stuff
- BBQ Pork- Dice or julienne. You can mix in green onions if you like.
- Dried Shrimp, found in Asian grocery stores, soak to soften before using.
- Shiitake mushrooms Use dried or fresh. Rehydrate dried and dice. Fresh shiitakes should be seasoned sitr fried.
- Egg-Straight from wathching the Joe's Rice Roll Video. Scramble an egg and use with the batter. Add 1 -2 tablespoons of egg after pouring batter into pan. Nice effect and great with bbq pork and green onions!