Tag: pie crust

Happy Chicken Pot Pi Day!

Happy Chicken Pot Pi Day!

Here in California, we have been battered by some extreme weather…more rain, snow and high winds than we have seen in a long, long time.  I hope folks are staying safe, warm and dry.

So we are having a somewhat subdued, quiet Pi Day.  Especially since we haven’t had power all day!  That’s not gonna stop me, pi golly.  I adore pies, sweet or savory, by the slice, as a potable hand pie, you get the pic. So Pi Day is just an excuse to make pie.  A day of cold, wet, blustery weather calls for comfort food so what better dish than Chicken Pot Pie?  

I LOVE Pot Pie.  As a kid, it was a special treat if mom pulled out Swanson’s Chicken or Beef Pot Pies for dinner.  Little did I know, it meant an easy meal for her.  As I got older and my taste became more refined I left behind those Swanson’s pies.

I discovered Marie Callendar’s Pot Pies!  So good, more crust, bigger pie, yum.

My love of pies logically led to making my own pies and this includes savory pies, top on the list is Chicken Pot Pie.   

The Elephant In the Room

Not everyone wants or has a compelling need to start from scratch and that’s OKAY!  It’s perfectly fine to start with cooked chicken (a Costco rotisserie chicken comes to mind), commercial low-sodium chicken stock AND a premade pie crust. Making a Chicken Pot Pie is a labor of love.  If any step, homemade PIE CRUST comes to mind, gives you anxiety, use a shortcut. There are great frozen pie crusts dough and puff pastry doughs that can be used to make a fabulous pot pie. Hate prepping veggies?  Frozen WORKS, really.  But if you want to go the whole nine yards…read on 🙂

For novice pie makes, this is a good recipe to make over a couple of days so it doesn’t seem overwhelming.  Make the pie crust and throw it in the fridge to chill. You could do this up to a couple of days before.  This also applies to poaching the chicken and making the filling too.  The chicken can be shredded, the stock reduced, and the filling made and kept in the fridge until you are ready to assemble the pie.

Pick your favorite veggies, I like mushrooms, carrots, celery, broccoli, potatoes, and peas.  Pretty classic aside from the broccoli.  Blanching the veggies ensures they will be nicely cooked in the pie.  Blanch 10 minutes, the goal is al dente + so they don’t get too soft.  The veggies should be cut roughly the same size for even cooking.  The exception to this would be mushrooms, saute’ these before adding to the sauce.

Sauce Me Up

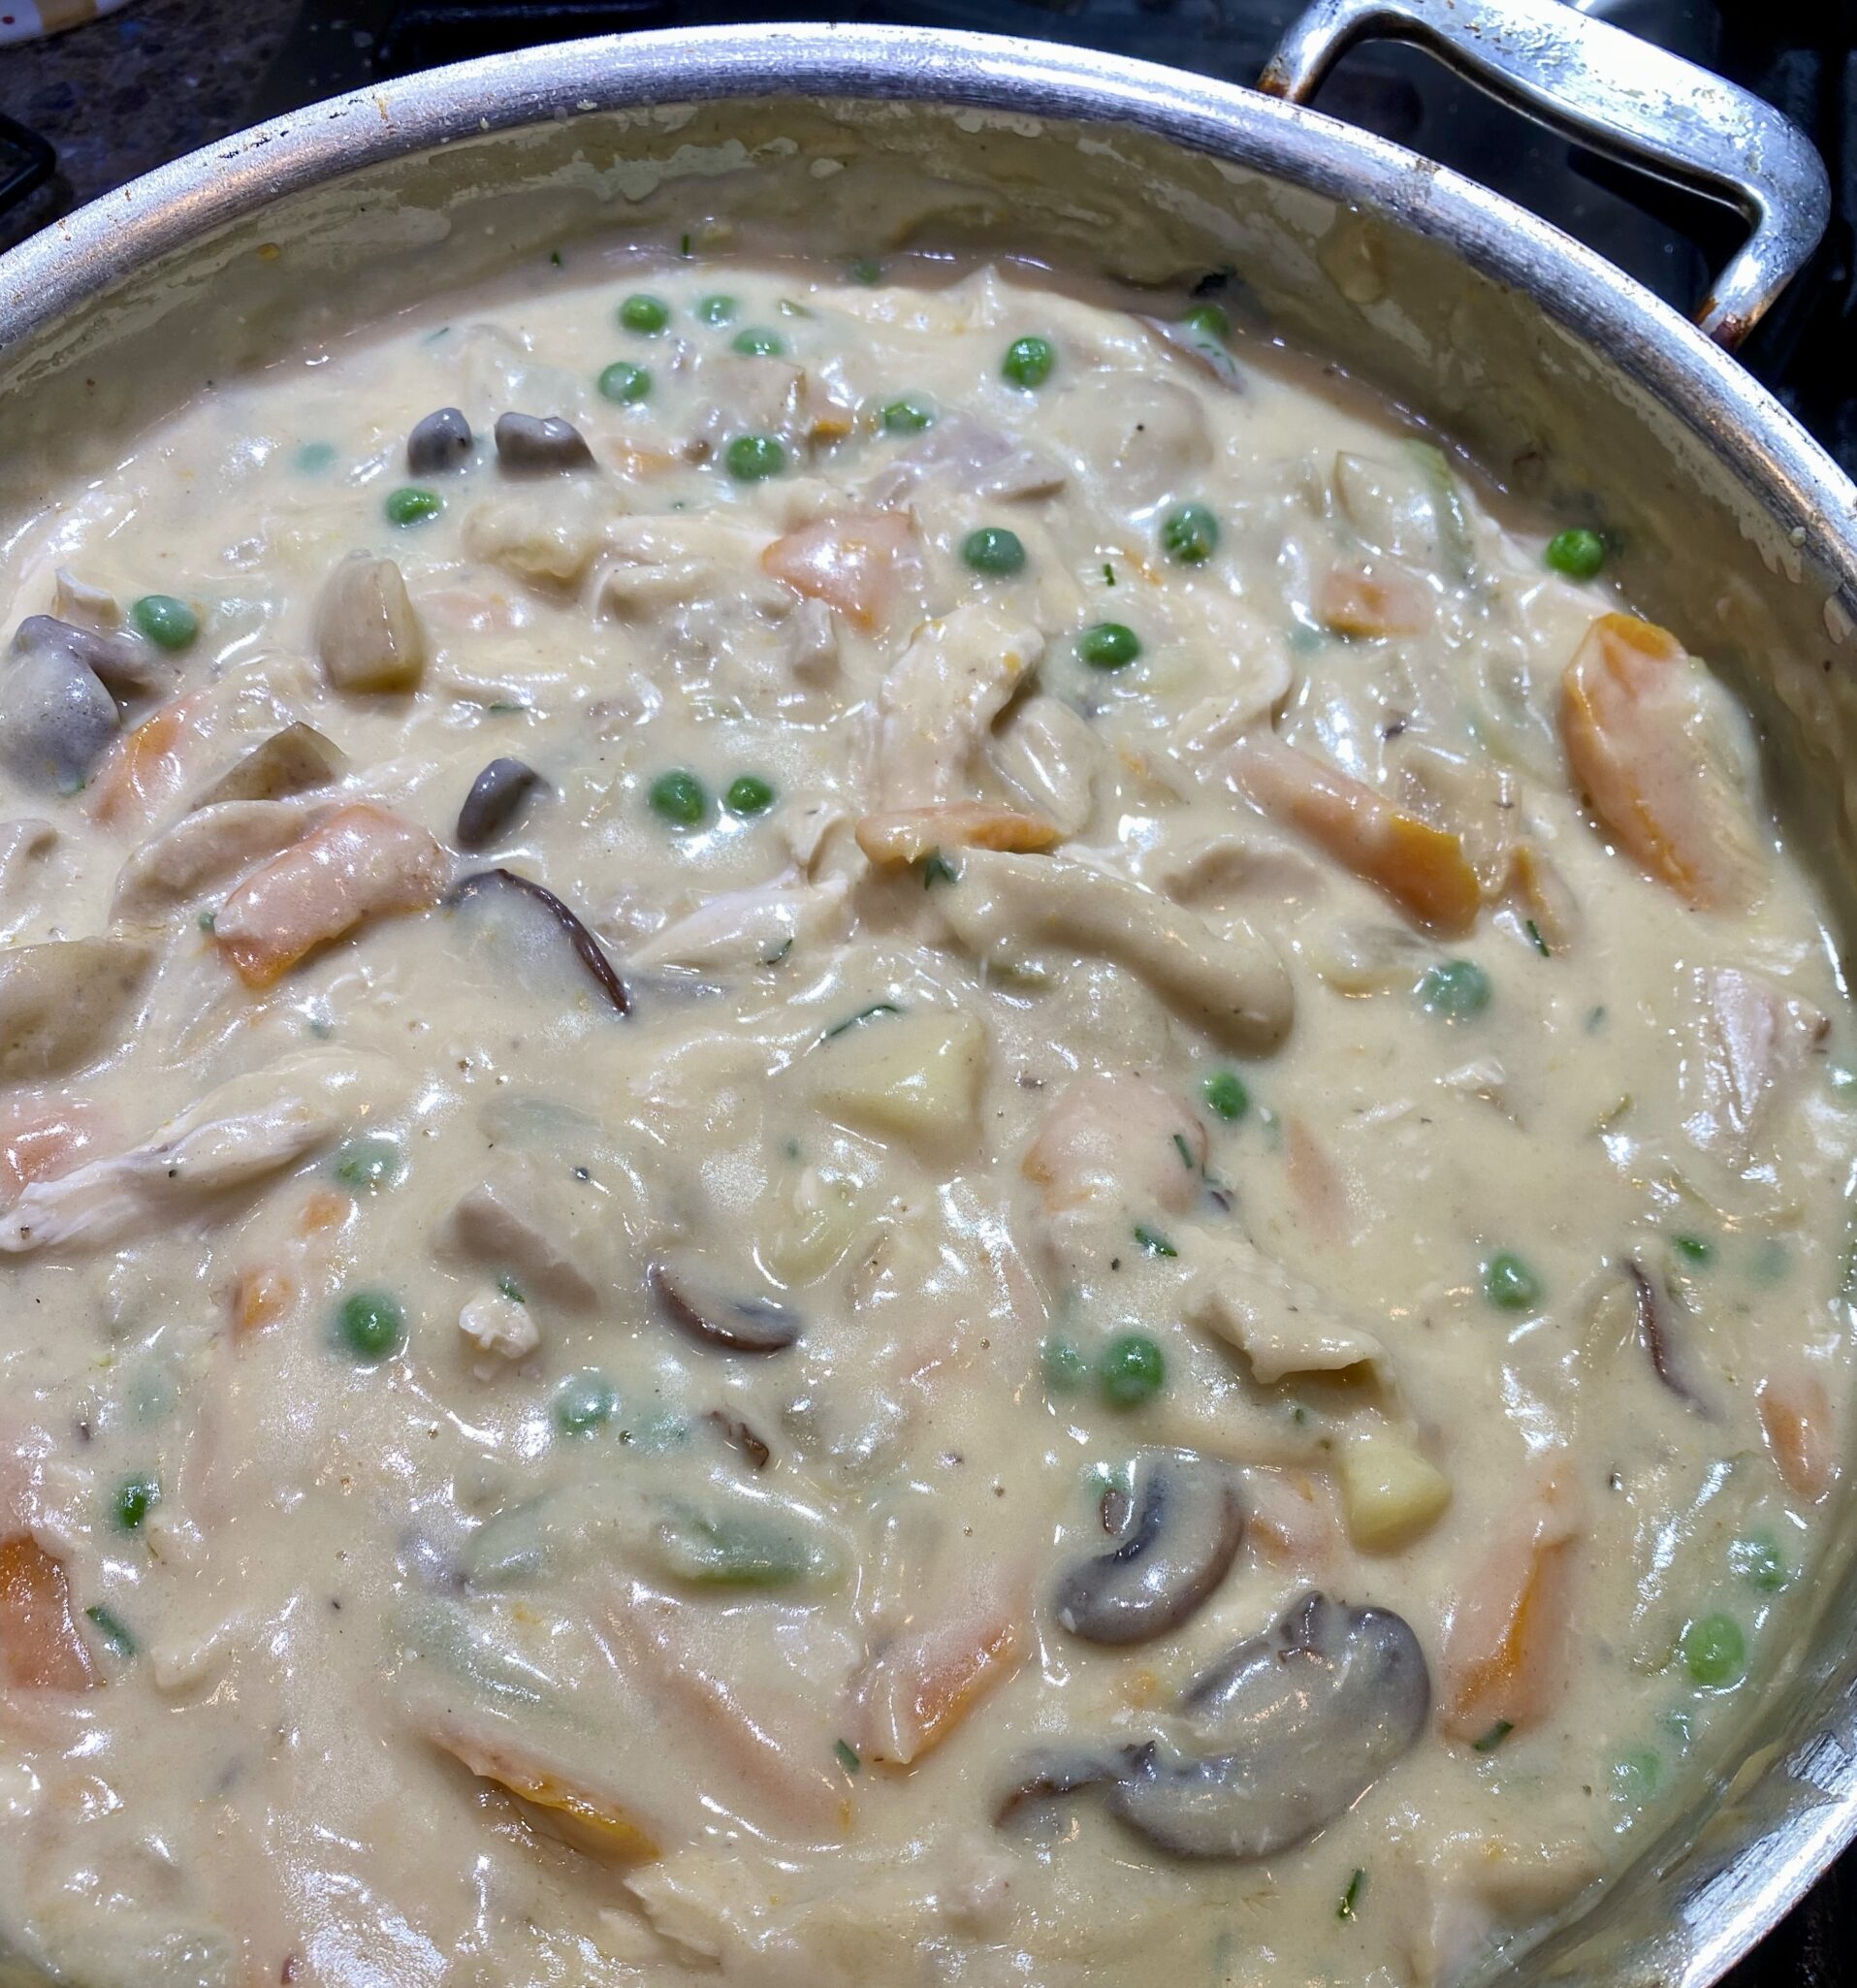
What holds everything together is a simple bechamel sauce of butter, flour, milk,and stock.  Start by making the roux .  Sauté onions with the butter for flavor and add the flour. Cook this for a couple of minutes before adding the chicken stock and milk.  Simmer sauce until it is thick like gravy, stir constantly.  Season well with salt and pepper.  

Two Pie Camps

There are 2 kinds of pie people in my book, those who like crust (ME) and those who like filling (Can’t even imagine who that is).  So I’ve searched far and wide for a pie crust I like.

I love Dorie Greenspan’s pie crust recipe. It’s buttery and flaky, and best of all, it makes a generous amount of dough, enough for a two-crust pie and a small single-crust pie. That’s a lot of crust.  Which is exactly what I want.

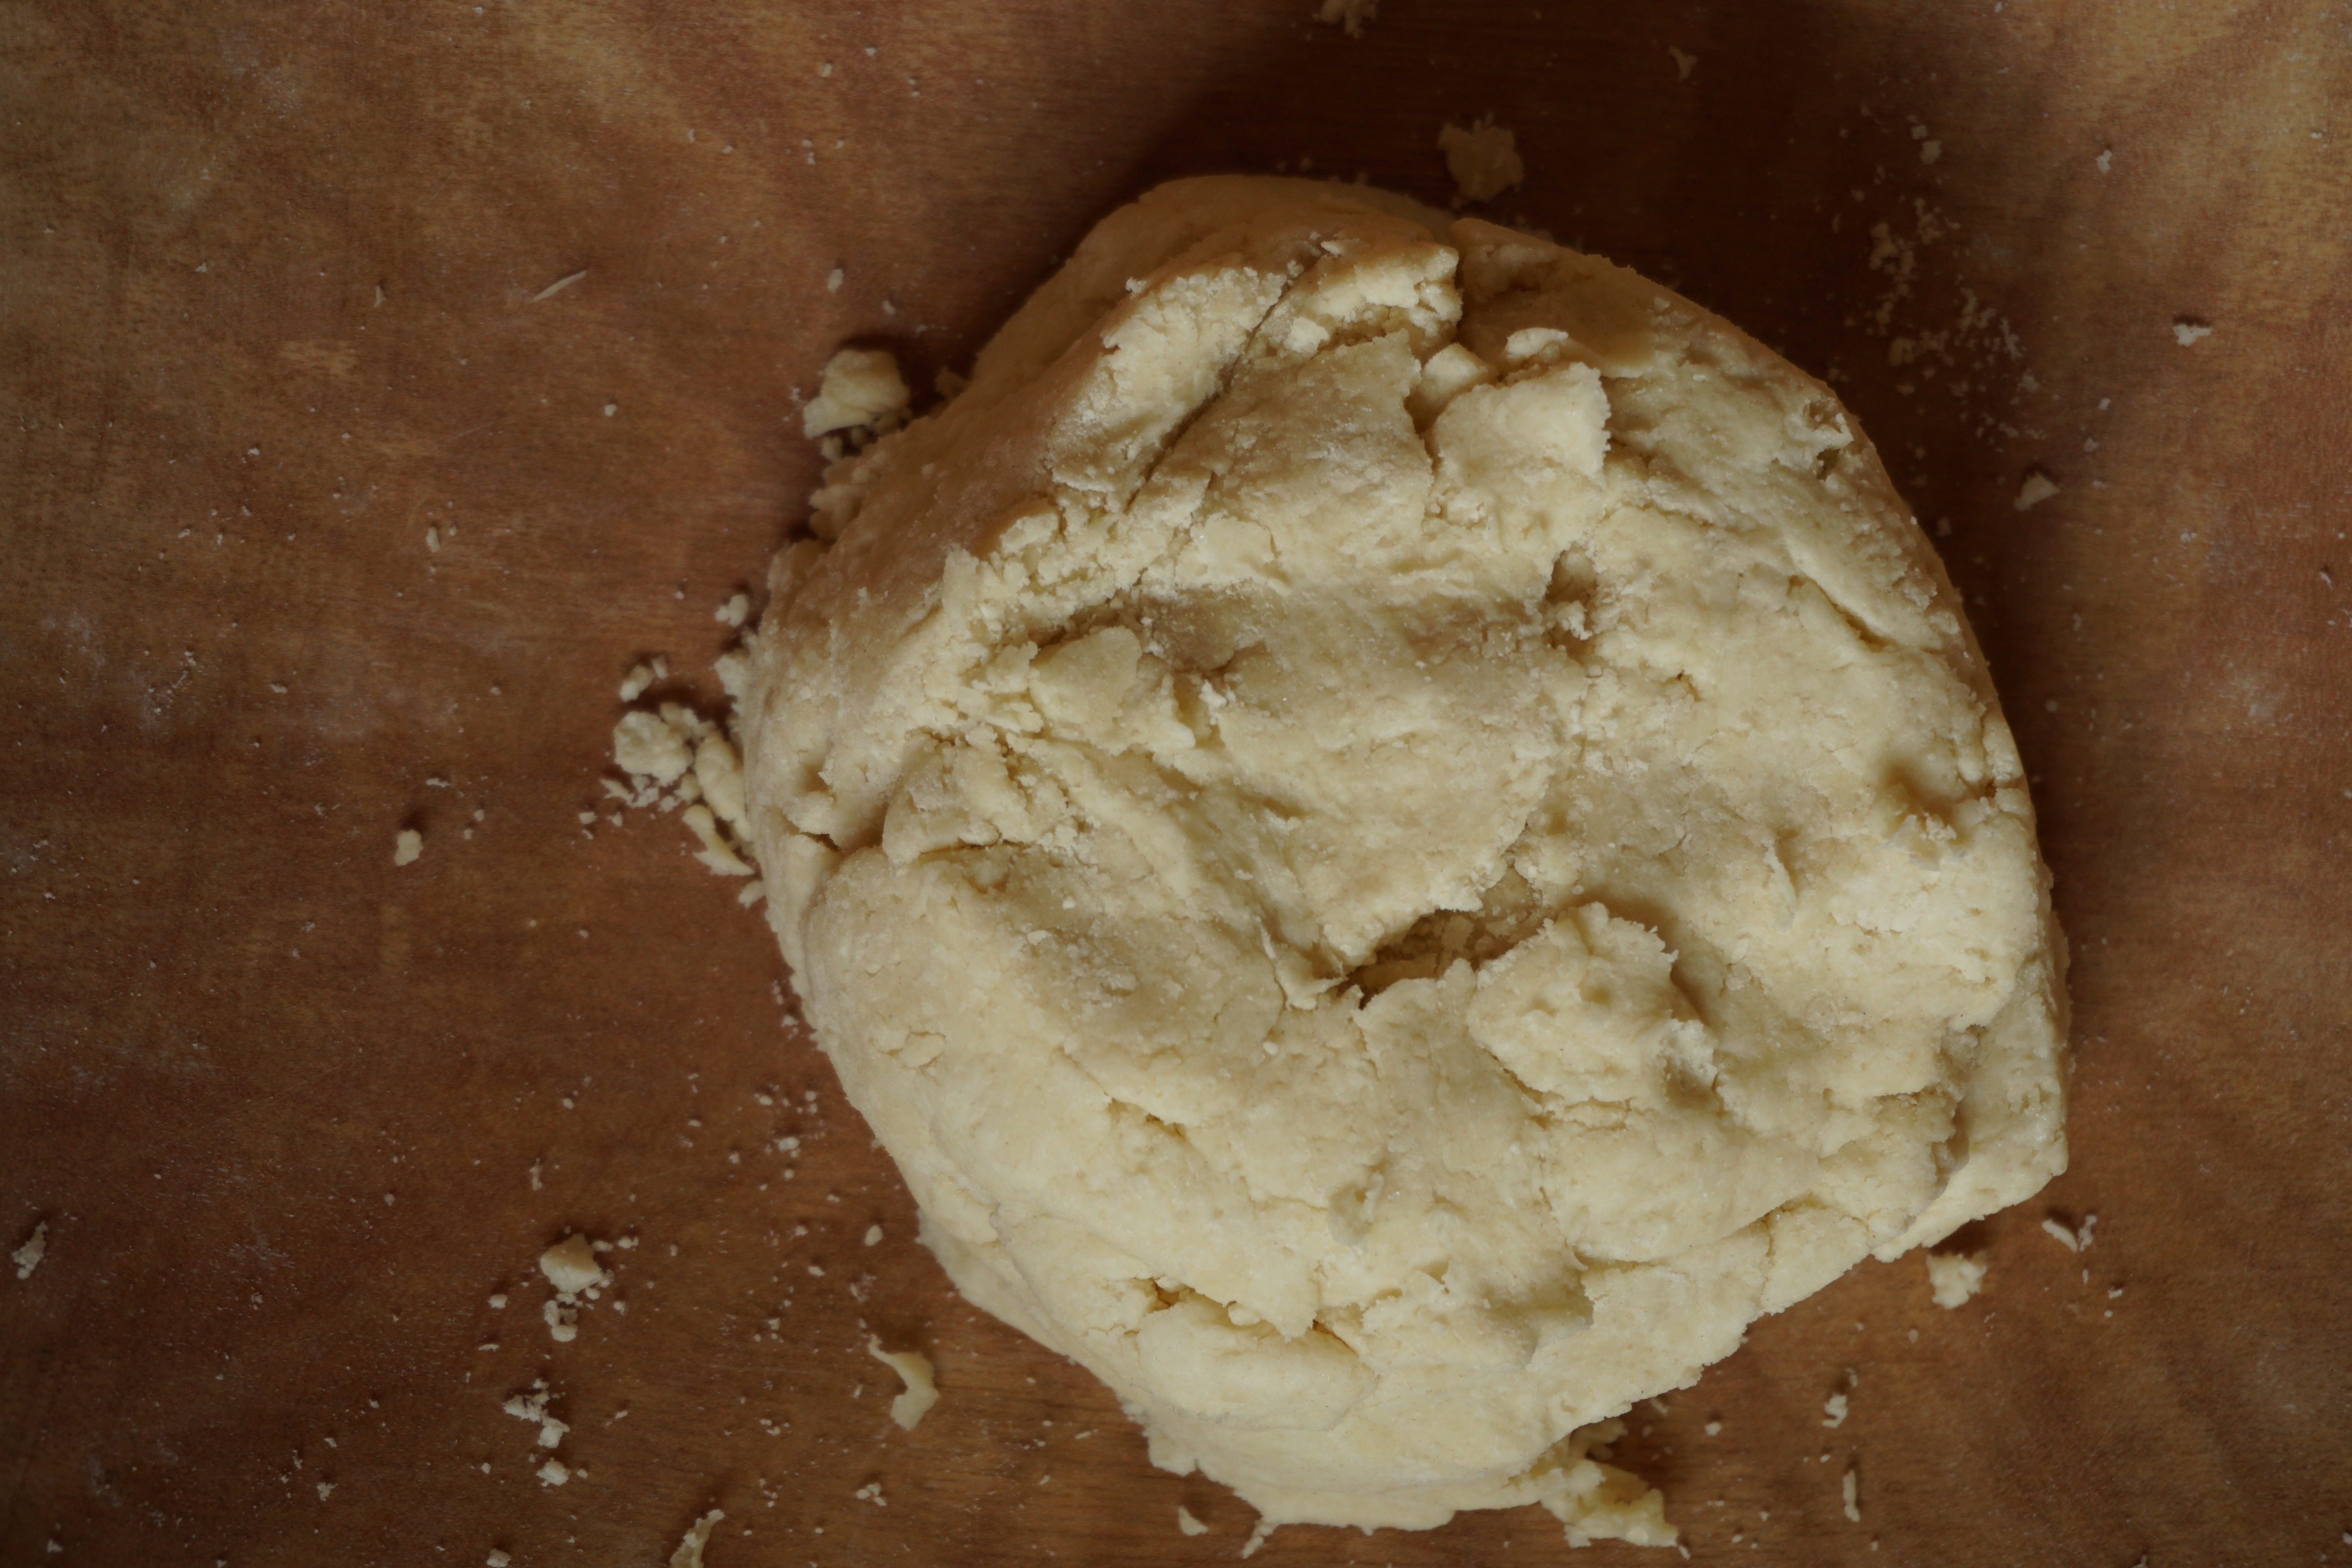
Make the crust by hand or in a food processor.  Be extra vigilant that you don’t overprocess the dough.

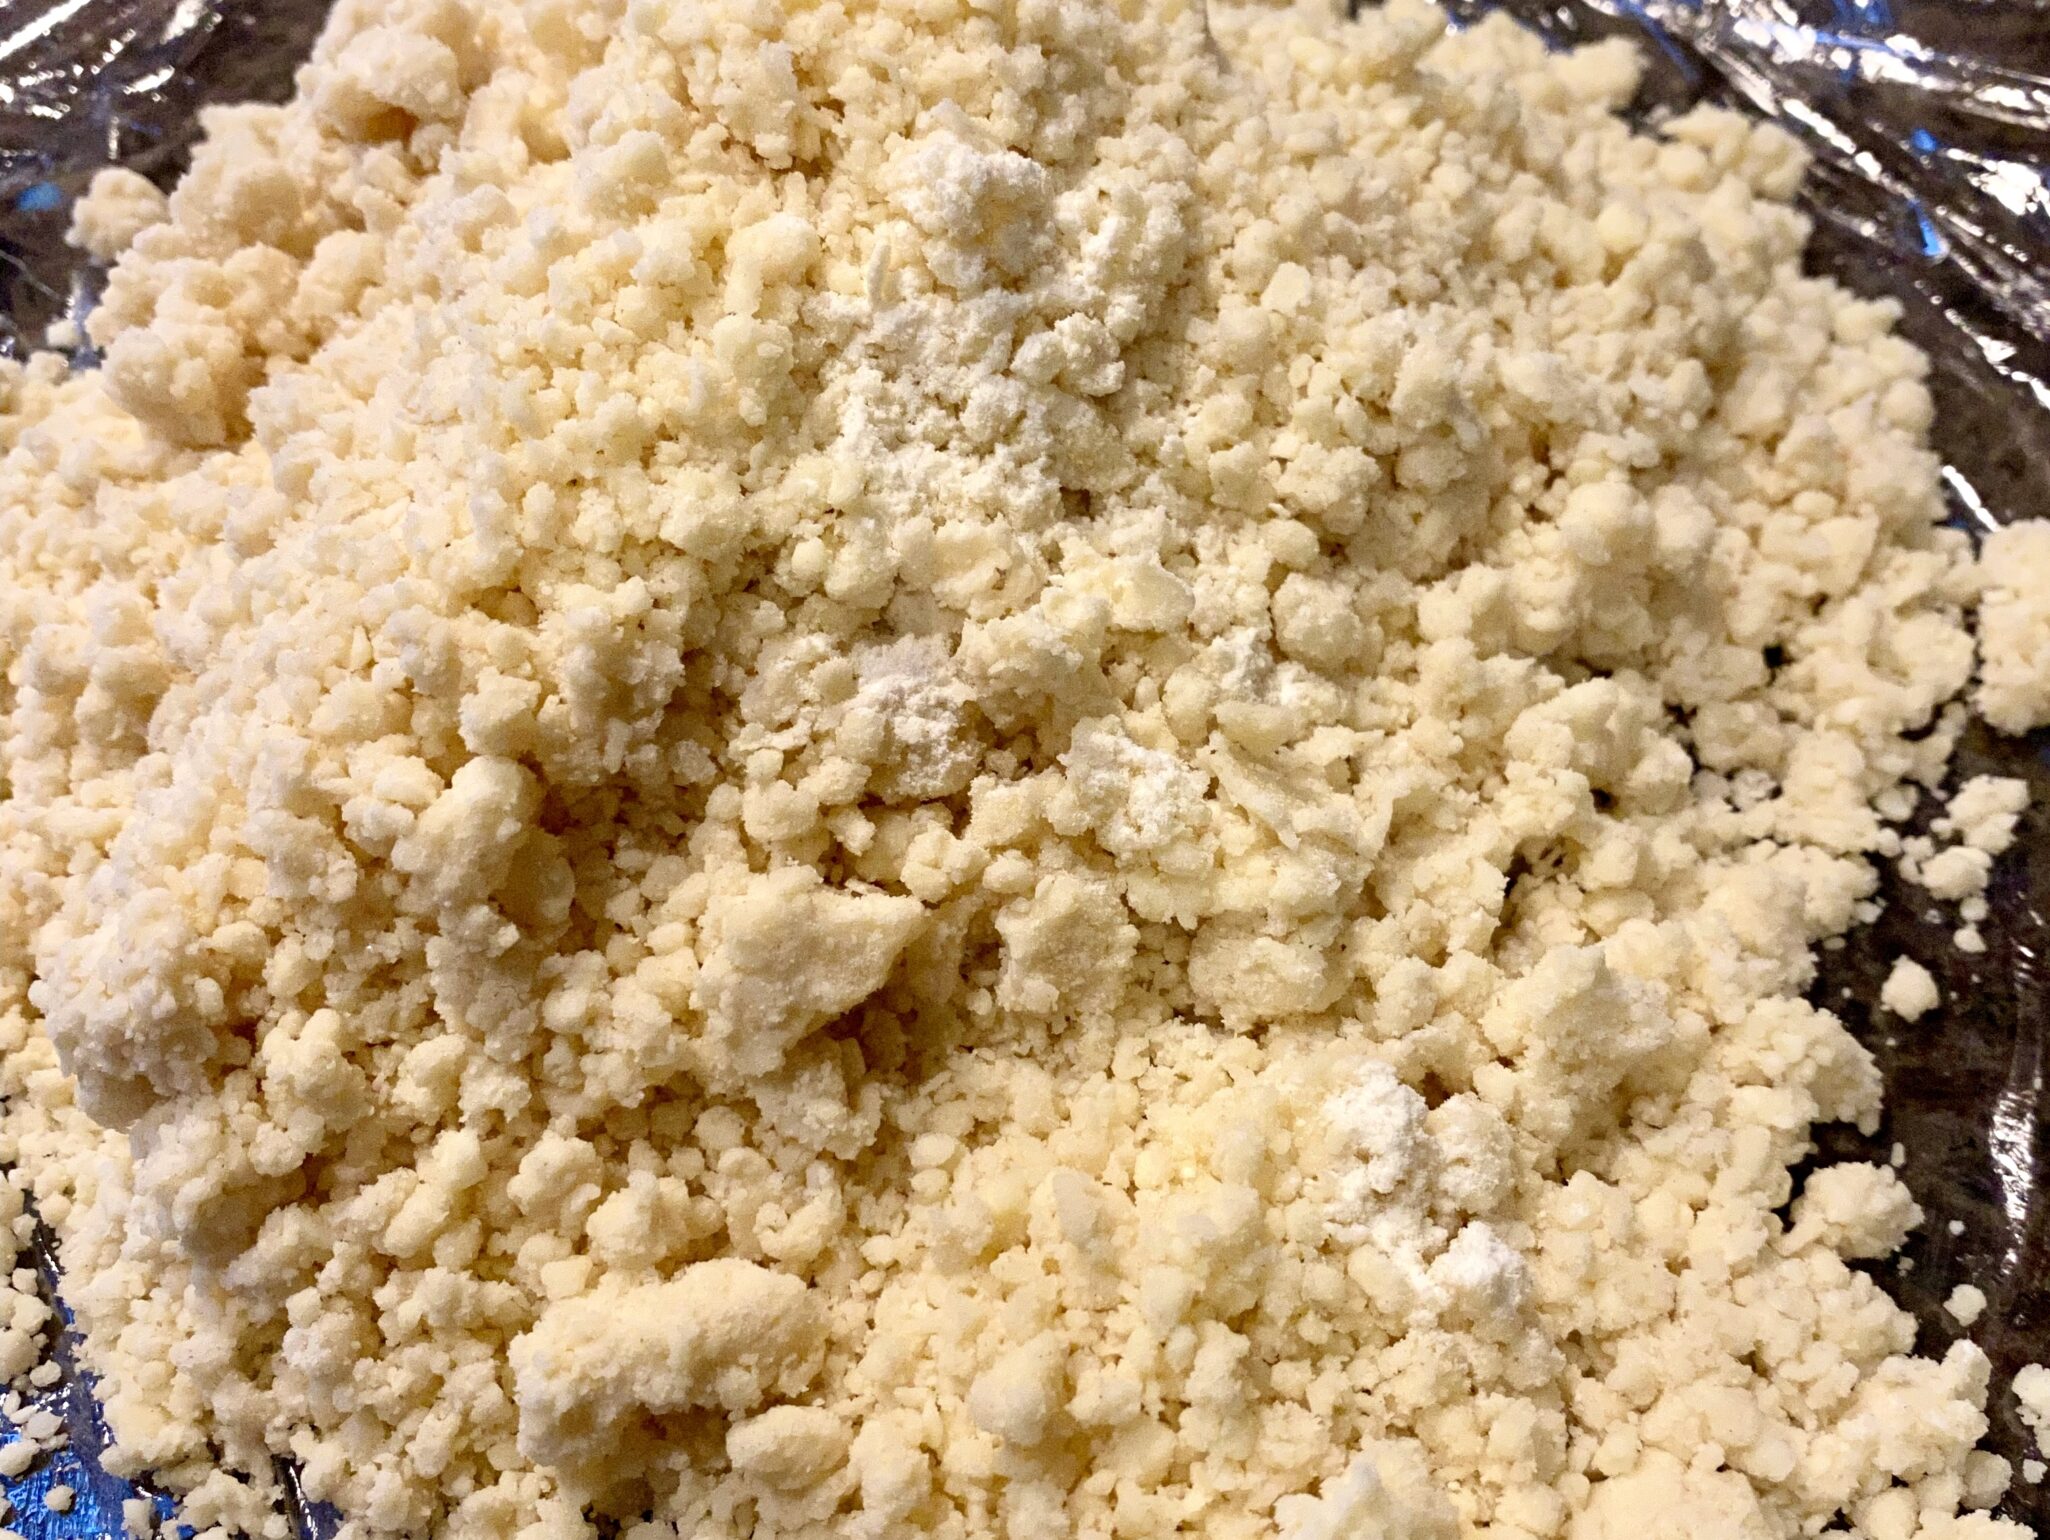
This is what your dough should look like coming out of the food processor. 

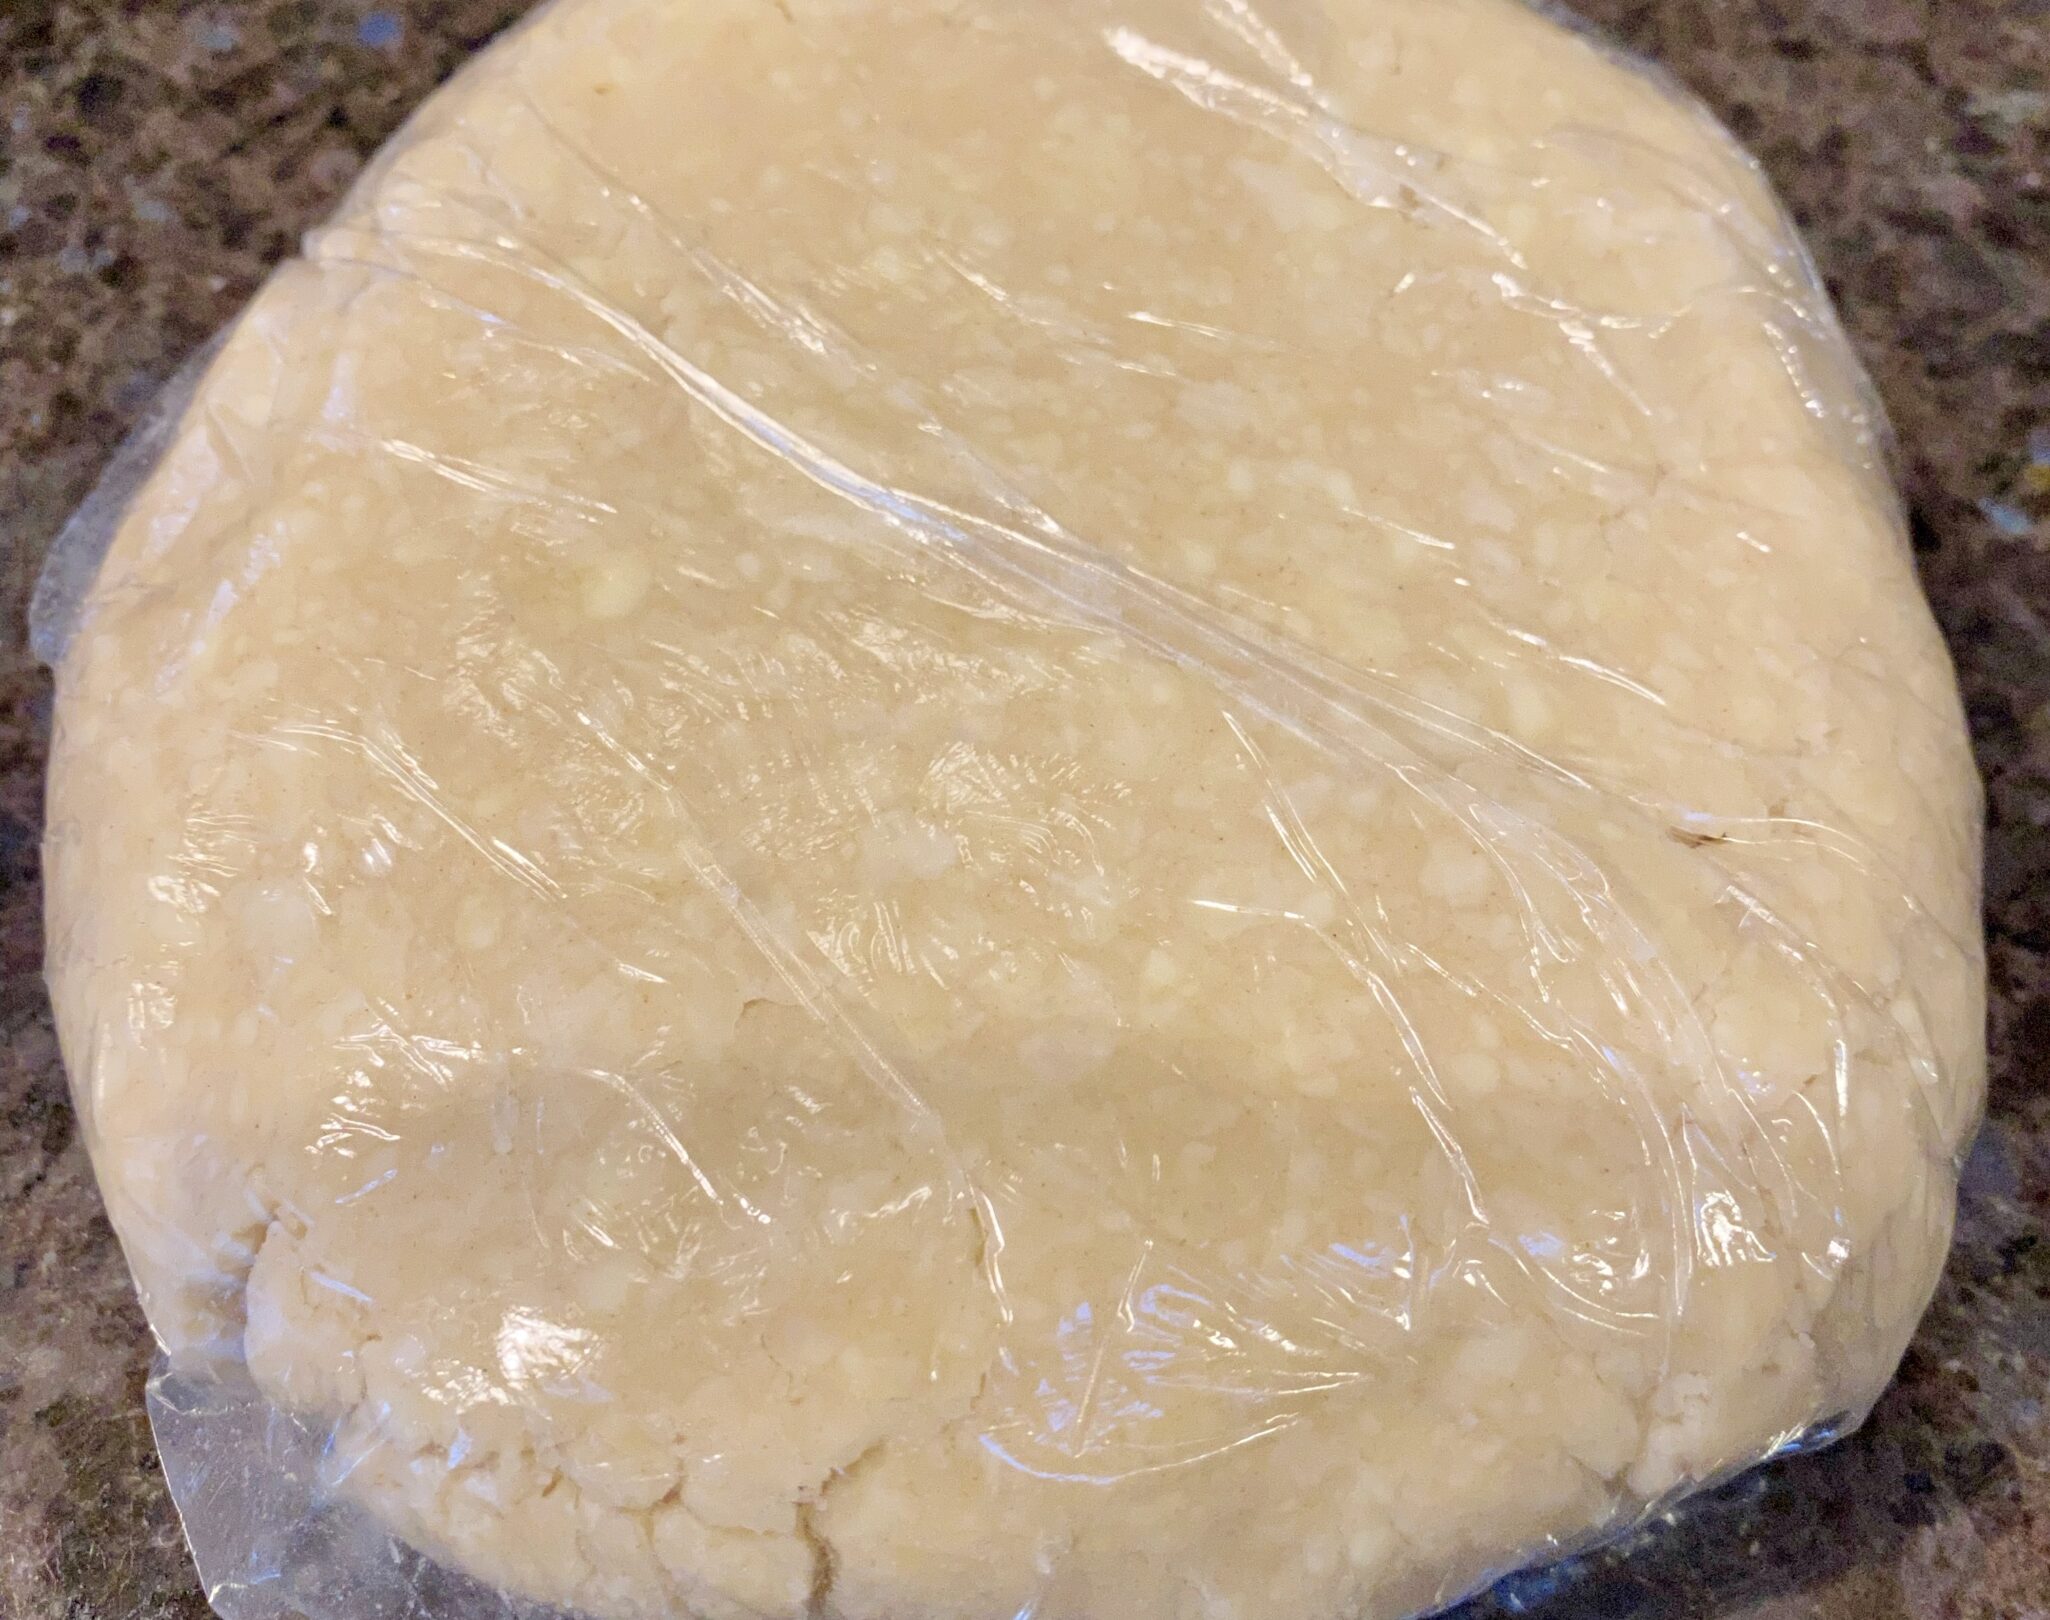
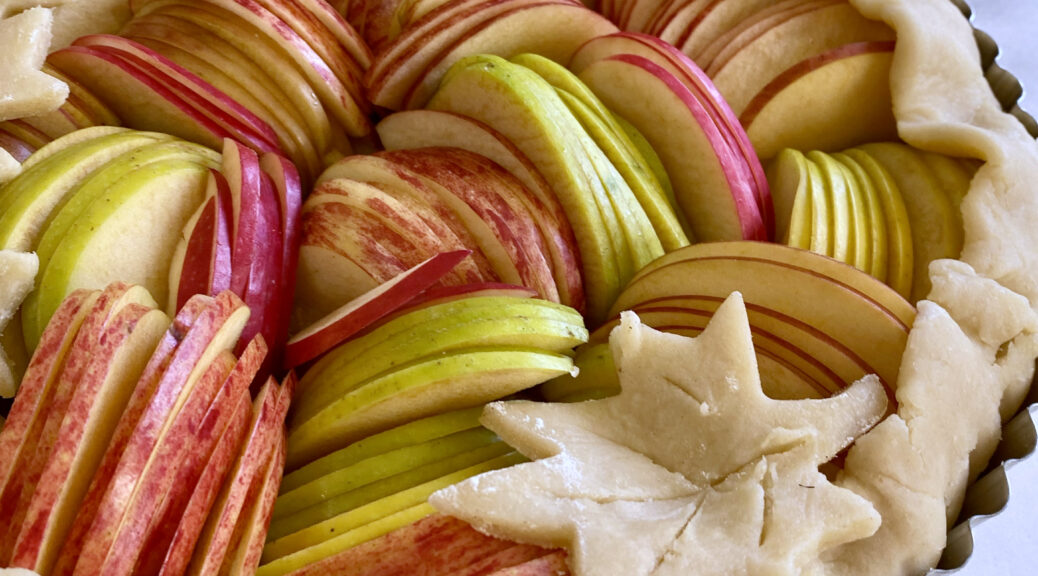
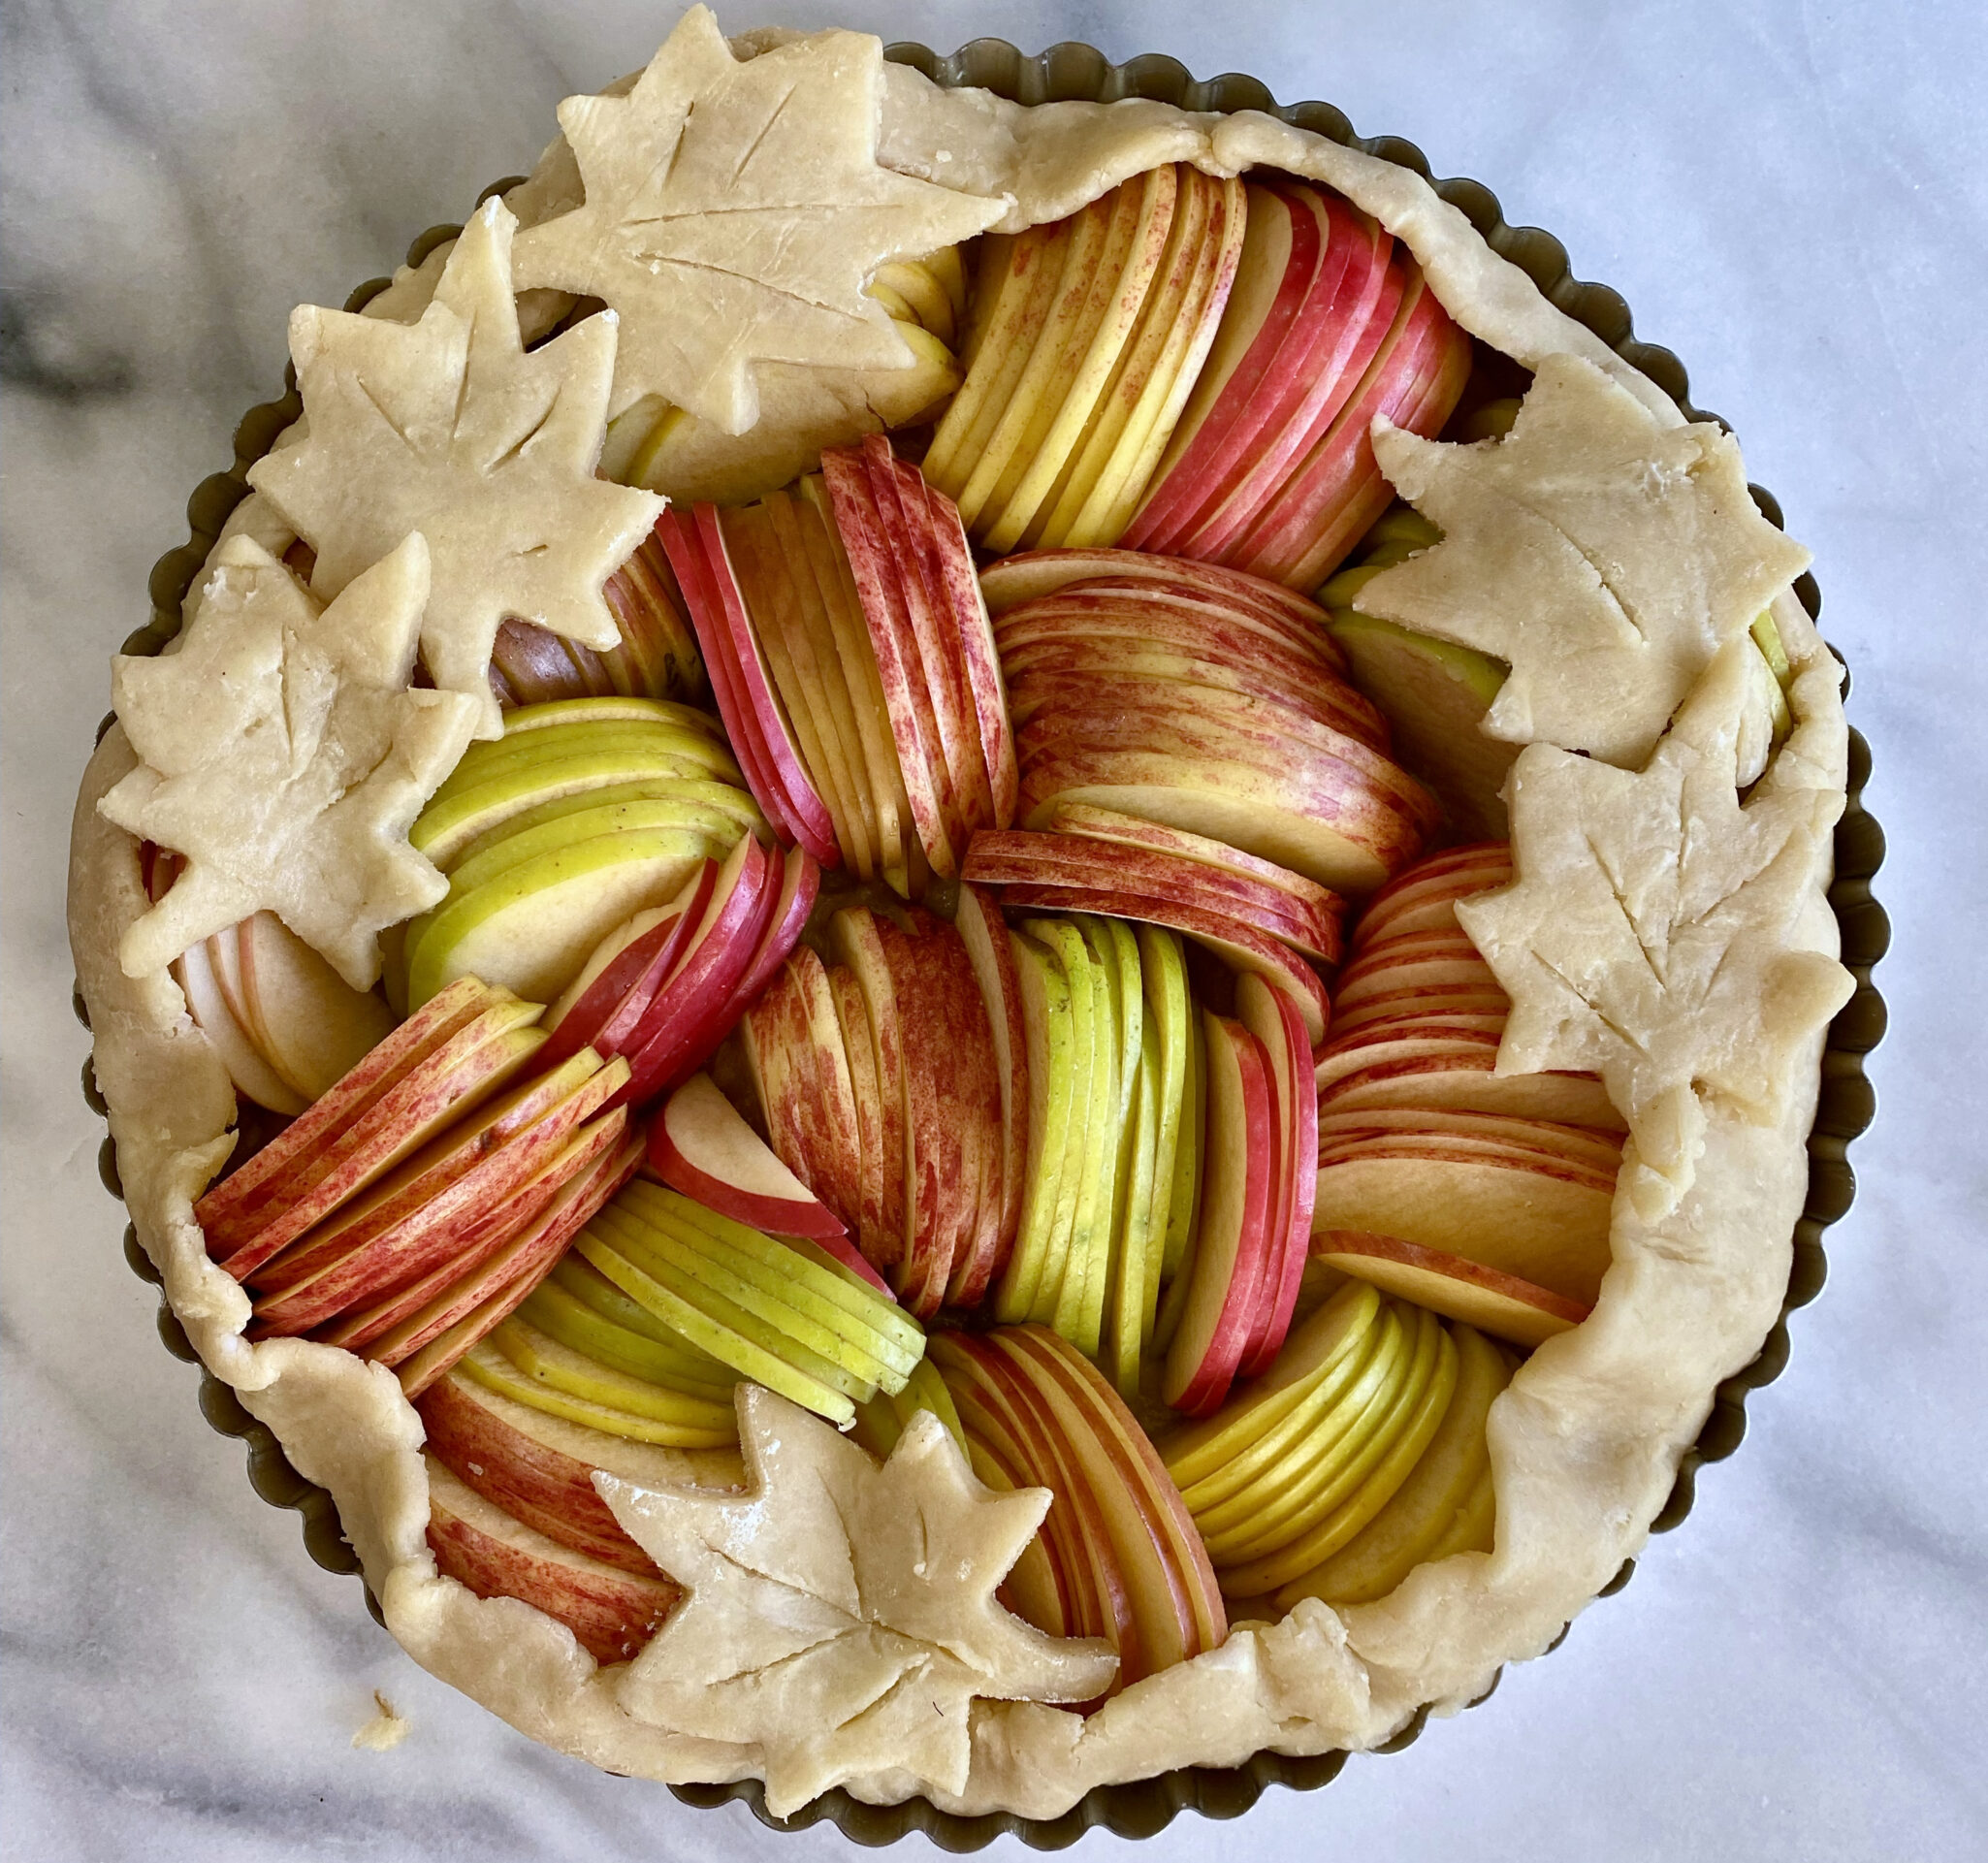
Gather it up into a disc shape and chill.  Roll out 2 crusts one for the top and one for the bottom.  Follow my tweak below or line your baking dish with the bottom crust and chill again.

Let’s Get to the Bottom of the Pie

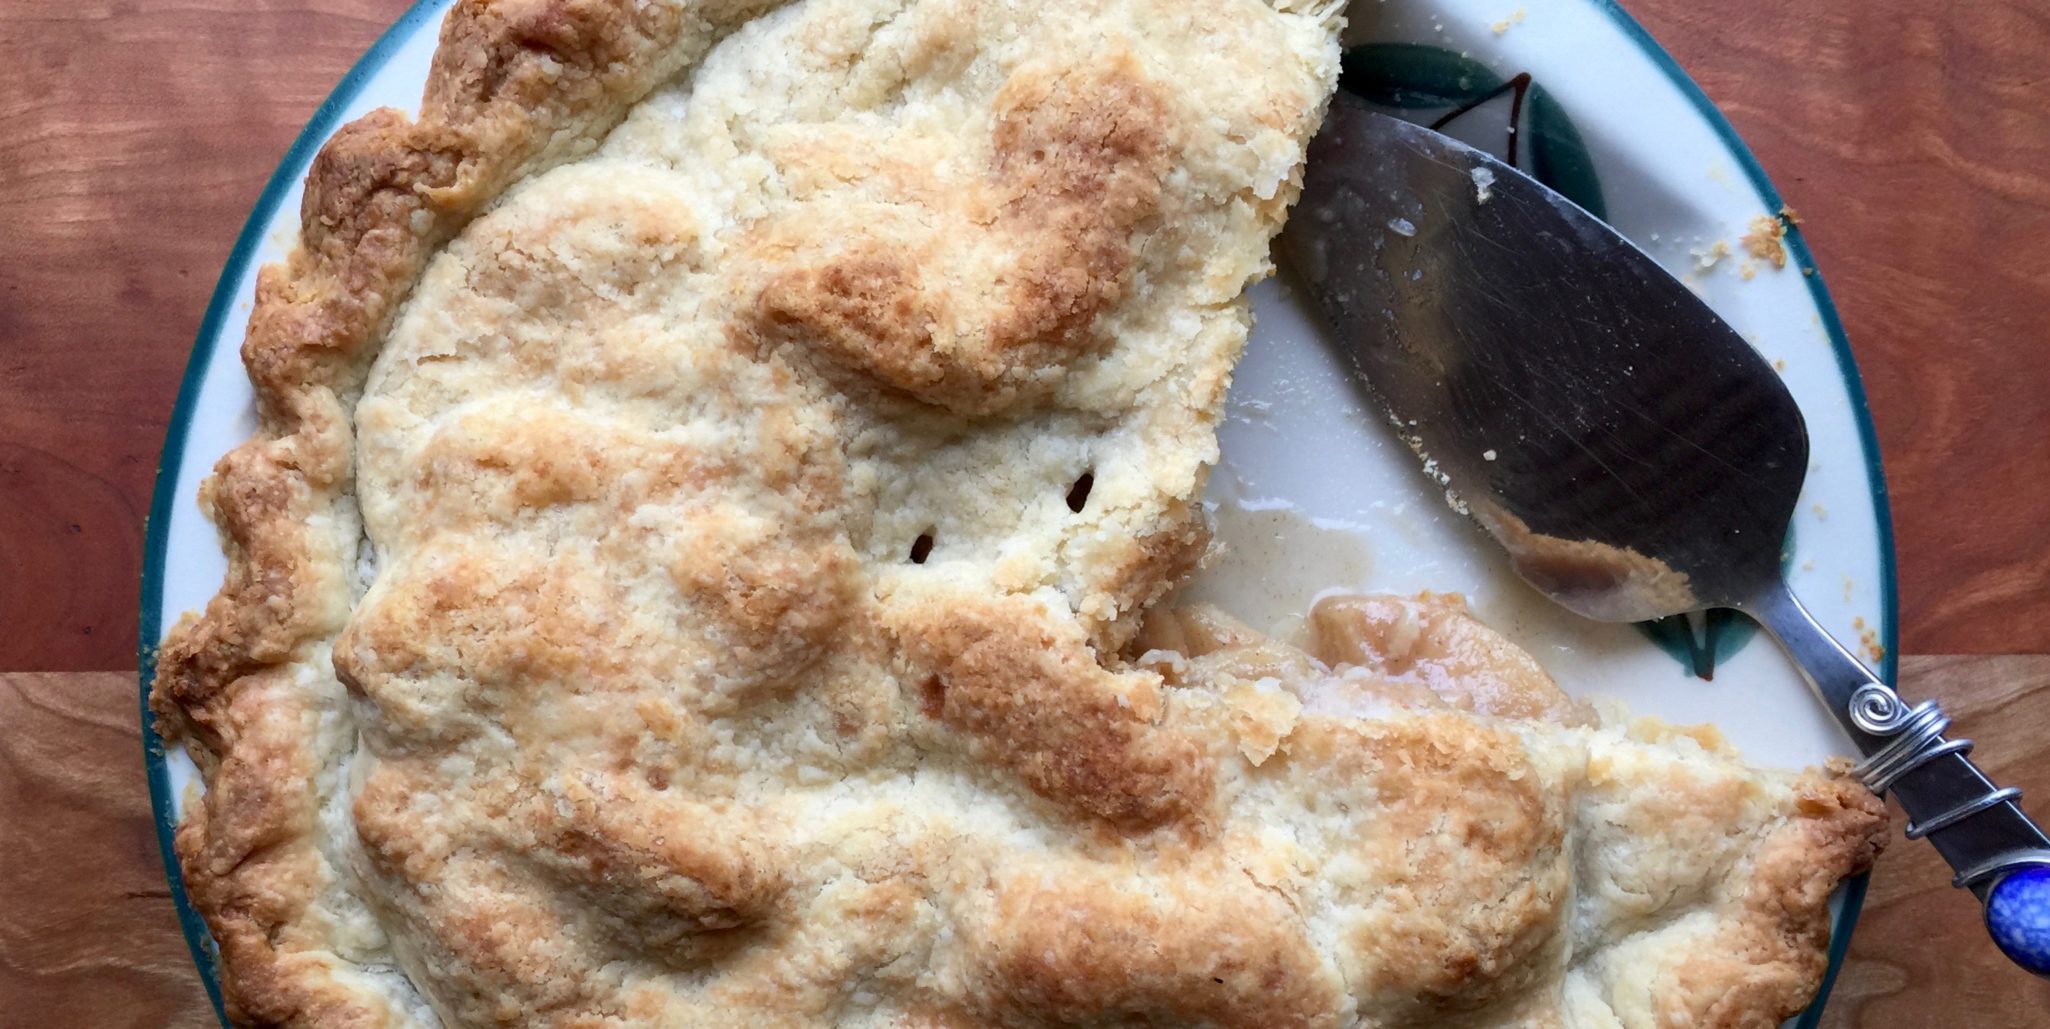
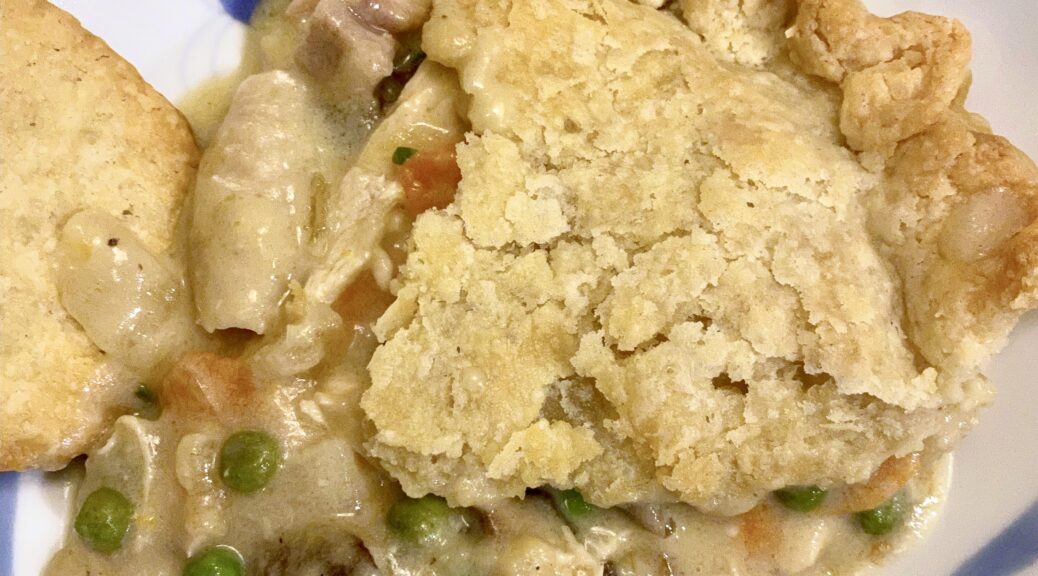
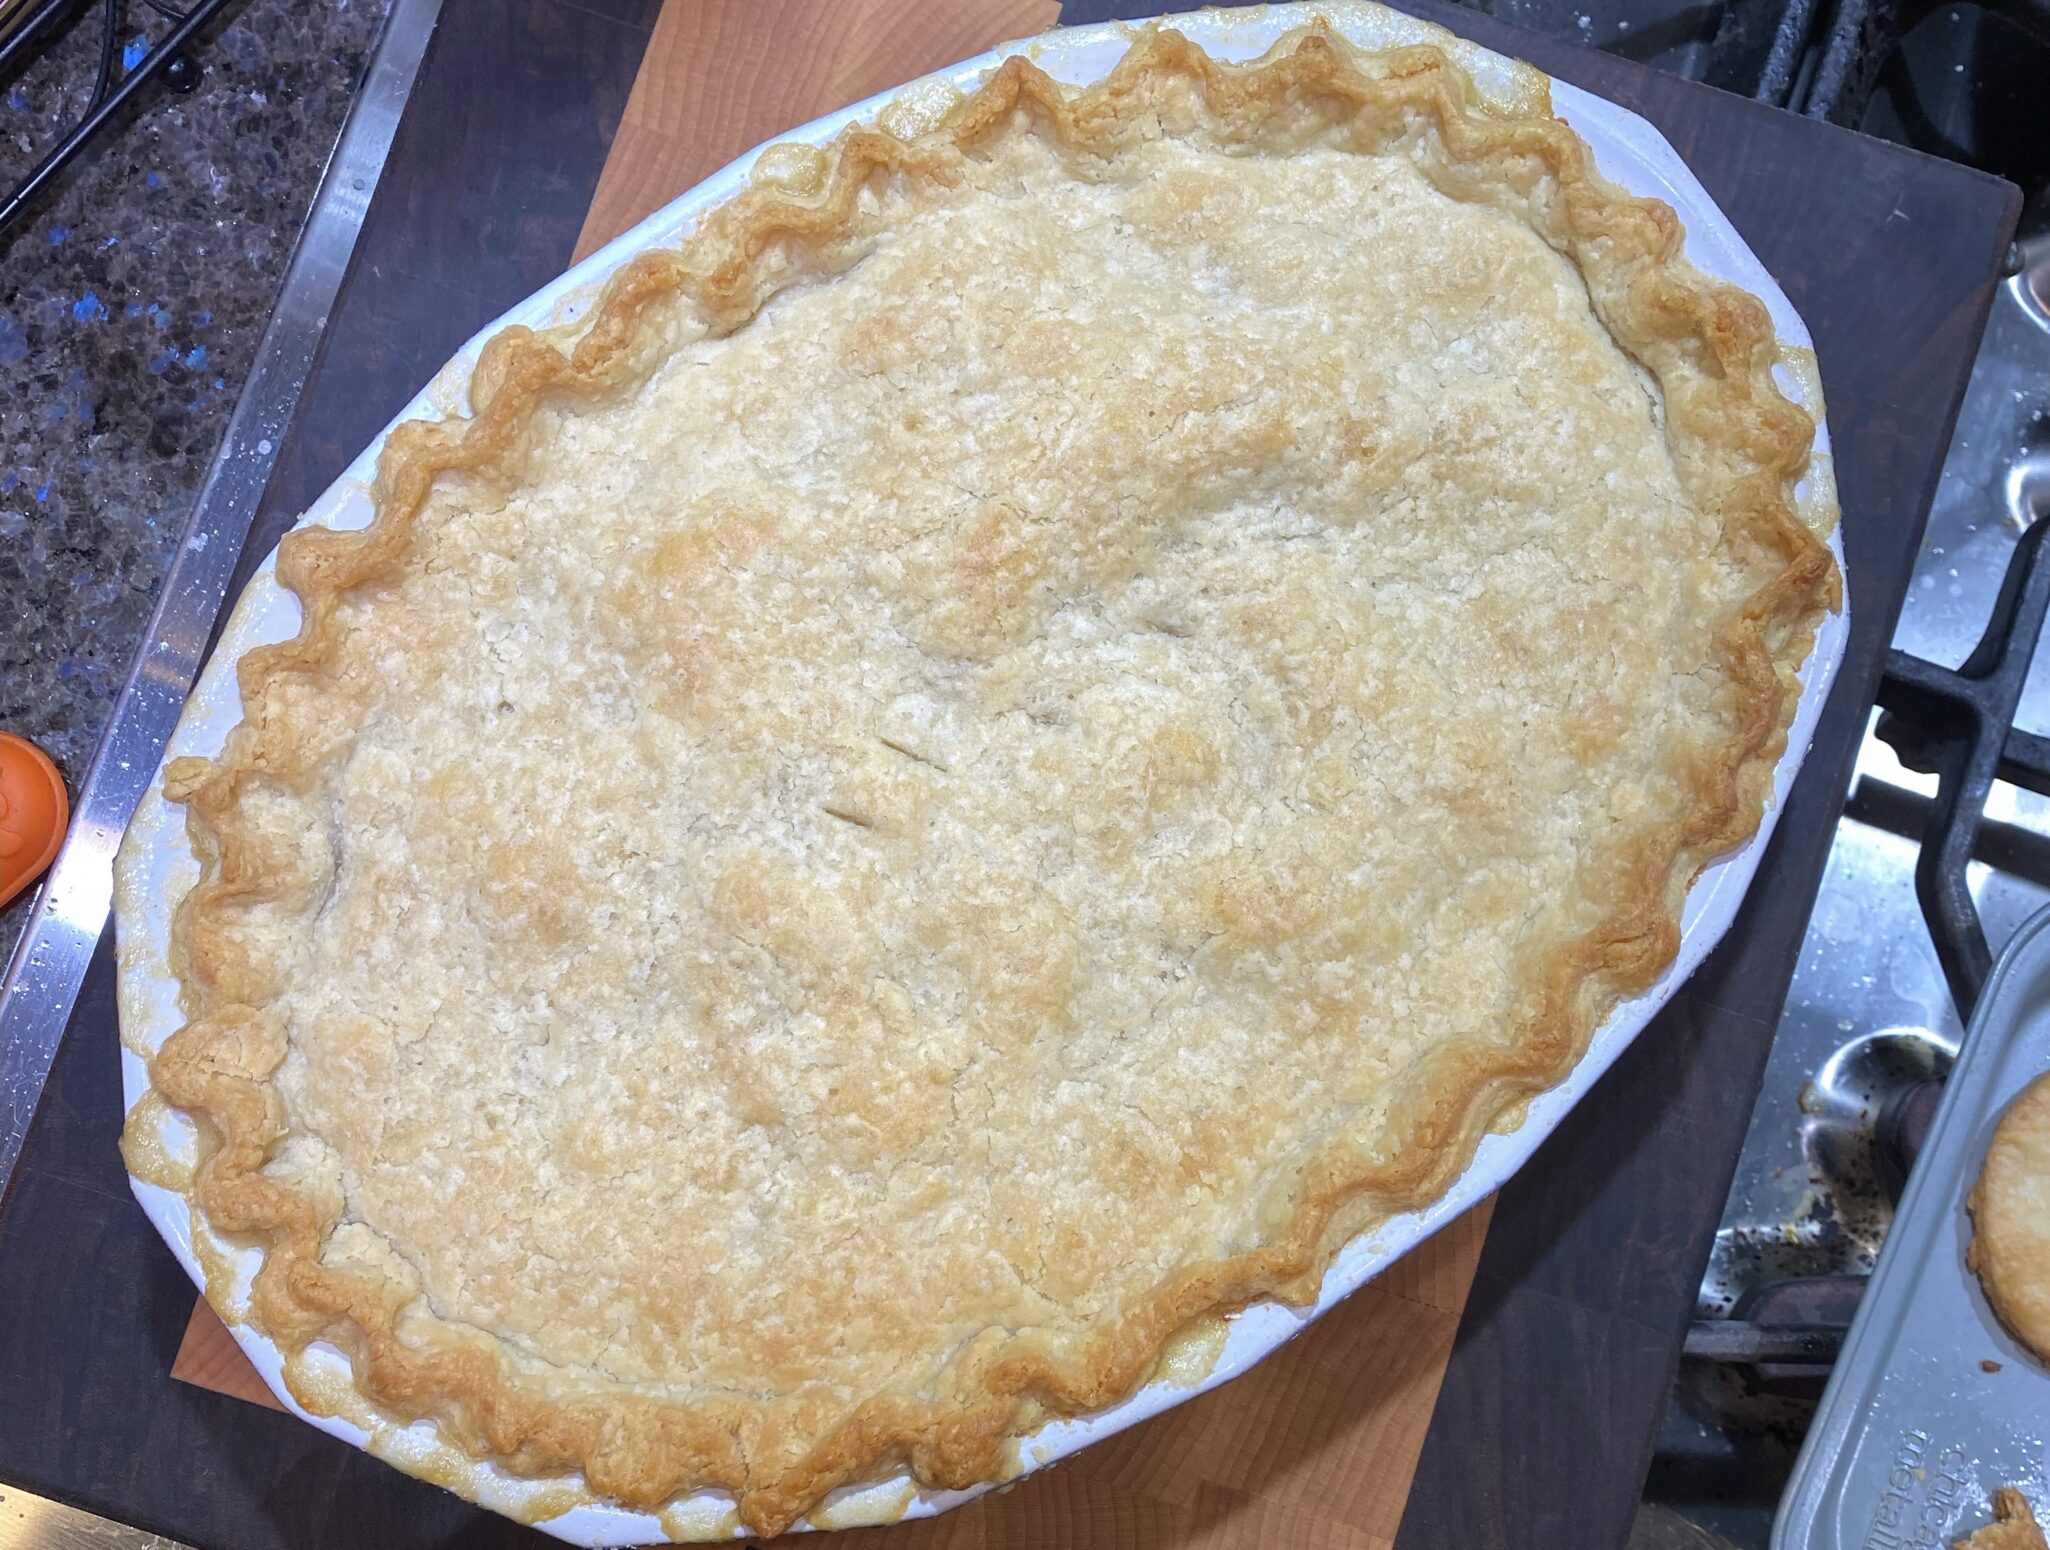
Bake your chicken pot pie with a top crust only.  What Deb?!  That’s less crust!  Hold on now…here is the tweak.  Roll out the pie dough for the bottom crust then cut out circles or squares from this sheet equal to a serving of your pie.  Bake them separately.  When it’s pot pie time, place one of these buttery, flaky rounds on the bottom of each plate then topped with a generous wedge of your baked pie over it.  Buttery, flaky, crispy, crust on the top and bottom. This, my friends, is chicken pot pie nirvana.

Let it sit for 5-10 minutes before serving!

So, Happy Pi Day, now go make some pie! Check out my IG Reel for Chicken Pot Pie!

Classic Chicken Pot Pie

Ultimate comfort food. This is the classic Chicken Pot Pie. Buttery, flaky crust with a thick, velvety Bechamel filled with chunks of chicken and veggies. A keeper!
Course comfort food, dinner, One dish meals
Cuisine American
Keyword Chicken, chicken pot pie, comfort food, food for the soul, made from scratch, pie, pot pie, savory
Prep Time 1 hour
Cook Time 1 minute
Servings 6 servings

Equipment

  • 1 food processor

Ingredients

The chicken and stock:

  • 1 3 1/2-pound whole chicken (approximately 3 cups of cooked chicken, shredded or cubed) Shoretcut 1: Sub chicken parts for whole chicken Shortcut 2: Costco Roast Chicken Yeah, you read that right
  • 1 carrot
  • 1 stalk celery
  • 1 small onion halved
  • 2 teaspoons salt or 1 t salt and 1 tablepsoon Better Than Bouillion Chicken Base

Simply Irrecrustable: or Dorie's MoRe CrUsT RecipE

  • 1 1/2 cups all-purpose flour
  • 1/2 teaspoon salt
  • 1/2 cup 1 stick chilled unsalted butter, diced into 1/2-inch cubes (best to chill cubes in the freezer for at least 15 minutes before using)
  • 1/4 cup vegetable shortening chilled
  • 3 to 4 tablespoons ice water

It's All About the Filling

  • 3 med carrots sliced about 1.5 cups
  • 2 stalks celery sliced about 1 cup
  • 3/4 cup green peas frozen or fresh
  • Use any veggies you like broccoli, squash, potatoes. You want about 3 cups of vegetables sliced or chopped.

Da Sauce: This is a generous amount of sauce so you can increase your veggies if you like.

  • 6 tablespoons unsalted butter
  • 1 1/4 cups yellow onion (you have leeway use 1 med or large onion which yields 1 cup to 1-1/2 cups diced onions diced
  • 1/2 cup all-purpose flour
  • 2 1/2 cups chicken stock reserved from cooking chicken
  • 1 1/2 cups milk
  • 1 teaspoon chopped fresh thyme leaves
  • 1/4 cup dry sherry
  • 2 tablespoons minced fresh parsley
  • 2 teaspoons salt to taste
  • 1/2 teaspoon freshly ground black pepper to taste
  • For the egg wash: optional
  • 1 egg whisked with 1 tablespoon water

Instructions

Da Chicken: A whole chicken in a large stockpot with water to make a chicken pot pie casserole. Yep, you read that right.

  • Combine the chicken, carrot, celery, onion and salt or chicken base into a large stock pot. Add cold water until just covered and bring to a boil over high heat.
  • Reduce the heat to a simmer and cook for 45 minutes. Remove the chicken from the pot and let cool for 15 minutes. While the chicken is cooling, continue to boil the remaining water and vegetables in the pot.
  • When the chicken is cool enough to touch, strip away as much of the meat as you can. Place the meat on a dish, set aside. Shred chicken or cube. You should have about 3 cups.
  • Return the chicken bones to the stockpot and continue to boil, on high heat, until the stock has reduced to a quart or quart and a half.
  • Set aside 2 1/2 cups of the stock for this recipe. Freeze remaining stock for a rainy day.

All About the Crust: Simply Recipe Yields only 1 crust. You will need to double it or make Dorie's omitting the sugar

  • Combine the flour and salt in a food processor. Add the chilled butter cubes and pulse 5 times to combine. Add the shortening and pulse a few more times, until the dough resembles a coarse cornmeal, with some pea-sized pieces of butter.
  • Slowly stream in ice water, a tablespoon at a time, pulsing after each addition, until the dough sticks together when you press some between your fingers.
  • Empty the food processor onto a clean surface. Use your hands to mold into a ball, then flatten the ball into a disk. Sprinkle with a little flour, wrap with plastic wrap, and refrigerate for at least 30 minutes, or up to 2 days, before rolling.

Filling It Up

  • Blanch prepped carrots, celery, potatoes, broccoli (if using) in water for about 10-15 minutes. Veggies should be al dente but cooked through. Set aside.
  • In a large skillet, melt butter on medium heat. Add the onions and cook until they're translucent, about 10 minutes. Add the flour and cook, stirring, one minute more.
  • Whisk in 2 1/2 cups of the chicken stock. Whisk in the milk. Decrease the heat to low and simmer for 10 minutes, stirring often until thickened and creamy.
  • Add the chicken, thyme, sherry, peas, blanched veggies, parsley, salt and pepper and stir well. Taste and adjust seasoning if necessary. Pour into prepared baking dish(s)

Pieformers: Assemble

    Bake: Preheat oven to 375

    • Roll out dough on a lightly floured surface to a little less than a quarter-inch thick.
    • Roll roughly to the shape and size of your baking dish. A little bigger so you crimp the edge. Lay pastry over filling and dish.
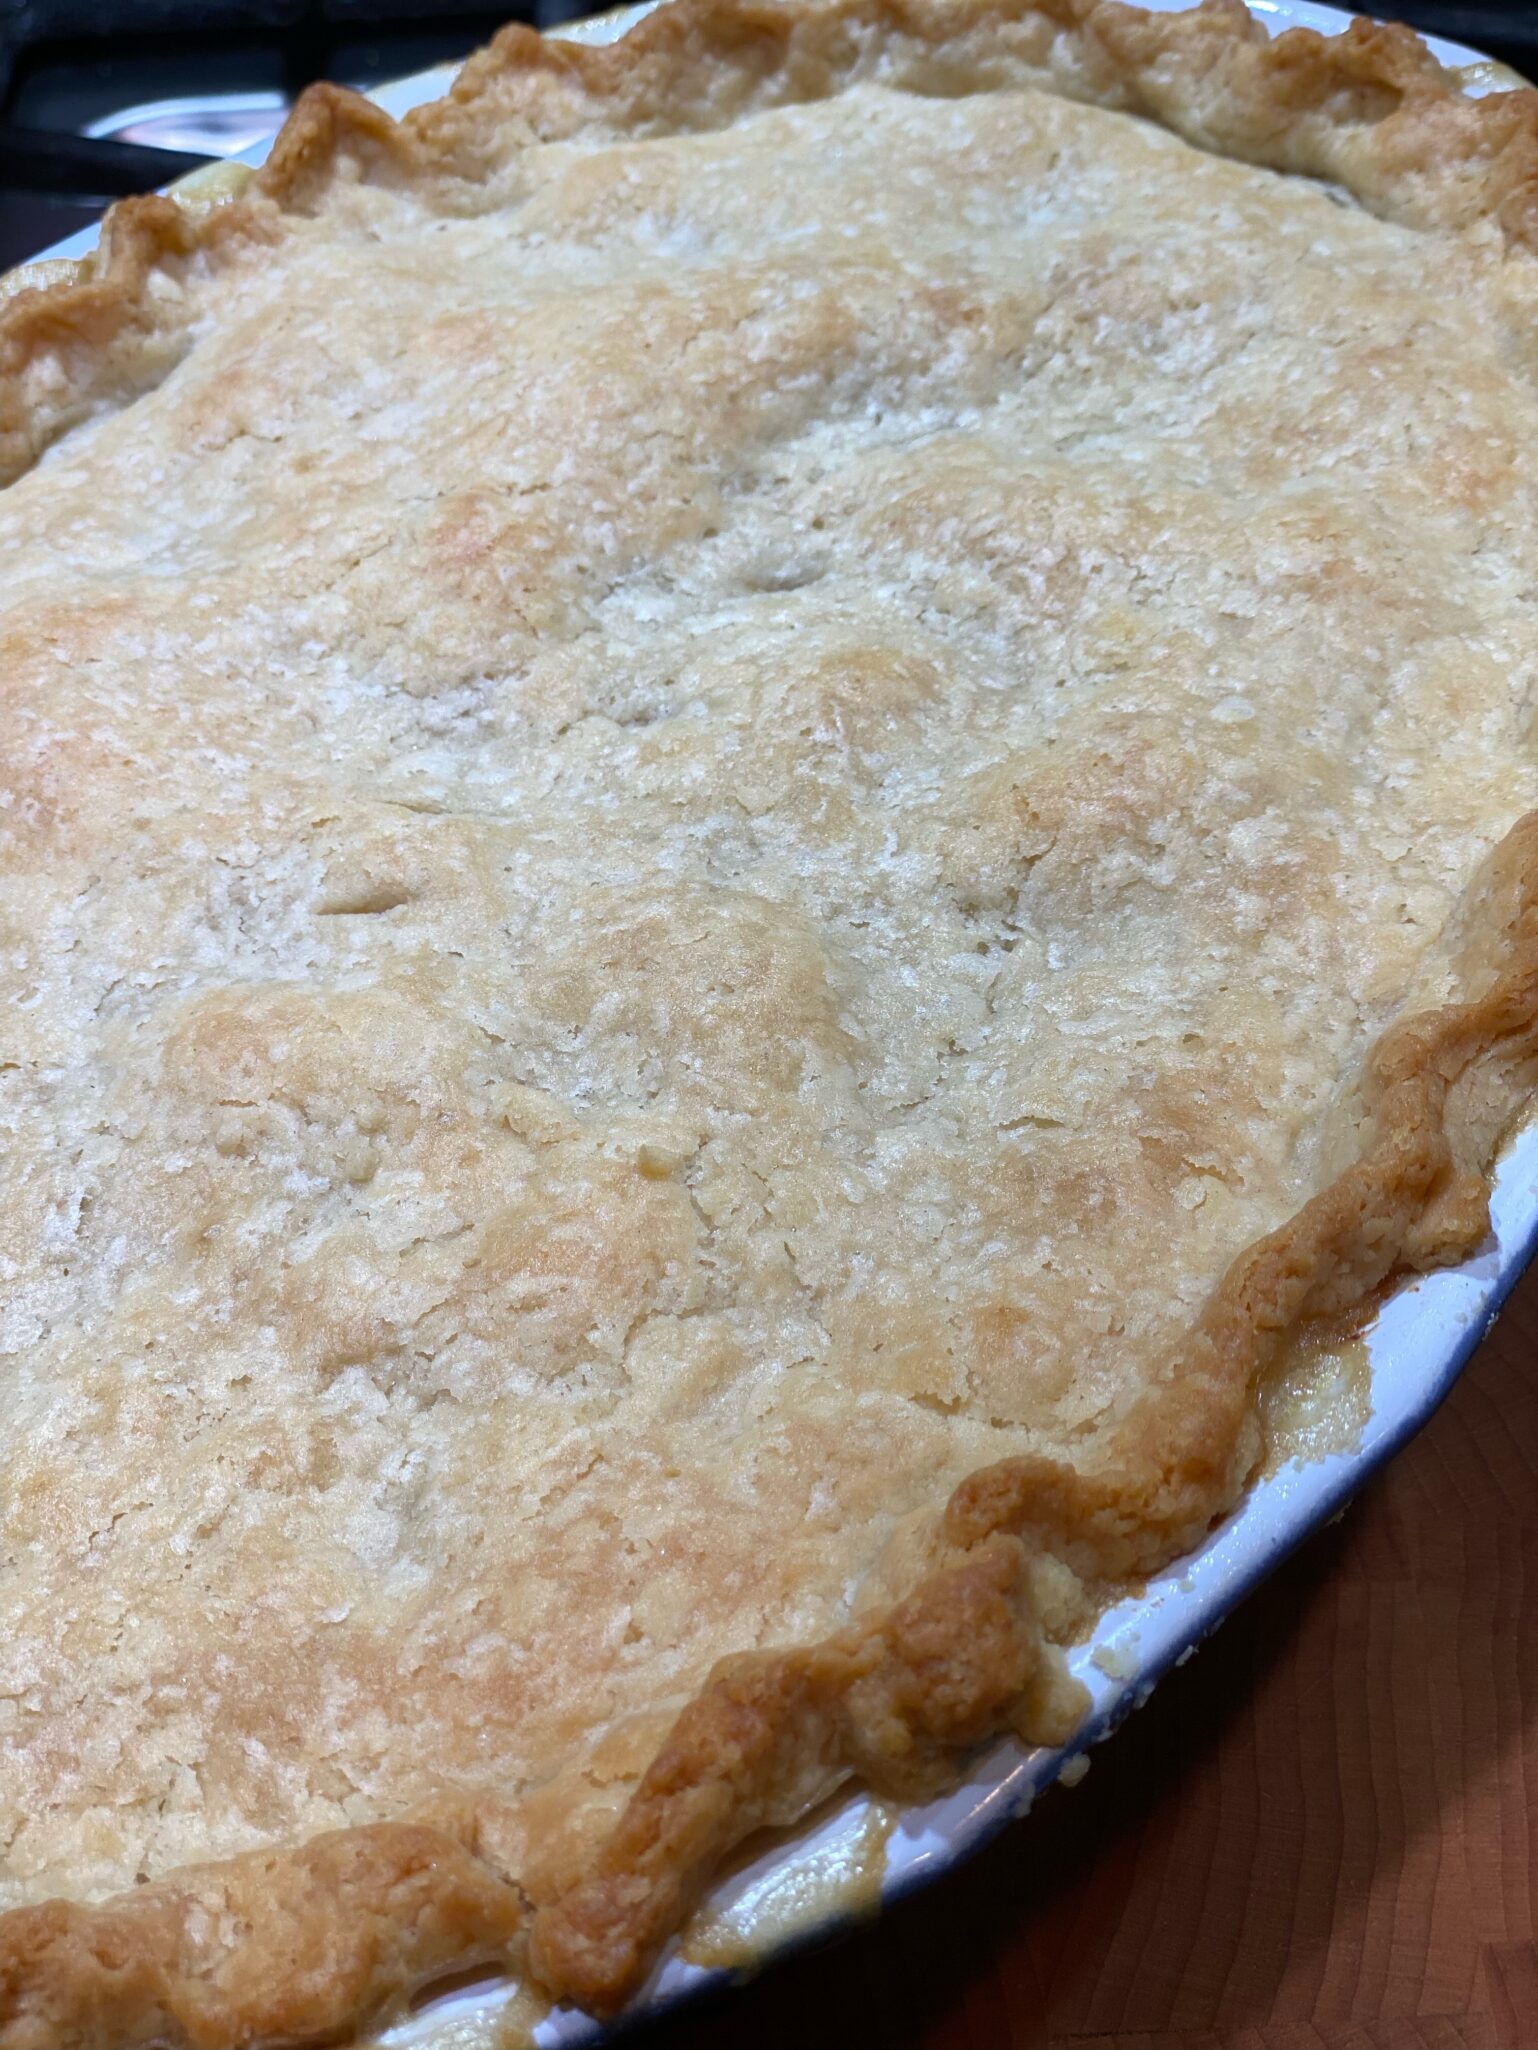
    • Fold the excess dough under itself and crimp edge of pie.. Cut a 1-inch vents into pie. Use a pastry brush to apply an egg wash to each pie.
    • Line a baking sheet with foil, place pie on baking sheet. Bake at 375°F for 45 minutes, or until the pastry is golden and the filling is bubbling. If the edge gets too dark, cover with foil.
    • Let cool for at least 5 minutes before serving.
    Apple Almond Galette (You’re the Apple of My Pie)

    Apple Almond Galette (You’re the Apple of My Pie)

    When the fall season rolls around, apples begin to crop up at our farmer’s market.  Gone are the days when the only available apples were Red or Golden Delicious (thank goodness)!  The variety of apples is mindblowing.  My intention is to just get a few, but I invariably end up with what feels like a bushel of apples.

    Here, There, and Everywhere…Apples

    This is why I am constantly bookmarking recipes that sound wonderful and highlight apples knowing full well I won’t be able to resist the fall bounty of apples.  Luckily, I found an Apple Almond Galette from Zoe Bakes.  It’s the perfect recipe “to show off them apples”.  Get a combination of apples, Fujis, Mutsus, Braeburns, Jonagolds, or Honeycrisps.  Yes, you can get them ALL these days.

    Better yet, you don’t have to peel the apples as the PEEL is part of the apPEAL of this galette, it’s a win-win and why you want a variety of apples.  Use a mandolin (carefully) to thinly slice the apples.  A knife is very doable, it will just take a bit longer than a mandolin.  The filling is an almond cream easily made in a food processor and consists of almond paste, eggs, butter, and a touch of almond extract.  A lovely combination-apples and almonds.

    For the galette crust, I used Dorie’s pie dough (1/2 recipe), but feel free to use your favorite pie crust.  You will need enough dough to create a 13 to 14-inch circle.  Roll your dough on parchment paper so you can then slide it all onto a baking sheet, easy peasy.  Spread the almond filling in the center of the dough leaving a 2-inch border.  Next, take stacks of your sliced apples and arrange them ARTFULLY on the almond filling.  Then fold the edge of the dough over the apples.

    The finished galette is not only gorgeous, it’s delicious.  Serve it with softly whipped cream or ice cream.

    This galette is now part of our holiday dessert menu every year. It’s a keeper!

    Apple Almond Galette

    A rustic, delicious riff on apple pie. The apples sit on a layer of almond cream encased in a buttery, flakey pie crust.
    Course Dessert, Snack
    Cuisine American
    Keyword almond cream, Apple galette, apples, zoe bakes
    Prep Time 25 minutes
    Cook Time 45 minutes

    Equipment

    • 1 mandolin optional
    • 1 food processor

    Ingredients

    Pie Crust

    • 1 recipe of Dorie's pie dough will make 2 galettes

    Almond Cream Filling

    • 4 oz almond paste
    • 2 tbsp unsalted butter room temperature
    • 1 tbsp all-purpose flour
    • 2 tbsp sugar
    • 1 egg yolk
    • 1 tsp vanilla
    • 1/2 tsp almond extract

    Da Apples

    • 5 large Apples thinly sliced on a mandoline or use a sharp knife and slice
    • Egg wash 1 egg mixed with 1 tablespoon water
    • 2 tbsp granulated sugar for sprinkling over top Can substitute raw or Demerara sugar

    Instructions

    Galette shell: Use Dorie's Pie crust recipe link below

    • Roll the chilled pie dough to an 1/8-inch-thick circle = 13-14" circle on a piece of parchment paper on a baking sheet or slide the parchment onto a baking sheet.

    Almond Cream

    • In a food processor blend the almond paste, flour, sugar, butter, almond and vanilla extracts and yolk until smooth. Spread over the center of the dough, leaving about a 2-inch ring on the outside.

    Assemble

    • Arrange apples over the almond cream. Fold the uncovered dough over the apples and pleat to keep it in place. Freeze the galette while you preheat the oven to 425°F.
    • Brush the crust with the egg wash and sprinkle the sugar over the crust and apples.
    • Bake at 425°F for 20 minutes, then reduce the heat to 350°F and bake for an additional 25 minutes or until the apples are tender. Allow the galette to cool to room temperature before sliding it onto a serving plate.
    • Garnish with toasted almonds if you like and serve with a bit of Greek yogurt or whipped cream or ice cream (I like vanilla!).
    Mom’s Apple Pie

    Mom’s Apple Pie

    I admit this is a misnomer.  It’s really not mom’s apple pie, at least not my mom.  My mom was not a baker.  In fact, I cannot remember a single baked good made by her…nada, zilch.  That’s not to say we didn’t have desserts or baked goods, they just happen to come from a bakery or restaurant or somewhere else, just not our kitchen.  There were plenty of bakeries in the city and in Chinatown.  My parent’s after-work excursions for dinner ingredients often included a sweet treat from one of the Chinatown bakeries.

    We snacked on almond cookies from Eastern Bakery.  Swooned over the best damn sugar doughnuts in town (providing you ate them in the first 5 minutes after they were made) from Sun Wah Kue.  Hiked up the hill to the Fortune Cookie Factory.  For special occasions, we walked over to Victoria’s Bakery in North Beach, a stone’s throw away from Chinatown, and picked up a St. Honore.  Imagine a cake with layers of rum-laced pastry cream, covered with billows of whipped cream, and then wait for it…little cream puffs perched around the edge.  My mom’s absolute favorite cake.

    Our favorite desserts came from a deli-restaurant we went to all the time, Ping Yuen Bakery Cafe.  Their Apple Pie was an American-Chinese mash-up.  Strictly sweet apples layered in a crust made with lard and painted with an egg wash that gave it a crackly pattern on top.  This was the apple pie of my childhood.

    All About the Pie

    Whoops, lost in nostalgia.  My first attempt at pie-making was an apple pie and it remains my favorite pie to make.  The crust is made with butter and a little bit of shortening, double F-bombs, flavor, and flaky (gotcha).  My current fav is Dorie Greenspan’s crust which you can find here.  For the filling, I have opted for mace instead of nutmeg, substituted brown sugar for some of the granulated sugar (caramel overtones), and added a squeeze of lemon (cuts the sweetness).  You could call this my lifelong project-perfect pie. When apple season rolls around I head to my favorite purveyor of apples Prevedelli Farm.  My favorites include Mutsu, Jonagolds, Pippens and Granny Smiths.  I  combine 2 or 3 different varieties of apples to hit sweet, tart, crisp, and soft all in one bite.  Experiment, that’s my mantra.

    This is a good old-fashioned all-American apple pie, packed with apples, a hint of cinnamon and nutmeg surrounded by a flaky, buttery crust!  YUM.  Now go make one!

    Mom’s Apple Pie

    My go-to Apple Pie recipe, been using this for years. Tried and true.
    Course Dessert
    Cuisine American
    Keyword Apple Pie, Cinnamon Bun
    Prep Time 45 minutes
    Cook Time 45 minutes

    Ingredients

    My current favorite pie crust recipe is from Dorie Greenspan. It makes a generous amount of dough so you will have excess that you can use for hand pies or small pie.

    • Pastry for 9 inch Two-Crust Pie
    • 3/4 cup sugar 1/2 cup granulated sugar + 1/4 c dark brown sugar
    • 1/4 cup all-purpose flour*
    • 1/2 teaspoon ground mace
    • 1/2 teaspoon ground cinnamon
    • Dash of salt
    • 6 cups thinly sliced pared tart apples about 6 medium
    • 2 tablespoons butter
    • 1 tablespoon KA Boiled Cider (secret apple booster) optional

    Instructions

    • Prepare pie crust. Place in fridge to chill while making filling.
    • Heat oven to 425 degrees.
    • Mix sugar, flour, mace, cinnamon and salt.
    • Stir in apples. Turn into pastry-lined pie plate; dot with butter.
    • Cover with top crust that has slits cut in it; seal and flute.
    • Make a 3 inch aluminum foil ring. Set aside to use if crust browns too much
    • Bake at 425 for 15 minutes. Lower temperature to 375 degrees, bake until crust is golden brown and juice begins to bubble through slits in crust, 40 to 50 minutes. Cover edge with ring if necessary.
    All About that ‘Crust, No Filling (Pie Crust Recipe)

    All About that ‘Crust, No Filling (Pie Crust Recipe)

    I absolutely love pie. Apple pie, Lemon Meringue Pie, Pumpkin Pie, Pecan Pie, Peach Pie and BANANA CREAM PIE. Yum.  My favorite part of the pie is the crust, all that buttery goodness in tender flaky sheets.  My current favorite pie crust recipe is from Dorie Greenspan (ok, I might still be starstruck) it is really good.  A combination of butter for flavor and shortening for flakiness.  I tweaked it a bit, little less sugar  (1/8 cup) and a little less salt (1 tsp).  The recipe calls for up to one-half cup of water.  Start with 6 tablespoons.  I usually don’t use more than 8 tablespoons which is well short of one-half cup.

    I like starting with a food processor and finishing by hand, the best of both worlds.  The food processor makes short work of cutting the fats into the dry ingredients while finishing the dough by hand prevents overworking the dough and ending up with a tough crust.  By all means, try each method to see what gives you the best crust possible without having you tear your hair out.  Use the food processor throughout or make it completely by hand.  Directions for both are in the recipe.

    Just remember the golden rules, keep your ingredients COLD.  If your dough gets too soft at any point put it back in the fridge to chill. Don’t overwork your dough.  This link is to Food52’s  (a great website-check it out) article on what “overwork” means…it’s spot on and now I don’t have to explain it!

    And…..EAT. PIE.

    Pie Crust

    Course Pie, Pie crust, Pie dough
    Cuisine American
    Keyword buttery, Flaky, Pie crust, tender
    Prep Time 20 minutes

    Ingredients

    • For a 9 inch Double Crust
    • 3 cups all purpose flour
    • 1/8-1/4 cup sugar
    • 1-1 ½ tsp salt
    • 2 ½ sticks very cold unsalted butter cut into tbsp size pieces
    • 1/3 cup very cold vegetable shortening cut into 4 pieces
    • About ½ cup ice water you should not need all of it

    Instructions

    • Put the flour, sugar, and salt in a food processor fitted with a metal blade, pulse just to combine the ingredients. Drop in the butter and shortening and PULSE only until the butter and shortening are cut into the flour. Don’t overdo the mixing- what you’re aiming for is to have some pieces the size of fat green peas and others the size of barley.*

    Food processor:

    • Pulsing the machine on and off, gradually add about 6-8 tbsps of the water- add a little water and pulse once, add some more water, pulse again and keep going that way. Then use a few long pulses to get the water into the flour. If, after a dozen or so pulses, the dough doesn’t look evenly moistened or form soft curds, pulse in as much of the remaining water as necessary, or even a few drops more, to get a dough that will stick together when pinched. Big pieces of butter are fine. Scrape the dough out of the bowl and onto a work surface.

    Hand Method: (My preferred method it allows for more control)

    • Pour dough into a large mixing bowl. Drizzle water onto dough and mix with fork to bring dough together. The dough will look a little dry but when pinched should hold together. Try not to add too much water. Pour dough onto a lightly floured flat surface and knead lightly to bring dough together.
    • Divide the dough in half. Gather each half into a ball, flatten each ball into a 1"disk and wrap each half in plastic. Refrigerate the dough for at least 1 hour before rolling (if your ingredients were very cold and you worked quickly, though, you might be able to roll the dough immediately: the dough should be as cold as if it had just come out of the fridge).

    To Roll Out Dough:

    • Have a 9 inch pie plate ready to go.
    • You can roll the dough out onto a floured surface or between sheets of wax paper or plastic wrap. If you’re working on a counter, turn the dough over frequently and keep the counter floured. If you are rolling between paper, plastic or in a slipcover, make sure to turn the dough over often and to lift the paper, plastic, or cover frequently so that it doesn’t roll into the dough and form creases.

    Little tricks of the trade

    • Roll from the center of the dough ball out (away from you. Rotate a quarter turn and repeat. by constantly moving you insure it isn't sticking. I cheat, I had hubby get me plastic strips approximately 16 inches long and 2 inches wide in varying thickness, 1/8", 3/8", 1/4", 1/2". The ends of my rolling pin sit on the plastic strips so I roll evenly and to the right thickness.
    • If you have time, slide the rolled out dough into the fridge for about 20 minutes to rest and firm up.
    • When baking lower the rack to the lowest position in the oven. This helps crisp up the bottom crust.

    I hate a soggy bottom, don't you?