Category: Stupid Easy

These recipes are seriously easy and delicious!

Huli Today Gone To Maui (Instant Pot Huli Huli Chicken)

Huli Today Gone To Maui (Instant Pot Huli Huli Chicken)

So excited, going to Maui next week! Just a quick jaunt for a friend’s big birthday (I won’t divulge which big B-day). I have not been to Maui in a very long time. I was about to graduate from pharmacy school the last time I visited, a lifetime ago.  Needless to say, there was a lot of plate-lunch and MacDonald’s Saimin on that trip. Won’t be doing that this time. Nope.  Well, maybe for nostalgia’s sake…maybe just one 2-scoop plate lunch.

With Hawaii on the brain, I was looking for a quick easy meal one night after a long, frustrating, commute home from work. (2 hours to drive 25 miles,  auugh). Wes had pulled out some chicken thighs and it was up to me to figure out what to do with them. Too cold and too late to barbecue, I was stymied when, “Look! On the Counter! It’s a Coffeemaker! It’s a toaster-oven!

No, it’s an INSTANT POT!”
A quick perusal online and what should pop-up? Huli Huli Chicken. I don’t think Hawaiian was one of my Google words but I’m going with it. Normally Huli Huli Chicken is grilled, but that calls for marinating the chicken for a couple of hours and then firing up the grill. We would be eating at midnight.  I opted for the Instant Pot recipe.

STUPID EASY

That’s all I can say. Soy sauce, pineapple juice, catsup, fresh grated ginger and garlic, brown sugar, and broth. Throw it into the pot, submerge the chicken thighs in all that deliciousness and set it for 10 minutes. Then, let the pot do its thang and use natural release for 10 minutes.

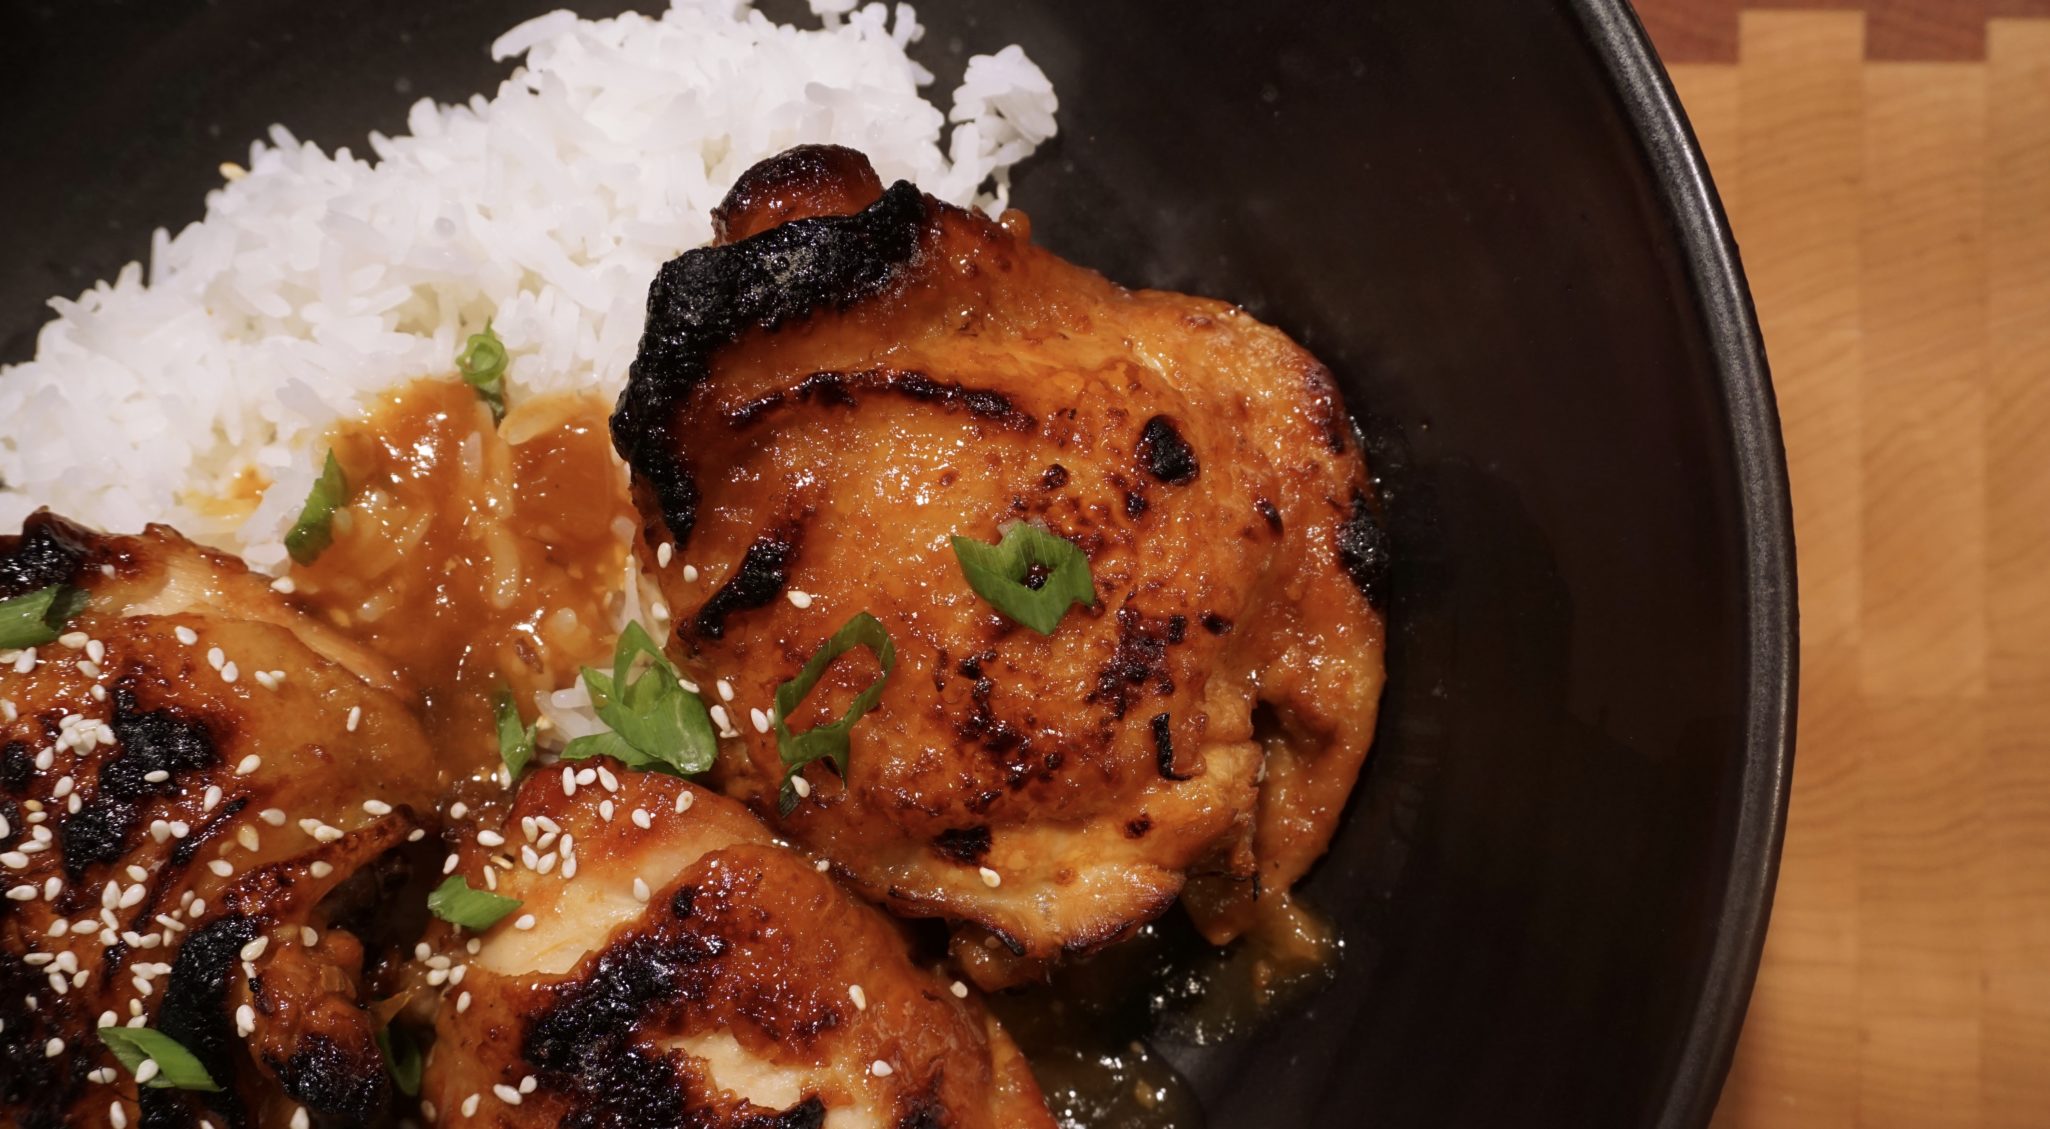
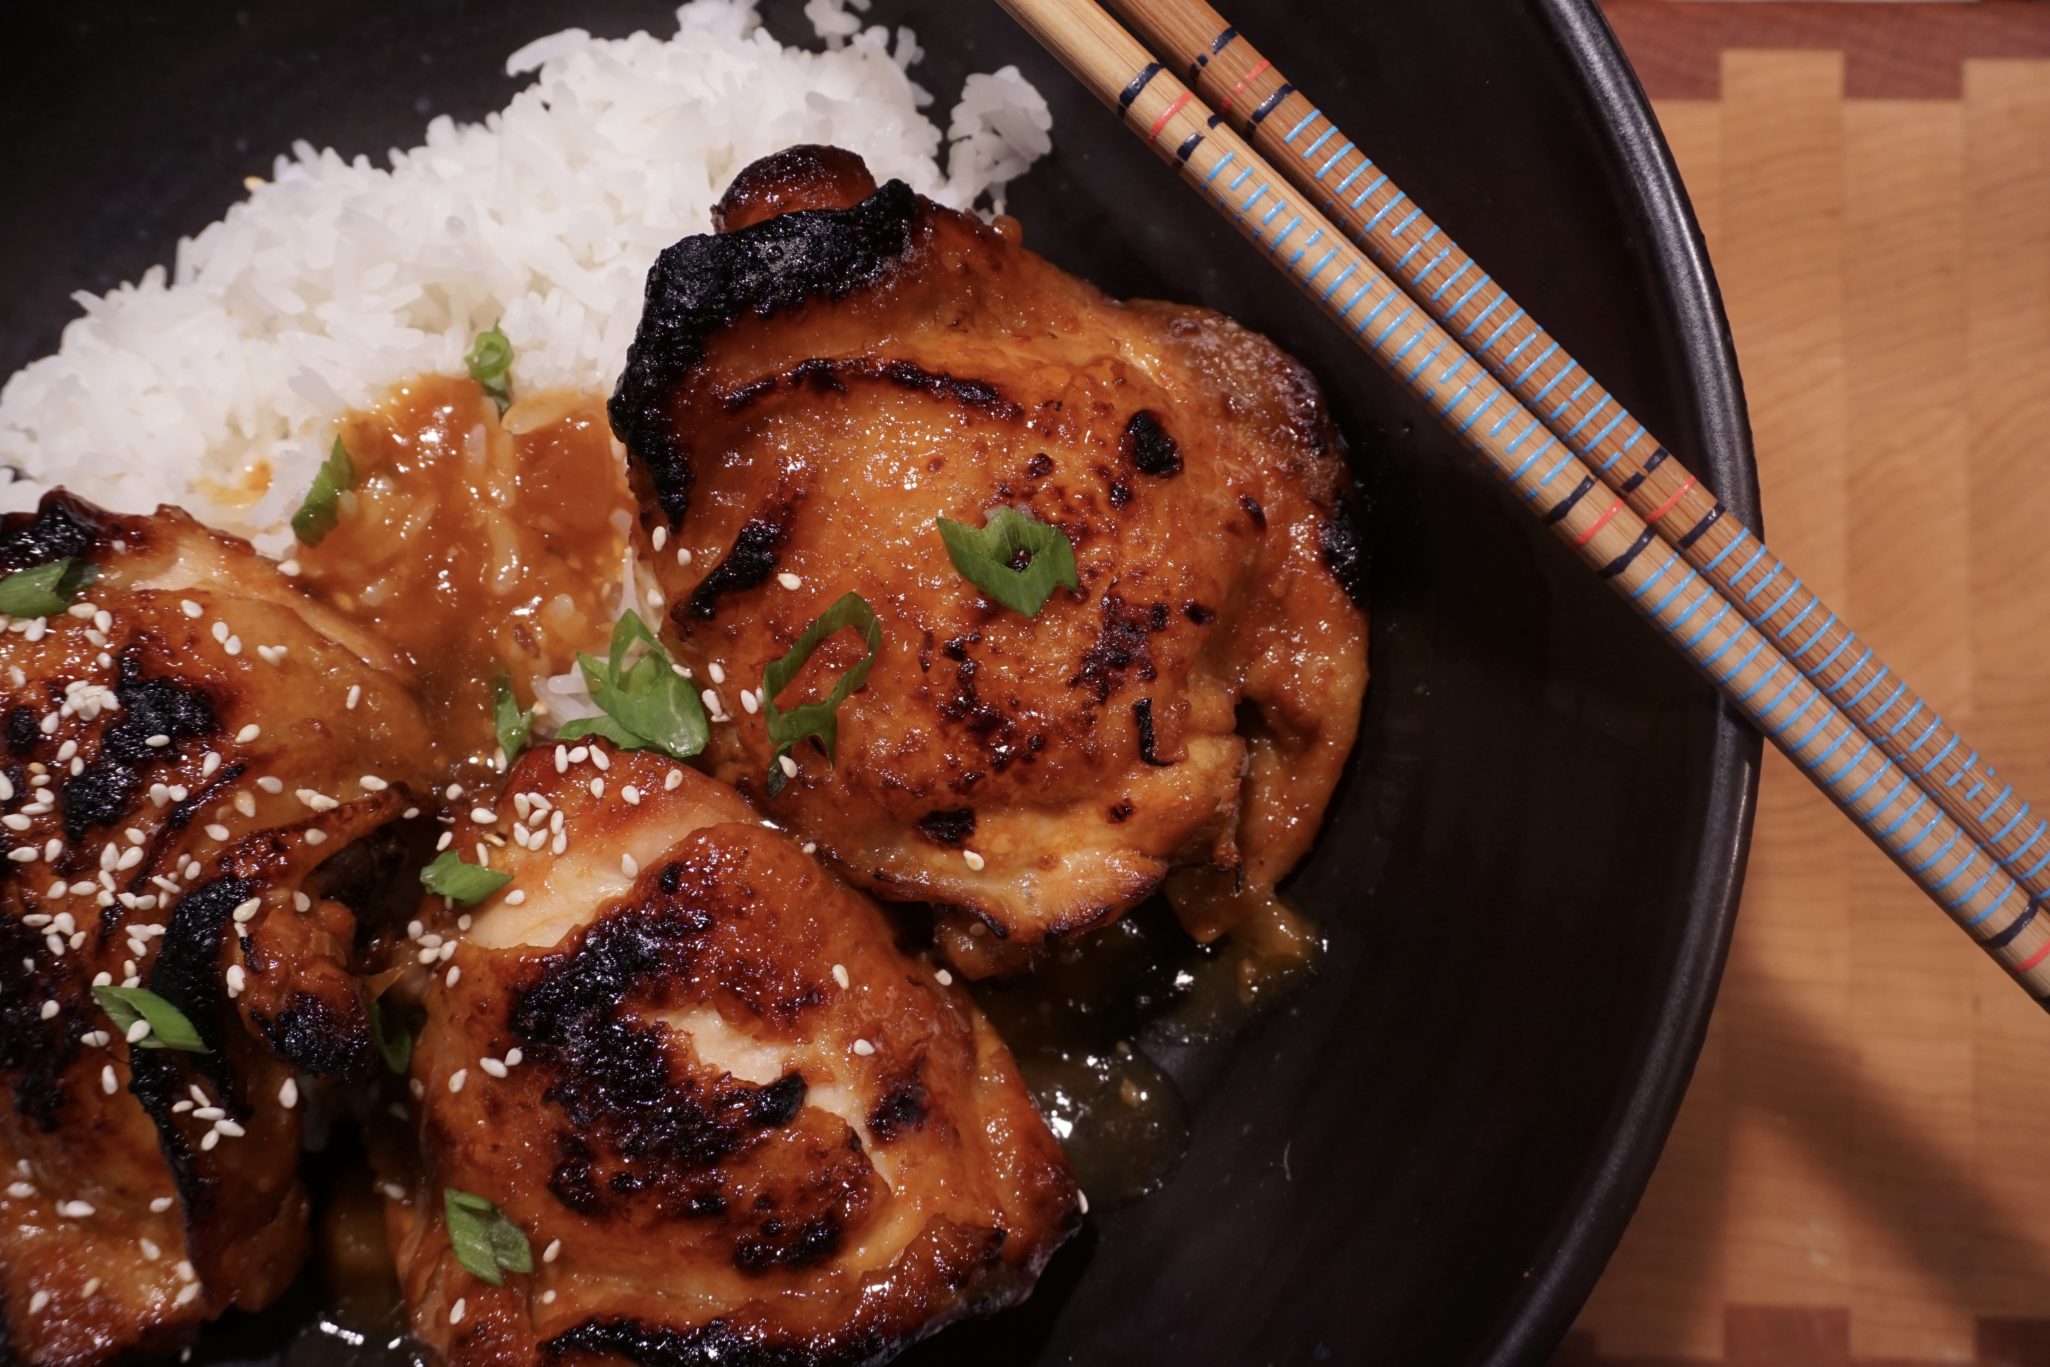
Remove the chicken and pop it under the broiler to crisp up the outside. While the chicken is getting a Hawaiian tan ok, char, in the oven, add a cornstarch slurry to the sauce in the IP to thicken, DONE. Dinner is served.  You could spice up the marinade by adding a touch of Siracha Sauce or lemon juice for a bit of tartness.  Your call.

The Instant Pot version is an adaptation.  Huli Huli chicken is a barbecue recipe.  Skip the broth and use the remaining ingredients to marinade the chicken for a minimum of several hours. Then throw the chicken on the grill. Reserve some marinade to make the sauce and use the rest to brush on the chicken while grilling. Which you could definitely do….if you had time.  Instead, by cooking the chicken in the sauce a la Instant Pot you have dinner on the table in a fraction of the time!  HOW cool is that?

A glass of wine, a side of rice, and a salad, and my commute fading from memory.  My mood definitely took an upswing.  I took my first bite of chicken, pineapple-ly sweet, balanced with the saltiness of the soy, and finished with a garlicky-ginger bite.  Jumped up and did a short hula-hip check on the hubs.  Ono-licious.

Instant Pot Huli Huli Chicken
Serve on a bed of rice, perfect for a weekday meal.

Huli Huli Chicken

Huli Huli Chicken an island favorite tweaked for a quick and easy meal. Instead of grilling chicken marinaded in a pineapple-soy marinade, the chicken and marinade components go in the Instant Pot.
Course chicken, dinner, Main Course
Cuisine Asian-American, Hawaiian
Keyword Carnitas in an Instant Pot, Huli Huli Chicken
Prep Time 15 minutes
Cook Time 17 minutes
Servings 6 servings

Equipment

  • 1 Instant Pot

Ingredients

Da Main Ingredient

  • 6 bone in chicken thighs ..you can use boneless, skinless thighs approximately 2 pounds

Instant Pot Marinade

  • 1 cup pineapple juice
  • ½ cup Shoyu or ponzu sauce
  • ½ cup brown sugar
  • cup ketchup
  • ¼ cup chicken broth or dry sherry
  • 2 teaspoons fresh grated ginger root
  • teaspoons minced garlic

Thickener

  • Cornstarch Slurry 1T cornstarch + 2 T cold water

Garnish

  • 4-5 stalks green onions sliced at an angle for garnish
  • Roasted sesame seeds

Instructions

  • In your IP Pot, whisk together pineapple juice, soy sauce, brown sugar, ketchup, chicken broth, ginger and garlic
  • Add chicken to the pot.
  • Close and seal your pot. Set your pot to Poultry, Pressure Cook or Manual for 11 minutes and allow a 10 minute NPR
  • Remove and place your chicken on a jelly roll pan lined with foil.
  • Set your pot to sauté, when the sauce begins to boil add the cornstarch slurry a little at a time until the desired consistency is reached.
  • Baste the thickened sauce over the chicken
  • Set your oven to broil.
  • Broil the chicken for 5 to 7 minutes or until some of the sauce caramelizes.
  • You could also put them on the grill...baste often
  • Transfer chicken to a serving dish and garnish with green onion
Rice Krispy Treats (Double Your Pleasure, Double Your Fun)

Rice Krispy Treats (Double Your Pleasure, Double Your Fun)

Oh Snap

It’s the last day of January and in order to avoid total embarrassment… here is the last cookie to complete my 12 Days of Cookies list. I give you the stupid easy, childhood favorite- Rice Krispy Treats!  Wait, do not roll your eyes and think “lame”. This is not your mama’s, on the side of the Snap, Crackle and Pop box, recipe. This is Rice Krispy Treats with a twist that is not for the faint of heart.

Little Crackle

No, there isn’t booze in these treats.  The recipe comes by way of Smitten Kitchen (love that site).  I had been looking for a way to jazz up this childhood favorite (not just add multi-colored sprinkles) and bring a bit of pizazz to them.  I found a couple of recipes that were just crazy, too much stuff, too complicated, just yuk. At the end of the day, a riff on Rice Krispy Treats should still transport you back to the ones you ate as a kid but at the same time your brain should be going “holy cow-what did she do to these!”

The Pop

Ladies and Gentlemen, I give you…

SALTED BROWN BUTTER RICE KRISPY TREATS

Yep, the exact same ingredients as the original recipe plus a sprinkle of flaked salt and well, DOUBLE the amount of butter. Yep, mo’ buttah, mo’ betta.

And if that wasn’t enough, you kick it up another notch by browning the butter!  Great balls of butter!  You end up with a Rice Krispy treat that is gooey, sweet and salty, nutty and buttery.  YES, scream it from the rooftops, DOUBLE BUTTER!

Up your Krispy Game, reserve half the salt to sprinkle on the treats at the end.  Use Fleur de Sel or grey salt, your hipster friends will ooh and aah.  Oh, snap.

That’s it folks, cookie number 12. Drop the mic, done.

Brown Butter Rice Krispy Treats
These went to a Bake Sale for a Bird Sanctuary that would be obliterated by Trump’s stupid wall. Jason renamed them Double Buttah “R-aah-ce”  (he’s from Tennessee!) Krispy Treats.

Salted Brown Butter Rice Krispy Treats (Smitten Kitchen)

Not your mama's Rice krispy treats! Brown butter and more marshmallows madke these devilisly delicious
Course bar cookies, cookies
Cuisine American
Keyword rice krispies
Prep Time 15 minutes
Cook Time 5 minutes

Ingredients

  • 1 stick unsalted butter 4 ounces
  • 1/4 -1/2 teaspoon flake salt such as Fleur de Sel or Grey Salt or coarse kosher salt
  • 1 10 ounce bag of miniature marshmallows DO NOT BY FANCYSCHMANCY ONES, they don't work
  • 6 cups Rice Krispy cereal

Instructions

  • Butter a 9x9 inch square pan, set aside.
  • In a large saucepan or pot, melt butter over medium heat, The butter will begin to foam and the milk solids will start to brown. Watch it like a hawk, you don't want it to burn. It will smell nutty and toasty. Serious Eats has a great tutorial on brown butter
  • Remove pan from heat, add marshmallows and salt. Stir continuously until the marshmallows melt and blend with the butter into a homogenous mixture.
  • Add Rice Krispies and stir until well coated.
  • Pour into 9x9 inch prepared pan and press firmly to compress. If you want, decorate with Sprinkles on top.
  • Cool, run a knife around the perimeter of the rice krispies, invert pan and tap the bottom. The rice krispies should release fairly easily from the pan. Cut into approximately 2 inch squares.
  • Enjoy!
What’s for Dessert? Croutons!

What’s for Dessert? Croutons!

Awhile back I reviewed Food52 Mighty Salads. Flipping through the book I found quite a few recipes to try including a tomato pasta salad, a crab and corncake salad and a tomato cucumber salad with lamb kebabs.  At the very end of the book, snuck in on the last page (those sneaky Food52ers) I found a single non-salad recipe.

Better yet, it is a DESSERT recipe.  A tantalizing little tidbit among a sea of greens and grains.  As part of their thank you page and because they couldn’t write a cookbook without a sweet finish, they came up with Berry Salad with Brioche Croutons.  It is simple, yummy and the perfect ending.

….of course I had to try it.

It is STUPID EASY and delicious.  Start with your favorite loaf of brioche.  Cut 4 slices about 3/4 inch thick and then cut into cubes.  Place in a buttered baking dish, throw in a handful of nuts, your choice.  I like walnuts but feel free to use pecans or almonds or a mix of your favorite nuts. Drizzle with 2 tablespoons honey and finish with a sprinkle of sea salt or kosher salt (a little bigger sprinkle).  Bake in a preheated oven (350 degrees) for 7 minutes or until golden brown.  Cool.  Store in an airtight container.

Now you could just munch on these bad boys all by themselves, which I have been known to do, or you could throw them on top of a bowl of berries-strawberries, blackberries, blueberries, raspberries, whateverberries (just checking if you are paying attention) sweetened with some raw sugar as suggested by the folks at Food52.

My favorite option is on top of plain Greek yogurt with a touch of honey and fresh berries..  It adds a nice crunch and makes my breakfast seem deliciously decadent.  Its way too easy not to try.


Jest Jammin’ (Strawberry Lime Jam)

Jest Jammin’ (Strawberry Lime Jam)

From my weekly trip to the Farmer’s Market I once again came home with way too many strawberries…I should have bought one basket but noooo…I went bonkers and bought a HALF FLAT of strawberries.  That’s 6 baskets of strawberries between the two of us.

Which means it’s JAM TIME.  I pulled up the recipe for STUPID EASY JAM I posted a couple months ago, grabbed the lime instead of the lemon sitting on the counter and less than an hour later I’m spreading homemade jam on toast to go with my coffee.  How easy is that? Yummos.  The lime is a nice change from lemon it gives it a tropical twist.

I think the best thing about regattas and long bike rides is guilt free carb loading. There is nothing better than a pb&j sandwich. I love the saltiness of the peanut butter and the sweetness of the jam smooshed between two slices of Wonder Bread.

Even though I didn’t row or ride today, a loaf of soft white bread reminiscent of Wonder Bread, a jar of just made jam and summer’s last hurrah heat wave was the perfect excuse for a pb&j sandwich and a tall glass of ice cold milk for dinner. Nothing like starting the day with jam on buttered toast and ending it with a pb&j.  Felt like a kid again.

So if you are like me and find yourself with too many strawberries.  Make some jam!

Ketchup Noodles

Ketchup Noodles

One of my favorite shows on Netflix is the Japanese production Samurai Gourmet. I LOVE this show. I’m crossing my fingers that they will produce more episodes.  It follows newly retired exec Kasumi as he rediscovers the simple pleasures of life (most of which involve food of course).  Timid by nature, he has an alter ego, a confident, bravado-filled Samurai, who appears when Kasumi is faced with an awkward situation.  Its funny, sweet, poignant and filled with FOOD PORN.

Each episode features a meal that Kasumi savors over.  My favorite episode finds him searching for a favorite dish from his youth. The first bite immediately transports him back to his childhood.  To really make you drool, there are close-ups of each dish being prepared or eaten followed by Kasumi exclaiming “oishi!” (delicious!). If you have Netflix, this is must-see TV.  If you don’t, call me.  We’ll do a marathon session and go out for ramen afterward.

So I arrived home after a particularly long commute and needed to unwind.  Not wanting to watch the news I popped on Netflix and found my favorite episode of Samurai Gourmet.  Big mistake, before the end credits ran I was ravenous. Watching Kasumi slurp up a plate of pasta had me salivating for a bowl of noodles.  I hopped up, headed to the fridge, and luckily found a tiny portion of linguine left from last night’s dinner.  I grabbed it, the butter, and the bottle of ketchup.

Yep, you read that right.  Butter and ketchup.  Did you laugh when you read that? When I was a kid my Mom would make us Ketchup noodles for an after-school snack.  It was quick and easy and held us over until dinner.  I continued the tradition with my kids and would have a plate waiting for them as they came running in from school.  Jamie, our noodle girl loved them.

You can add anything you want to this dish.  Saute some onions and minced garlic before adding the noodles to the pan.  Spice it up with a dash of chili flakes…use your imagination!  Here is a refined version from Just One Cookbook, a Japanese blog post.  See, I’m not alone, ketchup and noodles are a Japanese thing too.

Mom's Ketchup Noodles!

Yes, you read that right, ketchup noodles, delicious
Course One dish meals
Cuisine Asian-American
Keyword butter, ketchup, noodles
Prep Time 5 minutes
Cook Time 15 minutes
Servings 2

Ingredients

  • 8 oz spaghettini or angel hair or linguine fini or 12 ounces Chinese Egg Noodles
  • 2-3 tbsp butter salted, unsalted whatever floats your boat
  • 2-3 tbsp ketchup or to taste
  • Parmesan Cheese, freshly grated OR To be true to my mom, you should use the pre-grated parmesan cheese in the green can by Kraft!
  • salt and pepper garlic salt is nice too, not a mom ingredient but it works

Instructions

  • Cook noodles according to directions on package, drain and reserve
  • Melt butter in a skillet over medium heat. When it starts to bubble, add noodles, increase heat to medium high.
  • Toss to coat noodles with butter. Add ketchup and continue to toss to mix thoroughly while frying. Season with salt and pepper. Serve immediately. Pass the cheese in the little green can. Does that still exist?
  • ENJOY!!!!

Notes

If you want to go crazy, you could saute' some minced garlic in the butter before adding the noodles.  You can use garlic salt also.
A riff on ketchup noodle:  Replace the ketchup with Oyster Sauce which is just as delicious..salty, briny, buttery....hmmm yum

Hi Mui, Claire, Jorge, Jeffy

Jamie’s Home, Doing the Mango Tango

Jamie’s Home, Doing the Mango Tango

Hello friends!! Jamie here from the good ‘ol peach state. Yup, I have now moved even farther away and further south (metaphorically) from The Bay.  The deep south is definitely different than Texas.  I mean, Texas isn’t part of the south. Texas is Texas. Home of brisket, football, and deep-fried butter. Ironically, the first time I had mango lassi I was in Texas.  It was my freshman year of college, and my friends and I were doing–of course–absolutely nothing on a Tuesday night.  We heard that a club on campus was giving out free food, so we went.  Turns out, they were giving out mango lassi, and, boy, there was a lot of people there.  I soon understood why (well, other than the fact that it was free food and college kids).  It was like a mango milkshake, but even better–thicker, richer, and tastier.  Sweet with that hint of tartness from the yogurt. If you haven’t tried a mango lassi before, you need to drop everything right now and go get one.  Well, after you read this blog post, of course.

Living in Atlanta this summer has made me CRAVE ice cream.  Maybe it’s the insanely hot and humid days or maybe it’s because I have way more free time to daydream about desserts.  Whatever the reason, I’ve been dying for some ice cream. So, when I traveled home for a week for work, I broke out one of my mom’s ice cream machines. Yes, I did say “one of.” I pulled out the Cuisinart to make mango lassi frozen yogurt ice cream.  It is the CREAMIEST DREAMIEST treat of the summer. It was the easiest treat of the summer, too.  Just throw the ingredients into a blender, pour it into the ice cream maker, then pop it into the freezer.  Voila!

The recipe for Mango Lassi Ice Cream is from blogger turned cookbook author, Lisa Fain of The Homesick Texan.  I have an affinity for her .  When she  moved to New York City she started a blog about Texas life and food.  I’m like her except I am The Homesick Californian living in Texas..maybe I should start my own blog.  Just kidding Mom!

HI CLAIRE

Mango Lassi Ice Cream (Homesick Texan)

Ingredients

  • 16 ounces frozen diced mango thawed, or 2 1/2 pounds fresh mango, peeled, pitted, and diced
  • 1 14-ounce can sweetened condensed milk
  • 8 ounces plain Greek-style yogurt, preferably full fat
  • 1 tablespoon freshly squeezed lime juice
  • 1/4 teaspoon kosher salt
  • Pinch ground cardamom

Instructions

  • Place the mango, sweetened condensed milk, yogurt, lime juice, salt, and spice in a blender and then puree until creamy and smooth.
  • Freeze according to your ice-cream maker’s instructions. We have a Cuisinart Ice Cream maker. After 20 minutes of turning it was still relatively soft. I transferred the mixture to a Tupperware and threw it in the freezer. A couple days later the ice cream was still creamy.
  • Next time I made add bits of mango to the puree just to intensify the mango.
  • You can never have too much mango.
  • Another thought: I bet you could use other fruits for mangoes. Strawberries or peaches come to mind.
  • If you don't like cardamon try ginger or cinnamon in place.
  • Yield:
  • About a quart

So much fun with an ice cream machine!

That’s a Wrap, Happy Hour Time! (Korean Tacos)

That’s a Wrap, Happy Hour Time! (Korean Tacos)

Jamie is in Atlanta for the summer working but fortunately she will be coming home for a couple of weeks.  I miss my Happy Hour buddy.  We both agree happy hours are the best of all worlds.  It’s much more relaxed than throwing a dinner party. People come and go as they please and help themselves to food and drink, it’s all good.  The food is casual and the attire is flips and anything comfortable. It’s all about chillin’ with friends and family. You can hang outside so don’t bother cleaning the house, noone cares, especially after a couple of wine coolers.

Luckily for us, we finally landscaped our yard. Yay.  Years of drought and an invasion of gophers left our yard looking like a moonscape of dirt, holes and mutant weeds.  It was bad.  We called gopherbusters (not really their name but that’s what they do) and a gardener and got to work.  In my defense, I grew up in San Francisco.  The ratio of cement to grass is like a bajillion to one.  Lawn mower? Never seen one much less owned one. But the yard is done, PARTY TIME.

Just need Jamie to come home.

In anticipation  of when she does, I have been checking out recipes that would be perfect for our little casual soirees’.  Korean Chicken Lettuce Wraps from SkinnyTaste caught my eye. SkinnyTaste started out as a blog on healthy seasonal cooking your family will love and has blossomed into a full fledge book.  The Korean wraps remind me of a Chinese appetizer, San Choy Bao, which literally means lettuce bun, think of it as an Asian Taco.  The filling is seasoned Korean BBQ style which I happen to LOVE.  Each bite is sweet, salty, spicy and the lettuce adds a refreshing crunch.  It’s a party in your mouth.  The original recipe calls for brown rice but if you are going low carb like I SHOULD be, you can substitute squash, diced carrots, zoodles or sautéed mushrooms.

We are serious about our happy hour bites and this dish meets the rigorous criteria we set for a date with a wine cooler or bottle of ice cold beer.

STRINGENT Happy Hour Food Standards:

Bite sized- check (2 bites)

Eat with your hands- check

Its YUMMY- check

It’s STUPID EASY- check

4 out of 4!  Lets go make some wraps.

That's a Wrap! (Korean Style Lettuce Wraps)

Ingredients

  • 1/4 cup low sodium soy sauce or tamari
  • 2 teaspoons light brown sugar
  • 1 teaspoon sesame oil
  • 1/2 teaspoon crushed red pepper flakes
  • cooking spray
  • 1 pound lean ground chicken or turkey
  • 1/4 cup chopped yellow onion
  • 2 garlic cloves crushed
  • 1 teaspoon grated ginger
  • 1/4 tsp fresh ground black pepper

FOR WRAPS

  • 12 large outer lettuce leaves such as green leaf Bibb lettuce or even iceberg lettuce which creates a nice round bowl
  • 2 1/4 cups cooked brown rice
  • 2 tablespoons Gochujong or more if desired
  • 1/2 tablespoon sesame seeds plus more for topping
  • 2 sliced scallions white and green parts

Instructions

Filling:

  • Combine soy sauce, brown sugar, sesame oil and chili flakes in a small bowl. Set aside.
  • Heat non-stick pan over medium high heat, add small amount of vegetable oil, add onions to pan and cook for 1-2 minute. Add garlic and ginger, sauce for additional minute before adding ground chicken to pan. Break up the chicken with a spatula or wooden spoon.
  • Cook until the chicken loses its pinkness.
  • Add sauce ingredients to pan and stir to incorporate, reduce heat to medium-low, cover and simmer mixture another 5 minutes.

In place of brown rice:

  • Sauteed diced zucchini, mushrooms
  • Kid friendly version use corn or cooked zucchini zoodles

To Serve:

    You can set up a serve yourself taco bar or assemble each wrap.

    • In each lettuce leaf place 2 tablespoons of rice or prepared vegetables
    • Top with approximately 2 tablespoons of chicken mixture
    • Garnish with a dab of Gochujong or Siracha sauce, green onions and sesame seeds.
    • Serve immediately.

    Strawberry Fields Forever-Strawberry Pie Now

    Strawberry Fields Forever-Strawberry Pie Now

    Tasked with dessert for Easter dinner at my brother’s this year, I pondered on what to bring.  Inspiration hit at my local farmer’s market when I spied the baskets of luscious, red, ripe strawberries.

    It’s PIE TIME

    I conjured up an image in my head, fresh sweet ripe strawberries piled in a crispy buttery crust and topped with a dollop of whipped cream.   This perfectly describes Rose Levy Beranbaum’s strawberry pie recipe. .  I own as many of her cookbooks as I do Dorie Greenspan’s and that’s saying a lot, both are baking gurus extraordinaire.  Rose’s recipes are organized, reliable, easy to follow, and best of all delicious. First, the ingredients are listed by volume measurements and weights (ounces and grams, how great is that?) in all her books and then formatted in tables.  In addition, each recipe has pointers for success, helpful hints, and a Harold McGee/ Alton Brown-like blurb on understanding the recipe.  My favorites include Rose’s Christmas Cookies, Cake Bible, and her more recent book  The Baking Bible.

    Her Glazed Strawberry Pie recipe is from The Pie and Pastry Bible. In addition to being delish, it is super easy to make. The strawberries are the star of this pie so make sure your berries are ripe and sweet. Start by slicing the strawberries in half then make the glaze.  The glaze calls for sugar, cornstarch as the thickener, and cranberry-raspberry frozen concentrate.  Yep, frozen fruit juice concentrate.  Finally, fold the strawberries in the glaze and pour them into a pre-baked crust.

    It’s all about the crust and filling, uh-huh

    Use your favorite pie crust recipe (or mine), fully pre-bake it, and as it cools, make the filling.  Keep in mind the pie will need to chill in the fridge for a good couple of hours before serving.  Serve with whipped cream (totally worth the calorie splurge).

    Take advantage of strawberry season and MAKE THIS PIE.  Your family will love you. Your friends will love you.  You could run for office (hint, hint) after making this pie.

    Glazed Strawberry Pie from Pie and Pastry Bible

    Ingredients

    • 1 Basic Flaky Pie Crust for a 9-inch pie
    • 1 tablespoon egg white lightly beaten
    • 1/4 cup sugar
    • 3 tablespoons cornstarch
    • 1 cup liquid cran/raspberry concentrate thawed, undiluted
    • 3/4 cup water
    • 4-5 cups strawberries rinsed, hulled, dried, and halved

    Instructions

    For pie dough:

    • Favorite pie crust recipe, need only a single crust.
    • Remove the dough from the refrigerator. If necessary, allow it to sit for about 10 minutes or until it is soft enough to roll.
    • Roll dough 1/8 inch thick or less and about a 13-inch circle.
    • Transfer the dough to the pie pan. Fold under the excess and crimp the border using a fork or your fingers. Cover it loosely and refrigerate for a minimum of 1 hour and a maximum of 24 hours.
    • Preheat the oven to 425°F at least 20 minutes before baking.
    • Line the pastry shell with foil and fill with pie weights, rice or dried beans. Bake for 20 minutes. Carefully lift out the rice or beans with the foil. With a fork prick the bottom and sides and bake 5 to 10 minutes more or until the crust is a golden. Check after 3 minutes and prick any bubbles that may have formed.
    • Cool the crust on a rack for 3 minutes, so it is no longer piping hot, then brush the bottom and sides with the egg white.

    Make the filling:

    • In a 2-quart saucepan, mix together the sugar and cornstarch. Gradually stir in the cran/raspberry concentrate and water until smooth. Over medium heat, bring to a boil, stirring constantly. Boil for 1 minute. Remove the pan from the heat and cool completely.
    • Gently fold in the strawberries and spoon the filling into the baked pastry shell. Refrigerate for 4 hours or until set.
    • Serve with freshly whipped cream
    • Store:
    • Refrigerated up to 2 days.
    • The Pie and Pastry Bible
    It’s A Nutty World (Union Square Cafe Bar Nuts)

    It’s A Nutty World (Union Square Cafe Bar Nuts)

    My go to munchie nuts have been my cousin Bonnie’s Spicy Pecans.  Sweet and spicy with hints of clove, ginger and cinnamon they are addictive-they are my crack.  During the holidays I make tons of these nuts.  So much so I dreamt about them in my sleep.  Auugh! Time for a change. Now don’t get me wrong, I love them and will continue to make a batch or two or three but I think it best if I have a fall back…see what is outside my little nut bubble. So, I google nuts, candied, spicy, recipes and wouldn’t you know it what pops up, Smitten Kitchen. In her archives I find a recipe for Union Square Cafe Bar Nuts.  Hmm, wait a minute, I think I have that cookbook. I can picture it-green cover, Danny Meyer, NYC, iconic.  So I go to pull it out….45 minutes later after searching my stacks of books (help, is there a Cookbooks Anonymous out there?) I find it-EUREKA.  I dust off the cover, flip through it and there on page 8, Union Square Bar Nuts. Yes. So here it is in all its yumminess.  I adapted the recipe a wee bit combining advice from the book and Smitten Kitchen (I feel like a SK groupie, hope she doesn’t think I am stalking her).  I hope you will try it, a delicious alternative to my cousin’s Spicy Pecans and best of all it is STUPID EASY.

    These have only a hint of sweetness and border on a little salty (you can adjust if you like) but that’s why they are perfect bar nuts!  The recipe calls for 2 tablespoons of fresh rosemary.  I thought wow that seems like a lot, but it doesn’t overwhelm the nuts at all.  I used 1/4 teaspoon of cayenne and thought it was fine but feel free to up the heat if you like spicy.  If you don’t have kosher salt, you can probably use regular table salt just cut the amount by half.  I ended up buying a jar of mix dry roasted UNSALTED nuts at Costco.  It is a nice combination of cashews, pecans, almonds, and pistachios.  You could definitely use cashews or pecans alone but I think the mix is nice.  Plus it’s a good deal!  You can use olive oil instead of butter (hello veggie friends).  Because the baking time is so short, you are literally just heating the nuts, I think it’s fine to use roasted nuts.

    Pack in a cute jar, slap a ribbon around it, the makings of a great hostess gift.

    Happy Hour anyone? I’ll bring these delicious Union Square Cafe Bar Nuts!

    It’s A Nutty World (Union Square Cafe Bar Nuts)

    Ingredients

    • 18-20 ounces nuts can be a combination of cashews, pecans, almonds or walnuts or a single type of nut (3-5 cups)
    • 2 tablespoons coarsely chopped fresh rosemary
    • 1/4-1/2 teaspoon cayenne
    • 2 teaspoons dark brown sugar
    • 1 teaspoon kosher salt
    • 1 tablespoon melted unsalted butter or olive oil

    Instructions

    • Preheat oven to 350 degrees
    • Spread nuts on a baking sheet or sheet pan and toast 7-10 minutes or until they become light golden brown in color
    • In a large bowl combine remaining ingredients
    • Remove nuts from oven and toss in the butter/oil mixture until thoroughly coated
    • Return nuts to the oven for an additional 5-7 minutes.
    • Bar nuts can be served warm or at room temp.