Category: Sides

Eric Kim’s Grape Tomato “Quick Kimchi” (Rock-Paper-Scissors)

Eric Kim’s Grape Tomato “Quick Kimchi” (Rock-Paper-Scissors)

Every Sunday I meet up with friends for coffee then we walk to our local farmer’s market to stock up for the week.  Every year, like clockwork, when summer is upon us, the following conversation takes place between us…

While Walking Back From the Market…

She who shall not be named Person #1 So, who is going to buy the Granny Cart?  I can’t lug any more melons, corn, and peaches.  We need wheels.  I feel like a Sherpa and my shoulder hurts.

She who shall not be named Person #2  Aren’t you the one on Medicare already?  You should get it.

She who shall not be named Person #3 But you’re the one with the watermelon, half flat of strawberries, and 6 ears of corn!

She who shall not be named Person #1 Wait a minute, you’re the one with grandkids, you get it.

She who shall not be named Person #2 I’m the youngest, I’m not getting it.

Needless to say, due to vanity, we are still schlepping our haul in multiple tote bags, occasionally stopping for a breather.  This Sunday may have been the breaking point, none of us could resist, so much amazing fruit right now. We loaded up on berries, peaches (Biscuit Berry Peach Cobbler), cantaloupes, (Melon, Prosciutto & Mozzarella with Basil Oil), and watermelons, (Watermelon and Tomato Salad).  Somebody has to bite the bullet and get that cart!

Tomatoes Are Coming…Update They’re Here!

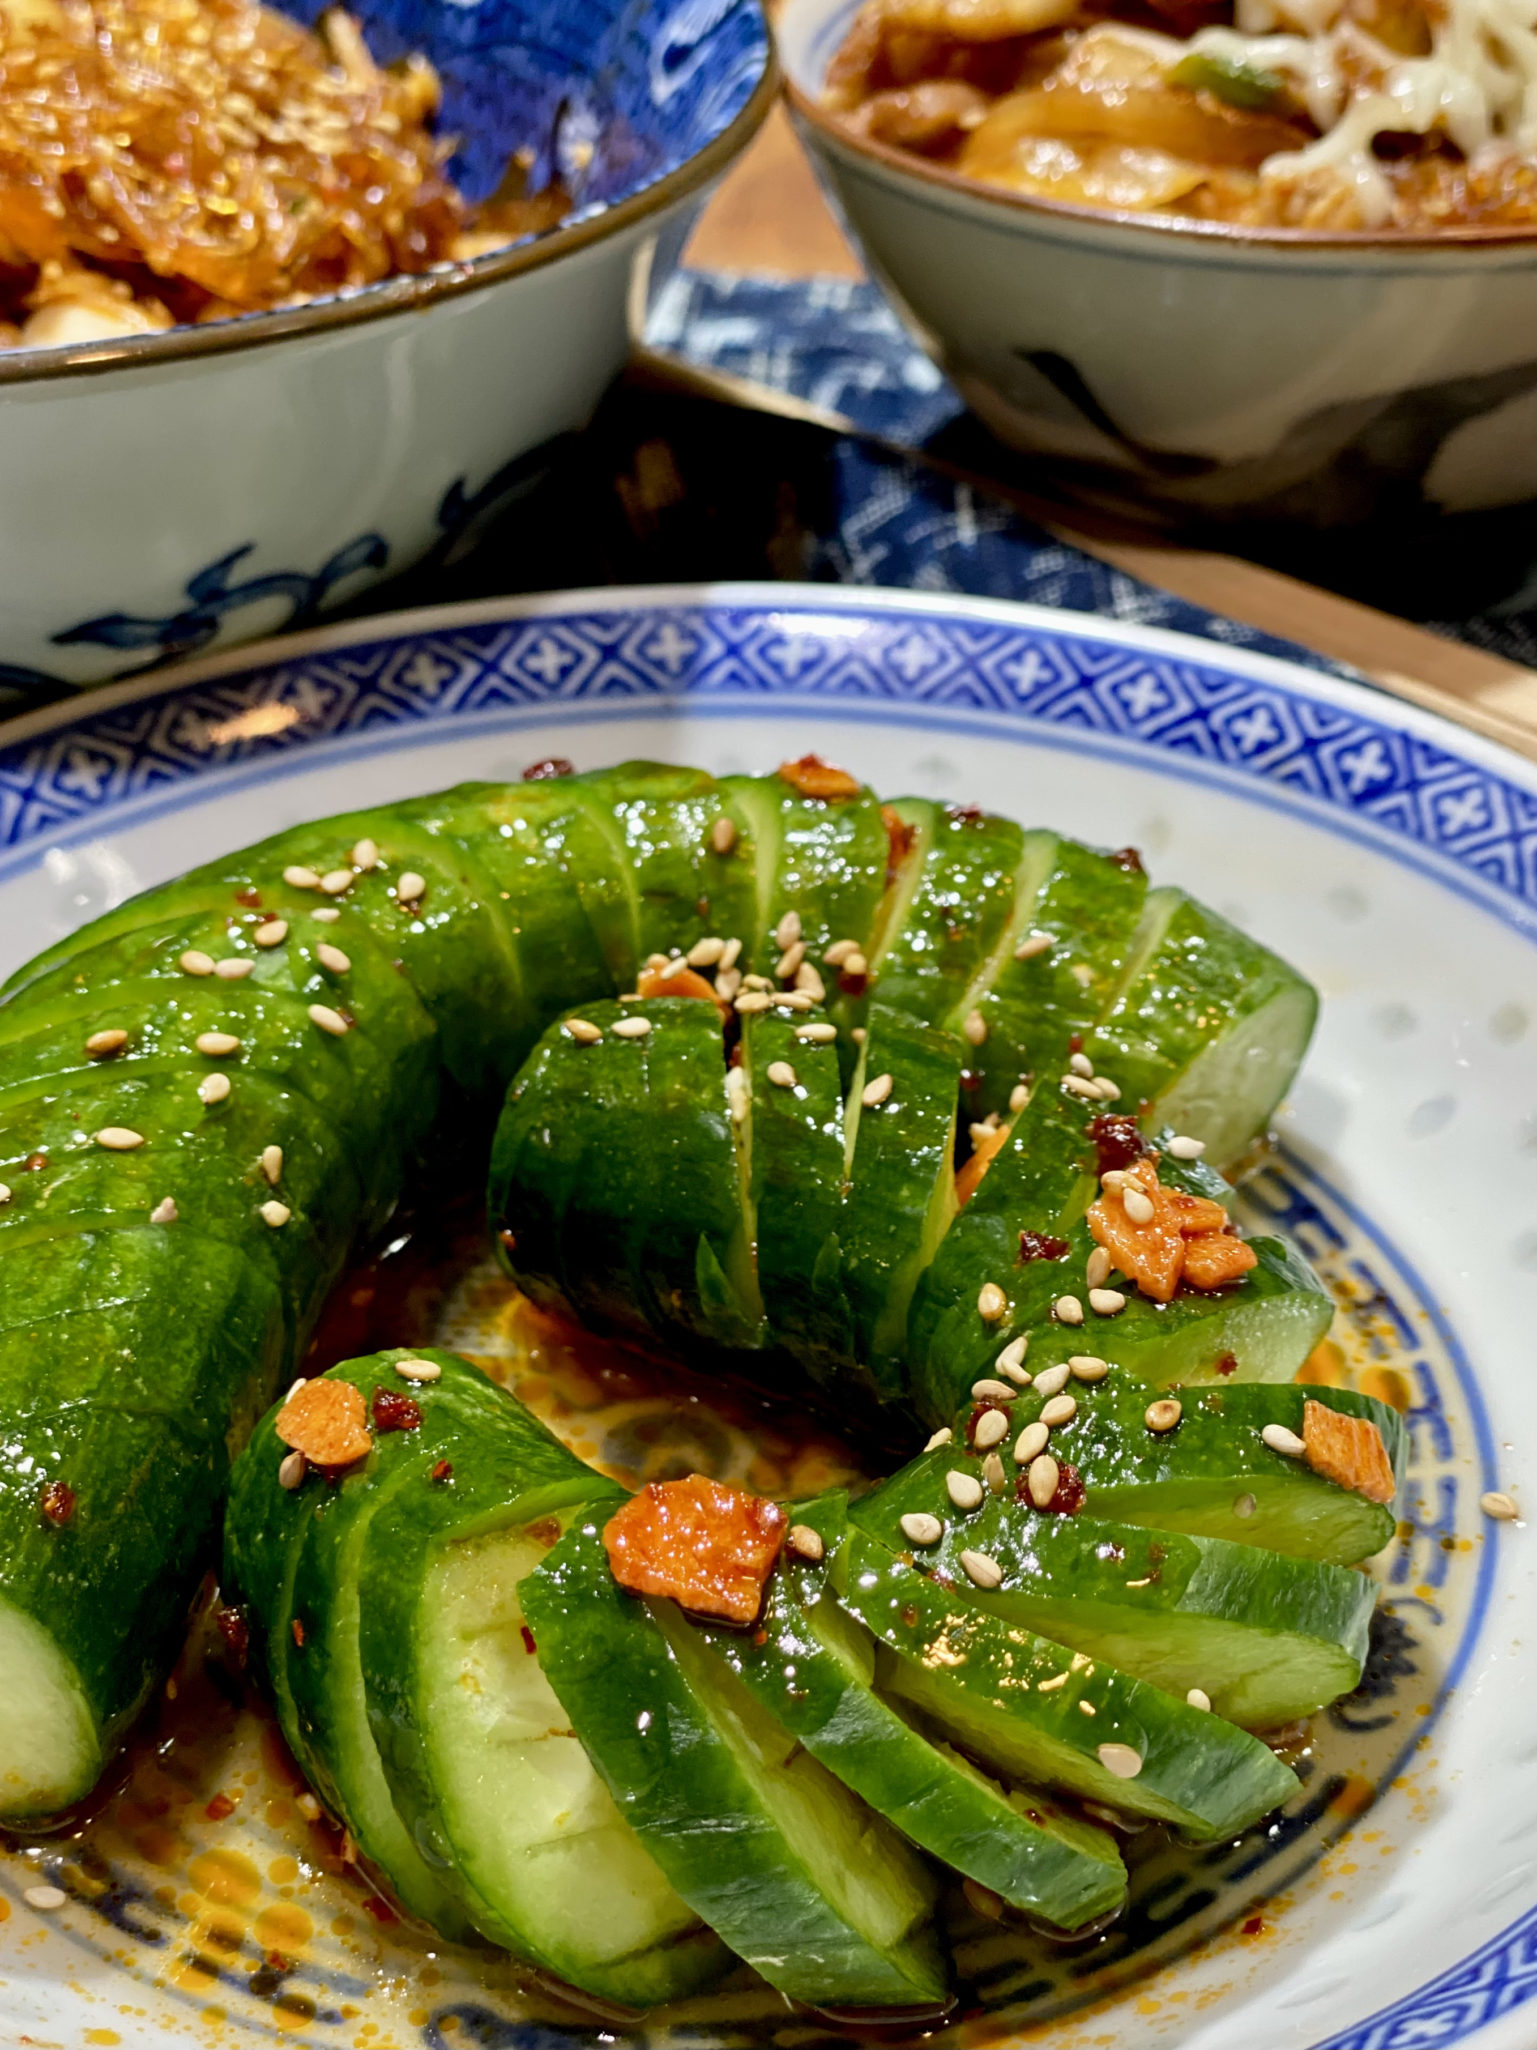
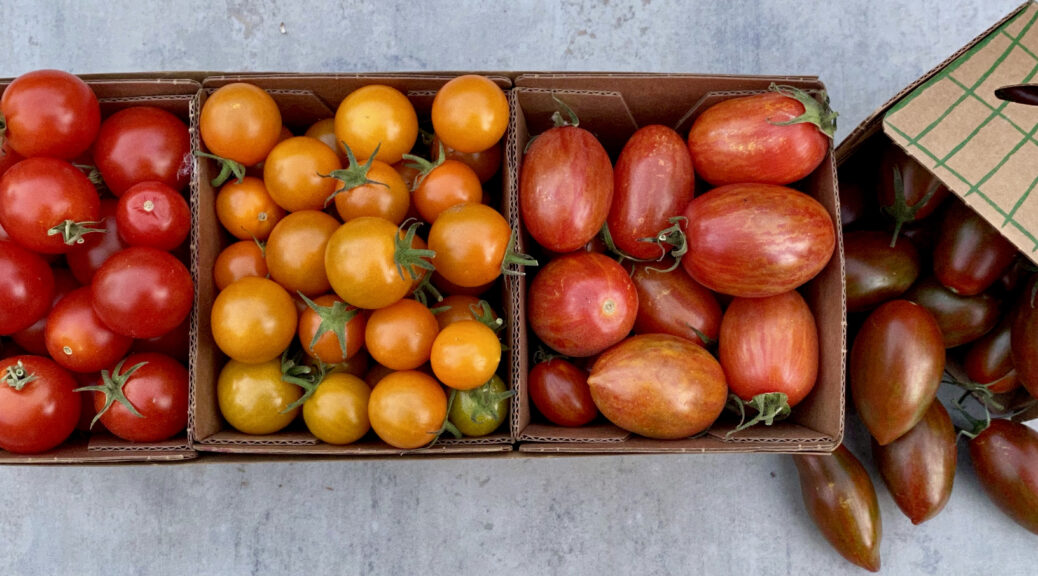
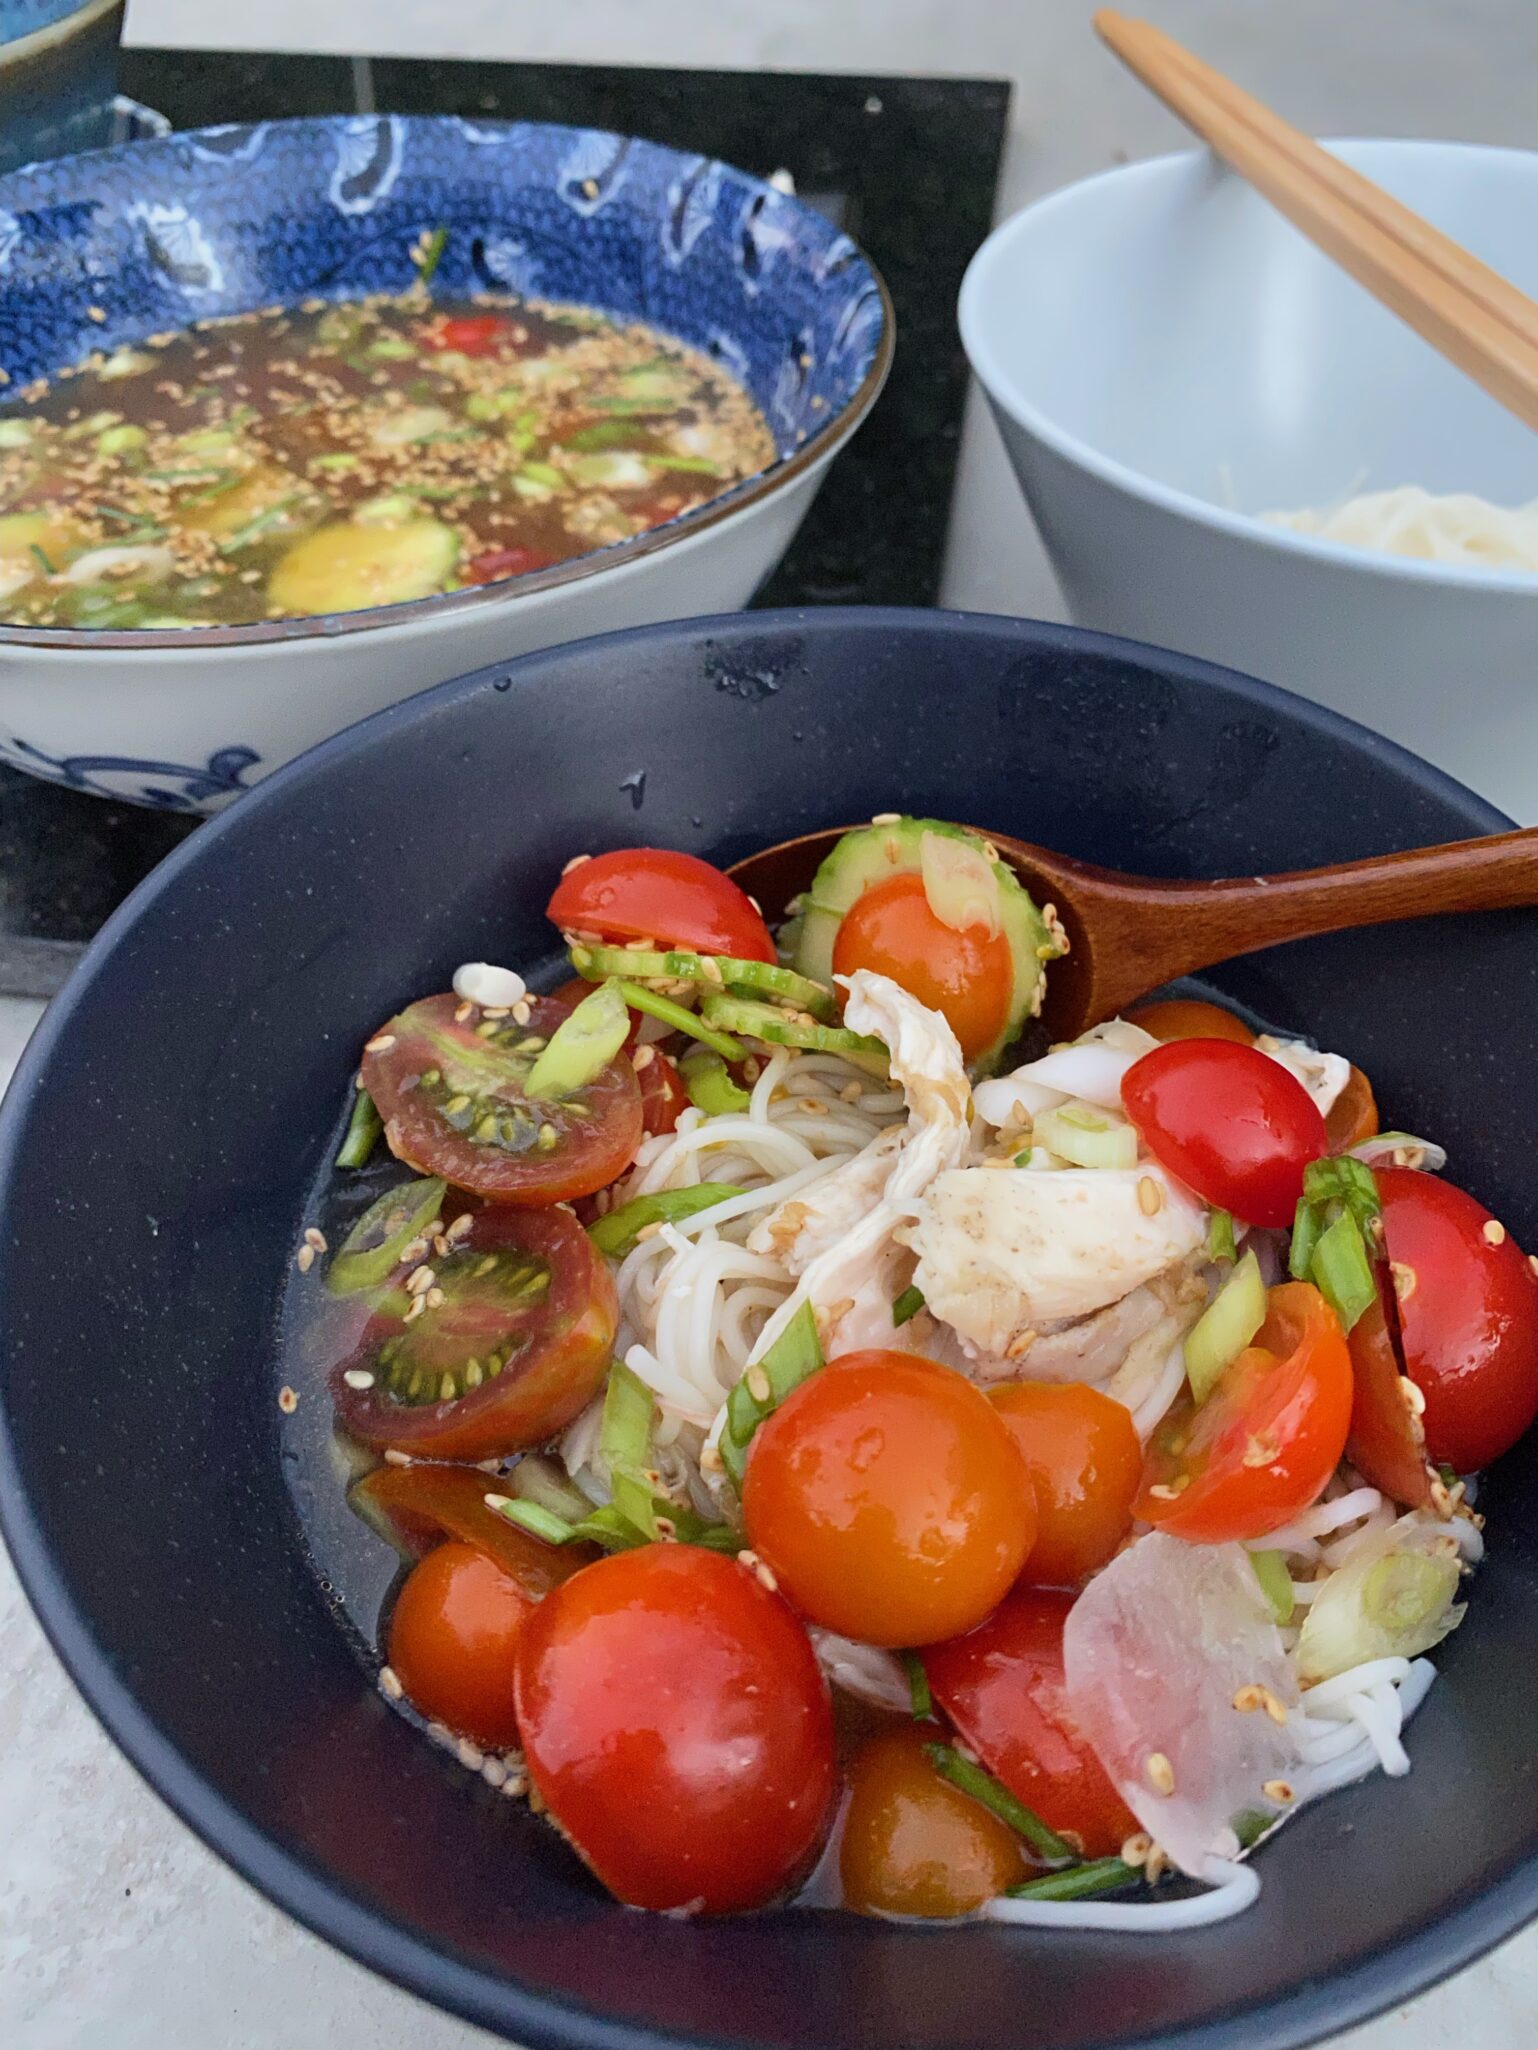
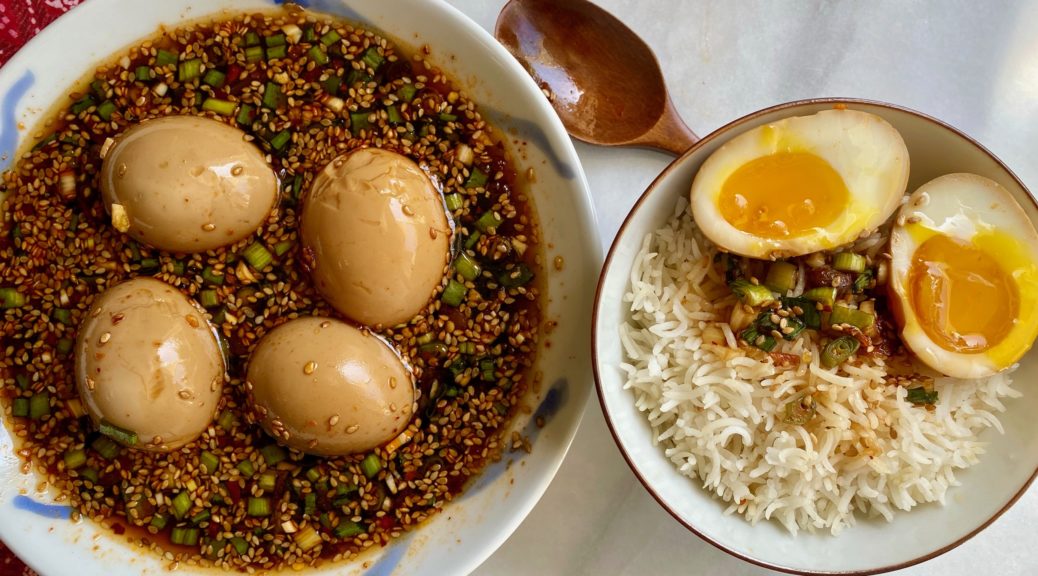
And I bought my first baskets of cherry tomatoes of the season today.  One of my favorite dishes, especially with the 90-degree weather we are having, is Eric Kim’s Grape Tomato Quick Kimchi.  I’m staying away from the stove as much as possible and this dish fits the bill. It’s the perfect way to enjoy those lovely tomatoes.

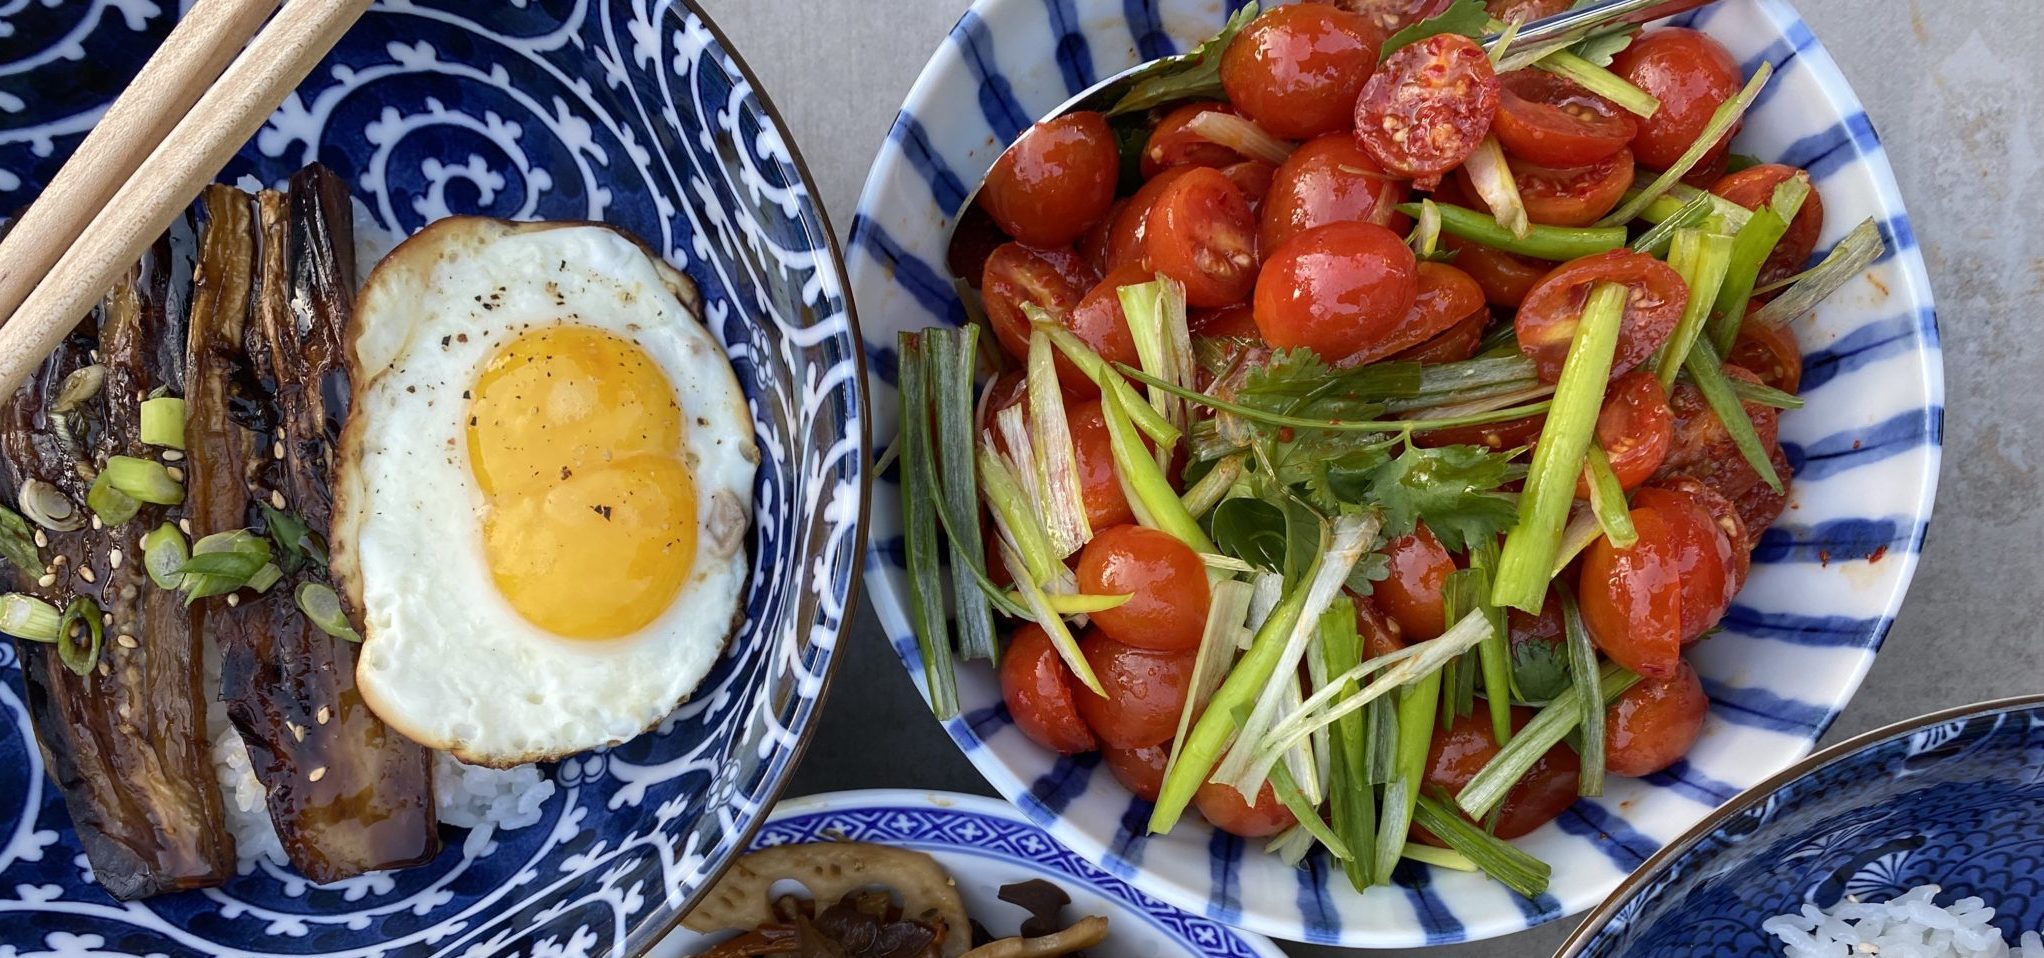
Side Dish Today…Lunch Tomorrow

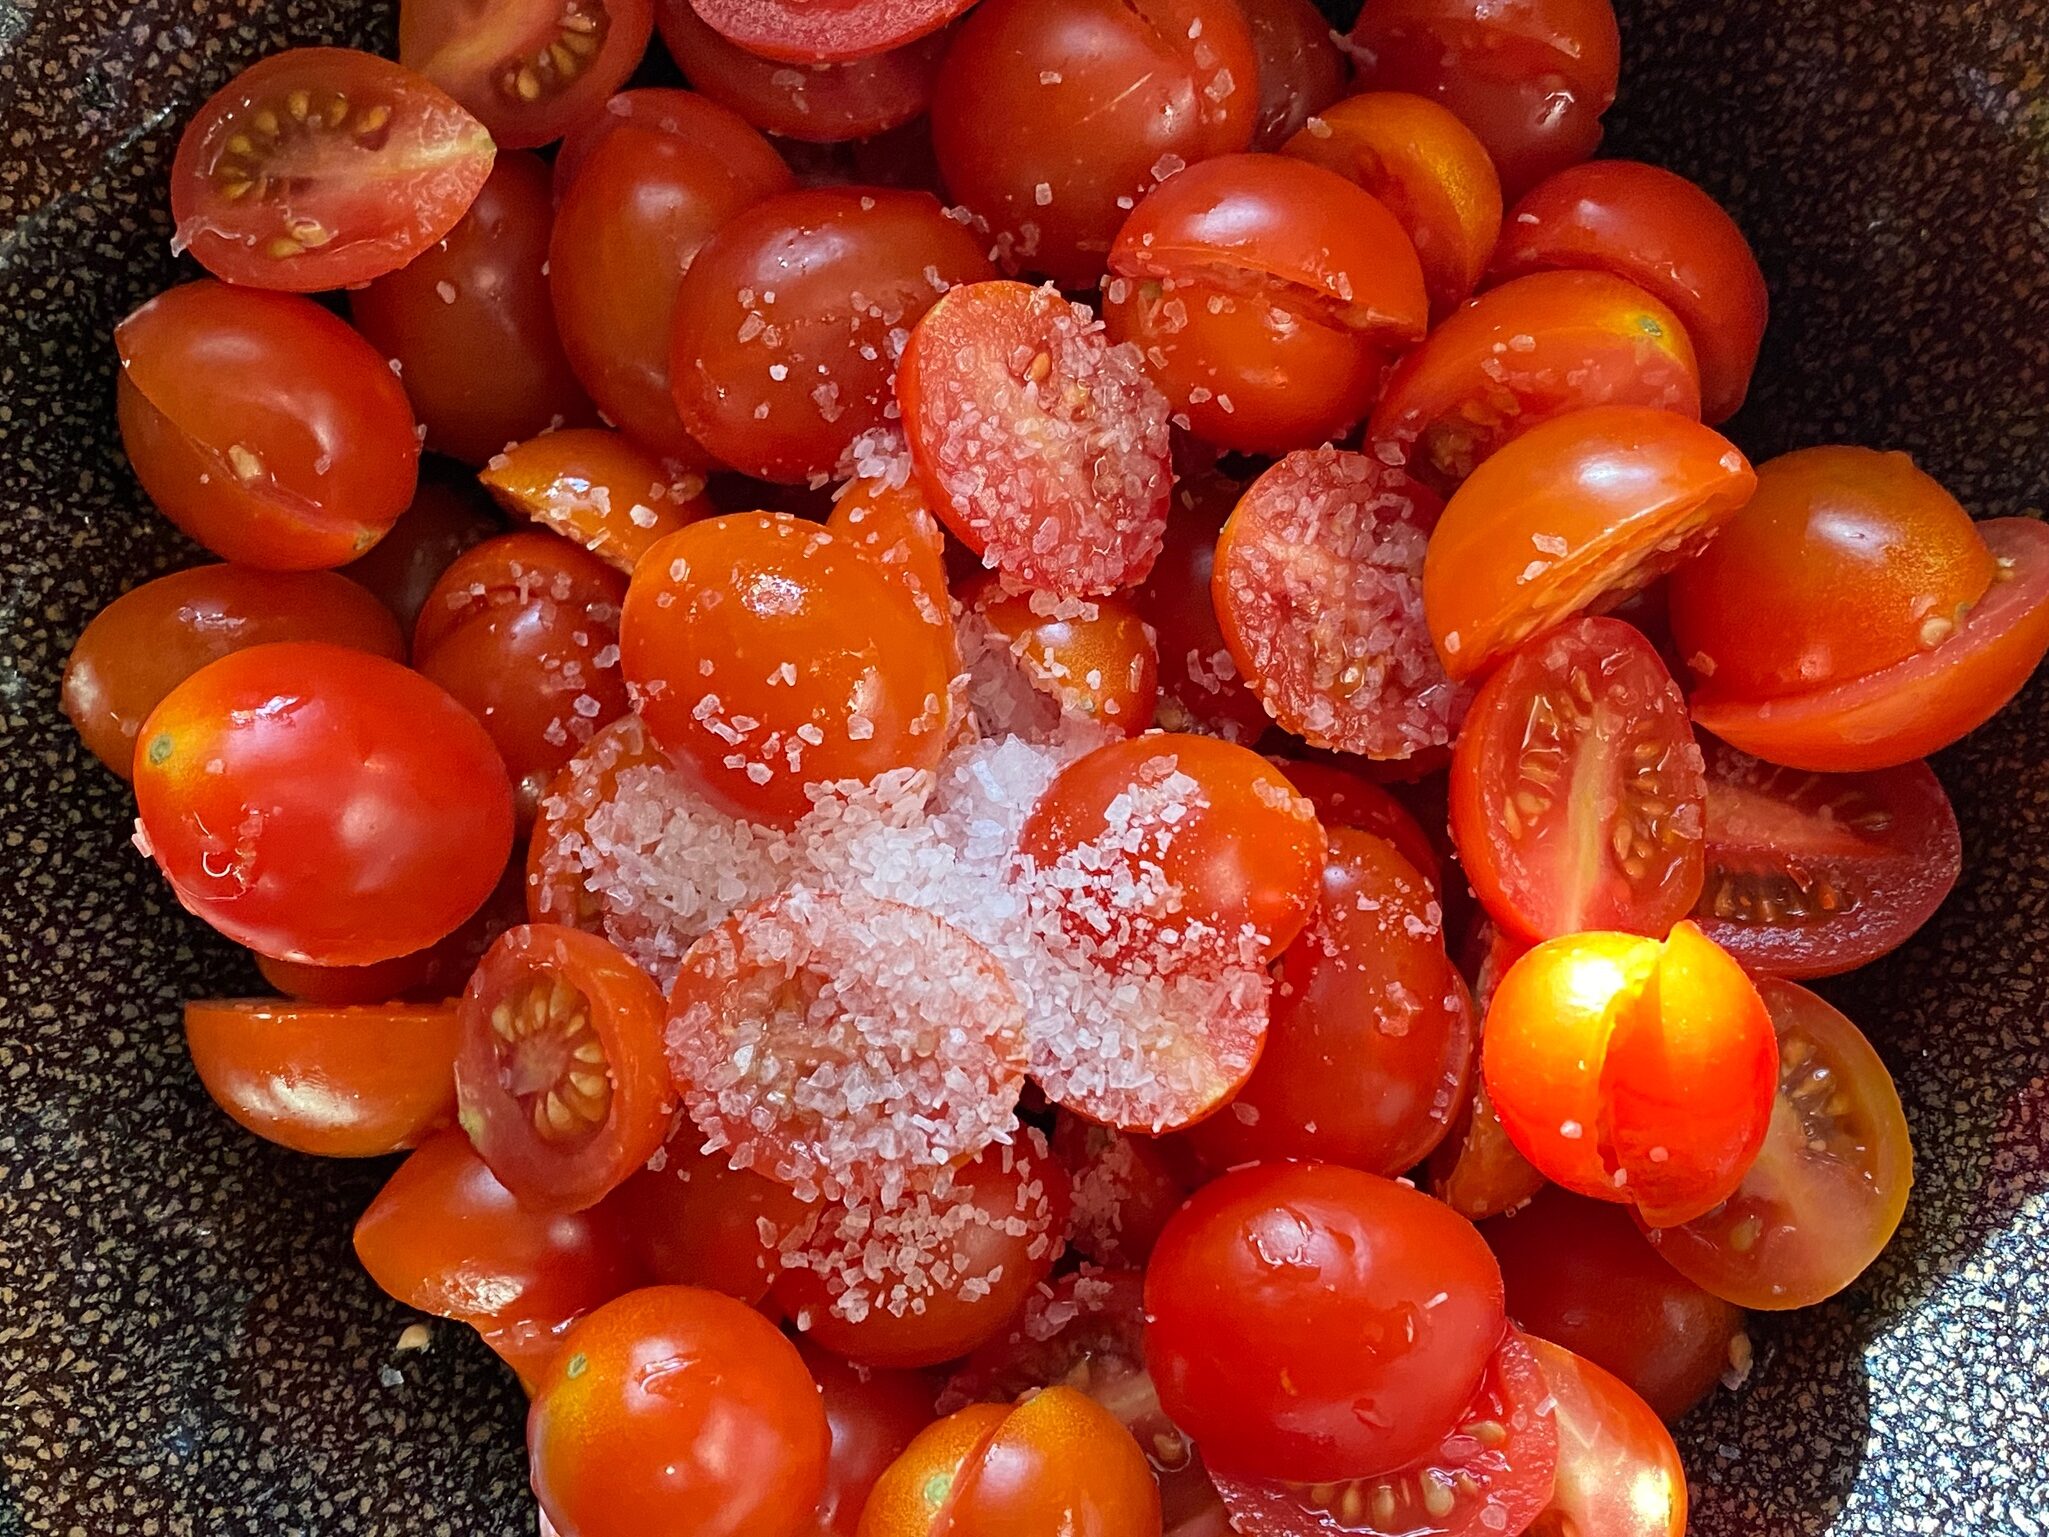
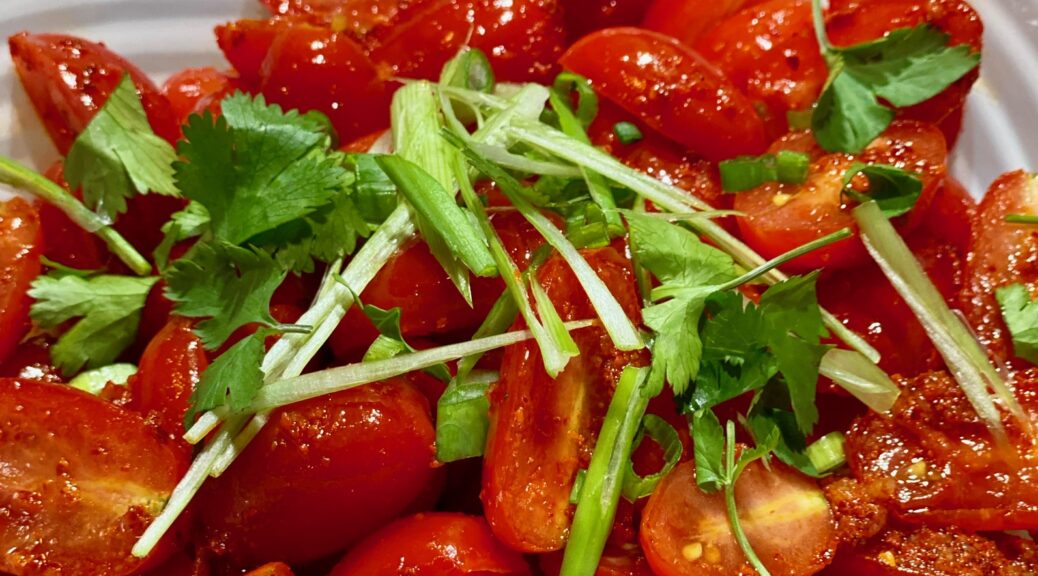
Simple to make, the time-consuming part is salting and allowing the tomatoes to drain.  Use any variety of cherry tomatoes.  The dressing consists of vinegar, fish sauce, sugar, and Gochugaru.  Red Boat or Three Crabs, are good choices for fish sauce.   Either can be found in any Asian store.  Gochugaru is Korean chili powder that can also be found in most Asian stores.  Your best bet would be a Korean market or online.  If you can’t find it feel free to substitute with chili flakes (1/4 tsp or to taste) or Aleppo pepper powder (1:1).  Toasted sesame oil provides a nutty, sweet finish to the dressing.

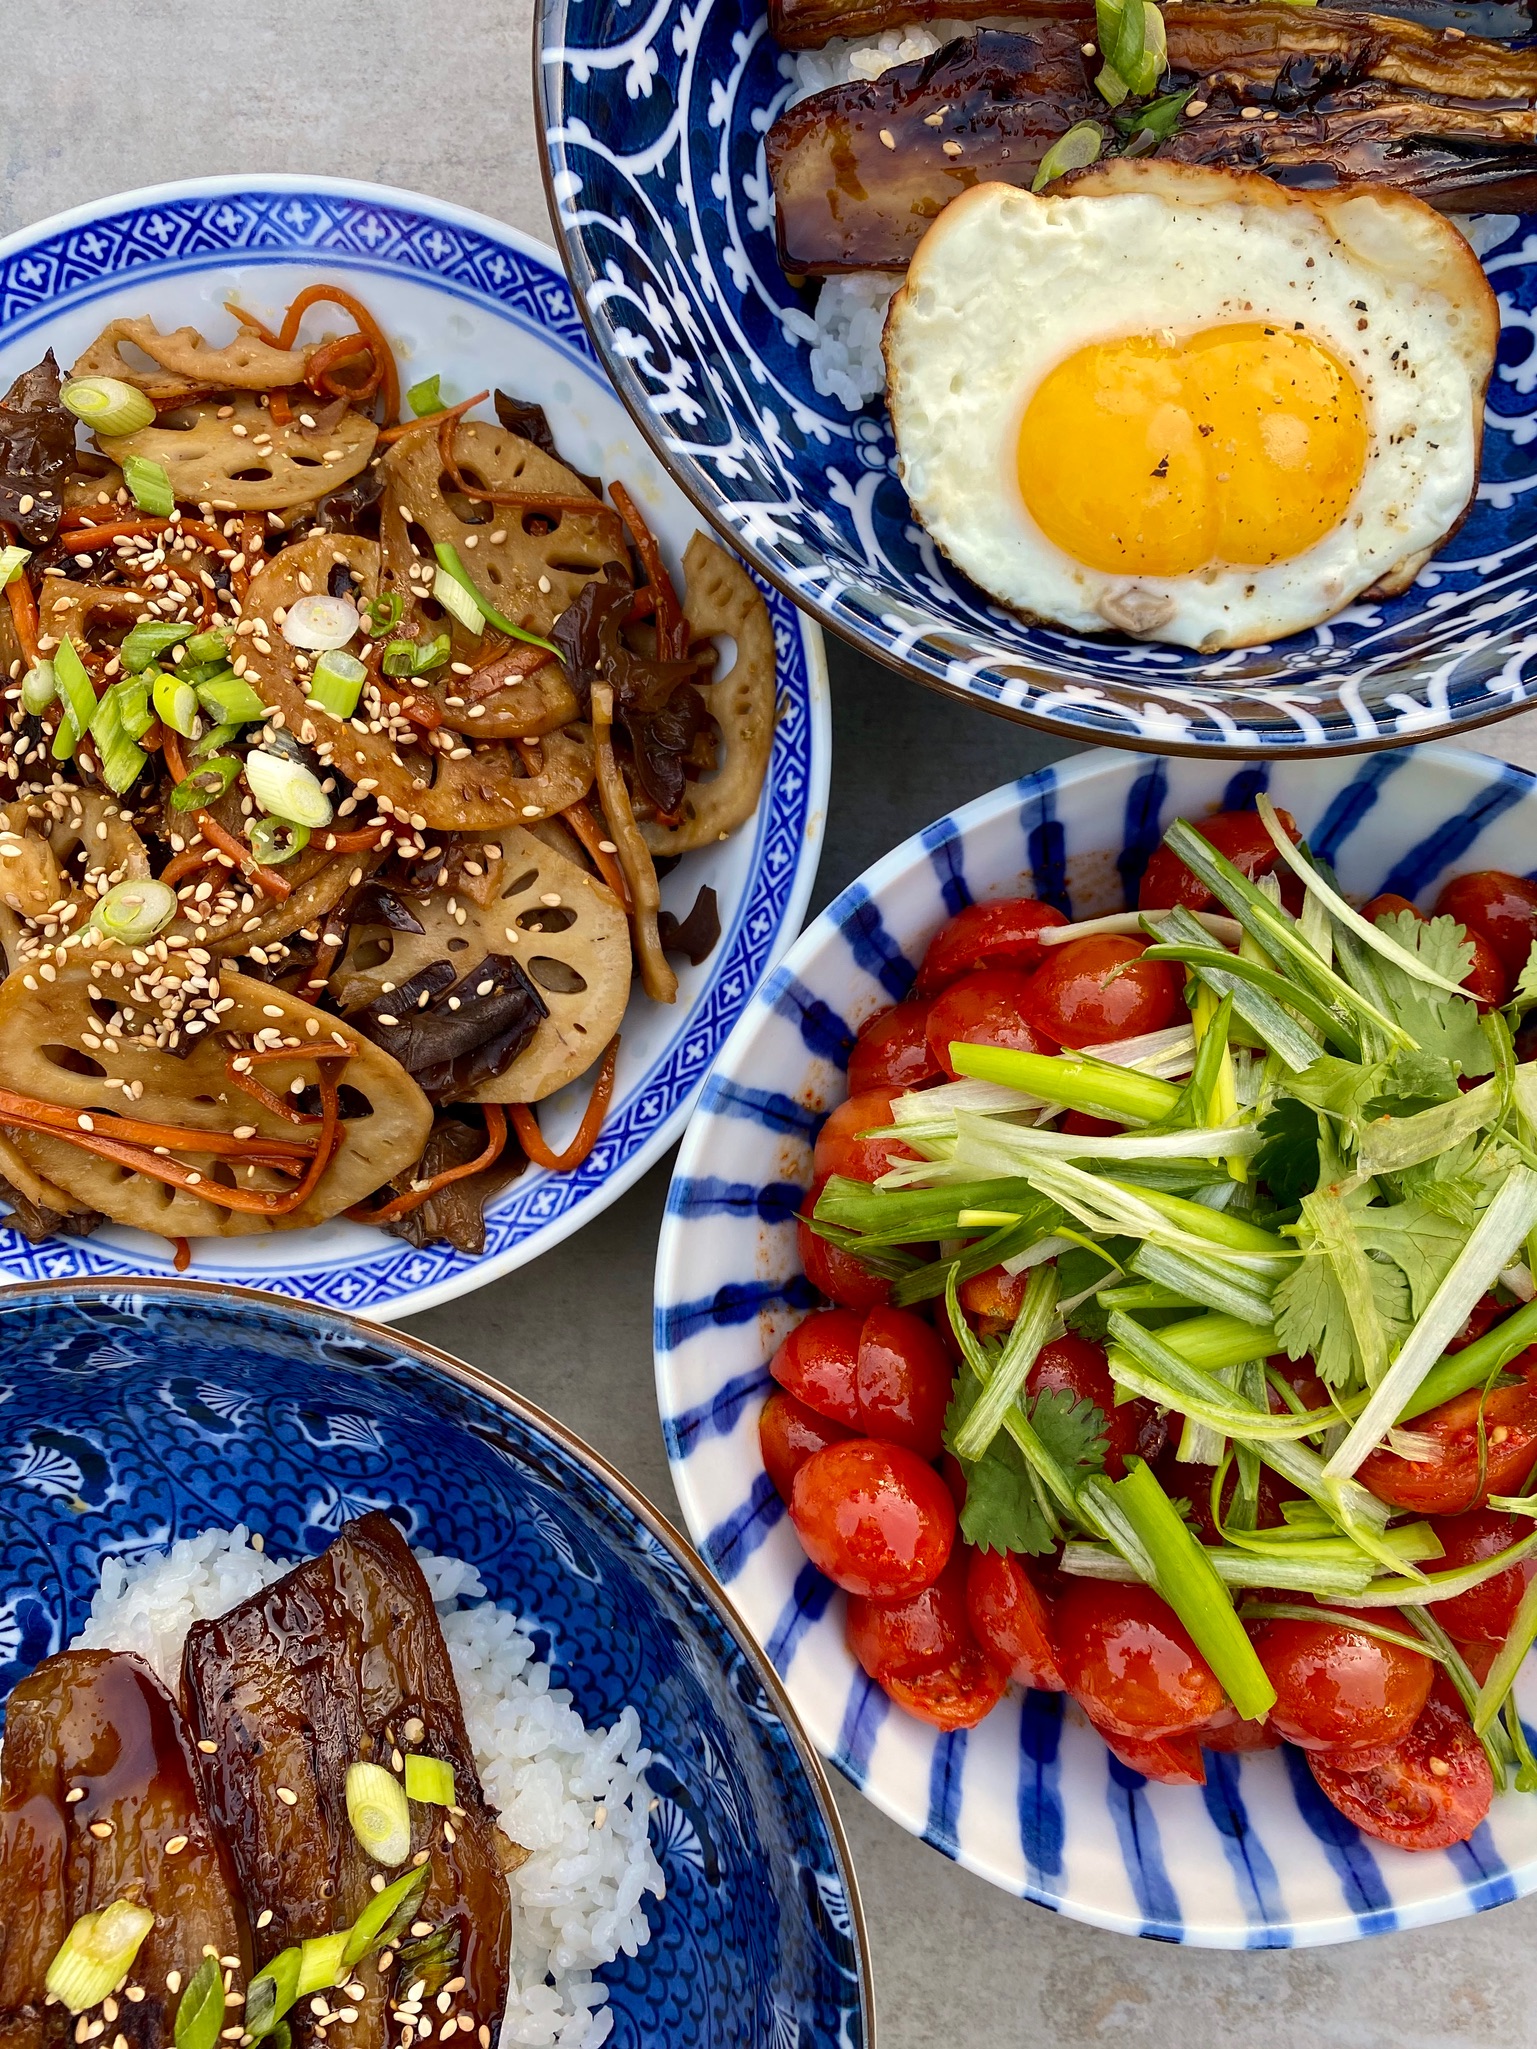
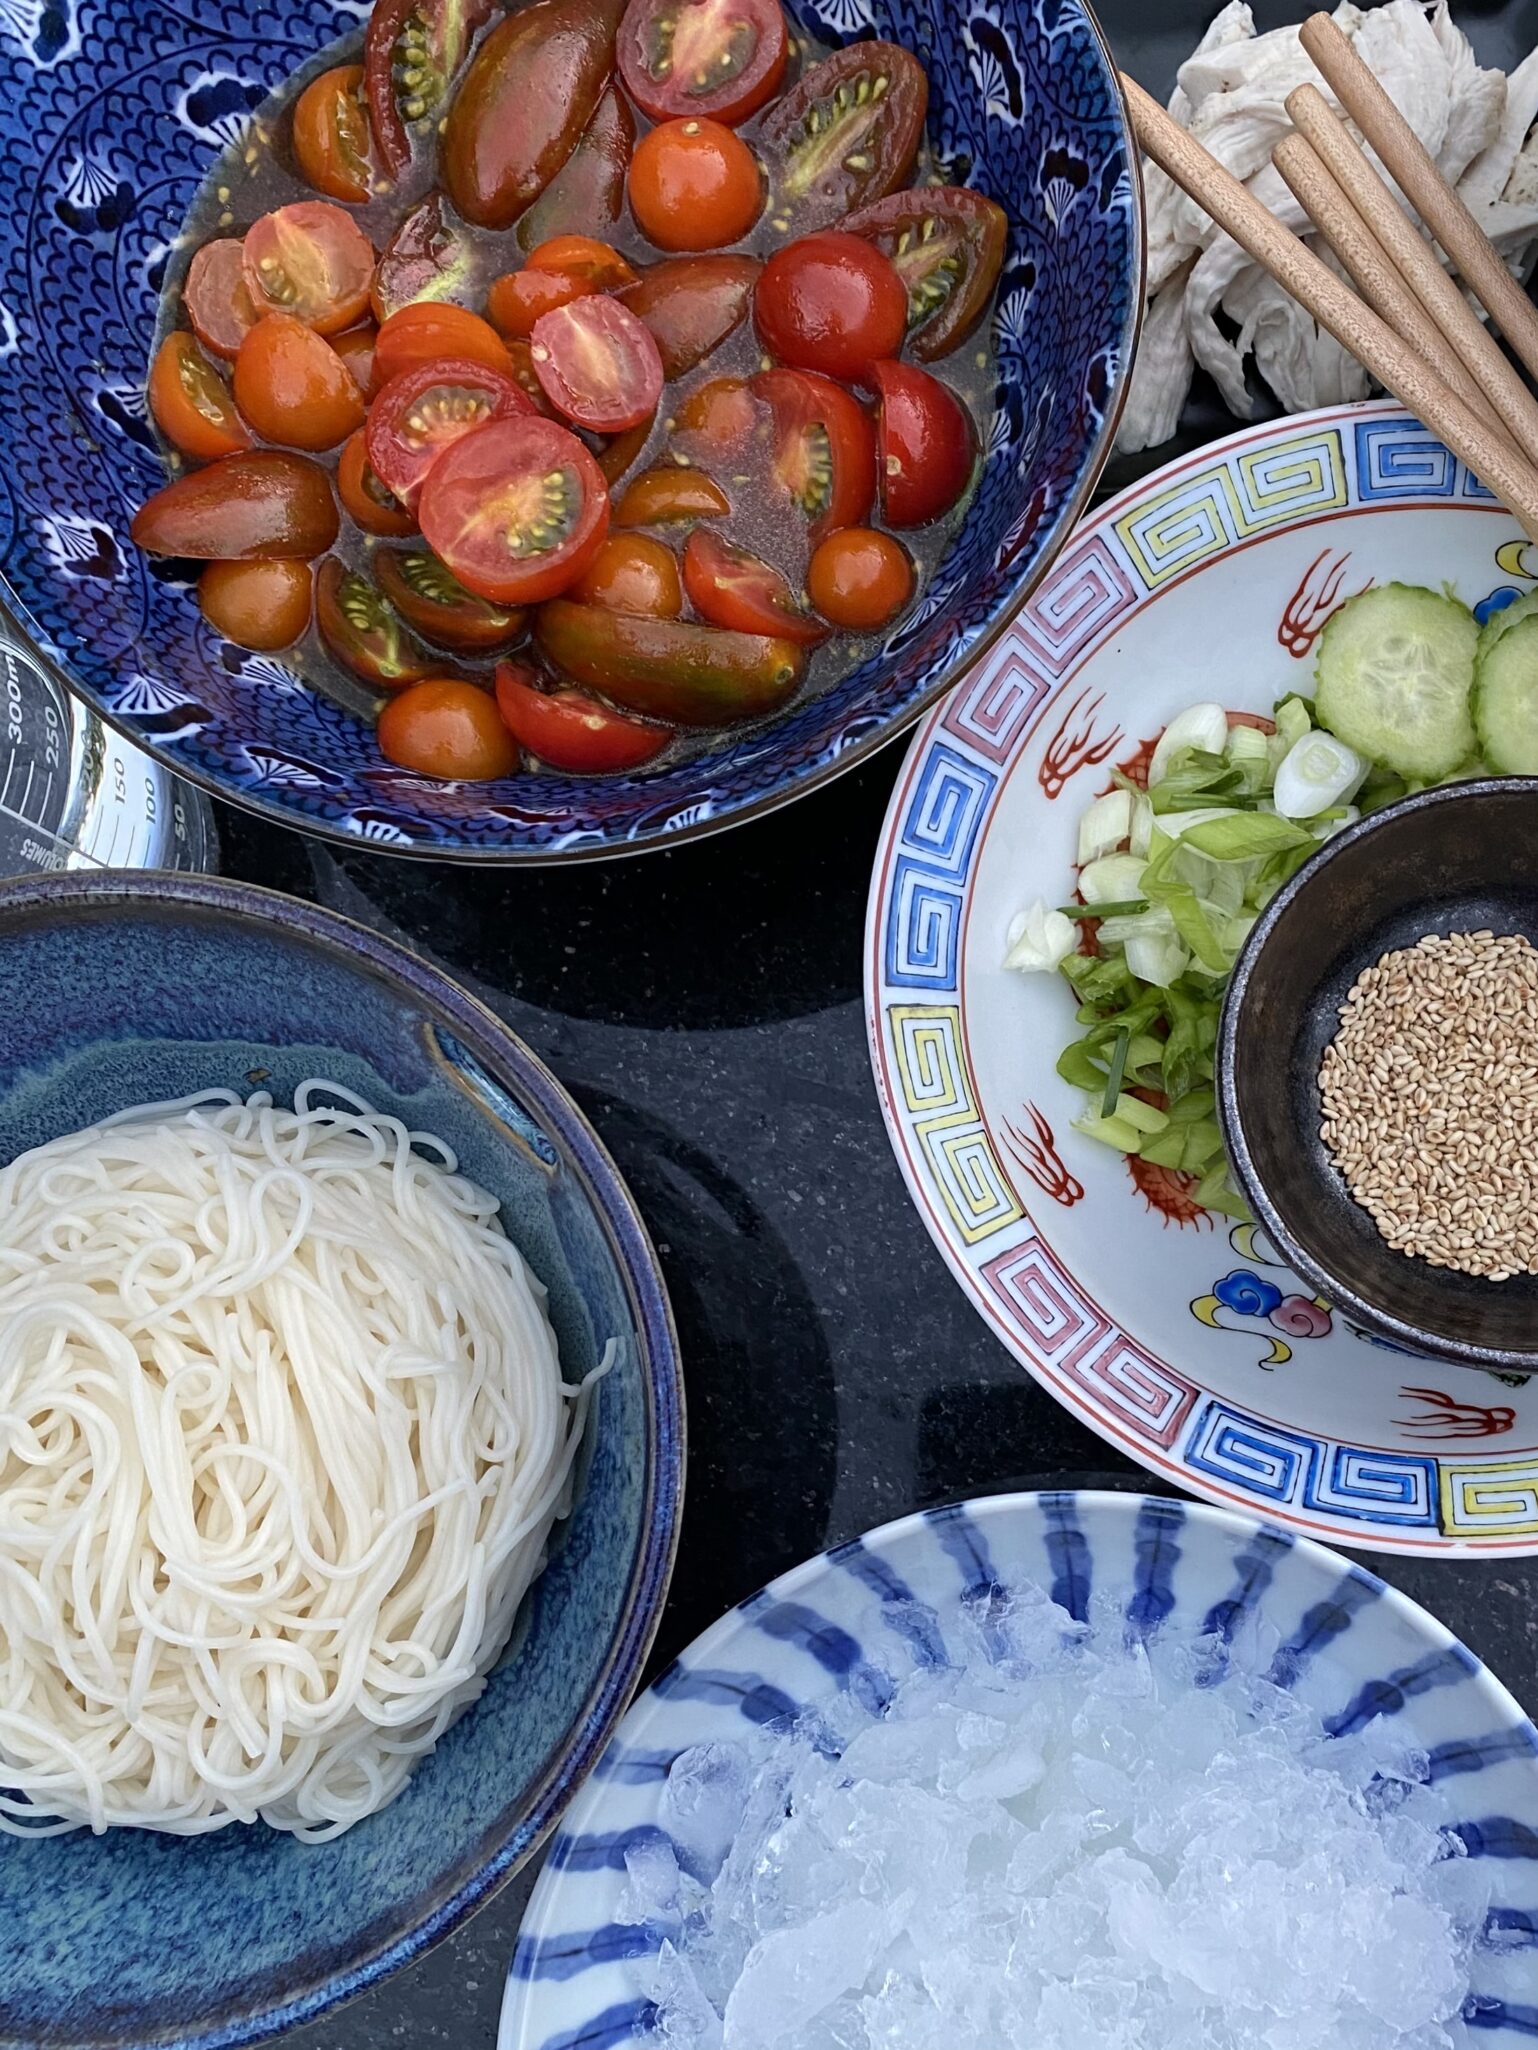
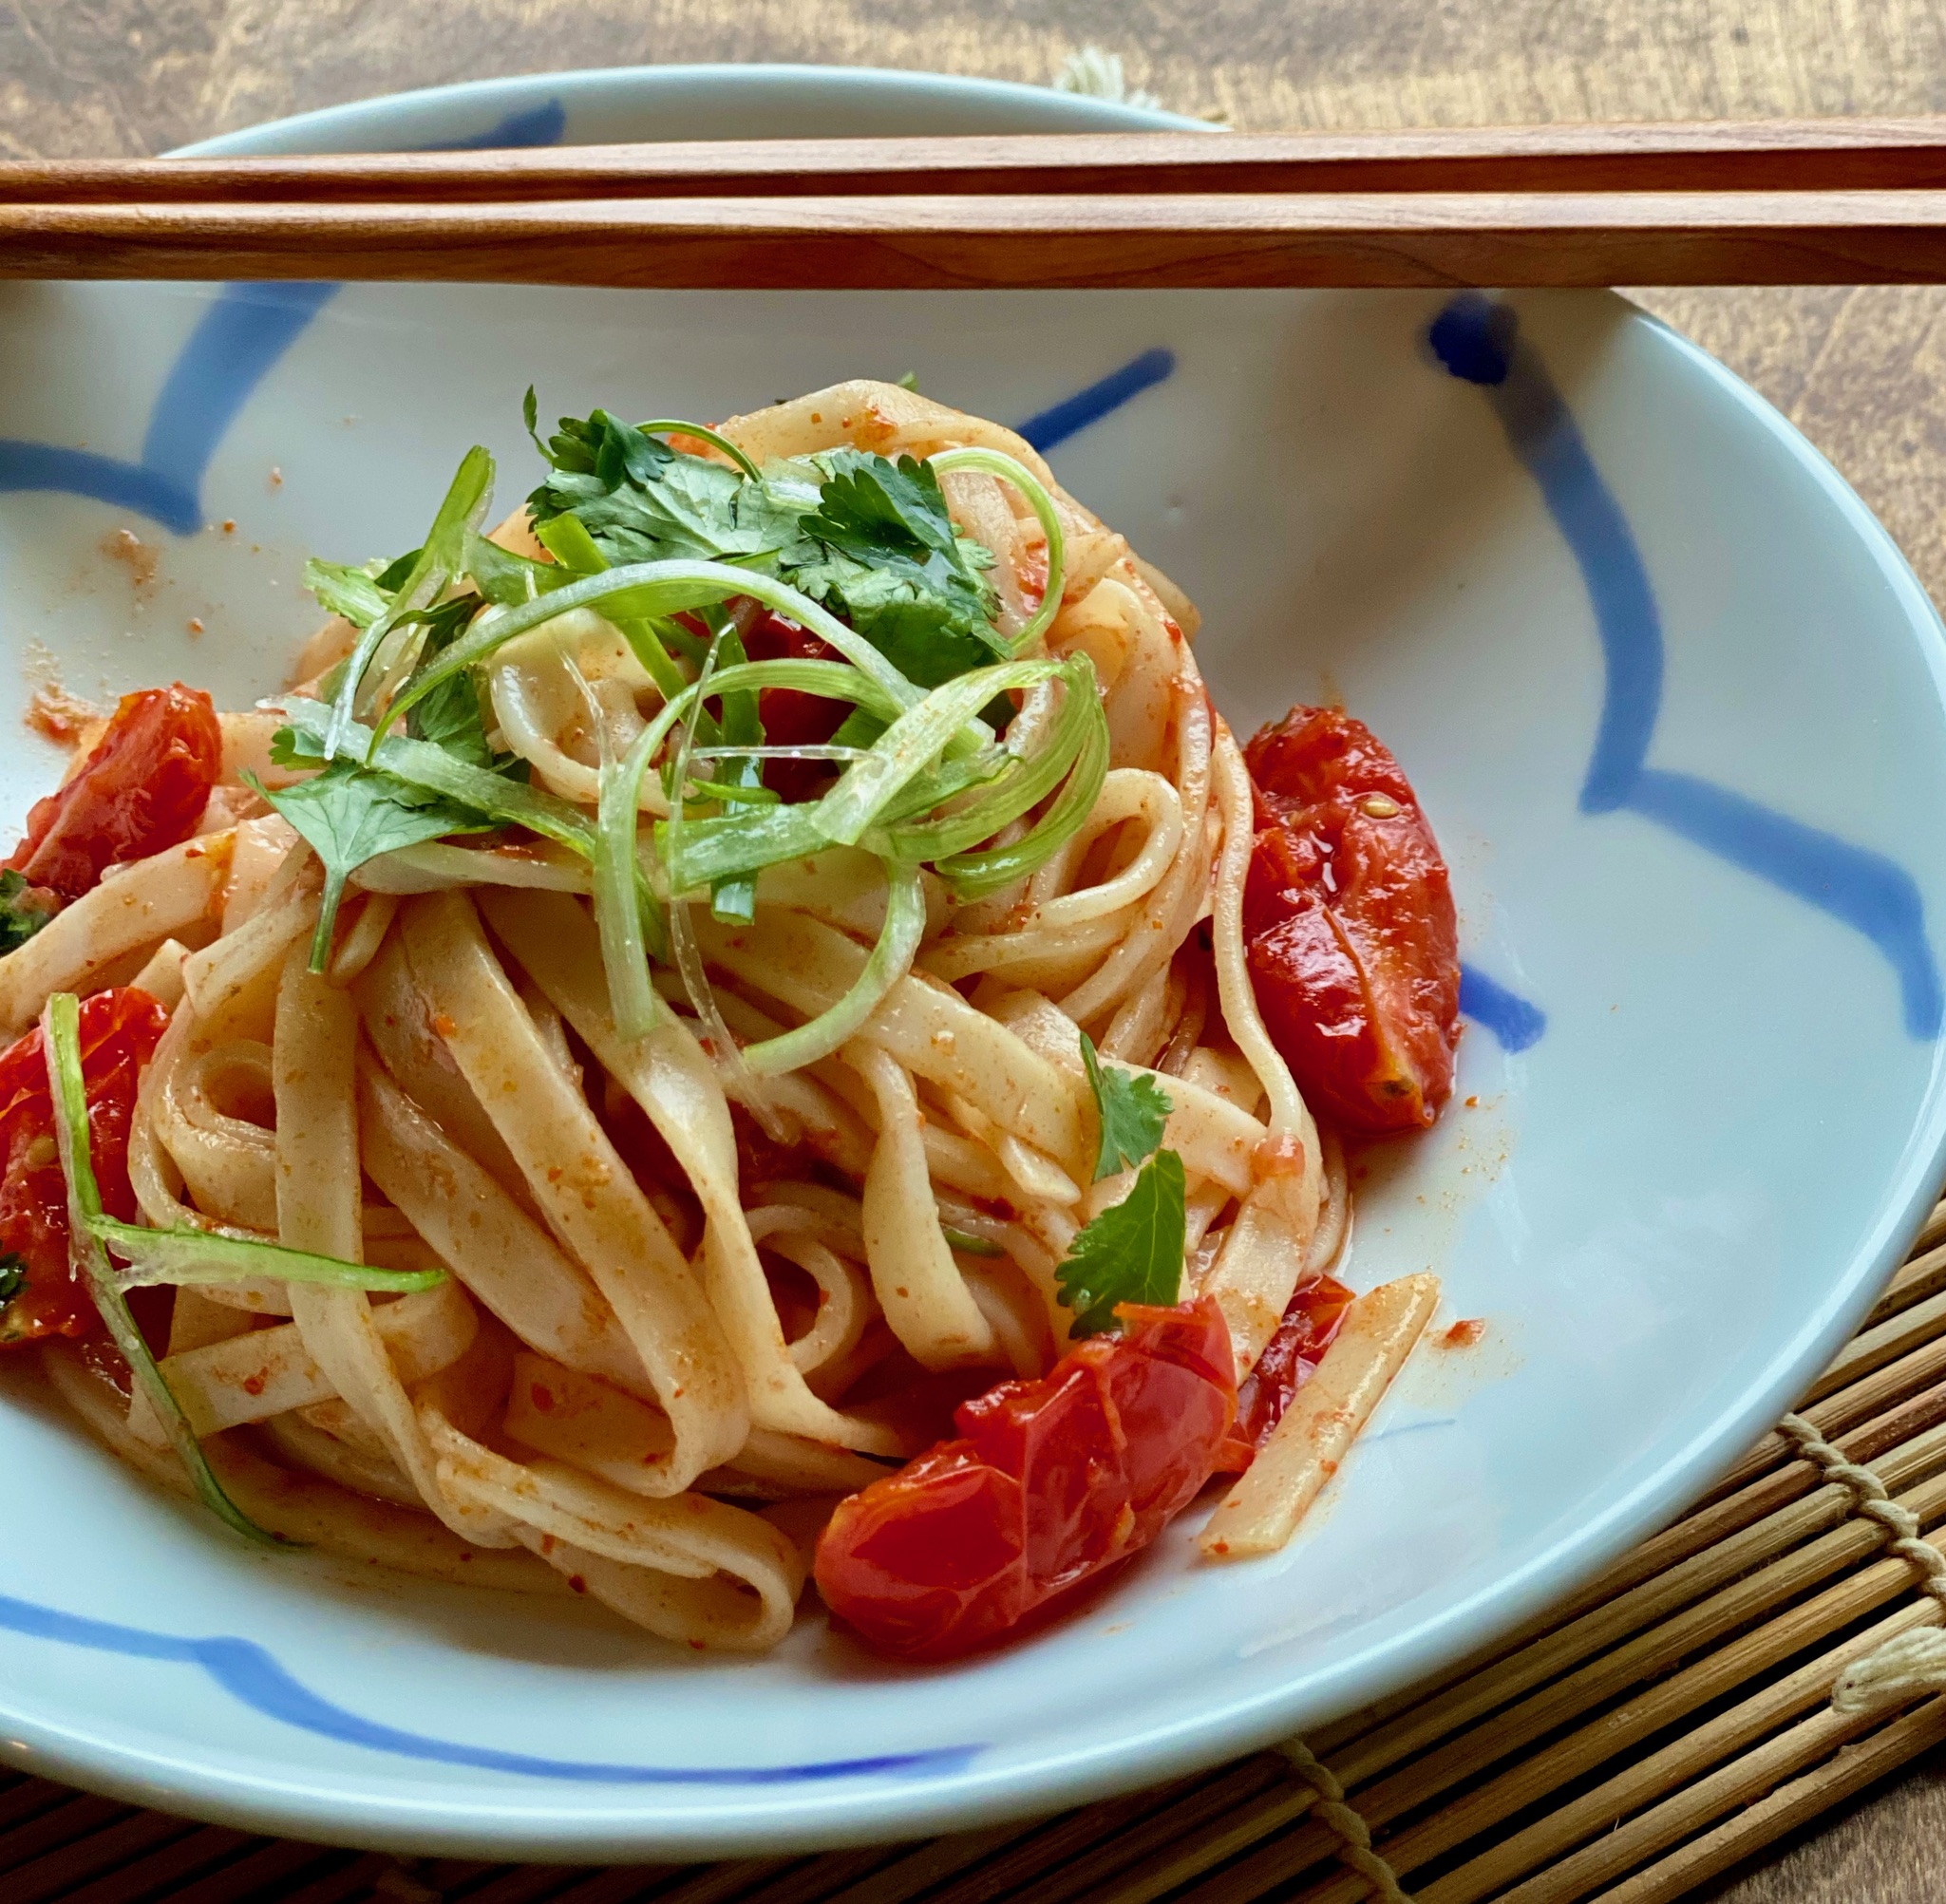
Serve it as a salad or side dish, like Banchan, it goes well with any kind of meal.  I make a big batch so I have extra for an easy lunch the next day. Just cook up some pasta, either ramen noodles or Angel Hair pasta, and toss it with the leftover tomatoes and sauce.  The pasta warms the tomatoes and picks up the flavors of the dressing, it’s delicious.

With tomatoes coming into season now and the weather warming up, this easy-to-make dish is perfect.

Grape Tomato ‘Quick Kimchi’

Eric Kim's Quick Tomato Kimchi. Refreshing, easy to prepare banchan using fresh cherry tomatoes is the perfect summer dish
Course Appetizer
Cuisine Korean-American
Keyword Banchan, cherry tomatoes, Cold Noodles with Tomatoes, grape tomatoes
Prep Time 30 minutes
Cook Time 5 minutes

Ingredients

Tomatoes

  • 1 pound grape tomatoes (or any ripe cherry tomato) about 2 to 3 cups, halved lengthwise
  • 1 teaspoon kosher salt

Banchan Dressing

  • 2 tablespoons white distilled vinegar substitute with rice vinegar
  • ½ teaspoon finely grated garlic
  • 1 tablespoon plus 1 teaspoon sesame oil Toasted sesame oil like Kadoya
  • 1 tablespoon gochugaru powder of flakes
  • 2 teaspoons fish sauce
  • 1 teaspoon granulated sugar

Garnish

  • Thinly sliced scallions chopped chives, or cilantro or flat-leaf parsley leaves for garnish (optional)

Instructions

  • In a medium bowl, toss the tomatoes with the salt, transfer to a colander, and let drain about 30 minutes. In the same bowl, add vinegar and garlic and set aside.
  • After 30 minutes, add the sesame oil, gochugaru, fish sauce and sugar to bowl with the vinegar and garlic and whisk to combine. Pat the tomatoes dry, then add the tomatoes to the dressing and toss until well coated.
  • Garnish with the optional herbs before serving. This is best eaten right away, but can be refrigerated for up to 24 hours.
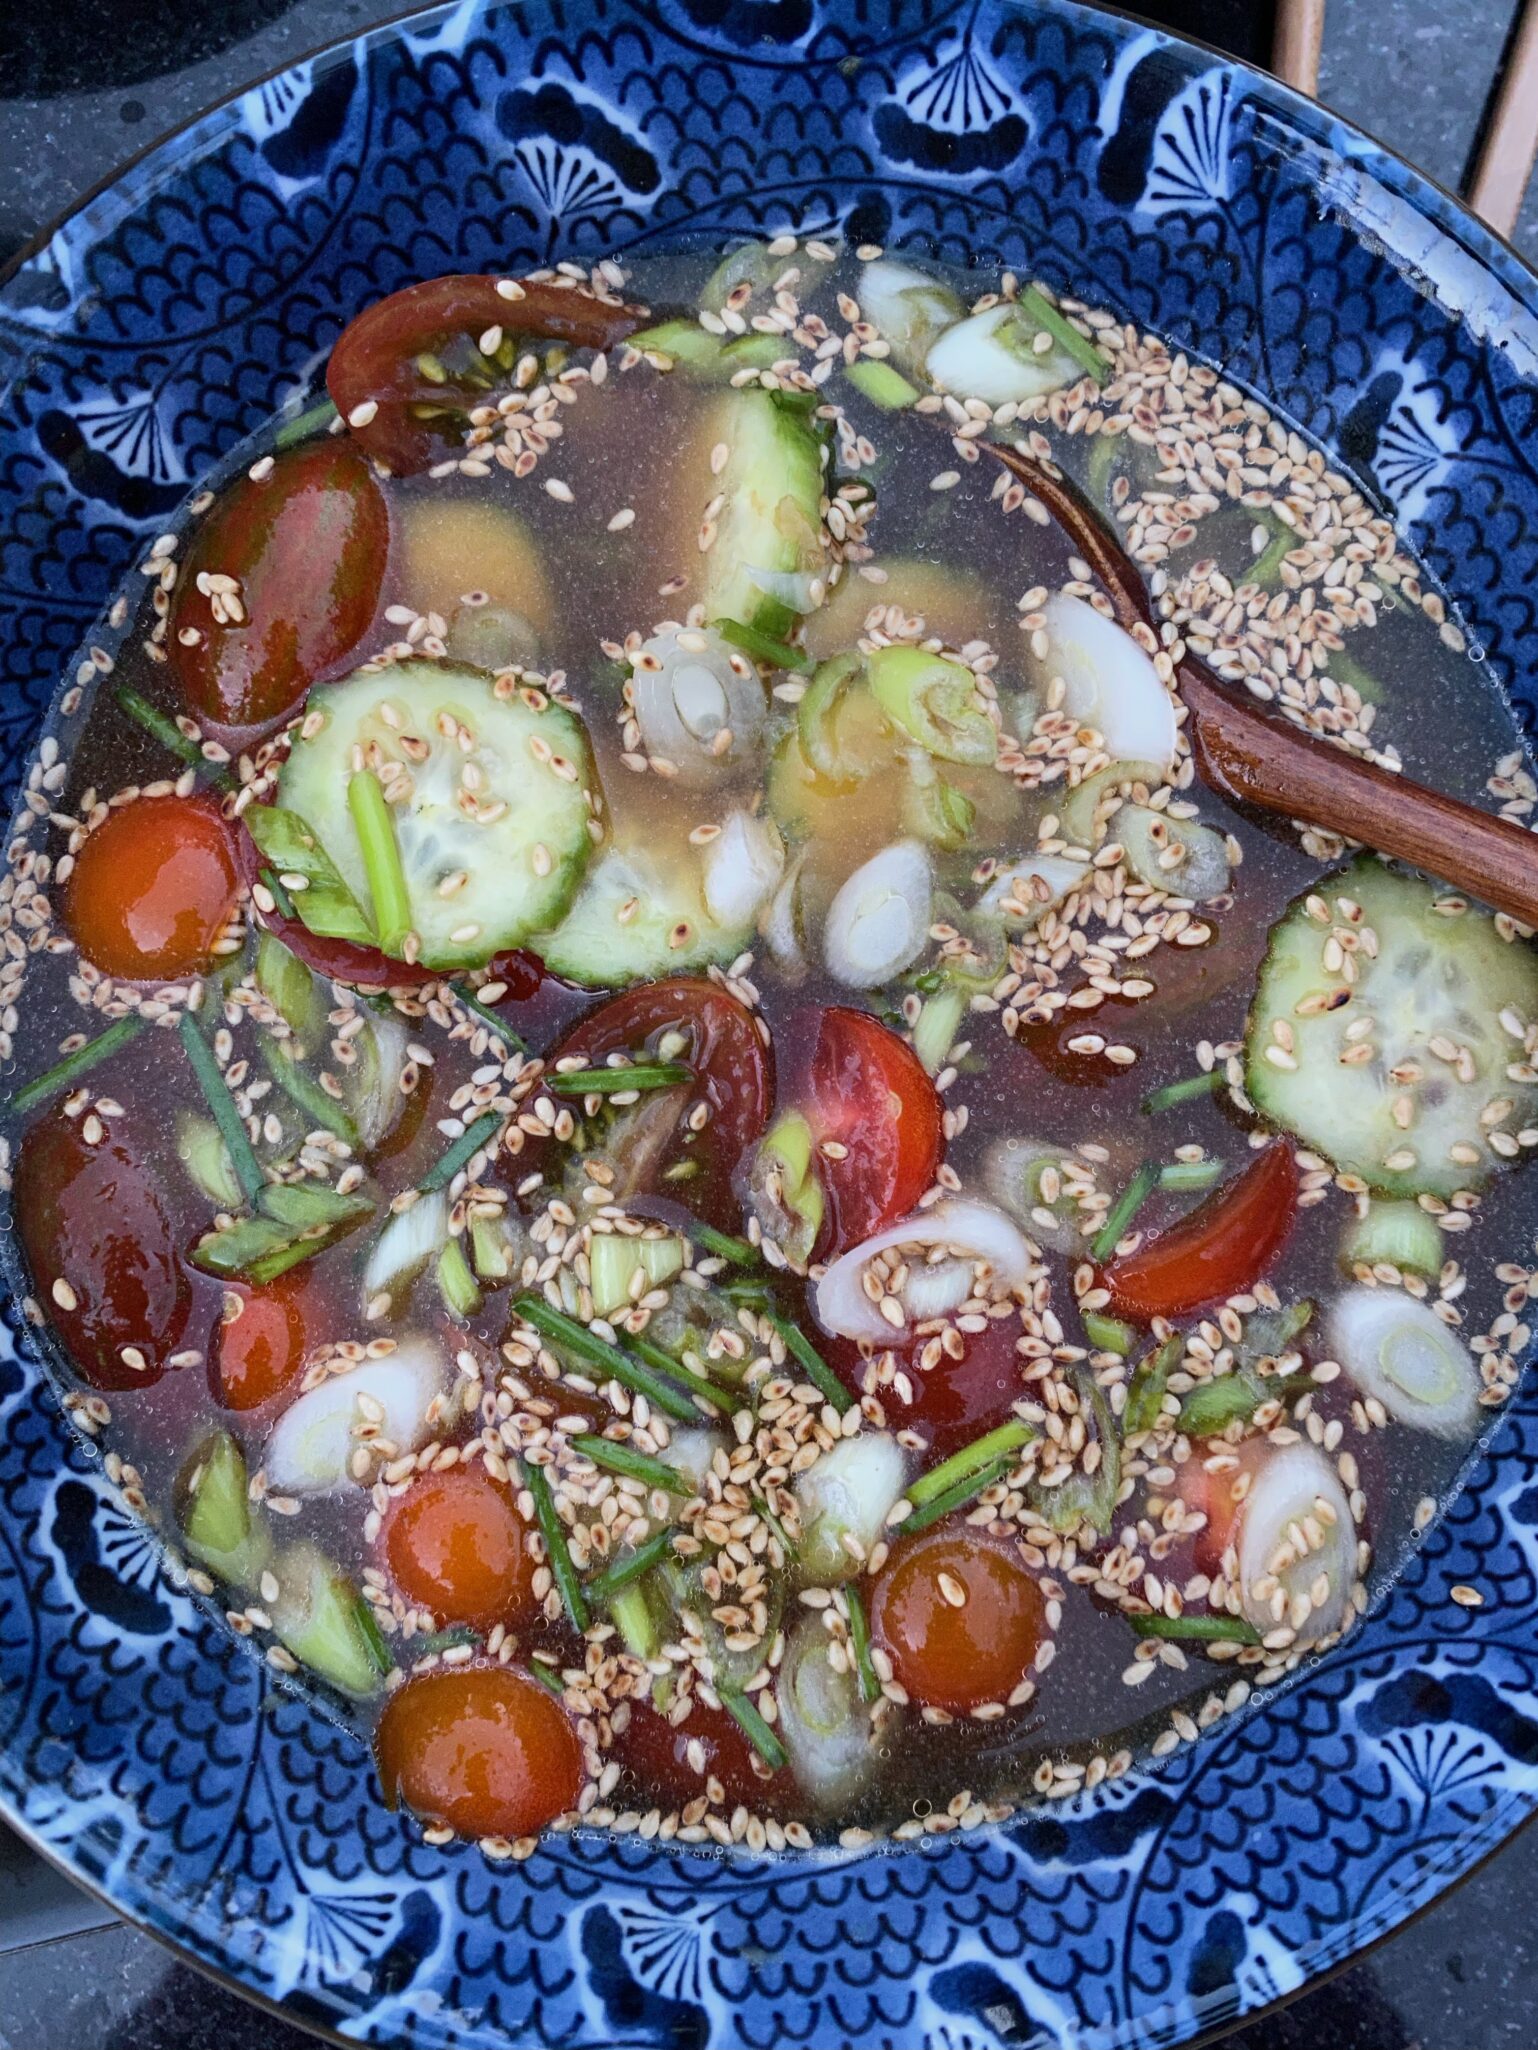
  • Make this for banchan for dinner and use any remaining as a pasta sauce the next day. It is delicious with somen noodles. Cook as directed. Add tomatoes to hot noods and mix. Serve immediately.
Back to My Lotus ROOTS (Renkon No Kinpira)


Back to My Lotus ROOTS (Renkon No Kinpira)


We are always looking for ways to increase our veggie intake.  Part of the problem is our everyday veggies are BORING.  Let me clarify, Veggies aren’t boring, it’s our method of prep.  We should be arrested for vegetable prep neglect and indifference.  We often find ourselves nuking frozen corn or mixed veggies as we sit down to eat. Veggies are a sad afterthought.

No More

Expanding our veggie-verse has become a priority.  What we have discovered are the veggie-centric dishes such as Chinese Cucumbers, Indian Dal, Aloo Gobi, Korean Banchan,  or Japanese Tsukemono.  Make batches ahead of time so dinner on a busy night means pulling out the Tupperware from the fridge.  Win-win!

One of my favorites is Kinpira Renkon or Stir-fry lotus root.  Make a batch and store it in the fridge.  Super simple to make and a delicious accompaniment to rice.  I tweaked the recipe to include carrots and cloud ears (black cloud mushrooms).  Look for fresh lotus root in Asian supermarkets, it is mild in flavor, crunchy, and delish.   It also comes vacuum-packed, sliced, and ready to use.  If you can’t find it, Jicama might work.

Slice the lotus root and place it in water with a touch of vinegar.  Julienne the carrots, and soften the cloud ear mushrooms in warm water.  That’s it. The veggies are then sauteed’ in soy sauce, Mirin (cooking wine), and sesame oil.  Easy peasy.

Enjoy!

Simmered Lotus Root (Renkon no kinpira)


An easy Japanese stir fry veggie dish
Course Appetizer, Side Dish
Cuisine Asian, Asian-American, Japanese
Keyword black fungus, Carrots, Kimpira, lotus root
Prep Time 15 minutes
Cook Time 5 minutes

Ingredients

The Star

  • 2-2.5 cups lotus root peeled and thinly sliced
  • 2 Cups water or enough water to cover lotus root
  • 2 Tsp vinegar

The Supporting Cast

  • 1/2 cup carrots julienned
  • 1 T dried cloud ear mushrooms Once soaked will yield about 1/3 cup
  • 1 tbsp toasted sesame oil
  • 1 tbsp vegetable oil
  • 2 tbsp mirin
  • 2 tbsp soy sauce or tamari

To Finish:

  • 1 tsp toasted sesame seeds
  • dash of chili flakes or 1 small fresh chili pepper, thinly sliced, for milder version de-seed and de-vein pepper optional (shichimi togarashi is recommended)
  • 1 stalk green onion, diced optional

Instructions

  • Soak the lotus slices in cold water and vinegar for 10 minutes and drain and rinse a couple of times.
  • In a large saucepan over high heat, warm both oils. Once hot, add the lotus root slices and cook until they become soft, 4-5 minutes. Add carrots halfway through cooking time. Stir in the mirin, soy sauce/tamari and reduce heat to low. Add cloud ears when you add the sauce ingredients to pan.
  • Simmer until the marinade has almost disappeared.
  • Remove from heat, sprinkle with sesame seeds and shichimi togarashi prior to serving.

Notes

Simmered Lotus Root (Renkon no kimpira)

Alternate recipe

Instructions

  • Peel and rinse the lotus root. Cut it in half and then thinly slice about 4-6mm thickness. Add the vinegar to the water and soak the lotus root in the vinegary water for about 3 minutes.
  • Julienned carrots and black fungus. Set aside.
  • De-seed and finely chop the chili pepper or slice into thin rings.
  • Heat sesame oil over medium heat and stir fry the lotus root. Once almost finished cooking (about 75% and starting to look more translucent), add the sake, mirin and sugar. Cook for about 2 minutes or until liquid is mostly evaporated. Add the soy sauce and fry for 1 minute, or until most of the sauce is soaked up. Lastly toss in the chili pepper and sesame seeds. Remove from burner, serve and enjoy!
Cold Noodles with Tomatoes (Tomato Triple Play)

Cold Noodles with Tomatoes (Tomato Triple Play)

I have taken over tomato duties from the hubby who has given up on becoming an urban farmer.  We just haven’t had any luck with turning our garden into a summer veggie paradise.  My bounty from 5 tomato plants so far has been a grand total of 4 tiny red orbs 🤦🏻‍♀️

FORTUNATELY, we have a wonderful farmer’s market in town.

My haul from last week’s farmer’s market included a variety of cherry tomatoes including Bronze Torch Cherry Tomatoes (pictured on the right above) from Live Earth Farm in Watsonville. We have been buying Live Earth produce since my kids were toddlers and they’re in their twenties now!  The Bronze Torch Cherry Tomatoes are simply AH-MAZING.  Sweet, tomatoey, delicious.

Tomato Trifecta

I am a big fan of Eric Kim.  He writes regularly for New York Times Cooking and just published a wonderful cookbook, Korean American.  It is hands down one of my favorite books. His recipes are easy and delicious and his writing is even better.  You can also find him on YouTube making many of his recipes, he’s funny, personable, and charming.  I went to his book signing at Omnivore Books in SF, fun, I’m such a food groupie.

I love his Grape Tomato Quick Kimchi which I make all the time.  Serve as Banchan (side dish-pictured on the right above) one day and as a sauce over noods the next day.  It is downright delicious.  As soon as I saw his Cold Noodle with Tomatoes recipe I jotted it down on my MAKE ASAP list.  It is so easy and incredibly delicious.  It should go on your list too.

Start with cherry tomatoes, slice them in half, and sprinkle with salt.  Let the tomatoes sit in the bowl while you put together the rest of the dish.  No need to use a strainer as the juices from the salted tomatoes become part of the broth.  Mince garlic, get out the rice vinegar, soy sauce, Dijon mustard, and sesame oil, and toss it all in a bowl along with the tomatoes.  Next, add cold-filtered or bottled water to the bowl (use water that tastes good).  Add diced scallions, and slices of radishes (the little red ones) or cucumbers to the broth. Set the broth aside.

Here’s the Hard Part

How to cook your somen.  DO NOT COOK YOUR SOMEN while you are getting the other components together. Make the broth and set it aside.  Focus on the noods so you don’t overcook them.  For somen (thin Japanese wheat noodles), start with plenty of unsalted water.  Somen has salt in it. If you use too little water, the noods will absorb too much water because of the salinity. Watch them like a hawk, and stir them with chopsticks or tongs while cooking to separate the noodles, this takes 3-4 minutes TOPS.  Remove from heat, rinse thoroughly under cold water and drain well.

Before serving, twirl noodles into a bundle and place them in a bowl.  Add crushed ice to the tomatoes and pour it over your noodles.  Garnish with additional scallions and sesame seeds.  It’s so refreshing, the perfect summer meal.  Carnivores, feel free to add shrimp or chicken or half of a hard-boiled egg.   Serve asap on a hot summer day.  Sooooooo good.

BONUS,  Ottolenghi’s Charred Tomatoes and Cold Yogurt.  Yes, my trifecta of tomato recipes.  Tomatoes, roasted with thyme, cumin seeds, lemon, and garlic,  served over yogurt or Labneh. It’s my go-to party appetizer, especially in the summer.  It’s “lick the bowl clean” good.  A showstopping, easy dish.  Make it, you’ll thank me.

Cold Noodles with Tomatoes

Refreshing, delicious, and easy to prepare, Eric Kim's Cold Noodles with Tomatoes
Course noodles, one bowl meal, pasta, Soup
Cuisine Asian, Asian-American, Korean
Keyword cherry tomatoes, Cold noodles, Cold Noodles with Tomatoes, soup
Prep Time 15 minutes
Cook Time 5 minutes

Ingredients

The Star

  • 2 pints ripe cherry tomatoes halved
  • 2 teaspoons kosher salt (Diamond Crystal)

The Noods

  • 12 to 14 ounces somyeon somen, capellini or other thin wheat noodle

Soup and Seasonings

  • ¼ cup rice vinegar
  • 2 tablespoons soy sauce Kikkoman, Sempio 501 or 701 or LKK Premium Soy
  • 2 tablespoons granulated sugar
  • 1 large garlic clove finely grated
  • ½ teaspoon Dijon mustard
  • ½ teaspoon toasted sesame oil
  • 2 cups cold filtered water or bottled water of your choice.
  • 1 tablespoon toasted sesame seeds

The Garnishes

  • 2 radishes thinly sliced, or cucumbers work in a pinch
  • 2 scallions thinly sliced at an angle
  • 2 cups crushed or cubed ice

Omnivore Options

  • cooked shrimp or shredded chicken
  • hard boiled eggs, but not too hard-boiled lol

Instructions

  • In a large bowl, toss together the tomatoes and salt. Let sit until juicy, about 10 minutes.
  • Bring a large pot of water to a boil. Cook the noodles according to package instructions, drain and rinse under cold water. Set aside. See post for how to cook somen noodles.
  • Add the vinegar, soy sauce, sugar, garlic, mustard and sesame oil to the tomatoes, and toss with a spoon until well combined. Stir water into the tomatoes and sprinkle the surface of the broth with the sesame seeds, radishes and scallions.
  • Right before serving, add the ice to the broth. Divide the noodles among bowls, and ladle in the broth and any unmelted ice, making sure each serving gets a nice sprinkling of tomatoes, radishes, scallions and sesame seeds.
Jangjorim (Soy Braised Beef 장조림)

Jangjorim (Soy Braised Beef 장조림)

I have a total backlog of recipes I want to share with you and this one is top of the list.  I have made this as many times as I have made Eric Kim’s Quick Grape Tomato Banchan or Ottolenghi’s Charred Tomato and Cold Yogurt (so good) and that is saying a lot.

Do You Banchan?

Jangjorim or Soy Braised Beef can be served as banchan (those yummy little dishes that come with every Korean meal) or as a topping to a rice bowl or in a bento box.

I’m not a salad lover. Well, let me rephrase that, I’m not a salad maker…so much trouble.  But banchan? Worth the trouble, I’ll make a batch of each, keep them in the fridge and pull ’em out for lunch and/or dinner.  They go with everything, rice, noodles, or sammies.  Want a little funkiness in your grill cheese, add kimchi (김치).  Want crunch and spice in your noodles, add spicy cucumbers (오이무침).  Pickled or braised veggies go so well with rice, maybe that’s why I like them.

Koreanbapsang’s recipe for Jangjorim is my starting point.  First step, make the stock to cook the meat.  The stock includes onions, scallions, garlic and Korean radish (mu,무).  The radish gives the dish sweetness, I save the radish to serve with the Jangjorim.  It’s delicious.

Shank-alicious

Next, cut beef into cubes and simmer in the stock.  Use brisket, flank, chuck, or my favorite, shank.  Shank is both flavorful and economical, win-win.  For those not familiar with shank, it comes cut crosswise into pieces with the bone in the center.  Remove the meat from the bone and cut it into pieces. Throw the bones into the cooking broth for extra flavor.  I’ve also used pork shoulder or butt as a substitute with nods of approval from the fam.  After simmering, remove the meat and place it in another pot along with 2.5 cups of the original stock and add the seasonings.  Reserve the radish.  Cook meat on medium heat for approximately 20 minutes.  Then add shishito peppers, boiled, peeled eggs, kelp (optional), and the reserved radish. Cook for another 10 minutes or until meat is tender.

Shishito peppers can be a bit spicy, so if you have little kids or big kids that are spice averse, use bell peppers or Anaheim peppers, and cut into manageable bite-sized pieces.  Cook eggs as you would six-minute ramen eggs.  Chill eggs thoroughly before final braising to avoid overcooking the eggs.  Normally, the eggs are hard-boiled but jammy eggs are my jam.

Jangjorim can be served at room temperature to warm as banchan or over rice.  The meat can be shredded or sliced.  It’s so flavorful, a little bit goes a long way.

I love this dish and hope you will try it!

Jangjorim (Soy braised Beef)

Jangjorim or Soy braised Beef, adapted from Korean Bapsang, is a delicious Korean side dish that works well in a bento box too!
Course Meat, Side Dish
Cuisine Asian, Korean
Keyword Banchan, Korean, shishito peppers
Prep Time 10 minutes
Cook Time 1 hour

Ingredients

Da Stars

  • 1.5 pounds shank meat or beef brisket you can sub pork shoulder or butt
  • 10 to 12 Shishito peppers or other fresh green peppers Use less and cut into halves if using large peppers
  • 3 boiled eggs* peeled

Da Stock

  • 1/2 medium yellow onion
  • 2 stalks scallions white part only save green parts for garnish
  • 6 ounces Korean radish (about 1/4-1/3 of one radish) mu, cut into big chunks
  • 7 cloves garlic
  • 3 slices thin ginger about 1-inch round
  • 1/2 teaspoon whole black peppers or ground peppers to taste

Da Sauce

  • 5 tablespoons soy sauce
  • 2 tablespoons soup soy sauce guk ganjang, 국간장 (or use more regular soy sauce)
  • 3 tablespoons sugar
  • 3 tablespoons rice wine or mirin
  • 1 piece 3-inch square dried kelp substitute a bay leaf

Instructions

  • Cut the beef into 2-inch chunks. This recipe is very flexible. You use brisket or flank. I love beef beef shank which is very economical. It has great flavor and texture. You could even use pork shoulder or butt. Delicious!
  • In a medium pot, bring 8 cups of water and Da Stock ingredients to a boil. Cover and continue to boil for 5 minutes over medium-high heat.
  • Drop the meat into the pot. Bring it to a gentle boil, and remove the scum. Reduce the heat to medium. Boil, covered, for about 30 minutes.
  • Remove the meat. Strain the cooking liquid into a large bowl, and then add 2.5 cups of the liquid back to the pot. (You can save the remaining broth to make a soup or stew later.)
  • Add the meat and sauce ingredients to the pot. Bring it to a boil over high heat. Reduce the heat to medium, and boil, covered, until the meat is tender and the sauce is reduced to about ⅓, about 20 minutes. You can cook longer if the meat is still not tender enough.
  • Add the optional dried kelp, peppers and eggs and continue to boil for about 10 minutes. Discard the kelp, and transfer everything else to an airtight container for storage. Cool before storing in the fridge. Shred the meat and pour some sauce over to serve.
  • Optional: Serve the radish and onions with this dish! Normally, the meat is shredded, and served with shishito peppers and eggs.

Notes

Refrigerate in an airtight container. It will keep for a week. If you want to keep it longer, boil the meat and sauce again after a few days.
The meat will become hard in the fridge. You can soften it by leaving the shredded beef out at room temperature for 20 to 30 minutes, or microwave for about 20 seconds to soften.
Whole Roasted Cauliflower Takoyaki Style-Ahead of the Game

Whole Roasted Cauliflower Takoyaki Style-Ahead of the Game

So, you drew the short straw, didn’t you?  Yep, the proverbial boring Thanksgiving dish.  Vegetables, sheesh.  Auntie has drawn dessert, ugh, means lime green jello mold with pineapple.  Which is not dessert actually but it’s ok, she’s your Aunt.

Could be worse, you could have drawn salad.  Really, who goes for salad first on Thanksgiving?  Sure I take the customary 2 lettuce leaves and a crouton to make my plate look balanced.  It’s all for show I don’t actually eat it.  At least we can salvage the veggie dilemma.

I am here to make you the belle of the ball, a prince among paupers.  Along the way, we are demystifying the twenty-dollar whole roasted cauliflower.  Yeah, fess up, you have paid that much and didn’t even blink an eye when you did.

You will never order whole roasted cauliflower again.

Well, at the least, you won’t pay twenty bucks for it.

You don’t have to core it this much, I was a bit overzealous

Start with a nice looking head of cauliflower,  Wash it, trim off the outer leaves, (here is my hack) core the center stem with a melon baller if you have one. If not use a paring knife.  Coring shortens cooking time.

Slather the cauliflower top and bottom with olive oil.  I use a squirt bottle, a brush would work also.  Season with salt and pepper, again, top and bottom.  Place on a parchment or foil-lined baking sheet.

That’s it.  Your work is done.  Your oven does the rest of the heavy-lifting. Roast for about 45-50 minutes.  Pierce it with a knife, if it goes through fairly easy, it’s done.  Out comes a beautiful toasty, crispy edged, soft- centered, delicious, cauliflower canvas, ready to be painted.

You can top your cauliflower with just about anything.  I have served it with roasted tomatoes, or brushed with a garlic and herb butter, it’s your cauliflower, go crazy.

My latest razzle dazzle topping was inspired by a recipe I found in a little book called Emily the Cookbook. Emily is a pizza joint in Brooklyn that is on my bucket list of places to try.  They serve a roasted broccoli dish that is based on the toppings for Takoyaki, a popular Japanese seafood-filled round pancake.  So simple, yet so good.  In fact, it’s so simple I’m using pics to show you how to make it.

All you need is Okonomi Sauce (preferred) or Tonkatsu Sauce (think Worchestershire/Steak Sauce but better), Kewpie Mayonnaise (Japanese mayo), Bonita Flakes (fish flakes) and green onions.

Squirt a bunch of the mayo (it even comes in a squirt bottle-how easy is that?) all over the top.

Then squirt a bunch of Okonomi Sauce on top.

Finish with a flurry of bonita flakes, green onions and some sesame seeds if you like. Want to keep it vegetarian? Instead of bonita flakes,  TJ’s has a fish-free furikake.

That’s it.  Easy and Monster tasty!

Whole Roasted Cauliflower with Takoyaki Style Sauce

Easy and delicious way to serve cauliflower. Whole roasted with a umami bomb sauce.
Course Appetizer, Main Course, Vegetable
Cuisine Fusion
Keyword Cauliflower, takoyaki sauce, Whole roasted cauliflower
Prep Time 10 minutes
Cook Time 50 minutes
Servings 4

Ingredients

  • 1 head cauliflower 1.5-2 pounds
  • 3-4 tbsp good quality olive oil
  • salt and pepper

Takoyaki Sauce

  • Kewpie Mayonnaise
  • Okonomi Sauce
  • Bonita Flakes or Furikake
  • Green Onions for garnish
  • Toasted Sesame Seeds for garnish
  • Lemon wedges for garnish

Instructions

  • Preheat oven to 450 degrees
  • Wash and trim cauliflower. Remove leaves and cut stem even with the bottom of the cauliflower. Using a melon baller or paring knife, core cauliflower stem. Take care not to cut too much, you want to leave the stalks connected to the stem.
  • Brush or squirt olive oil all over the top and bottom of the cauliflower. Season with salt and pepper and a little garlic salt (optional). I have used Momofuku Savory Salt for a bit more punch. The sauce will give it alot of flavor though.
  • Roast for about 45-50 minutes.  Pierce it with a knife, if it goes through fairly easy, it's done.

Takoyaki Sauce

  • Can I call this a recipe? Basically squirt copious amounts of Kewpie mayo and Okonomi Sauce in zig zag lines all over the cauliflower. Sprinkle Bonita Flakes or Furikake all over and hit it with green onions and tossed sesame seeds let.
  • Done. Bring it to the table in all it's whole roasted glory!

Notes

From the Japanese cookbook, Just One Cookbook. Kewpie imposter recipe!
For 1 cup of American mayonnaise (like Best Foods), add 2 Tbsp rice vinegar and 1 Tbsp sugar. Whisk until the sugar dissolves. For 1 Tbsp of American mayonnaise, add 1/2 tsp rice vinegar and 1/8 tsp sugar.
Uncle Gary’s Sweet Potato Casserole

Uncle Gary’s Sweet Potato Casserole

Every Thanksgiving I look forward to my cousin Gary’s Sweet Potatoes.  As sure as there will be a turkey on the table, his sweet potatoes will also be there.  Drenched in butter and brown sugar and covered in a blanket of toasty mini-marshmallows,  it is the veggie-carb highlight for me.   As I make my way around the table, I’ll squish everything else to one side of my plate to make room for those bedazzled yams.  I’ll angle the spoon just so as to get “more than my share” of warm, gooey, toasty marshmallows.  I’ll go back for seconds and then pack a little box (ok, not so little) to take home.

I LOVE those Sweet Potatoes, so does everyone in our family and anyone who has shared a Thanksgiving meal with us.

Now I am going to share them with you.

You’re welcome.

Uncle Gary's Sweet Potatoes

I will go on strike if Uncle Gary's Sweet Potatoes are not at our Family Thanksgiving feast.
Course holiday dish, Side Dish, Vegetable
Cuisine American
Keyword marshmallows, Sweet Potatoes, Thanksgiving
Prep Time 25 minutes
Cook Time 1 hour

Ingredients

  • 6 sweet potatoes medium sized
  • 4 tbsp butter
  • 1/3 cup firmly packed brown sugar
  • 3 tbsp orange juice or rum
  • 1/4 tsp cinnamon ground
  • 1/4 tsp nutmeg or mace ground
  • 1 bag mini-marshmallow 10 ounce

Instructions

  • Preheat oven to 350 degrees. Butter a shallow baking dish or casserole (9x13 pan)
  • Prepare and boil whole yams or sweet potatoes until soft but not falling apart. Drain, set aside to cool. Once cooled, peel and cut into 1/4 inch slices.
  • Arrange slices, overlapping, in a buttered, shallow, baking dish or casserole
  • Dot with butter, sprinkle lightly with salt, cinnamon and nutmeg. Drizzle with orange juice or rum.
  • Bake uncovered for 30 minutes or until bubbly or glazed looking
  • Remove from oven and scatter the marshmallows over the top.
  • Bake again until the marshmallows are warmed through and start to brown.
  • Serve immediately.
Savory Bread Pudding with Mushrooms (Thanksgiving Favs)

Savory Bread Pudding with Mushrooms (Thanksgiving Favs)

I love Thanksgiving.  Unlike other holidays that seem focused on family, Thanksgiving is a free-for-all.  We invite everyone we can think of, especially those that can’t make it home, to join the feast.  Each person brings their own family favorite to share.  We have a table filled with a cacophony of dishes, Uncle Gary’s Sweet Potatoes, Sticky Rice Stuffing, Chinese Roast Duck, Lox and crackers, Stir-fried Bok Choy, Baklava…anything goes.  It all tastes wonderful, enhanced by the lively, happy chatter of friends and family we don’t see often enough.

Reelin in the Years

The stalwarts of our Thanksgiving table include Uncle Gary’s Sweet Potatoes.  Non-negotiable to the point that Uncle Gary and Sweet Potatoes are synonymous.  Sweet potatoes, copious amounts of butter, brown sugar, topped with mini-marshmallows, what’s not to love?  Over the years Uncle Gary (yes, a real person, my cousin) has tweaked his recipe, adding pineapple, boooze, marshmallow cream, only to be met with a chorus of “it’s good BUT not as good as your regular sweet potatoes. Why mess with perfection?

The other must-have is the Chinese American contribution to Thanksgiving, Gnaw Mai Fan, or Sweet Rice Stuffing.  A mixture of glutinous rice (sweet rice), bits of Chinese sausage (lop Cheung), mushrooms, green onions, dried shrimp (umami bomb), bbq pork, and roasted chestnuts is now in vogue, the gluten-free option to classic bread stuffing.

Confession Time

Ok, I have a confession.  I am the maker of the Gnaw Mai Fan or Sweet Rice Stuffing that graces our feast every year, but I LOVE traditional bread stuffing.  Yep, I’m a stuffing girl.  After making the VAT of Sweet Rice Stuffing for everyone else, I use to pull out the teeny box of Stove Top stuffing in the pantry to whip up for me.

Fortunately, those days are over.  A savory bread pudding with mushrooms from Epicurious satisfies my stuffing craving.  Filled with onions, peppers, ‘shrooms, croutons and bound by eggs and cream, it is deliciously decadent.  Make sure to toast the bread, it makes a difference.  Use a French batard that has a nice crust and a fairly tight, soft crumb.  For an extra rich, creamy version, use Challah or Brioche.  Substitute leeks for some or all of the onions for another yummy tweak.

Pros– lots of veggies, bell peppers, celery, mushrooms, onions, moist, scrumptious, adaptable,

Cons-lots of eggs, heavy cream and butter, and cheese, but hey, it’s a holiday!

I do tweak the recipe just a touch. Use half and half in place of at least half of the heavy cream.  You could probably reduce this further by using chicken stock for part of the half and half too.  I also substitute olive oil for half of the butter used to saute the veggies. The recipe is below.

It’s All About the Pies

I know how Gary feels, typecast for Thanksgiving, not being given the option to bring something different for the feast.  It is ASSUMED we will bring pies.  Lucky I love to bake, as does Jamie.  The pie parade includes traditional Pumpkin Pie and Pecan Pie, Tartine’s Lemon Cream Tart and a gorgeous Cranberry Curd Tart.  Choice and color to the dessert table.

Happy Thanksgiving!

Savory Bread Pudding with Mushrooms and Parmesan Cheese

Decadent, savory bread pudding with mushrooms, peppers, onions and cheese held together by a rich creamy egg custard.
Course Main Course, Side Dish
Cuisine American
Keyword Savory Bread Pudding with mushrooms
Prep Time 30 minutes
Cook Time 1 hour
Resting Time 15 minutes

Ingredients

The Dry

  • 1 1-pound loaf crusty country-style white bread (A Frence Batard preferred over Ciabatta which has bigger holes)
  • 1/4 cup olive oil
  • 4 teaspoons chopped fresh thyme
  • 1 large garlic clove minced

The Stuff

  • 6 tablespoons 3/4 stick butter Can use half butter, half olive oil
  • 1 pound assorted fresh mushrooms such as crimini, button, portobello, and stemmed shiitake, thinly sliced
  • 1 1/2 cups finely chopped onion can replace half to all of onions with leeks
  • 1 1/2 cups thinly sliced celery
  • 1 cup finely chopped red bell pepper use any color bell pepper
  • 1/3 cup chopped fresh parsley (Italian flat leaf parsley)

The Wet

  • 3 1/2 cups heavy whipping cream substitute half and half for 50% of cream,
  • 8 large eggs yes, 8
  • 2 teaspoons salt
  • 1 teaspoon freshly ground black pepper
  • 1/3 cup finely grated Parmesan cheese

Instructions

The Bread

  • Preheat oven to 375°F. Butter 13x9x2-inch glass baking dish. Cut bottom crust and short ends off bread and discard. Cut remaining bread with crust into 1-inch cubes (about 10 cups loosely packed).
  • Place cubes in very large bowl. Add oil, thyme, and garlic; toss to coat. Spread cubes out on large rimmed baking sheet. Sprinkle with salt and pepper. Bake until golden and slightly crunchy, stirring occasionally, about 20 minutes. Return toasted bread cubes to same very large bowl.

The Veggies

  • Melt butter/olive oil in large skillet over medium-high heat. Add mushrooms, onion, celery, and bell pepper. Sauté until soft and juices have evaporated, about 15 minutes. Add sautéed vegetables and parsley to bread cubes.

The Binder

  • Whisk heavy cream, eggs, salt, and ground pepper in large bowl. Mix custard into bread and vegetables. Transfer to prepared dish. Let sit for min. of 30 minutes. Sprinkle cheese over. DO AHEAD Can be prepared 1 day ahead. Cover and refrigerate.
  • Bake stuffing uncovered until set and top is golden, about 1 hour. Let stand 15 minutes.

Notes

This rich, custard-like stuffing is also a great main-course option for vegetarians.


Meat & Tofu Patties Wanja-Jeon

Meat & Tofu Patties Wanja-Jeon

From a historical perspective, who was the OG that took a hunka meat and decided to grind it up?

It was GENIUS

I mean, think of all the foods you love that start with ground meat?  Top of the list, duh, BURGERS.  Followed by Italian SAUSAGES, Spaghetti and MEATBALLS,  Sloppy Joes, ragú, chili, and meatloaf…  In Asian cuisine you have,  Steamed Pork Patty, Japanese Soboro, potstickers, momos…toppings for rice bowls, quick soups, dumplings…I could grind on but you get the meat of it.

Dinners were always delicious at my Auntie Lil and Uncle Stan’s house.  A blend of Korean and Hawaiian dishes that made my mouth water.  My favorite dish was Auntie Lil’s Beef and Tofu Patties, her version of Wanja-jeon, 완자전.  Kind of like bite-sized flattened meatballs she called mini-burgers.   Add tofu and carrots to make the jeon moist and tender. Then season with sesame, onions, garlic, and soy sauce and finally dip in flour and egg then fry to a light golden color. Freakin’ delicious.

Ultimately, consumed at a torrid pace by…me.  Unfortunately, I never asked her for the recipe so to re-create Auntie Lil’s Wanj-jeon, I turned to a couple of my favorite Korean food sites, Korean Bapsang and Maanchi.

Where’s the Beef…Patty

Wanja-jeon can be made with beef or a combination of beef and pork. I might try some ground chicken in place of the pork, but for now let’s stick to the OG version, BEEF. I did try 50:50 beef: pork and didn’t feel there was a big difference. Finely dice or mince the carrots, onions, garlic, and scallions.  Drain and press the excess water from the tofu (very important, no soggy patties for us) and smoosh it up.  Add soy sauce and sesame seeds and oil. Lightly mix the ingredients together.

Set aside two bowls, fill one with the flour and the other for the eggs.  Beat the eggs in a shallow bowl and set them aside. Use a two-tablespoon ice cream scoop to make balls and lightly flatten each.  Dip each patty into the flour and place it on a pan or platter.  When you have floured all of the patties, it’s fry time. Heat a non-stick pan over medium heat and add the oil.  Place your bowl of beaten eggs near the pan.  When the pan is hot, dip each patty into the egg mixture and carefully place it in the pan.

Fry over medium-low heat, the patties should be a light golden brown and firm to touch.

Serve Wanja-jeon warm or room temperature.  I like to serve the patties with a dipping sauce that has a little sweetness and kick.  Enjoy!

Wanjajeon (Pan-fried Beef and Tofu Patties)

Korean Beef and Tofu Patties, known as Wanja-jeon are delicious two bite morsels that are delicious as an appetizer, and perfect for Bento box lunches. Kids love them!
Course Appetizer
Cuisine Asian
Keyword beef and tofu patties, Korean Snack, wanjajeon
Prep Time 30 minutes
Cook Time 20 minutes
Servings 4 servings

Ingredients

The Patty

  • ½ pound ground beef or mixture of pork and beef
  • 4 ounces of tofu squeeze out excess water and smoosh
  • 3 tablespoons chopped onion, yellow or white ~1/4 of an onion
  • 1-2 garlic cloves (1 tsp) minced
  • 1 green onion finely chopped
  • 2 tablespoons chopped carrot minced or finely chopped
  • 1 large egg slightly beatened

The Patty Seasonings

  • 1 tsp kosher salt
  • ½ teaspoon soy sauce
  • ¼ teaspoon ground black pepper
  • teaspoons toasted sesame oil

The Dredge & Fry

  • 2 eggs
  • 2 to 3 tablespoons all purpose flour
  • 3 tablespoons vegetable oil
  • 1 tsp roasted white sesame seeds, crushed optional

Dipping Sauce

  • 2 tbsp soy sauce
  • 1 tbsp rice vinegar
  • 1 tsp granulated sugar
  • 1/2-1 tsp Gochugaru or crushed chili flakes
  • 1 tsp sesame oil
  • 1 tsp green onions, finely diced
  • 1/2 tsp garlic, minced
  • 1 tsp toasted sesame seeds

Instructions

Patties

  • Combine ground beef, pressed tofu, onion, garlic, green onion, carrot, 1 teaspoon kosher salt, soy sauce, ground black pepper, sesame oil, sesame seeds if using, and 1 egg in a bowl.
  • Mix well by hand until the mixture gets a little sticky.
  • Divide the mixture into ~16 equal pieces. A 2-tablespoon ice cream scoop makes easy work of this. Shape each into a ball between your palms, then flatten into 2-inch patty about ¼ inch thick.
  • Dip each patty into flour, coat well but shake off the excess. Set each aside on a platter. Dredge all the patties at once and place on a platter or tray.

Fry Time

  • In a bowl beat 2 eggs, add a pinch of salt.
  • Heat a large nonstick pan over medium-low heat. Add some oil and tilt the pan to spread it around.
  • Working in batches, dip each patty in the beaten egg, making sure to coat all of the patty, and place in the hot pan, one by one.
  • Cook for about 1-2 minute until the bottom part turns light golden brown. Flip it over and cook for a few more minutes until the bottom part turns a little crunchy and light golden brown.
  • Patties should be firm to touch when done. I cook the patties in two batches in a 12-inch pan. Clean the pan between batches. Serve the patties warm or at room temperature. Leftover patties are perfect in bento boxes.

Dipping Sauce

  • Combine all ingredients, stir well.
  • This is an all-purpose dipping sauce that can be used with dumplings, meat patties, Korean pancakes and jeon.
Mayak Eggs to Momofuku Eggs-Eggtraordinary

Mayak Eggs to Momofuku Eggs-Eggtraordinary

Originally this post was going to just be about the latest Korean craze, Mayak Eggs (마약계란).  Tik Toks, Reels, IG Stories, folks “egging” everyone on to try Mayak Eggs.  The eggs are cooked Ramen Style (we’ll get into that later) and soaked in a bath of soy sauce, sweetener, chilis, garlic, and green onions.  Yep, pretty darn tasty, a flavor explosion of sweet, salty, spicy, and garlicky.

Egg-a-Licious

Ramen Style eggs are cooked in a pretty specific way.  Bring water to a boil and carefully drop your eggs in the boiling water. Let them boil for 6 minutes before immediately plunging them into an ice bath to stop the cooking.  The end result is a soft-boiled egg, where the egg white is cooked through but still tender and the yolk is just beginning to set around the edges. The center of the yolk is oozy, unctuous, and scrumptious, perfect in a bowl of ramen.

I have a confession to make…

I didn’t cook my Mayak Eggs this way.  A couple of years ago, (you all know I LOVE kitchen gadgets right? Donut pan, meat grinder, Instant Pot….) I bought an egg cooker.  Yep, a good for only one thing gadget, cooking eggs.  So I used it for my Mayak Eggs.

Well, I am not going to tell you to go buy an egg-cooker (don’t do it) so I needed to make Six Minute Ramen Eggs for myself.  I still had Mayak Eggs in the fridge so I decided to make Dave Chang’s Momofuku Ramen Eggs.  His recipe was part of Food52’s 10 all-time favs, so this was an easy call.

6 Things You Need to Know

  • Both these recipes are incredibly EASY.
  • Both are riffs on a soy sauce-based brine to flavor the eggs
  • Plan to make them in advance as the eggs need to sit in the brines for awhile
  • Mayak means drug in Korean.  Yes, they are addicting-that good
  • The longer the eggs are left in the brine the more color and flavor they will absorb

I saved the best for the last…

  • The hardest, most frustrating THING will be peeling those damn eggs!

Key points before the deep dive into the unappealing task of peeling.

Do You Mayak?

The sauce for the Mayak Eggs is delicious on rice or noodles. The soy sauce and sweetener (you can use corn syrup, rice syrup, or honey) balance each other so it is okay to leave the eggs in the brine/sauce to store.  The aromatics, garlic, chilis, scallions pump up the flavors in the sauce and take the eggs to a whole new level.  Absolutely delish.  Mayak Eggs can be served as a banchan (side dish) or as a topping on a bowl of rice (my fav) or noodles.  I tossed one in my bowl of Congee, along with a splash of the sauce this morning.  Delicious.

For less spicy eggs, de-seed and/or de-vein the chilis or reduce the number of chilis.  You can definitely play with this sauce and make it your own.  Add a little fish sauce for a briny flavor or a Ponzu instead for citrus notes.  Go crazy, it’s all good.

Dave is a Good Egg

Momofuku Eggs are closer to a traditional ramen egg. Not only great with ramen or Udon, but also delicious as part of a rice bowl like Taiwanese Pork Belly Rice Bowl or Buta no Kakuni (Japanese Pork Belly) or Simple Minced Pork BowlThe brine is salty.  Marinade your eggs for no more than 4 hours and use a low-sodium soy sauce.  Once made, the eggs can be stored sans sauce in an airtight container.  For a sweeter egg, add another tablespoon of sugar.

It’s the Big Egg…Here’s the Hard Part…Peeling

The goal is to end up with a smooth, pristine, beautiful egg…after peeling it.  The eggs are a little softer than a hard-boiled egg adding another layer of difficulty. Peeling without leaving little divots in the eggs, not an easy task.

  • Boil enough water such that the water level is one inch over the eggs.
  • Add 1 tablespoon vinegar and 1 teaspoon salt to the water. ( I see just as many recipes that don’t include this-optional)
  • When the water comes to a boil, carefully lower the eggs into it.
  • For the first minute of boiling, stir the eggs around the pot, this helps center the yolk.
  • Boil (not crazy boil, gentle rolling boil) for 6 minutes for a runny yolk, an additional minute for a jammy egg.
  • Have an ice bath ready to transfer the eggs into.
  • Allow eggs to cool for 5 minutes in the ice bath.
  • Crack the eggshell by tapping on it with a spoon.  Carefully peel the eggshell off along with the membrane between the shell and egg.  It helps to peel the egg in water or under running water.
  • Invert your teaspoon so the bottom is facing you, and slide it under the eggshell and membrane, lift the spoon to separate the shell from the egg.
  • Rinse any shell fragments off eggs and place them in brine.  Done!

Mayak Eggs

Delicious and easy, Mayak Eggs are the perfect rice or noodle bowl accompaniment
Course Appetizer, Main Course
Cuisine Asian, Asian-American
Keyword appetizer, egg, Mayak eggs, momofuku egg, ramen egg
Prep Time 10 minutes
Cook Time 6 hours
Servings 6 servings10

Ingredients

Cookin' Da Eggs

  • 4-6 eggs room temperature
  • 2 tsp salt
  • 1 tbsp white vinegar

Da Marinade

  • 1/2 cup soy sauce I use Sempio 701 Soy Sauce for this dish
  • 1/2 cup water
  • 1/2 cup rice syrup corn syrup or honey
  • 3 garlic cloves chopped
  • 3 to 4 green onions chopped
  • 1 green chili chopped (optional)
  • 1 red chili chopped (optional)
  • 1 tbsp sesame seeds

Instructions

Cookin Da Eggs

  • Heat enough water to cover 6 eggs by 1 inch in a pot. Add salt and vinegar and bring it to a rolling boil. Using a slotted spoon add eggs to water. Cook the eggs for 6 minutes for runny yolk or up to 10 minutes (Nooo, don't do it!) for hard-boiled eggs. While eggs are cooking, make a water bath of ice and water in a medium-size bowl. When the eggs are done, Immediately transfer them to the ice water bath. Cool for 5-7 minutes before peeling.

Da Sauce (marinade)

  • Combine soy, water, and sweetener and stir to blend. Add garlic, green onions, chilies and sesame seeds, stir.
  • Peel the eggs carefully without damaging them (easier said than done) and place in an air-tight container. Pour the sauce mixture over the eggs, cover and store in a refrigerator for at least 6 hours to overnight before serving.
  • It will last 5 to 7 days in fridge!
  • Drizzle with sesame oil! Serve with hot steamed rice.

Momofuku Marinated Ramen Egg

Momofuku 6-minute eggs perfect topping on ramen or by itself as a snack
Course Appetizer
Cuisine Asian
Keyword egg, ramen egg
Prep Time 5 minutes

Ingredients

  • 6 tablespoons warm water
  • 1 tablespoon sugar addtional tablespoon for a sweeter egg
  • 2 tablespoons sherry vinegar
  • 3/4 cup soy sauce low-sodium or Tamari
  • 4-6 large eggs

Instructions

  • In a medium bowl, whisk together the water and sugar to dissolve the sugar, then stir in the sherry vinegar and soy sauce.
  • Bring a large pot of water to a boil. Carefully put the eggs into the boiling water and cook for exactly 6 minutes and 50 seconds, stirring slowly for the first 1 minute. Meanwhile, fill a large bowl with cold water and ice. When the eggs are done, transfer them to the ice bath.
  • Once the eggs are cool, (5-7 minutes) peel them in the water. See notes above.
  • Transfer the eggs to the soy sauce mixture and marinate in the fridge for at least 2 hours and up to 4 hours, making sure they are completely submerged or occasionally rotate eggs.
  • Remove the eggs from the sweet and salty marinade. You can save the soy sauce mix for another round of eggs, if you wish. Refrigerate eggs in a tightly sealed container.