Category: Recipes

Recipes I’ve tried and sometimes modified that I think you should try!

Ina Garten’s Country Cake with Strawberries (The Comeback Cake)

Ina Garten’s Country Cake with Strawberries (The Comeback Cake)

When my oldest was a tyke his favorite cake was the Barefoot Contessa’s Strawberry Country Cake.  This was his cake of choice for his birthday for quite a few years… Then Along Came Daddy (his Carrot Cake actually) that put the kibosh on the strawberry cake, so sad.  After I shoved my ego aside, I was FINE with Wes’s Carrot Cake becoming the birthday cake of choice.  It is pretty damn tasty.

The other birthday tradition we have, which thankfully has stayed the same, is going to a Giants game.  His birthday is in June, right about the time baseball is in full swing and school is out for the summer.  This year was no exception, we planned the perfect day for his b-day.

Giants versus the Cubbies plus SF Giants Pride Jerseys for the first 20K fans, dinner at our favorite neighborhood Chinese Restaurant, Gourmet Carousel (which recently re-opened with the OG owners-yay), and to round out the day, birthday cake at home.

Surprise, Surprise, Surprise

Every year around this time, when the weather warms up, the days are longer, this thought pops into my head, “Hey, shouldn’t P&K Farms Strawberries and Triple Delight Blueberries be showing up soon?”.  As luck would have it, both P&K and Triple Delight were at the Farmer’s Market the week of his birthday.  I made a command decision…Ina’s Country Cake with Strawberries for his birthday this year, NOT Carrot Cake.  He’s a big boy, he can handle it.

It Was A Hit, He Loved It

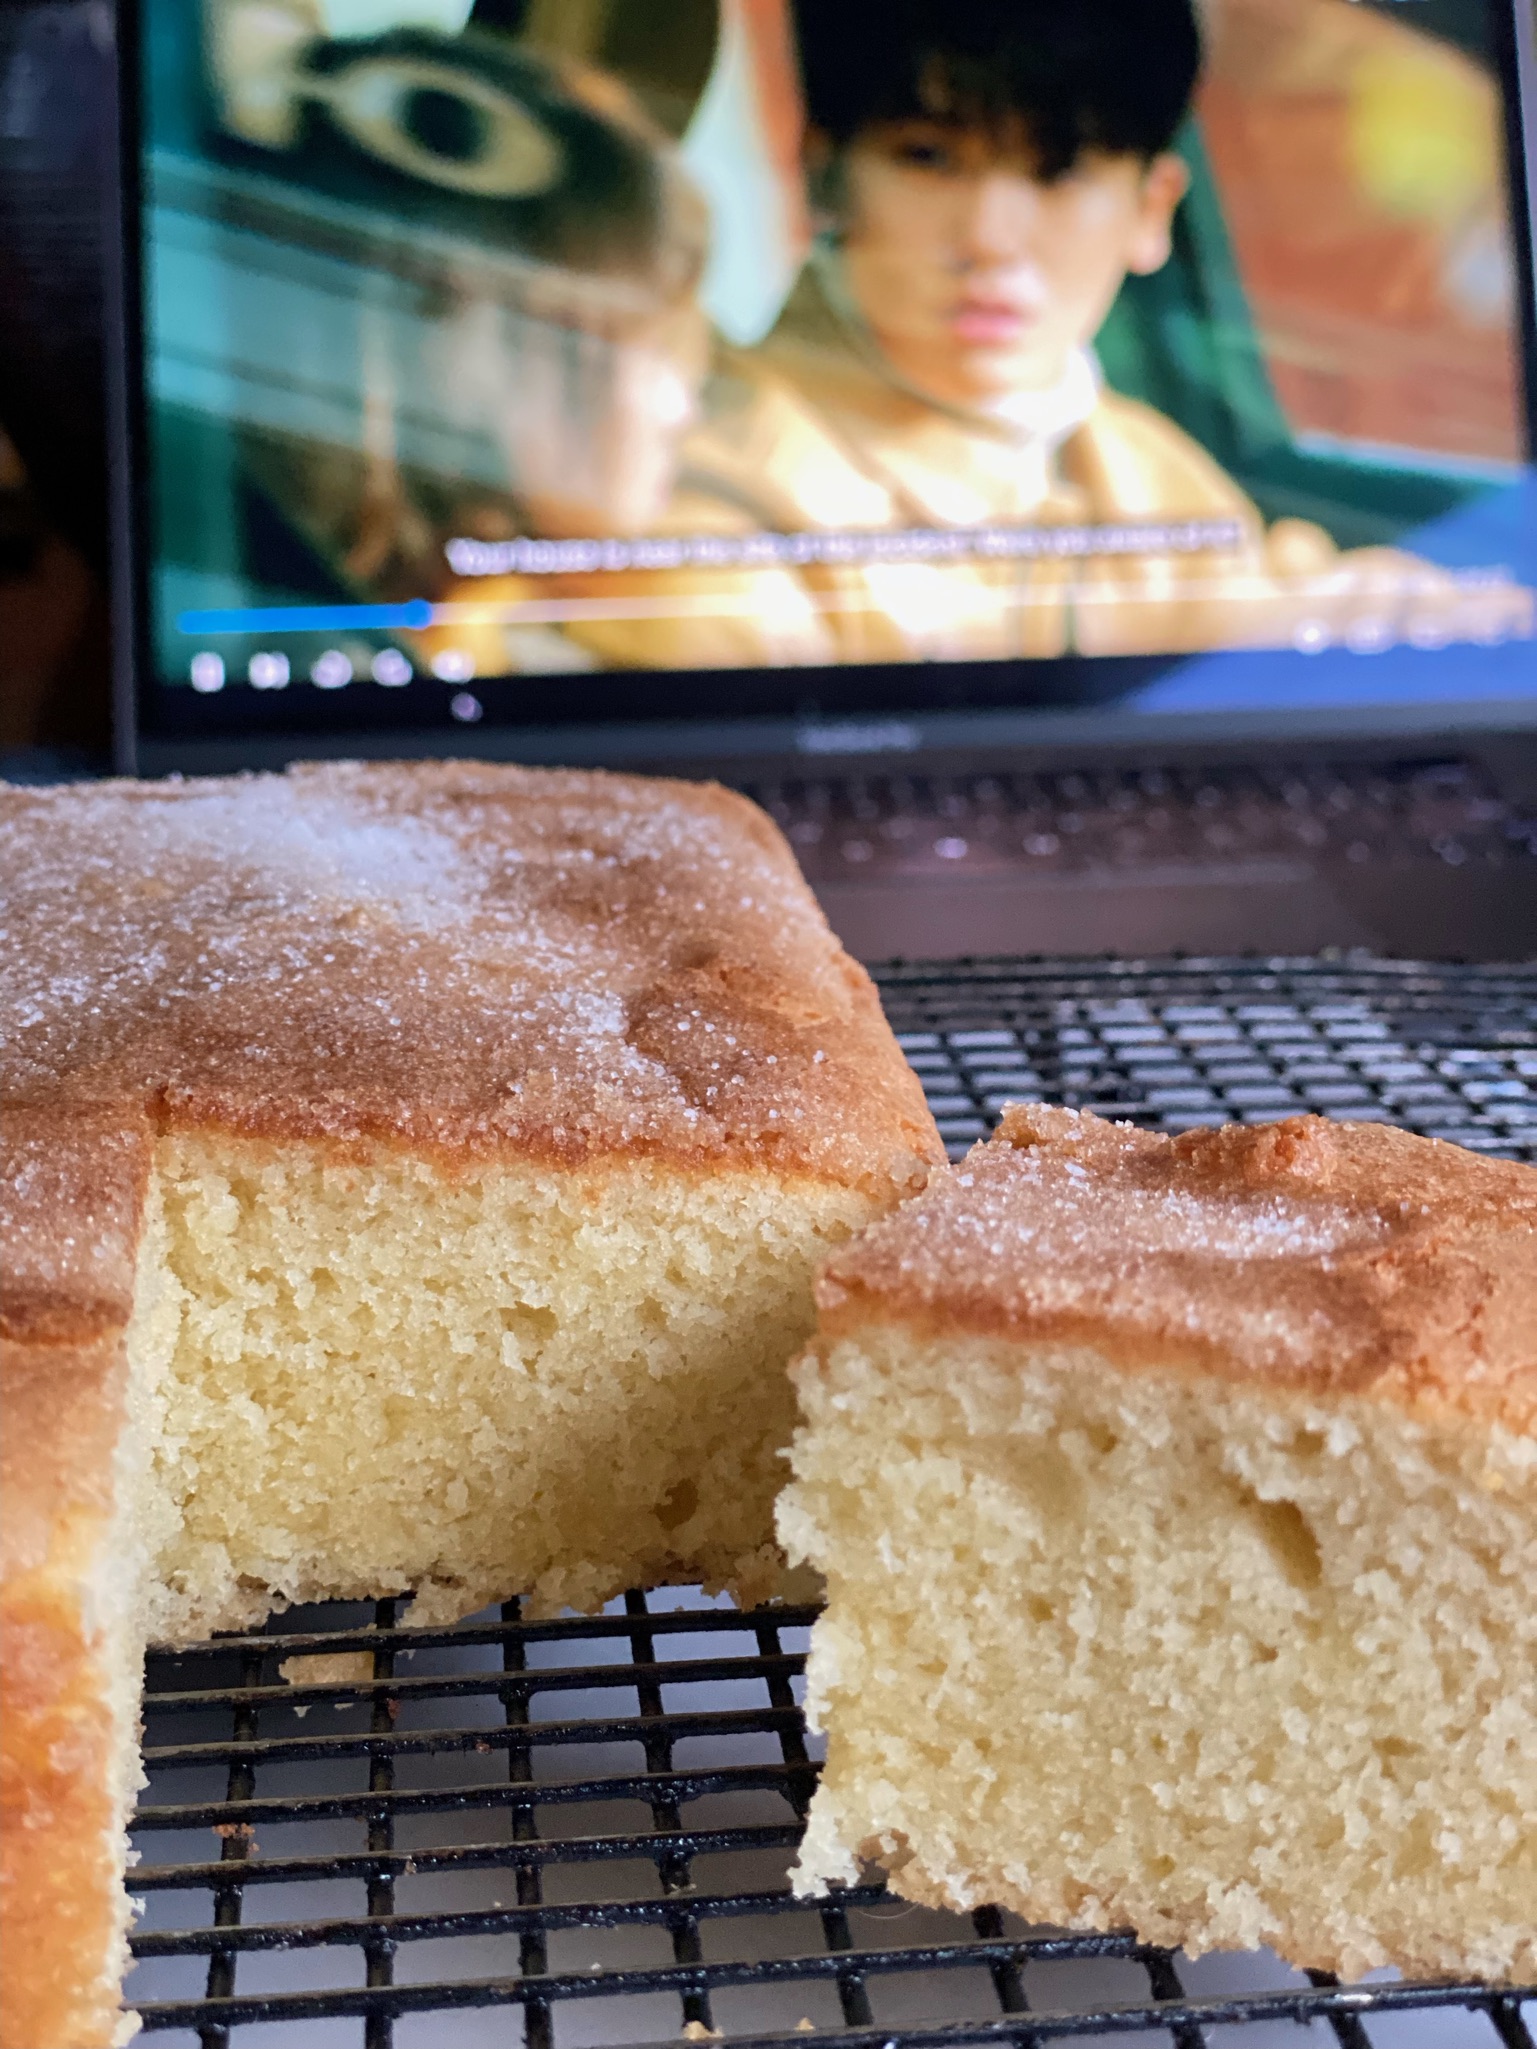
This version of Ina Garten’s Country Cake with Strawberries is from a long-ago issue of Food & Wine.  If you Google Ina Garten’s Strawberry Country Cake you will find multiple sites that have published her recipe.  Why Food & Wine’s version?  First, I had a subscription to F&W back in the day and that’s where I found the recipe.  Second, the recipe makes a single-layer cake that you split into two layers.  Finally, the recipe calls for large eggs. Barefoot Contessa fans know she often uses extra-large eggs in her recipes (which I rarely buy). So this version is my go-to.  I baked another one and ended up freezing it.  We pulled it out of the freezer on Father’s Day and left it on the counter to thaw.   It was delicious, so feel free to use one of the double recipes and freeze the second layer for another day!

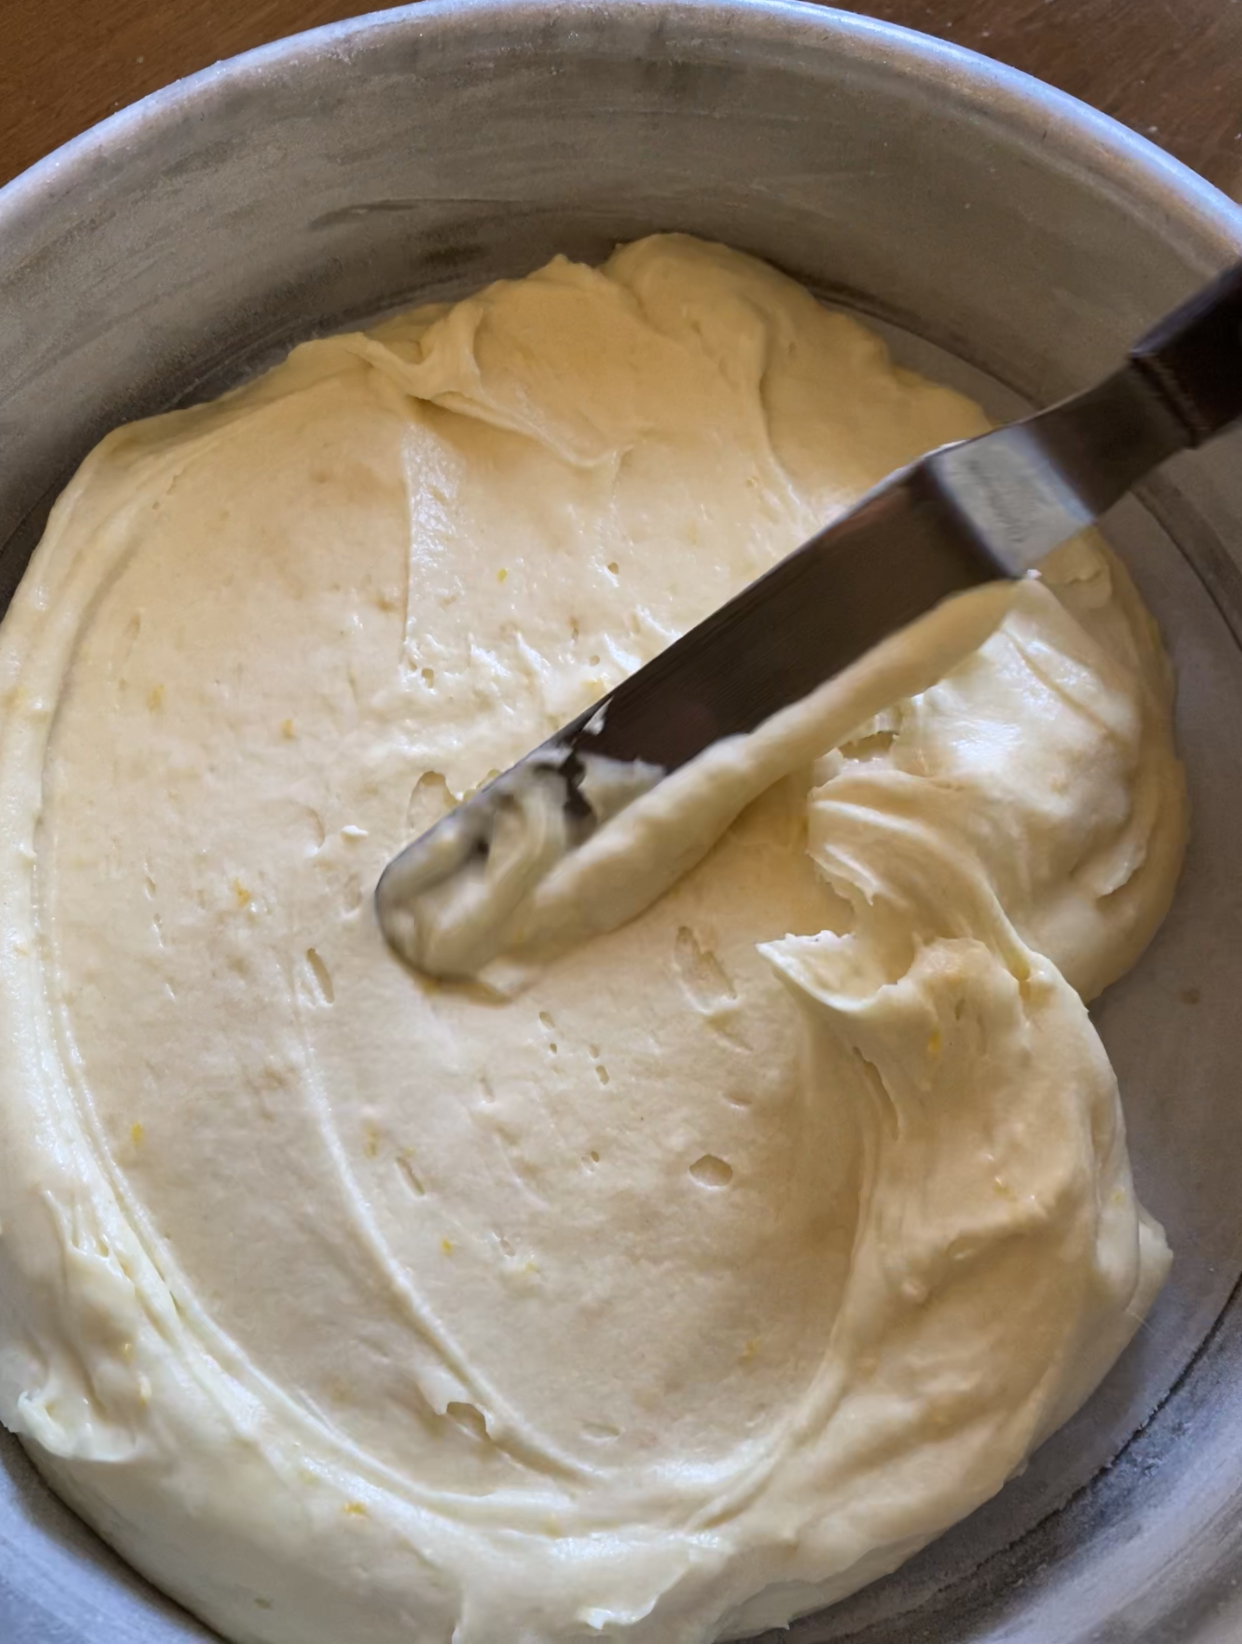
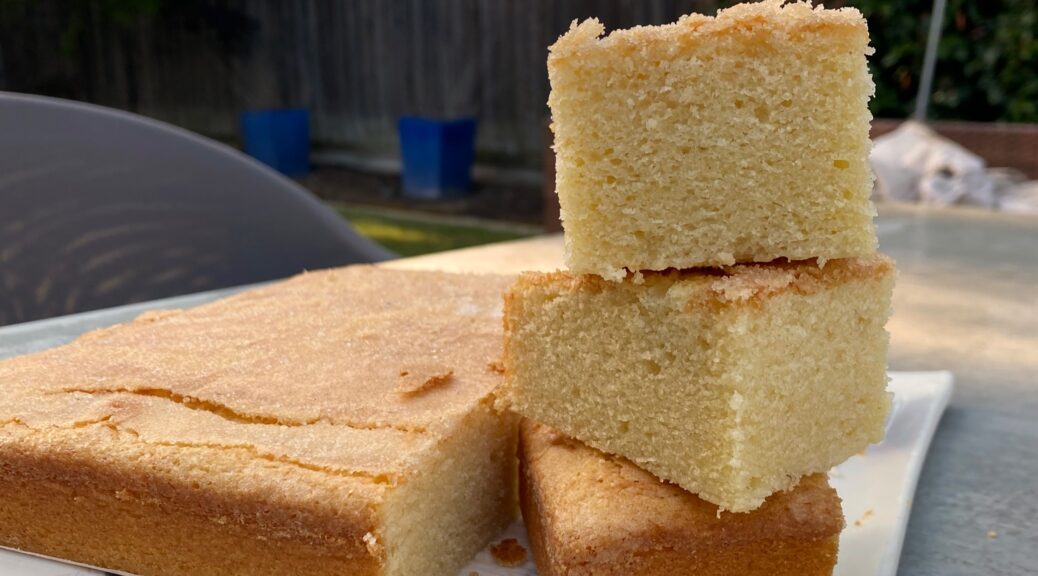
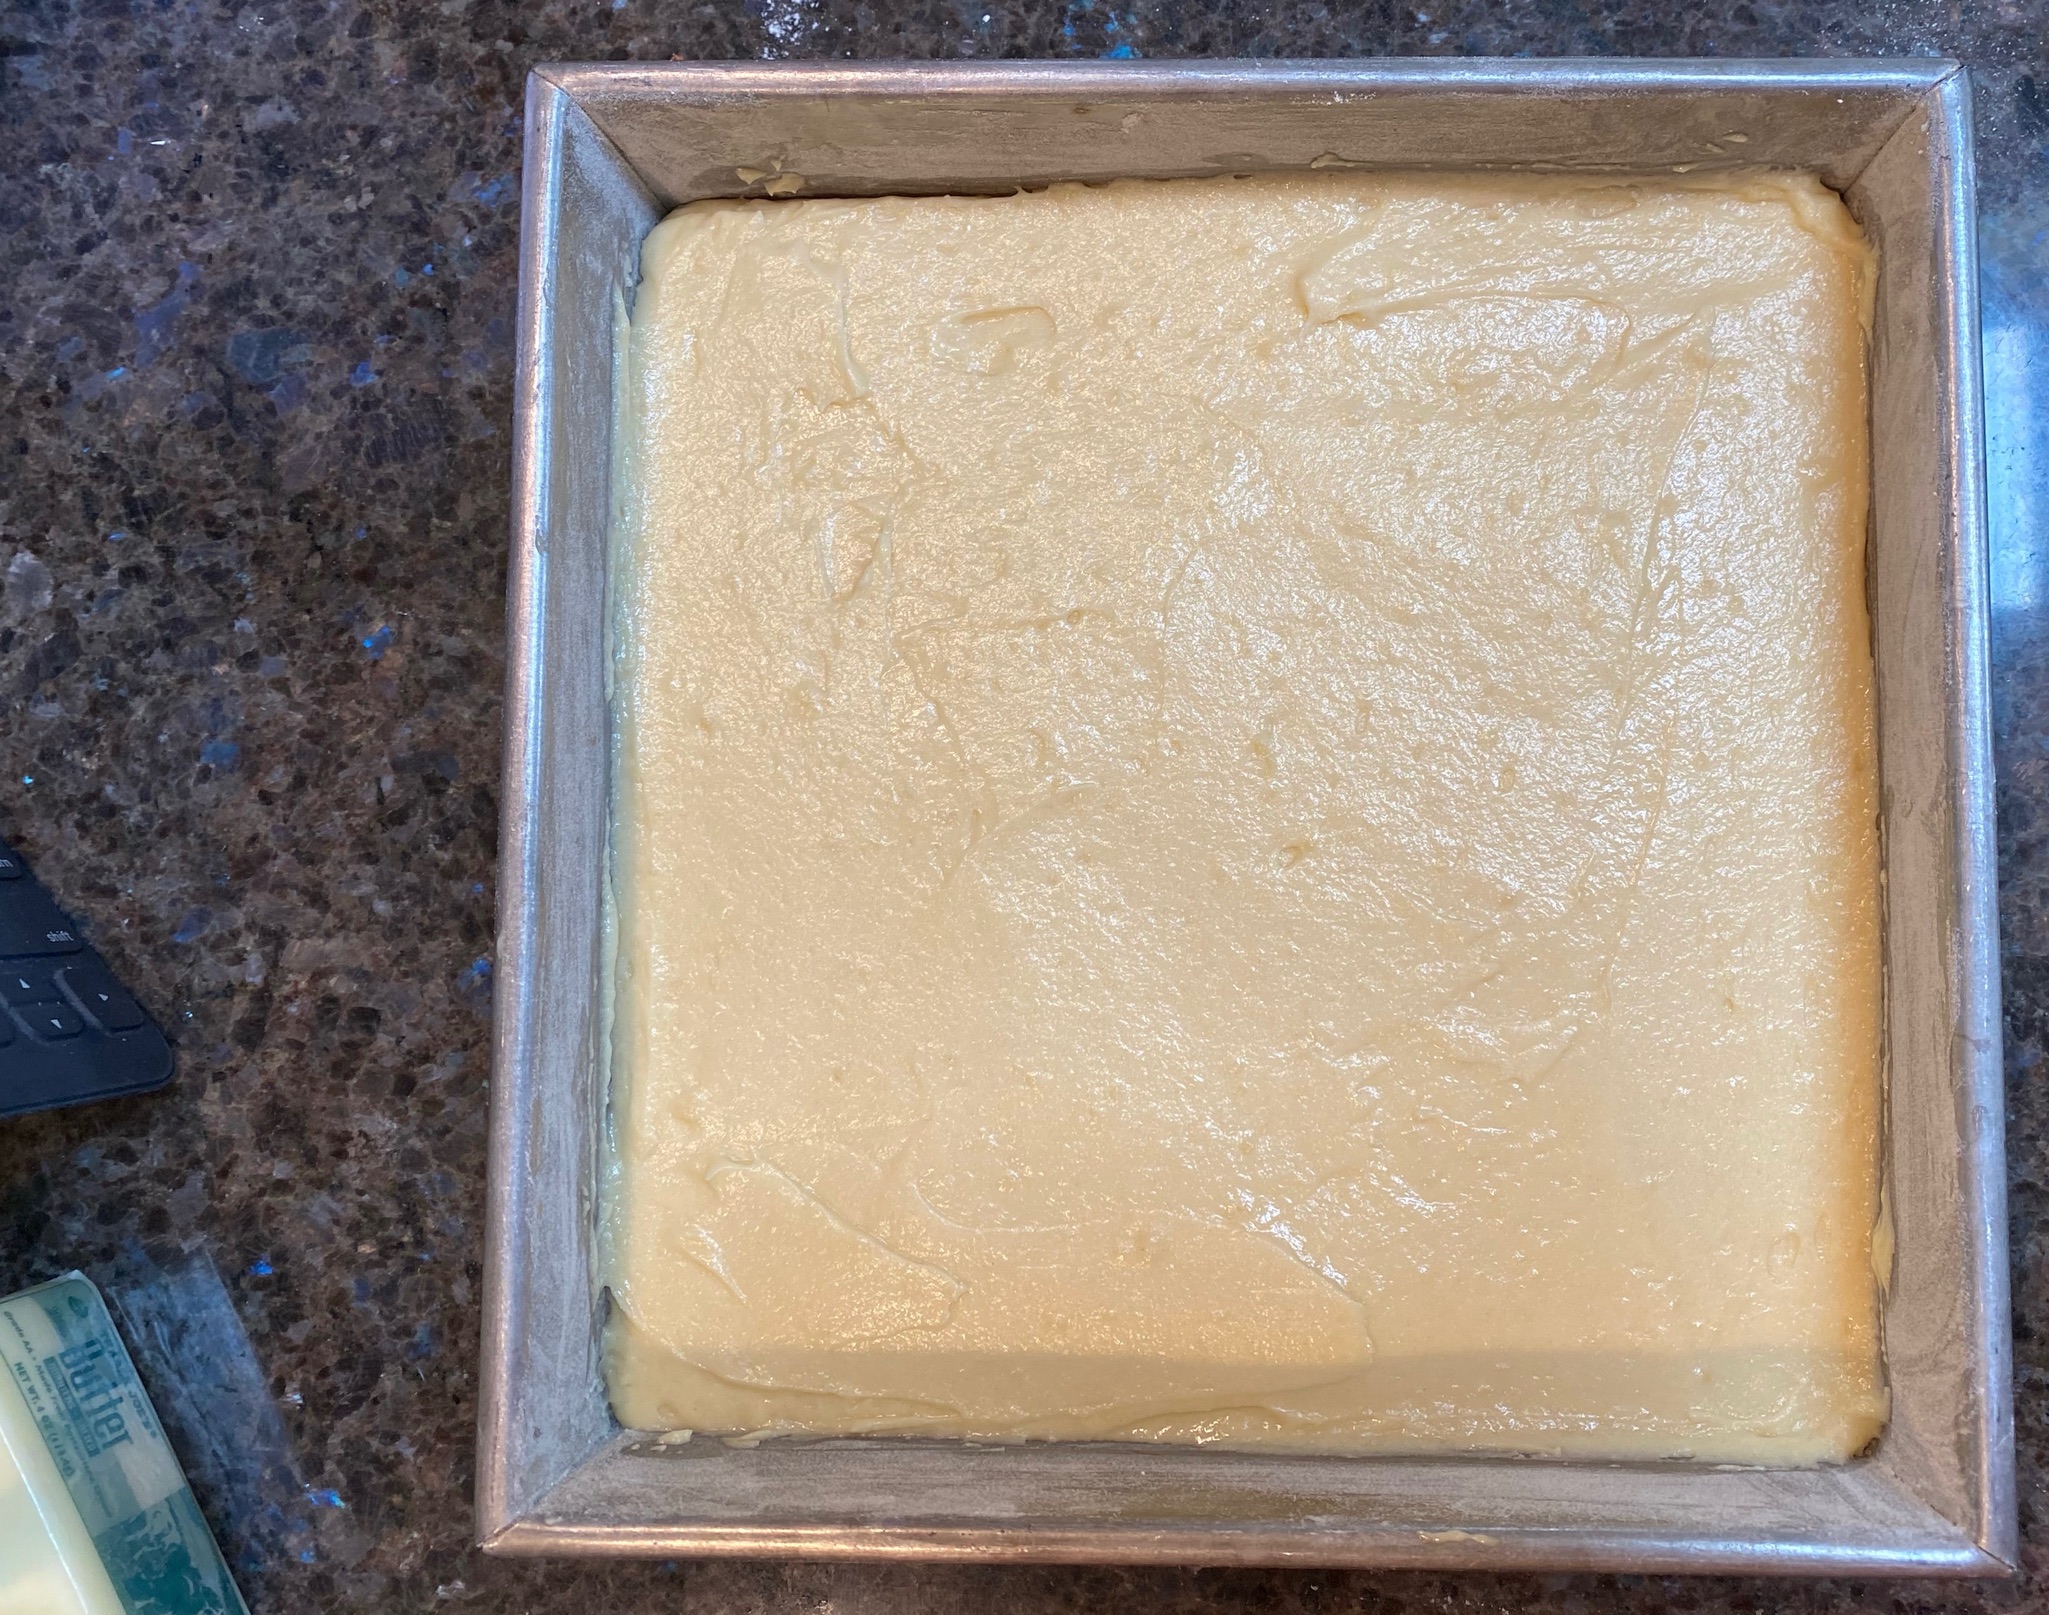
I adore this cake, it is buttery, has a nice crumb, and is not too sweet.  Classic prep, cream butter and sugar, add eggs one at a time, and then the sour cream and zest.  Scrape down the sides of the bowl with each addition.  Add the flour mixture and beat on low speed until the batter is well combined and homogenous looking but do not overbeat.  The addition of lemon and orange zest adds a refreshing citrus hint that is terrific with berries.  Sour cream adds a hint of tang and moisture to the cake.  Spread batter into an 8-inch round cake pan that has been buttered and floured or sprayed.  The batter is fairly thick, not pourable, and will need an offset spatula to spread evenly in the cake pan.

I would increase the amount of whipping cream to 1-1/2 cups, and decrease the sugar to 2 tablespoons, especially if your berries are sweet.  Your whipped cream fans will be happy.

Split the cake into two layers.  The easiest way I know how to do this is with a serrated bread knife.  Place knife level to at the midline of your cake and slice through to the middle only, keeping your knife level.  Rotate the cake and continue to slice from the outside to the middle.  The first cut acts as your knife’s guide for an even cake.  Easy peasy.

Whip It, Whip It Good

Start with heavy whipping cream, preferably pasteurized, not ultra-pasteurized, which is heated to a higher temperature and does not whip as well.  Heavy whipping cream has a higher percentage of butterfat than whipping cream (36% vs 30%) and heck, it’s dessert, so we are going for the gusto. Chill your heavy whipping cream, bowl, and whisk attachment before whipping.  This kickstarts the process and results in the lightest whipped cream possible. Place the cream, sugar, and vanilla in the chilled bowl and whisk at medium-high speed until soft peaks form.  You want peaks that will stand up but the tip will slowly fold over.  Don’t overdo it, if the cream looks a bit grainy, or curdled that’s too far.  If you go too far, add a bit of heavy cream and fold it in with a spatula.  This will loosen the whipped cream and smooth it out again.

This is what your whipped cream should look like.

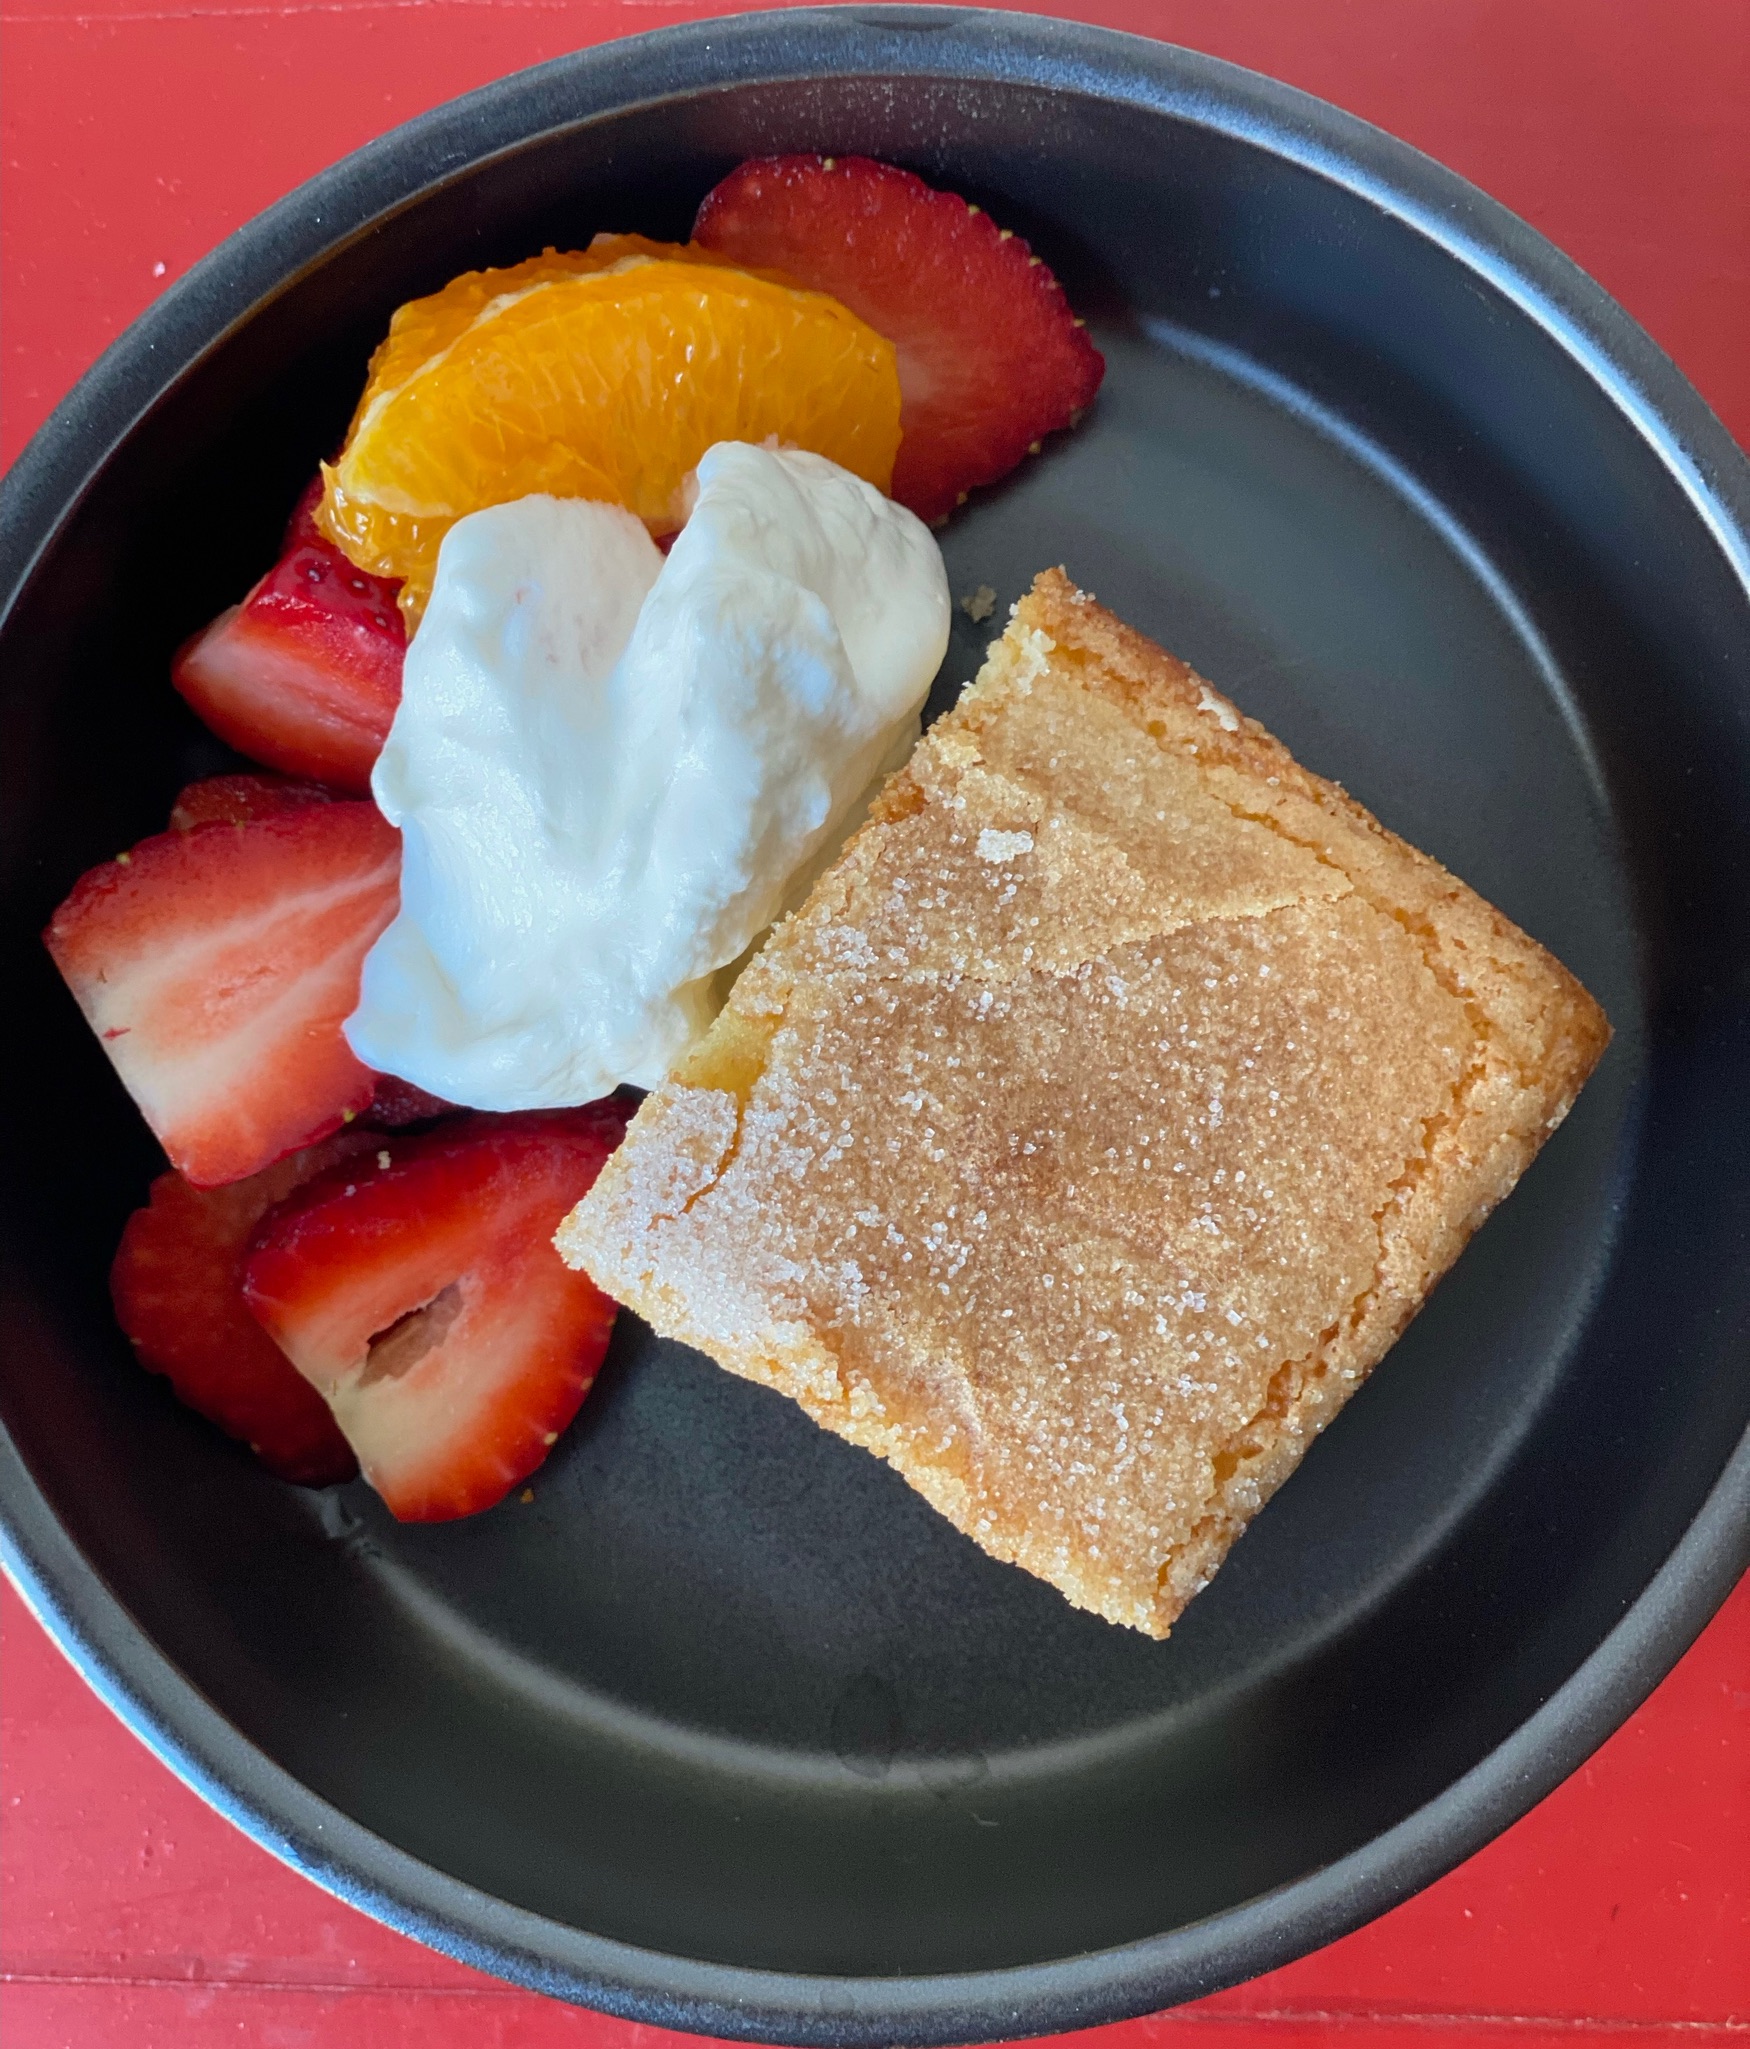
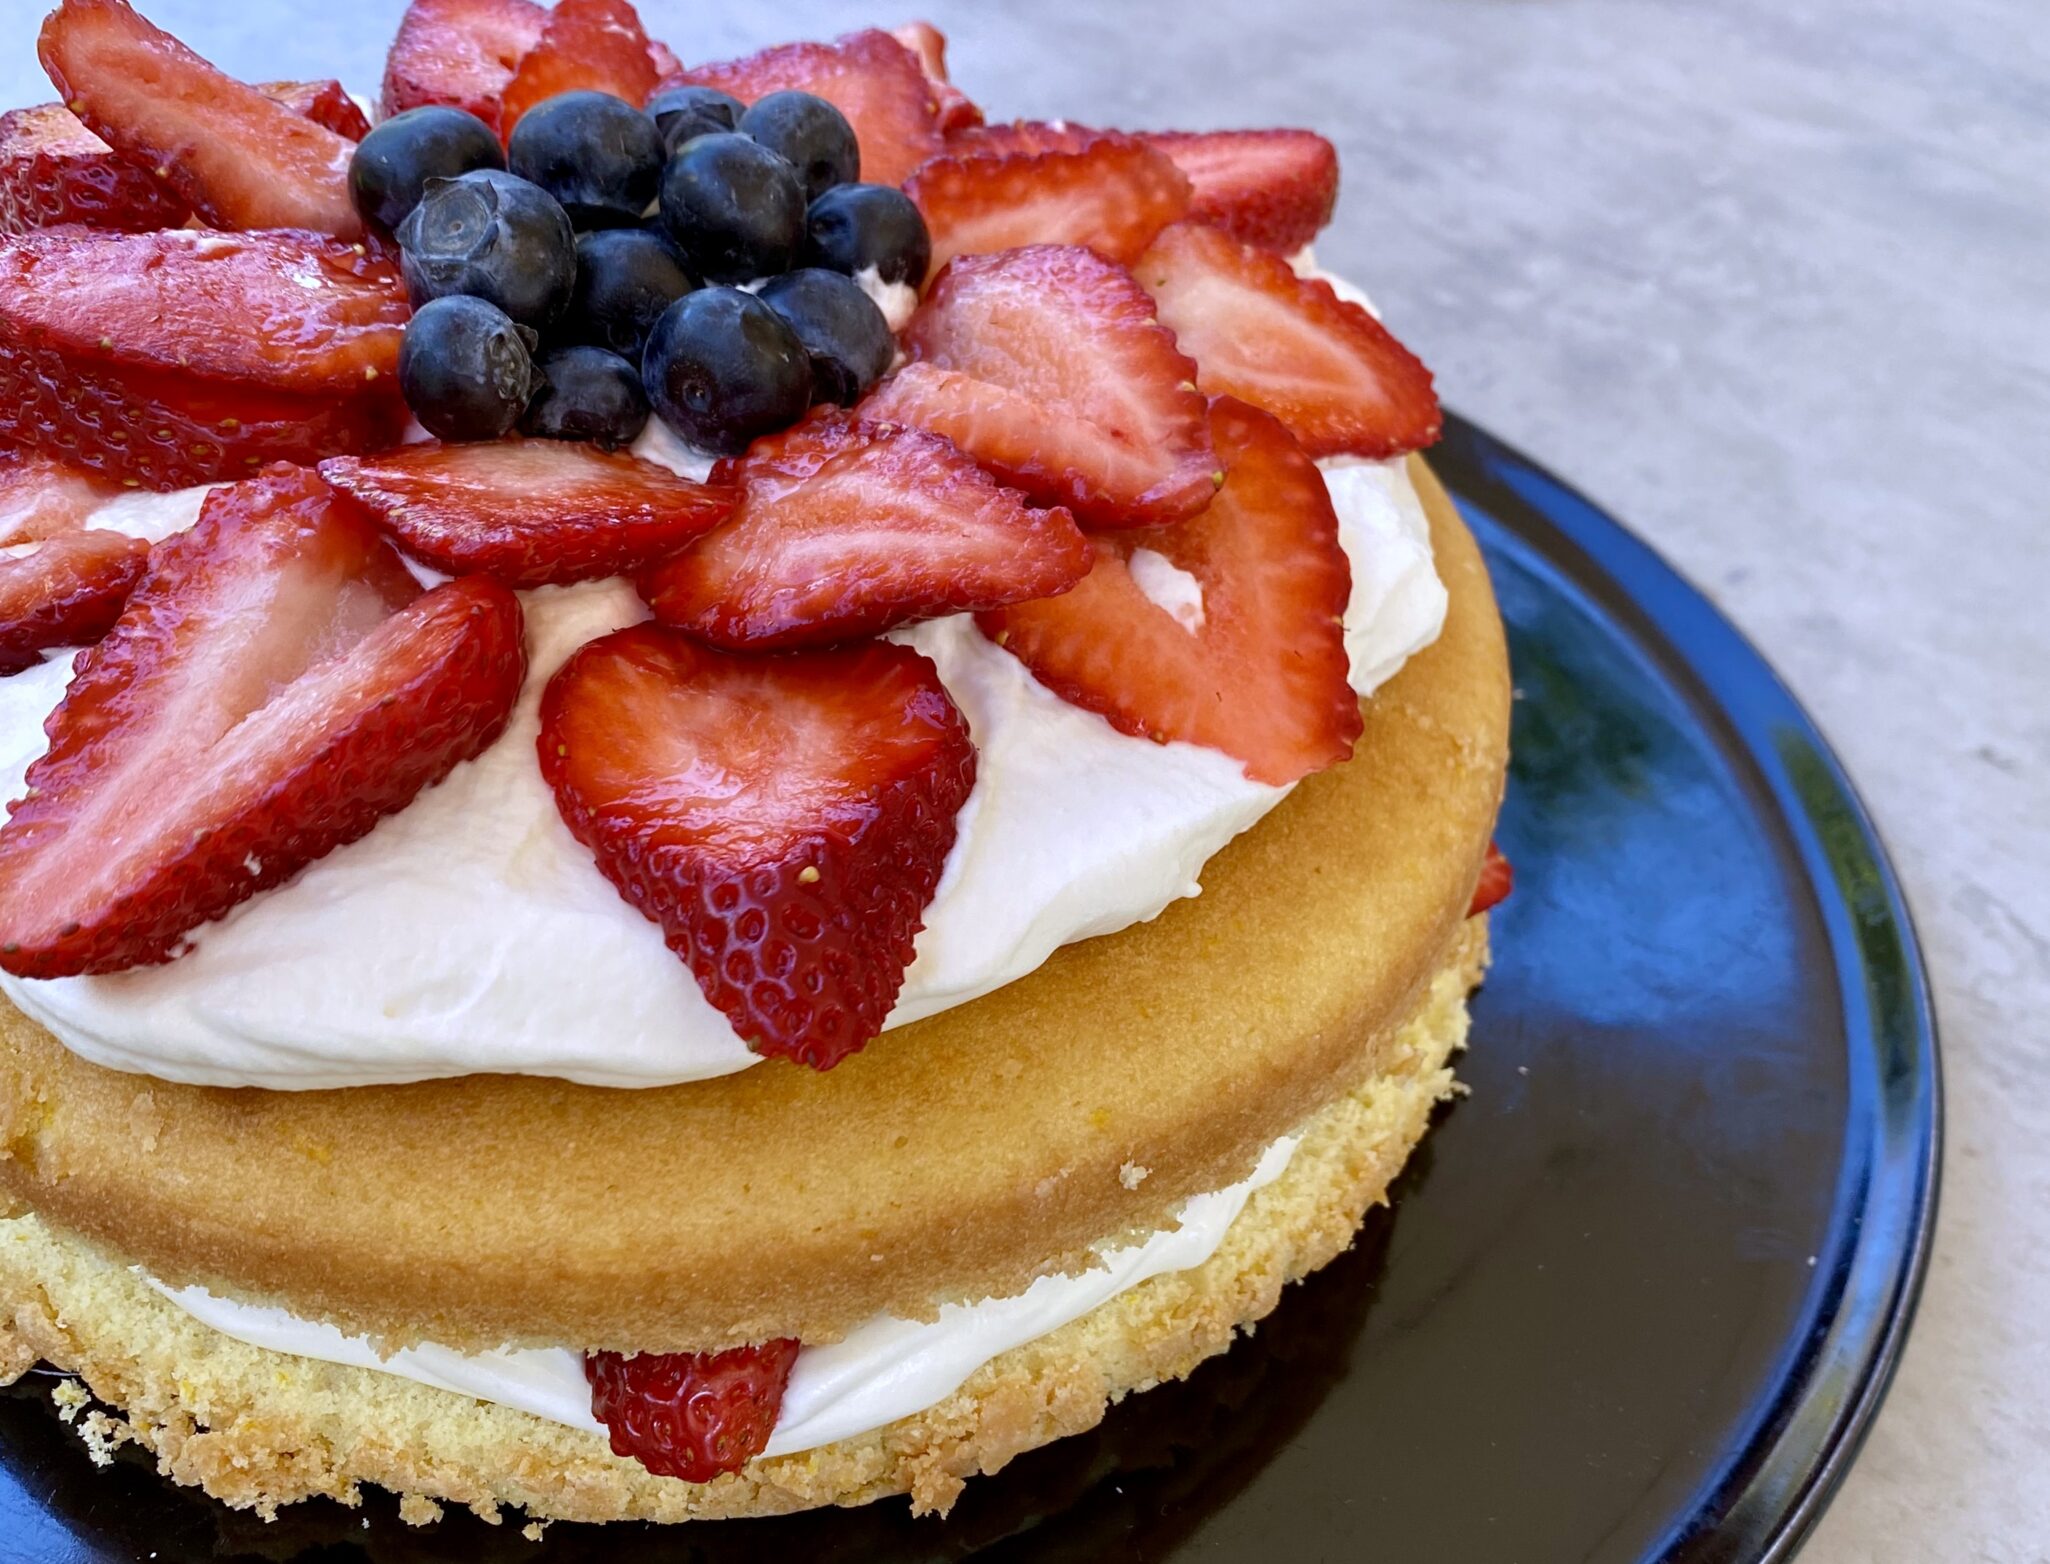
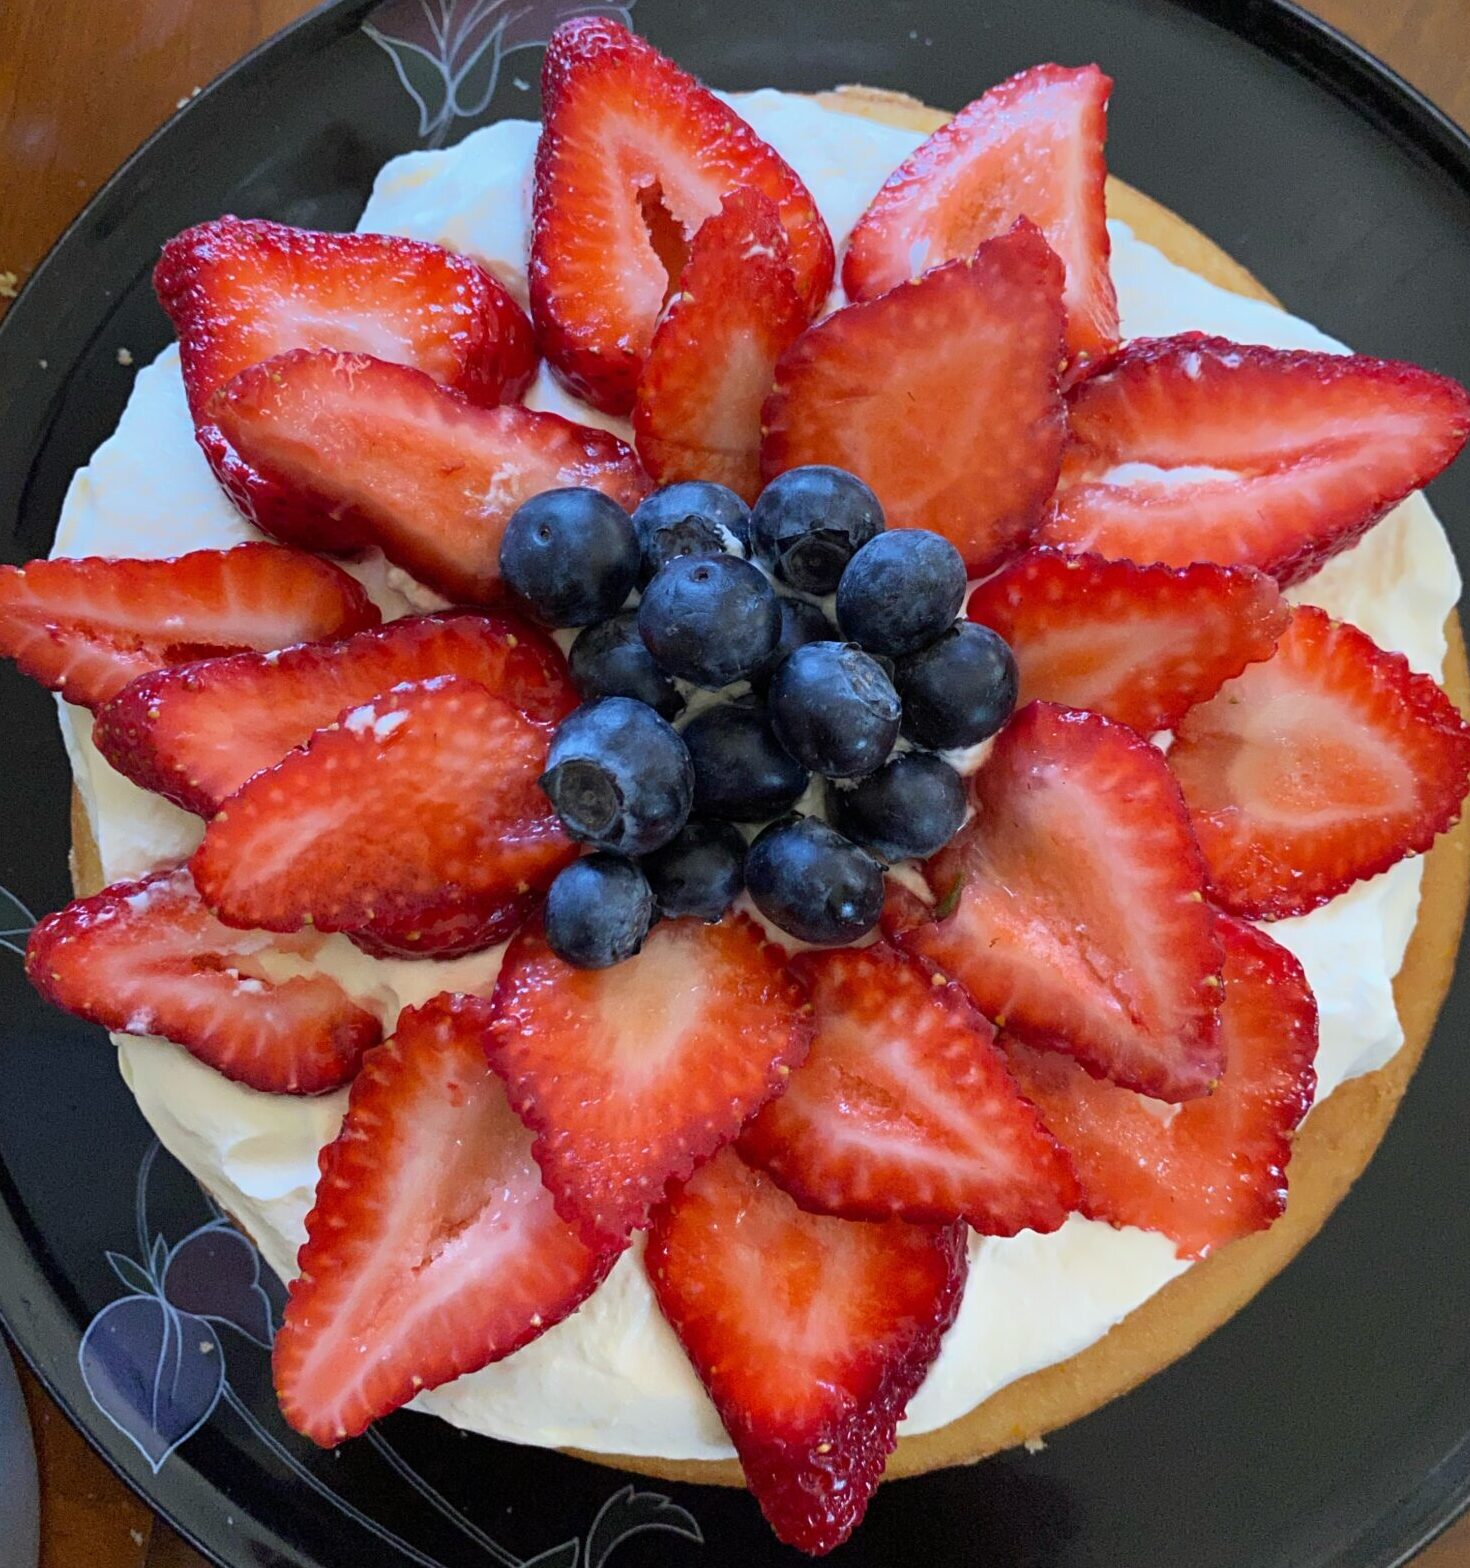
Plop a generous amount of cream on the bottom layer of your split cake. Spread to the edge leaving a small border.  Arrange your berries on the cream.  If you like, dice the strawberries for this layer, so you can maximize the number of berries.  Top with the second split layer cut side down and top with the remaining cream.  Arrange halved strawberries in a cool pattern, and place blueberries and raspberries, if using, in the center of the cake or scatter blueberries in the crevices between the strawberries.  Serve to oohs and ahhs from the cake gallery.


Add this cake to your Bake It Bucket List.  Now.

Country Cake With Strawberries and Whipped Cream

Like a family sized Shortcake, Ina Garten's iconic Strawberry Country Cake
Course Cake, Dessert
Cuisine American
Keyword barefoot contessa, cake, ina garten, shortcake, strawberries, whipped cream
Prep Time 20 minutes
Cook Time 37 minutes
Servings 8

Equipment

  • 1 8-inch cake pan

Ingredients

Dry Ingredients

  • 1 cup all-purpose flour
  • 2 tablespoons cornstarch
  • 1/4 teaspoon baking soda
  • 1/4 teaspoon salt

Creamed Mixture

  • 6 tablespoons unsalted butter softened
  • 3/4 cup granulated sugar
  • 2 large eggs
  • 1/4 cup plus 2 tablespoons sour cream
  • 1 1/2 teaspoons finely grated orange zest
  • 1/2 teaspoon finely grated lemon zest
  • 1/2 teaspoon pure vanilla extract

Topping

  • 1 cup heavy cream I use`1.5 cups of heavey whipping cream!
  • 3 tablespoons granulated sugar adjust sugar to taste, I use 1.5 tablespoons of sugar
  • 1/2 teaspoon vanilla extract
  • 1 pint strawberries or berry medley hulled and sliced, blueberries and raspberries left whole

Instructions

  • Preheat the oven to 350°. Butter and flour an 8-inch round cake pan. In a medium bowl, sift the flour with the cornstarch, baking soda and salt.
  • In a large bowl, using a handheld mixer, beat the butter until creamy. Add the 3/4 cup of sugar and beat at medium speed until light and fluffy. Add the eggs, 1 at a time, beating until incorporated. Add the sour cream, the orange and lemon zests and 1/2 teaspoon of the vanilla and beat until blended. Add the dry ingredients and beat at low speed until smooth.
  • Scrape the batter into the prepared pan and bake for about 40 minutes, or until golden and a wooden skewer inserted in the center comes out clean. Transfer the pan to a wire rack and let the cake cool for 15 minutes before turning it out onto the rack to cool completely.
  • Beat the cream with the remaining 3 tablespoons of sugar and 1/2 teaspoon of vanilla until soft peaks form.
  • Slice the cake in half horizontally. Spread most of the whipped cream over the cut side of the bottom cake half. Layer most of the sliced strawberries on top. Replace the top half of the cake and garnish with the remaining whipped cream and strawberries. make ahead .

Notes

The cake can be frozen for up to 1 month. Let it cool completely before wrapping in plastic and then foil. The assembled cake can be prepared up to 2 hours ahead.

Read More Read More

Another Butterful Cake! (Everyday Butter Cake)

Another Butterful Cake! (Everyday Butter Cake)

Growing up, one of my favorite places was Ping Yuen Bakery on the corner of Grant Ave. and Pacific Ave.  A hop, skip, and a jump from my parent’s real estate office, you would find us there often, breakfast, lunch, dinner, and tea time.  Though called Ping Yuen Bakery, it was an all-encompassing, eat-in Chinese American diner that served noodles and won-ton soup alongside hamburgers and fries.

Their layout was genius, the front deli window enticed passersby with roast ducks, crispy-skinned pork, char siu (bbq pork), fried chicken, and an array of prepared braised and stir-fried dishes. On the other side was a full-service bakery that featured apple pies, custard pies, fresh strawberry cakes, chocolate cakes, and almond cookies.

One of my favorites (there were many) was their pound cake or butter cake.  The cake, tweaked to be a little lighter, a little less sweet, but still buttery, is the Asian version of a classic butter pound cake.

A post featuring a gorgeous, simple butter cake flittered through my feed and caught my eye.  Buttermilk by Sam, a baking blog from a political analyst by trade (gotta love that) described her Everyday Butter Cake as somewhere between a tea cake and a pound cake, it reminded me of Ping Yuen’s Butter Cake, so of course, I had to try it.

A Butter-ful Cake

The beauty of this recipe is that it is not just DELICIOUS it’s also pretty darn easy to make.  It can be made by hand or in a mixer with the admonishment to not overmix.  You start with semi-melted butter for the cake, no waiting for the butter to soften, just zap it in the microwave or melt it on the stove.  Do not melt it all the way, you want the butter to be slightly viscous with some lumps left.  Using cake flour ensures a tender, fine crumb cake, and the sour cream does the same plus adds moisture.  The cake flour and cornstarch create a lower protein content flour=less gluten= tender, light cake. Ta-da.

Make This Cake by Hand-It’s a Good Workout

Finally, sprinkle the remaining granulated sugar over the top of the cake batter.  This morphs the top into a sweet crunchy layer during baking.  This cake is a keeper.

I first made this cake a couple of months back on a cold, rainy day.  While the cake was baking I turned on a favorite K-drama to pass the time.  The aroma of sugar and butter wafted through the air and the heat of the oven warmed the house.  The perfect antidote to the dreary weather.

Fast Forward to Spring-Finally

Beautiful, sweet strawberries from P & K Farms and plump, juicy Triple Delight Blueberries back at our local farmer’s market prompted me to make this cake again.  It also reminded me that I had yet to share this cake with you.  Make this cake, go to your local farmers market pick up some berries or peaches, and enjoy!

Everyday Butter Cake

A delicious, easy butter cake from Buttermilk by Sam
Course Cake
Cuisine American
Keyword butter cake, pound cake
Prep Time 15 minutes
Cook Time 45 minutes
Servings 16 servings

Ingredients

Wet Ingredients

  • 1 cup unsalted butter (226 gm)
  • 1 cup granulated sugar (200-210gm)
  • 1 tsp fine sea salt
  • 1 tablespoon pure vanilla extract
  • 3 large eggs

Dry Ingredients

  • 2 cups cake flour, sifted (250gm)
  • ¼ cup powdered sugar can sub with granulated sugar
  • 2 teaspoons baking powder
  • ¾ cup sour cream (180gm)

Instructions

  • Preheat the oven to 350 F. Grease and flour a 9” square or round cake pan.
  • Place the butter in a large glass or heatproof bowl and microwave it until it’s almost but not completely melted. You will still have some lumps. Or place is a small saucepan and melt over low heat. Remove from heat before it is completely melted.
  • Add the sugar and whisk very well, a full 30 seconds.
  • Add the salt and vanilla and whisk for another 30 seconds.
  • Add the eggs one by one, whisking to fully incorporate before adding another then whisk for a full minute, until it’s light and creamy.
  • Sift in the cake flour, powdered sugar and baking powder together and add to creamed mixture.
  • Whisk in the sour cream. Fold the batter until it’s smooth.
  • Pour the batter into the prepared pan. Sprinkle with an additional 3 tablespoons of granulated sugar.
  • Bake for 30-45 minutes, until a cake tester comes out clean and the top is golden brown.
Gochujang Buttered Noodles (Ketchup Noodles 2.0)

Gochujang Buttered Noodles (Ketchup Noodles 2.0)

My Dad made dinner most of the time.  Every evening he would leave the office, shop for dinner ingredients, go back to the office, pick up my mom, then go home.  Once home, he donned his apron and cranked out a typical Chinese meal in about 30-45 minutes.  A typical meal consisted of a quick soup, stir-fried beef with vegetables, and steamed fish.  It takes me 30 minutes just to decide what to make let alone have it on the table. Yep, my Pop was Dinner Dad Extraordinaire.

But when I stop and think about it, my mom was the one who got us up, made us breakfast, packed our lunches, and made most of the non-Asian holiday meals.  I have been giving short shrift to my mom all these years.  She accounted for 2/3 of our daily meals and my favorite lasagne.  Aiyah, I can’t believe I “marginalized” my own mom.

The Real Deal

My mom was instrumental in trying new things in our house.  An early adopter of the microwave, yogurt (before it was fashionable and filled with fruit and sugar), and frozen food.  Fridays meant Date Night for the parents and Swanson’s TV Dinners for us, and thanks to Swanson’s genius ad campaign, we got to eat in front of the TV.

There are a couple of dishes that my mom made that trumped (sorry) everything else.  First, Avocado Sandwiches.  My mom was ahead of her time-avocados, mashed with a little bit of mayo, S & P, and a squirt of lemon juice, slathered on white bread.  The OG of Avocado Toast. She’d make a killing.

Second, Ketchup Noodles. Butter, noods, ketchup,  a little salt and pepper.  There you have it, perfection.

Which Brings Me to…

Gochujang Buttered Noodles.  A trademark Eric Kim recipe, easy, fast, and absolutely delicious.  I can’t give him 100 percent credit, this dish reminds me of my Mom’s Ketchup Noodles, think of his version as Ketchup Noodles 2.0.  Gochujang, the Korean, sweet and spicy chili paste replaces ketchup, and honey and vinegar bring a balanced sweet-tart flavor.  Fresh garlic adds punch. It’s delicious.  Another Eric recipe goes viral.

The Sauce

Gochujang or Korean Chili Paste comes in mild, medium or hot and can be found at most Asian grocery stores.  Trader Joe’s also carries a gochujang paste.  Do not confuse this with Gochujang Sauce which is thinner in consistency and probably contains sweeteners.   Use mild honey or agave syrup for the sweetener and rice vinegar or sherry vinegar for the acid, together they bring balance to the dish.

Reduce the sauce until you you run your spatula through it and it stays separate for a couple of seconds.  It will be syrupy and have a nice sheen.  Add your pasta and reserved pasta water (a little at a time to desired consistency).

The Noods

Asian pasta, like ramen or Taiwanese dry noodles, is my favorite for its texture, but spaghettini or linguine works in this dish.  The bottom line, use your favorite pasta.

Finish the dish by garnishing it with chopped scallions, sesame seeds, and crushed seaweed.  I also like to drizzle some sesame oil on top.

Enjoy!

Gochujang Buttered Noodles

Ingredients

  • 1 pound spaghetti or other long pasta
  • 6 tablespoons unsalted butter
  • 12 garlic cloves finely chopped (about ⅓ cup)
  • Kosher salt and black pepper
  • ¼ cup gochujang paste
  • ¼ cup honey
  • ¼ cup sherry vinegar or rice vinegar
  • Finely chopped cilantro or thinly sliced scallions optional

Instructions

  • Bring a large pot of water to a boil. Add the spaghetti and cook according to package instructions. Reserve 1 cup of the cooking water. Drain the spaghetti and return to its pot.
  • While the pasta cooks, melt 4 tablespoons of the butter in a skillet over medium-low. Add the garlic and season generously with salt. Cook, stirring occasionally, until the garlic starts to soften but not brown, 1 to 3 minutes.
  • Stir in the gochujang, honey and vinegar, and bring to a simmer over medium-high. Cook, stirring constantly, until the mixture reduces significantly, 3 to 4 minutes; when you drag a spatula across the bottom of the pan, it should leave behind a trail that stays put for about 3 seconds. Remove from the heat.
  • Transfer the sauce to the pot with the spaghetti and add the remaining 2 tablespoons butter. Vigorously stir until the butter melts. Add splashes of the pasta cooking water, as needed, to thin out the sauce. Taste and season with salt and pepper. Top with the cilantro or scallions (if using) and serve immediately.
Miso-Honey Chicken with Asparagus Sheet Pan-tabulous!

Miso-Honey Chicken with Asparagus Sheet Pan-tabulous!

Sam Sifton’s What to Cook column in the NY Times is my usual starting point for what should I make for dinner during the week.  I found Yossy Arefi’s Sheet Pan Miso-Honey Chicken and Asparagus in his column a little while ago and bookmarked it.  Like so many others, I have jumped on the sheet pan meal train.  I love a cooking method that includes hashtags like #quick, #easy, and #delicious.  This recipe was simply yummy and had me licking my plate clean at the end.

Da Sauce

The flavor from the marinade manages to hit every note-sweet from honey, and spicy from chili sauce.  Eartiness and salty from the miso.  The ginger and garlic create an added one-two flavor punch.  It is absolutely delicious.  Reserve half of it to serve at the table for those who just can’t get enough of it, like me!

Most of the ingredients for the marinade are items that you probably have in your pantry or fridge, especially if you like Asian cuisine.  For those not familiar with miso-the star of this marinade, miso is a cornerstone in Japanese cooking.  It is made from soybeans that is fermented and it is responsible for that salty, slightly funky flavor and umami.  It comes in two basic types, white and red.  White miso is milder and if I could only have one miso, this would be it.  Here is a primer on miso from Spruce Eats.  Look for it in Asian grocery stores and many of the larger supermarkets.  There really isn’t a substitute so if your local markets don’t carry it, try online.

Improvising for the lack of asparagus, I grabbed a head of cauliflower from my crisper and I was in business.  I prefer bone-in chicken so I slathered the marinade on bone-in, skin-on chicken thighs and opted to roast it.  Roast the chicken and cauliflower in a 425-degree oven for approximately 25-30 minutes until the chicken is crispy and browned, and the cauliflower is tender and golden.  It would be tough to broil bone-in chicken and have it cook through, high-heat roasting works well.

Sheet-Pan Miso Honey Chicken with Asparagus

An easy and delicious one-pan meal. Chicken thighs are marinaded in honey, miso, and soy sauce elevated with the addition of minced garlic and ginger. Delicious!
Course Main Course, Meat
Cuisine Asian-American
Keyword Chicken thighs, gochujang, NYTcooking, sheet pan meal
Prep Time 10 minutes
Cook Time 30 minutes

Ingredients

Marinade

  • 3 tablespoons white miso
  • 3 tablespoons mild honey
  • 3 tablespoons soy sauce or tamari
  • 1 tablespoon rice vinegar
  • 2 teaspoons finely grated fresh ginger
  • 2 teaspoons finely grated garlic
  • 2 teaspoons chile-garlic sauce or other hot sauce
  • 1 tablespoon neutral oil + 1 tablespoon water for marinade

The Stars

  • 1 Pound large bunch asparagus trimmed
  • 2 teaspoons neutral oil for asparagus
  • 1½ to 2 pounds chicken thighs boneless, skinless (although I like leaving the skin on

The Garnish

  • Salt and pepper
  • 2 scallions thinly sliced

Instructions

  • Make the marinade: In a bowl, whisk together the miso, honey, soy sauce, rice vinegar, ginger, garlic, chile-garlic sauce, 1 tablespoon oil and 1 tablespoon water. Refrigerate half the marinade for serving.
  • Place the chicken in a shallow dish or zip-top bag and pour the remaining marinade over the top. Toss the chicken until coated and let marinate in the refrigerator for up to 30 minutes.
  • When you are ready to cook, heat the broiler with a rack set 6 inches below it. Line a large baking sheet with aluminum foil. * See notes for directions to roast chicken instead of broiling.
  • Remove the chicken from the marinade, scraping off and discarding any excess. Place the chicken in a single layer on one side of the baking sheet, with the flatter side up. Place the asparagus on the other side. Drizzle the asparagus with remaining oil, then season the asparagus; toss to coat.
  • Broil until the chicken is cooked through with some charred spots and the asparagus is browned, about 10 minutes.
  • To serve, top the chicken with a drizzle of the reserved marinade and a sprinkle of scallions.
  • Serve with rice, if desired.

Notes

A variety of vegetables can be substituted for asparagus such as bok chop, broccoli, or chard. I had a head of cauliflower in my crisper and thought, why not?  I was in business.  Too lazy to debone the chicken I slathered the marinade on bone-in, skin-on chicken thighs and roasted the chicken and cauliflower in a 425-degree oven for approximately 25-30 minutes until the chicken was crispy and browned, and the cauliflower tender and golden. Just know the bone in chicken will take approximately 35 minutes to roast so cut your vegetables to a size that needs the same amount of time.
Molasses Snickerdoodles: Walking for Cookies

Molasses Snickerdoodles: Walking for Cookies

More rain, more gray…will it ever end?  Of course, it will but when?  Last week, the high winds took out our power at home so we escaped to San Francisco for the day.  Luckily, we had a brief, much-welcomed break in the weather and made the most of it.  It was too gorgeous not to take a walk and hit some of the scenic spots in The City.

Polk Gulch-Polk Street

There are a couple of streets that come to mind for me that define life in the city, and Polk Street is one of them. If you haven’t visited this area of the city, put it on your list.  Polk Street stretches from the  Civic Center area near City Hall, the gritty Tenderloin, all the way to the tony Russian Hill area, Aquatic Park, and Fisherman’s Wharf. To walk from Aquatic Park, the northern end of Polk to Civic Center, the southern tip, encapsulates San Francisco.

How can one street be home to Michelin-Starred Restaurants, trendy coffee kiosks, and French Bakeries, but also drug addicts and homeless sleeping in doorways or living in tents?  City life is uncensored and chaotic, where you see Everything, Everywhere, All at Once

We made a beeline for Polk Street which is only 2.5 blocks away…uphill.  The perfect way to start a walk since we’ll inevitably end up at one of the many bakeries on or near Polk.

We stopped at Batter Bakery for a cup of coffee and some cookies.  Known for their cookies, I had a tough time choosing what to try.  As much as I love shortbread, which they have so many permutations, we decided on their Sand Angel and a Sesame Cookie that looked scrumptious.  The Sand Angel had me at first bite.  A molasses cookie with a crispy edge and soft, slightly cakey center, best described as a cross between a Snickerdoodle and Molasses Cookie.  Yummy on the cookie meter, 🍪🍪🍪🍪

Grabbing our coffee and cookies we continued on our walk.  I pointed out spots of interest to the hubster.  Places that were part of my childhood-my elementary school, Victor’s Pizza (still there!), and the corner my favorite dessert cafe, Blum’s occupied (sadly not there).  We passed Bob’s Donuts and Swan’s Oyster Depot, SF icons that have been around for as long as I can remember.

On our walk back we stopped to take a peek at a new neighborhood park, Francisco Park. Built on top of an old reservoir, it’s a nice respite with gorgeous views.  With a community garden, playground, picnic tables and a doggy-run on street level, the park is worth a visit.  Just a note those two highrises, the Fontanas, led to the restrictions on building heights in the city. 😉

So, after a fun day in the city, I returned home with one thing on my mind, Molasses Snickerdoodles.  Adapted from Grandma’s Molasses, it isn’t quite the same as the Batter Bakery cookie, but it’s pretty darn good!

Key points: Beat butter and sugar until light and fluffy.  This will give this cookie a cakier texture in the middle. If you prefer a less cakey texture and a chewier center, two things, beat only until smooth and creamy, and during baking when the cookie puffs, pull the pan out and bang the sheet on the oven rack. Do this a couple of times.  More on this later.

If the dough seems too soft to work with, chill it for 10 minutes.  A #40 scoop (2 tablespoons) will yield a 2.5-3 inch cookie.  Perfect dunking size.  The dough balls are rolled in a mixture of cinnamon and granulated sugar.  Substitute turbinado or raw sugar for a crunchier finish.

Variations on a Cookie

One dough, two different bakes.  The cookies on the left received Sarah Kieffer’s pan-banging baking treatment.  This means about two-thirds of the way through baking, when the cookies are puffy, rap the pan on the oven rack to deflate the cookies. Repeat this a couple of times.  The result is flatter, chewier cookies with crisp edges.  The cookies on the right were allowed to bake undisturbed, they puffed and fell naturally creating cracks.  This results in cookies that are a little thicker and cakier than the pan-banging cookies.

Enjoy!

Molasses Snickerdoodles

A rift on Snickerdoodles, adding molasses gives these cookies a nice earthy flavor. Crispy-edged, tender, slightly cakey, cookie.
Course cookies, Dessert
Cuisine American
Keyword Cookie recipe, cookies, Molasses Snickerdoodles
Prep Time 15 minutes

Ingredients

Dry Stuff

  • 1 3/4 C. all-purpose flour
  • 1/2 tsp Cream of Tartar
  • 1/2 tsp Baking Soda
  • 1/8 tsp salt

Creamed Ingredients:

  • 1/2 C. unsalted butter room temperature
  • 3/4 C. granulated sugar
  • 1/4 C. Light or mild Molasses
  • 1 large egg
  • 1 tsp Vanilla Extract

Dredge

  • 3 Tbsp. granulated, raw or turbinado sugar
  • 1 tsp Cinnamon

Instructions

  • Preheat oven to 375° F.
  • In a bowl, whisk together flour, cream of tartar, baking soda and salt until well blended. Set aside.
  • In a large mixing bowl or the bowl of a stand mixer, beat butter and sugar on medium-high speed until light and fluffy, 1 to 2 minutes.
  • Add molasses and beat until combined, scraping down the sides of the bowl as needed.
  • Add egg and vanilla and mix until smooth.
  • Add dry ingredients and mix on low speed until incorporated and no dry flour remains.
  • In a small dish, mix raw sugar together with cocoa powder and cinnamon until well blended.
  • Drop dough by the tablespoonful into sugar mixture, rolling until completely coated. (Dough will be sticky, but the sugar mixture should keep it from sticking to your hands.).
  • Arrange on non-stick or parchment-lined baking sheets, leaving 2 inches of space between cookies. Repeat with remaining dough.
  • Bake for 9 to 10 minutes or until cookies are just set on top and bottoms are lightly golden brown.
  • Let cool for 5 minutes on baking sheets and transfer to a wire rack to cool completely.
Another Biscuit? SWEET!!!

Another Biscuit? SWEET!!!

Bleary-eyed, I arrived home at 6:15 AM after dropping off Jamie at the airport at 5 AM.  I actually live only 10 minutes from the airport.  Are you wondering is California traffic that bad?  A protracted goodbye with the kid? A flat tire?

NOPE

Being very nice, enabling parents, we offered to drop her off for her flight and return the rental car.  The plan went smoothly, I dropped her off curbside and headed to the car rental lot to pick up the Hubster.  As soon as I entered the return lot a voice in my sleep-deprived brain said…hmmm, is this a good idea?  Apparently not.  The parking guys that man the exit booth do not arrive until 6 AM.  I guess it stands to reason if you are dropping off a rental car, you are probably catching a flight. 🤦🏻‍♀️🤦🏻‍♀️🤦🏻‍♀️. So we sat in the car for 50 minutes, the Hubster occasionally looking over at me and shaking his head while playing Spelling Bee.  I ignored him.

By the time we got home, I was wide awake.  I might as well bake, I deserve a morning treat (ok, not really).  A recent article by my fav NYT cooking columnist, Eric Kim, highlighted (glowingly) the Buttermilk Sugar Biscuits from Tandem Coffee + Bakery in Portland, Maine.  I LOVE biscuits and a recommendation from Eric…turn on the oven now, please.

These biscuits are sweeter than most biscuits.  They have a crunchy exterior due to the high sugar content and yet are still flaky and tender inside.  This makes them sturdy enough for biscuit sandwiches, think ham or fried chicken.

First, grate cold butter and lightly blend it with flour, sugar, baking powder, and salt.  This eliminates cutting the butter into the flour step.  By grating the butter you have strands of butter that help create those flaky layers.

Let’s Skip to the Good Part

Pour the crumbly mass of butter and flour onto your counter. Take out your bench scraper and push your dough mass together and gently press down to compress, you want to roll or pat the dough into a rectangle.

Fold one half over on top of the other half using the bench scraper, gather the escaped bits, and press them into the dough. Then roll the dough out again into a rectangle.  Repeat the process a total of 5 times, rotating your dough ninety degrees each time.  The dough will come together and be less crumbly.  This is the process of lamination, creating layers of butter and flour in pursuit of flakiness.

With the last fold, shape the dough into a square.  Use your bench scraper to cut the dough in thirds both lengthwise and crosswise yielding 9 squares.  Cut straight down without sawing through the dough.  Sawing would smoosh the layers creating an uneven rise while baking.

Next time I will trim the outside of the dough to help with an even rise.

Flaky, crispy, buttery, and sweet. Brush the biscuits with butter and sprinkle them with Maldon salt or any coarse finishing salt you like to highlight the sweet-salty vibe.  Enjoy!

Buttermilk Sugar Biscuits

Course Biscuits and scones, Breakfast
Cuisine American
Prep Time 20 minutes

Ingredients

  • 1 cup cold unsalted butter 227 grams
  • 3⅓ cups all-purpose flour 425 grams plus more for rolling
  • ½ cup granulated sugar 100 grams
  • 1 tablespoon baking powder
  • teaspoons kosher salt (such as Diamond Crystal) or 1¾ teaspoons fine sea salt
  • cups cold buttermilk 300 grams
  • Melted butter and flaky sea salt both optional, for finishing

Instructions

  • Heat oven to 375 degrees and line a large sheet pan with parchment paper or foil.
  • Coarsely grate the butter onto a plate, then freeze until cold and hard, at least 10 minutes. Meanwhile, in a large bowl, whisk together the flour, sugar, baking powder and salt.
  • Add the butter to the dry ingredients. Using a spoon, toss together until all of the butter is coated with flour.
  • Add half the buttermilk and toss with the spoon. When incorporated, add the rest of the buttermilk and gently toss again, without mashing together or overmixing, until the dry ingredients are lightly hydrated throughout. The mixture will be crumbly.
  • Flour a clean surface and dump the mixture directly onto it. Using your hands, gently press the crumbs together and then use a floured rolling pin to roll the mass gently but firmly into a 1-inch-thick rectangle.
  • Fold the dough in half: Using a bench scraper, lift the top half off the surface and fold it over the bottom half. This step may be crumbly and messy at first, but just go for it and fold what you can down from the top. Repeat this roll-and-fold motion 5 times, flouring the surface and dough as needed and using the bench scraper to straighten the edges as
  • Build the final layer: Fold the dough in half one last time, then roll to about 1½ inches thick to create a 6-inch square, using the bench scraper to straighten out the edges.
  • Using the bench scraper or a sharp knife, cut straight down into
  • the square to create a 3-by-3 grid of 9 squares, then place them on your sheet pan, upside down if you’d like taller biscuits.
  • Bake for 25 to 35 minutes, rotating the pan halfway through, until risen, golden brown on top, and slightly pale on the sides.
  • Don’t worry if a couple of the biscuits tip over or if melted butter pools underneath. Brush the tops with melted butter and sprinkle with flaky sea salt, if using
Corned Beef & Cabbage (Let’s Hash It Out)

Corned Beef & Cabbage (Let’s Hash It Out)

I feel if I am going to eat a meal that is associated with a holiday I ought to learn a little bit about that particular holiday and its significance to the culture or country of origin.  The extent of my knowledge regarding St. Patty’s Day is corned beef and cabbage.

So Friday as I was pulling my corned beef out of the fridge, I googled St. Patrick’s Day.  In a nutshell, Patrick, before he became a saint, is credited with bringing Christianity to Ireland.  St. Patrick’s Day is the day of his death.  A folktale credits him with driving the snakes out of Ireland, symbolism for pagan religions as there are no snakes in Ireland.

Corned Beef and Cabbage is not the chosen celebratory meal in Ireland but rather came about here in America.  Corned beef and cabbage were both relatively cheap and out of necessity became the meal of choice for the poor Irish immigrants striving to make a new life here.  In Ireland, you are more likely to have Irish Stew and Soda Bread.

Shortcut Corned Beef

I will admit, I make this once a year.  Don’t get me wrong, I love Corned Beef, I just don’t make it at home…except on Saint Patty’s Day.  As a kid, my favorite breakfast was Corned Beef Hash by Mary’s Kitchen.  Yep, hash out of a can, I thought it was delicious.

Two things I did differently this year.  On a whim, I splurged on Wagyu Corned Beef Brisket from Costco.  Second, we pulled out the Instant Pot.  With two unknowns it’s hard to know if the Waygu or the IP was responsible for just how delicious the corned beef came out.  It was tender, moist, and delicious.  A variety of recipes found online served as my guide with a shout-out to Simply Recipes.

  • Various recipes I looked at called for a 2.5-pound chunk of corned beef. I don’t know about you, but after cooking,  it shrinks quite a bit and that wouldn’t be enough, not in my family at least. There would be little left for my fav breakfast hash (not acceptable in my book).  The piece I bought was 4 pounds and fit nicely in my 6-quart Instant Pot.  This was enough for dinner, the next day’s lunch, and a generous skillet of hash for that leisurely weekend breakfast.
  • Rinse corned beef thoroughly before placing it in the pressure cooker, helps keep the salt at bay.
  • Place the corned beef on the metal trivet that comes with the Instant Pot, makes it much easier to lift out when it is done.
  • Add 1 quartered yellow onion and a couple of cloves of garlic to the pot.  Sprinkle the seasoning packet that comes with the corned beef and 1 tablespoon of brown sugar on the surface of the meat.
  • Add 4 cups of liquid to the pot.  It may not completely cover the meat, and that’s okay.  The liquid can be all water, water, and beef stock 1:1, or a can of stout and water.  The Wagyu beef was on the salty side.  So be careful with the stock, use low sodium or homemade.

Let’s Get to the Easy Part

Seal your Instant Pot and set it to high pressure for 85 minutes and go relax, but tell everyone you are making dinner, they’ll never know.

Once the cycle is complete, turn off the Instant Pot and allow the corned beef to natural-release for 15 minutes before taking it out.  If it has not completely depressurized, vent the pot before taking off the lid.  Add your potatoes, carrots, and cabbage (that you prepped while it was cooking, oops, forgot to mention).  Place potatoes and carrots into the pot first, then the cabbage on top. Seal the pot and set a timer for 5 minutes.  Quick release when it is done.

Slice corned beef against the grain.  Serve with honey mustard and veggies on the side or if you are like the Hubster, make a sandwich…yum.  Happy Saint Patrick’s Day!

But What About Breakfast?

I like corned beef, I LOVE corned beef hash.  The remaining corned beef became Sunday breakfast.  I pulled out my cast iron skillet, the remaining beef and potatoes, chopped some onion and bell pepper, bada-bing-bada-boom, hash.

Feel free to add other vegetables or change the proportions.  This can easily be a veggie-focused hash, more potatoes, throw in the leftover cabbage, add some mushrooms…it will be delightful and perfect for a weekend relaxing breakfast.

Beautiful board made by 3jamigos woodworking.

Corned Beef Hash and Eggs

What to do with leftover corned beef? Hash of course!
Course Breakfast, Brunch, lunch
Cuisine American, Irish-American
Keyword cabbage, Corned beef, corned beef hash, potatoes
Prep Time 10 minutes
Cook Time 15 minutes
Servings 4 servings

Equipment

  • cast iron skillet

Ingredients

  • 2 to 3 tablespoons unsalted butter
  • 1 small onion finely chopped (about 1 cup)
  • 1/4 green or red bell pepper or pepper of choice!, chopped
  • 2 to 3 cups cooked corned beef finely diced or chopped
  • 2 to 3 cups chopped cooked potatoes from dinner 🙂
  • Kosher salt and freshly ground black pepper
  • Chopped fresh parsley or scallions
  • Eggs one per serving

Instructions

  • Heat butter in a large skillet (preferably cast iron) on medium heat. Add the onion and pepper and cook a few minutes, until translucent.
  • Add corned beef and potatoes. Spread out evenly over the pan. Increase the heat to medium-high and press down on the mixture with a heat-proof spatula.
  • Do not stir the potatoes and corned beef, but let them brown. If you hear it sizzling, that's a good sign.
  • Use a spatula to peek underneath and see if they are browning. If nicely browned, use the spatula to flip sections over in the pan so that they brown on the other side. Press down again with the spatula.
  • If there is too much sticking, you can add a little more butter to the pan. Continue to cook in this manner until the potatoes and the corned beef are nicely browned.

Egg-a-licious: Your choice, hash is good with eggs cooked any style

  • Or cook eggs like Shashuka. When hash is close to being done, create depressions in the hash and crack an egg into each spot. Cover skillet for a couple minutes until egg is cooked to your liking.
  • Remove from heat, top with chopped parsley or scallions. Season with freshly ground black pepper and salt to taste.
Happy Chicken Pot Pi Day!

Happy Chicken Pot Pi Day!

Here in California, we have been battered by some extreme weather…more rain, snow and high winds than we have seen in a long, long time.  I hope folks are staying safe, warm and dry.

So we are having a somewhat subdued, quiet Pi Day.  Especially since we haven’t had power all day!  That’s not gonna stop me, pi golly.  I adore pies, sweet or savory, by the slice, as a potable hand pie, you get the pic. So Pi Day is just an excuse to make pie.  A day of cold, wet, blustery weather calls for comfort food so what better dish than Chicken Pot Pie?  

I LOVE Pot Pie.  As a kid, it was a special treat if mom pulled out Swanson’s Chicken or Beef Pot Pies for dinner.  Little did I know, it meant an easy meal for her.  As I got older and my taste became more refined I left behind those Swanson’s pies.

I discovered Marie Callendar’s Pot Pies!  So good, more crust, bigger pie, yum.

My love of pies logically led to making my own pies and this includes savory pies, top on the list is Chicken Pot Pie.   

The Elephant In the Room

Not everyone wants or has a compelling need to start from scratch and that’s OKAY!  It’s perfectly fine to start with cooked chicken (a Costco rotisserie chicken comes to mind), commercial low-sodium chicken stock AND a premade pie crust. Making a Chicken Pot Pie is a labor of love.  If any step, homemade PIE CRUST comes to mind, gives you anxiety, use a shortcut. There are great frozen pie crusts dough and puff pastry doughs that can be used to make a fabulous pot pie. Hate prepping veggies?  Frozen WORKS, really.  But if you want to go the whole nine yards…read on 🙂

For novice pie makes, this is a good recipe to make over a couple of days so it doesn’t seem overwhelming.  Make the pie crust and throw it in the fridge to chill. You could do this up to a couple of days before.  This also applies to poaching the chicken and making the filling too.  The chicken can be shredded, the stock reduced, and the filling made and kept in the fridge until you are ready to assemble the pie.

Pick your favorite veggies, I like mushrooms, carrots, celery, broccoli, potatoes, and peas.  Pretty classic aside from the broccoli.  Blanching the veggies ensures they will be nicely cooked in the pie.  Blanch 10 minutes, the goal is al dente + so they don’t get too soft.  The veggies should be cut roughly the same size for even cooking.  The exception to this would be mushrooms, saute’ these before adding to the sauce.

Sauce Me Up

What holds everything together is a simple bechamel sauce of butter, flour, milk,and stock.  Start by making the roux .  Sauté onions with the butter for flavor and add the flour. Cook this for a couple of minutes before adding the chicken stock and milk.  Simmer sauce until it is thick like gravy, stir constantly.  Season well with salt and pepper.  

Two Pie Camps

There are 2 kinds of pie people in my book, those who like crust (ME) and those who like filling (Can’t even imagine who that is).  So I’ve searched far and wide for a pie crust I like.

I love Dorie Greenspan’s pie crust recipe. It’s buttery and flaky, and best of all, it makes a generous amount of dough, enough for a two-crust pie and a small single-crust pie. That’s a lot of crust.  Which is exactly what I want.

Make the crust by hand or in a food processor.  Be extra vigilant that you don’t overprocess the dough.

This is what your dough should look like coming out of the food processor. 

Gather it up into a disc shape and chill.  Roll out 2 crusts one for the top and one for the bottom.  Follow my tweak below or line your baking dish with the bottom crust and chill again.

Let’s Get to the Bottom of the Pie

Bake your chicken pot pie with a top crust only.  What Deb?!  That’s less crust!  Hold on now…here is the tweak.  Roll out the pie dough for the bottom crust then cut out circles or squares from this sheet equal to a serving of your pie.  Bake them separately.  When it’s pot pie time, place one of these buttery, flaky rounds on the bottom of each plate then topped with a generous wedge of your baked pie over it.  Buttery, flaky, crispy, crust on the top and bottom. This, my friends, is chicken pot pie nirvana.

Let it sit for 5-10 minutes before serving!

So, Happy Pi Day, now go make some pie! Check out my IG Reel for Chicken Pot Pie!

Classic Chicken Pot Pie

Ultimate comfort food. This is the classic Chicken Pot Pie. Buttery, flaky crust with a thick, velvety Bechamel filled with chunks of chicken and veggies. A keeper!
Course comfort food, dinner, One dish meals
Cuisine American
Keyword Chicken, chicken pot pie, comfort food, food for the soul, made from scratch, pie, pot pie, savory
Prep Time 1 hour
Cook Time 1 minute
Servings 6 servings

Equipment

  • 1 food processor

Ingredients

The chicken and stock:

  • 1 3 1/2-pound whole chicken (approximately 3 cups of cooked chicken, shredded or cubed) Shoretcut 1: Sub chicken parts for whole chicken Shortcut 2: Costco Roast Chicken Yeah, you read that right
  • 1 carrot
  • 1 stalk celery
  • 1 small onion halved
  • 2 teaspoons salt or 1 t salt and 1 tablepsoon Better Than Bouillion Chicken Base

Simply Irrecrustable: or Dorie's MoRe CrUsT RecipE

  • 1 1/2 cups all-purpose flour
  • 1/2 teaspoon salt
  • 1/2 cup 1 stick chilled unsalted butter, diced into 1/2-inch cubes (best to chill cubes in the freezer for at least 15 minutes before using)
  • 1/4 cup vegetable shortening chilled
  • 3 to 4 tablespoons ice water

It's All About the Filling

  • 3 med carrots sliced about 1.5 cups
  • 2 stalks celery sliced about 1 cup
  • 3/4 cup green peas frozen or fresh
  • Use any veggies you like broccoli, squash, potatoes. You want about 3 cups of vegetables sliced or chopped.

Da Sauce: This is a generous amount of sauce so you can increase your veggies if you like.

  • 6 tablespoons unsalted butter
  • 1 1/4 cups yellow onion (you have leeway use 1 med or large onion which yields 1 cup to 1-1/2 cups diced onions diced
  • 1/2 cup all-purpose flour
  • 2 1/2 cups chicken stock reserved from cooking chicken
  • 1 1/2 cups milk
  • 1 teaspoon chopped fresh thyme leaves
  • 1/4 cup dry sherry
  • 2 tablespoons minced fresh parsley
  • 2 teaspoons salt to taste
  • 1/2 teaspoon freshly ground black pepper to taste
  • For the egg wash: optional
  • 1 egg whisked with 1 tablespoon water

Instructions

Da Chicken: A whole chicken in a large stockpot with water to make a chicken pot pie casserole. Yep, you read that right.

  • Combine the chicken, carrot, celery, onion and salt or chicken base into a large stock pot. Add cold water until just covered and bring to a boil over high heat.
  • Reduce the heat to a simmer and cook for 45 minutes. Remove the chicken from the pot and let cool for 15 minutes. While the chicken is cooling, continue to boil the remaining water and vegetables in the pot.
  • When the chicken is cool enough to touch, strip away as much of the meat as you can. Place the meat on a dish, set aside. Shred chicken or cube. You should have about 3 cups.
  • Return the chicken bones to the stockpot and continue to boil, on high heat, until the stock has reduced to a quart or quart and a half.
  • Set aside 2 1/2 cups of the stock for this recipe. Freeze remaining stock for a rainy day.

All About the Crust: Simply Recipe Yields only 1 crust. You will need to double it or make Dorie's omitting the sugar

  • Combine the flour and salt in a food processor. Add the chilled butter cubes and pulse 5 times to combine. Add the shortening and pulse a few more times, until the dough resembles a coarse cornmeal, with some pea-sized pieces of butter.
  • Slowly stream in ice water, a tablespoon at a time, pulsing after each addition, until the dough sticks together when you press some between your fingers.
  • Empty the food processor onto a clean surface. Use your hands to mold into a ball, then flatten the ball into a disk. Sprinkle with a little flour, wrap with plastic wrap, and refrigerate for at least 30 minutes, or up to 2 days, before rolling.

Filling It Up

  • Blanch prepped carrots, celery, potatoes, broccoli (if using) in water for about 10-15 minutes. Veggies should be al dente but cooked through. Set aside.
  • In a large skillet, melt butter on medium heat. Add the onions and cook until they're translucent, about 10 minutes. Add the flour and cook, stirring, one minute more.
  • Whisk in 2 1/2 cups of the chicken stock. Whisk in the milk. Decrease the heat to low and simmer for 10 minutes, stirring often until thickened and creamy.
  • Add the chicken, thyme, sherry, peas, blanched veggies, parsley, salt and pepper and stir well. Taste and adjust seasoning if necessary. Pour into prepared baking dish(s)

Pieformers: Assemble

    Bake: Preheat oven to 375

    • Roll out dough on a lightly floured surface to a little less than a quarter-inch thick.
    • Roll roughly to the shape and size of your baking dish. A little bigger so you crimp the edge. Lay pastry over filling and dish.
    • Fold the excess dough under itself and crimp edge of pie.. Cut a 1-inch vents into pie. Use a pastry brush to apply an egg wash to each pie.
    • Line a baking sheet with foil, place pie on baking sheet. Bake at 375°F for 45 minutes, or until the pastry is golden and the filling is bubbling. If the edge gets too dark, cover with foil.
    • Let cool for at least 5 minutes before serving.
    Roasted Chicken & Croutons with Fish-Sauce Butter-Sheet Pan Magic

    Roasted Chicken & Croutons with Fish-Sauce Butter-Sheet Pan Magic

    I couldn’t help but tweak Eric Kim’s Roasted Chicken with Fish-Sauce Butter title.  I added Croutons to the title because… lets be real, the croutons are the star of this dish.  It reminds me of Roti Roti, a food truck fixture in the Bay Area.  A simple winning formula of chickens roasting on a spit, dripping all that deliciousness onto a bed of potatoes below it.  Well, that’s this dish but with bread and your own oven.

    First, roast chicken thighs on a sheet pan (the operative words for an easy meal) in a 450-degree oven.  This gives you crispy skin chicken and a pool of deliciousness aka SCHMALTZ on the pan.  Then toss flakes (yes flakes, more on that later) of bread onto the pan and smoosh it around so it soaks up the chicken fat.  Shove it back into the oven, and fifteen minutes later those bread flakes have morphed into golden, crunchy, umami bombs.

    It’s Soooo Good

    I divide the dish evenly between me and the hubsters, he gets the chicken,  I get the croutons, yep, 50-50 all the way.

    Let’s talk flakes.  You can use any bread you like, sourdough, milk bread, or my favorite, ciabatta.  The key is to tear the bread so you get shards or flakes.  Cubes don’t cut it for this dish, not enough surface area. Try to tear or split the bread to form flakes for ultimate crispness.

    The rest is easy-peasy.  Place chicken on a sheet pan, and season with salt and pepper.  Go easy with the salt as the fish sauce has salt. Drizzle olive oil on the chicken and flip each piece around to coat each piece.  Roast for approximately 25 minutes.  I prefer bigger pieces of chicken so the skin crisps without drying out the chicken.  Pull the chicken out, there should be a nice puddle of schmaltz in the pan.  Add the croutons to the pan and toss the bread in the chicken fat.  Slide the pan back into the oven to crisp the croutons and finish the chicken.  If the chicken is cooked through before the croutons, pull them out and continue to bake the croutons.

    Meanwhile…

    While the chicken and croutons are roasting, make the Fish-Sauce Butter.  The sauce is genius, easy to make, and delish with just four ingredients, fish sauce (I use 3 Crab Vietnamese Fish Sauce), lemon juice, brown sugar, and BUTTER.  Reduce the first 3 ingredients to a syrupy consistency.  When the surface of the sauce is covered with bubbles, turn the heat off and add the chunk of COLD butter to the pan and swirl to create an emulsion.

    Leave the chicken and croutons in the pan, drizzle some of the sauce on the chicken and croutons, garnish with cilantro and green onions, and bring the pan to the table.  So easy. Serve the remaining sauce on the side. If you want to be fancy, transfer chicken and croutons to a serving platter.

    Accompaniments?  Rice, double carb, is always yummy, or I like serving it with mashed cauliflower.  Another winner from Eric Kim.  Sheet pan magic happening here.

    Roasted Chicken and Croutons with Fish-Sauce Butter

    From Eric Kim via NYTCooking, roasted chicken thighs, toasty croutons, and a scrumptious, quick sauce made with Vietnamese Fish Sauce, brown sugar, lemon, and butter. The perfect weekday meal.
    Course dinner, Main Course
    Cuisine Asian-American
    Keyword brown butter, Chicken thighs, croutons, fish sauce, oven-baked
    Prep Time 15 minutes
    Cook Time 35 minutes
    Servings 2 servings

    Ingredients

    • 4 bone-in skin-on chicken thighs (about 2 pounds)
    • Kosher salt such as Diamond Crystal and black pepper
    • 2 tablespoons olive oil
    • ¾ pound bread crusts removed, bread torn into bite-size pieces about 4 cups;
    • 1 tablespoon dark brown sugar
    • 1 tablespoon fish sauce
    • 1 tablespoon lemon juice
    • 3 tablespoons COLD unsalted butter kept in one piece
    • Cilantro leaves with tender stems for serving
    • scallions or chives, chopped garnish for serving

    Instructions

    • Heat oven to 450 degrees. Pat the chicken dry with paper towels and season lightly with salt and pepper. (The fish-sauce butter is plenty salty, so don’t overdo the salt here.)
    • Arrange the chicken skin-side up on a sheet pan and drizzle the oil over the chicken skin, coating it evenly.
    • Roast until the chicken is light gold and the sheet pan is a pool of hot, rendered chicken fat, SCHMALTZ, about 20-25 minutes.
    • Take the sheet pan out of the oven, scatter the bread around the chicken. Using tongs toss gently to coat in the chicken fat.
    • Place the pan back in the oven and roast until the chicken is golden, crispy and sizzling (you’ll hear it), about 15 minutes.
    • While the chicken roasts, combine the brown sugar, fish sauce and lemon juice in a small saucepan and bring to a simmer over medium heat. Cook, occasionally swirling the pan or stirring the sauce with a wooden spoon, until it bubbling vigorously and the mixture has reduced by about half, 2 to 3 minutes.
    • Turn off the heat and add the butter, constantly swirling the pan or stirring with a wooden spoon, until all of the butter has melted and incorporated into the fish sauce mixture. It should be a heavy syrup consistency.
    • To serve, scatter the cilantro and scallions or chives over the chicken and croutons. Spoon some of the fish-sauce butter over each chicken thigh, reserving some to add to each plate for dipping the chicken and croutons while eating, so yummy.

    Notes

    Roasting chicken thighs in a hot oven is a hands-off way to achieve two of life’s greatest pleasures: crispy skin and golden schmaltz. And you want that chicken fat because it will crisp hand-torn bread into croutons. A bold but balanced fish-sauce butter that you whip up on the stovetop while the rest of the meal takes care of itself in the oven, takes this over the top. Be sure to start with cold butter; the gradual melting of the fat helps thicken the sauce without breaking it.
    After making this dish...go get his cookbook, Korean American, another winner.